
HOLIDAY DONATION DRIVE - SUPPORT MSW - DO YOUR PART TO KEEP THIS GREAT FORUM GOING! (Only 13 donations so far - C'mon guys!)
×


popeye the sailor
-
Posts
16,007 -
Joined
-
Last visited
Content Type
Profiles
Forums
Gallery
Events
Everything posted by popeye the sailor
-
 I've built older kit where the grade of the plastic was an issue. it's not so much the age of the kit itself, but the batch it came from. I've experienced plastic that seemed stringy and hard....cutting or trimming it would take chunks out.........to plastic that so soft, one had to watch how the blade was angled. superb job Johnathan....take your time rigging looks super!
 -
those are the instructions I posted the Cutty Sark instructions are the 'most lost' of all.......you would not believe how many folks I sent them to, before I posted them. I'm glad to see them in use the rigging sheets should be there too http://seymore-thecuttysark-abuildlog.blogspot.com/
-
the Mojo part I can handle........it's the tangents. I've got two of them stuck in my head now......one I already built the hull frame, and the other one, I'm in the process of cutting out the bulkheads, stern and bow stems. I have been pacing them......I even began to make stairs for the Progress project. see.....I'm always in motion........but it prevents me from finishing the wood demon is powerful....obey you must
-
yea....I gotta get moving on her. need to stop going on wild tangents.........every time I do, it increases my projects and gets me into trouble
-
I was hoping you were going to do this..........it looks great! not to mention that there is an overhang around the sheer...love the way the deck looks. I hope I'm not coming off like a purist......anyone that has seen my build, know that I'm not bashful about climbing out of the box absolutely.........it's what you want. seal coat on....that's gonna be a good looking deck! I'm kicking myself right now for not following up on that kit I saw likely gone by now
-
probably because dragonflies don't have a proboscis like that........I think he was referring to 'the sting' instilling fear into his enemies a log is a great idea
-
hi there EJ.........marveling the progress you've made since I last looked in. ratlines and rigging looks great masting is really nicely done as well ! looking really good
-
great progress George.......seriously nice work!
- 90 replies
-
- 1
-

-
- fairmount alpine
- billing boats
- (and 1 more)
-
checking in to see you've made some seriously nice progress on the rigging your sails looks awesome as well! thanks for the head's up on the parrel beads too........I've been using these tiny black ones. they are not consistent in size, but they pass muster for the scale I use them on. superb work your doing! I don't do enough soldering either........guess I'll need to kick myself into doing it too
-
to think.......if it wasn't for Richthofen, the D VII would have been used in the war a lot sooner.
-
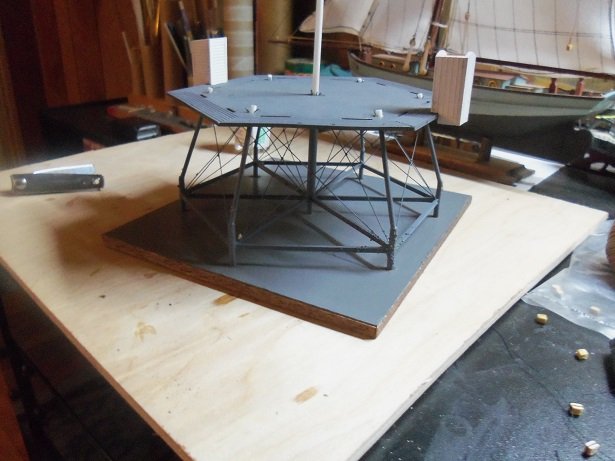
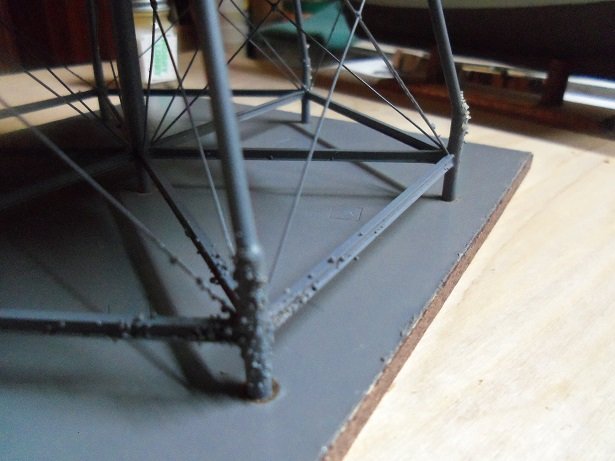
....perhaps something along the lines of a wash? I'll look into it. I am glad you pointed it out. I thought about red tissue paper......but that would look terrible so now the screw pile has been painted........while the paint was wet, I sprinkled some play sand around the base areas. there are a few larger grains that I can flick off later. I'll touch it up with some rust, flat green, and flat black...kind of a dry brush, and it should look a bit better. later add some rocks and the green scenery stuff......should make it look more like home the table is a bit messy, as can be seen.......a couple more lines on the boat in the background, and it will be finished.
- 97 replies
-
- 11
-
-
might be hard for me.........I'm like a bull in a china shop
-
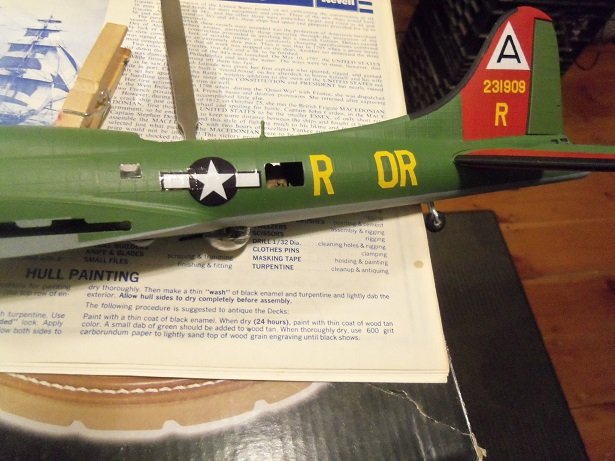
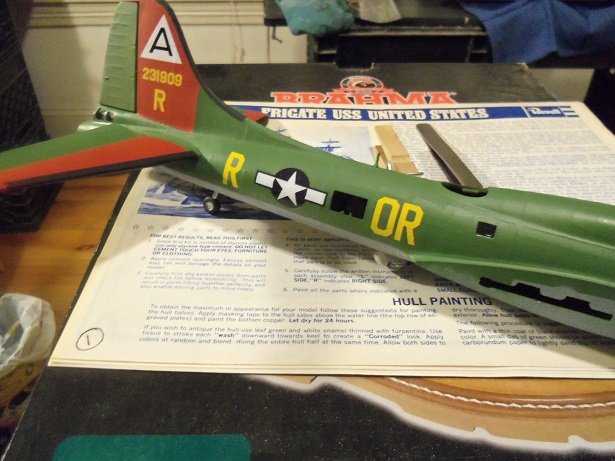
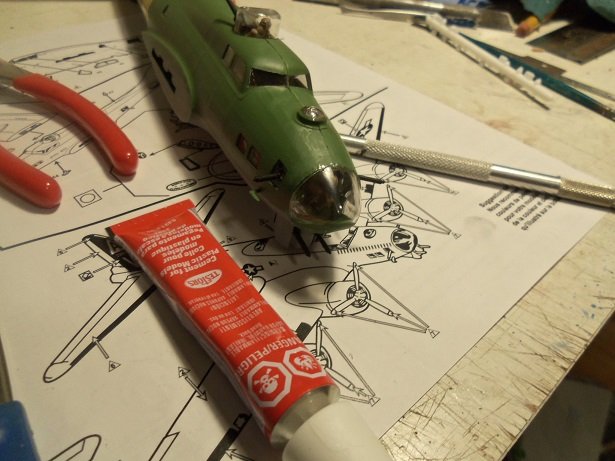
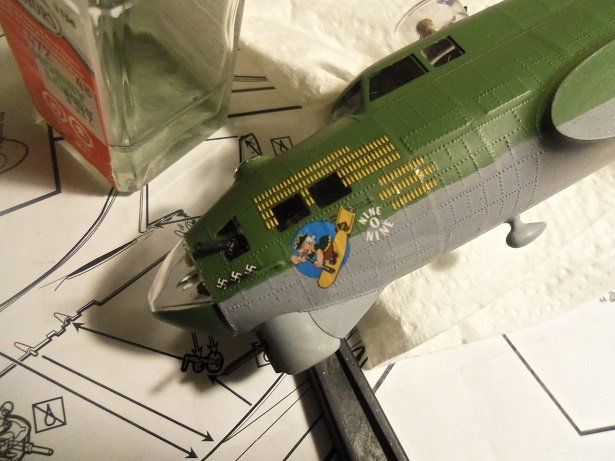
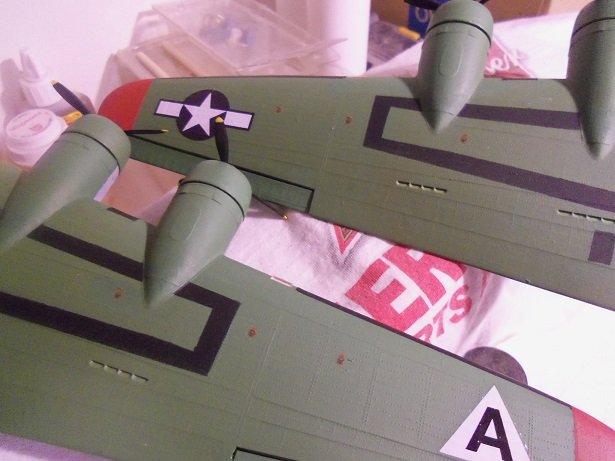
thanks gents the one thing about jogg'in the scale like this, is that some of the 1:72 decals are really too small to use. the writing just looks like dashed lines, so I'll just use the ones that stand out......like the fuel fills and such. I did manage to do a little more on her. one thing I came to the conclusion on...... if I choose to do another B 17, I can only do one that has the yellow lettering. there are some squadrons that use white lettering...I would hope that they come with their own decals, and not like the situation that I have here, in this case. then again, it was a snap decision and the plane was an odd scale. it's still coming out quite well the fuselage decaling......I had to refer to the pictures I have, since both sides are not the same. I still need to decal the props....then they can be permanently added to the model. only a few parts left. I'll have to do some gray on the underside of the nose........I touched it up after this picture was taken. the nose art nails it you can see that the nose looks a bit off with the green. I also did the fuel fills on the wings. I took today off....just as well, 'cuz I had some kitchen plumbing to do. we seen to have sprung a leak last evening {Sunday}. I did it myself.......wanted to see it done right oh.........and even if I wanted to leave her as a stand alone model, I can't. at some point in the assembly, I must have broken off the 'tab' that keeps the right landing gear down. it collapses on it's own.........stayed down long enough for me to have gotten those pictures. good thing it comes with the stand so I have a four day weekend for Thanksgiving........something to be thankful for
- 153 replies
-
- 12
-
-
love the construction of these biplanes...........got some serious detail here! very nice
-
that's why I asked how you were doing with the tubing.......I ran into that problem. some of mine was a bit stiff and really hard to remove the bends, to get it how I wanted it. heat does work, but I also stuffed it with bendable brass wire of the same ID. poses real good after that! awesome progress so far........how did you not get that green on the tire and areas where you didn't want it? I paint my parts before assembly.
-
very nice look'in model
-
!WOW! awesome job Danny....look'in great
-
sorry I haven't followed up on this log........I've been off on another tangent I'm trying to get back to this one though.......working towards getting one or two of these near finished projects off my main table first. more on this one soon......
-
cat 5 cable wire does a very nice job! I have a ton of it.......used to make these cables in my spare time for extra cash really nice progress since I last looked in! looks awesome
-
hope it's nothing serious
-
catching up with your progress.....liking what I see one thing to keep in mind though........no ......or very low gloss with regards to the paint. they were not known to be shiny. are you painting the deck sheer? I haven't seen too many with a bare wood deck sheer.......most were gray.......and I do recall some {pacific fleet} that were olive drab {faded}. wait a day or two before sanding the hull, to give the paint time to fully cure. you'll see where the low spots are. you used bondo.........now if you had used resin, applied with a brush, it would have settled down to a smooth finish as it dried. sanding would have been a lot easier for you......that job couldn't have been easy. you came out with a nice hull though, and that's what counts. don't be too critical over a few dings.......these boats did some rough service at times, depending where they were stationed. these boats were like aqua army tanks.......they went anywhere