popeye the sailor
-
Posts
16,007 -
Joined
-
Last visited
Content Type
Profiles
Forums
Gallery
Events
Everything posted by popeye the sailor
-
 the stuka.........how the heck did that get in there?!?!?!
 -
I know how ya feel......although where you are, you feel it a lot more I work out of the garage during the summer months......I used to airbrush and paint in the cellar during the winter, but the second floor tenant brings the kid she babysits down there now....so that's out. I have a make shift spray booth in the spare room....close the door and keep a window open....it works.
-
models have come a long way........all resin?!?! the launcher looks a lot better now that it'a painted nice added deck detail.......is the deck to be painted or planked?
-
nice looking kit! I'd be tempted to try and save any and all writing on those P.E. sheets.........the 'stencil' looks really cool! {yea.....I was a kid who played with the box instead of the toy }
- 378 replies
-
- 4
-

-
- java
- pacific crossroads
- (and 2 more)
-
most folks cut a rabbit along the keel for the plank to rest in.......you won't get the cracks and gaps that way. where the plank butts up against the keep, I sand the edge of it at a bevel, so it will do pretty much the same thing. where it will meet the bow stem, I usually bevel it to lay flat to the stem, and shape the curvature. I should point out that if there is going to be a second planking, you really don't have to be extremely fussy. you just want to get the contour of the hull established. the second planking will clean it up
-
I recall my mother telling me about my father waking her up in the middle of the night, asking for a screwdriver or a wrench.......of course, he was asleep I haven't gotten to that point yet, but the admiral has asked me how big around was the log I was sawing last night?!?!
- 378 replies
-
- 5
-
-
- t78 norden
- billing boats
- (and 1 more)
-
perhaps the fall out is from folks getting discouraged with how slow the process is. are you taking advantage?
-
thanks again John......now that see how this winch is supposed to work, I hope to get it right. yours doesn't look too bad at all.......I like your use of color
- 378 replies
-
- 5
-
-
- t78 norden
- billing boats
- (and 1 more)
-
I noticed that the Coast boat Bent is being discontinued again...at least, that's what I saw on the Billing Home site. thanks for the head's up Samson......I knew that most boats are moored, but know little about beaching boats. I kinda figured that the bottoms had to have been beefed up, to withstand being dragged like that, considering how much they must weigh. as for the winch on the pilot house base......strange concerning the anchor, considering how far it is from the bow. but I did notice a sliding cover near one, that suggests that the anchor rope could be routed under the deck. again, you have been very helpful.....thank you hello Lou........yes....I see that I had my doubts about it, but that's the reason why I like seeing aspects in operation. you get a lot more insight, when seeing something like this in operation. I did come up with a neat way of making winch reels {or concave drums}, so it wasn't a total loss. I figured the top rollers were spring tensioned, so it could grip the ropes.......buy thinking it might have an adverse affect on the catch. the winch in the earlier video is a different configuration, to route the catch off to the side, while using the rope part to haul it in. I like that type too, and would be very easy to scratch build. I was tempted to do just that. now that I see how this winch works, I won't bother thanks for looking , and the kind comment. thanks Ferit for the good word
- 378 replies
-
- 6
-
-
- t78 norden
- billing boats
- (and 1 more)
-
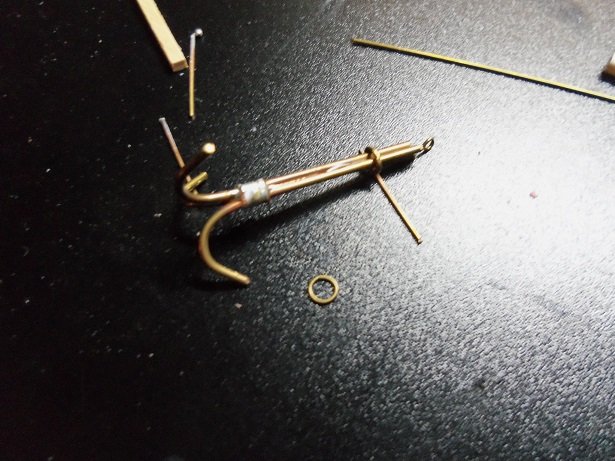
I love the video!!! nothing like fresh flounder.........caught and prepared in the same day don't get no better than that! I guess I need to revamp my thoughts on the net winch......as mentioned, I can make the drums out of dowel. I just hope I have the correct diameter last night after I left here, I went to the table and fixed the anchor.......got rid of that nasty lump of solder. then I started to play around with making a sluice table.......this is showing some promise this is a relatively small boat though......there might not be enough room for it, but I think a short one will look good. if this was a larger vessel, room could be better allocated for catch bins and like detail. .....and yes, I do believe this is gill netting, now that I see how the fish was removed from the net. here I am trying to look up articles about netting.......I should have been looking in you tube! the best thing about this particular video, is the operation of the winch that is supplied in the kit, although I will have to come up with one of those net separators. I may be able to incorporate ideas from all the videos! thanks John and Samson for posting them.....they are wonderful! thanks for all the likes!
- 378 replies
-
- 5
-
-
- t78 norden
- billing boats
- (and 1 more)
-
tried to PM you but your not taking messages
-
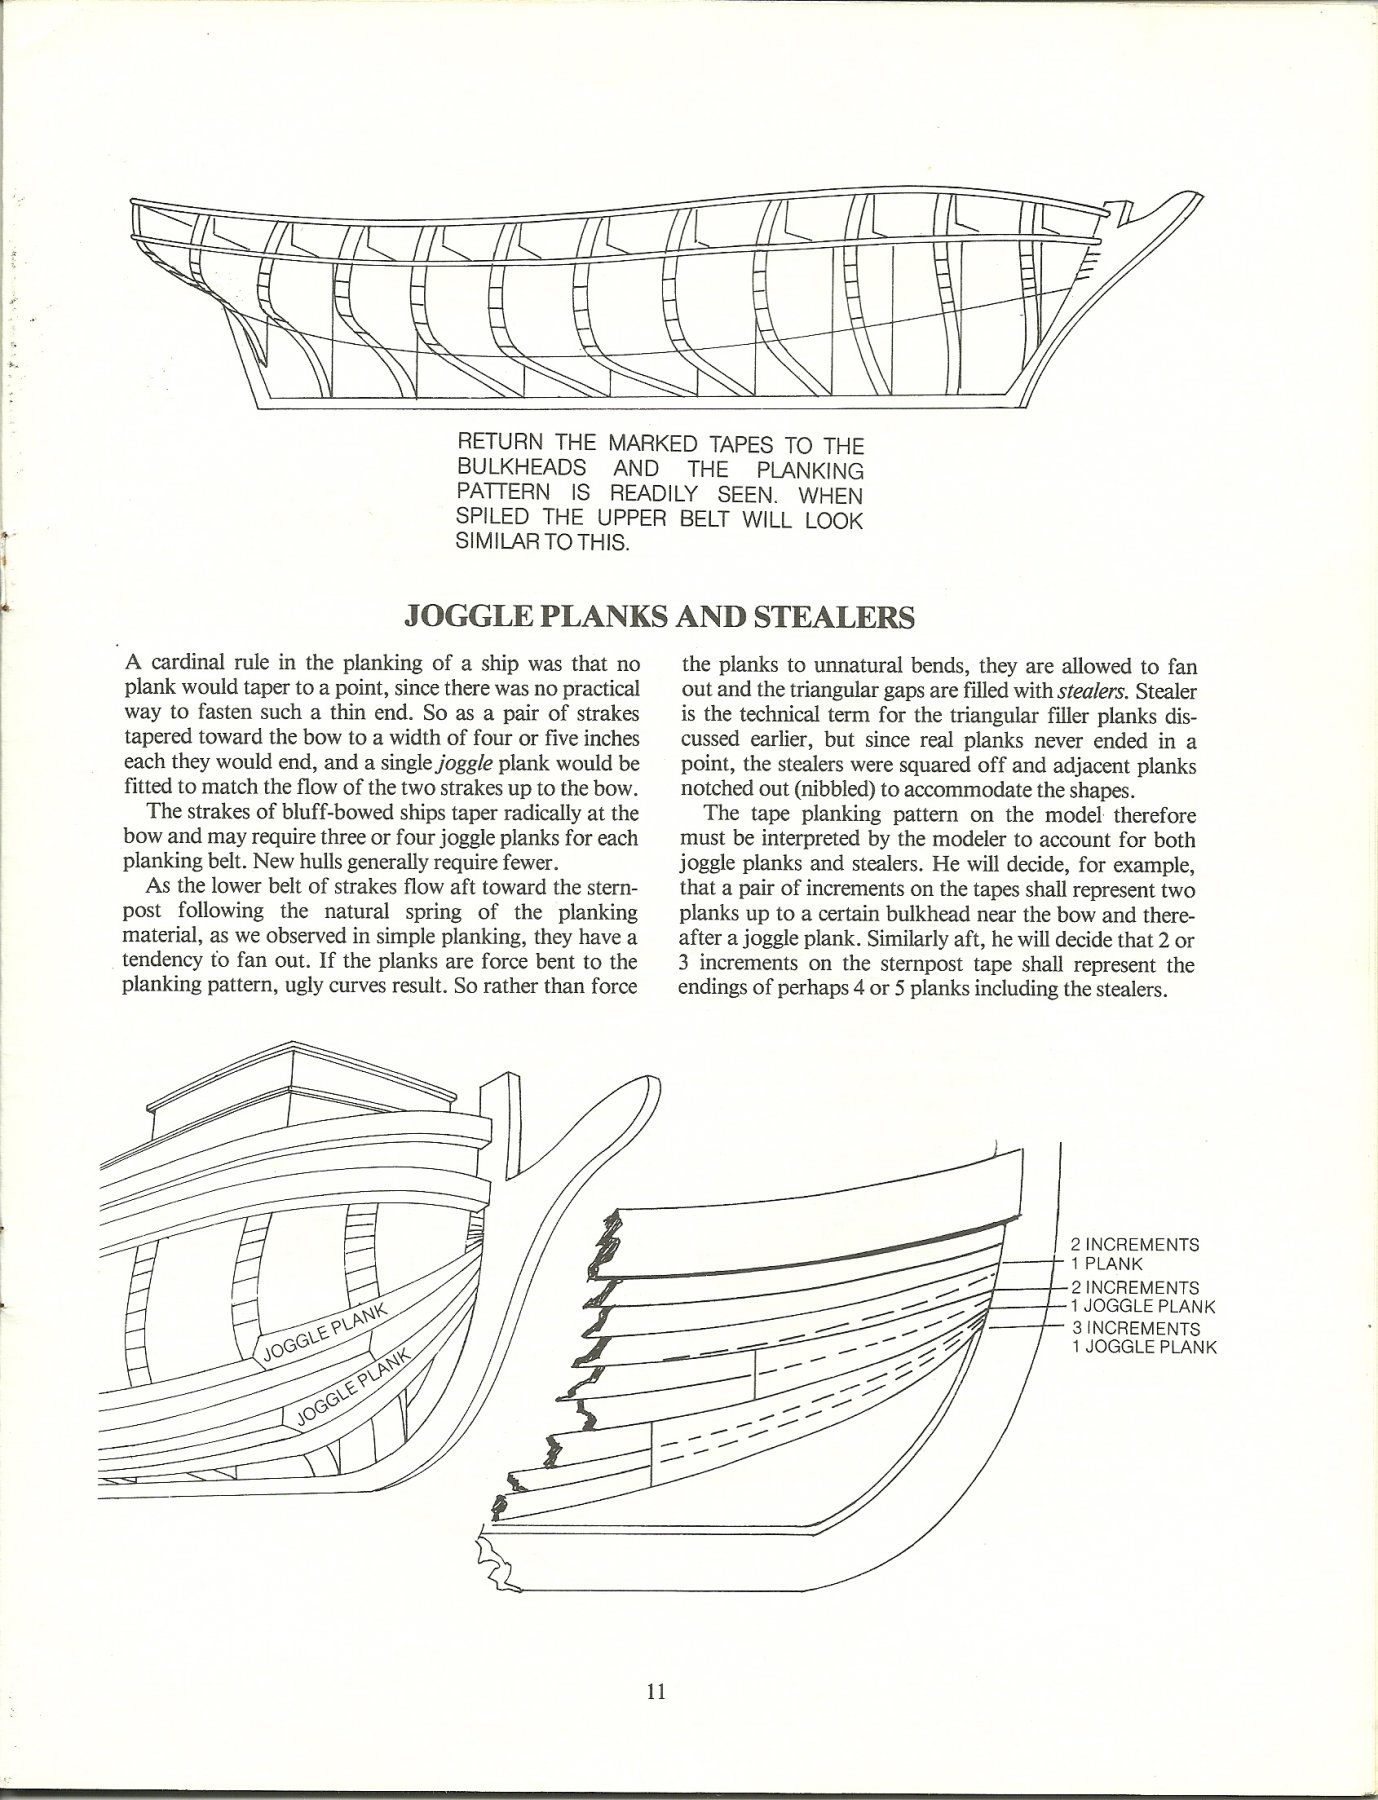
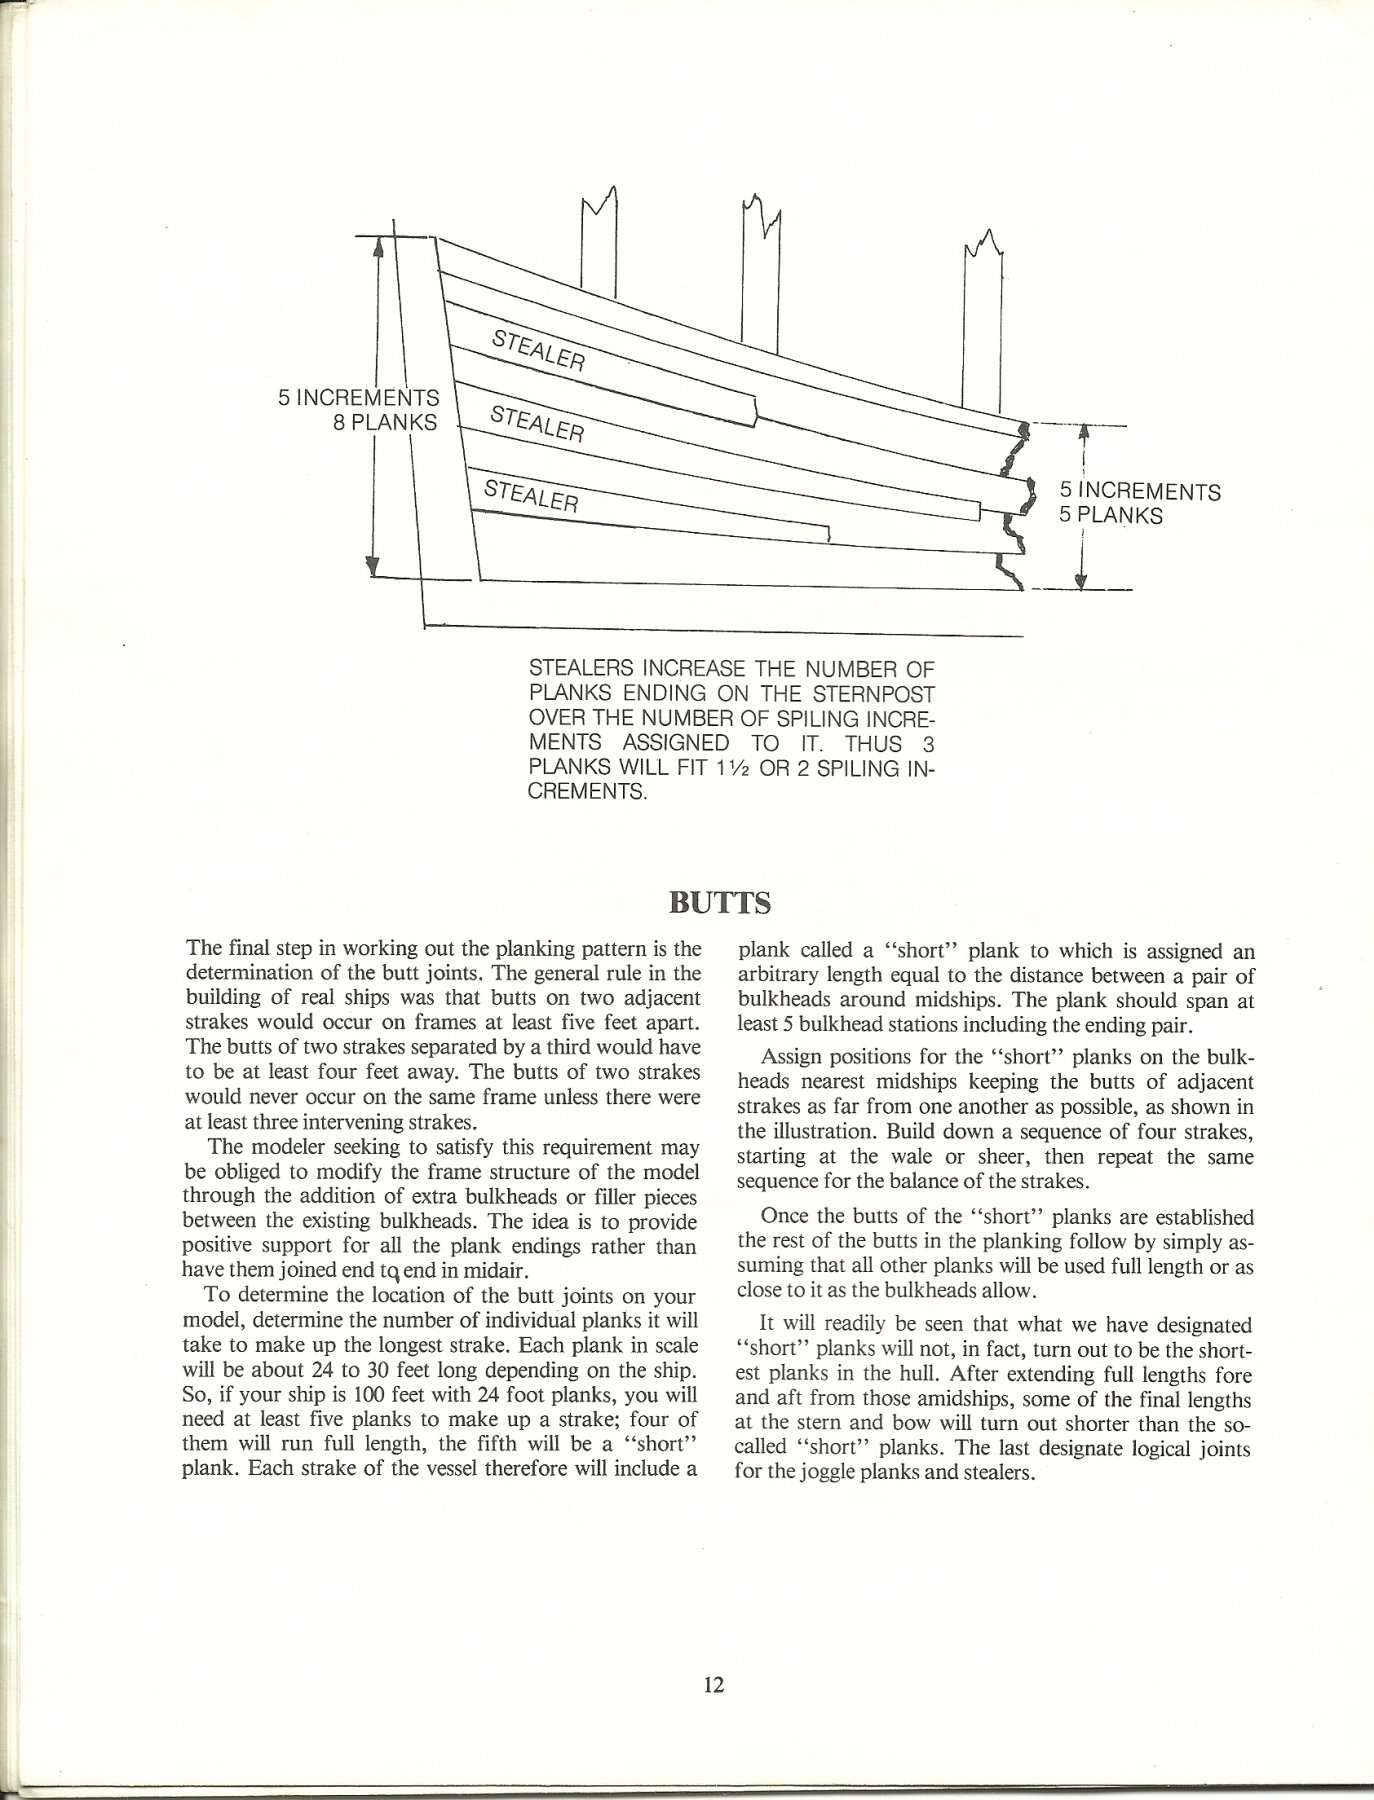
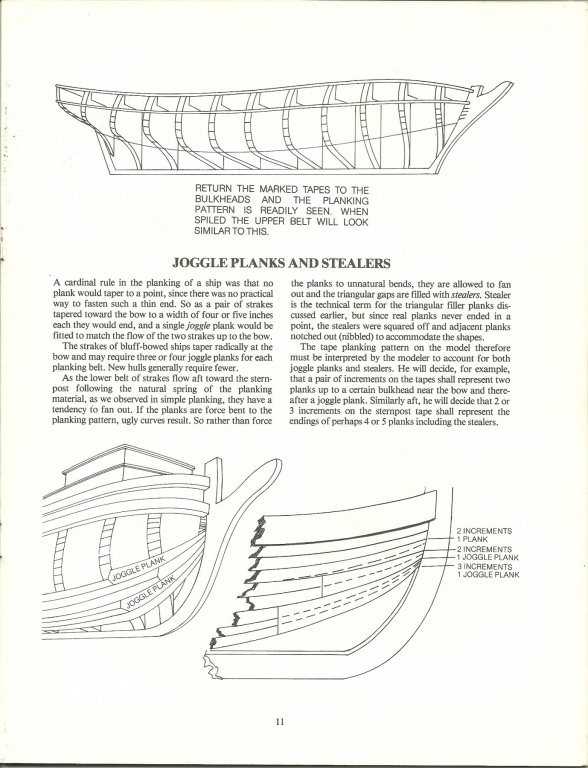
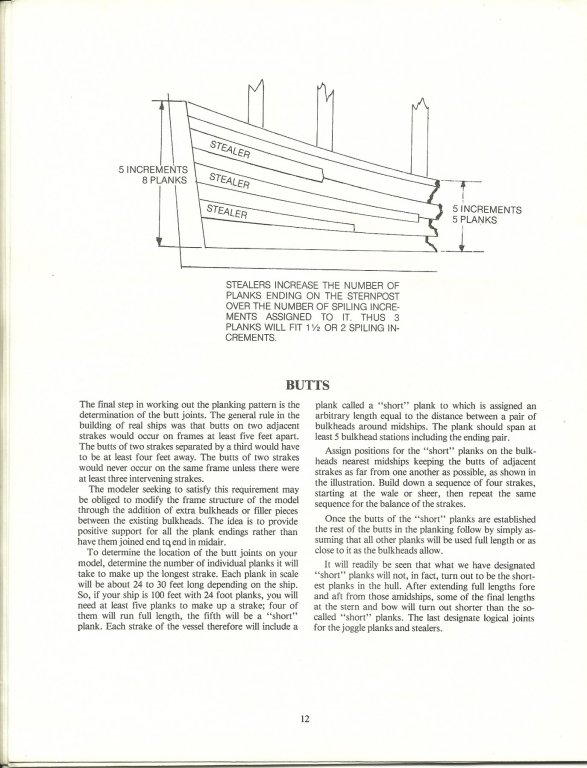
do your garboard strake and go up from the bottom. the clinkering is due from not tapering enough, or starting the tapering too late, with some hulls, depending how blunt the bow is, you may have to do what is called 'joggling'.........starting at the bow with a single strake, and combining it with a second strake, as you proceed to the mid ship this should give you some insight as to what I'm getting at. the mid ship has more surface area that at the bow or stern. with some hulls, the mid ship may require an extra strake or two to cover completely. basically, your merging these plank and integrating them into a single plank
-
I was kinda wondering what was stuck under the fore deck. looked like it didn't belong there. glad you got things sorted out
- 455 replies
-
- 2
-
-
- slightly modified
- greyhound
- (and 1 more)
-
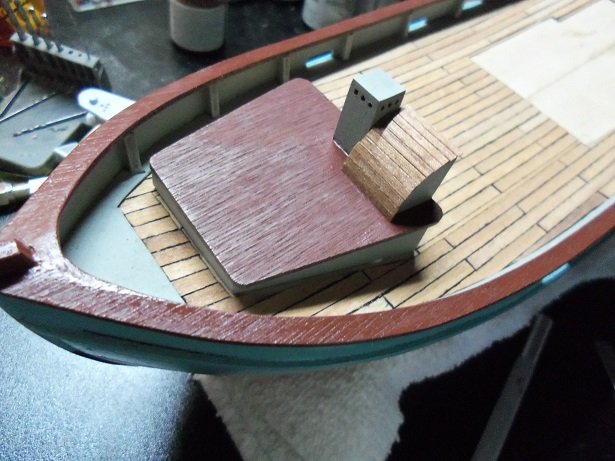
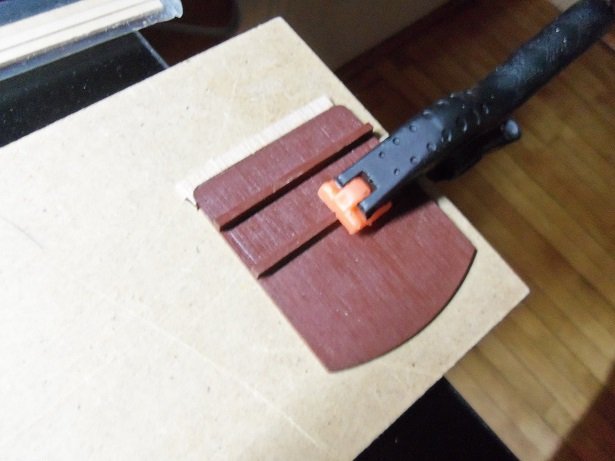
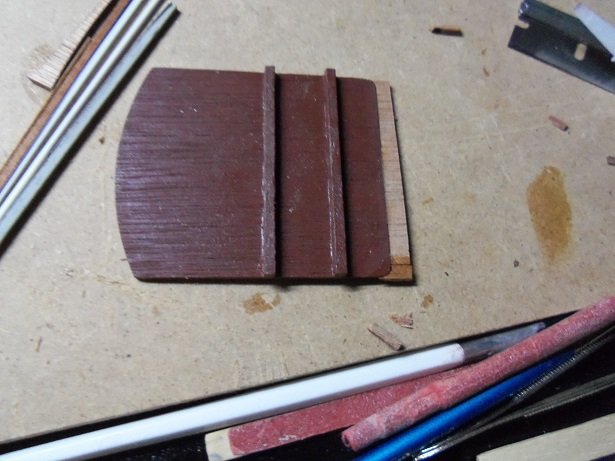
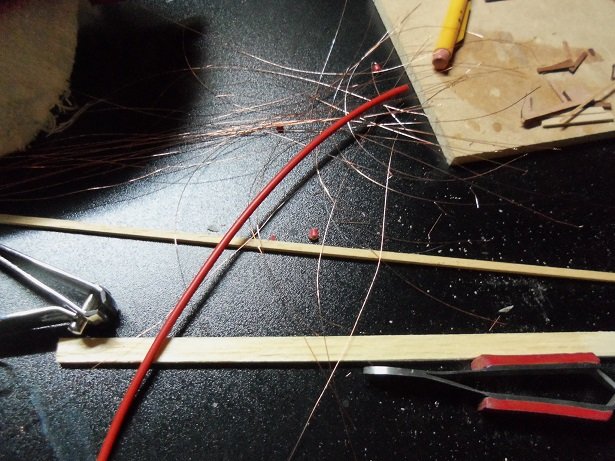
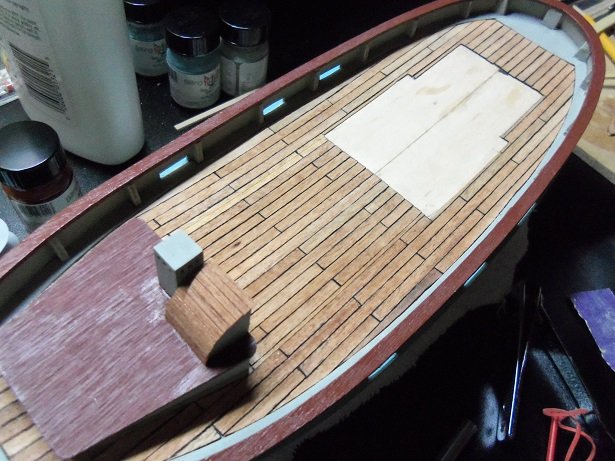
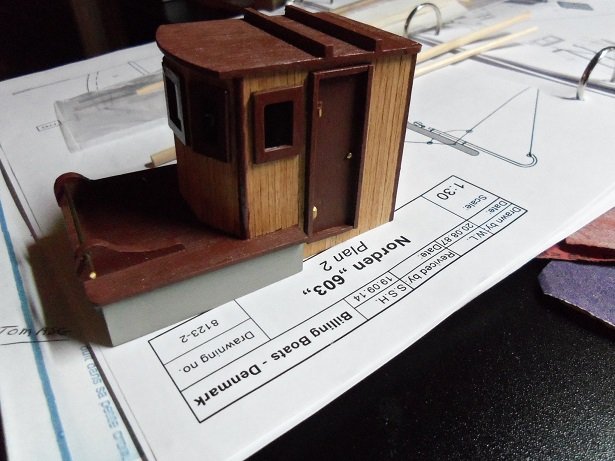
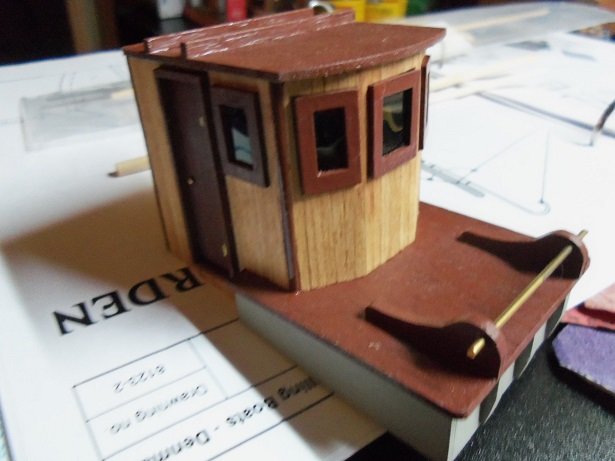
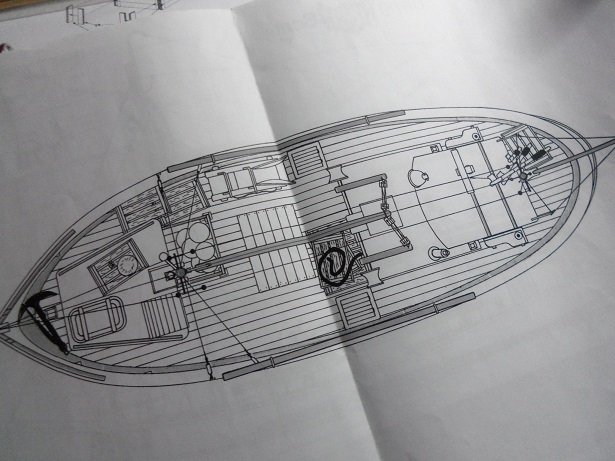
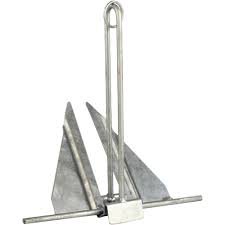
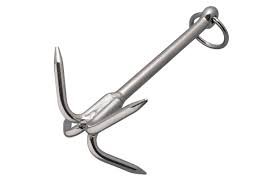
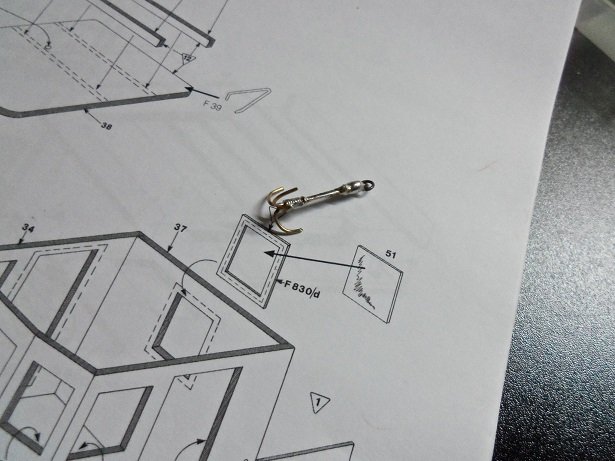
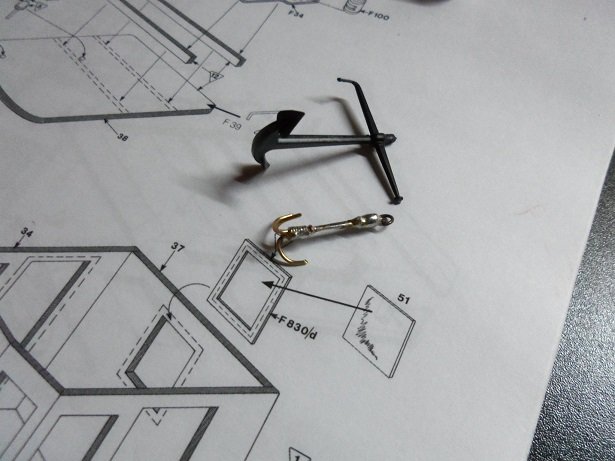
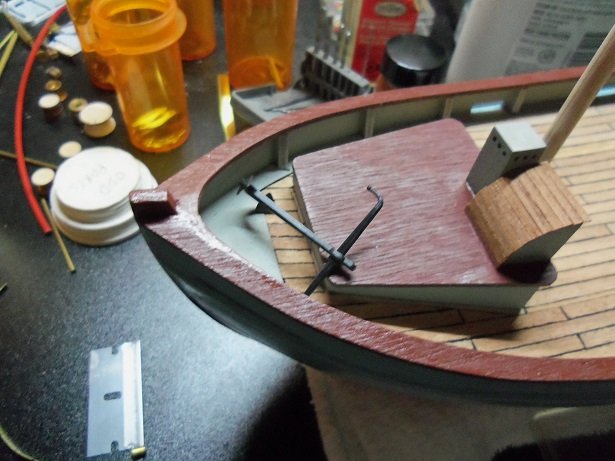
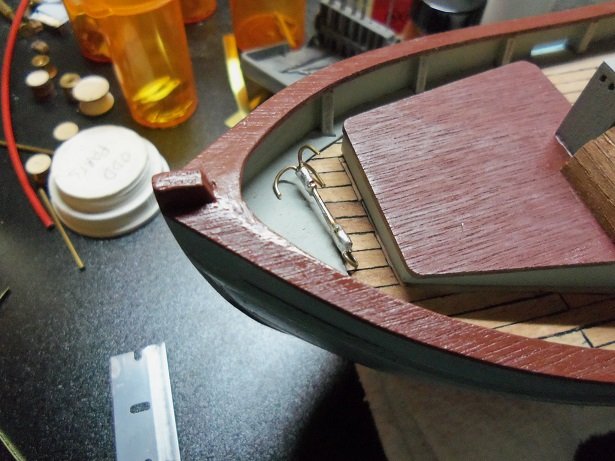
...need a big table.....hmmmmmmm........I wonder if king Arthur wouldn't mind........ anyway........this morning was kind of a bust. I had to make up for lost time. I did do a couple of things Friday evening, before I got ready to hit the bunk for work the next day. I made up the roof for the companionway, and I cemented the forward structure to the deck. the roof for the pilot house was painted as well. in checking the fit this afternoon, I found that it was too short......no way to center it, so there would be a sufficient overhang. I attempted to cement a strip of wood on the end of it, but the corners are rounded, and it would be terrible to fill in the gaps. so I went to the box and got out the part of the sheet where the roof was laser cut....of course another part was to close in one area, leaving a serious void near an end. I cut off the bad part and cemented what there was onto the roof. another small piece was trimmed to fill in the rest of it, adding not quite 1/4 of an inch to it. this was sanded and painted, rounding off the corners again after. when dry, it was cemented to the pilot house. I started doing something else, that was good 'n hostile......I stripped all the wire out of the red hose. I know why it was left in there, but I wanted the ends to be hollow, so to better attach the hose to pins I'll need to create.......the other end I'll have to make a sprayer nozzle. how.......I don't know......but I'll do something this is when I realized that I hadn't sealed the deck, or the pilot house. all my lacquer is in spray cans......I would need to decant them. not wanting to have a debacle with lacquer turning white on me, I decided to use the leftover Poly Urethane I had kick'in around. it left the deck and pilot house 'flat', but it deepened the grain and made it look a bit darker. I hurried this up a tad.......gotta remember to lessen the solder lump near the ring. as mentioned, the anchor is a bit too large...it also would look better on a clipper ship, or similar. on the model {which I was going to show two diagrams, but forgot to post them}, the overhead view shows the stock removed from the anchor, and laid on the deck. the dark shadow is the stock this is the only visual of the the two cold bins hatches on both sides of the deck, as well as what looks like a large hold in the center. for now I will be working with the anchor.......replacing it with a grappling hook style anchor. most of these boats would use a smaller anchor.....like a sand anchor. my first attempt turned out to be too large.........adjusting the scale in my head {no....I'm not stepping on a cat's tail}........ I though that larger diameter brass rod would work better. I fidgeted like crazy trying to get them lined up......I ended up wrapping them in wire that I got from other kits, and then soldering over it. now that I knew what to do, I used the smaller diameter rod. it looked better after trimming the shank length. the ring you see wasn't the one used......I soldered on a smaller one, and I got this. I got too much solder at the top by the ring........gotta fix that. comparing the two together, I think the grappling hook look better. ...and the comparison on the model. all it needs now is the sampson post and some rope. another thing I considered is, why do they have an anchor? they are dragged onto the beach.....an anchor is not needed for mooring at a dock, and while fishing is going on, the boat merely drifts with the current......the net goes out....the boat can't be still, it has to move. don't get me wrong.....it's good to have one in the event it needed. but, in normal operation, it's not needed. oh.....here is another shot of the pilot house base winch. it's not a windlass, or used for the anchor. I'm still stumped what it could be used for.

- 378 replies
-
- 11
-
-
- t78 norden
- billing boats
- (and 1 more)
-
sounds like you've been busy I use an archive pen for simulated calking. it contains India Ink which won't seep into the wood. one time though, I left the cover off too long and it dried out. I bought a bottle of India ink and gave it a dose.....works fine now, but I will have to toss it soon.....the tip is starting to fray.
-
I'm going for some Haddock right now...........I'll be back
- 378 replies
-
- 4
-
-
- t78 norden
- billing boats
- (and 1 more)
-
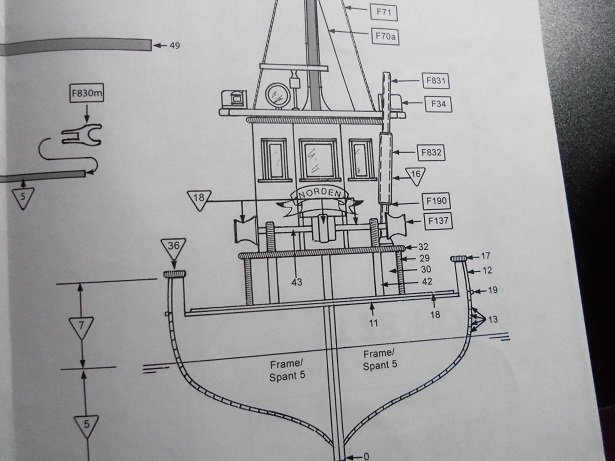
the BF 0134 and the BF 0171 are part of the Nordkap fittings. look in the nautical discussion forum......I posted information on the Nordkap. I will do something with the anchor to give you an idea of the direction I'm going. the anchor lays on the deck of the bow, with the stock removed from the stem of the anchor...I've never seen that in a boat or ship, let along a model of one. I will have to look to see how you have yours part #42 can be either called fenders, or breakwaters. I see the notches, but I do believe, I see a hole there as well. comparing this boat to the Cux, or the Mary Ann, both of these vessels have a pulley built into the bulwark near the bow stem. it would be logical, seeing that all three boats are of Danish construction, that I could do the same thing to the Norden, and it would look just as good. as I read about this model, it's based on a combination of information on these types of fishing boats........kinda puts in the category of a mongrel you'll find that quite a few models are generic in nature......likely the main reason why there are so many inaccuracies. I would say cost is a close second. I'm still having a hard time with the net winch......especially after seeing the video. noting that the fish in the net slides of to the left, while the drums are pulling the net in via the ropes on the edges of the net.......how is that possible with the configuration of this winch? unless the fish are removed prior to the net going through the winch, I don't see fish going through there........not unless you want to squish the fish it's gotta be me.......I must be looking for too much functionality. cold bins are located as holds on both sides of the deck......catch is prepped and thrown in the bins. look'in how that guy handled the catch, I probably should have painted the inner bulwarks red. I'll tell ya though, it almost makes me want to create another hull, and change the layout. base the pilot house towards the bow, situate the winch along side, with a sluice table, and have three or four bins situated around the table. hang the buoys off the cap rails and have a ball............ yeeeee-ha!
- 378 replies
-
- 6
-
-
- t78 norden
- billing boats
- (and 1 more)
-
chances are there are some lashings under there.......you may elect to drill some small holes. nicely done
-
hi john, yepper....I have a picture of what is in of the fitting kit. I'll post it later. Billing's had fitting kit sets for a small number of their models. since tom Richardson assembled the fitting loose {what he sent me for the first Nordkap}, I surmised that there was no kit for this model. I haven't looked at how the anchor is set up, but the anchor doesn't fit the type of boat. if this was a clipper ship........maybe. I plan on making a grappling hook type anchor. basically, if this boat used a windlass, there should be hawse holes in the bow. for a winch to be that far back........well, the deck is too cluttered for that. the anchor is deployed and retrieved manually. I'll report back soon.......supper is almost ready
- 378 replies
-
- 3
-
-
- t78 norden
- billing boats
- (and 1 more)
-
in seeing the videos that Samson posted ......and now yours, neither of the winches are involved in pulling the boats onto the beach. the tow rope is fastened to the bow stem and is pulled by a tractor. I thought the same thing about the winch on the base.....if it was used to bring the net in, to logically rig it, I was thinking a gallow. the pulley can redirect the rope over to the roller, which is affixed to the cap rails {port and starboard}. I believe it should be either belt or chain driven....the small structure behind it should be hollow {open}, then detail can be added to give it some sort of functionality. on a much brighter note.........I have been on the lookout for the fitting kit, for the Nordkap. I did get a return on one of my inquiries...my request was being referred to someone in charge at Premier ship models. I have heard nothing since.....this was a week and a half ago. the other evening, I was sent a picture of a model, sold by Billing's. I recalled a kit that was different {but pertained to the subject}, so I went to Billing's USA to check it out. the site had changed somewhat and listed new items......one of which was the Nordkap fitting kit! I wasted no time.......I ordered it! it didn't specify a delivery date. I'll let you know when I get it
- 378 replies
-
- 7
-
-
- t78 norden
- billing boats
- (and 1 more)
-
super look'in progress to the rigging Bob.........nice 'n neat too
- 682 replies
-
- 1
-
-
- halifax
- lumberyard
- (and 1 more)