
HOLIDAY DONATION DRIVE - SUPPORT MSW - DO YOUR PART TO KEEP THIS GREAT FORUM GOING! (Only 20 donations so far - C'mon guys!)
×


popeye the sailor
-
Posts
16,007 -
Joined
-
Last visited
Content Type
Profiles
Forums
Gallery
Events
Everything posted by popeye the sailor
-
 I make them similar, but I don't do the scarf joints. I should give it try look really good Per!
 -
thank you very much Samson for posting these videos. the winch doesn't look like the one supplied in the model.....I notice though that the drums are flat. I had taken the large one and the back smaller one, and sanded them to look more like a reel. perhaps I shouldn't have done that? the piece of equipment that hangs from the mast untangles the net and puts it in the bin.........hmmmm. the deck set up is different. I see other videos......I will look at them as well you given me lots to think about. if you find any more to add, by all means, feel free thanks again! hello Piet! thanks for looking in and the kind comment. so glad to have you looking in saw your latest log......
- 378 replies
-
- 3
-

-
- t78 norden
- billing boats
- (and 1 more)
-
I don't know how I missed the start Piet.....I was looking in pretty much all last week! sad to hear about your father. I look forward in seeing your progress. how long is the model going to be?
- 378 replies
-
- 6
-
-
- java
- pacific crossroads
- (and 2 more)
-
thanks everyone for the kind comments.......and to all of you who hit the like button I did a bit more, but not enough to hoot about....I'll include it in my next update. thanks John and Kevin....appreciate the good word thank you very much Samson for the pictures, but now i'm a little confused. this boat is supposed to be a coaster...is the re a difference between a caster and a 'kutter'? I've always been intrigued with boats that have part of the deck tarped over or the bow encased in a shell. Billing's based a few of their models after the Kutter... perhaps you can help me figure out the winch .....it can be seen at the begging of the log. thanks Pat.......with the number of billing's models I've built, my fleet has certainly grown. if I still had the Cux and the Susan A , the number would stand at around ten. imagine if I was all caught up...I'd be at a whopping 17 {add the bluenose project, it would be twenty} I'm not counting the plastic builds....they are another medium all together thanks for the good word ! thanks OC.......that they will........now it's pretty much deck work. as Johnnyreg has asked me earlier......I still need to make the bin. as for the flotation buoys, I already have some handy....just need to make sure the size is correct. this is always the fun part to me
- 378 replies
-
- 4
-
-
- t78 norden
- billing boats
- (and 1 more)
-
sorry to hear Jesse...my condolences to you and your family. a dog is just as much part of the family......lost one myself Haps {Happy} has been gone now for almost eight years.......me and the misses still miss him.
- 1,306 replies
-
- 8
-
-
- syren
- model shipways
- (and 1 more)
-
there is some framework on the front wall behind it. is it loaded from inside the structure? looks really neat
-
it's not too much trouble to put in some balsa filler blocks. if you don't want to do that, you could always try thickening the deck platform with some 1/32 basswood flat stock, or sheet wood that might be harder. either way, it's a little extra work
-
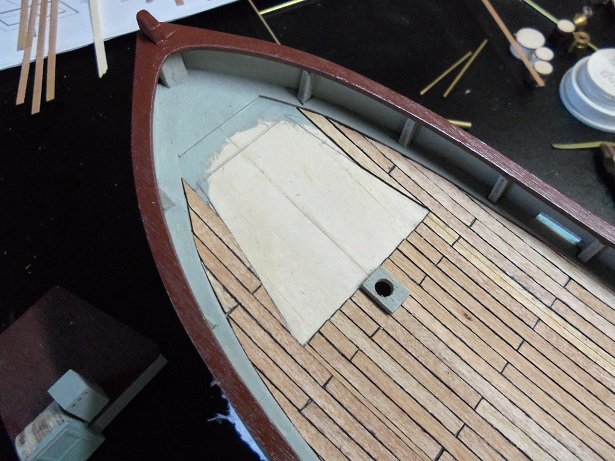
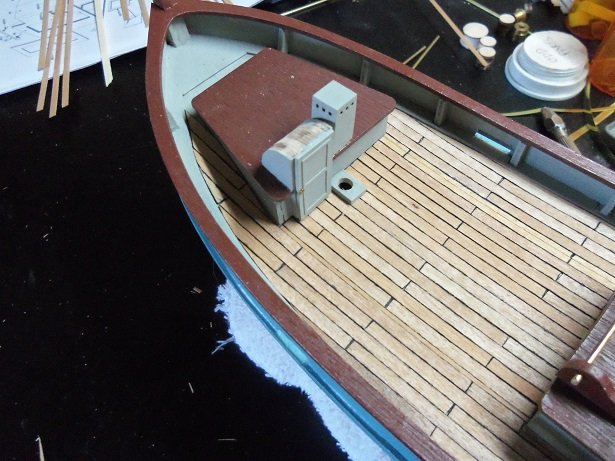
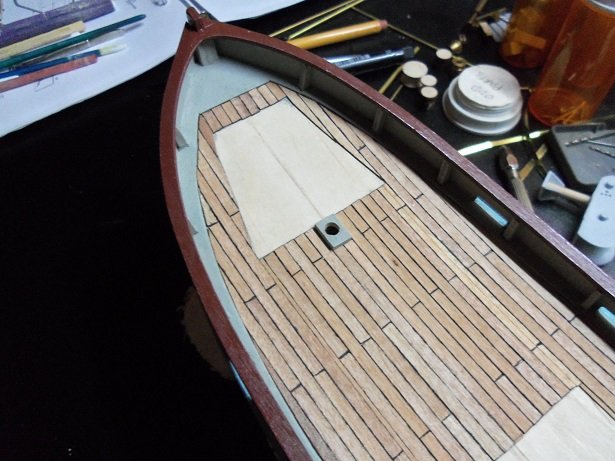
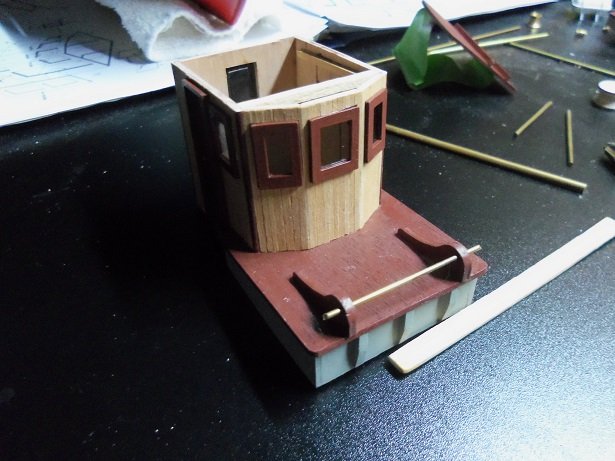
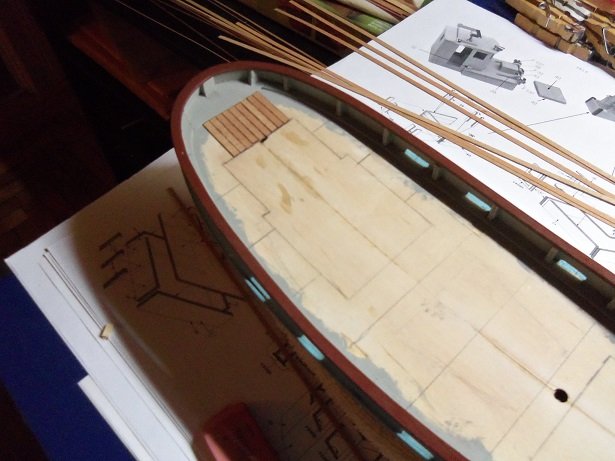
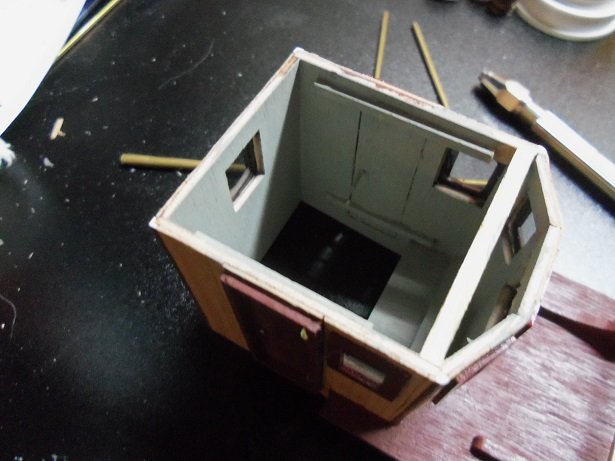
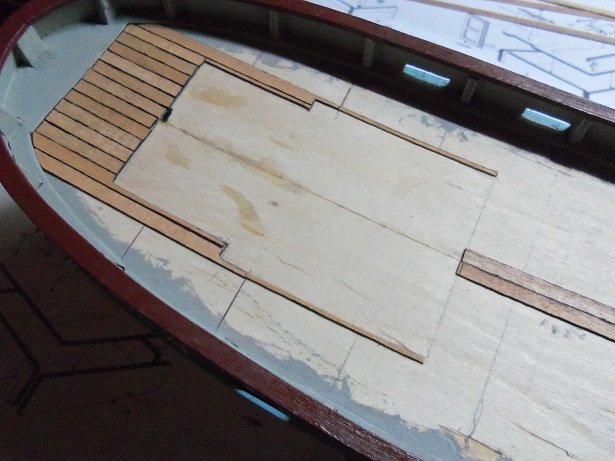
thanks John.....the margins made it easier to plank. I didn't have to do all that cutting around the posts. doing it this way does present problems...one of these days I'll figure out a better way to overcome it. I would try and replace that 1 mm strip, but it can get very messy, so I'll just leave it be. both sides of the mid ship was done this morning. ......and I started to close up the bow section. this makes for some unique plank cutting. the forward structure was dry fitted, as was the pilot house, to unsure a good fit. the mast cap was cleaned out, so it will accept the mast. I will need to make a couple of supports for the aft mast behind the pilot house, since there is no hole for it in the deck. it didn't take long to finish the bow section. although, I will need to make a tiny addition to the starboard side front corner {inside the open area}. before I cement the structures in place, I'll go around the edge with flat black, so no sign of the underlayment can be seen.
- 378 replies
-
- 13
-
-
- t78 norden
- billing boats
- (and 1 more)
-
oh dear.......one of the knee pieces is missing! did you take the barrel out already?!?!?!
-
thanks OC........both side are now done....working on the bow area.
- 378 replies
-
- 3
-
-
- t78 norden
- billing boats
- (and 1 more)
-
the nets look good! your close to the finish
-
part quality can be a pain......I'm not into waiting for parts, unless it's for the inventory. the part has to be really nasty, for me to do it. I was stubborn in the beginning.......but I got tired of guessing the shroud length. they look more natural,, if they are off a little......but I started going too far out of whack for my taste
-
A would be toe logical choice........the part in the back is a knee.
-
I didn't see that you repaired the rounded part, but apparently, I guess you did....so that was good they look really nice .
-
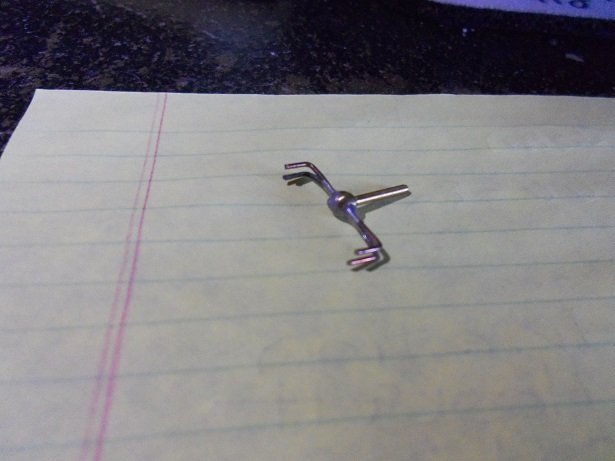
glad to see your getting back to this one.......you must have repaired all the damage {even the hull}. I made up a tool similar......two pieces of wire soldered together with a handy dandy handle jutting out from the middle. it will only do one size lanyard though, so I want to make a couple other in different lengths. it can also be used to insure the center hole is in the correct position, on the dead eye in the channel {that is, if CA didn't get on it}. you did a great job with this model......it will be good to see her finished I know it's not the right time of the year........but short sleeves or roll them up please
-
thanks gents for the kind comments and the likes the lowly mast collar...where would we be without them? this one sure got me out of a bind. it's nice when you can quickly solve a problem when it arises......I'd say it's a beneficial skill that's a must have for any beginner modeler. thanks Ferit and John
- 378 replies
-
- 4
-
-
- t78 norden
- billing boats
- (and 1 more)
-
watered down a little with a foam brush works well. most times though I just keep a damp cloth near and wipe after gluing.
-
I was in there a few weeks ago......I didn't see them, but I did find a drill index {an assortment actually} that goes from 3 mm, down to the micro sizes. I have a couple pin vises...even a couple that spin when you pull a collar down. the ones you have look like they would work well in a press......
-
glad to see your finding a little time to relax......loose term for a sense of frustration I hope Janet is feeling better
-
nice looking gears and spools......a lot crisper and cleaner that the supplied part you showed. I'm currently working on a coaster.....the which aboard is fairly tough to find a decent picture of, let along a functional view. making the frame should be fun to watch
-
hello Ferit! nice you come look'in in. ain't that the hoot! the hull looks scary in the beginning......by the time they get paint, they start to lose the rough appearance. hope you follow along........there's more fallout.....errrr folly..to come !
- 378 replies
-
- 4
-
-
- t78 norden
- billing boats
- (and 1 more)
-
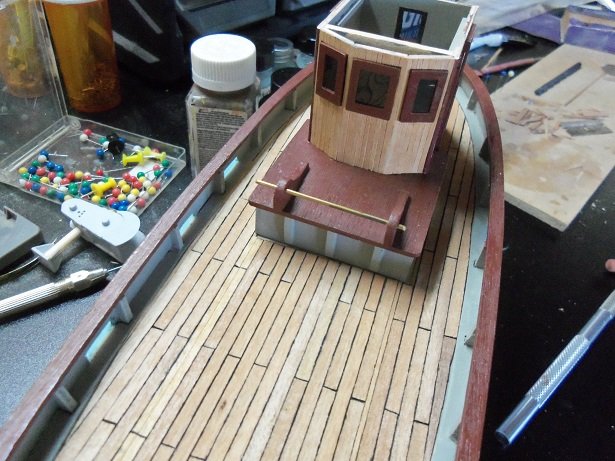
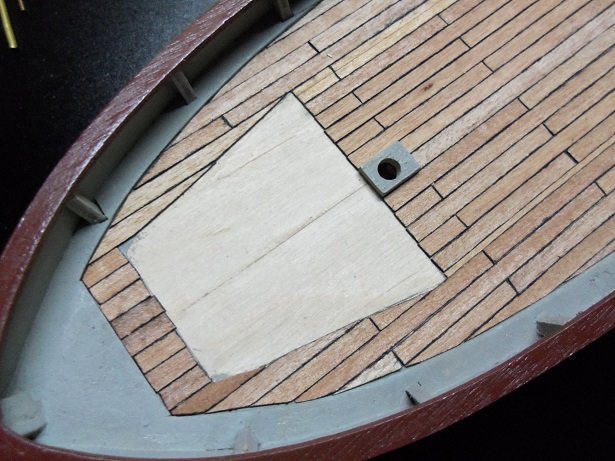
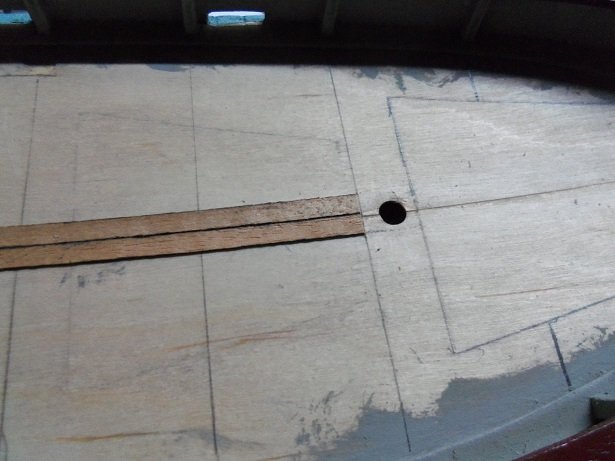
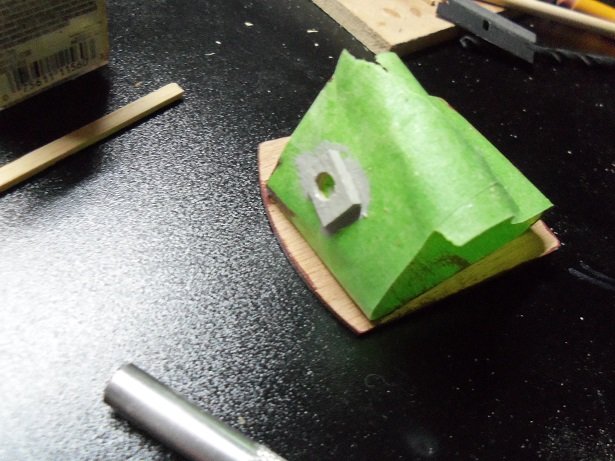
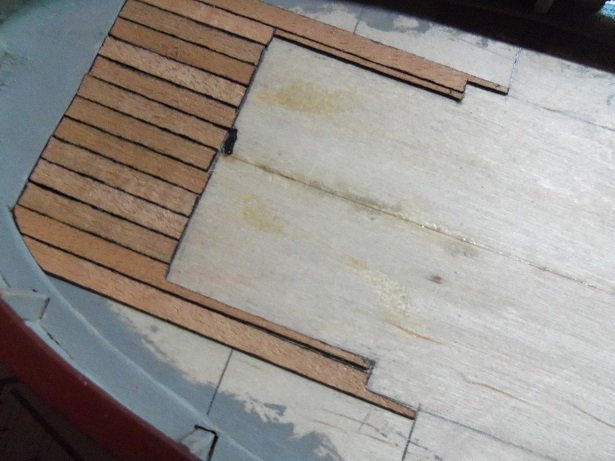
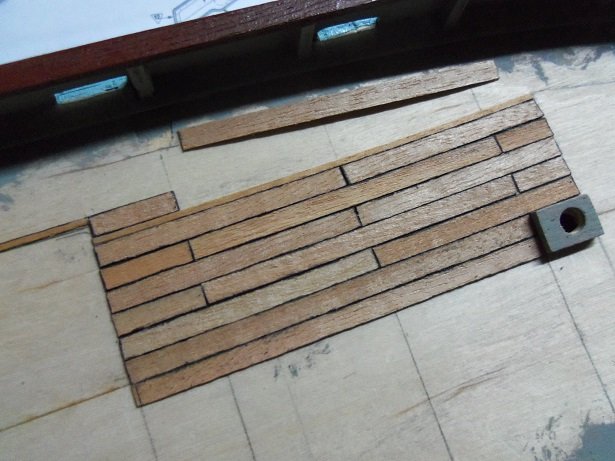
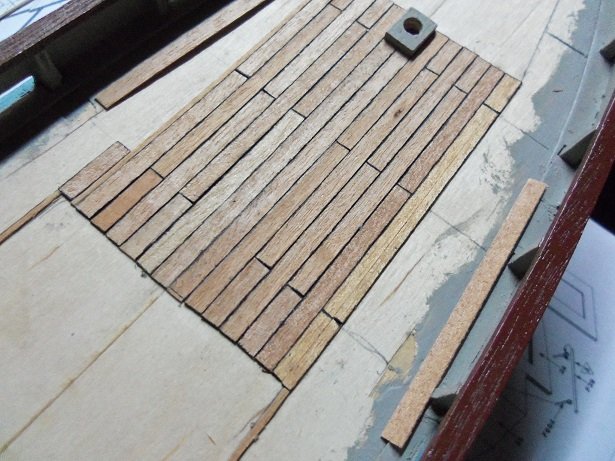
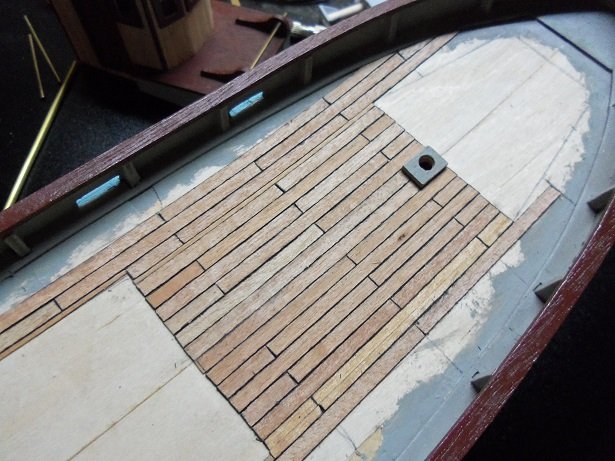
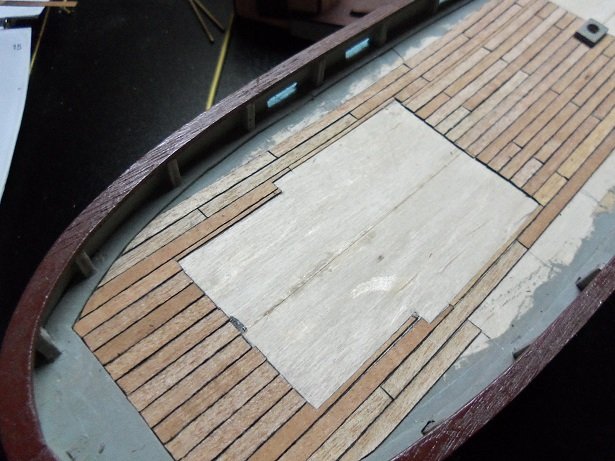
yes.....I got right back to work......the admiral wasn't home.......it was quiet. the front of the pilot house was fleshed out. all it needs now is some minor sanding and a lacquer coat. I hadn't had enough of the planking.....so I started on the deck. usually I begin at the bow.....but this time I though I'd go from back to front. I'm using an archive pen to simulate the calking. I have 2 new ones......this is my old one, that I had filled with India Ink, when it dried out on m the last time. it's still alive and kick'in of course, I'm jumping back and fourth between planking and reading logs.......johnnyreg asked about the interior of the pilot house. as mentioned, being a small structure, I'm not going to do much with it. the tint doesn't darken it enough though...and looking in, I can see satin brown paint blotches around the doors. I gave it a coat of flat pale gray. done with the area behind the pilot house, I ran two solid planks in the center of the deck, from the front of the pilot house base, to the forward structure. in cleaning out the mast hole, the planking broke up! DRATZ! now what the heck am I gonna do. there's only one thing that will fix it.....a mast collar! I cut the bad part off the planking. I have this strip of wood in the pile on the table...I think it's Obetchi 2 x 6 mm. a piece was cut off, a 3/16 hole drilled through it and trimmed to fit between the planking and the forward structure. I painted it flat pale gray when done. working my way around the pilot house, I had to do some fancy cutting to negotiate the base. I drew lines at most of the bulkheads, except the few at the bow and stern.......those I'll just run straight {most will be short pieces anyway}. I figured I'd cheat a little.....I ran a pair of 1 mm strips to the front of the outline for the base. Once I worked my way to the mid ship, I wanted to make sure the pattern was right. so I cut and dry fitted planking to the center plank on one side.....OK.....I'm good. so I ran the pattern from the center planks. darned if that 'cheat' didn't come back to haunt me! for the port side, I ended up running a 1 mm strip all the way from the base, to the forward structure. before I started this area, I had cemented the mast collar in place. now with that 1 mm strip, I should be good, as it brought the planking flush with the strip I cheated with. I figured that I'd be doing the same thing with the starboard side.......no, not exactly. for some crazy reason, the 1 mm strip fell short of being flush......you figure I'm using 3 mm thin strips......with the added 1 mm, it falls short?......OK....fine! I did some test fitting, and I ended up using two 2 mm strips together to match up with the deficit. what I did though, was mark them for cutting the butt joints, but when I did the calking, I didn't do one of the sides, lengthwise. I did them opposite one another, and when they were put side by side {cut and butt jointed to follow the pattern}, they almost look seamless. once sanded, it may be hard to notice thinking about this......I could have done the same thing to the port side, and it probably would have looked better. anyway.......I continued with the port side planking.......I did a little more to the starboard side, before changing sides. a good portion of the deck is done.......not much more to go.....then a lot more fancy cutting capping in the forward structure. it's late my friends........I've been up since 4 AM. I think it's time to hit the bunk if only i had thought of that remedy sooner
- 378 replies
-
- 11
-
-
- t78 norden
- billing boats
- (and 1 more)