


popeye the sailor
-
Posts
16,007 -
Joined
-
Last visited
Content Type
Profiles
Forums
Gallery
Events
Everything posted by popeye the sailor
-
 amazing structure Danny........the guns look awesome! you make it look WAY to freak'in easy
 -
you could even lash them more toward the bow.......they are called bow chasers. most modelers tend to delete them though...thought to be too much for the model, or problematic to lash them in place. some aren't even included in the kit.....outa sight, outa mind sort of thing as well.
-
love to see one of these models with the studding sails set I did my U.S.S. United States with them....looked so cool!
- 1,350 replies
-
- 1
-

-
- constitution
- model shipways
- (and 1 more)
-
looks good.....keep going have you tried rigging them with the carronade cemented in place?
-
you have a great holiday season as well.......glad to hear your almost done with the planking. look forward in seeing her soon
- 455 replies
-
- 2
-
-
- slightly modified
- greyhound
- (and 1 more)
-
STEVE!!! good to hear from you! HA.......caught the bug eh?!?!? I build the Guillows planes...got back into it after what seems like an eternity......I'm building a Fokker Dr 1 - 1:14 scale. I'm afraid to show the admiral how big it is......it's got a 20 inch wingspan. glad to hear your having fun with it......hope you post some pictures, and I'd take a front row to see another great ship build. keep me informed
- 291 replies
-
- 3
-
-
- bounty
- billing boats
- (and 1 more)
-
thank you very much Mark.......I think a lot of us did. I have fond memories of building model airplanes with my brother........having dogfights....crashing them. and then put them back together to fight another day. my brother grew out of it....but I didn't. of course, as I got older, I got more pyrotechnical...M 80's did a number on 'em they were only 1/144 scale........when I started to build the larger scale aircraft, I got more conservative thanks again! saw your Royal William........absolutely beautiful!
- 133 replies
-
- 4
-
-
- jeanne d arc
- heller
- (and 2 more)
-
thanks Mobbsie for the good word funny you should say that.......I have been contemplating change. I took some pictures in my son's old bedroom, and I like the lighting in there.......it's so much brighter. we were at Harbor Freight one day, and I saw this four drawer wooden work bench......not too large, but quite spacious. I showed it to the admiral and commented on how nice it would be. now.........it just so happens that there is a tall......somewhat wide......and not too thick package in the back of the tree........could it be?!?!?!?! my finger's are crossed......I hope Santa found me worthy on the main table......I have an eight compartment bin in the back........at Harbor Freight, they have {I think} is a 16 compartment bin. I put that in my second letter to Santa {in case the first one got filed in the dead letter office}. {I've seen 'miracle on 34th street'...even have the movie}. as for a ship of that magnitude..........not that the admiral would buy me a plastic model......Heaven forbid.....there is another package that is as long and as wide. I can hope, but I doubt it in any case.......the computer room could become more spacious, if one of my tables was in another room. there are some things going on that I should be concerned about.......but I'm not letting anything foul the holidays. nothing serious.......but it will be a game changer thanks for the good word......thanks to all who hit the like button.........and above all, I want to wish you all a very Merry Christmas, and a prosperous New Years!
- 133 replies
-
- 5
-
-
- jeanne d arc
- heller
- (and 2 more)
-
she's one heck of an impressive model Mark. very well done.......the rigging is amazing!
- 652 replies
-
- 2
-
-
- royal william
- euromodel
- (and 1 more)
-
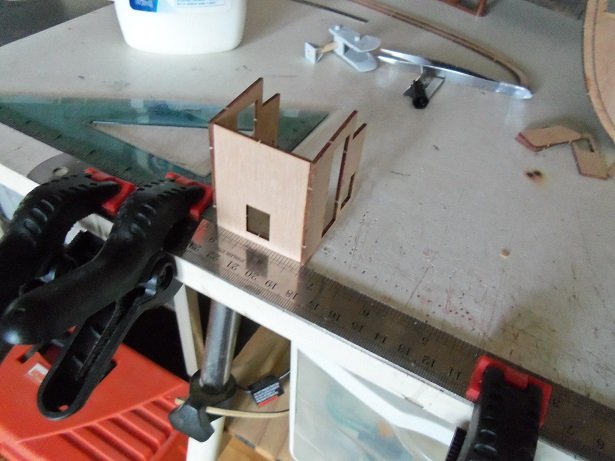
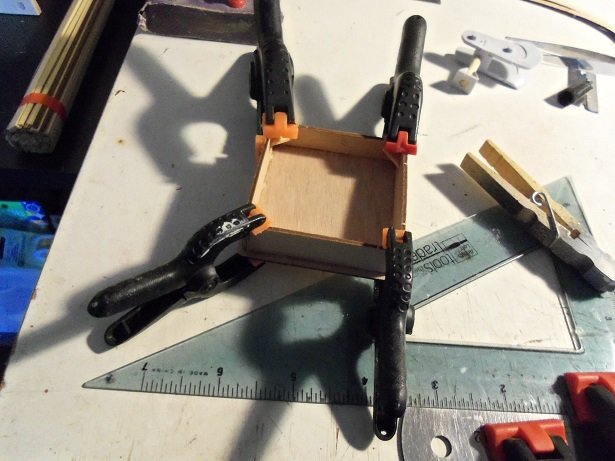
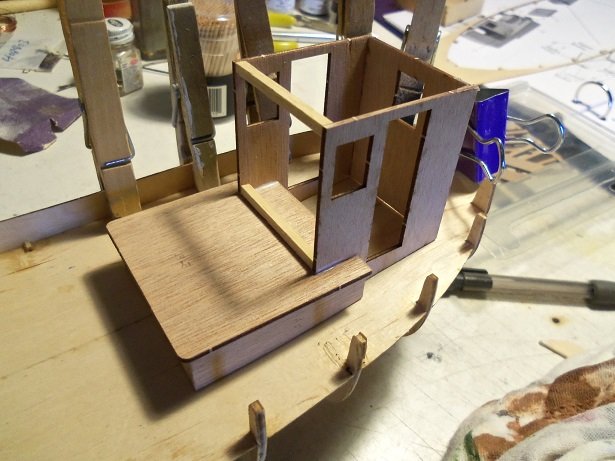
boy!........I must be out of touch or something.......I made another goof up! I'd better wake my butt up, or this build is gonna look terrible! I started to assemble the pilot house.......one of the bases is connected to it. again....I saved all the punch outs for the windows and doors....I'll use them for something. I did some sanding to the bulwark posts, to get them ready to accept the thin plywood bulwark strips. one of the posts that got broken off by the CA debacle broke away again, so I'll have to put it back on when the strip is in place. when the pilot house was dry, two spreaders were measured out and cemented in the front corners, completing the box. they were arranged, so they wouldn't need to be removed.......if anything, they will lend extra strength to the assembly as I work on it. the front wall is made up of three pieces that will give it a sort of hex shape. to do this, I thought it best to attach the pilot house to the base, so that an exact measurement can be made for their location. this is when I found that I had cemented the top of the base on backwards......the square corners are to be towards the stern, and the rounded corners are to be towards the bow. so.......I had to remove the top and reposition it. it wasn't a huge deal.......the top came off without too much bother. with a little sanding to clean it up, the top was cemented in the proper position. to insure that the pilot house and base are in sync with each other, it was set on the deck. the bottom surface is curved to match the curvature in the deck.....I didn't have to clamp it at all. I will let the bulwark dry for a while....the strip is kinda stiff and has plenty of spring-back. I also need to trim it at the center stern post before the port side is cemented on. when the port side is in place, then I can work on making the margins for the bulwarks, and mark out where these structures are to be located.
- 378 replies
-
- 14
-
-
- t78 norden
- billing boats
- (and 1 more)
-
interesting hue.........looks really good great job J!
- 258 replies
-
- 1
-
-
- harriet lane
- model shipways
- (and 1 more)
-
in that case, the burn marks won't make a difference.
- 455 replies
-
- 2
-
-
- slightly modified
- greyhound
- (and 1 more)
-
hmmmm......I have one of those laser levels {sitting in my workshop gathering dust}. I have one of those line levels as well {the one going across the deck}. this looks like a very good method per.......I will have to try this out thanks for the tip!
-
thanks again everyone for the kind comments. I wasn't happy with some of the close ups.....it looked like I gobbed the paint on. actually, it was the plastic finish, but no matter, it still came out reasonably well. I got to add a few thing to it, so that added to the enjoyment. we were at Hobby Lobby yesterday.......I saw the Hood and the Missouri large scale kits.......I hope something like them is under the tree for me a part of me thinks this isn't my best work.....but I still enjoy working with plastic. seeing what some of you folks are coming out with, inspires me to think there's hope for me yet. thanks as well for all the likes
- 133 replies
-
- 4
-
-
- jeanne d arc
- heller
- (and 2 more)
-
darn injection pins.......they show up anywhere, don't they?!?!?!?! happens to the best of us though..... do something one way, then realize that you wanted to show it differently. might be just as well to remove the door to repair it, seeing that the hinge area needs to be cleaned up. looks minor.......you can fix it easily
-
thanks Lou, Yves, and bob for the good word given the minor problems I encountered {some my own doing}, the model came out looking not too bad. it's a really good subject and there's plenty of info on the ship. thanks as well for the likes!
- 133 replies
-
- 5
-
-
- jeanne d arc
- heller
- (and 2 more)
-
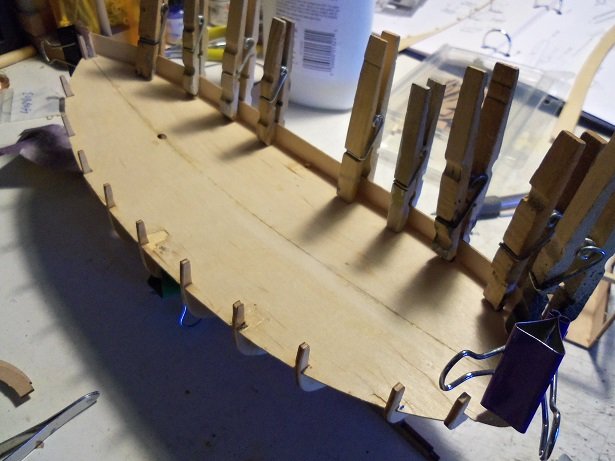
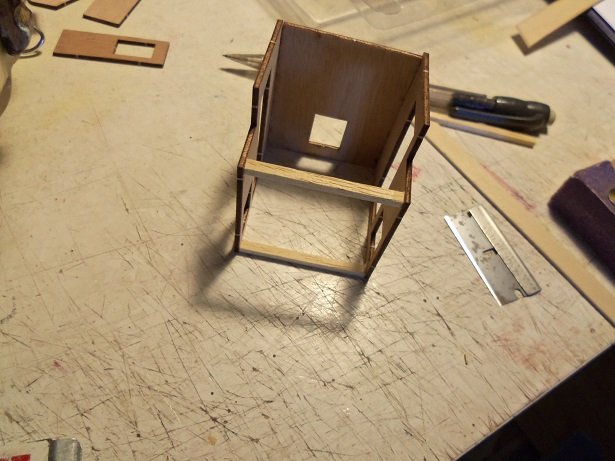
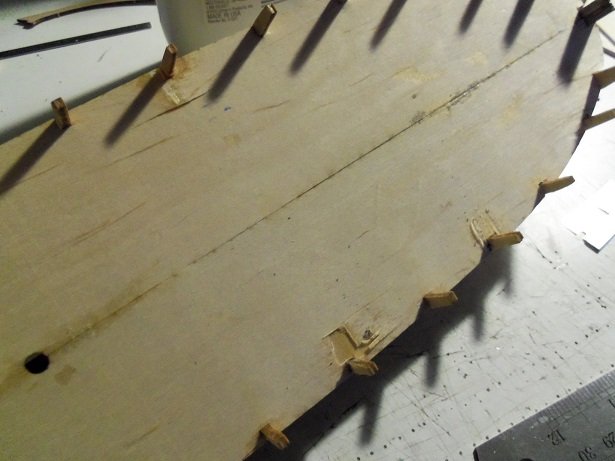
I did a little tinkering with her this morning, adding the tops to the structure bases. I also managed to get a shot of the deck platform...mental note to self....lighten up on the CA! totally out of character for me......I'm usually not this careless. that's what I get for doing something, and taking off in a rush. I still need to do more faring, but I needed to wait for the posts that I had to cement back on, to dry. it had the entire week end, so it should be alright to handle. I want to see about making some waterways along the bulwarks......and I notice that the bulwark strips do not have scuppers, so I may add some. while I was scheming, I put the tops on the structure bases. I have an errand to run today {getting some more paints too....hee....hee....hee}........I hope to make a little more progress
- 378 replies
-
- 6
-
-
- t78 norden
- billing boats
- (and 1 more)
-
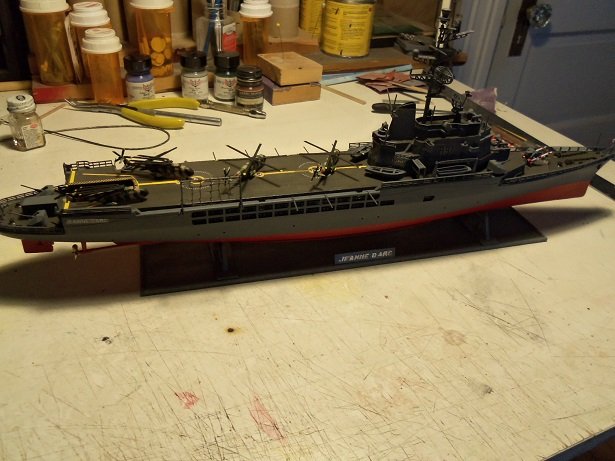
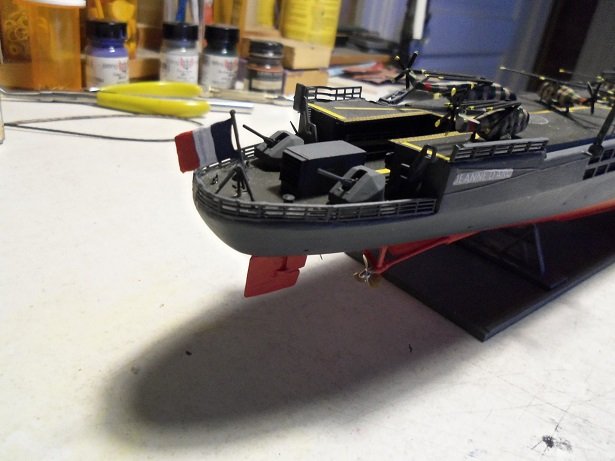
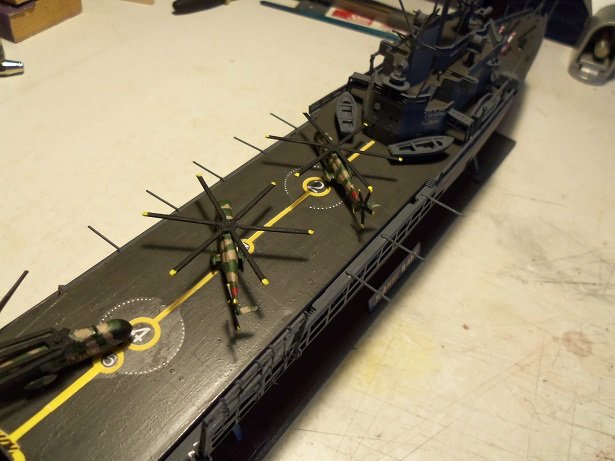
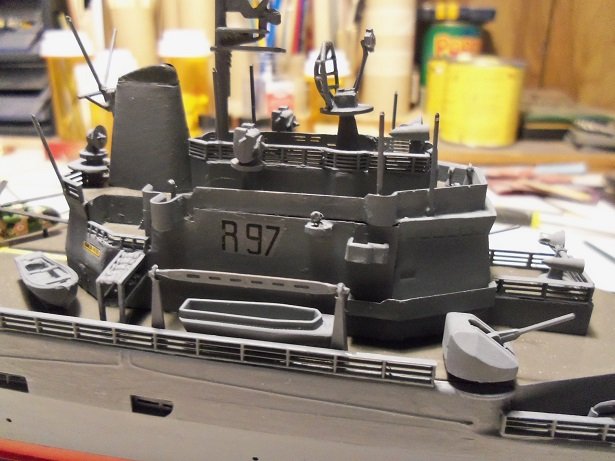
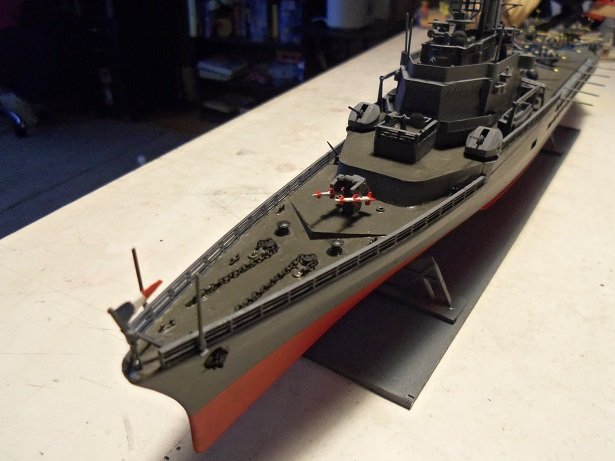
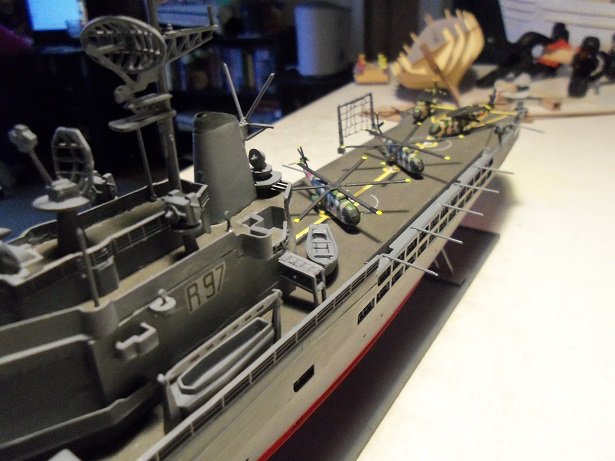
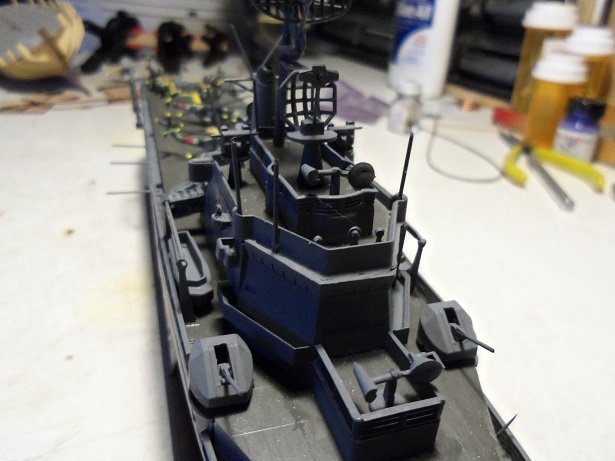
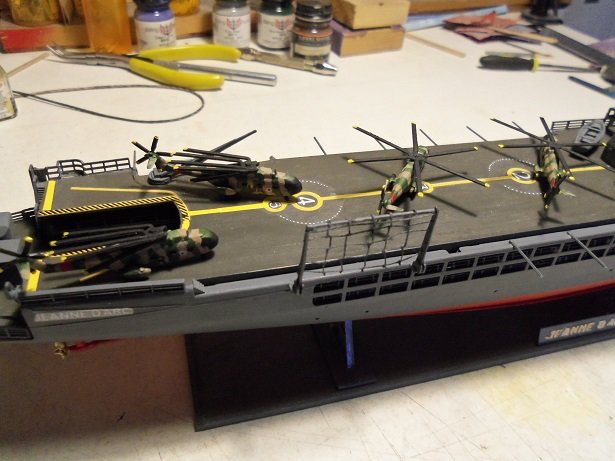
well folks.......she is finished. right after I had assembled the net thing, she got torpedoed by a rogue glue bottle..........but the damage was minor and it was repaired in no time. all that was left to do, was cement on the multitude of antennas.....and there ya go! I think it's time for a change for the work stations.....I want to move one into Kevin's old room. I may get my wish so...with out further adoooooo....here is the Jeanne D'Arc. I didn't bother to do much rigging to her........there were no holes to do it, nor did I think to add any. I didn't feel like flirting with disaster. I do wish it was a larger scale, but I still found some enjoyment with it. I saw that Revell had a kit on the market.......for the looks, I'd suggest this model.....Revell looks a bit fake. I hope those who followed enjoyed the build
- 133 replies
-
- 18
-
-
- jeanne d arc
- heller
- (and 2 more)
-
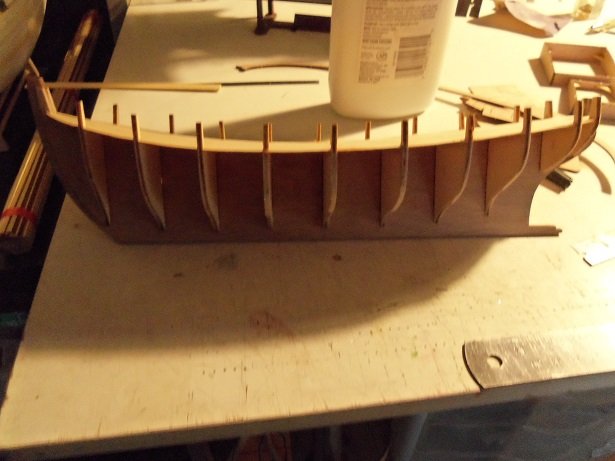
When I did the AmericA {reissue}, I thought that doing the two halves and then cementing them together, would pose a seam problem. I was unsure how to clamp them together, so the seam would not be visible. so I assembled the frames first and planked afterwards.......it came out just as well. I also thought that faring the two separate might cause them to be imbalanced as far as the contour went. after they were joined together, it would be too late to correct it. I've always done the hull frame as a whole........this method seemed alien to me. I did notice that the keel parts were a little warped.....dry fitting the deck platforms revealed how tough it would be to align them. this was another factor that led to me assembling the two halves together. when the admiral saw it.....she lamented how small it was.......certainly not a larger model like the Cux, or the Mary ann. as I recall, the hulls on those two models are around 22 inches long.........the Norden is only about 13 inches long. I reassured her that this is a small boat, and as large as the other two. I also reassured her that I could do just as much with this kit, as with any other kit she may have picked out. still, it was kinda comical to hear her rant, thinking that I wasn't happy with it.....size wise, don'tcha know I got a couple of pictures of the hull frame, to show my goof up......once planked, it will all be covered up, but it's a good lesson about using too much Ca. perhaps if I didn't lay it down like I did, it might not have been as bad........but live and learn. it's minor and I can fix it very easily. thanks for the good word OC, John, and Lou.......I hope to have an update on her shortly. now to go and take Gibbs out. he was going stark raving mad a short time ago.......two squirrels were playing in the back yard, and he had a front row seat, looking out our bedroom window! news at eleven!
- 378 replies
-
- 7
-
-
- t78 norden
- billing boats
- (and 1 more)
-
good to see your finally getting to add some detail {the fun part} looks really good! lighting is going to be a great perk.......the overall ship is really taking shape very nice!
-
have you checked out Eduards http://www.eduard.com/ really nice work there Scott........the added detail is fantastic!