HOLIDAY DONATION DRIVE - SUPPORT MSW - DO YOUR PART TO KEEP THIS GREAT FORUM GOING! (Only 51 donations so far out of 49,000 members - C'mon guys!)
×


popeye the sailor
-
Posts
16,007 -
Joined
-
Last visited
Content Type
Profiles
Forums
Gallery
Events
Everything posted by popeye the sailor
-
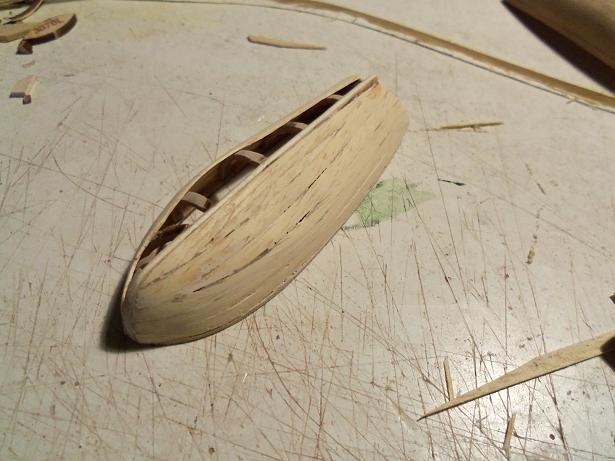
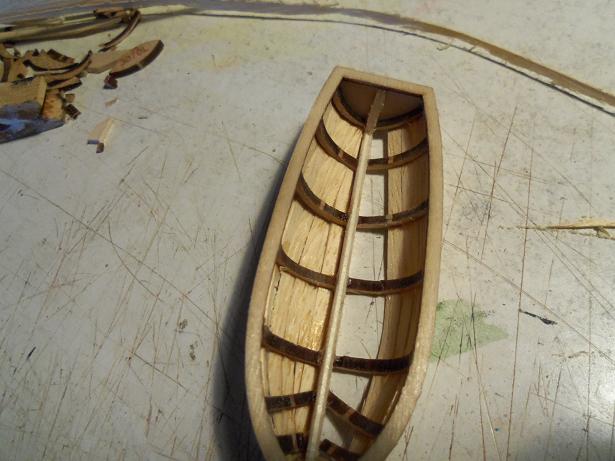
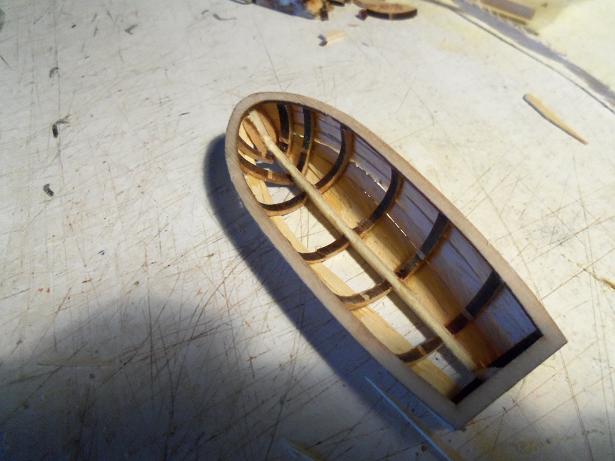
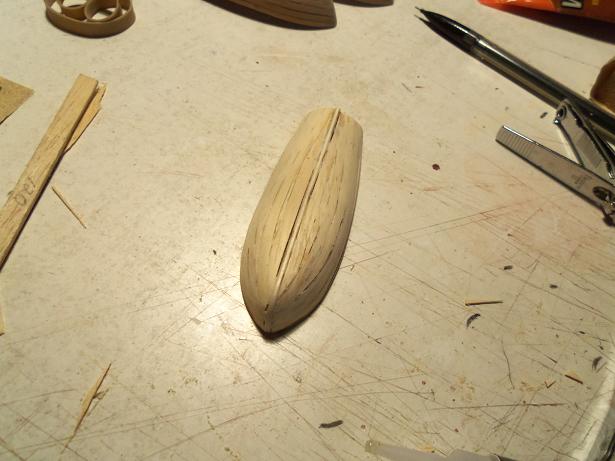
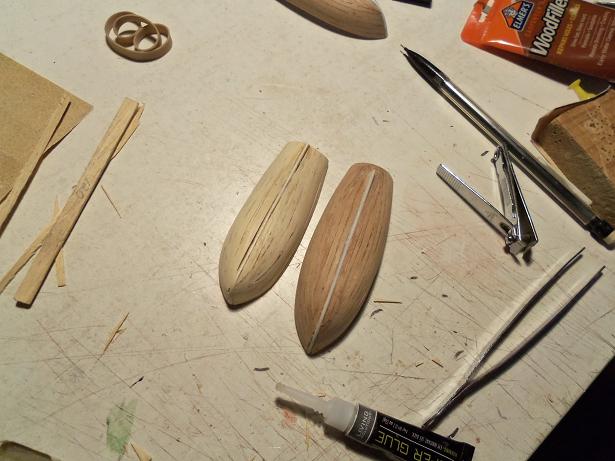
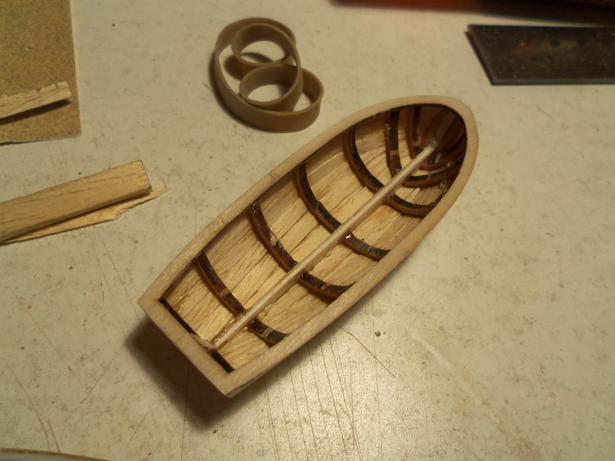
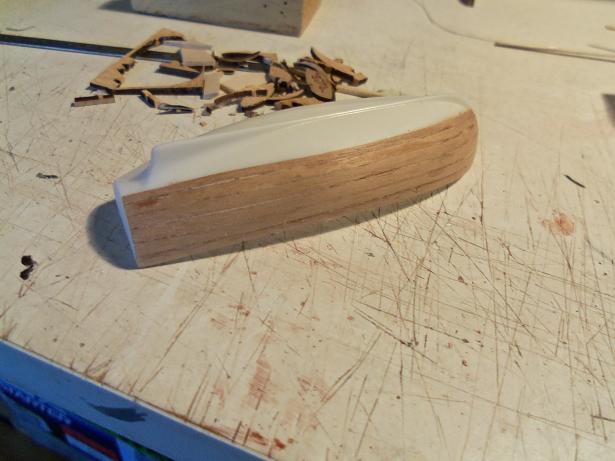
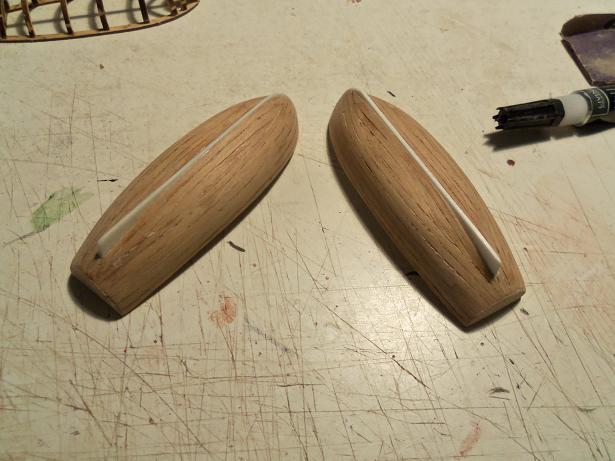
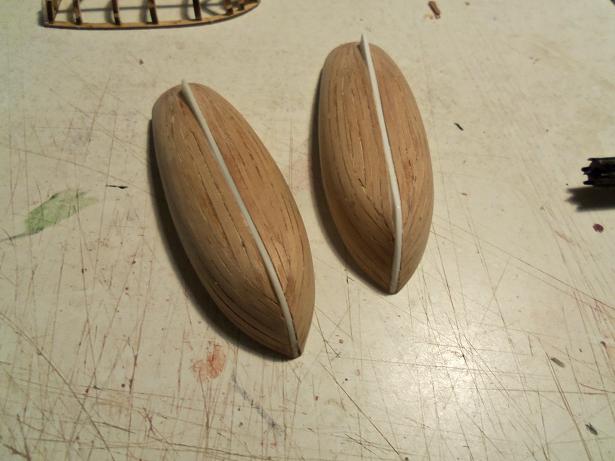
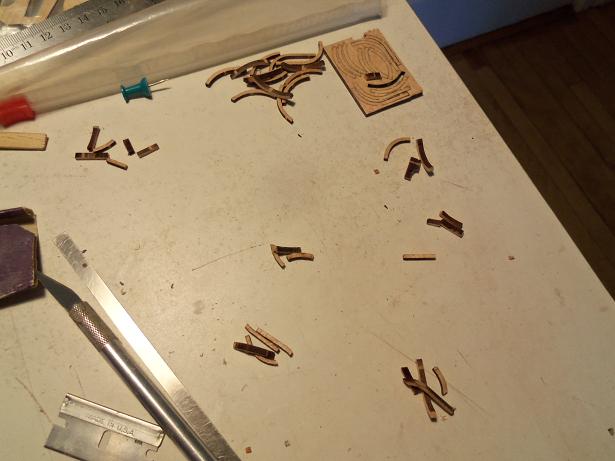
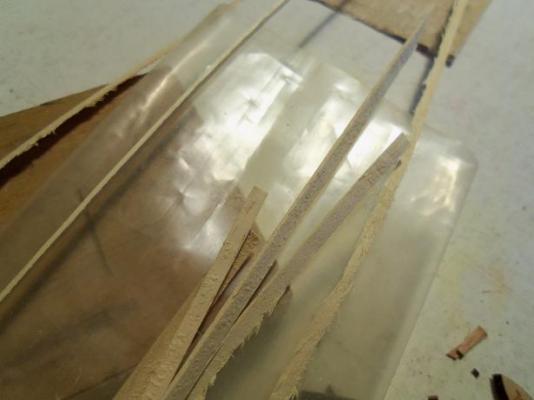
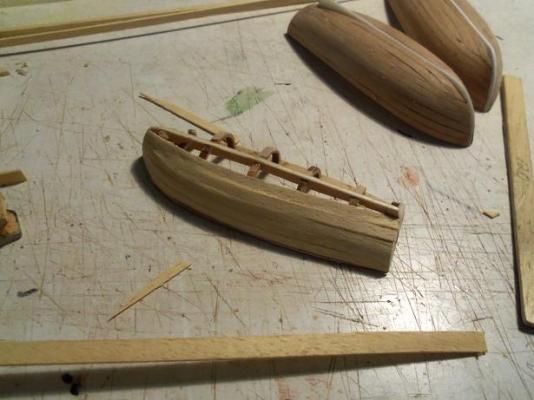
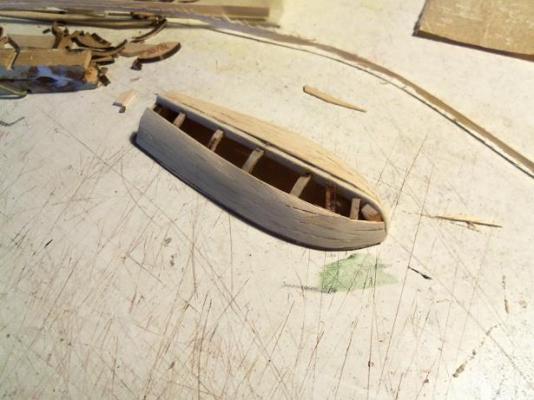
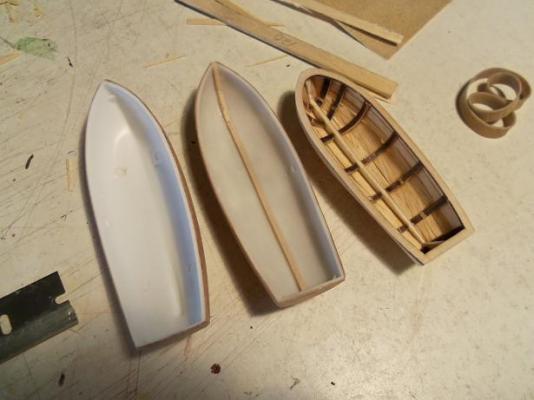
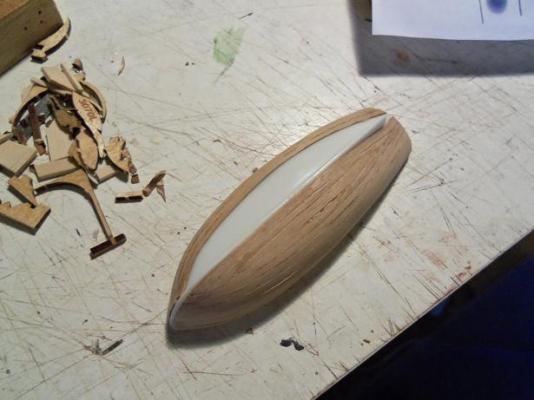
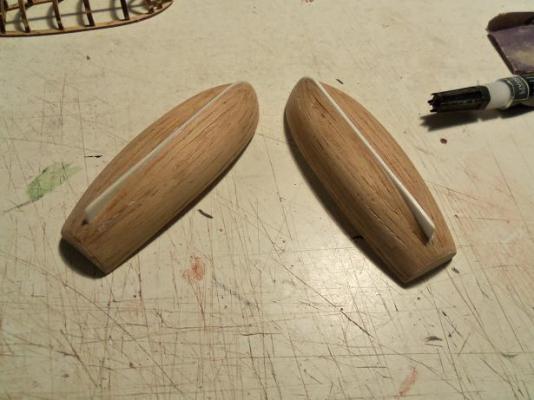
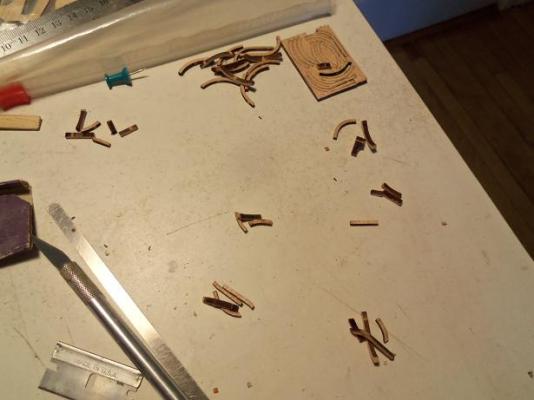
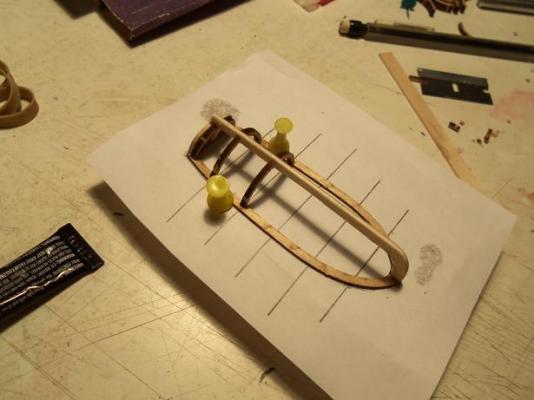
 OK........on with the mini armada! I used some of the leftover thin Annegre that I had cut for the United States build, for planking the plastic boats. for the interior of these two, I will add in the keel, the ribs, and detail them out. I think that will kill the plastic look. that jig I made has served me a few uses........cutting down the Annegre, then the block of rib parts, and for the latest bit of progress........cutting 1.8 x 3 mm strip stock, in half, to around 1 x 3 mm. it's not quite 1 mm.........taking into account fore the thickness of the blade.........I'm glad I found the other blades I bought for the scroll saw. I had to shim the jig on both sides to center the strip stock, and then work very slowly, to run them through. to give you an idea of what this looks like, here are a couple of pictures. I began to plank the frame, sanding it as I went along. soon, I had one side done I had started to plank the other side......a couple of rows, to keep it from warping...and so nothing else would break off. it's finally done here is the relation to size of these boats.........the plastic one would be out of scale I added the keel to one of the plastic boats. ....and a shot of the interior, of the wood boat


-
jeeze.......thanks for all the kind words........when I first did it for the Nordkap, I didn't know what to expect. I knew I was too green to do a scratch built one, like I've seen some of you folks do. the only wood one I've done so far was the one I did for the Susan A. I've managed to get the skin of CA off my fingers.......don't think I like a world without touch. the two plastic boats.....I have a feeling that they will find a home on the trawler {if I can fit them}. I like the way the scratch boat came out.......I did have to use some filler on it, but I'm hoping that stain will work out. I'm sure that once the interior of the plastic boats are filled in.......it will hide the plastic aspect quite nicely thanks to all of you for the comments and likes........I am humbled for the interest you've shown. I have the update on the scratch built boat......I hope you enjoy it just as much! can't wait to see what you do with your Gary........what an assembly line! I've never done a metal boat Lawrence.........I think that would make me join the folks doing other builds I've seen, that were unhappy with the supplied parts. they elected to make scratch built boat. there is a lot of satisfaction in taking what is supplied, and making it work. I'm sure you have pictures with your ship's boat in them........I'll have to take a closer look
-
thanks for the likes and good comments this has gone better than I thought it would. the faring process met with a couple of loose ribs, but it has been done. I also adapted the jig yet again......this time I shimmed it up to cut 1.8 x 3 mm planking in half {thickness}. without a good guide to keep the scroll saw blade from going side to side, it was trying.....but I went slowly and it worked out well enough. how many of those boats do you have for the Titanic Gary? that's gonna be quite a process I wish I could answer you all.......your comments are on the last page, and I can't review them....your all just too kind I have more to add.......but work time calls, and I got to get ready....still need to take Gibbs out as well for his morning jaunt.....I hope we don't see another skunk, like last Monday see you all tonight!
-
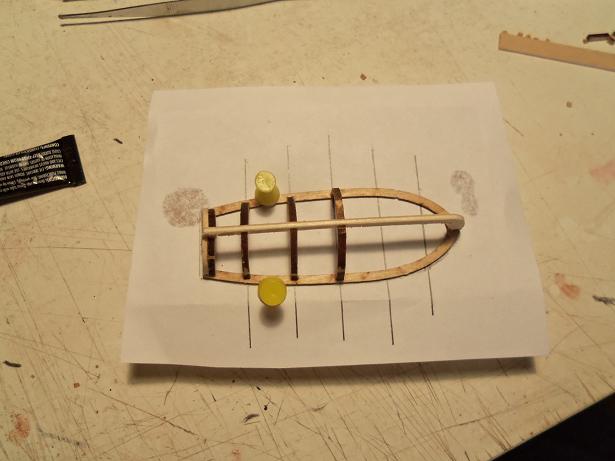
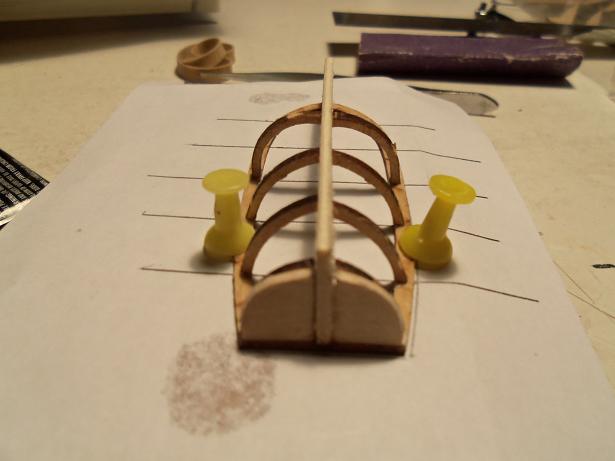
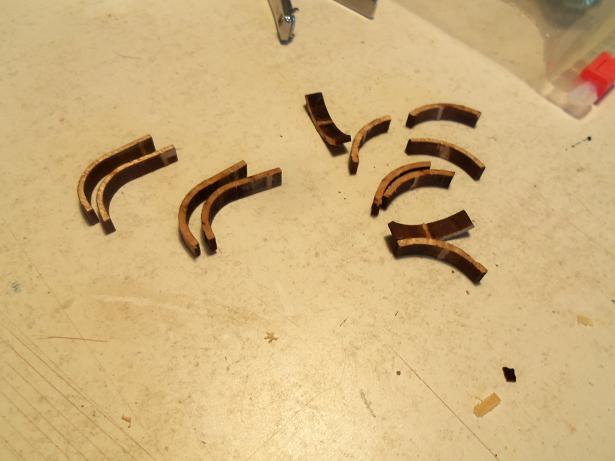
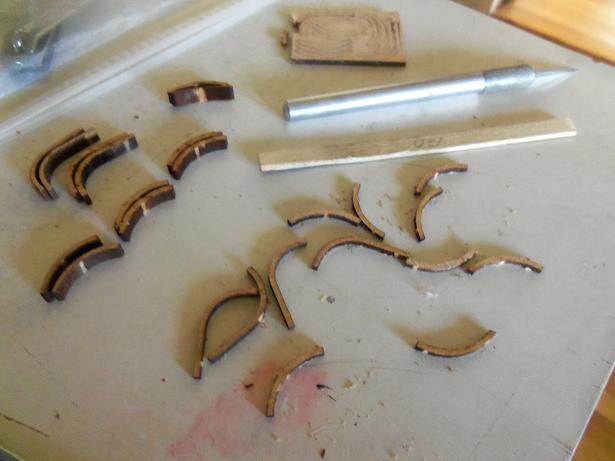
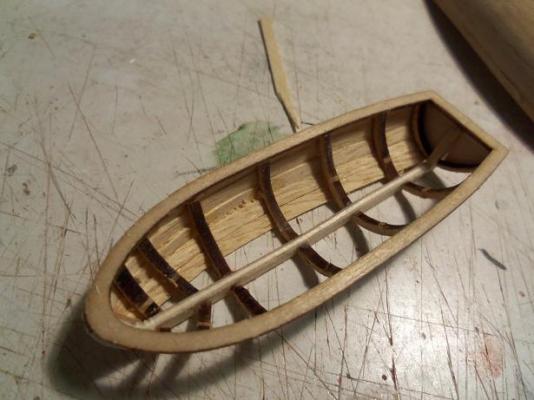
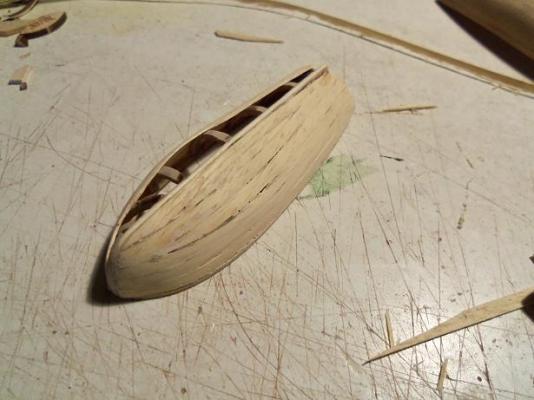
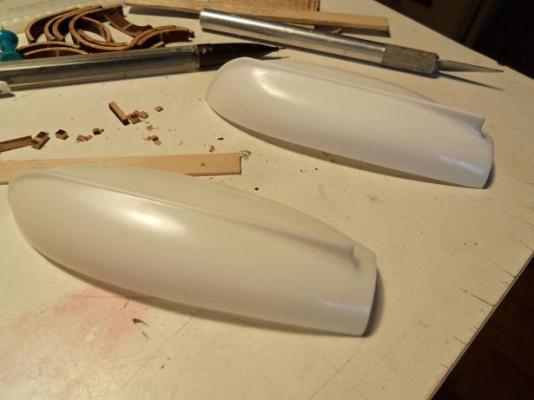
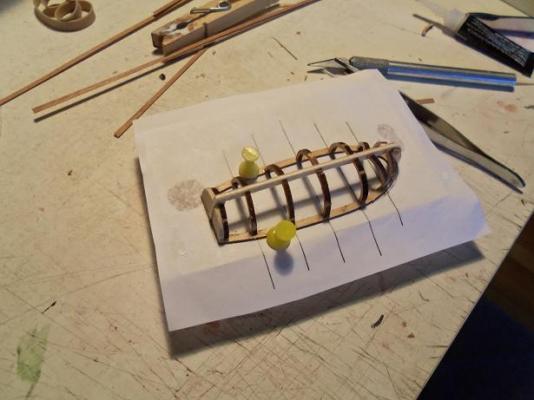
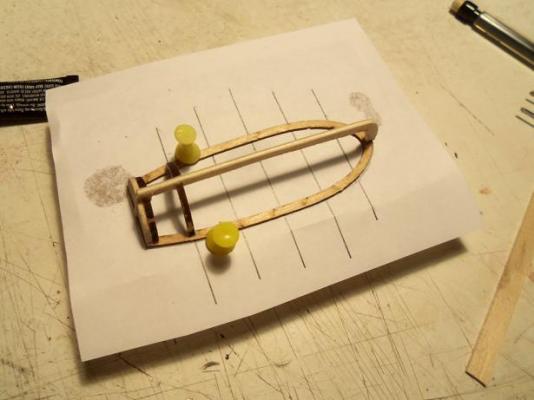
since I got a head start on the scratch built boat, I thought I'd get started on the plastic one. I got an idea to compare this boat with the one from the trawler build. there is a slight difference at the bow stem, but otherwise, the two look very close. a small impression at the skeg, is the only difference . the third pair of ribs were added to the scratch build. the fourth pair were set up......being careful that both sides are done the same way planking the plastic boat was just as I remembered it................there were times where my fingers were fused to the boat.........but I sanded it as I went along, so you'd never know it the last ribs were added to the scratch built one.......adding an extra one to control the planking's turn at the bow. time to finish up on the planking........and then plank the other plastic boat, while I was at it. how many other ship's boats are going to come out of the closet? soon........both plastic boats were done the scratch built one was removed from the jig. it needs to be fared now......I need to see if I have any more of that thin planking. I want to use basswood......but I might use the Annegre I also tried to cut the wider ribs in half........this met with limited results. I can still cement the pieces back together, once I figure out which ones go where ?!?!


-
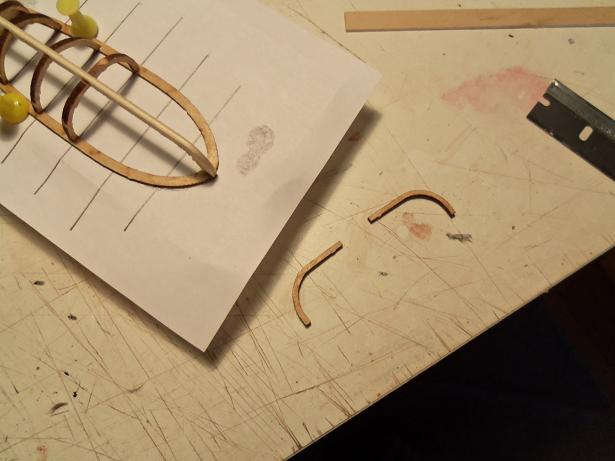
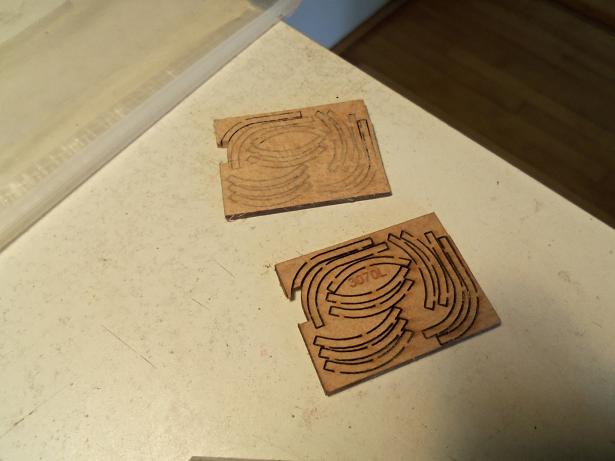
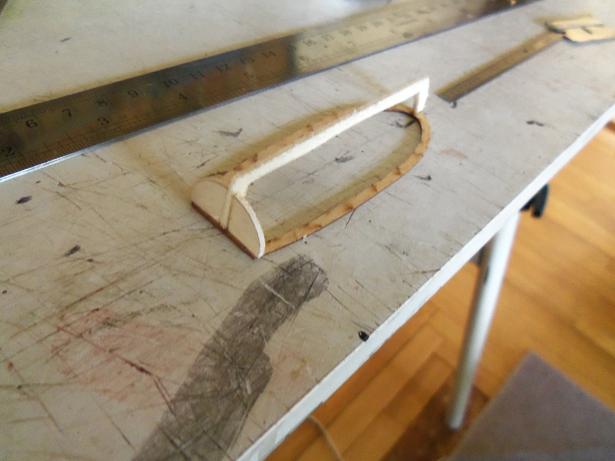
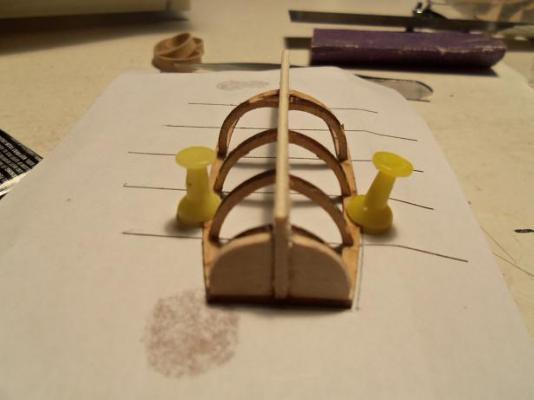
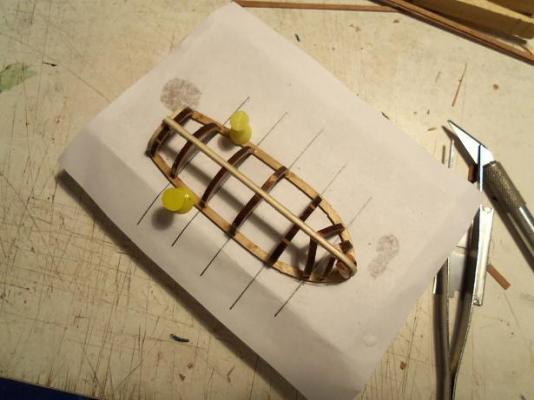
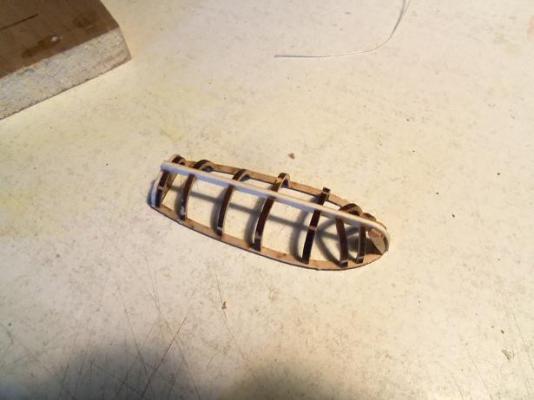
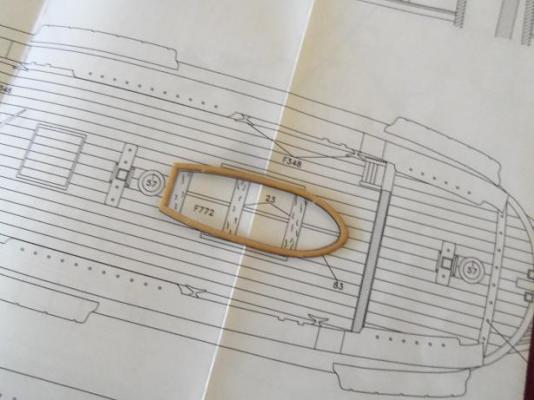
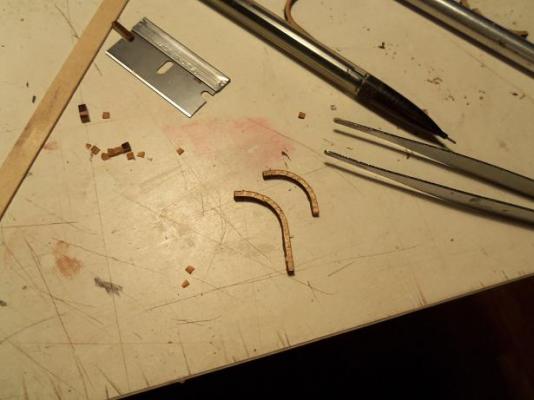
well folks......this was a very interesting couple of days. I got a good head start on these boats. the one thing I noticed, is that there is no real curve to the gunwale {cap rails}, so i really don't need any type of jig to make the frame. to do the scratch built one, I will use the gunwale {cap rails].....I traced out the keel, and cemented it on it. I checked the gunwale to the diagram and found that it's the same size. no pictures of the tracings...I'm afraid, I was too far under the spell in punching the parts out of the block, I saw that they are too thick so, with the other parts block, I thought to cut it in half. it worked OK for the most part, a chunk did break out of the halves........but the pieces can be glued back on I did it with the scroll saw......I went out there and located the broken piece. I was able to do this using the jig, that I made to cut the Annegre. made the perfect guide the transom halves were made by tracing the stern of the plastic boat.......after cementing them in place, I saw that they were too big and later trimmed them down. punching out the 'adjusted' ribs......these look much better some of the cast off wood was used to make the stern rabbits.....the first pair of ribs were cemented in place. I made up a jig to measure out where the ribs were to go. ....and then the second pair for the third and fourth pairs of ribs, the larger ones will be needed. to be sure that the widest part of the hull is achieved, these ribs will be reversed, to use the long end to the best advantage.


-
super looking prop!...........still can't get over the hardware for the crane......looks sweet!
-
nice start to the planking David....the stern came out nice as well. I thought the same thing about the Gothenborg.....never regretted opening those windows up better than 'em being blacked out like they show you on the box
-
looks awesome since I last looked in..............very nicely done!
-
the ship's boat turned out great! I hope I can come up with as nice a boat as you did! very inventive!
-
very well done Vivian........ a very unique concept. amazing detail
-
there are different parts that make up paint. I would think that brushing it on afterwards {a clear coat} would do the trick. but yes...the best way is to mix the paint before it is applied. there is the ingredient that denoted whether it is to be gloss or flat...of course the flat has less of this additive than gloss paint. another thing to keep in mind though is that if your reviving a flat paint, you should add the base of another flat paint to it. this way, there is the same amount of the additive in the suspension and it won't upset the balance. as you saw with the separated paint, the pigment is heavier.......this is what causes separation in the first place. the suspension and this additive is most likely the same weight. just my understanding of paint......and all my years of playing with it.
-
hey Bob...............BASHMAN!!!!!!!!! yes folks..........that seems to be the ticket around here! I'll have to make a decent boat......there are two ways to do it, and I think with what I have here......I'll try both! yes John.....other woods......but I hate to see good parts go by the wayside I'll try to use them.....but in a nice way, of course. if I were to use this boat as a plug J........it might come out too large. the skeg looks too modern as well. too late Nenad......I'm already there! {can you see me waving to you?} thanks to all who commented and for the likes.........I think it's kinda cool, actually. it's not every day, that you'll see two ship's boats trying to woo over a ship, that they hope to find themselves nestled in. it's kinda like watch'in 'the bachelor' ...........but to keep with the medium, I think I'll call it.........'the bashlor'
-
nothing like a clean paint job.........that looks sweet! good to see an update Ron
-
perhaps you could fashion them, so the split is trapped in the chain plate.....let the wood hold it closed. I like your idea of the irregular dead eyes.....history never depicted that they were totally round
-
very nice work Kester.........always glad to see your build believe it or not.......I've done that with paint before. you are correct....what is at the top of the separated paint is called the suspension {base}.....the pigment is on the bottom. I had some paint that had been a bit over thinned..it was nothing more than a wash, at this point. I needed to paint some parts that were associated with what I had painted in the same color. I have an abundance of gold and silver enamels kicking around.......long since separated. I just did the same thing....with no 'residual' effect it's good to be resourceful
-
Again Augie.....more superb work with the grates! I'm sure that your method with the brick work will be a winner! I totally agree that there are thing that can be found........craft stores may have something you can use.
- 2,191 replies
-
- 1
-

-
- confederacy
- Model Shipways
- (and 1 more)
-
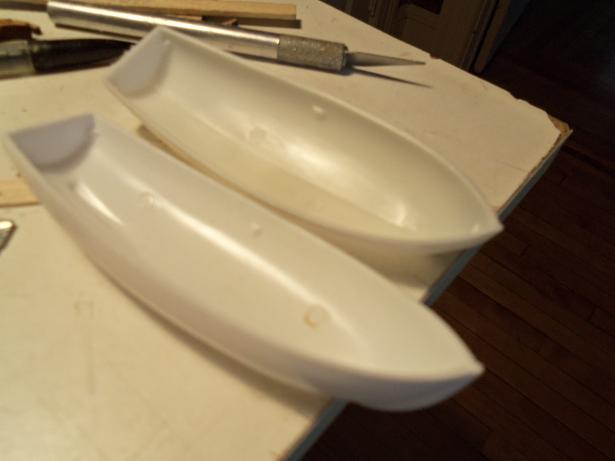
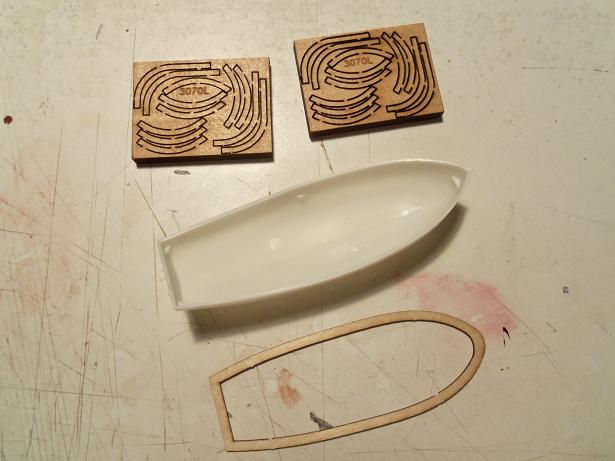
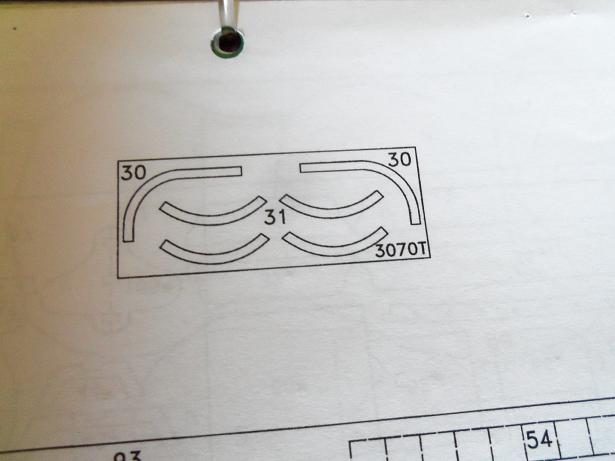
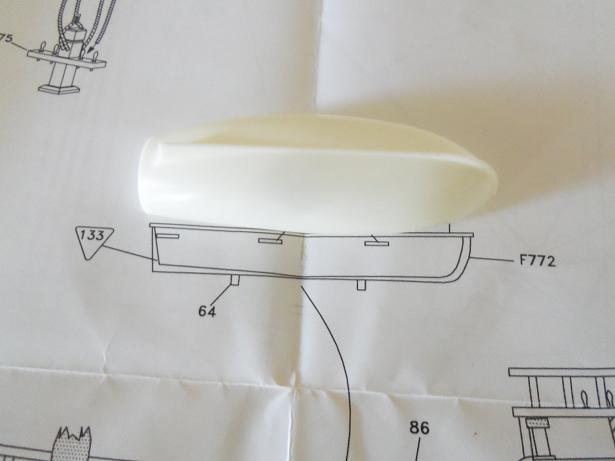
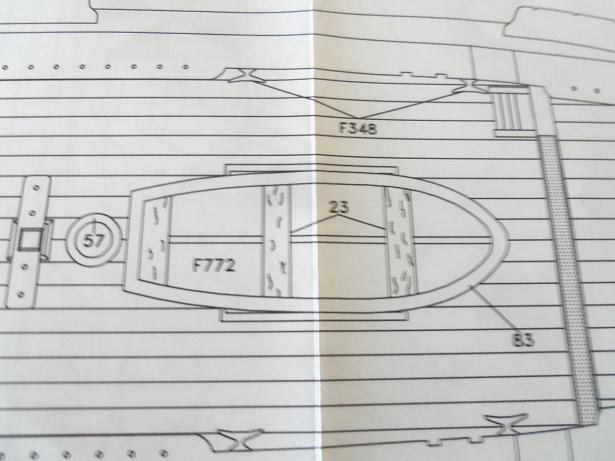
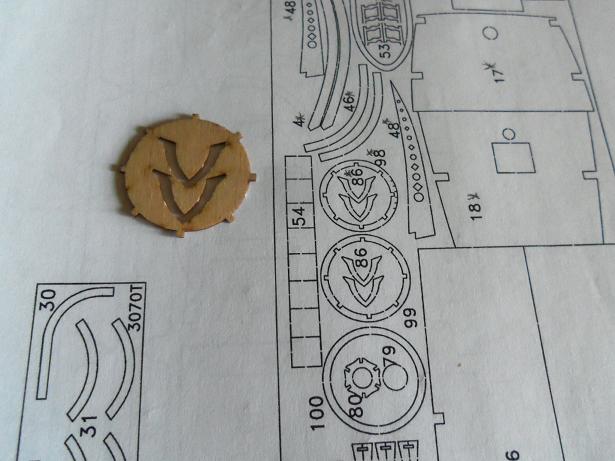
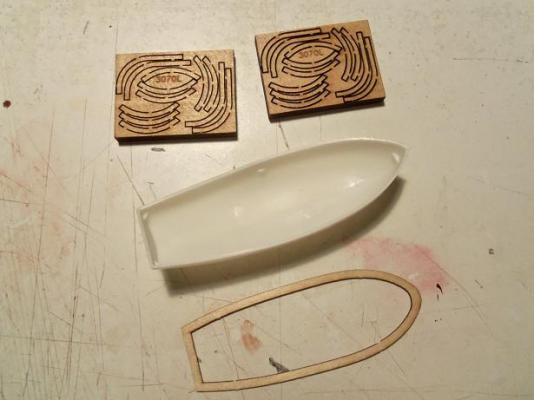
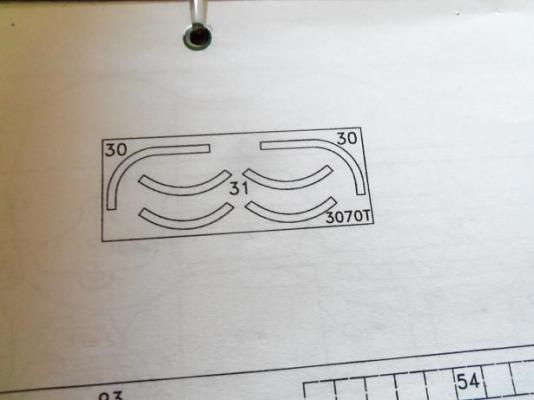
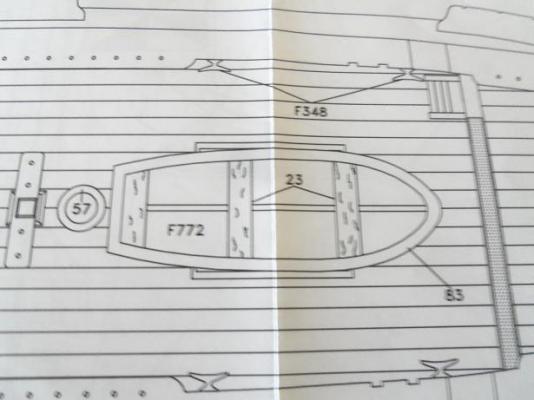
in seeing what the Corel kit supplies for Jct for his ship's boat, I thought it would be kinda neat to show you what the Billing kit offers. they utilize a plastic boat fitted with wood parts. there are just these parts, as far as I can see....... although you must keep in mind, that there are some parts missing in this kit. looking at the parts diagrams, I was a bit befuddled......the number stamped on the mini panels don't match up.......and I got two of them to boot! I do have a couple of ideas running through my head for these parts.....one of them is to scratch out the keel and omit the plastic.....do the whole boat from scratch. I'll look at my options and go from there there should be only one of these parts panels in the kit.......these have an 'L' suffix. the panel that goes to this kit has a 'T' suffix. I am not sure what kit these go to......a boon? I think so the kit diagram of the parts panel only had six parts to it.........2 - # 30 parts, and 4 - # 31 parts in looking up any sort of assembly for the boat.....this is all I found I also need to make another pair of cleats. I have the regular style cleats, but as you can see how they were laser cut, one of the pairs were on the parts panel that this kit is missing. still more to do in making the parts I need for her. *footnote*: after I had written this, I tried a dry fit with the cap rail and the boat, and I found that these don't match up either. it's looking more and more like a scratch build.....hmmmmmmmmmm well..........now, that settles that, now doesn't it?!?!


-
she looks super Sjors! you've really done wonders with the exterior.......the wales and rails will really make her pop! steady 'o she goes Sir!
- 1,616 replies
-
- 1
-
-
- caldercraft
- agamemnon
- (and 1 more)
-
thanks Piet, David, Michael, and John. when I saw that the funnel was prone to nicks and dings, I should have covered it over with some 1/32 basswood. but I didn't.....it came out alright though. I have a couple more thing to do, and then it can be permanently placed. thanks for the likes as well
-
thanks Mobbsie and Bob once I get to the deck planking......it will all come together. I still need to do some touch ups......especially those darn cap rails! that's like using balsa sheeting for the hull of the lobster boat...........what were they thinking! it looked much better after I had planked it over. thanks Augie! good to have you looking in Carl.......don't feel bad........after my three day stint at work, I usually end up playing catch up too. I just glad your back
-
thanks Mark........I never know where a crazy idea will take me next thanks Augie.......I was almost ready to make up some tear drop ribs and make a second one. every time I'd turn around, there would be a nick or something, that I couldn't explain. thanks for the likes!