HOLIDAY DONATION DRIVE - SUPPORT MSW - DO YOUR PART TO KEEP THIS GREAT FORUM GOING! (Only 20 donations so far - C'mon guys!)
×


popeye the sailor
-
Posts
16,007 -
Joined
-
Last visited
Content Type
Profiles
Forums
Gallery
Events
Everything posted by popeye the sailor
-
 very nice work on the improvement J! really like the way you did them........look really sweet!
 -
looking sharp Sjors.........rigging looks great so far!
-
a grating or platform would be a good idea......be sure to leave it removable. you could even do a sort of companionway structure.....you won't feel the need to enlarge the hole.
-
I took the liberty of looking up your lathe......here is what I found. it has the contact address and everything! http://www.lathes.co.uk/unimat/
-
Sjors.......you started it......that's a commendation all in itself! I've never coppered before, but I've seen them done both ways, and I think they look super! to augment what Augie said, if you chose to overlap them, you probably would have had to flatten one side edge row, and one end row of rivets, so they would sit flush on one another. to do that to over 1,000 rivets, would be a painstaking job indeed! your off to a good start......keep'em straight, and trim where you need.........you'll finish off with a good job indeed! sorry....couldn't resist if I had pom poms, I'd jump up and down and wave them for you! {nawww....I'd just scare the little kids!}
- 1,616 replies
-
- 2
-

-
- caldercraft
- agamemnon
- (and 1 more)
-
nice job on the planking.....very well done! shame that you've run into a snag like that......I hardly ever had a problem at all, dealing with Billing....now that the Wisconsin site {USA} is gone....I lost a good friend! you could also try here.....it's in the US. http://www.agesofsail.com/ecommerce/ Roger bought the business.....Billing USA is still up and running
-
it figures that a kit would throw you a curve ball like that. I've had the same thing happen to me....some I left, some I didn't. such a nice job on the decking and structures.....looks really sweet!
-
nice progress Bob!
-
nice job in the prep of the hull Sjors.......gonna be a huge task......no doubt about it! looking forward to the start of the copper work!
- 1,616 replies
-
- 1
-
-
- caldercraft
- agamemnon
- (and 1 more)
-
I think someone else posted the pictures.....you might need to take a look-see, if they're still around I didn't know you started this build Wayne.......I look at so many, I don't know how I missed it! the hull framing looks great.....you probably don't need to worry about that flat spot you mentioned. it will be covered by the deck. as long as it doesn't translate to the outside of the frame, and you can plank it with no problem......it should be OK. you've got a fantastic start going on here......I'll be watching
-
this is a feature...so far, only found in plastic kits. I used to enjoy buying these kits that had variants included. I used to save all the spare parts and decals......heaven help the model that I became discontented with I don't think we'll see that happening in wood kits, much beyond flag sheets though....I would think that would influence the cost effectiveness. wood, photo etch, brass and wood fittings are counted and monitored to suit the kit subject {although, photo etch might also be an exception}.
-
being terminology challenged Nils.......you might be right.....club rack would be a good description. I'm pretty sure, that in the heat of battle, capstan bars could very well, have been used as weapons there are probably debates out there, as to how they were stowed.......either binned or racked horizontally along the bulwarks. I think vertically racked looks just as good too makes them quite handy.
-
you gotta be careful Bob.......while mock-ups like these are a big help.......they can accidentally turn into models themselves :D I hope you made two of everything.....it looks superb!
-
Cutty Sark by NenadM
popeye the sailor replied to NenadM's topic in - Build logs for subjects built 1851 - 1900
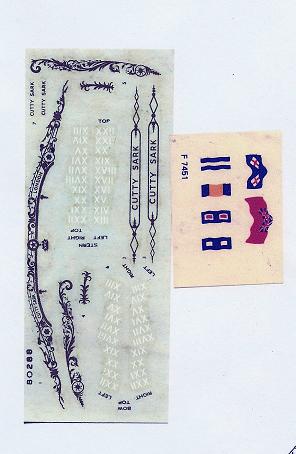
here is another picture I dredged up of the decals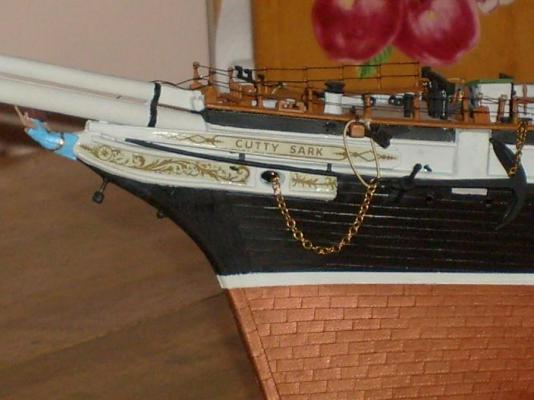
- 4,152 replies
-
- 6
-
-
- cutty sark
- tehnodidakta
- (and 1 more)
-
Cutty Sark by NenadM
popeye the sailor replied to NenadM's topic in - Build logs for subjects built 1851 - 1900
a lot of my work has been done using a decal maker. one visible draw back to it has been a transparency issue, but there is an update for it that is supposed to cure this problem. another aspect that I've seen, is in sizing down a particular decal.......some details disappear. even with photo shop, some of the minute details will get lost.....but it won't prevent you from making a very nice copy I had made up a few copies of the decals {minus the waterline markers}.......but I sent them off to another fellow a while ago. he was doing the Revell kit - 1:96 {this is what made me buy the decal program in the first place there are other sites on the web where the roman numerals can be found.....Dr. Dafi has some in photo etch, that may be of interest to you. the decals are pictures that I scanned and imported into the decal maker. then they are sized to the actual size of the decal sheet. as all knows....ink jet printers cannot print white, but with a little experimentation, some success can be achieved. another thing that can't be done totally, is metallic colors......gold looks like gold, but doesn't have the shimmer. if you look at my Cutty build.....you can see this........they were made from the decal maker.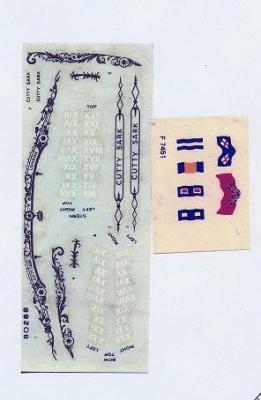

- 4,152 replies
-
- 6
-
-
- cutty sark
- tehnodidakta
- (and 1 more)
-
your mention of this new endeavor brought me to give a look see........stunning contents! I'm sure you'll have a really nice time with this build.....you've acquired many techniques to do so. I did notice that on the flag sheet, the word Mordaunt......there is a ship by this name. could this kit be built to be either one of these ships? if so.....this will be the first kit that I've seen that can be built into more than one ship. of course, any kit can be done in this fashion, if the ship in mind has the same hull construction. as I've found, with slight modifications, it can be done......fitting her out can easily be done with a little research. in seeing what you have done with the S.O.S., and her upcoming conclusion, I'll look forward to your start of this fine ship no doubt, another fantastic build
-
the additional height to the bulwark is a good fix Bob.......once sanded and painted, it will never be seen. don't be kicking yourself too much.....you've put detail in that I've never seen in any build of this fine ship. definitely shows the 'labor of love' and effort.....you are very much commended for it! to see how the hull is shaping up, makes one wonder what surprises are in store by the time you get to the masting keep up the good work !
-
looking super Denis looks like your on the home stretch......mizzen rigging and your finished. very beautiful ship my friend
- 555 replies
-
- 1
-
-
- sovereign of the seas
- mantua
- (and 1 more)
-
I hear you on that......but this summer time hiatus is beginning to drive me nutz! it slows me down though, so it keeps my speed issue in check it will be interesting to watch you rig these ships....in different scales, it will be something to see if you can do the same amount of rigging. I'll look forward in seeing your results with the hull planking
-
hello Hjalmar......welcome to the Halve Maen fan club! super work your doing thus far....looking forward in seeing more progress on your fine build! your new.......welcome! not a problem jumping right into a build.........hit the ground runn'in!
-
to think of the things I used to do........one time, I wore an apron, and clamped the end of it to the table, so it would hang and catch anything that I dropped. the sad thing was that if they flew left or right, try bending down to look for them :D needless to say......I abandoned that idea in a big hurry! looks great Piet....... too bad we couldn't do our work in a bubble........no matter where the part flies......it will always end up on the bottom!
-
Cutty Sark by NenadM
popeye the sailor replied to NenadM's topic in - Build logs for subjects built 1851 - 1900
for all the head banging Nenad, your doing a great job! I take solace in the fact, that so far, the only coppering I've had to do, has been painting detailed plastic so.......did you take hothead to work?- 4,152 replies
-
- 1
-
-
- cutty sark
- tehnodidakta
- (and 1 more)