


druxey
-
Posts
13,383 -
Joined
-
Last visited
Content Type
Profiles
Forums
Gallery
Events
Everything posted by druxey
-
 And next - a model pond yacht inside the boat? Seriously, that is a lovely piece of work, Keith.
 -
Remarkable!
-
Very nice and neat work. How about towing the other boats astern? (I'll shut up now.)
- 542 replies
-
- 5
-

-

-
- Sphinx
- Vanguard Models
- (and 3 more)
-
Once again, I'm just catching up, JD. A very nice result. A bit late in the day to mention it, but if you'd ended your garboard forward just as the stem begins to rise, it might have avoided putting drop strakes in. Next time, eh?
-
Not, in fact, a bon-adventure at all! Glad you got it all sorted eventually.
- 740 replies
-
- 3
-
-

-
- Tudor
- restoration
- (and 4 more)
-
Allan: Even regular bond paper will work well. As it is sealed, there should be no deterioration over time. However, you might wish to consider rag content (archival) paper. I've not tried using SilkSpan for this purpose, but imagine that would also work well.
-
One would need to use trigonometry, I think. The issue is you need to know one side and two angles or two sides and one angle. Not knowing the distance camera to subject means that all one can manage is an educated guess.
-
Are you referring to the cleats or the battens? If battens, I don't think that these came into use until the very end of the 18th century.
-
Work Table Recommendations ?
druxey replied to DanB's topic in Modeling tools and Workshop Equipment
As large a surface as you can comfortably fit in. You can never have too much bench space! -
I use very thin paper, well stretched, to paint on, using acrylic paint. It should mold well around the different plank levels. Also, put on in short lengths, it is easy to manage. You could pre-paint the base color over the chesstrees and fenders and simply add the detail after. As for trimming, I pre-trim the lower edges of the pieces and trim the upper edges (under the rail above) when dry. Any slight irregularity, should it occur, will be hidden under the shadow line of the rail.
-
And 90% rubbing alcohol (isopropanol) for de-bonding white or yellow glue! We all make oopsies....
-
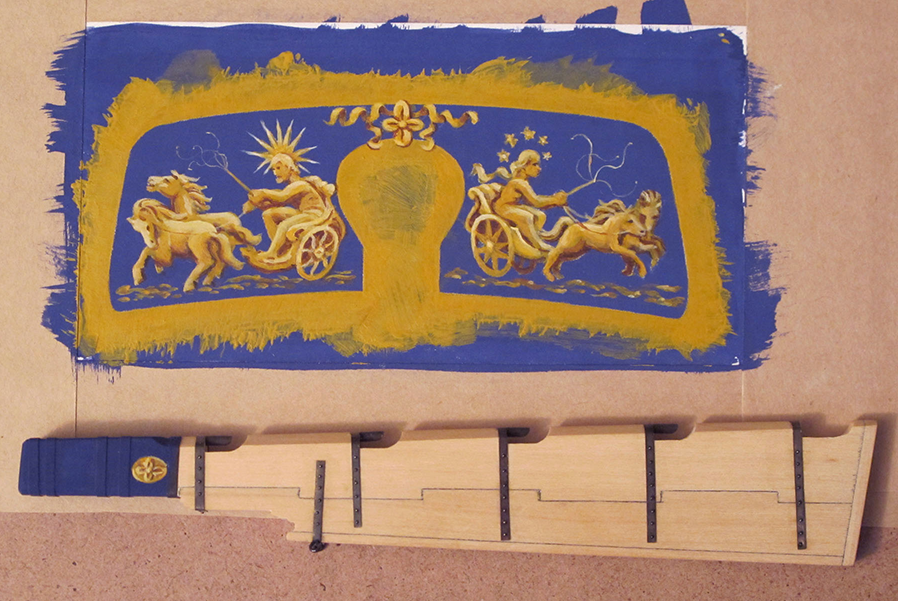
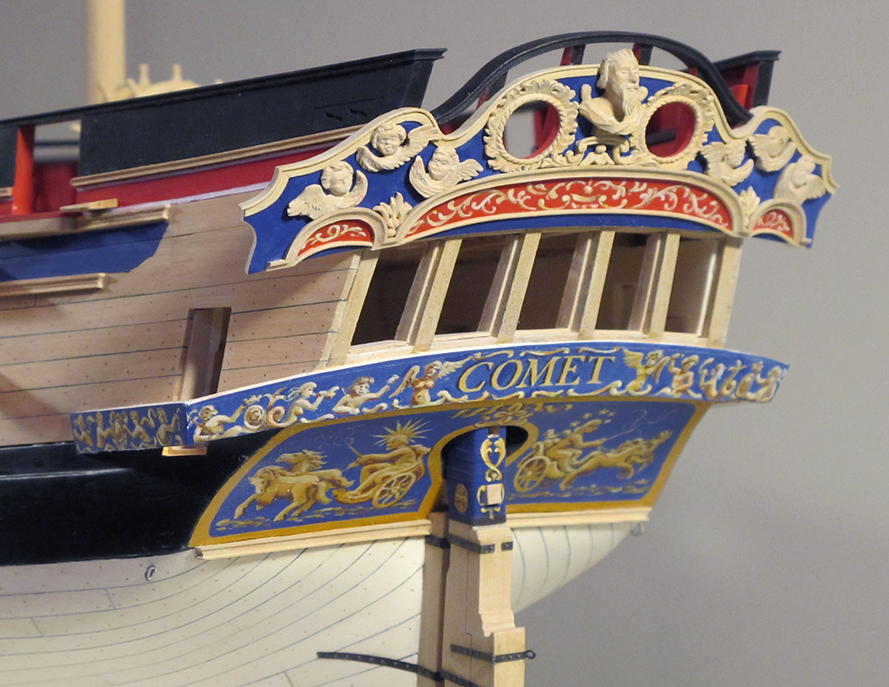
All looks very nice, Mark. Good process thinking on your run of moldings as well. Hdd you considered painting friezes on paper off-model and gluing them on in sections? Many contemporary models were painted this way. It obviates the need for awkward masking or working against gravity. And, if you mess up a piece, it's easily replaced. The friezework on Comet was done this way:
-
Joint not perfect? A little filler will fix it. Good frame iron recovery!
- 23 replies
-
- 1
-
-
- Model Shipways
- Shipwright Series
- (and 2 more)
-
So many things to juggle at once! But you enjoy a challenge - don't you? I realize that some compromises are needed in this area. Have fun with it.
- 2,699 replies
-
- 7
-
-
-
- heller
- soleil royal
- (and 9 more)
-
The 'bag' or curve of the pattern appears to be almost down to the cheek in your photos. Of course it may be the angle the pic was taken at, but the Berain shows a considerable gap between the lowest head rail and the upper cheek. Perhaps more revision is in order?
- 2,699 replies
-
- 5
-
-
-
- heller
- soleil royal
- (and 9 more)
-
If you wish to do that, then trace the outline and station lines, rotate the tracing and transfer it (or glue it) to the wood with the lower edge aligned along the edge of the wood.
-
That is coming along splendidly! I like the freelance touches you've added.
- 26 replies
-
- 1
-
-
- muscongus bay lobster smack
- Model Shipways
- (and 1 more)
-
Nice progress, HH, even if a little frustrating at times. I find that it's much easier to do final shaping of standards on channels after they are fixed in place. There is a better chance of getting them similar in profile that way. also there is no issue in holding them while you shape them. Headwork is always a bear. Your present pattern looks good. The head timbers athwartships have a bevel in order to meet the rail(s) at the correct angle.
- 2,699 replies
-
- 7
-
-
-
- heller
- soleil royal
- (and 9 more)
