


CaptainSteve
-
Posts
1,857 -
Joined
-
Last visited
Content Type
Profiles
Forums
Gallery
Events
Posts posted by CaptainSteve
-
-
-
-
-
Congratulations on an excellent build, Cathead.
And, as many have said, thanks for the accompanying history lesson ... 'twas most insightful !!
- mtaylor, mattsayers148, Canute and 3 others
-
 6
6
-
Jesse. There was a post here on MSW that I recall seeing some time ago which may hopefully help you ...
The suggestion was to put some stocking material over the end of your vacuum cleaner. Then clean around the area. The stocking should stop any small pieces from disappearing into the nether regions of your vacuum bag.
- jablackwell, mtaylor, Altduck and 7 others
-
10
-
-
-
After a somewhat bumpy ride towards the end o’ 2015, CaptainSteve be a-makin’ it his New Year’s Resolution to be steerin’ Kit-Basher’s back on her original tack. Thusly and therewithforth, I doth be planning on scouring the Build logs and a-pesterin’ some o’ you to share your fine ideas to repurpose-eth everyday items.
As such, the following was used with the permission of MSW member, Cobr@ ...
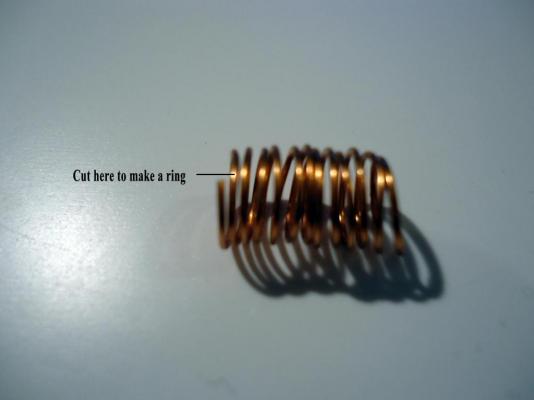
There is a way you can make good rings with brass wire.
First take something round which is the same diameter as the ring you want to make, a screwdriver for instance. Then wrap the wire around it in a spiral keeping it as tight as possible.

Once done, slide the spiral off the object you chose to wrap the wire round and cut it in the place i have highlighted in the second picture, you can cut off as many as you need all the same size and perfectly round. Note in the pictures the spiral was not tight as it was only to be used for reference purposes.
And here's a shot from Cobr@'s HMAV Bounty build, showing the above rings used to make door-knockers ...
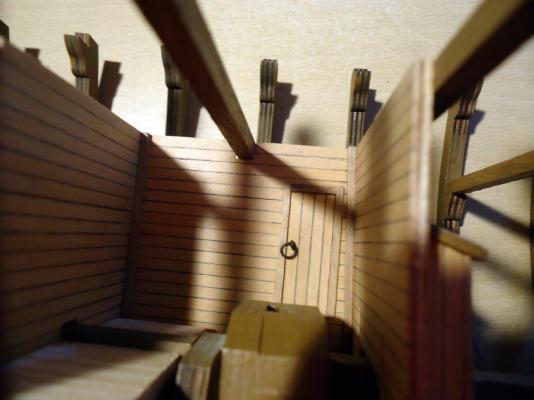
... the brass rings can be chemically blackened and/or painted.
O’course, as ye well know, all may feel free to post their own ideas …
- Jack12477, NenadM, mattsayers148 and 8 others
-
11
-
I do believe you are onto something there, LSMan ... and not for the first time, either. In fact, your revelation above with your stern timbers led directly to Re-Do #3 on my build.
Looking at the pics, I would imagine you may have to set your cannons a bit further back in the dummy gun boxes ... or build-up the surrounding sides.
-
Sounds as though you need to install a Las Vegas-style Chocolate Wheel in the Poker/Shipbuilding room ...
You could have various segments titled (for example) "Rig-A-Cannon", "Trennel For A-While" and "Carve Another Panel". Then, whenever you are bored, just spin up the next activity !!

- dgbot, SawdustDave, GLakie and 4 others
-
7
-
-
Nice work, CH !!
For the lettering, may I suggest either scribing the letters with a sharp carving chisel, and then painting the now-recessed characters.
OR you could try Nenad's patented "dot-matrix printer" ... as used mostly successfully by myself to label the flour sacks in my Launch build.
- mattsayers148, Cathead, mtaylor and 1 other
-
4
-
Ne'er a'fore have more fearsome beasts been spied upon the seas !!
Those carvings look fantastic, Nigel.
Great work.
- UpstateNY, Altduck and Dimitris71
-
3
-
Let's all drink to a Happier New Year, Nenad !!
- SawdustDave, dgbot, NenadM and 5 others
-
8
-
I admit to being a little confused by what it was you are trying to achieve ( I have but a simple mind ) until I saw the last few photos, then it all became clear.
Don't sweat it, Mobbsie ... I usually model in a confused state-of-mind.
- avsjerome2003, GLakie, dgbot and 6 others
-
9
-
Nice work, CH !! She's looking better and better every time I check-in on you.
- Canute, ggrieco, avsjerome2003 and 3 others
-
6
-
Wow !! That is some mighty fine planking there, Boyd !!!
- mattsayers148, Robert29, Dimitris71 and 2 others
-
5
-
Arr …
Avast and ahoy, Maties. Thanks fer droppin’ by fer a look-see, and a big Thanks to those o’ Ye who have hit the Like button (apologies to those who thought it was the Exit button).
A belated Merry Christmas to Ye one an’ all, by the by !!
Well, it be bein’ way too long since Our Hero was last postin’. Howe’er, that doest not meaneth that he has been slacking off … entirely.
“In truth,” he didst declare-eth a tad somewhat too defensively, “I has been spending many a while staring at Connie’s shapely rear end and doing much thinkin’ and ponderin’.”
But not much else, Ay, CaptainSteve ??
“Err … that be,” he didst bluster. “I mean … mayhaps.”
Now, whence last we didst leave Our Hero, he were workin’ on the second version o’ his stern timbers.
“Problems didst occur-eth,” he muttered ‘neath his breath, “and modifications were of necessity.”
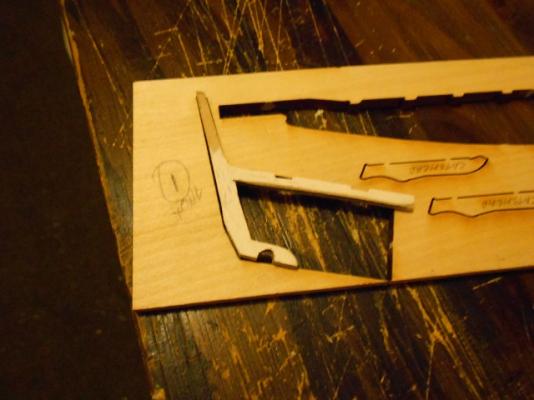
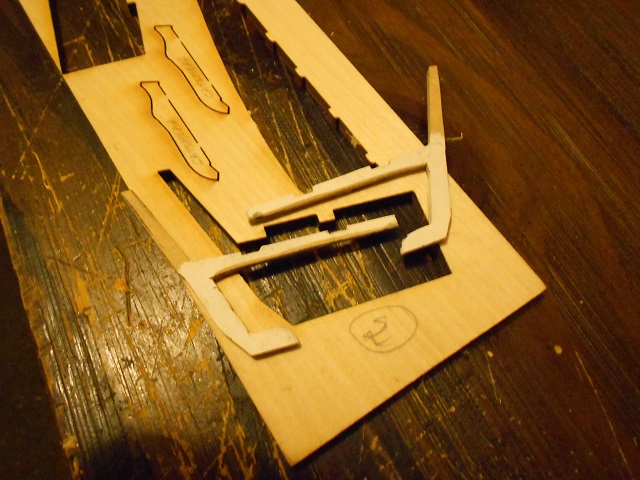
Now, for others who wouldst wish-eth to do as CaptainSteve be doing, and wouldst modify thine own Model Shipways kit such that stern windows are featured, Our Hero explains further:
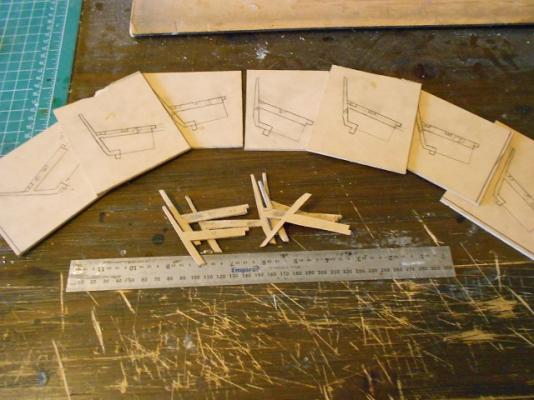
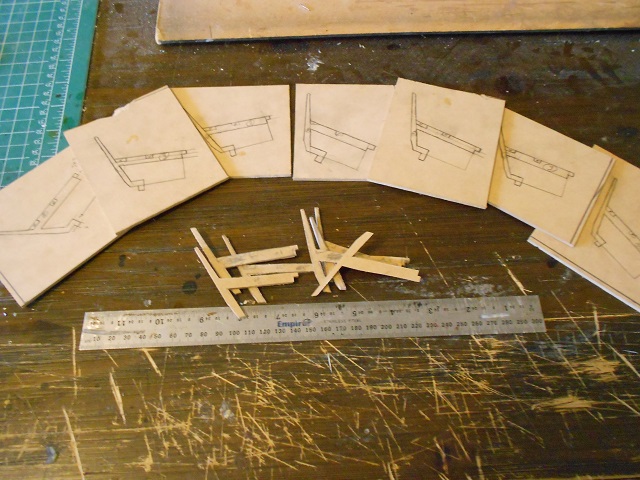
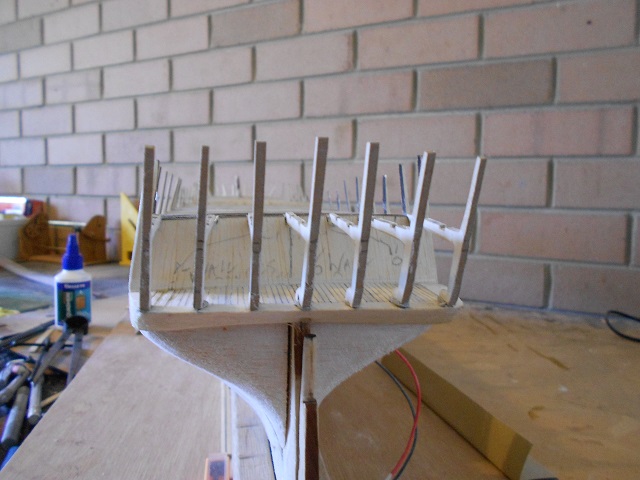
“Essentially,” He were to begin-eth, by way o’ explanatory narrative, “I didst discard-eth the four kit-supplied frames, using just the back and the top o’ each frame piece. “

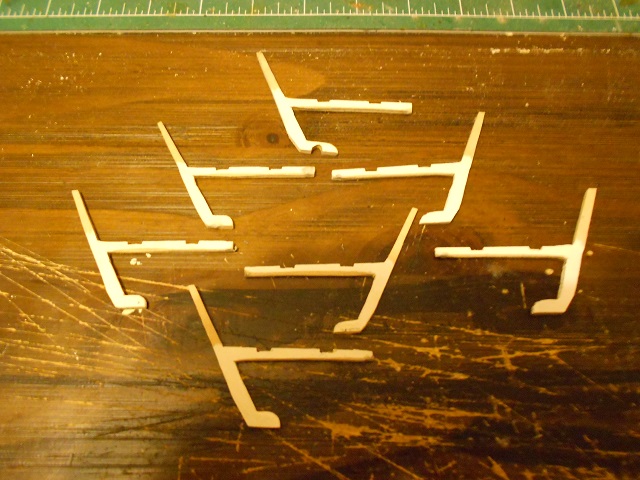
Thus, Our Hero were to use-eth the empty frame templates from the kit to sketch and create a set of seven open frame timbers, thusly allowing for the opening-up of the Gallery area, and for the framing o’ six windows.
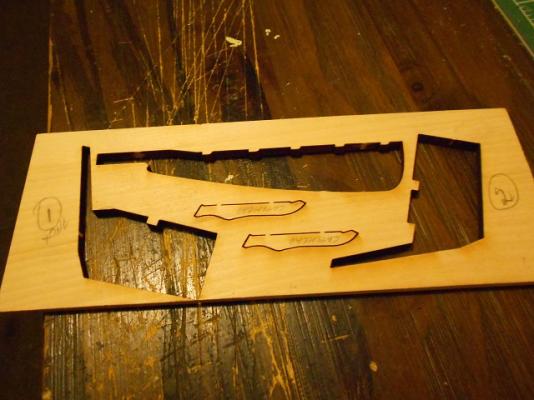
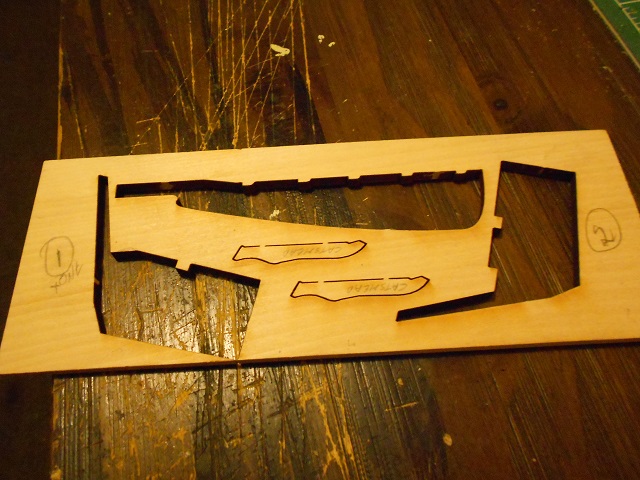
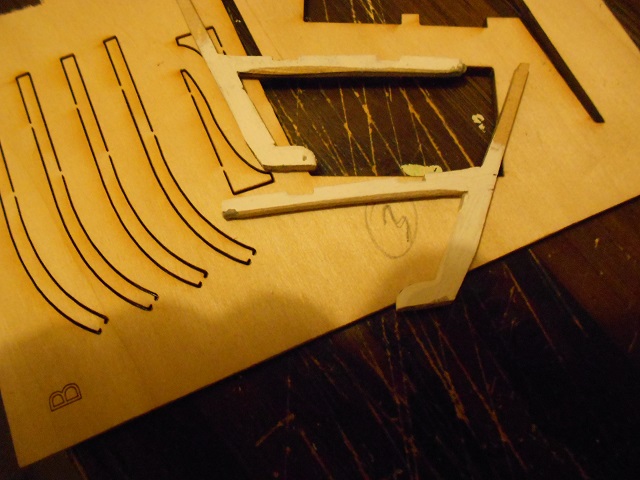
“If Ye be examinin’ the four stern frame templates from the kit,” CaptainSteve continued, “then Ye shall be seein’ subtle variations atwixt them … “
“Essentially, FRAME1, the biggest from the kit, becomes my middle Timber #1 …
“... the FRAME2 template is duplicated to become Timber#2, and Timber#3 …
“… the FRAME3 template is duplicated to become Timber#4, and Timber#5 …
“… and lastly, the FRAME4 template is also duplicated to become Timber#6, and TIMBER#7.
Using this system, Our Hero thus numbers his frames as such: 7, 5, 3, 1, 2, 4, 6.
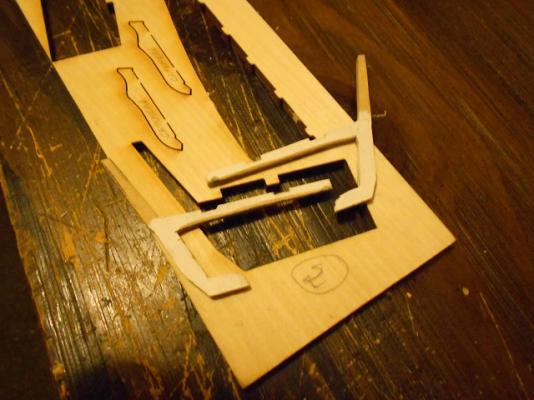
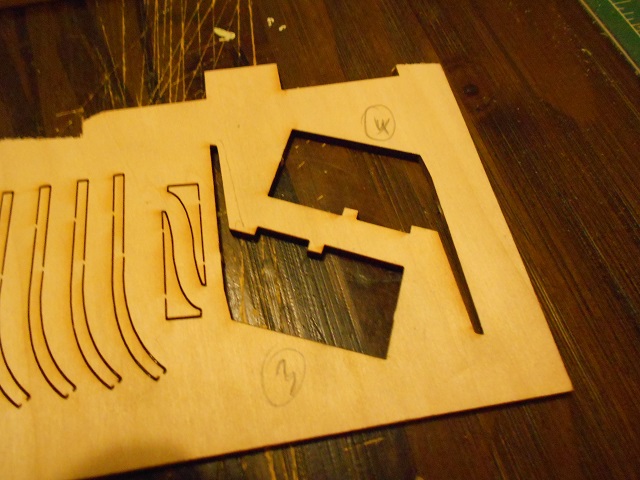
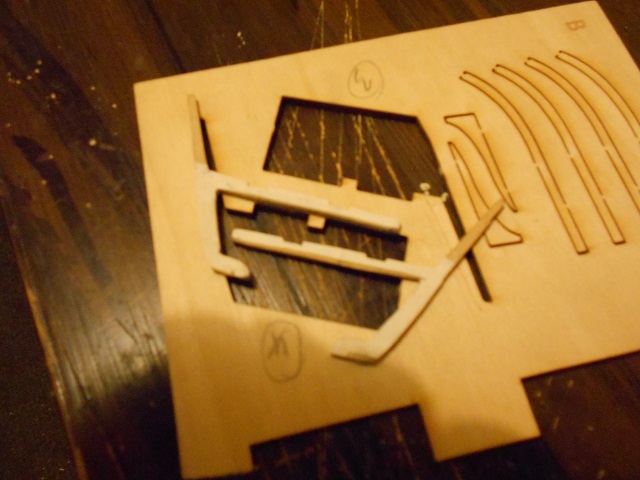
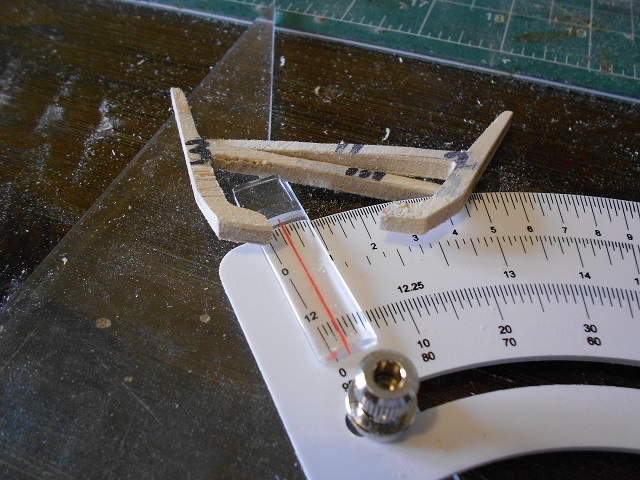
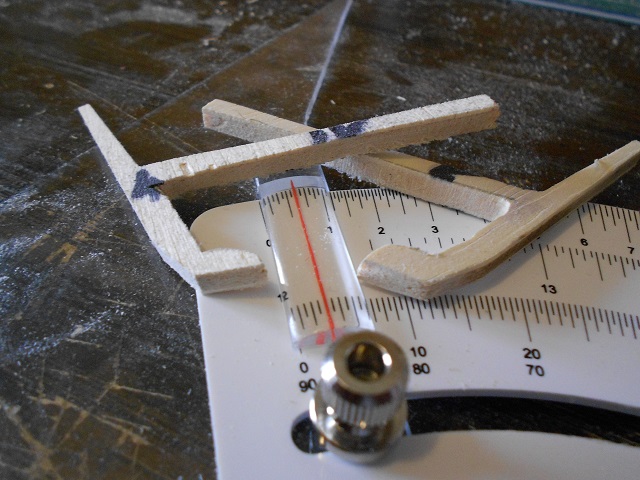
Once cut out, further modificationing were to prove-eth necessary. In particurly, the upper beam of each Frame Timber was extended, to allow for seating into the back of Bulkhead R. Additionally, a “footing” were to be formed for each timber, giving somewhere to affix the pieces to the transom.

Furthermore, groovin’s for cross-beams were marked and cut, allowing for support and frame strength.
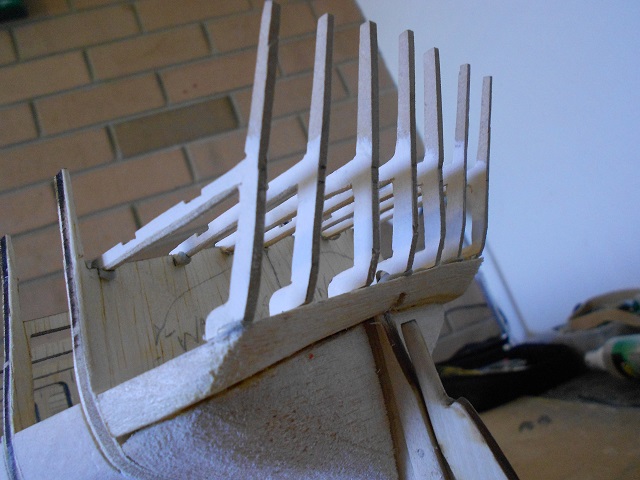
Next he were to interdict, “I didst happen to read-eth somewhere in me travels o’ how the stern window frames on the USS Constitution were angled e’re so slightly in such a manner that shouldst an imaginary line be drawn upwards from each, all wouldst meet at a singular point at the very tip o’ the upper spanker boom.”
(Jeez, stop to take a breath every now and then, CaptainSteve !!)
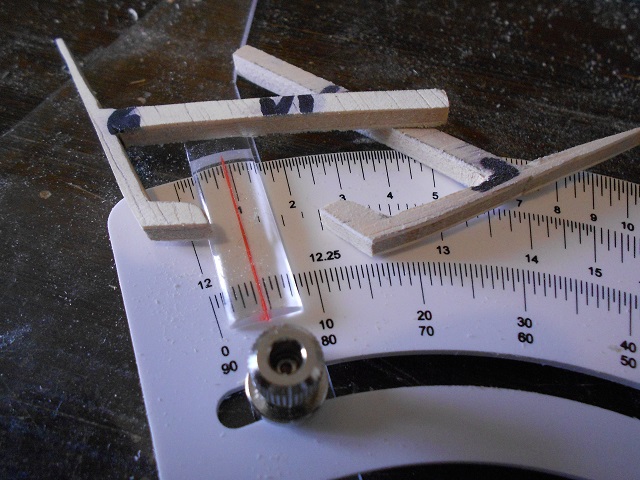
Thusly, the footing o’ each frame piece has been angled e’er so slightly:Frames 2 and 3, by 3 degrees …
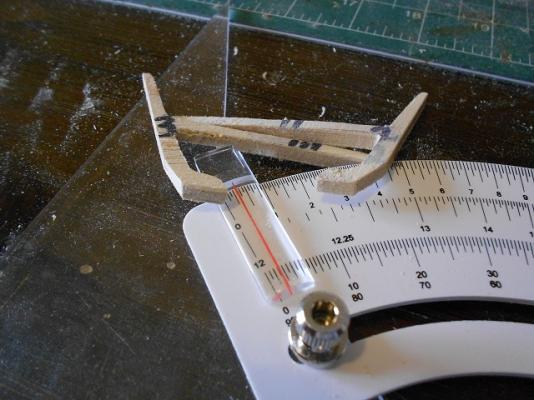
Frames 4 and 5, by 6 degrees …
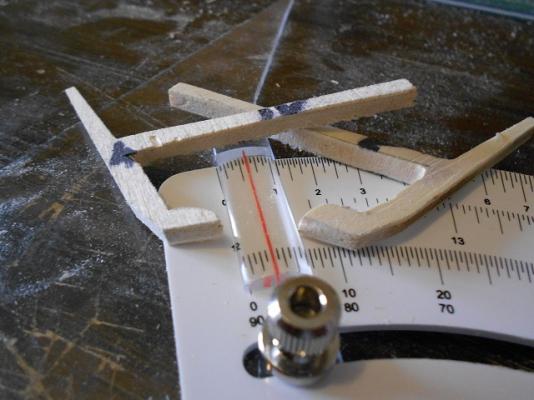
Frames 6 and 7, by 9 degrees …

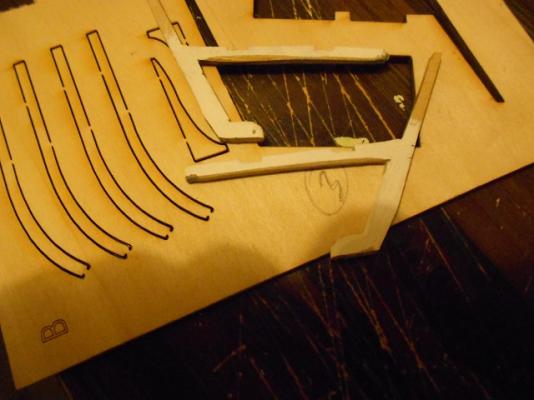
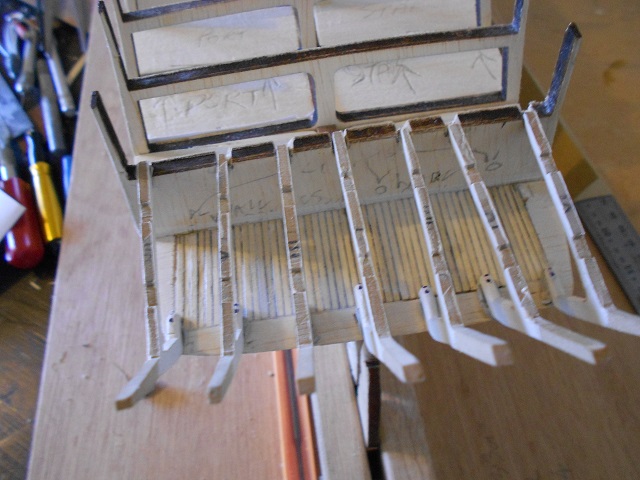
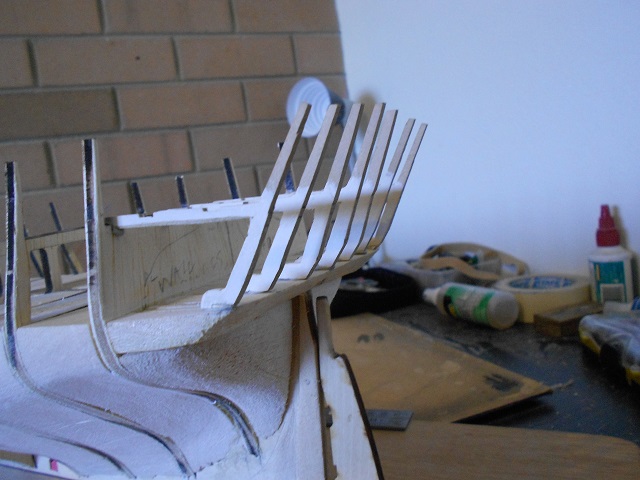
“If Ye doth squint,” he explained, “ye shall notice that the upper roof beams in the next few pictures be just a tad short in length …”
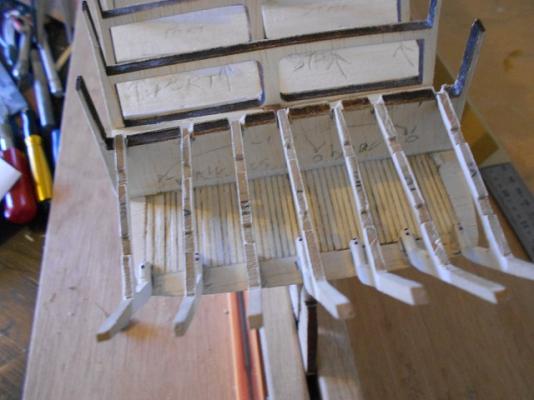
Hmm. ‘Twouldst appear-eth that yet another re-do be-eth featuring in CaptainSteve’s future …
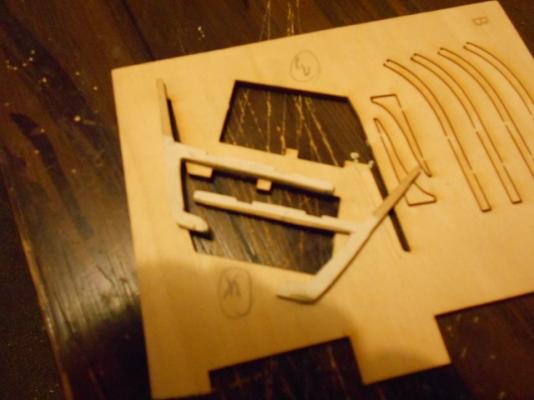
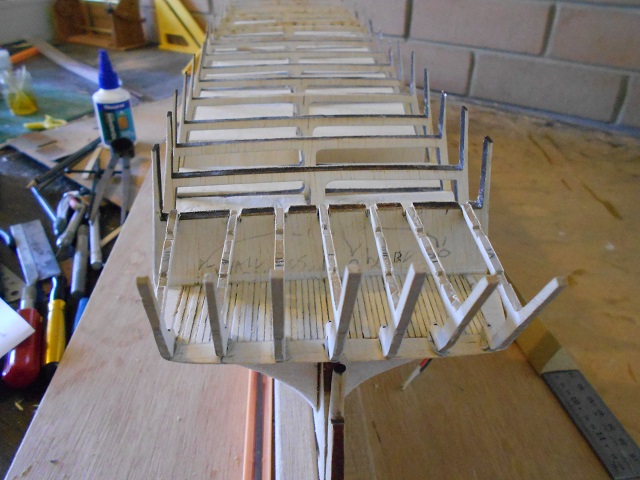
“But, afore that,” CaptainSteve didst announce. “And afore I continue to stumble blindly for’ard, I doth have some final pics with me latest re-do of the stern timbers dry-fitted into position …”
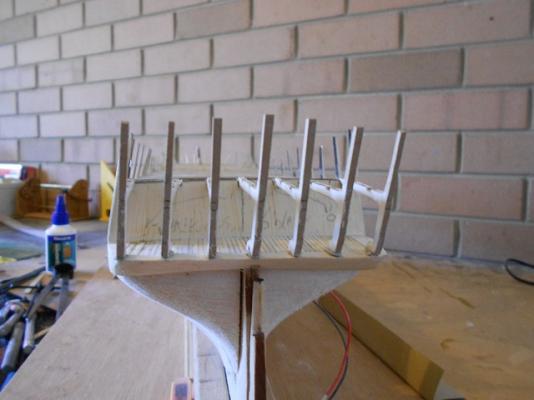


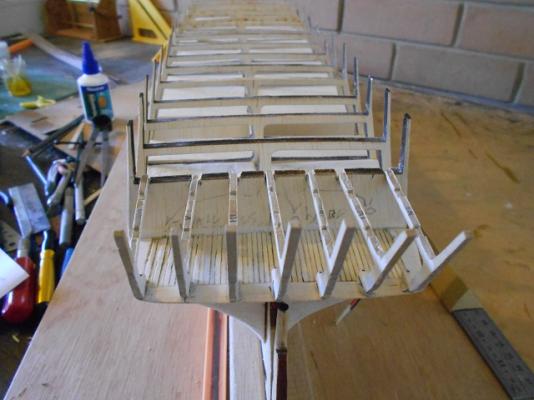
Verily, the final product will look most different to the above pictures.
“Fer one thing,” Our Hero tried most helpfully to explain. ”There will be cross-timbers.”
And then, almost as an afterthought he declared, “And panelling … and doorways … and … and …”
But fer now, Our Hero jus' be wondering if he be on the right path at this time …
-
Ken. I really have no idea as to which version was used on any given date. In fact, two years+ of reading books on Connie and following every thread on her history here on MSW, has changed my mind from being absolutely certain that there were six windows (because THAT was how she looked on the old Revell plastic kit box art !!). Instead, I have come to the conclusion that no-one can yet give a definitive answer to the question of what she looked like at any particular point in time.
As a couple of others have mentioned, I am also most likely to give credence to the Hull model. My reasoning being simply that if the very sailors under Capt Hull didn't know how many windows she carried at the time of the Great Chase, then the rest of us don't have any chance of knowing for sure.
- Canute, usedtosail, shiloh and 4 others
-
7
-
Captain Steve please help if you can?
No worries, Ken.
Here are the four versions as given in Marquardt's AOTS Constitution ...
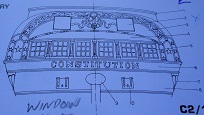
C2-1 Six window configuration after Corne's 1812 painting
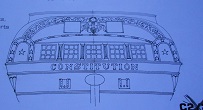
C2-2 Five window configuration after Corne's 1812 painting
Corne's 1803 configuration
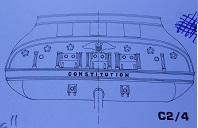
Current stern since circa 1870
In fact, this whole section is what has slowed my build right down. In truth, I have wanted to do a six-window configuration from almost the very beginning. But changing out the stern timber framing on this kit has proven to be a right PITA ... especially for someone possessing no skills as a scratch builder.
(However, I believe I am onto a solution ... finally)
-
-
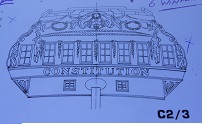
Ken. I've been following your build silently in the background ("Yes, yes. I know. Totally out of character, for me !!") ...
Not sure if you have seen Marquardt's AOTS Constitution, but here are three variations of the side gallery windows from that book ...

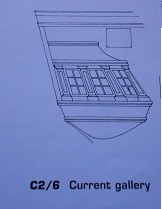
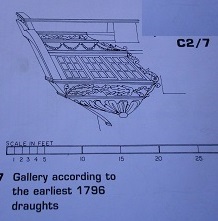
Hope they help. For my money, I'm in favour of the third version (C2/7), but I'm still a looong way from getting to that stage.
-
Nenad,
I considered many different kinds of stands when building the Launch. If you are still worried about using the base.jpg stand, then may I suggest something like these for you to consider.
(These photos were from a build by DGBot, as I recall, for the 2013 Manitowac competition.)
If structural integrity is an issue, then a stand with water-line cut-out for your Cutty to sit in, may be a possible solution to your problem.
- NenadM, usedtosail, avsjerome2003 and 8 others
-
11
-
Le hull ... she looks, 'ow you say, Magnifique !!
- Omega1234, avsjerome2003, Piet and 5 others
-
8


USS Constitution by xken - Model Shipways - Scale 1:76.8
in - Kit build logs for subjects built from 1751 - 1800
Posted
No. But I have some black wood stain (called Black Japan, for some unknown reason) which I was planning to use for the outer planking ... when I eventually get there.