


mtaylor
-
Posts
26,273 -
Joined
-
Last visited
Content Type
Profiles
Forums
Gallery
Events
Everything posted by mtaylor
-
David, There's been quite a few who have used silkspan. John Tilley, in this article also suggests it: http://modelshipworldforum.com/resources/Rigging_and_Sails/ScaleSails.pdf It's an old article and many of the links are dead but it's still valuable for the techniques.
-
Great looking launch, Matt. The details really make it pop!
- 425 replies
-
- 4
-

-
- bounty launch
- model shipways
- (and 1 more)
-
Rock on, Popeye. I guess I'm surprised by the concept of a green net but then, I'm not a fisherman in the ship sense. Or any sense now that I think about it....
- 956 replies
-
- 4
-
-
- andrea gail
- trawler
- (and 1 more)
-
Fantastic work, Augie. Other than that..; I'm pretty speechless.
- 2,191 replies
-
- 3
-
-
- confederacy
- Model Shipways
- (and 1 more)
-
Cutty Sark by NenadM
mtaylor replied to NenadM's topic in - Build logs for subjects built 1851 - 1900
What a great idea... I like it as I think (not sure yet) I have chicken coops to do.- 4,152 replies
-
- 4
-
-
- cutty sark
- tehnodidakta
- (and 1 more)
-
Hi JP, Will you be bashing or doing an out-of-the-box? If you're going to bash, have a look here: http://ancre.fr/en/monographies-en/20-monographie-de-la-renommee-fregate-de-8-1744.html#/langue-anglais There's photos of the completed model per the ANCRE plans which point out at least one error. La Renomme didn't have "billboards" like the English ships but the entire bow section above the wales had heavier planking. As I understand it, this is pretty good kit of her.
-
That is excellent detailing at such a small size, Denis.
-
Carry on Sjors... she's looking all fine and proper.

- 1,616 replies
-
- 3
-
-
- caldercraft
- agamemnon
- (and 1 more)
-
Congratulations, Captain. Great looking vessel and properly fitted out.
- 625 replies
-
- 3
-
-
- bounty launch
- model shipways
- (and 1 more)
-
Sweet work, Popeye. That air horn is perfect. As is everything else.
- 956 replies
-
- 3
-
-
- andrea gail
- trawler
- (and 1 more)
-
H.M.S. Victory, Heller, 1/100, Onward and Upwards.
mtaylor replied to Izzy Madd's topic in Plastic model kits
I suspected you had a faceplate for your ropewalk because of the 4 additional holes. Thanks for the explanation of the extra gear. That makes perfect sense to me. The ports don't follow the waies, they follow the deck. Thus the yellow stripe is between the wales and follows them. If you look at the real beast, some of the lids actually have the extra thickness so that when they're closed the main wale is unbroken. That's part of what they were, defense against small arms fire for the gunners. In foul weather, a canvas tarp was put over them (on some ships) and on others, the hammocks went below. -
I thought it got answered here: http://modelshipworld.com/index.php/topic/9614-how-is-the-pudding-spar-attached/
-
Ouch... didn't "like" that post as I know how frustrating that can be.
- 962 replies
-
- 1
-
-
- sovereign of the seas
- ship of the line
- (and 1 more)
-
H.M.S. Victory, Heller, 1/100, Onward and Upwards.
mtaylor replied to Izzy Madd's topic in Plastic model kits
Izzy, I'm not sure but I think you've go one too many gears.... this might account for the drain on the dilithium crystals.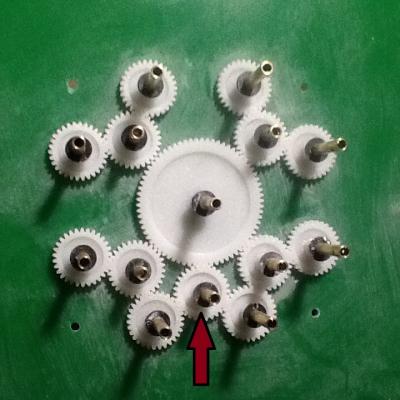
-
That's good news, Grant. Carry on but don't chase the staff for a few more days.
- 456 replies
-
- 1
-
-
- finished
- bomb ketch
- (and 2 more)
-
Grant, Modelbuilders and those who draw many of the plans usually seem to simplify things. From everything I've seen, it usually a "block" with a sheave mounting in or atop the bulwark. I'd think that if it were just a hole, that's inviting wear on the line. Maybe a really small ship might just have a hole...
-
Looks great on the base which has just a bit of a weathered look to it. Seemingly proper, in my mind. Good luck on tomorrow and that was great news on the prostate.
-
Specifications for Construction of U.S. Navy Ship Models
mtaylor replied to Rob Wood's topic in Nautical/Naval History
Hmm... interesting discussion. I wonder also about some of the new technologies and the longevity of them. Such as 3D printing. The metal might or might not hold up but what about the plastics? Some 3D people I've run across are touting "bio-degradable" plastics because apparently there's a bunch of waste generated. This might be fine for quick prototyping but not much else, yet they want everyone to go that direction.- 16 replies
-
- 1
-
-
- Specifications
- US Navy ship models
- (and 1 more)
-
Best wishes on the surgery, Grant. I'm sure it will go well and yes, the quality pharmaceuticals do help a lot. My admiral has had multiple hip and shoulder replacements and it seems like the procedures have improved vastly, even in the last few years.
- 456 replies
-
- 1
-
-
- finished
- bomb ketch
- (and 2 more)
