


vossiewulf
-
Posts
1,207 -
Joined
-
Last visited
Content Type
Profiles
Forums
Gallery
Events
Posts posted by vossiewulf
-
-
Thanks folks. So... I know I have to finish the deck furniture, but any suggestions on order from this point? There is probably a rational order in which to do everything, but I have no idea what it is.
-
Very difficult part executed perfectly. Really excellent work.
On 12/20/2018 at 4:27 AM, amateur said:But a square hull would never do
")
The impression I get is among this community of builders, wood bending is the standard by which skill is measured, so he who can do more bends and more difficult bends than the other guy, wins. So we have parts like the cabin roof bent into multiple smooth curves for no functional reason, and a hull shape that is closing in on being a circle
- Keith Black, mtaylor and BETAQDAVE
-
 3
3
-
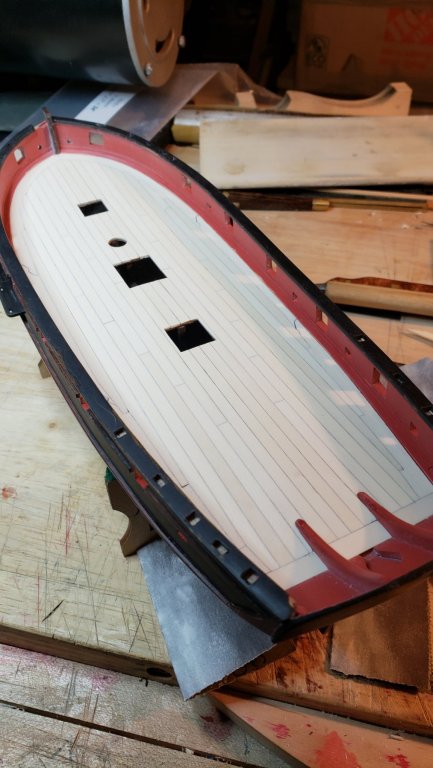
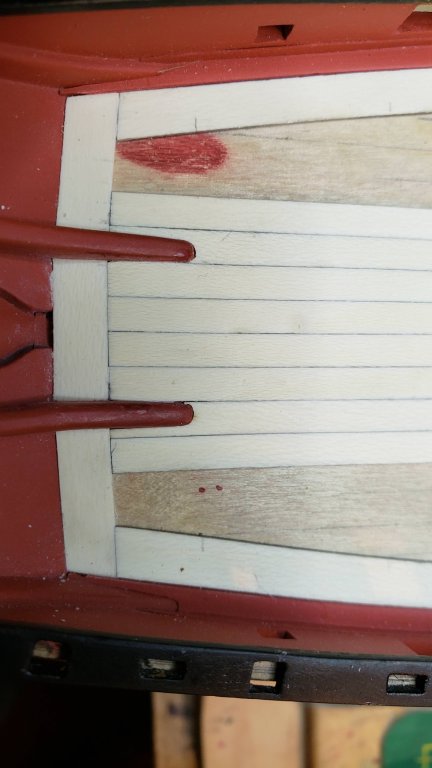
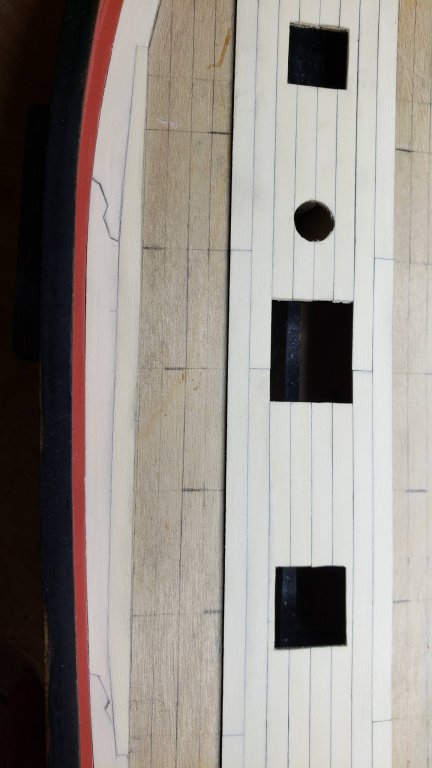
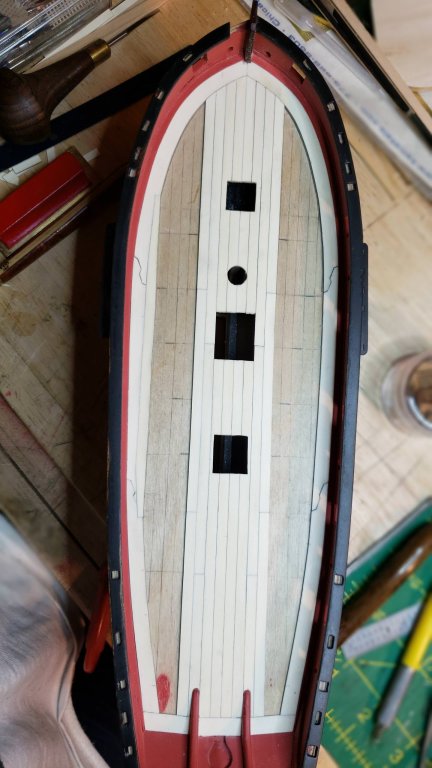
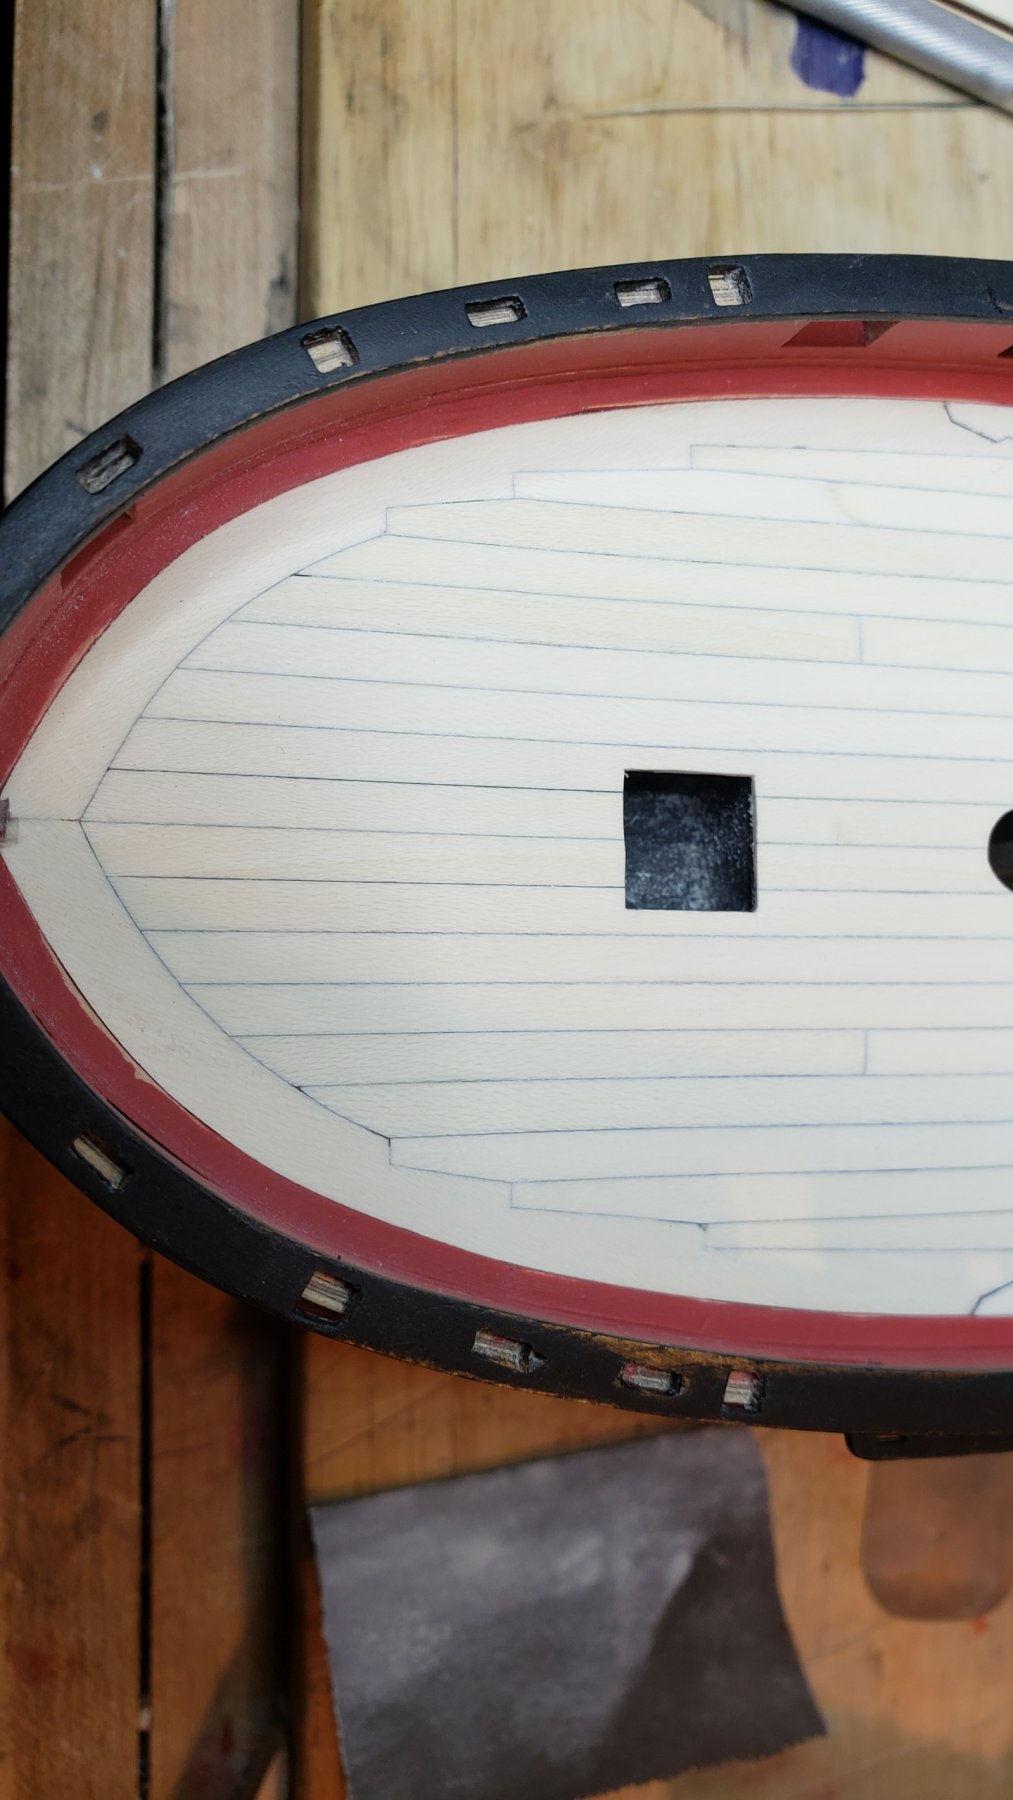
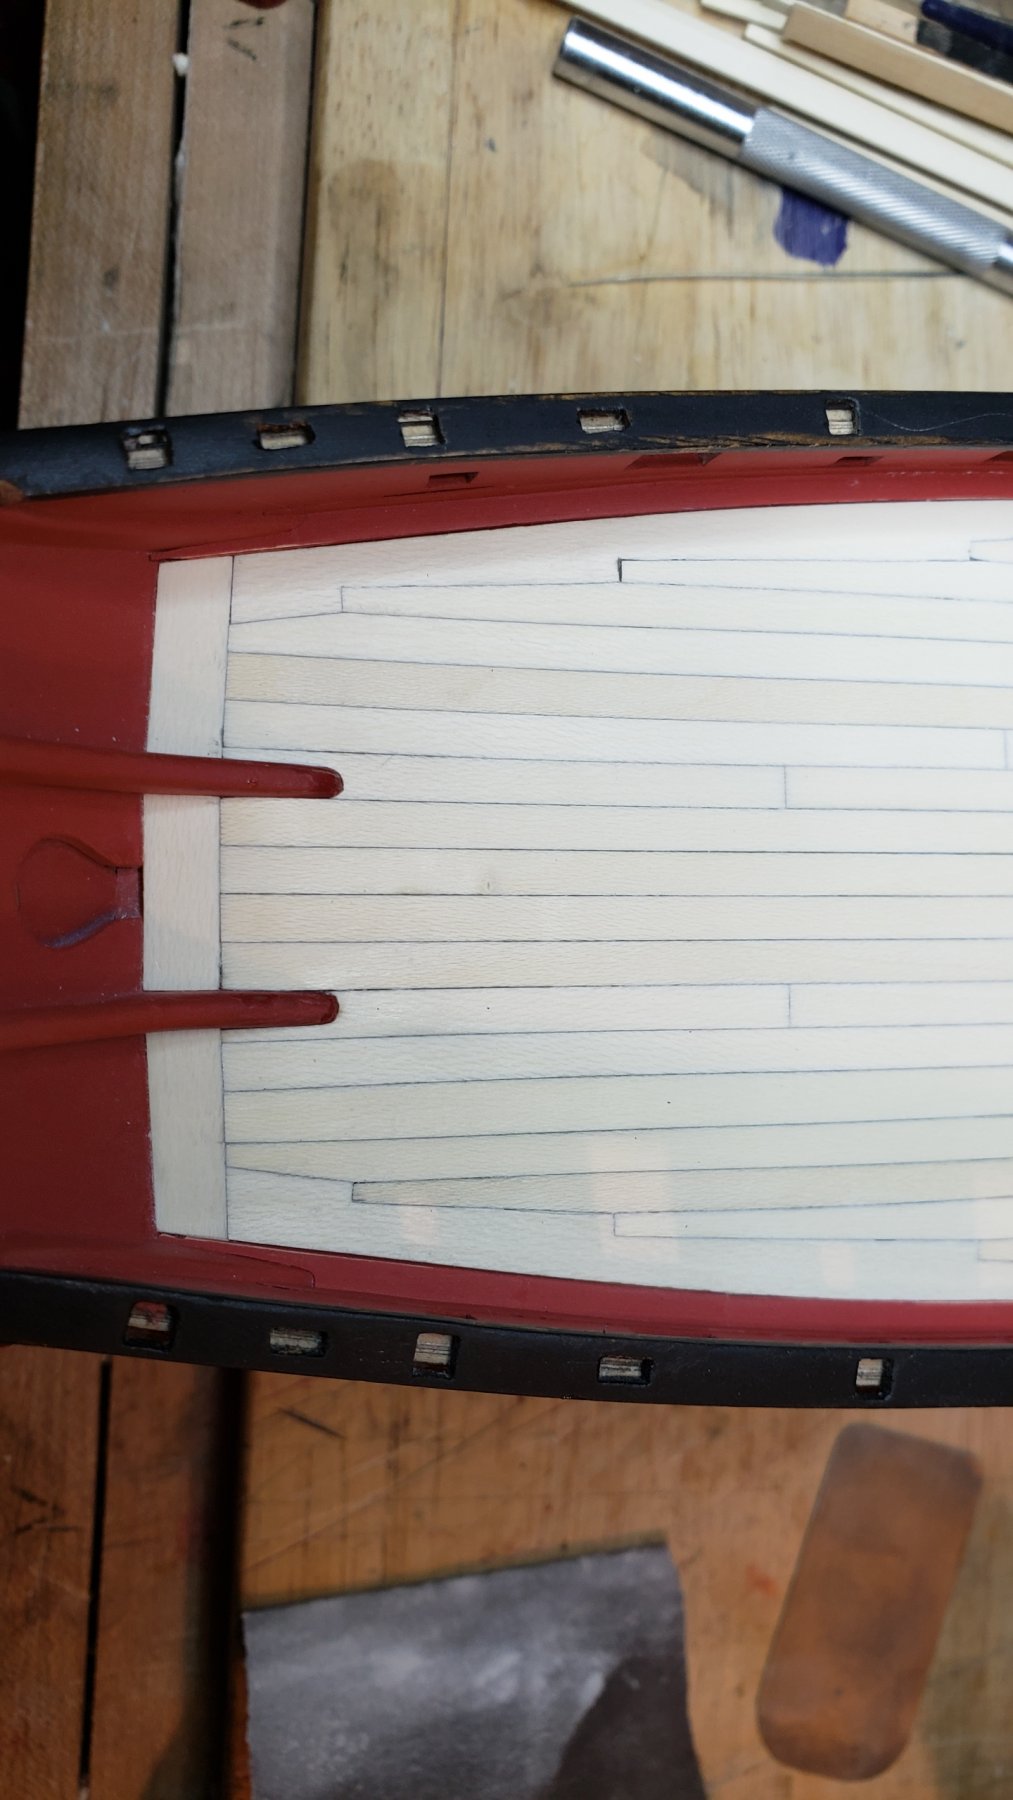
Done with deck except for clear coat. Starboard side fought tooth and nail to go off the rails, starting when I managed to put a big belly sweep into the first nibbed plank that's supposed to be all nice and straight. I had to make wider planks and then taper the rest of them on the starboard side to slowly remove that bend over four planks, lots and lots of fitting and sanding. But it looks reasonable now.

-
You don't think you will offer the polyester as an option Chuck? Switching over completely does sound a little extreme but it's very pretty rope and the explanations and instructions could make it clear that it's caveat emptor, make sure you're prepared to handle it. And I'm thinking a flexible CA glue would probably work well to control the fraying. Or at least I'd be willing to give it a try
-
Nice job with a pretty hull shape. It's going to be an eye-catcher.
- Omega1234, Old Collingwood, Piet and 1 other
-
4
-
That will work if Ron won't help, but will be a fair amount of work to process it into what you want. On the up side, PM-V11 steel and you'd definitely feel like it was your personal knife.
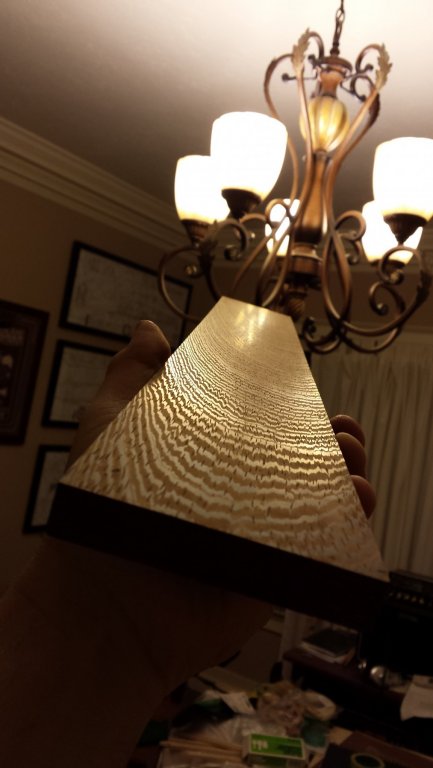
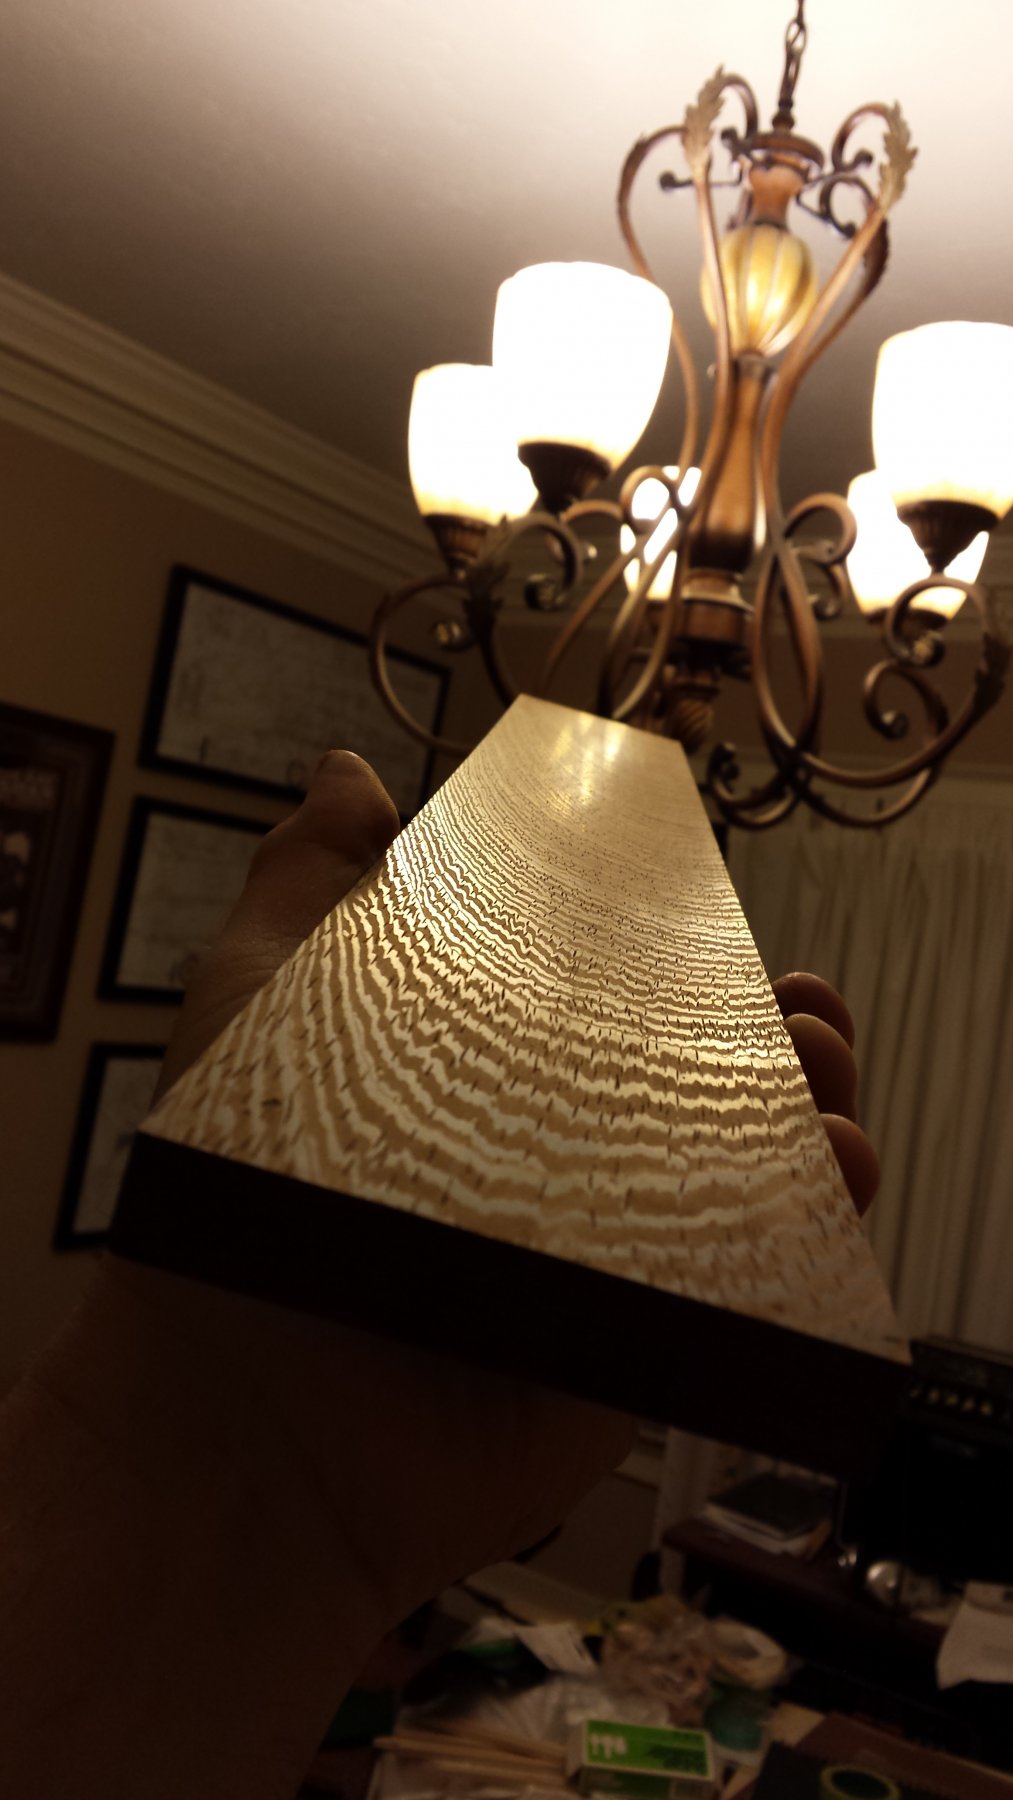
Below is a piece of wenge wood planed down with my Lee Valley low-angle smoothing plane with a PM-V11 iron. I don't anticipate having a need to do better than this.
-
My reaction to Flexcut tools is "meh". They're not horrible but neither are they (IMO) very good. I have one Flexcut knife and wasn't happy with how sharp I could get it, so I mostly use it for opening boxes. For micro tools available from retailers, I'd recommend the ones carried by Lee Valley over Flexcut any day, but the Lee Valley versions are considerably more expensive and that's usually a big factor also.
If the Lee Valley tools are out of budget, try Ebay, if you know how to recognize them there are sellers of less expensive Japanese sets that really aren't bad at all. And here's a used Robert Sorby set for $185 that's quite good. Here's a Narex set that is reasonably good for $200, they're from the Czech Republic.
-
Wow, that's disappointing, never had him say that before. Did he say why? Maybe a fairly minor change to the design would make it possible for him to make it for you? If he didn't explain, I would ask, I don't know of anyone good who is willing to do custom work like he does, and certainly not with the same quality of steel.
You can also work around his limitations by being willing to grind it down and shape it if needed yourself. That can be done reasonably safely to the temper of the steel by constantly dipping the blade in ice water and never letting it get more than warm under grinding. In one case I changed my mind about what I wanted, and took a blade he made and ground it quite a bit to change it to the new shape.
Let's figure out how to change your design so Ron can make it, and then you might need to invest a bit more time before you can put a handle on it.
And yes, I agree there is sharp and there is super sharp. When chip carving with the Hock knife, I can maintain super sharp for about 15 -30 minutes, after which I use the strop. I only do that a few times before returning to the 1000 grit stone to resharpen because strops, being soft, always start to round over the edge, and even the most subtle change in the bevel of the knife is noticeable to me when I'm carving.
- paulsutcliffe, mtaylor and 42rocker
-
3
-
On 12/17/2018 at 10:59 AM, Valeriy V said:
Thank you, Yves, for your appreciation, but I have not yet reached a high level artist. I aim for it.
This high level of metalworking is shown here: http://www.ship-model-today.de/fotoreport.htm
http://www.ship-model-today.de/towa2
I'm pretty sure none of them are human, that stuff is crazy.
-
Did you perhaps install planking that had just been delivered? Somehow that wood was bone dry when it was installed with nice tight joints and then it was exposed to humidity and expanded much more than I would have guessed possible- that's comparatively considerable change in plank width. That looks like normal boxwood, I didn't think it was that dimensionally unstable. That's the kind of wood movement you expect out of plain sawn oak.
No you say it was delivered in March and a couple months would be enough for basic acclimatization. I think maybe it has to be the hot air gun then? If you're getting them more dry than they would be acclimatized and installing right then with a tight fit, it will have nowhere to go when moisture gets back into those planks.
If it was in your garage hot and covered, that could also have acted like a sauna, semi-steaming the very dry wood. But even then I wouldn't have guessed it would go that far.
-
Yeah that's not shrinkage, that's expansion causing those lines and ripples. They must have been put on under exceptionally dry conditions and then been exposed to 90% humidity. If you have that much humidity range in your shipyard and can't control it otherwise, best bet is planking in springtime or fall, in between the extremes.
I'm sorry for that, must not have been a good day when you saw that had happened.
-
In simplest terms, I get the knife insanely sharp and then for each triangular chip I first cut lines from each triangle point to the center of the triangle so the chips for each side of the triangle can fall away independently, and then I remove most of the waste before making the final cuts. Removing the waste means much less force is needed for the final cuts and the less force used, the greater the accuracy. With chip carving everything has to be dead perfect, one triangle out of shape and it disturbs a pattern and is therefore easy to notice by anyone.
However letter carving isn't usually done with knives, primarily it's done with v-gouges of various sizes. Are you talking about scale lettering for a ship, or full sized for some other purpose? If it's small for a ship I might switch what I just said and recommend a knife.
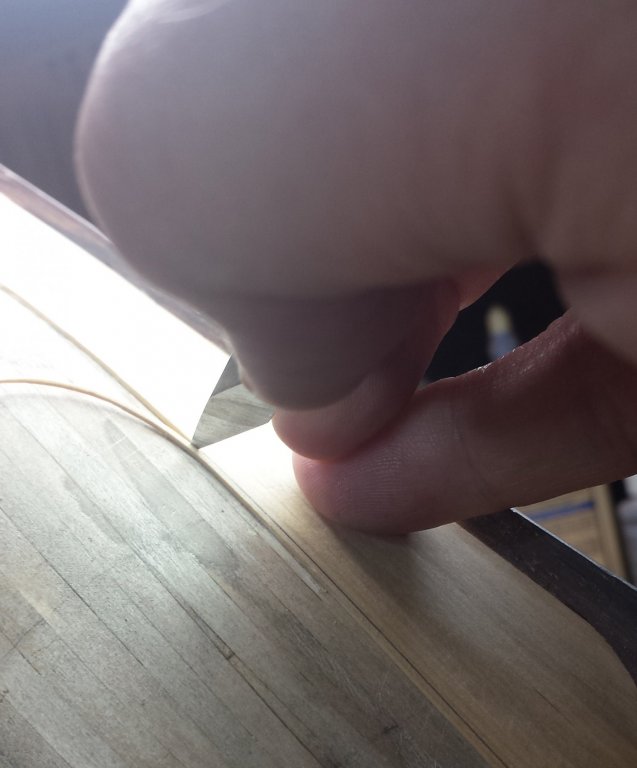
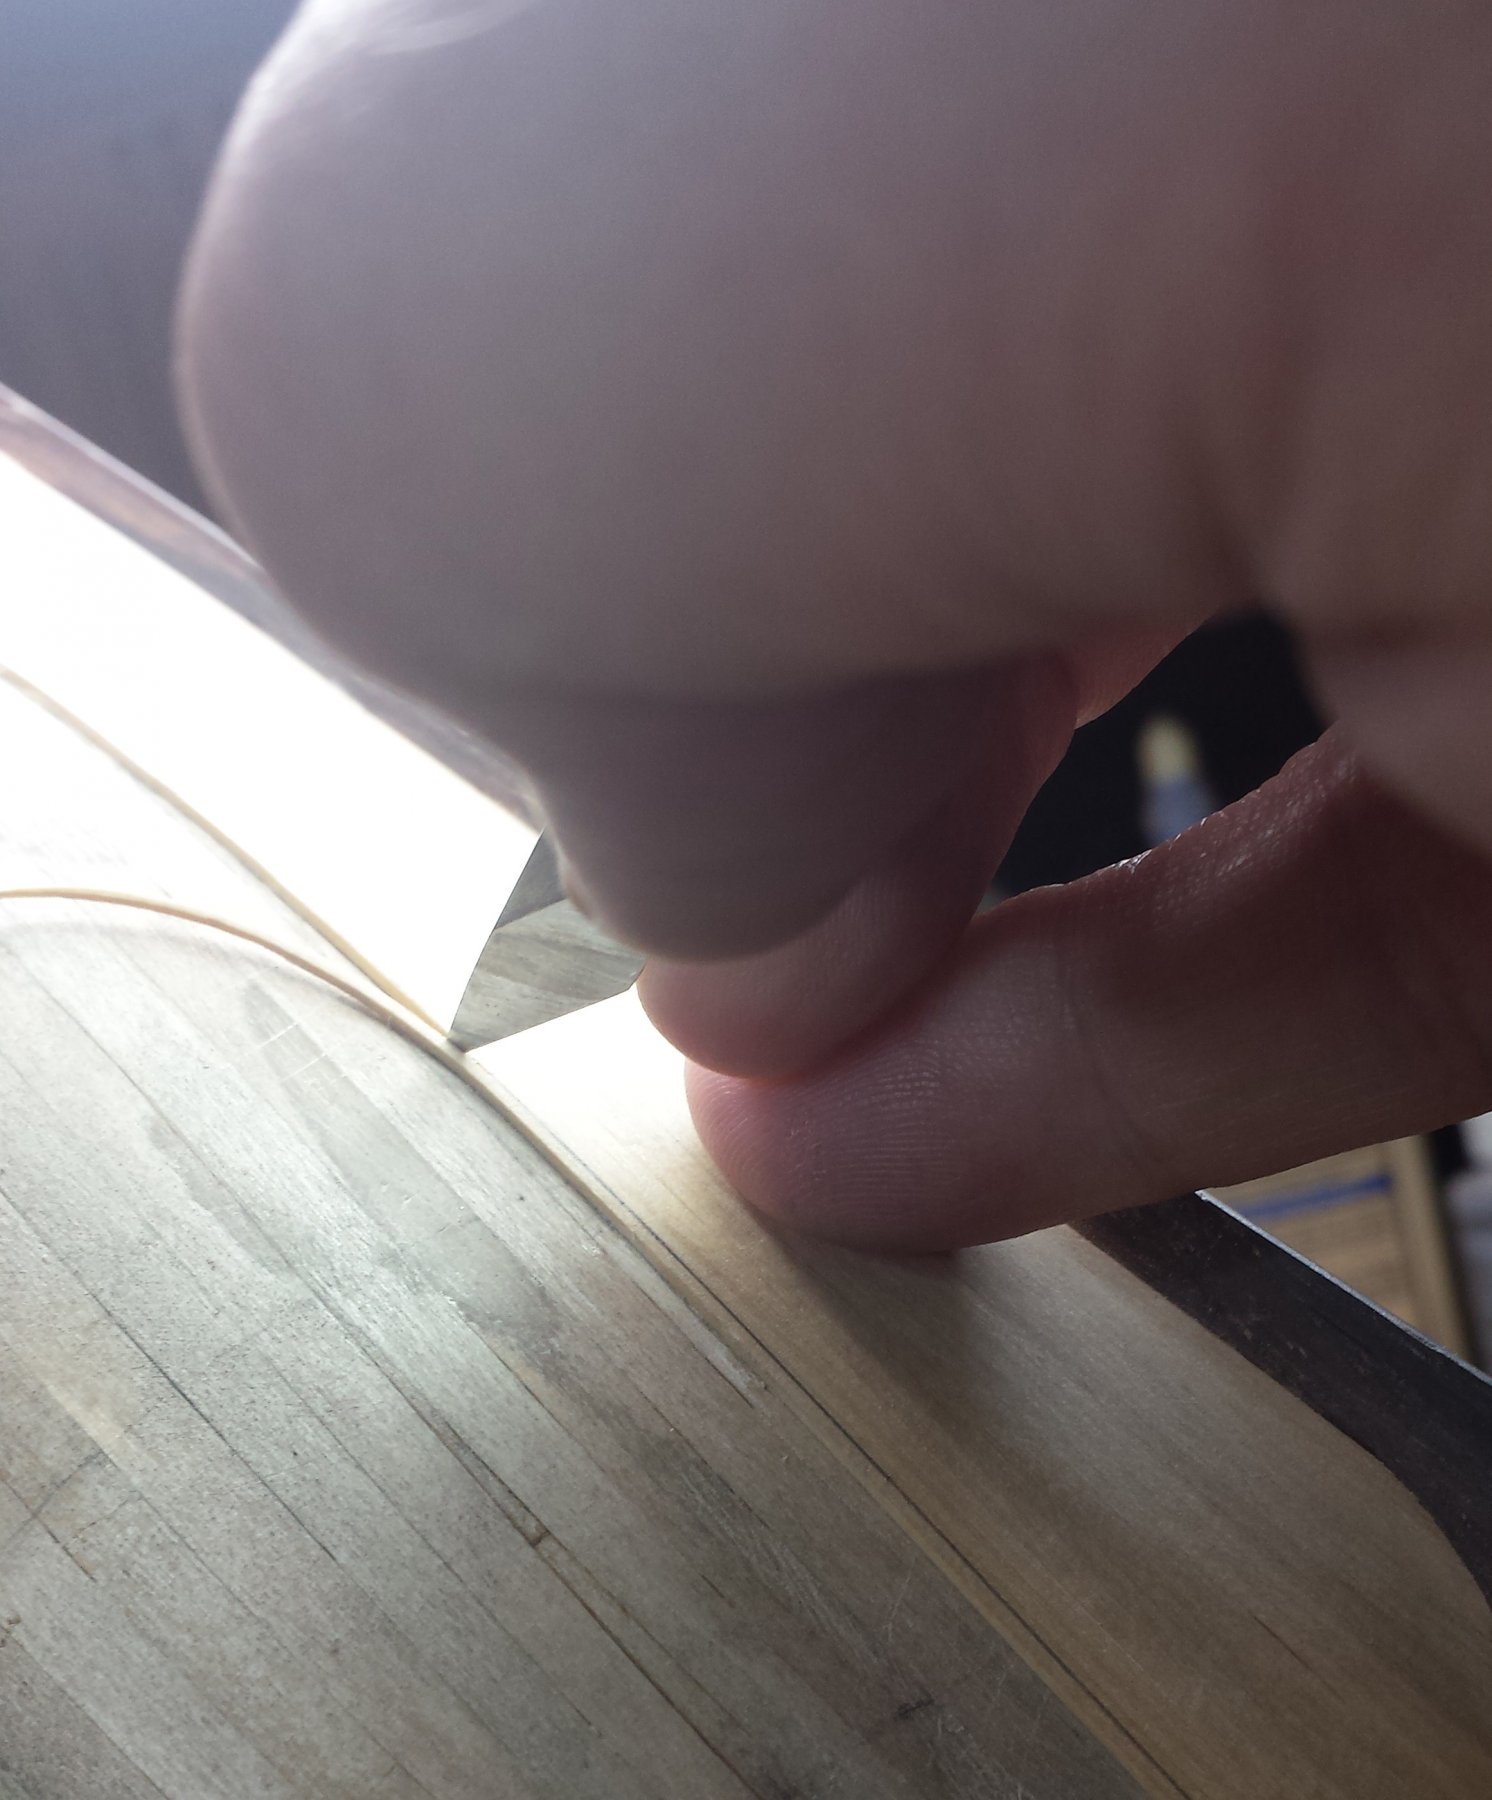
Also let me see if I can find the photos I took of how I hold a pencil-style knife for precision work. Found it, as you see only my pinky and the knife edge touch the wood, and my ring finger is against the side of the blade and is pressing down into my pinky- the point is to have each finger pressing down on the next one, it makes for a strong and steady support. If you keep your index finger and thumb quiet, you can cut very straight lines using this grip. Or you can carve and do curves by manipulating the blade just with the index finger and thumb- the fewer moving parts and the more constrained their movement, the more accuracy you get.
Not sure if any of that helped, but we need to get back to Gaetan's beautiful ship build
If you want to discuss it further, please start a thread over in the modeling tools/techniques forum.
- aviaamator, mtaylor, 42rocker and 4 others
-
7
-
You're welcome Gaetan, glad to help. Let us know how your new perfect knife works out
- mtaylor and paulsutcliffe
-
2
-
To return to another point of yours, how thin the blade is definitely matters, but it also matters in how often it needs to be sharpened and how strong that edge is. If you're making straight cuts and don't mind sharpening often, I long since had reached the same conclusion as you where the sharpest blade is achieved when each side of the blade is a whole bevel. I've been sharpening my detail/chip carving knives that way for a long time now, and I carved 90% of the chip carving below with a Hock detail knife sharpened that way.
The disadvantages are weakness under any twisting load, they have to be sharpened often, and sharpening takes much longer because you're hitting so much metal. Most of the knives I use for ship work aren't sharpened that way, they still have a big bevel but not the whole side of the blade. For me the only time the performance vs. drawbacks is positive is when I'm chip carving where you need well more than scalpel sharpness.

- paulsutcliffe, mtaylor, aviaamator and 8 others
-
10
-
 1
1
-
Doris, I wasn't joking about the book part. You've developed a whole series of techniques in combination with material sources to produce a totally unique type of ship modeling that promises to make outstanding results much more accessible to people- as you say, you only need simple tools, card stock, and your foils whereas we're working with table saws and thickness sanders and have to come up with all sorts of clamping arrangements whereas you're attaching your planks with a hair dryer.
I sincerely hope you take the time to create a book and teach a whole new generation of shipwrights a new, easier to approach ship modeling method.
-
Speaking of the color of holly, after seeing it in situ I tend to agree that it's too white for realism purposes, but at the same time using plain fir or maple isn't the right color either since holystoning a deck plus the normal bleaching of the sun would lead to a lighter color of those woods than is natural. So for pure realism's sake, you should deck with holly but stain it lightly to bring it down from the bone-white color of natural holly to that of bleached and holystoned maple or fir or whatever wood they used for your ship.
But at the same time one of the nice things about ship modeling is there is a long tradition of using plain unpainted woods and colors other than purely realistic with finishes- everyone agrees the structure should be accurate, but the colors are up to interpretation by the builder and as such the white holly is perfectly valid and definitely creates a dramatic look.
- popeye the sailor and Rick01
-
2
-
I forgot to answer, it depends on what you're calling Damascus steel. The traditional historical Damascus steel would be close to white steel, they didn't know anything about alloying small amounts of chrome and molybdenum, etc. into their steel. Also the idea they used, of folding bars together that had differing amounts of carbon, wasn't unusual- the Japanese not only did that also but controlled it very finely to produce particular patterns on the sides of the blades. The Saxons were the "people of the seax" and they also pattern-welded their knives.
The problem is that despite being pretty, pattern-welding steel doesn't make it better, in fact it's inferior to modern solid steels. The reason being that those patterns are made by folding bars together that have significantly different carbon content and therefore hardness. The reason they did this is they just weren't very good at controlling the carbon content of their source bars, and some would come out with too little and some too much- the solution was to fold them together into very fine layers, this minimizes the differences and allows the low-carbon steel to provide flexibility, while the high-carbon steel provided a good edge. Today's modern knives are basically made solid out of high-carbon steel so they're a bit less flexible than Damascus steel but have no soft/hard layers.
The original Damascus steel makers were more concerned with making swords, which have to be very flexible, but if you make them entirely out of flexible low-carbon steel, you don't get a good edge. By layering their steel they were able to produce swords that were flexible and wouldn't break in combat, but had edges that could be made much sharper than standard swords. As such they developed a reputation for sharpness, but that's a very different kind of sharpness than that required by a small knife.
Today "Damascus steel" can mean almost anything. Many Japanese makers use very dramatic Damascus patterns on their knives, but those patterns are just in the soft steel on either side of a solid cutting edge - it's purely aesthetic, it has nothing to do with the cutting edge. And even if you could get someone to make a real Damascus knife for you, it still wouldn't be better than a knife blade you can order from Mr. Hock at much less cost.
- mtaylor, paulsutcliffe, druxey and 1 other
-
4
-
You're welcome Gaetan, anything I can contribute to your work is worthwhile.
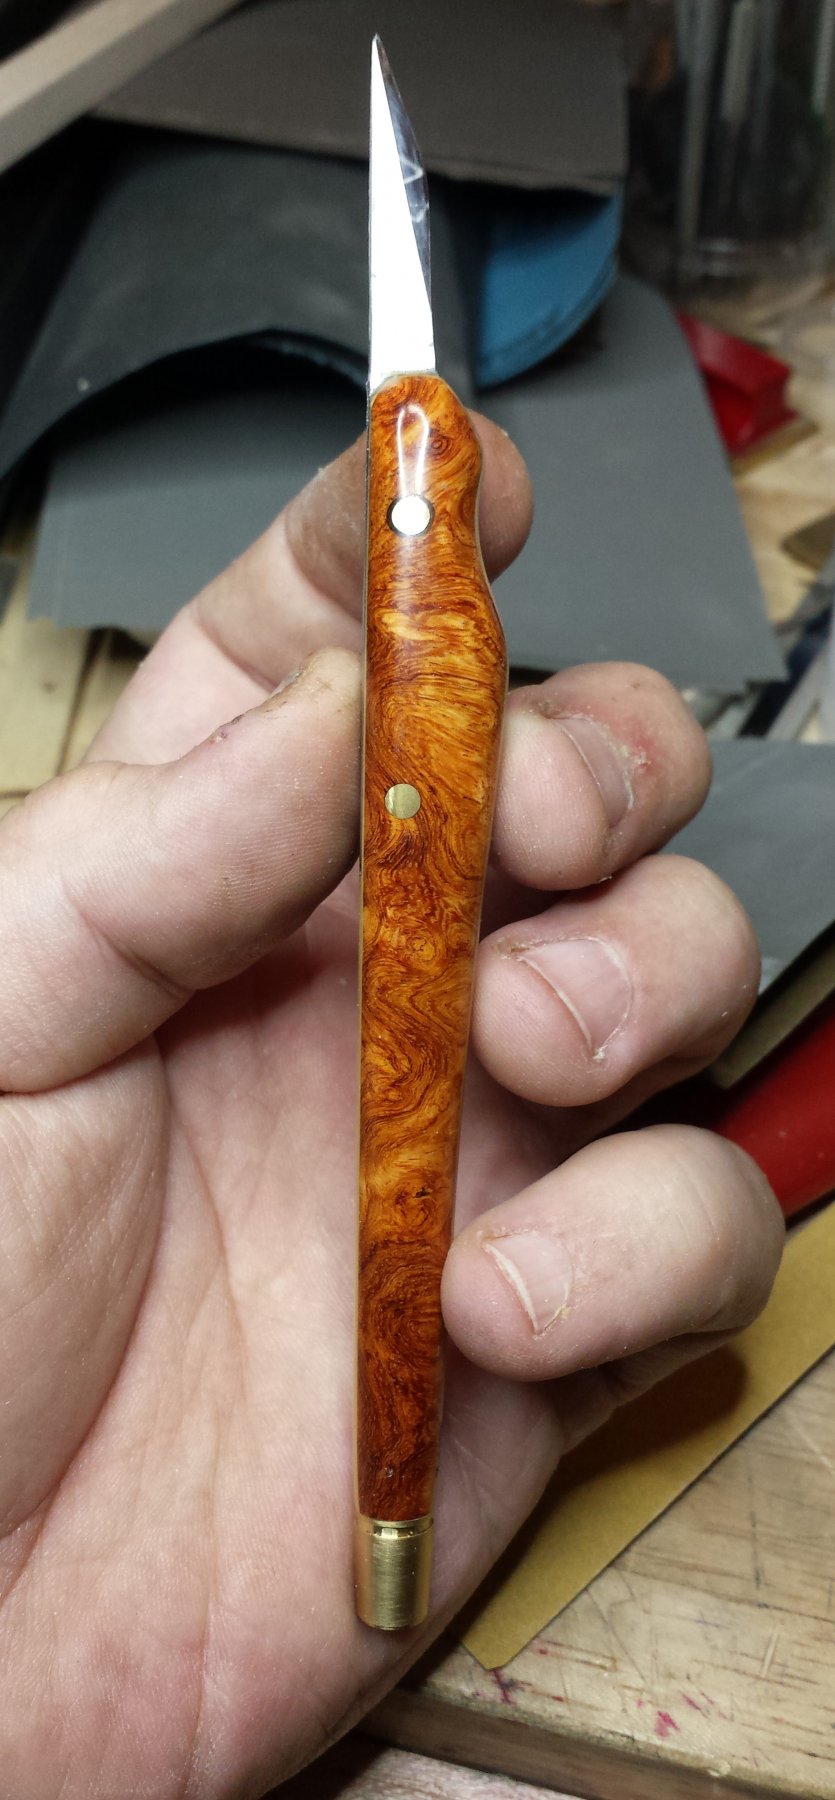
With your perfect knife, what you're talking about is a standard detail knife but much bigger, because you're building much bigger, and I understand that's hard to find because most people don't need giant detail knives
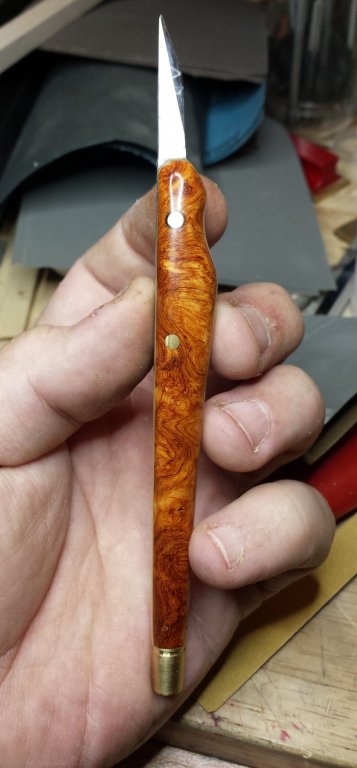
Your best choice is to draw what you want, including a tang locating 3/16" holes for the brass reinforcing pins, and send that drawing to Ron Hock and ask for a quote. I'd be very surprised if it came back more than $60, as he's made several custom blades for me and it's never cost me more than that.
Then all you need is a piece of wood (lathe pen blanks are usually good) for a handle, you rip that in half, mortise each side half the blade's depth, and then assemble it with epoxy. As noted all you need extra is some 3/16" brass rod to go in the reinforcing holes.
I then usually do a CA glue finish on the whole knife because 1) it's indestructible, 2) it's very pretty, 3) I actually feel like my best grip is on CA glue rather than wood, my hand never slips on the knife.
- druxey, paulsutcliffe, 42rocker and 1 other
-
4
-
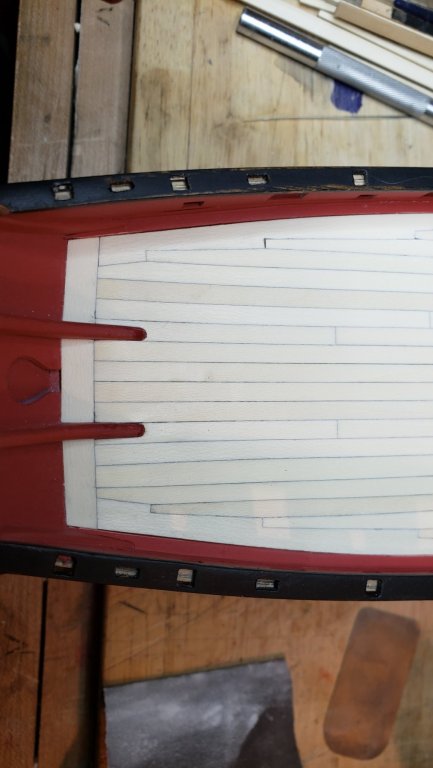
A few more strakes on including the tricky first nibbed one.
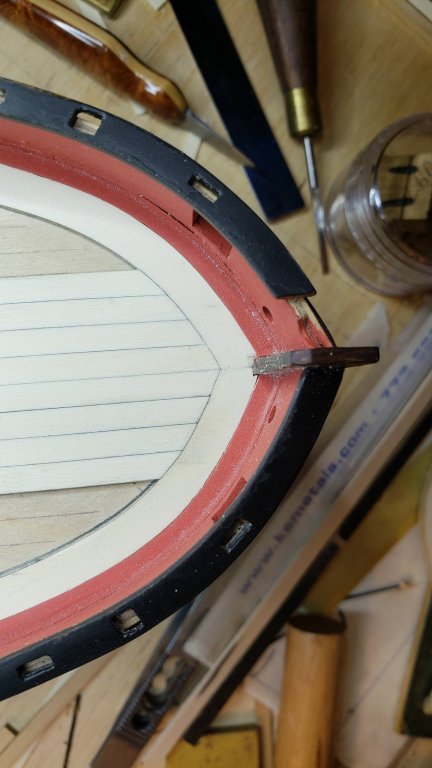
This wasn't easy as most of the plank is a cutout into the margin plank. Now had I planked a deck before, especially including straight-run nibbed plank ends on bow and stern I might have noticed that there was a chance that the nibs would interfere with the scarfs. But I hadn't so I didn't and we have a less than perfect location for the scarfs considering where the first nibbed plank ended up.
And overall.
- Tigersteve, davyboy, shipmodel and 8 others
-
11
-
Doris, just spent some time catching up and I've reached one conclusion: I will marry you if you teach me how to build models like that. Seriously, you don't need to feed me or take care of the house, just teach me the ship modeling. I'll handle the bills and teach you how to use power tools. It will be beautiful 😉
Truly amazing work. If you wrote a well-documented book with lots of photos on the process, you'd make a goodly amount of money on Amazon.
-
I didn't nail the hull, so probably not on the decking either although I haven't totally ruled it out. I will have to go look at Bob's Prince deck to see what he did as I'm not even sure what wood or color would work well with holly.
Speaking of holly, it cuts easily but is somewhat fuzzy- edges coming off the saw and any edge that is sanded will generate some fuzz on the edges that has to be carefully cleaned away prior to gluing. Not a major problem but a bit of an annoyance if you're going to use holly planking.
-
I should have known you have given this considerable thought
First of all Japanese steel will be referred to as white steel or blue steel. This has nothing to do with the color of the steel but rather the color of the wrappings of the bars as they leave the steel foundry, traditionally pure unalloyed steel (Fe + C) has white wrappings, while alloyed steel (some combination of Fe + C + chrome + molybdenum + vanadium) comes in blue wrappings.
Many argue that nothing can be made as sharp as white steel, however it's also the most fragile and also loses its edge quickly since the alloys are all designed to add resistance to loss of the edge (particularly vanadium) plus heat and stress resistance. In general a blue steel blade will hold an edge longer than white steel and will take more stress (twisting cuts) without the edge fracturing as compared to white steel.
With western steel we have primarily O-1 and A-2 steels, both are alloys with the first being quenched in oil, and the second being left to cool in ambient air (hence the O and A respectively). O-1 is easy to sharpen but doesn't hold an edge very well, whereas A-2 holds an edge better but is difficult and time-consuming to sharpen. In better quality steel there is also a cryogenic process that helps sort the molecules properly, leading to greater edge toughness.
Also for the first time in a while there's a newcomer, powdered sintered steels. These get around limitations in standard alloying practices by never completely melting the steel, instead the powdered ingredients in the desired ratios are mixed and placed in a form and a hydraulic die press basically squashes them into a solid steel bar in one quick shot. This is important because high vanadium in steel leads to much longer edge life, but in traditional alloying the amount of vanadium that could be added was very limited since vanadium will quickly grow into much too large crystals. With powdered steel, you can put in much more vanadium since the sintering process doesn't allow it time to grow large crystals.
As such, the most sophisticated (and best IMO) steel available to woodworkers right now is the PM-V11 steel that Lee Valley uses for many of its tools. It holds an edge for insanely long periods (I have jack and smoothing planes with PM-V11 irons) but is at least as easy to sharpen as O-1 steel. Unfortunately they haven't made any knives yet with it, just plane irons and chisels.
A couple of suggestions. One is Shapton Glass Stones. They're ceramic waterstones and 1) remain almost perfectly flat and 2) remove steel faster than anything I've ever used, and I've used all sorts of waterstones (including natural stones) and diamond and other ceramics- none of them come close to how fast Shapton stones remove steel. This means much less sharpening time and much more working time. I use 220 for shaping bevels, 1000/4000/8000 for sharpening and a strop.
Another is to try a knife or two from Ron Hock. He's the best of the western blade makers (IMO) and makes excellent plane irons and knives. He stops at Rc62 to provide somewhat better edge strength under stress, and he also cryogenically treats all his steel.
You're also right that you basically need blades with an edges parallel to the knife handle (straight blade), beveled at an angle (skew blade) and perpendicular to the handle (chisel). All are needed for good woodworking. For the chisels, I recommend the Lee Valley PM-V11 bench chisels, and you should also look at Japanese dovetail chisels and also shoji chisels (used for making the mortise cuts in Japanese shoji screens) since you are constantly working into tight spaces.
-
I forgot to say thanks Dan, that helped me a bunch in getting past the decision block.
-
On 10/18/2018 at 3:44 AM, Gaetan Bordeleau said:
Part 2 Searching the perfect knife
After few days of trials, I am very please with the results, the blade is as razor sharp as the scalpel blade and with more control. Finally, one last aspect. This knife is heavier than the scalpel and this additional weight is beneficial for the control of the tool.
You know I seem to remember an argument some time back where you insisted nothing was as sharp as a scalpel
I'm glad you've seen the light (and the metallurgy). The only downside to Japanese knives is they push the hardness to Rc63-64 and therefore the edges can be brittle, don't try many twisting cuts with your new knife.
And I agree with you about the weight, that's why I add the brass weights to my knives, to move the balance point to just ahead of center and to give them more mass for control.
- paulsutcliffe, billocrates, mtaylor and 4 others
-
7


Lady Nelson by vossiewulf - Amati/Victory Models - 1:64
in - Kit build logs for subjects built from 1801 - 1850
Posted
Thanks Rick. I haven't decided on finish yet for the windlass and other bits, natural and black and red all are choices. Yes, was looking at the pumps and they will have to go. BTW do you know if brass blackener works on copper? I'd assume it does, but the kit's provided eyebolts are copper.