HOLIDAY DONATION DRIVE - SUPPORT MSW - DO YOUR PART TO KEEP THIS GREAT FORUM GOING! (Only 24 donations so far out of 49,000 members - C'mon guys!)
×


gjdale
-
Posts
4,891 -
Joined
-
Last visited
Content Type
Profiles
Forums
Gallery
Events
Everything posted by gjdale
-
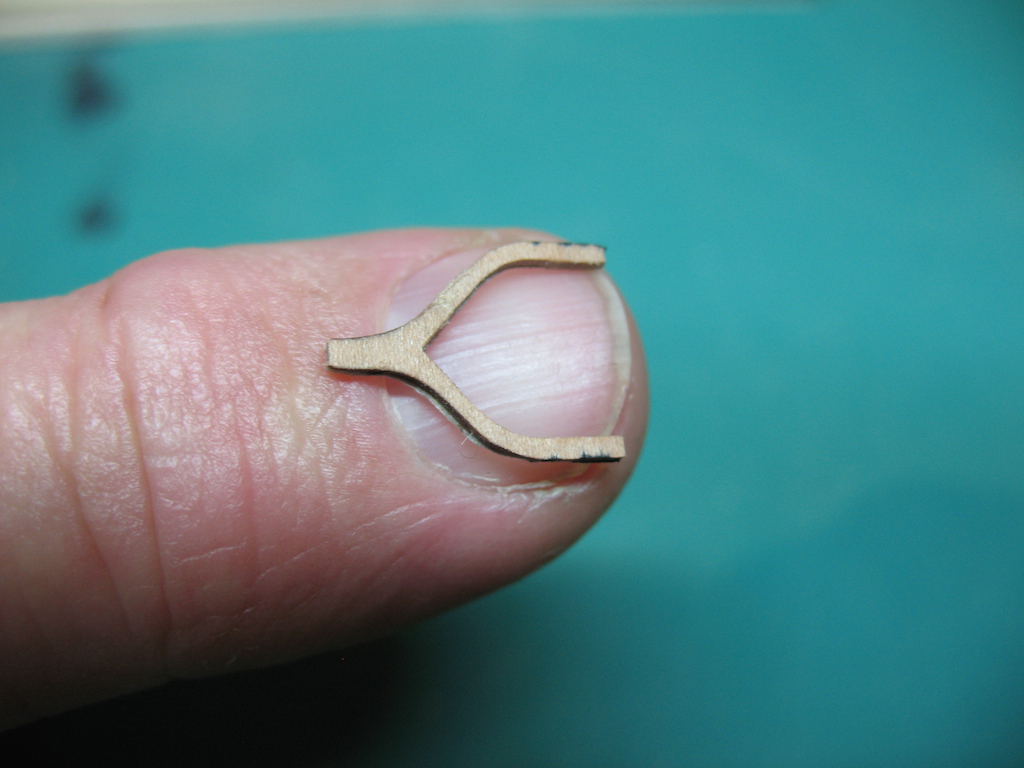
 A question of size: I was chatting on Skype with Mobbsie this evening and when I held up one of my boat frames, he commented that he hadn't fully appreciated the tiny size of these from the previous posts. So, at his suggestion, here is a picture of the smallest of the Pinnace frames, poised on the fingernail of my left forefinger. (No comments on the enormous hand size please ).
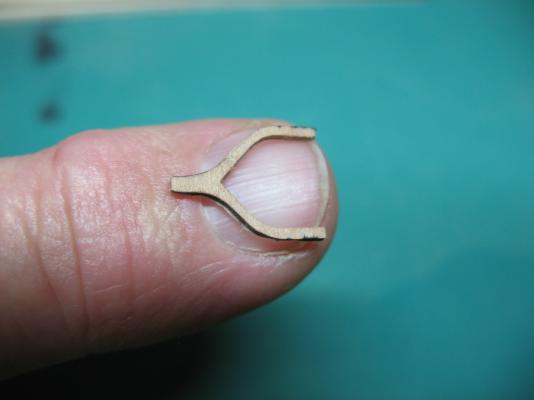
-
Thanks Augie, Mobbsie, Wayne, Sherry, Ben, Mark and Keith, and for all the "likes" as well. Augie - one day soon I'm going to test my theory on plywood and warping. My logic makes sense to me, so it will be it interesting to put the theory to the test. Mobbsie, Wayne and Sherry - I'm glad you find this useful, and hope that you can avoid some of the pitfalls that I have already encountered, and no doubt will continue to encounter. Ben - yessir, feel very lucky to have this saw. I believe in investing in quality when it comes to tools - that way I can only blame the operator when things don't work out. I also believe that quality tools pay for themselves over time. They even save you money by not having to throw out the cheap crappy one you bought first - that's what I tell the Admiral anyway! Mark - it's really not much different to the sistered frames you're making for Licorne - just a wee bit smaller........... Keith - you are too kind, but thank you anyway. I consider myself an apprentice still, but one who's always willing to give it a go and push for the next level. That's how we develop our skills - along with the help and guidance of friends and mentors like those we find right here at MSW.
-
I'm sure Anja will tell you that is the way it is supposed to be Sjors! Just remember: Happy Wife = Happy Life.
- 1,616 replies
-
- 2
-

-
- caldercraft
- agamemnon
- (and 1 more)
-
Hi Wayne, Nice to see an update on this lovely lady! It's not a race, and every pretty lady likes to take her time making sure the foundations are right before the makeup goes on. Take your time and be a gentleman with her, and she just might surprise you!
-
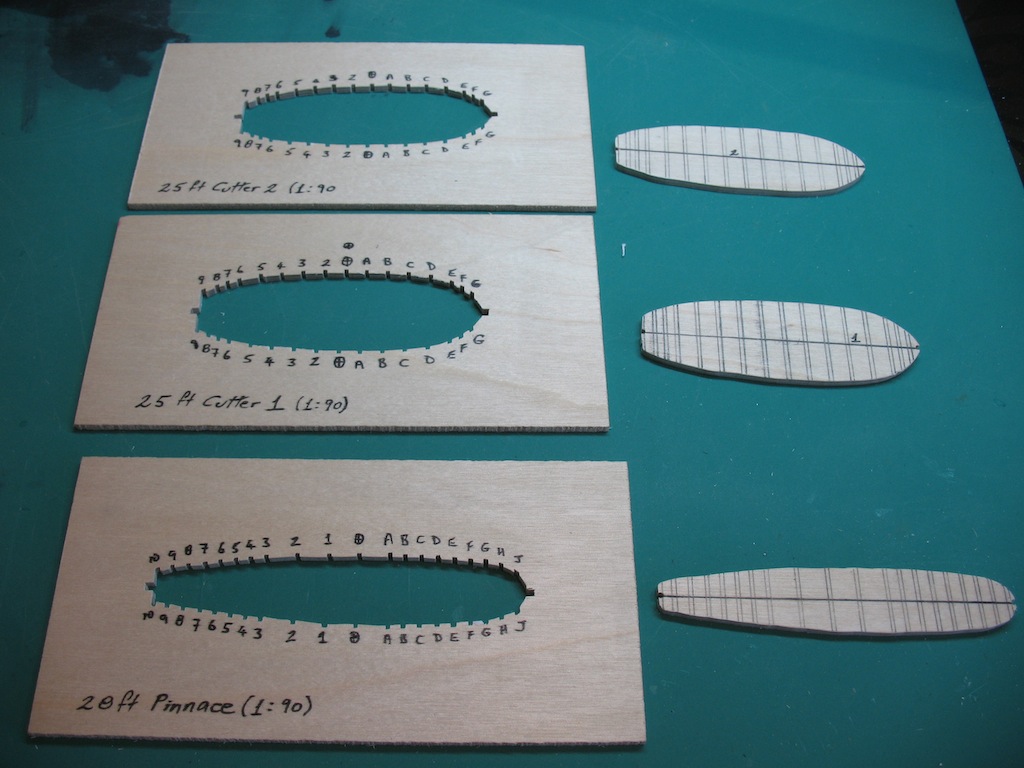
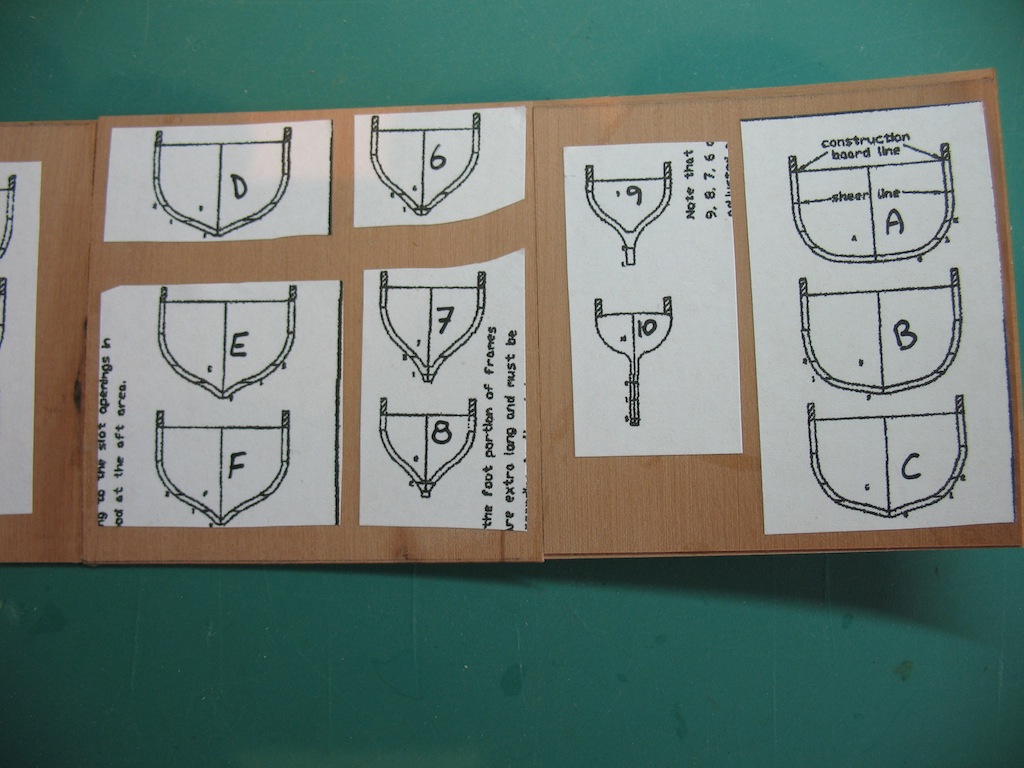
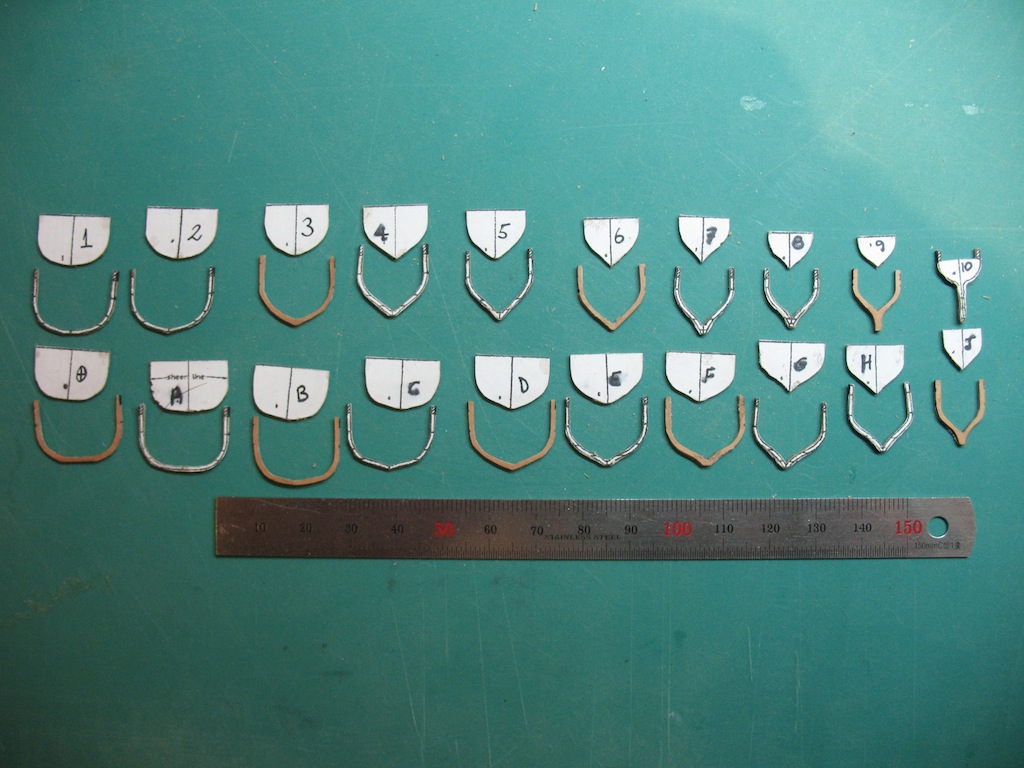
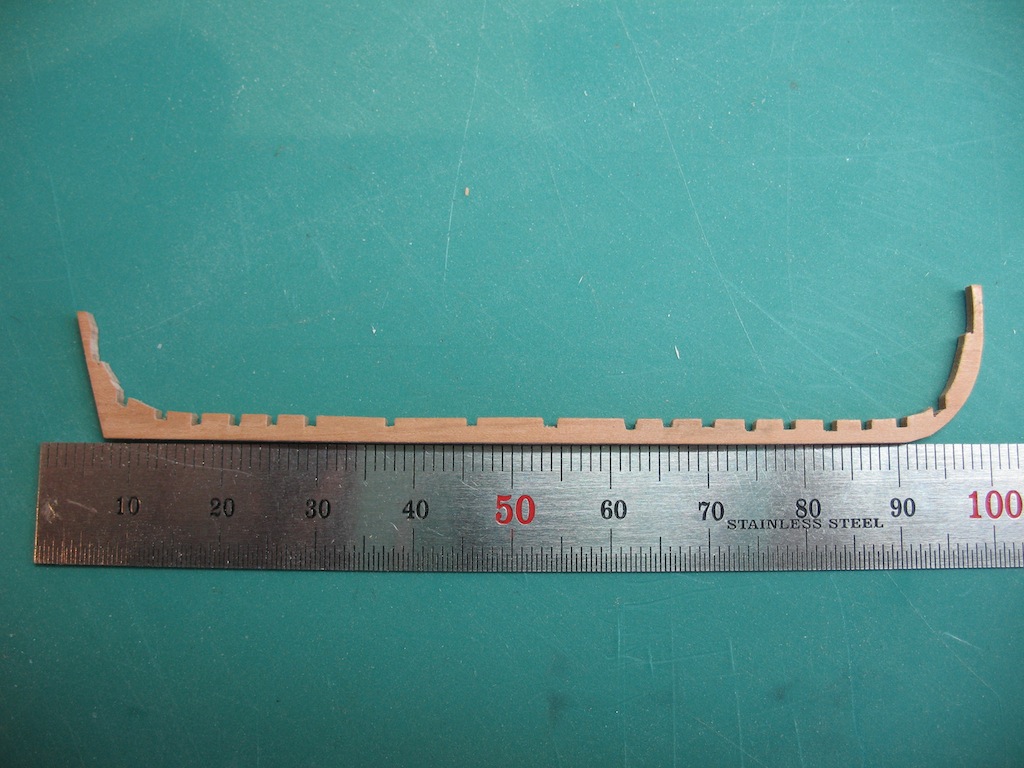
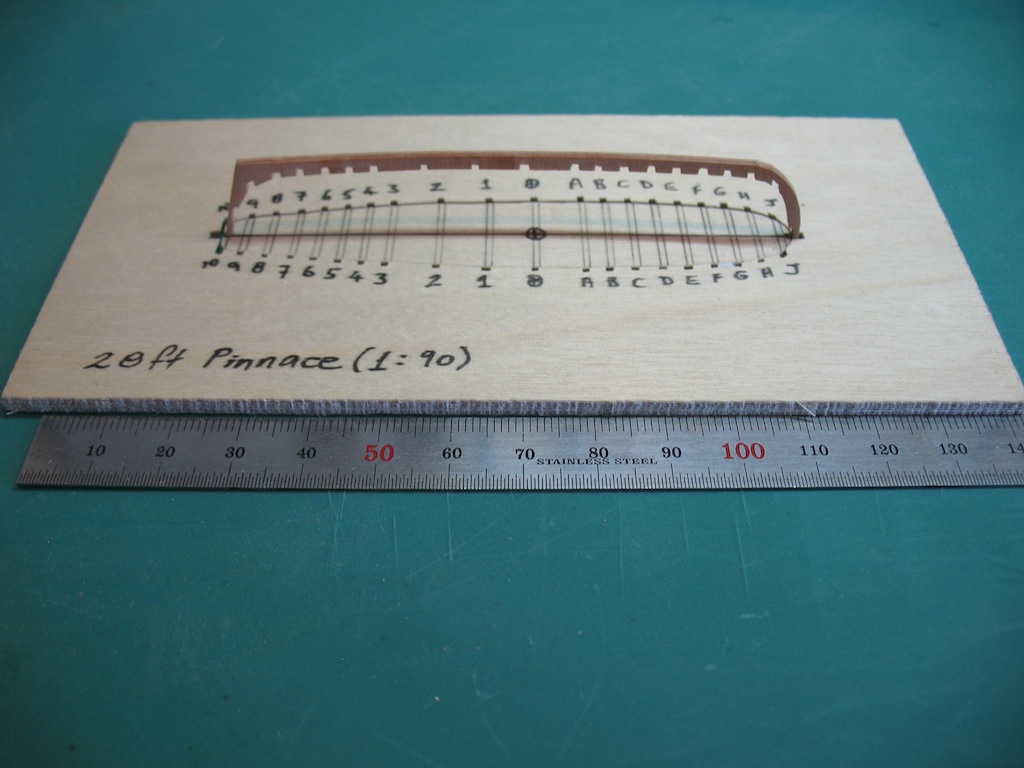
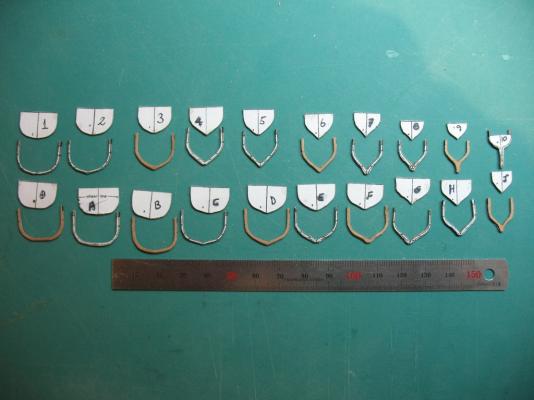
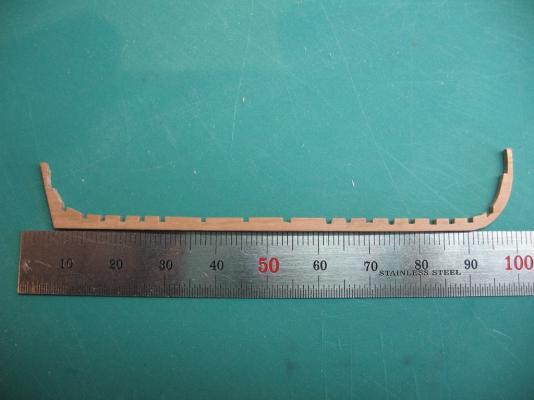
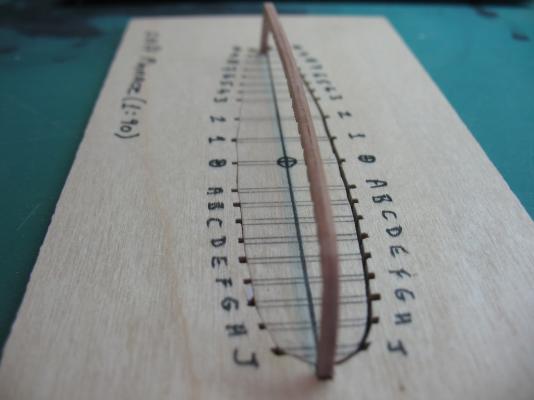
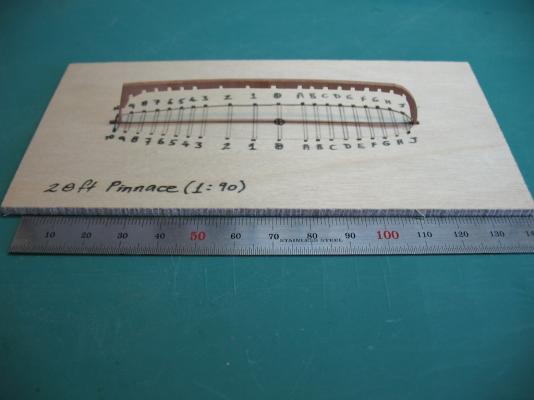
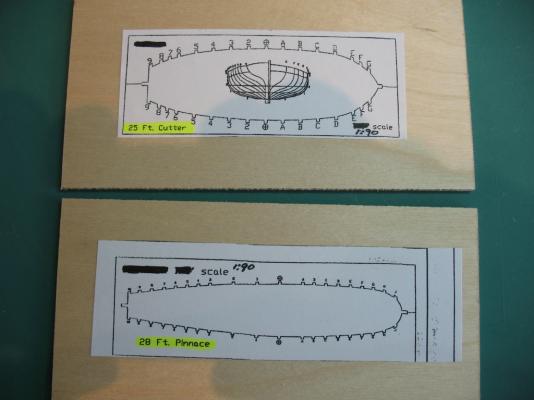
Ship's Boats - continued: In my last update, I described how I was planning to make the frames for both the 28 ft Pinnace and the two 25 ft Cutters. With that test deemed "successful", it was time to proceed. First up was to make the building boards - one for each of the three boats. After re-sizing the patterns from my Warrior Practicum (Romero), I printed these on sticky label paper (a tip picked up from Danny Vadas) and stuck them to 3mm Birch Plywood (aircraft grade). In this pic, you can clearly see the very different shape of these two hull forms. I think I could have equally well used 3mm MDF, but Romero specified the other, so I decided to see if there was a noticeable difference (other than a significant price difference, that is!). There wasn't - at least not to my rudimentary skill level. I used a 28 TPI skip tooth saw blade for the most part with these. Keith asked previously about a spiral blade (which cuts in any direction). Apart from having had difficulty controlling these in the past, they do have a noticeably wider kerf and I wanted to keep the kerf to a minimum for this job as I need to be able to re-insert the centre section as part of the building process (all will become clear a little further down the track). The one exception was when I cut the the transom "slot" at an angle after cutting the remainder of the board. To do this, I inserted a spiral blade and used the scroll saw's tilting head feature to cut the transom slot at 18 degrees for the Pinnace, and 12 degrees for the two cutters. This doesn't really show up in the pictures (I may have taken the pictures before cutting them). Anyway, here's what the completed build boards look like. I clearly still need some practice with the scroll saw, but cutting accuracy wasn't vital for this part (thankfully!). I mentioned previously that the frames are cut from 1/32" stock, made up by laminating two pieces of 1/64" stock. The reason for the laminated approach is to provide structural strength by laminating the two pieces with the grain running at 90 degrees to each other. While this does work, anyone who has tried laminating sheet stock will tell you of the problem of unwanted curvature - just check out Mark Taylor's Licorne log to read of his issues building ship-size frames at 1:64 scale, and you'll appreciate how much more severe the problem becomes at this tiny scale. On reflection, I reckon this is the reason that all plywood you buy is made of an odd number of laminates - to keep it flat. Anyway, here are the frame patterns laid out on the laminated stock - I'm using pear for the Pinnace, and will be using Costello Boxwood for the Cutters. (Oh, and by the way, after laminating, the stock was placed and clamped firmly between two thick boards for over 24 hours). Once the stock is cut down to "frame" size, the warping fortunately more or less disappears. However, here is a news flash - the scroll saw does not discriminate between wood and fingers! I got a little too close at one stage and just nicked my right forefinger - nothing more serious than say a slight slip with the old Exacto, but enough to make me sit up and take notice. After cutting 20 frames, I reckon I'm starting to get the hang of the scroll saw though. The real trick is getting your mind around manoeuvring the workpiece around the blade, rather than the other way around. To do this safely, you really need to allow plenty of "waste" stock around the final piece. I was a little short on spare stock, so economised a little more than perhaps I should have. Lesson learned. The method was to cut the inside of the frame pattern out on the scroll saw, clean up with a file, then temporarily re-glue it and shape the outside of the pattern on the disc sander (this gives the otherwise very fragile piece some support). For those frames with complex curves, the final part of the external surface was achieved using a grinding/polishing stone in a hand held rotary device (similar to a Dremel). The inner stock was then removed through the judicious use of Isopropyl Alcohol - being careful not to use so much that the frames delaminated! And here's the result: The keel was made in a similar way, only using stock of twice the thickness (ie two pieces of 1/32" stock to create a 1/16" thick laminate). Bending wasn't quite as severe, but is present nevertheless. I'm now keeping the completed keel clamped until it is ready for installation in order to minimise the warpage. Again, the inside line was cut first. Then the frame positions were transferred from the building board to the keel and the piece returned to the scroll saw to have the frame notches cut. Then the outside shape was formed using the disc sander. Here is the completed keel - note that the deadwood, and apron pieces have been included in the single piece. Here are a couple of pics of the keel in place on the building board. In the first pic, the line of the lamination running down the centre of the keel is quite evident. In the second pic, you will note that the aft end of the keel piece does not reach the aft end of the board. This is because the transom piece (frame no. 10) will be attached to the keel first, and then a stern support piece will be attached outboard of that into the build board. That's it for now. Over the next week, I hope to install the keel and frames onto the build board for the Pinnace, and once that is proved successful, I'll repeat the process for the two Cutters.


-
Thanks Brian, Lawrence, Keith, Remco, and Ben, and also all the "likes" - all of your comments and likes are very much appreciated. Brian - thanks for the recommend on the Bandsaw - it's a bloody beauty mate! Lawrence - the bandsaw is really nice, but I'd put the disc sander way ahead on the priority list. Save your pennies and buy yourself a Byrnes disc sander - it's a lovely piece of machinery and a joy to use. Keith - the small scale is a real challenge. I appreciate your comments, but I'm really looking forward to working with something in a bit larger scale! Remco - nice to see you back. You are of course one of those responsible for the growing tool collection! Ben - the dust extraction system is fantastic. I don't know how I managed for so long without one. The real bonus is that it's both a lot quieter in operation, and a lot easier to switch between machines, than I had anticipated. The scroll saw is not a dewalt, but an Excalibur, purchased through Carbatec here in Australia. It too is a real beauty and is proving to be worth every cent I paid for it (definitely NOT cheap!). One of it's key features is that instead of the table tilting, the entire headstock tilts, enabling an angled cut while maintaining a level cutting surface (more on that later). So, with thankyou's done, it's time for an update............next post.
-
Just lovely Sherry.
-
How to sand longer stock?
gjdale replied to Landlubber Mike's topic in Modeling tools and Workshop Equipment
You could always invest in a Thickness sander from Jim Bynes Same fantastic quality as his other tools. Perhaps not applicable in all situations, but worth thinking about. -
Just beautiful Alexandru!
-
Johann, It is somehow re-assuring to know that even a master craftsman like yourself makes an occasional mistake! Thanks for sharing this with us.
-
It is indeed smashing stuff Nigel. Here's another phrase for you: it looks as flash as a rat with a gold tooth!
-
Lookin' good Sjors. I'm not even going to comment on cotton balls vs real ones..................
-
HMS Druid by Krug - FINISHED - 1:48 - Hahn
gjdale replied to kruginmi's topic in - Build logs for subjects built 1751 - 1800
Lovely work Mark. -
Lovely work Joachim!
-
Fantastic work, as always Bob. Great foresight and planning with the main lower yard sheets too - that really is smart thinking.
-
So, from full time work, to retirement, to working on a production line eh Mark?................ Can't wait to see what rolls off the end of the line!
-
Welcome home Danny. Another lovely little piece to celebrate your homecoming! BTW, great job you're doing on that del prado Vic up at the van too.
-
Fantastic work Nigel. Can't wait to see the "new" timber put to work.
-
Welcome home Augie. I trust you won the battle with the great outdoors. Nice to see you back in the shipyard, even if the "summer schedule" means slower progress.......
- 2,191 replies
-
- 1
-
-
- confederacy
- Model Shipways
- (and 1 more)
-
HMS Naiad 1797 by albert - FINISHED - 1/48
gjdale replied to albert's topic in - Build logs for subjects built 1751 - 1800
Just beautiful work Albert! -
Very nicely done Mike. She looks fabulous.
-
Thanks John, Keith, Mark and Daniel. Keith the scroll saw blade in the pics is a 28 TPI skip tooth blade and it seems to work okay for this. I've got some 46 TPI spiral blades (that cut in any direction) but have found these very difficult to control in the past. I may give them another go for this as some of the smaller frames have REALLY tight curves. I also had a look at Ron's work in his Oneida log, having spotted the reference in your own log earlier today - some might fine work there, but oh to be working at 1:48 instead of 1:90! Next time........ Mark - yes, rest assured the new tools have more to do with future builds than ships boats. Daniel - nice to see you back. Always a pleasure to see you here - you were one of the first to encourage me to do better. So, in a way, it's all your fault!
-
Sorry John, Our posts must have crossed in the ether. Don't have a final tally time on Victory yet - she's not actually finished yet - but we're now at 18 years and counting) thank goodness I haven't been counting hours! As for what's next, you'll just have to wait and see, but the dark side is definitely involved........