


Tecko
-
Posts
262 -
Joined
-
Last visited
Content Type
Profiles
Forums
Gallery
Events
Posts posted by Tecko
-
-
Thank you @Omega1234 for your kind words.
I don't have an obsession, but an aversion to lawn care.

There is a women up the road who spends over three hours, twice a week, manicuring the small narrow lawn (public fairway) of her place.
Part of me feels sorry for her, but another part of me knows that she feels more worthy when she is done.
I am happy when she is finished too, because the vacuum motor finally stops.
-
Thank you @mtaylor, @oneslim, @prutser, @BANYAN, @Omega1234, @Jack12477, and @paulsutcliffe for your reactions and comments.
________________________________________________________
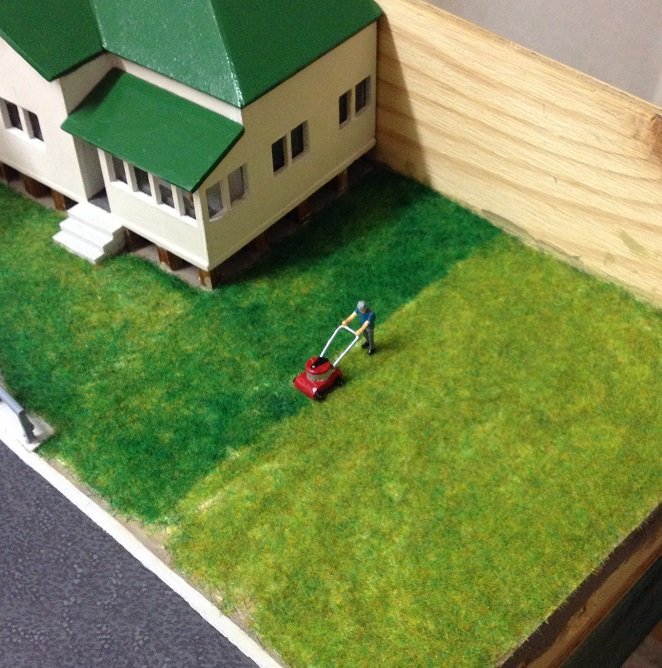
9 hours ago, BANYAN said:That is looking great Tecko; the colour and 'patchiness' of the grass to the bottom end of the lawn around the house is spot on (in the photo at least) for "Aussie' grass that has not been manicured
")
") ...
...
Well Pat, that is a problem. We need to fix that up somewhat...with The Whopper!
- paulsutcliffe, lmagna, druxey and 7 others
-
 10
10
-
Thank you @BANYAN and @druxey for your comments.
Thank you @Omega1234, @BANYAN, @michael mott, @KeithAug, @BenF89, @Jack12477, @oneslim, @mtaylor, and @prutser for your 'likes'.
_______________________________________________________
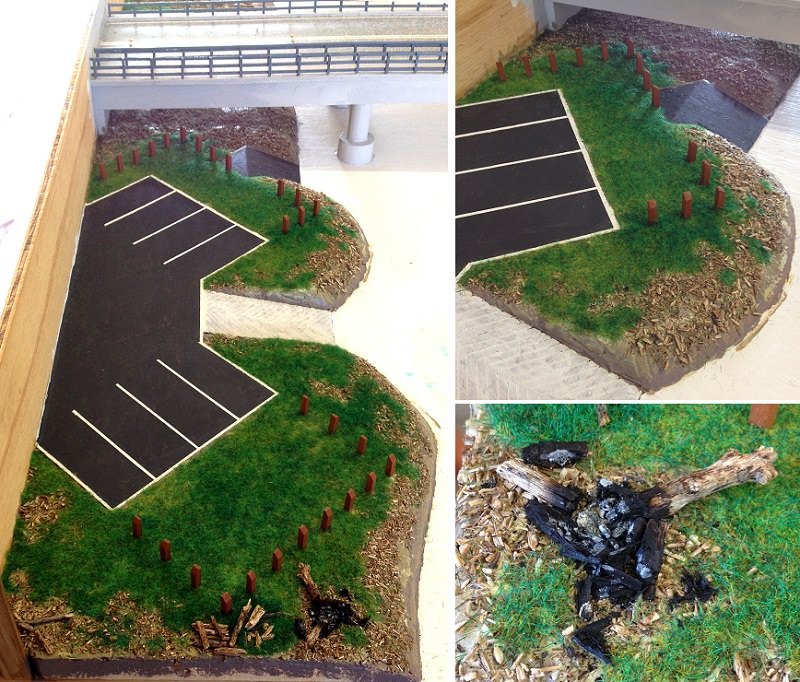
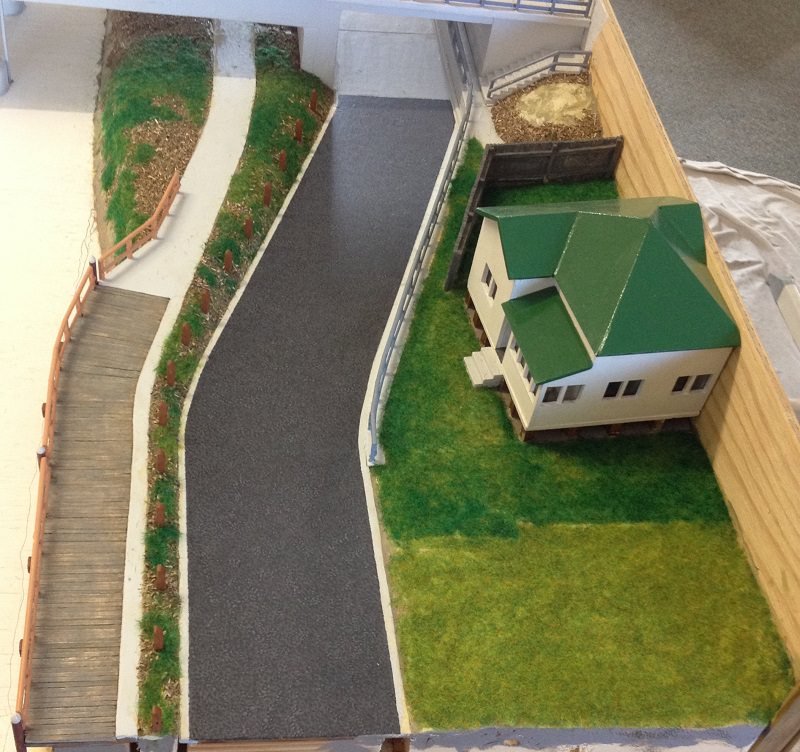
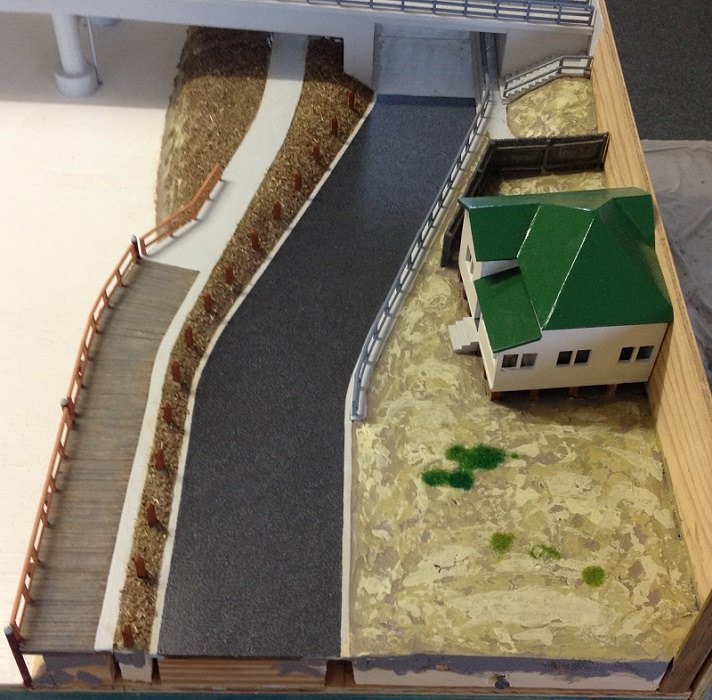
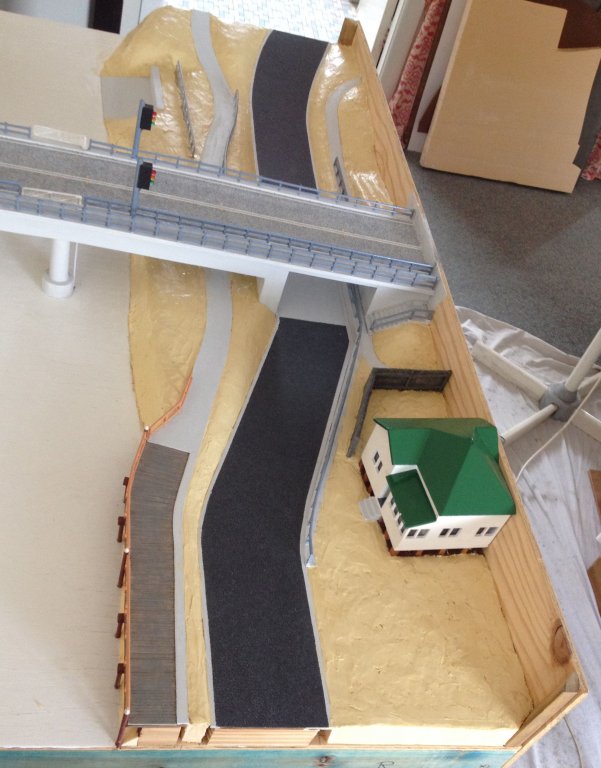
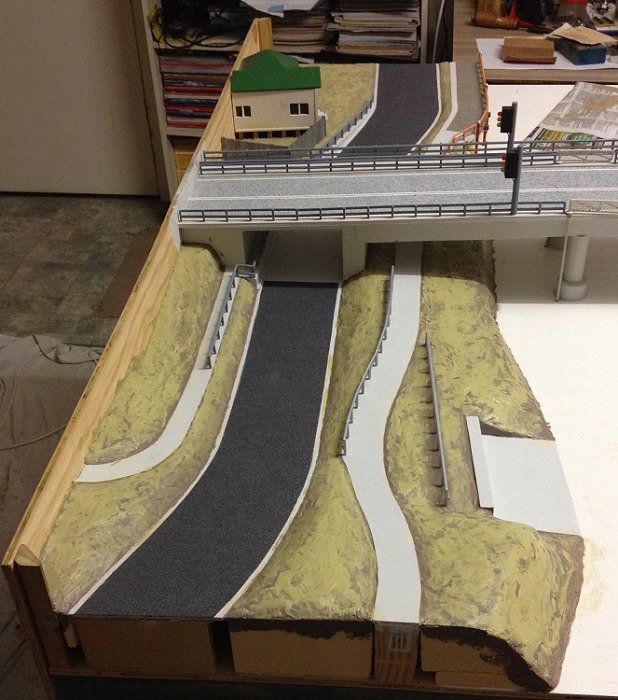
A fair bit of the ground will be covered with trees, especially the south-west side (other side of car park).

- mtaylor, lmagna, kees de mol and 8 others
-
11
-
-
9 hours ago, BANYAN said:
Very convincing effect when it works Tecko, pity you had to assist with the vac. The diorama is coming along really nicely -- are you going to add the council workers (or should I say 4 x supervisors and one labourer ;))
cheers
Pat

Yes, will have a few on the bridge.
But not sure where else on the landscape. It has been suggested to show them spreading the mulch from a wheelbarrow.
-
2 hours ago, druxey said:
Convincing grass, other than (in the photos) the 'Pasture' color is a bit too intense. That other packet of flock marked 'Spring' looks better to my eye. Nice progress with your landscaping.
Thank you for sharing your appeal. It is always good to know what others are attracted to.
Personally, I am a colourist. Intense colours have a strong appeal for me.
In regards to the grass, I love lush. If I was a dog, you would find me belly laying on the dark green lush grass.
-
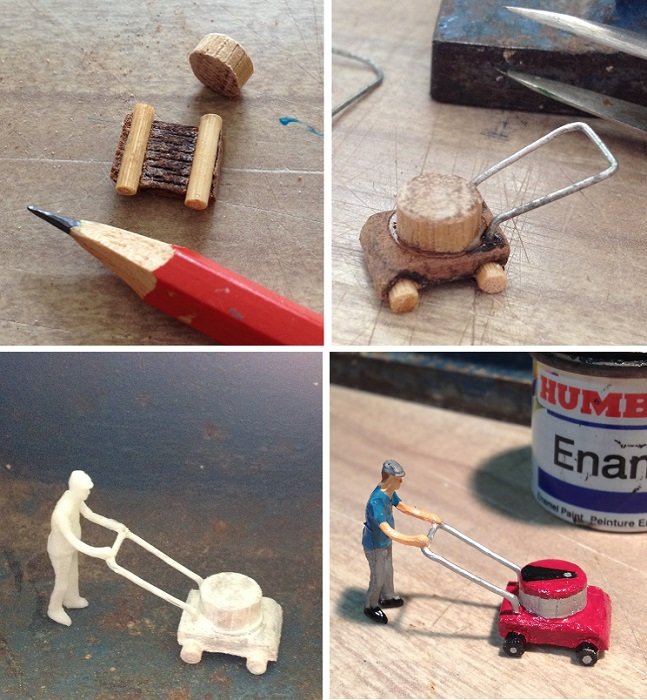
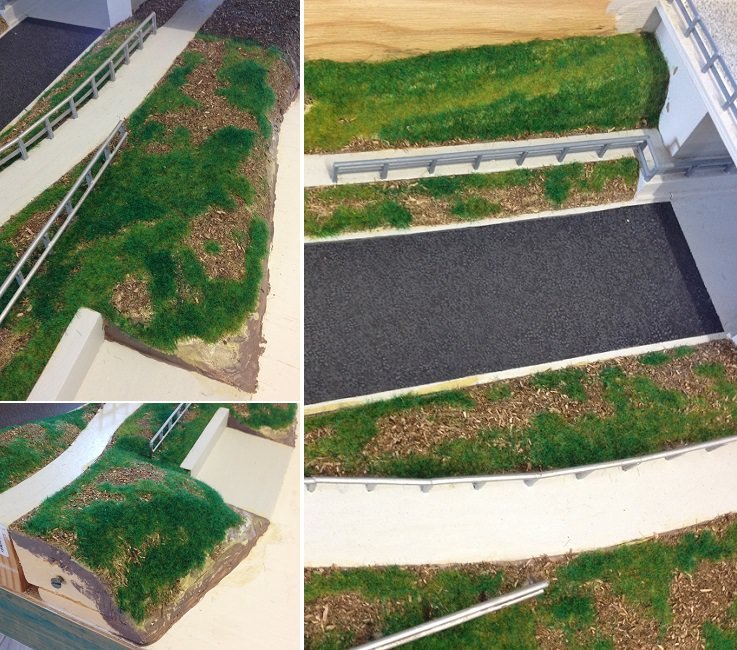
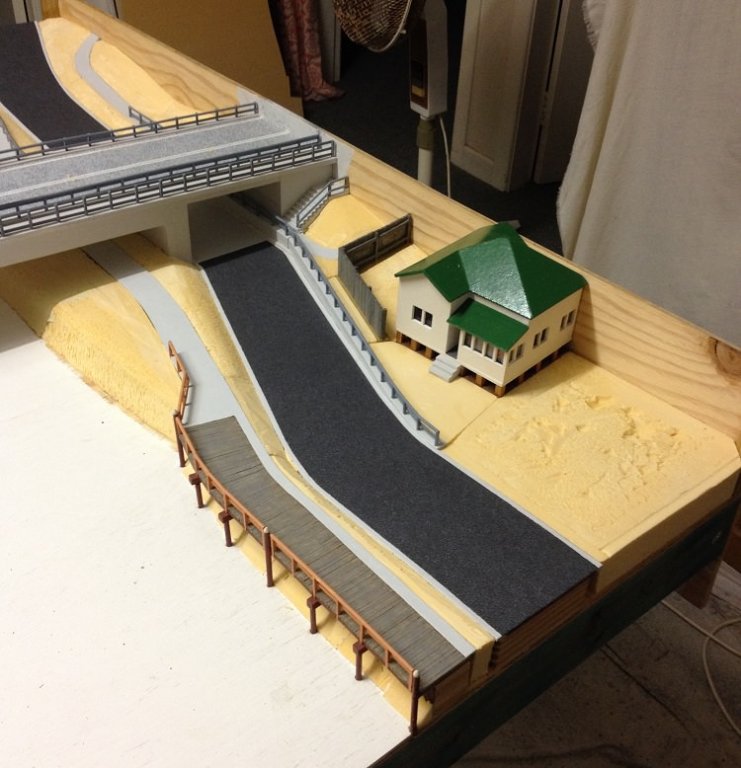
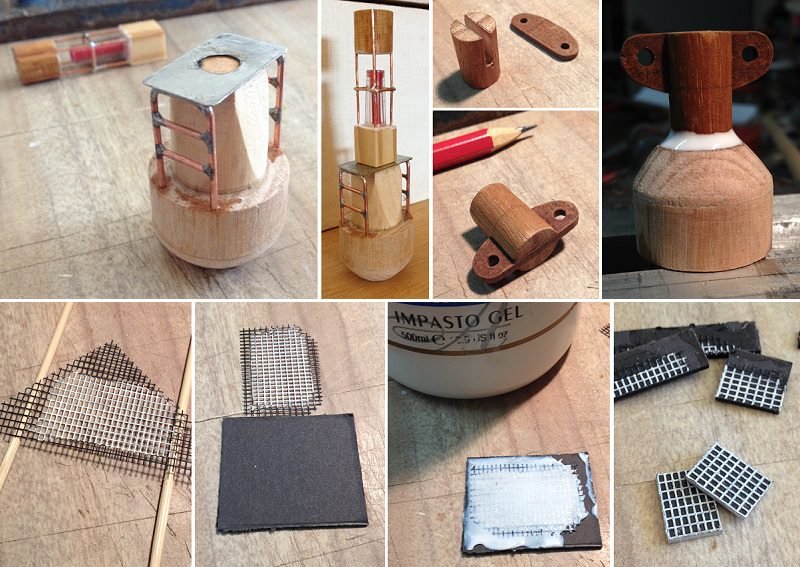
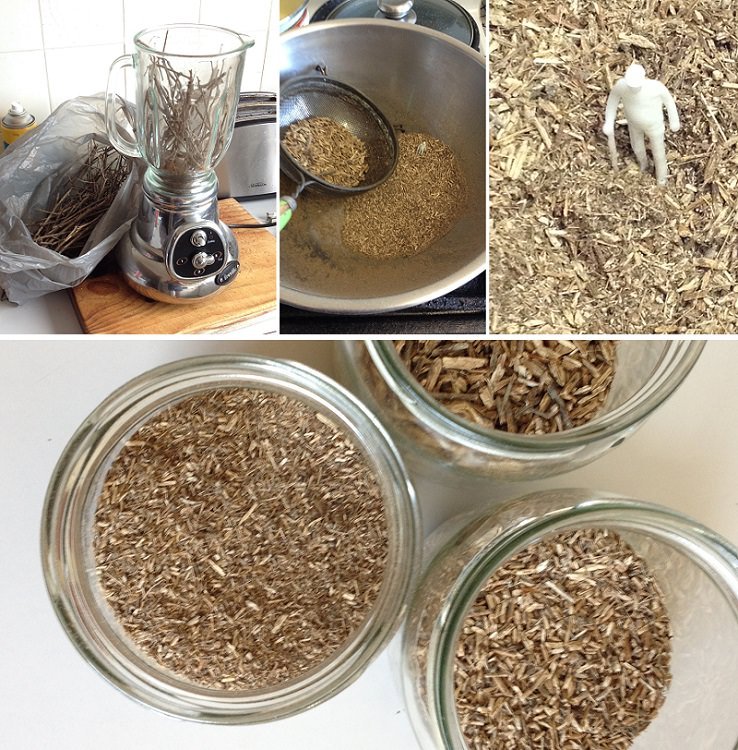
DIY static grass applicator. It works very well for small dioramas (1 or so square feet max). Any bigger and the charge gets overly dissipated and becomes weak.
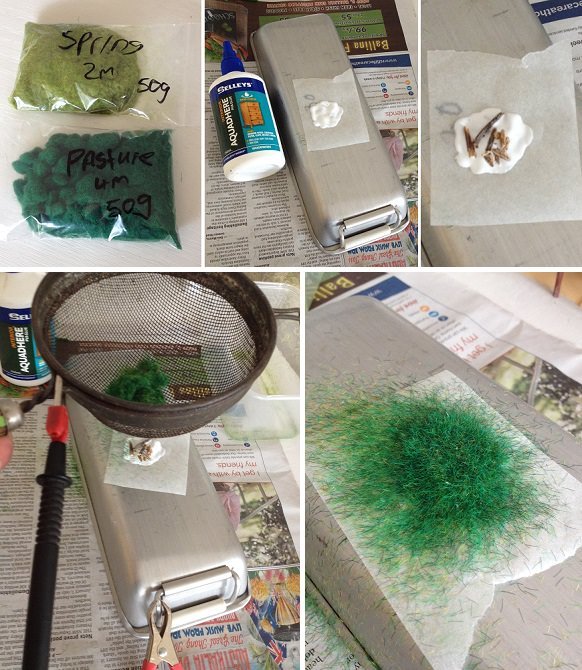
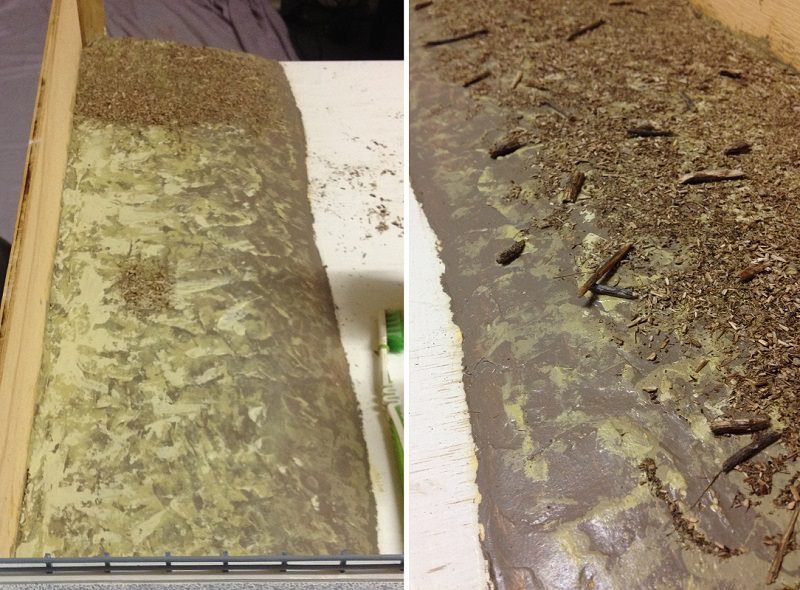
Experimented with grass applicator on the diorama. Results were mixed, but generally poor. Ended up using a small vacuum cleaner to assist in raising any loose grass into a vertical position. Repeated this application on the same area while the glue was still wet. This helped.
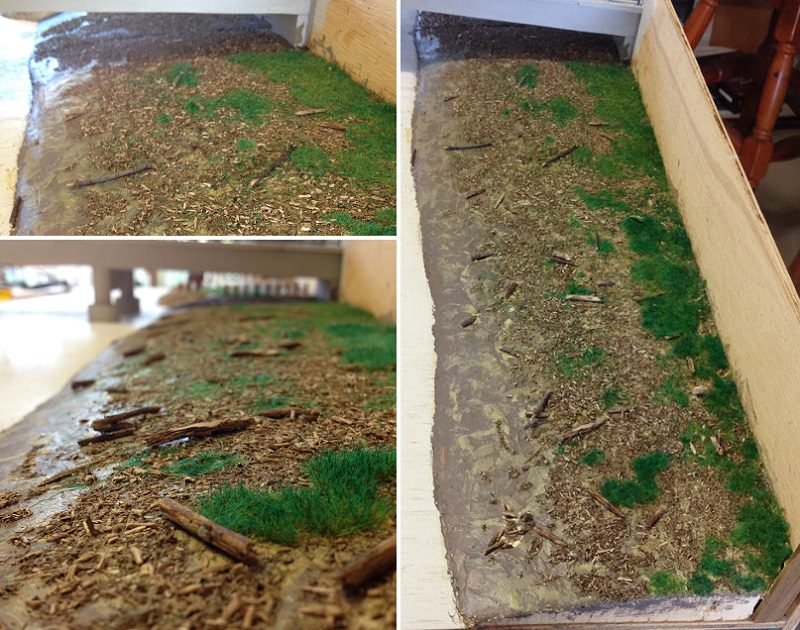
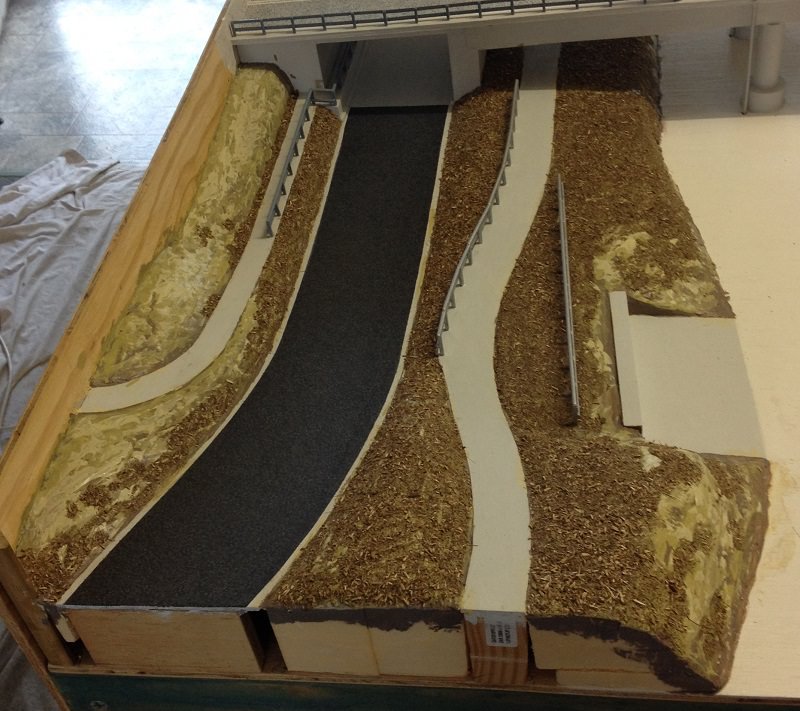
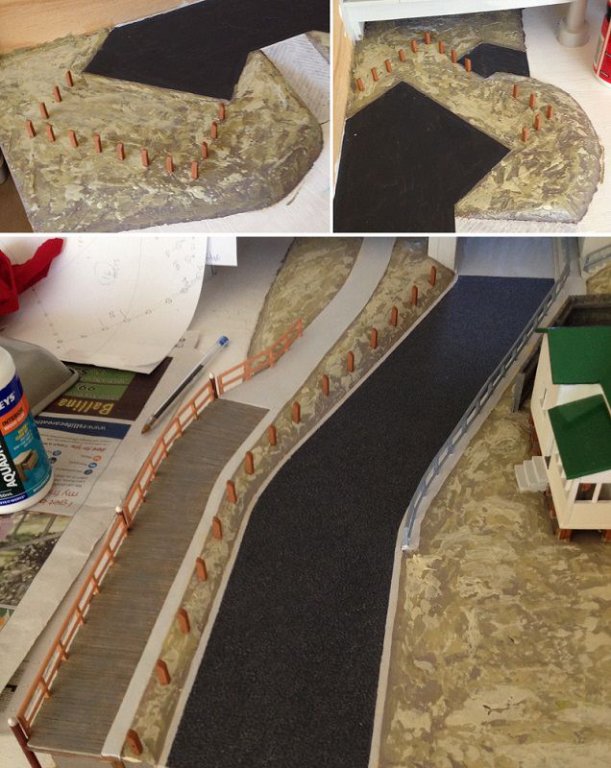
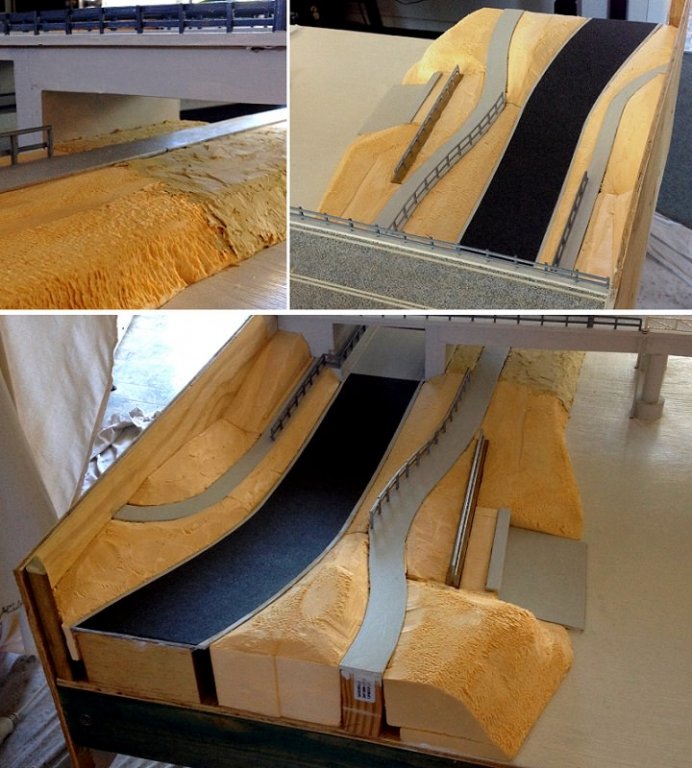
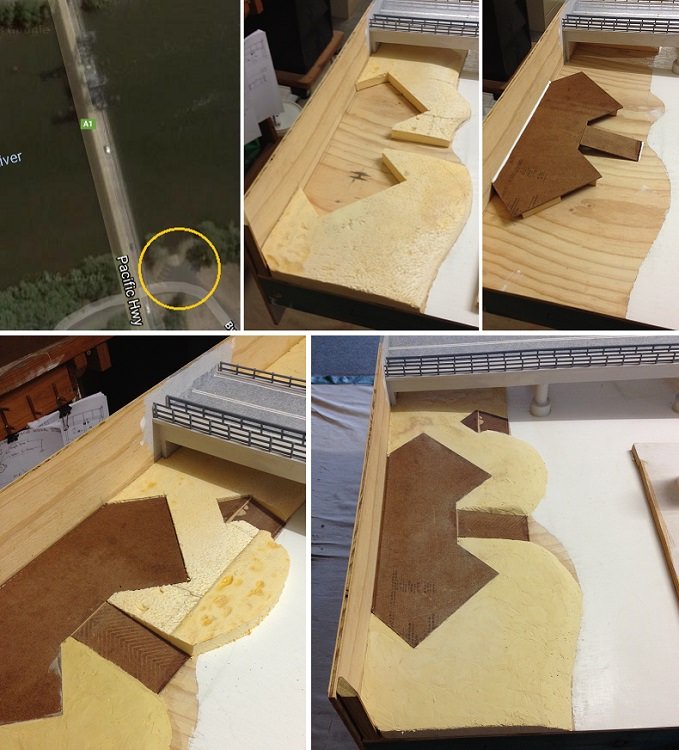
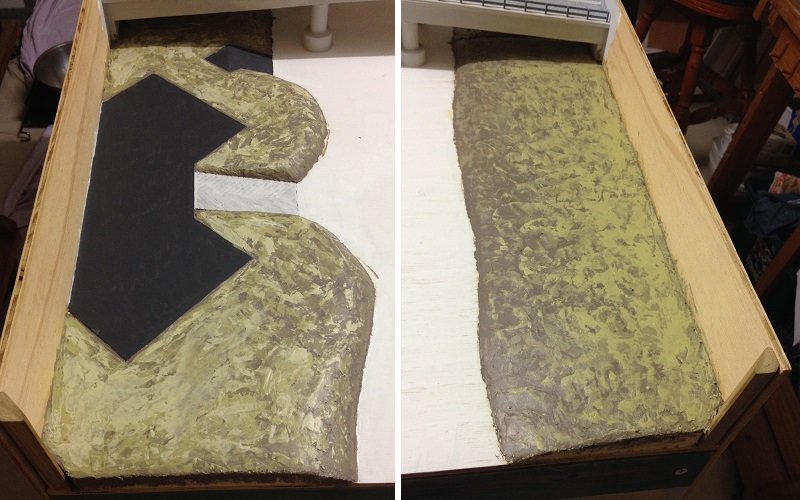
The shire council applied lots of wood-chip mulch over the north-side of the bridge. I did the same, and for both sides of the bridge to even up the display.
Grass, plants and trees will cover much of the mulch.
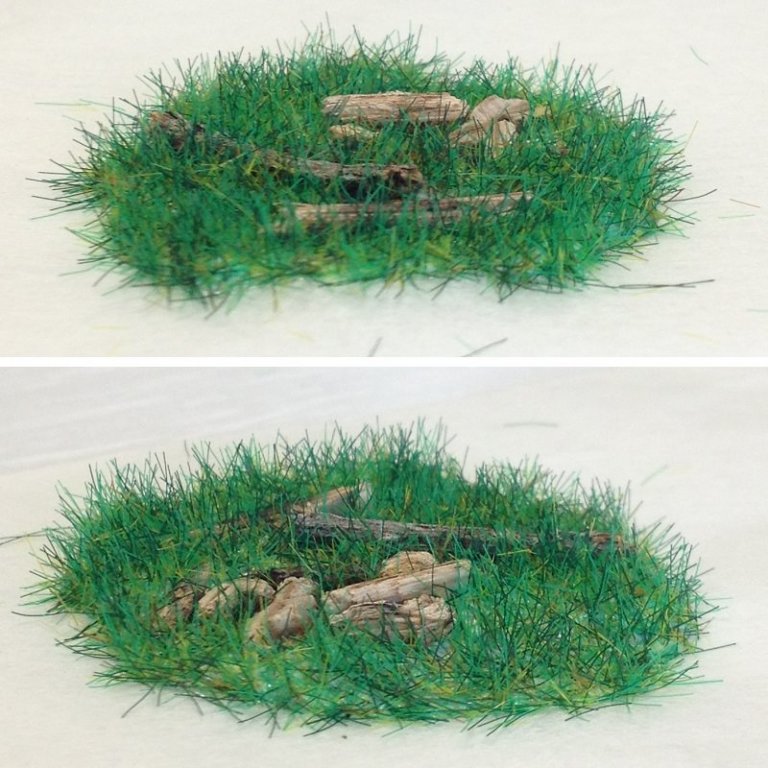
Added previous grass sample (patch) to diorama. It peels off the baking paper and then glued where you want it (great for clumps of grass).
-
Thank you Pat, Patrick and Hans for for compliments. Hans, there is nothing wrong with a bit of fibre in the diet
.
Thank you @Omega1234, @mtaylor, @oneslim, @KeithAug, @druxey, and @BenF89 for your 'likes'.
_____________________________________________________________________________________
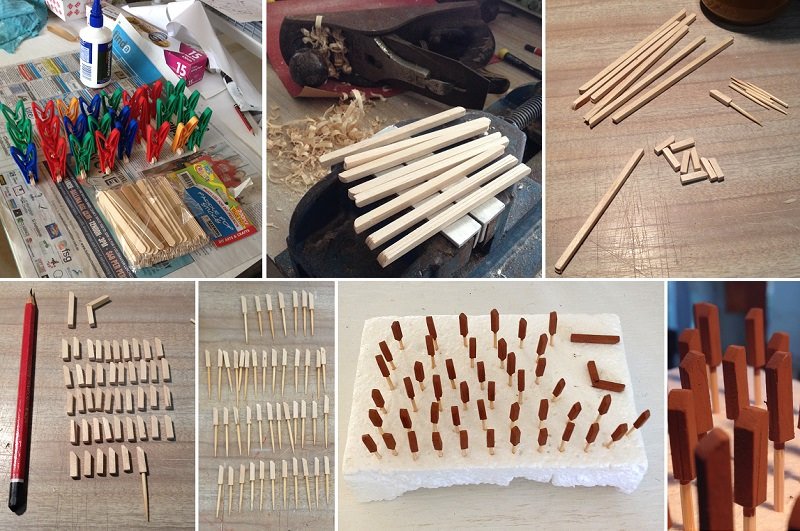
Before getting carried away with laying down the mulch everywhere, I had to make many posts that the council lads inserted on both sides of the bridge.
-
-
Thank you @KeithAug for the tip. Will give it a try next time ... hopefully the diorama won't be too large, for plaster can get quite heavy.
Thank you @mtaylor, @Omega1234, @BANYAN, @druxey, @paulsutcliffe, @oneslim for your 'likes'.
_____________________________________________________________________________________
-
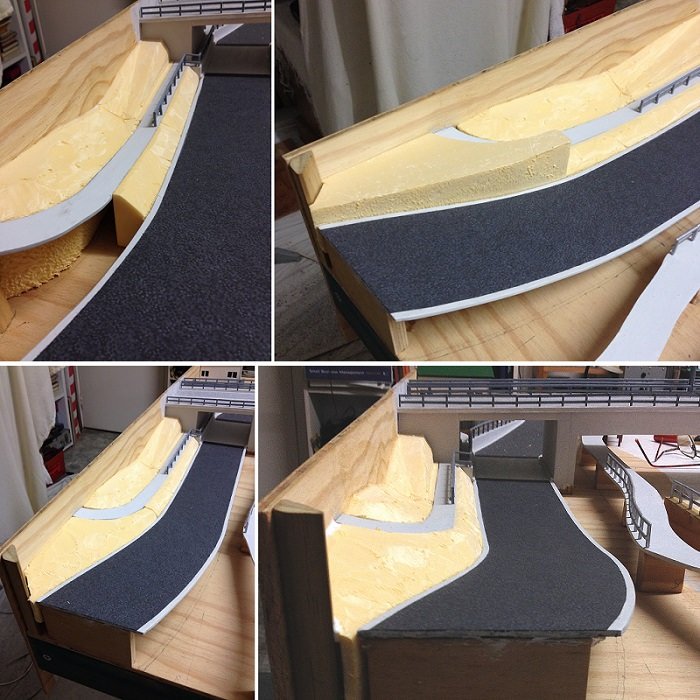
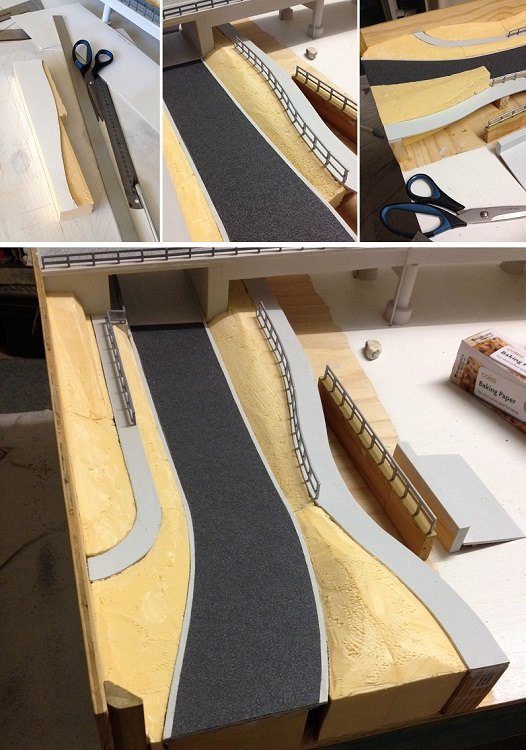
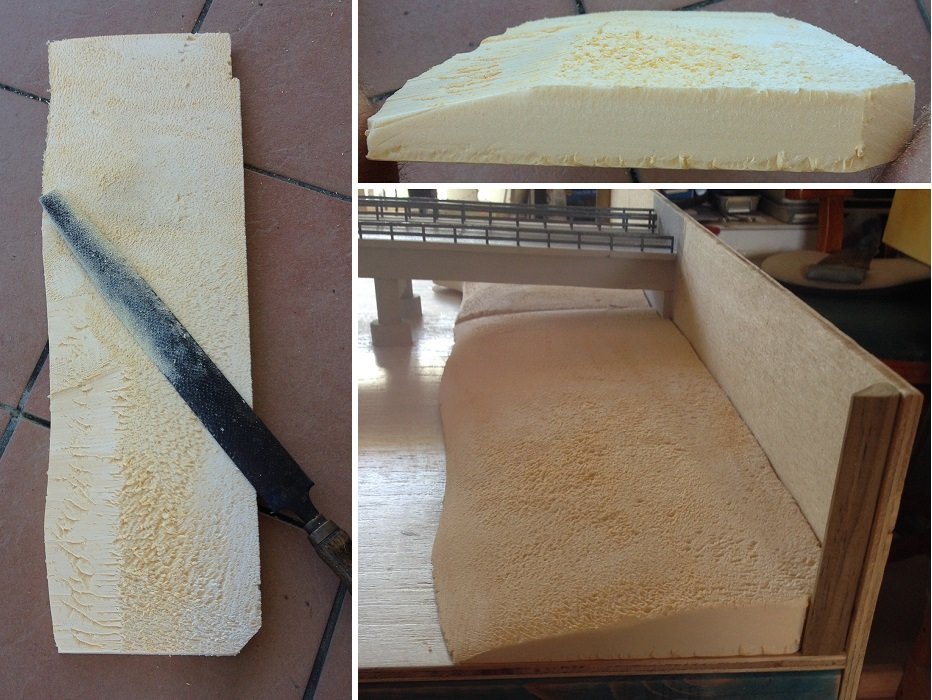
Decided to use condensed insulation foam for landfill.
Discovered that it cuts well with a thin stiff bladed knife. Used it for cutting out initial shapes and for whittling surface shapes.
A rasp file works well for shaping the foam to fit snugly between the around structures.
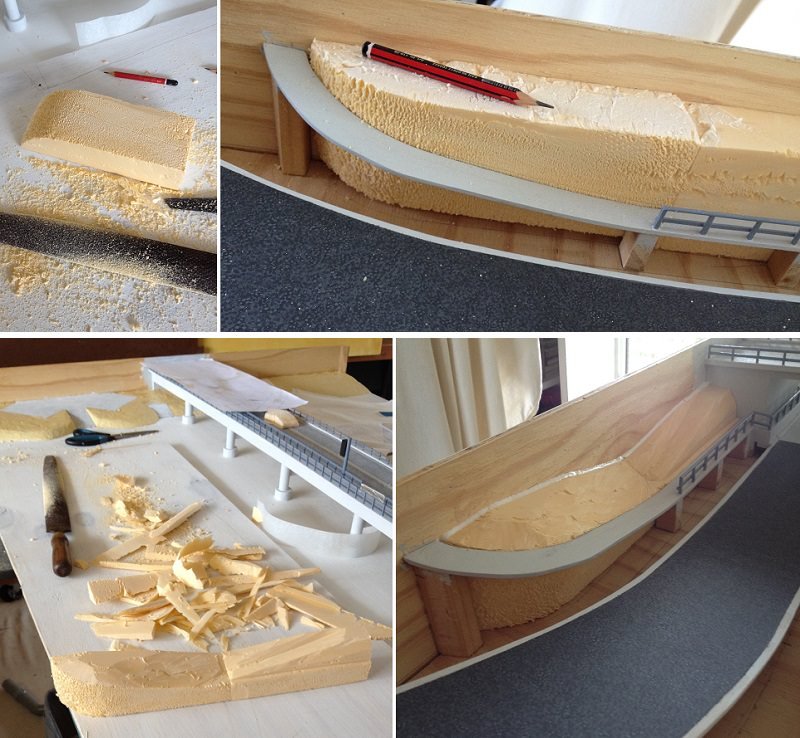
Started with the easiest landfill parts of the landscape.
PVA Glue works really good between foam and raw wood.
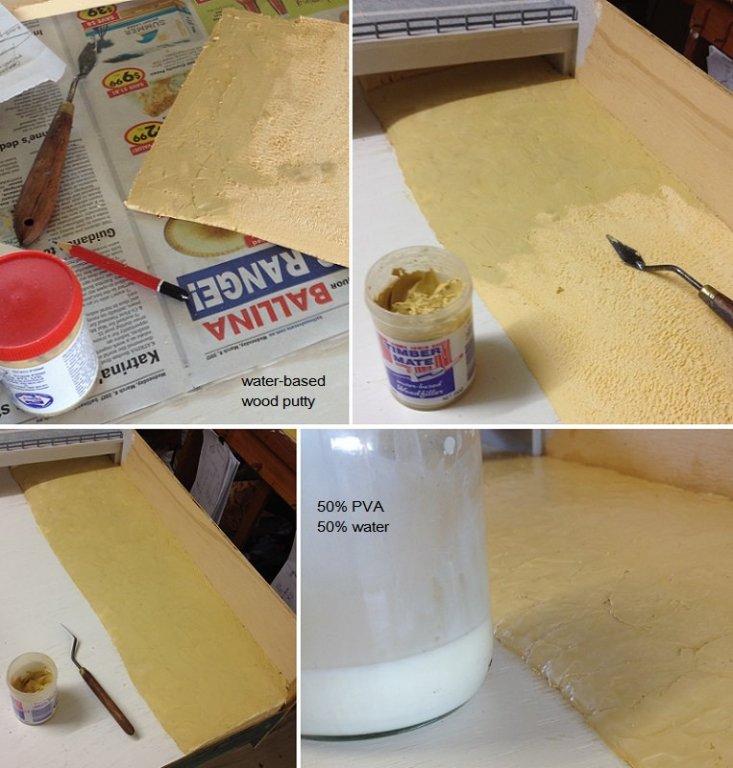
Decided to use water-based wood putty as a filler over the foam surface.
Discovered that it was too fragile for my purpose. It was suggested that I use a 50-50 PVA-water mix as a sealer.
Applied two coats. The first soaked right into the putty, the second coat became a hard skin (so to speak).
- paulsutcliffe, mtaylor, BANYAN and 5 others
-
8
-
57 minutes ago, BANYAN said:
... the bridge looks slightly oversized/out of proportion. With the bridge hanging out over the sides it would be a hell of a vessel to berth safely due to clearance with pierside obstructions etc...
Thank you for enlightening me. Will keep that in mind for future ad hoc boat/ship builds.
-
1 minute ago, Omega1234 said:
Ship...Boat...I’m never really sure about the correct terminology, but what the heck, it looks great, either way!
Thanks Patrick.
I think it is too small for a ship, but some sailors say that a ship can carry a boat (so if it carries a life boat, it is a ship). It's a quasi terminology, because there are too many variable definitions IMHO.
-
-
@Omega1234, @mtaylor, @druxey, @BANYAN,
Thank you for your responses. Much appreciated.
________________________________________
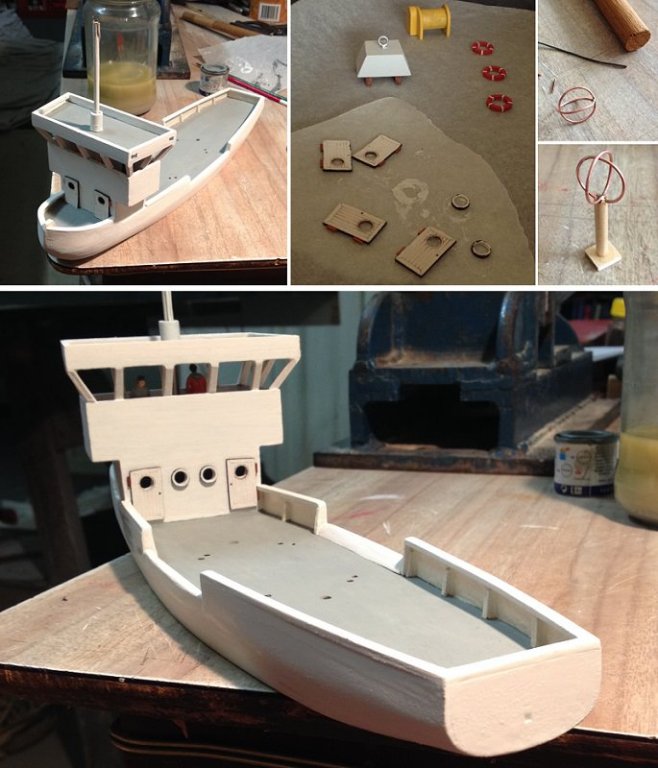
Back to the Buoy Tender.
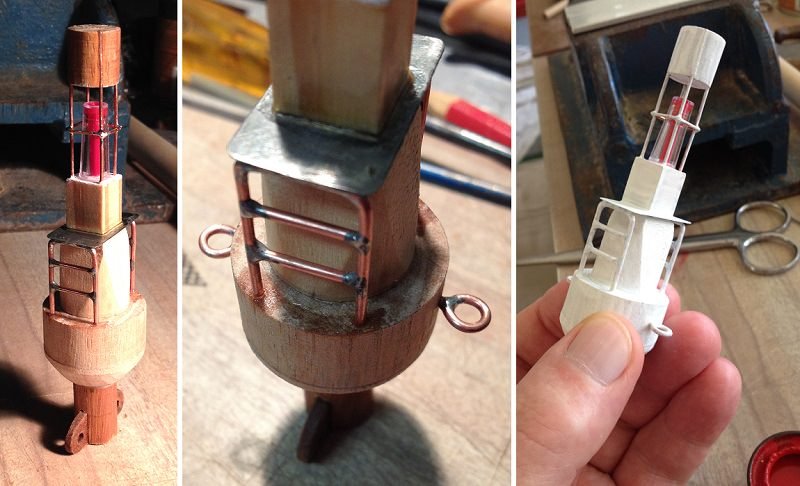
Installed the cabin. Added an angled railing along the gunwale.
Added doors and portholes. Made a cement black anchor for new buoy, and an old signal direction finder (for tracking a stray buoy). Strated to paint the boat.
-
10 hours ago, Omega1234 said:
Hi Tecko
Great work on the buoy. In fact, having seen your hand in the photos, gives me some idea of the overall size of your diorama. It must be huge!
Pls keep the updates coming.
Cheers.
Patrick
Hello Patrick. I have noticed that you have already seen photos of the overall size (4 x 8 feet) of the diorama. So I am now assuming you mean that the buoy is huge in regards to scale. That was my first impression too. They are huge, especially the ocean going buoys.
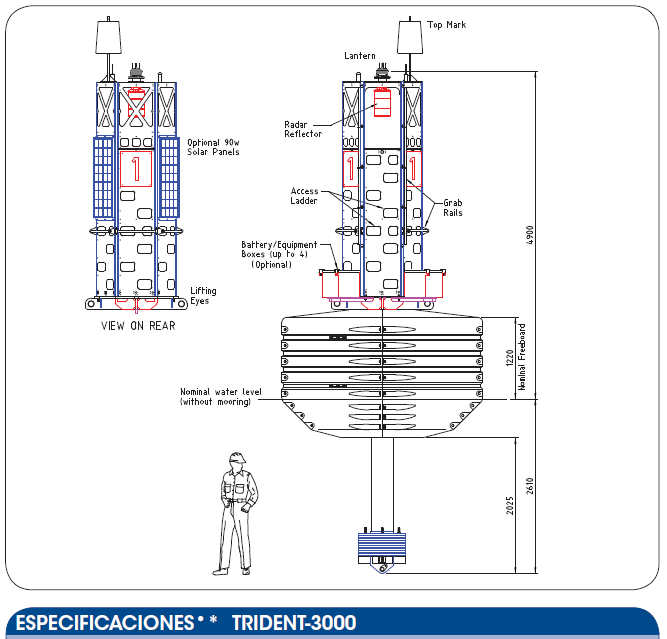
Some of the cranes they use on the buoy tenders are huge also.
-
4 minutes ago, mtaylor said:
Ah... updated the buoy in the process. Looks super. Do the solar panels generate any electricity for the lights/horn/bell???? Just kidding...
Thank you Mark. I take that as a great compliment.
- mtaylor, Omega1234 and paulsutcliffe
-
3
-
Thank you fellow model builders @BANYAN, @GrantGoodale, @paulsutcliffe, @druxey, @oneslim, @Omega1234, @KeithAug, and @mtaylor for your reactions.
Thank you Pat and Mark for your comments. Much appreciated.
_____________________________________________
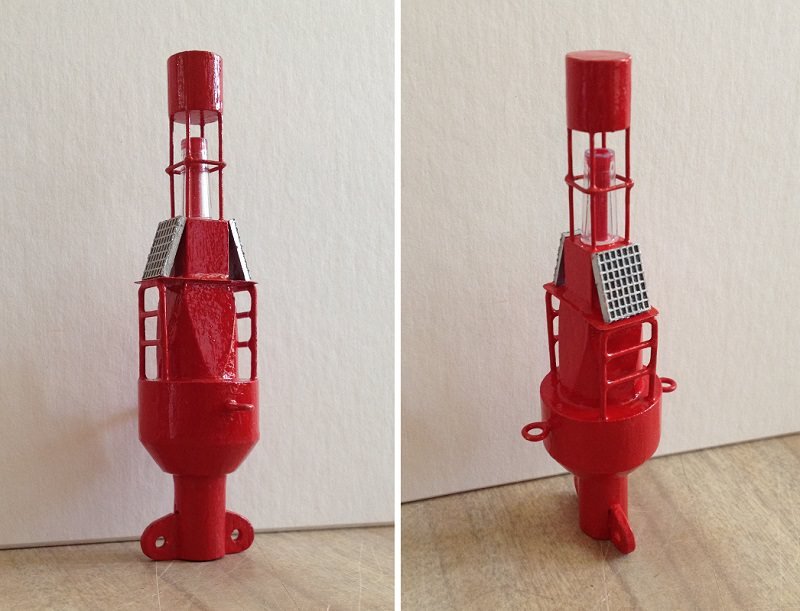
All we need now is a brand new red buoy.
As usual, an ad hoc assembly of found items.
- oneslim, paulsutcliffe, lmagna and 7 others
-
10
-
Thank you @Jack12477, @BANYAN, @oneslim, @druxey, @KeithAug, @GrantGoodale, @mtaylor, @Omega1234, and @*Hans* for your reactions.
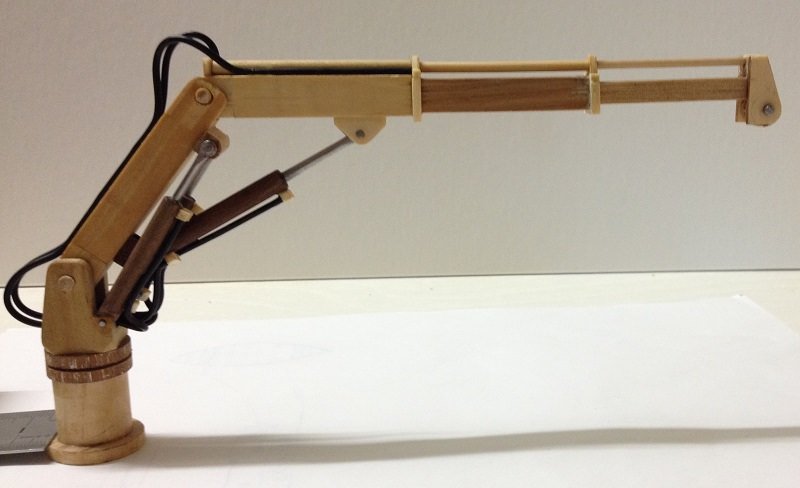
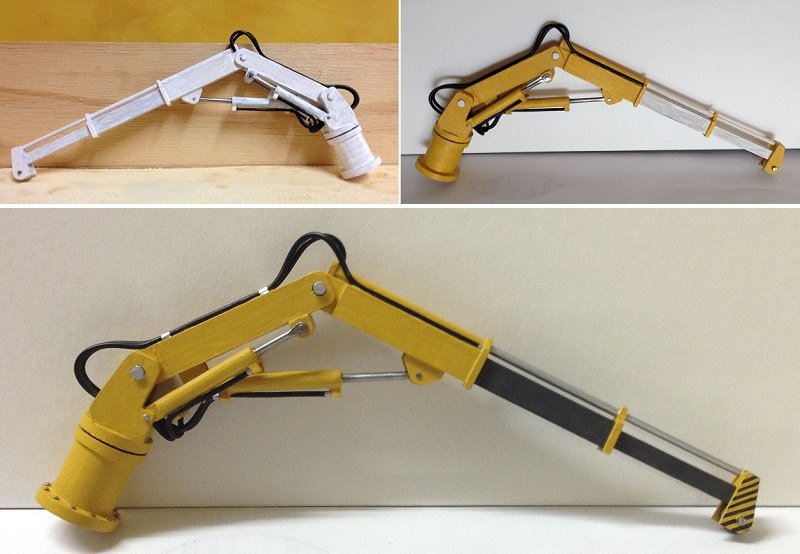
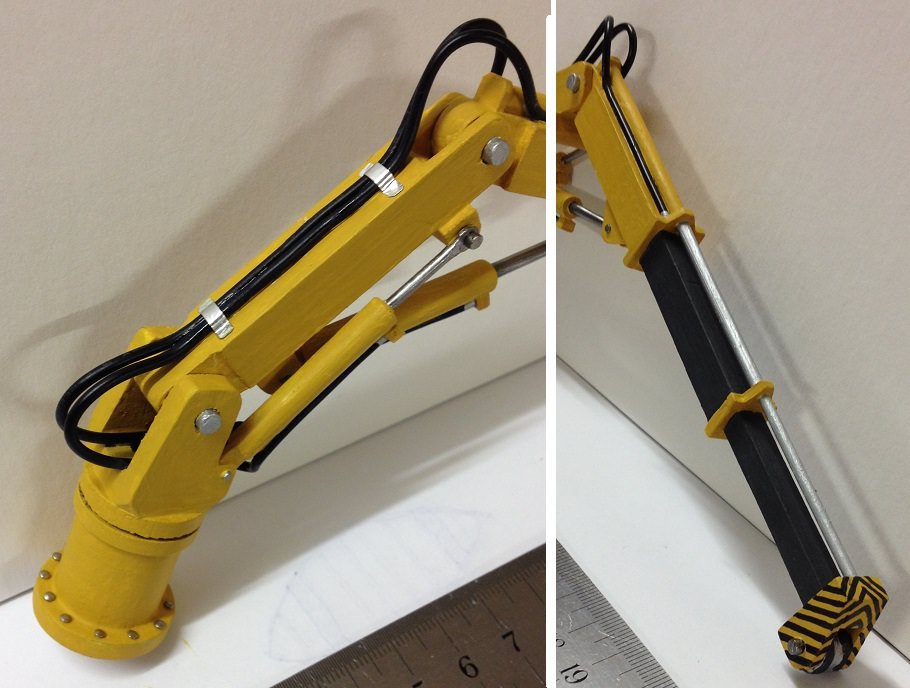
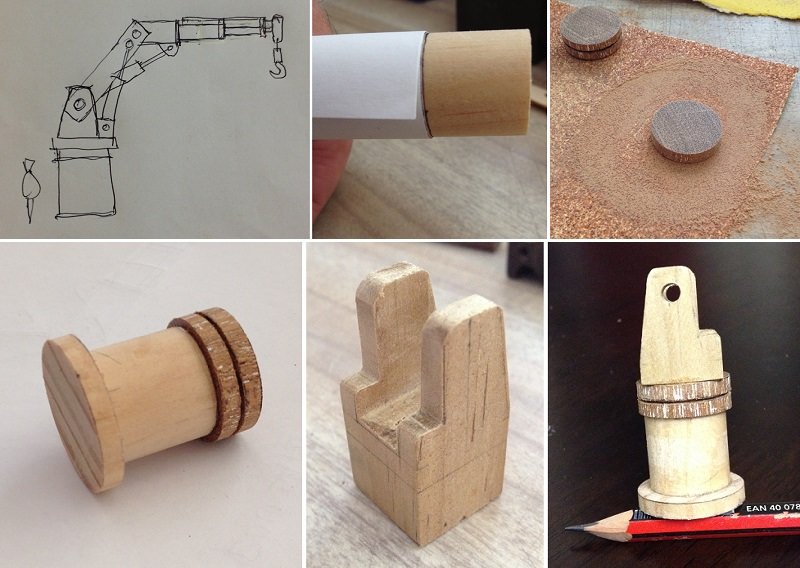
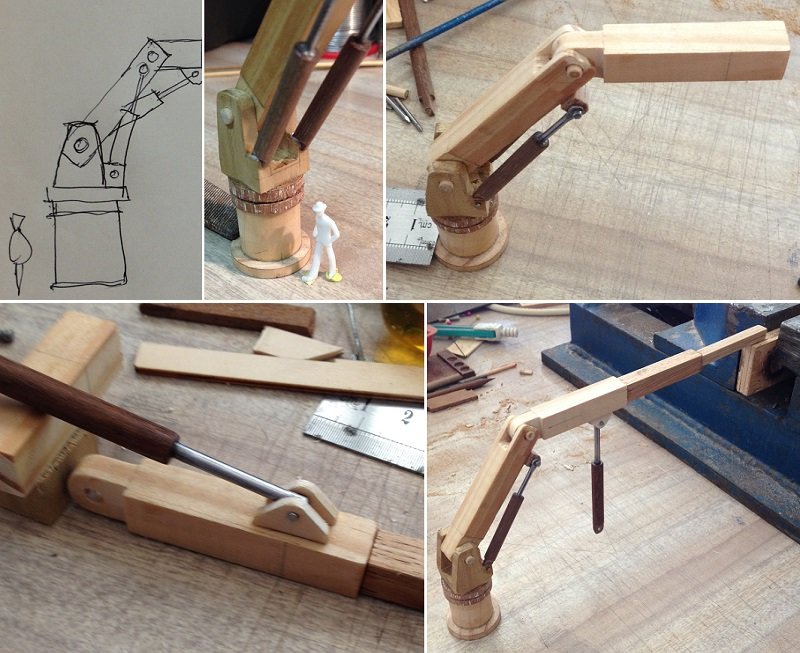
Glad that you are liking the crane (one of my first toys as a child. A pulley-cable system
 ).
).
______________________________________________________
Used black cable and aluminium foil for the hydraulics.
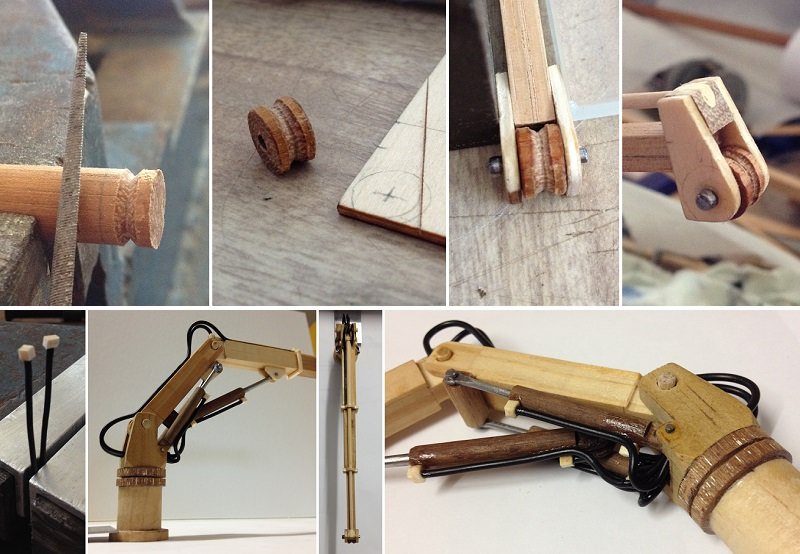
Used pin heads for mounting bolts.
-
-
Thank you @*Hans* for your compliment; and others who liked it too.
Thank you @RichardG, @mtaylor, @BANYAN, @John Allen, @*Hans*, @Omega1234, and @oneslim for your 'likes'. Much appreciated.
________________________________________
Since the
squidbuoy is so big, it needs a big crane.Used scrap wood and nails.
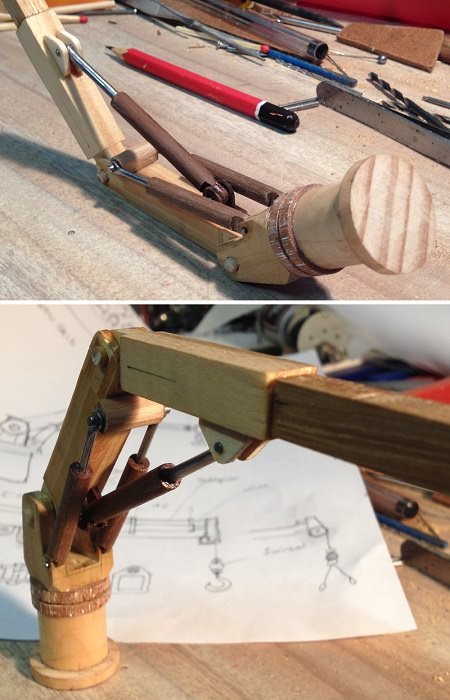
-
Thank you @Omega1234 for your response. Yes, a big part of the satisfaction of building a model is overcoming the difficulties. Many modellers are happy for their models to come together easily. Yet many of the same modellers would not part with the ones that were most challenging.
Thank you @mtaylor, @KeithAug, @John Allen, @oneslim, and @BANYAN for your 'likes'.
____________________________________________________________________________
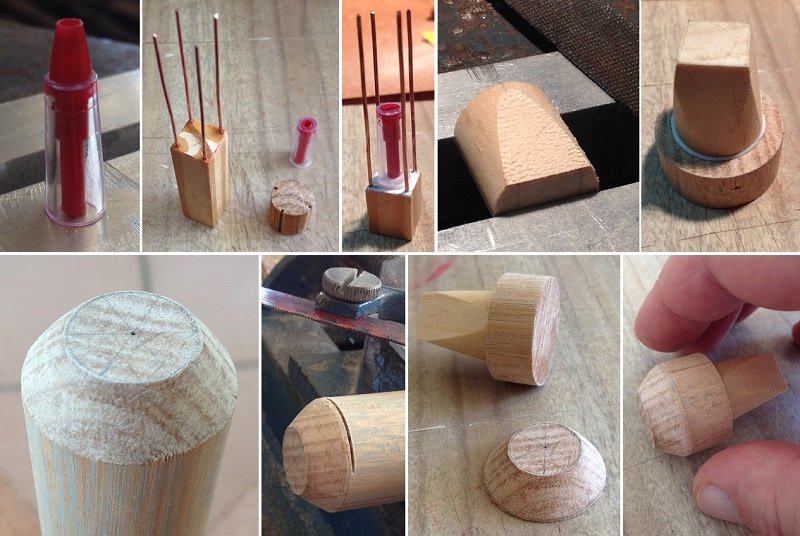
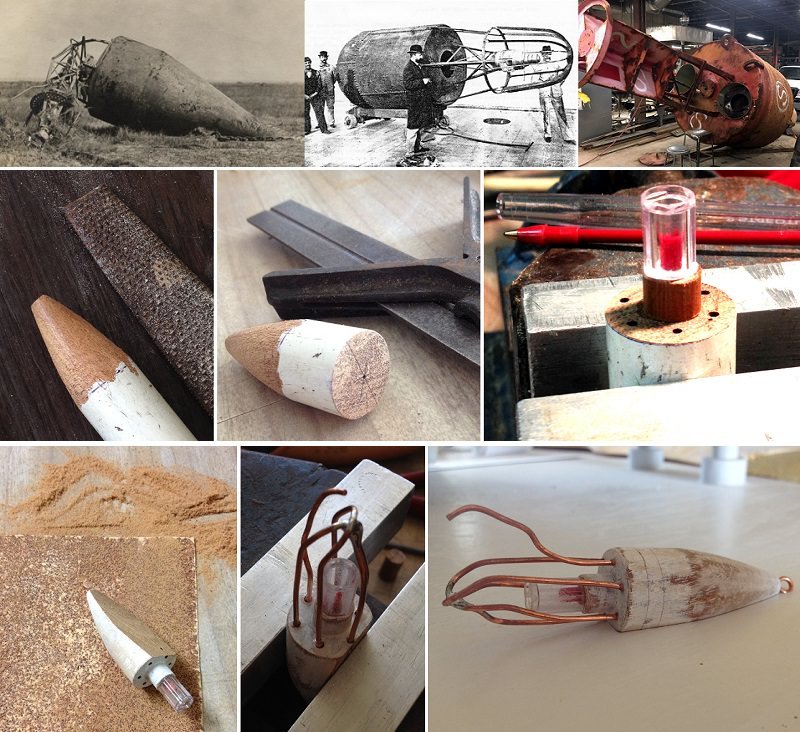
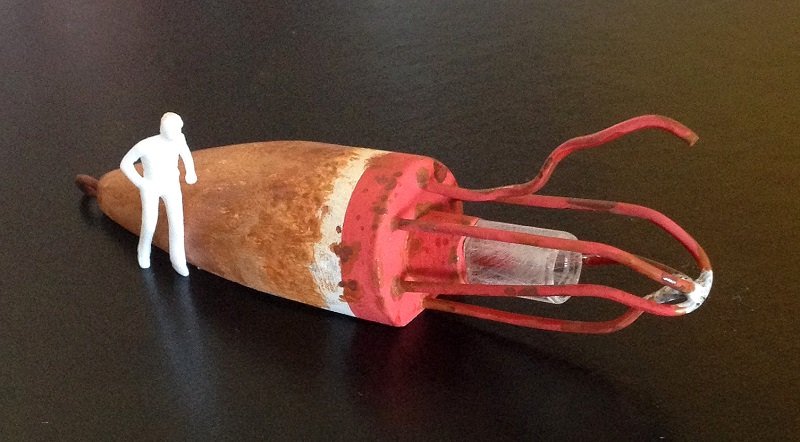
Decided to take a break from making the boat. My mind was getting too preoccupied about the buoys and crane part of this model.
I needed an old unserviceable buoy which was found aground near the Wardell bridge. This storey will give reason for the CLEM-PETER to be in the vicinity. It's task is the pick up the old buoy and replace it with a new buoy somewhere downstream.
Had fun making this buoy. It looks like a giant squid. I have an image in mind that will use that appearance to its advantage in the diorama.
Used an old broken broom handle, red Biro casing, and thick copper wire.
- *Hans*, BANYAN, John Allen and 6 others
-
9
-
Thank you @mtaylor, @BANYAN, @Mike Y, @druxey, @Omega1234, @John Allen, and @oneslim for your reactions. Much appreciated.
___________________________________________
Yeah, sometimes it's fun, especially when it works out okay.
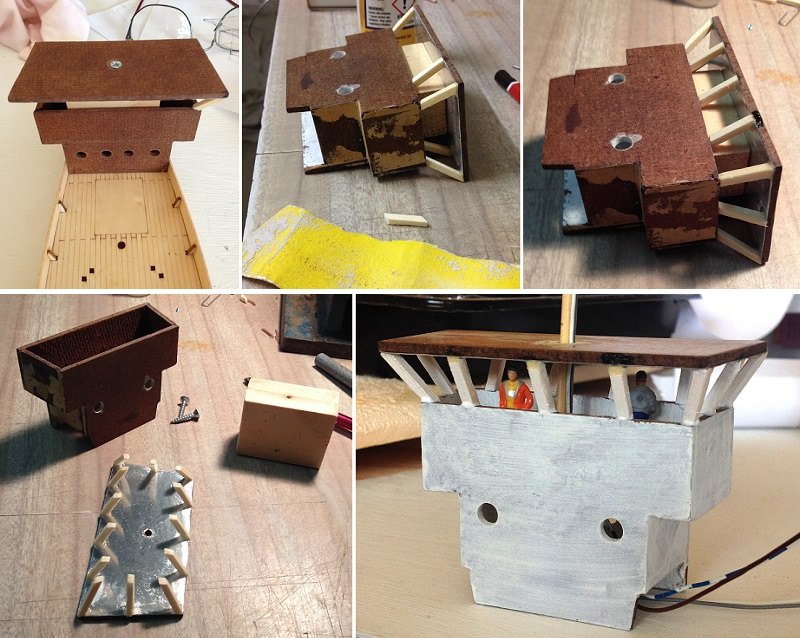
Had a bit of a headache working out how to attach the overhanging roof. So I placed a block of wood inside and secured it with a screw at either end. Then made window frames to fit in the gap, gluing only ceiling end of the frames. Then took out the block to complete the construction.
- John Allen, mtaylor, Omega1234 and 3 others
-
6
-
Wow. Thank you @Omega1234, @jablackwell, @oneslim, @John Allen, @BANYAN, @KeithAug, @mtaylor, and @prutser for your 'likes'.
________________________________________________________________________
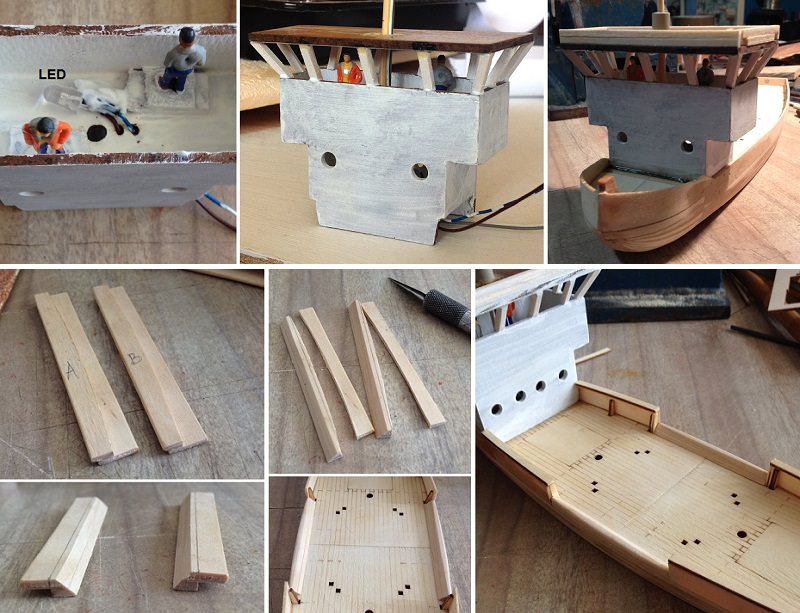
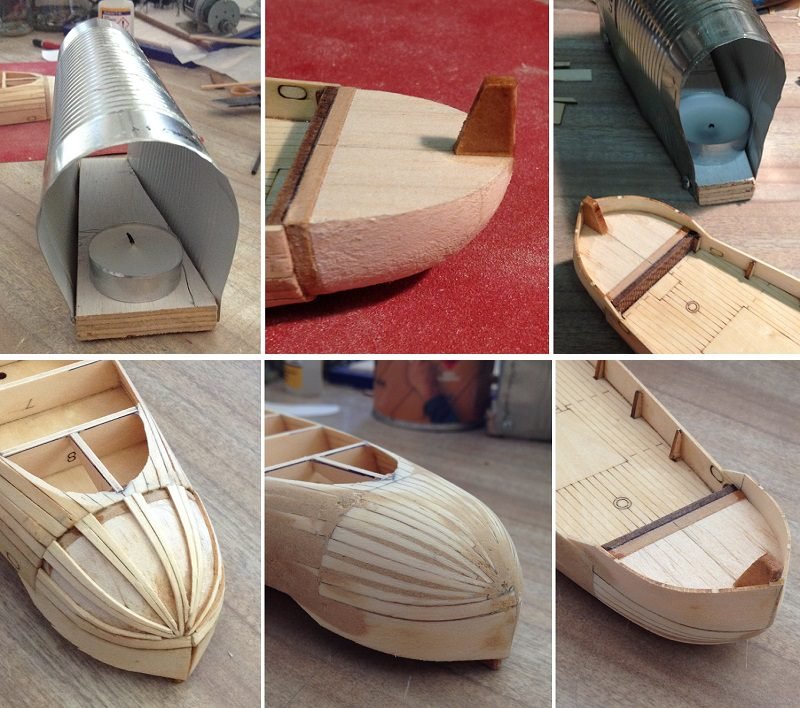
Decided to add a bow section to the wider end. The bulkheads already in place did not allow me to deepen the bow section.
However I still carried on the best I knew how at the time.
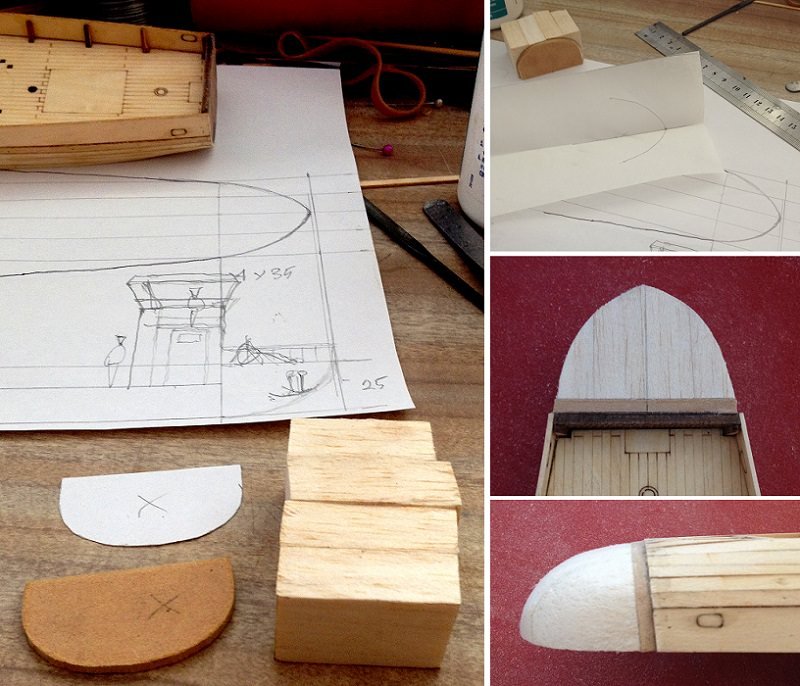
Needed to bend planking wood at a sharper curvature. Decided to made a variable curvature plank bending mould.
As I was planking the bow I realized I will eventually need to use wood putty. So I changed tactic and only placed planks to hold the putty.
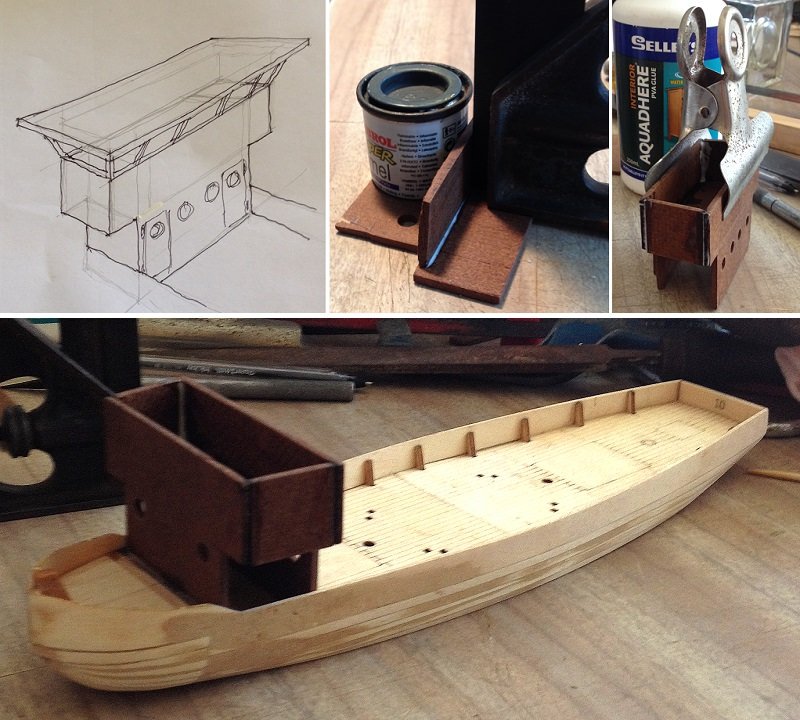
Decided on the cabin type and started to build this from 3 mm Masonite.
- BANYAN, John Allen, oneslim and 5 others
-
8
Wardell Bridge and boat by Tecko - 1:72 - diorama
in - Build logs for subjects built 1901 - Present Day
Posted
Thank you @BANYAN, for your response.
Thank you @mtaylor, @paulsutcliffe, @druxey, @KeithAug, @Jack12477, and @BenF89 for your 'likes'.
______________________________________________
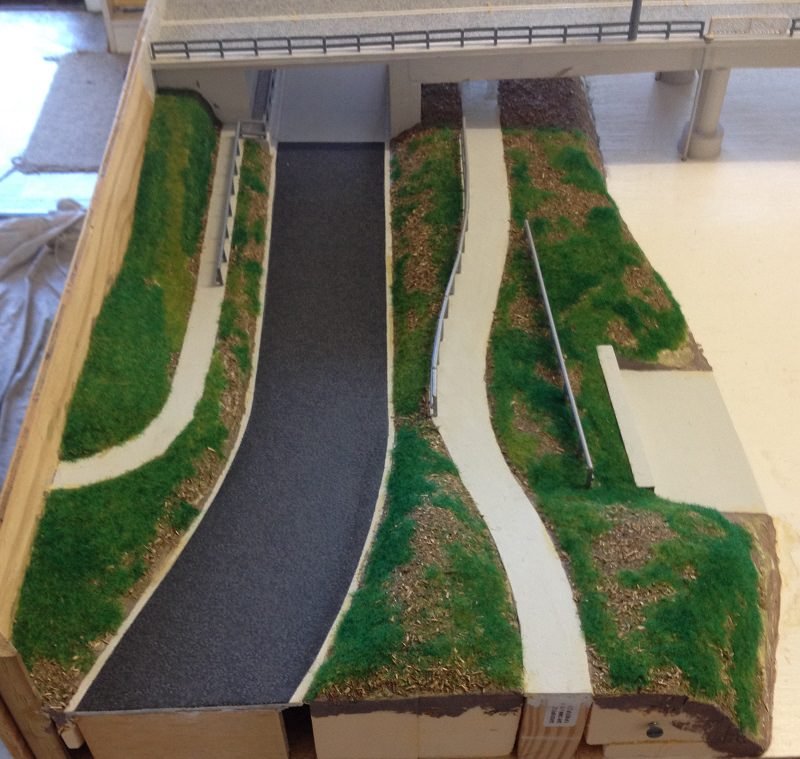
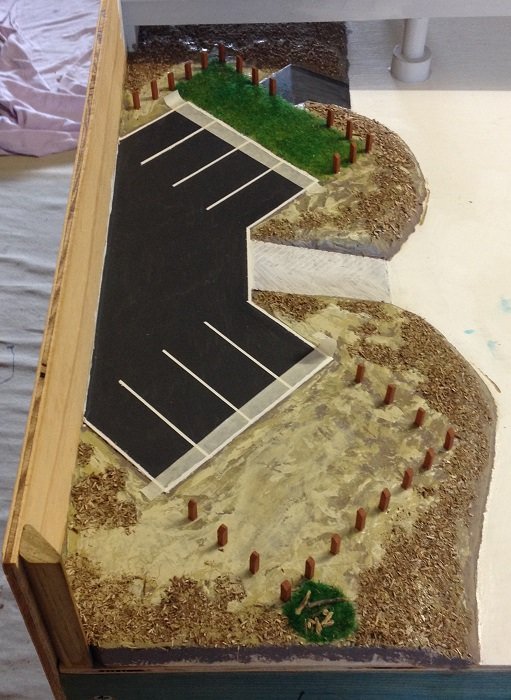
It has come to my attention that the whole display / diorama has not been seen for a while.
So here are some photographs:
I found it quite difficult to take single photo of the whole lot. It's like cramming myself into a corner to take the shot.