


Tecko
-
Posts
262 -
Joined
-
Last visited
Content Type
Profiles
Forums
Gallery
Events
Posts posted by Tecko
-
-
Thanks everybody for your likes and comments. Much appreciated.
14 minutes ago, mtaylor said:I love what you came up with. Just because we offer suggestions doesn't mean you need to accept them. I'm like Steven, I'd love to see this in person.
Thanks Mark. I know I don't need to accept anybody's suggestions. But the ones I do follow are because their suggestion is better than what I have in mind at the time. In this case, I gave the suggestion a go, but did not turn out as I hoped. Still liking the suggestion, I pursued a different approach, and it was good. So, I am glad for the original suggestion by @druxey.
-
-
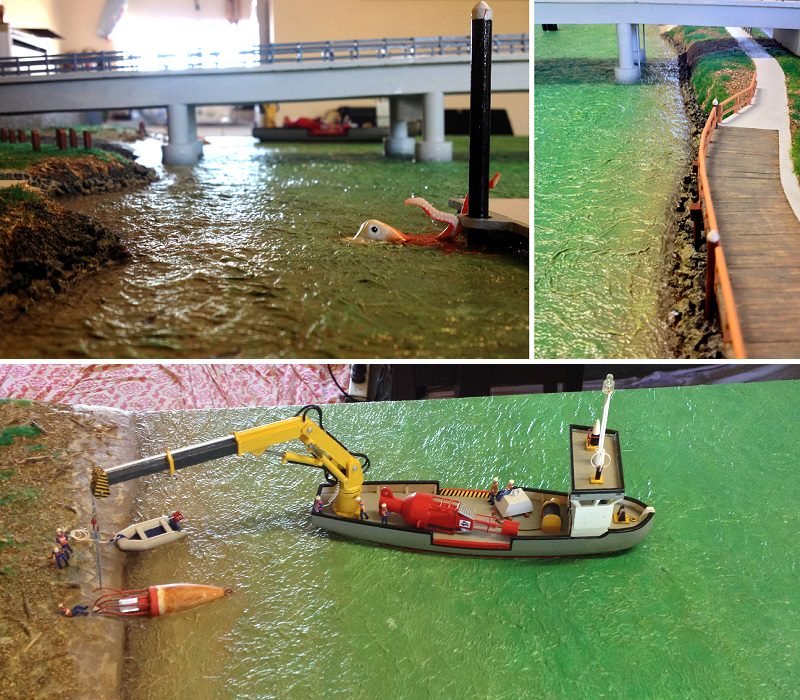
I still liked @druxey idea of weathering the footings somewhat. So I visited our Missingham bridge to study the footings. It had some barnacles on it.
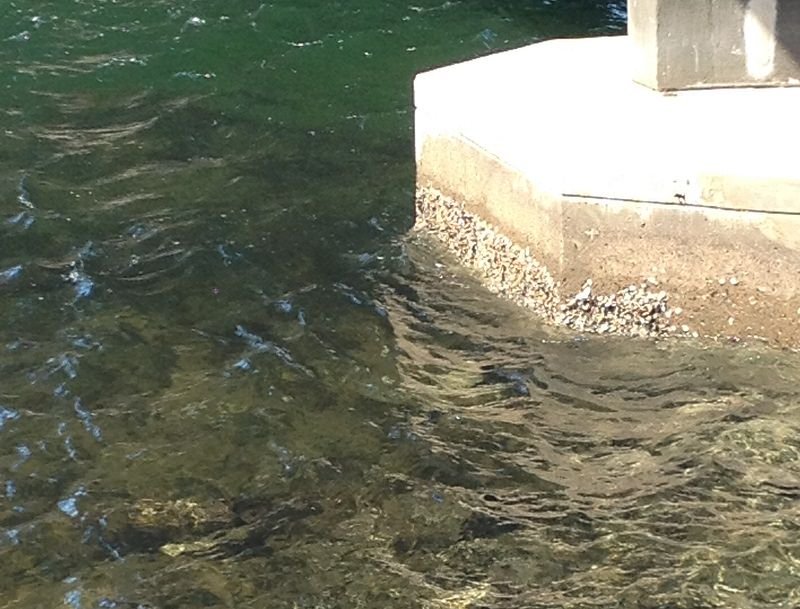
Decided to follow this example. Only used various shades of grey to neutralize colour comparisons. Exagerated the barnacles to make it look like barnacles at such a small scale. Also attempted to add some reflection on the water that was more greyish than before.
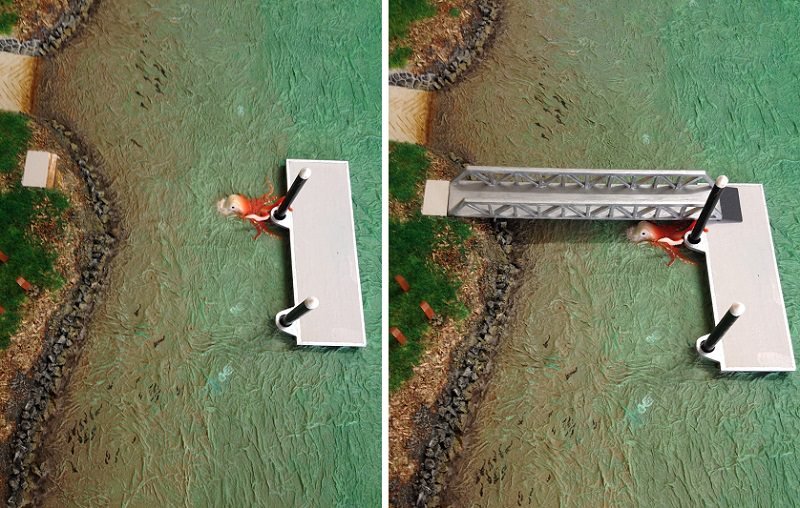
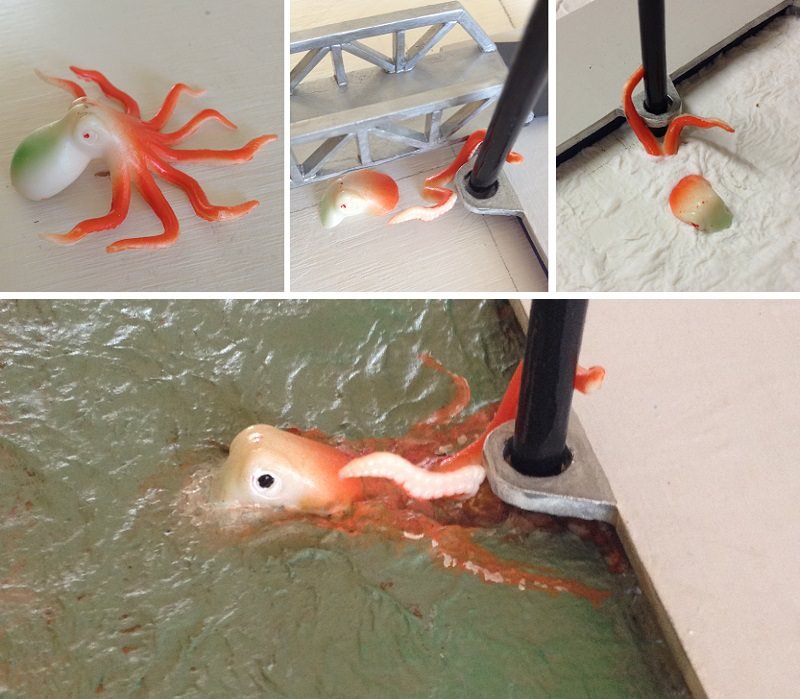
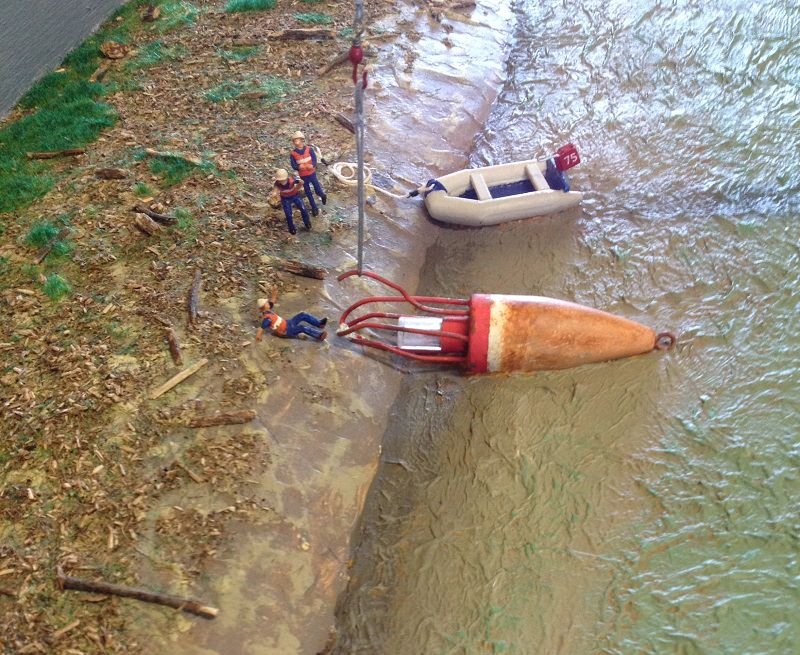
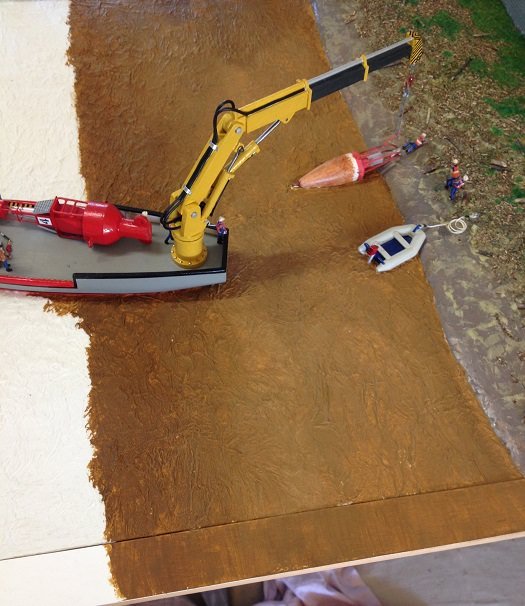
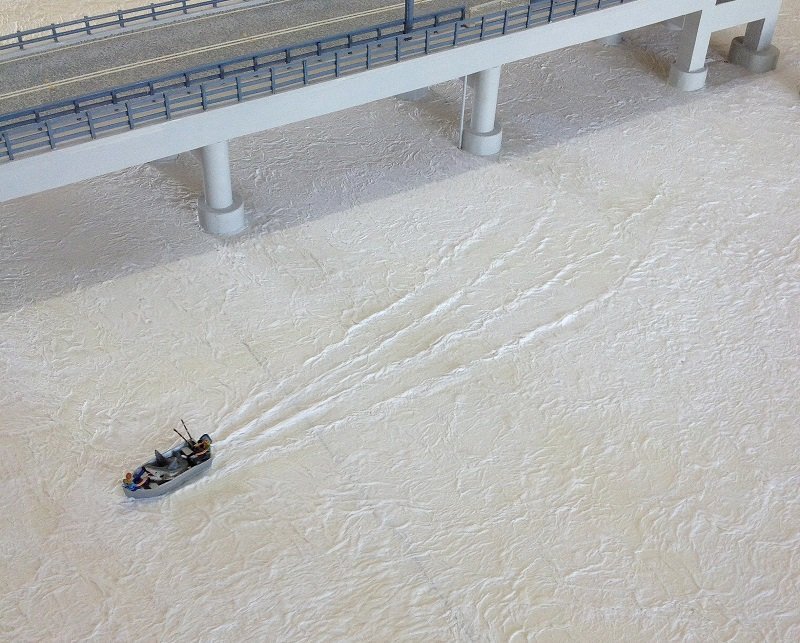
Cleaned up the wharf. Added another submerged tentacle to the kraken (near side). With the gangway in place, the kraken will be partly hidden (a sneaky fellow). Painted the fish and jellyfish swimming away from the kraken.
-
7 hours ago, druxey said:
It's your creation; you are in charge - not us!
Yes I know. I have been sharing this build and my thoughts for so long now that you and others have become my friends. I am like this with friends at home too. In most cases I am my own man, other times I am not.
It was a great idea, but I did not foresee the contrast in colour which persuaded me to go back.
-
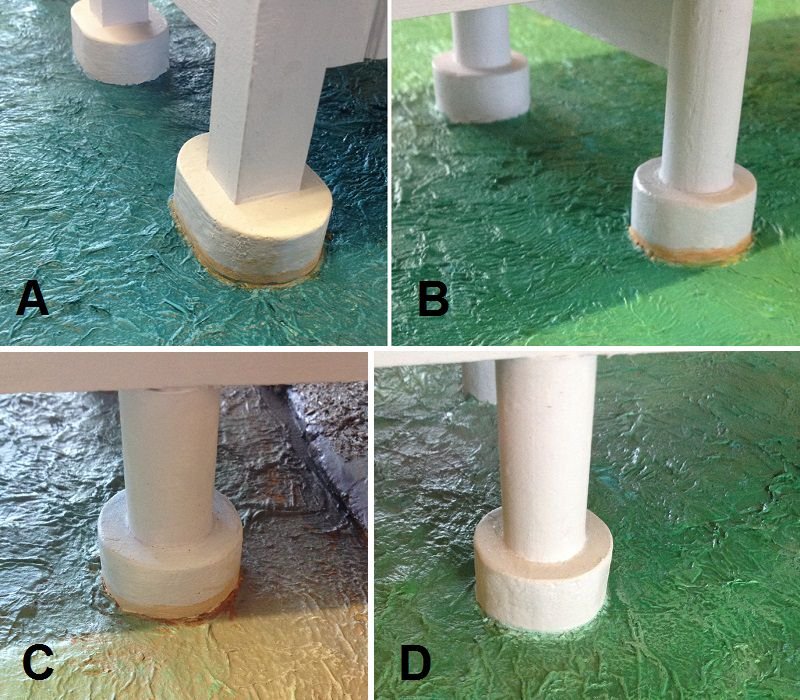
Well, I gave it a go and I have to say I disliked it. Sorry.
IMHO
A & B looks too out of place considering the colour of the water. It may look like that in real life, but it irks me. If the museum suggests that it ought to have a dirty flood line, then I'll tell them to get somebody else to paint it.
C looks okay because the water colour is similar.
D looks like closer to a brand new bridge that has not yet seen a flood.
It's not easy to paint around the footings under the bridge. If I put a dirty mark around the footings, then I'll have to do the same for the fender piers. . . and you can forget about me doing that.
So, I am going back to D. I am sorry If I have disappointed anybody about my decision.
-
-
Not much to see here, or to say. Just a few touch-ups is all I had time for today. I am too tired after riding a 25 mile race. All the way I did not see one rider in front of me.
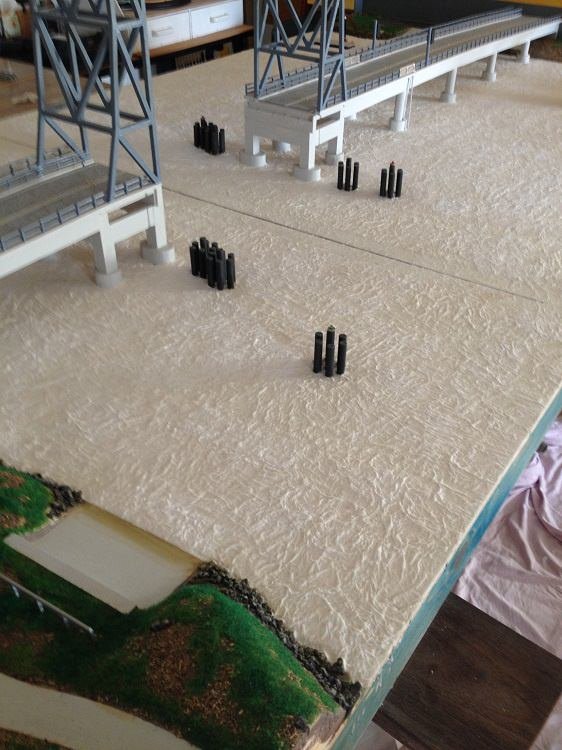
Played around with the bridge footings at water level. Tried to give a better impression than just cement and coloured water.

Then decided to add other sea creatures besides the kraken.
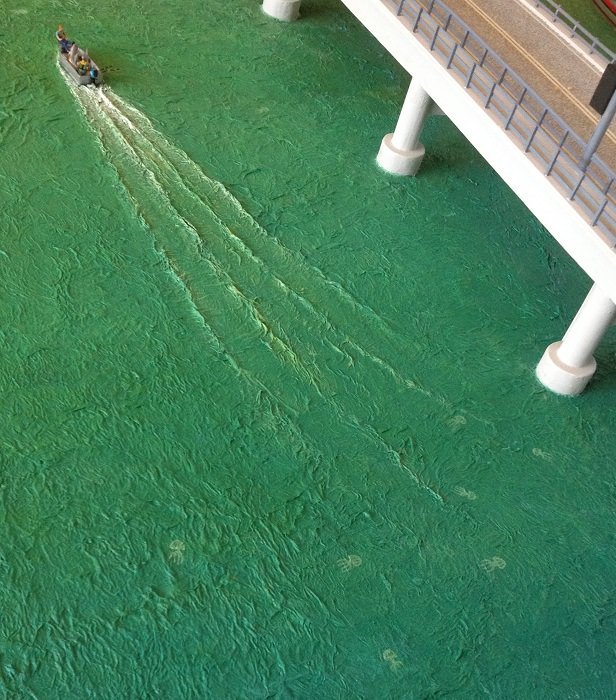
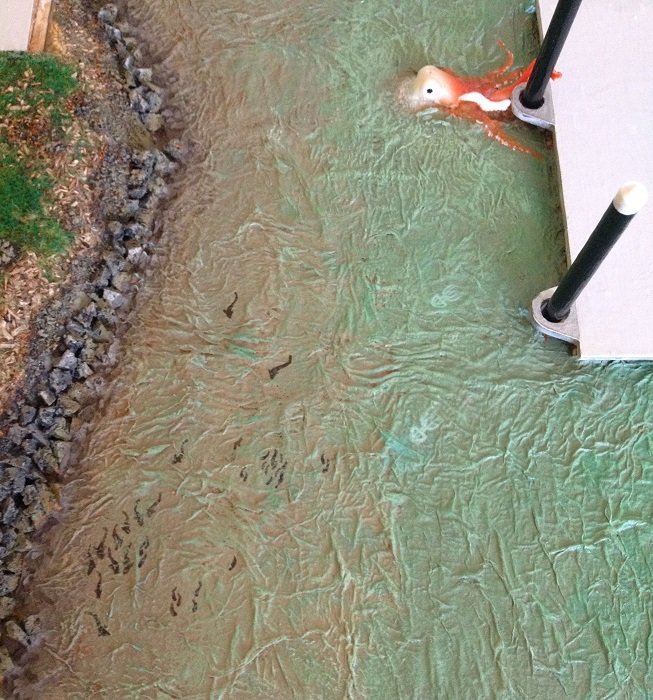
May get the kids to count how many jellyfish there are.
-
Thanks fellows.
Lou, that was funny, yet could seem bonkers 😮
_______________________________________
Sorry to show similar images.
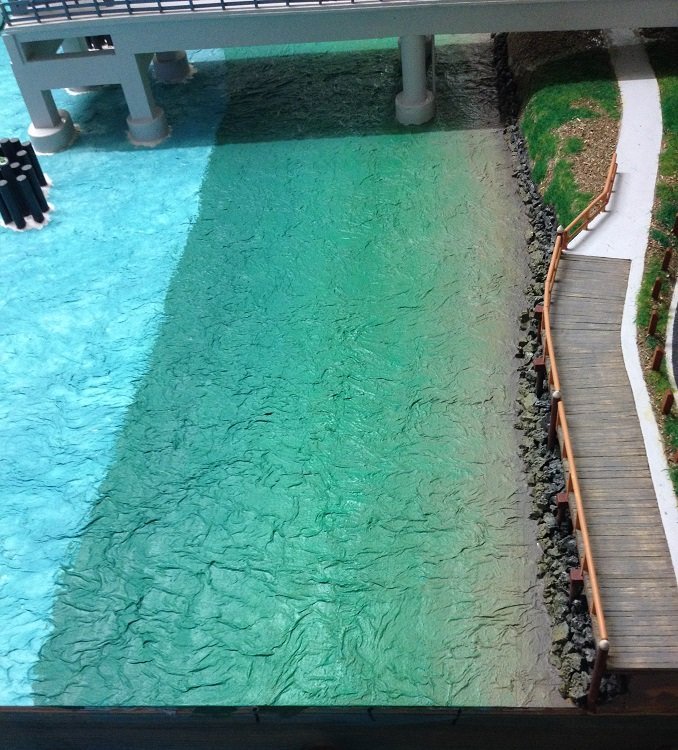
Spent the whole day dry-brushing the water surafce with lighter shades for the water crests. When it dried I was glad that it went darker, as previously explained. Now it's not so noticeable. Yet the whole water surface became slightly lighter shade
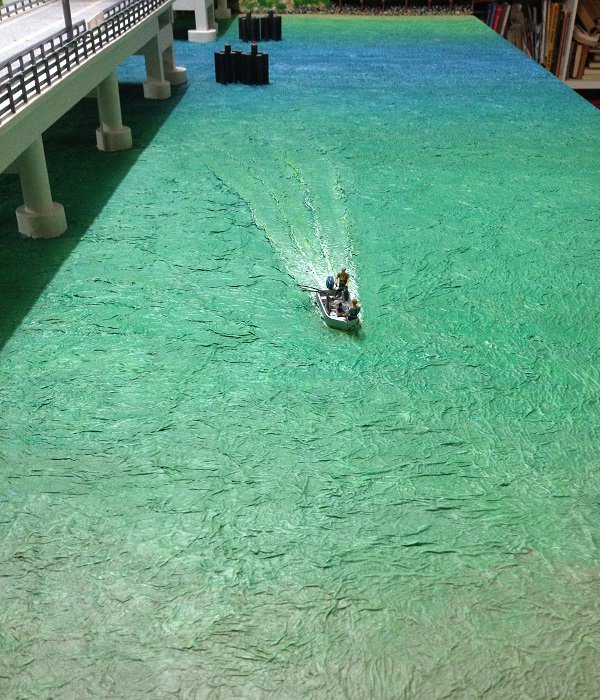
Still lots of little touch-ups required. Then a three day drying period is needed before applying the varnish. Each coat requires 24 hrs drying time. Looking forward to see how it will look then.
- DORIS, John Allen, mtaylor and 10 others
-
 13
13
-
"Crikey! It's a Kraken".
-
4 hours ago, druxey said:
Color of water is influenced by the sky; it changes constantly and is a moving target. It drives artists crazy trying to 'catch' a certain mood! Sp, whatever colors you end up with, no-one can say whether you are right or wrong.
Thank you for supportive gesture. Greatly appreciated. I am pleased with the painted effect, for its educational purpose.
Yes, the sky colours can be seen in the water, dependant on angle of reflection.
At a shallow angle it often reflects a lot of the sky background colours. But at a steeper angle one is more prone to see the degree of water clarity and its chemical make-up (like in satellite imaging).
Due to curvature of water riples, the sky colours get reflected in them. That is why dry brushing the water crests with a lighter colour gives it that extra sense of realism. This sort of detail will be one of my next steps with painting the water.
I have to say, with modelling, one gets to learn how to think outside of the 'normal' box of knowledge. One starts to 'see' more about what they are modelling than the normal observer. When it comes to painting, we start to study not so much the item but its colours. Determining what colour mix to use, is it reflective, shadows, etc,. I am hoping that the gloss finishing coats will be reflecting some of the outside colours, such as the watermark colours of the Buoy Tender, and the bridge footings. We will soon see if it does.
- paulsutcliffe, lmagna, druxey and 3 others
-
6
-
11 minutes ago, Louie da fly said:
I agree. The colouring looks really good and lifelike.
Steven
Thanks Steve.
I still think its quite bright; definately so for the actual area where the bridge is. However, for the purpose of showing depth, it certainly does that. Now here is some good news (for me anyway). The Ultra Gloss Clear Timber Varnish, which I applied on a test trip long time ago, has yellowed. This means that there will be a very slight darker glaze to the finish, with a hint of dirty yellow. It will, over time, dim the water colouring down. Plus make the blue slighty green, and the green slighty dirty water (yellowish) green. I think it will be better in a year's time (like wine).
- Omega1234, mtaylor, Louie da fly and 2 others
-
5
-
Thank you my friends.
Just to clarify why I added a card strip along the back edge of display. As I painted the water surface, I would also paint the card strip. This strip gets transposed onto the bottom edge of the canvas. It will be a water colour reference for the background of the diorama. The canvas painting will be in oil paints, my preferred painting medium.
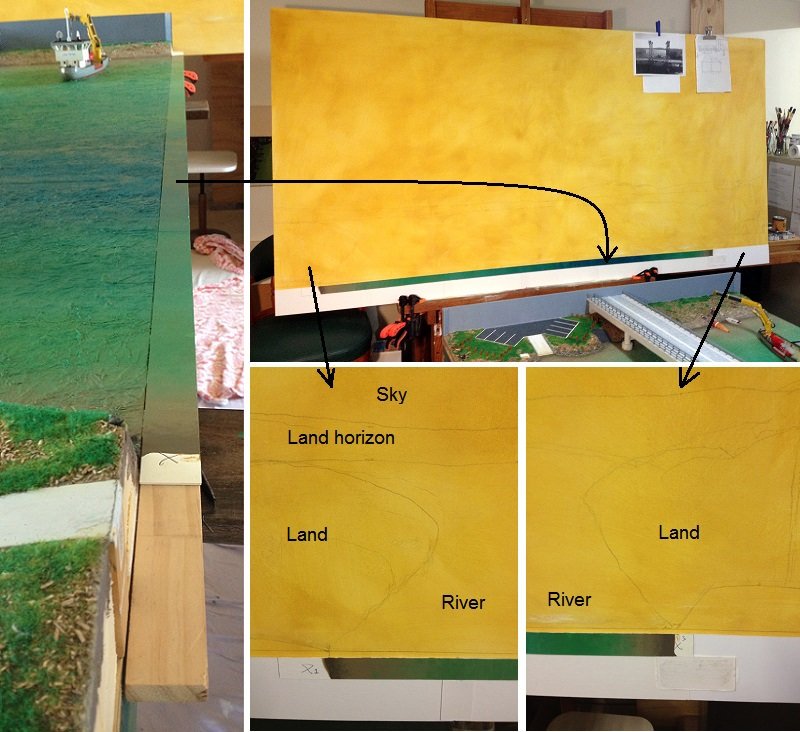
The painting will only look, in perspective, from the console operator's point of view.
Below, is an idea of what the background will look like. As you can see, it will be mostly sky.
-
Thank you Steve and John for your supportive comments. Today I feel much better about the whole colour scheme, even if it is not what is seen at Wardell.
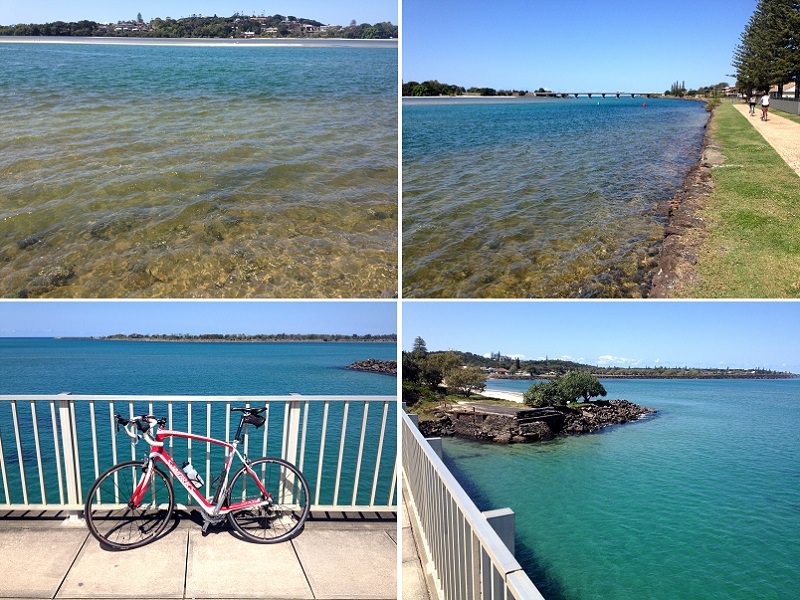
After finishing the basic colours for the river, I went for a needed bike ride. It has not rained for over a week and Richmond River, near the ocean, is very clear. Could not help notice a similar teal colour to what I have been painting. Took photos to show that such waters are not too overboard as such. Though, 20 miles up river, where Wardell Bridge is, is still dirty green.
So far . . .
- BANYAN, paulsutcliffe, Baker and 11 others
-
14
-
Thanks guys for your support and confidence in me. Sure hope not to disappoint. The following is just a start. Got half way with the basic blending one shade with the next. Once the basic coverage is done, there is still lots more to do. I still have lots to learn with using acrylics.
Starting from waters edge, I was assumed the water/wet mud and rocks would look darker, yet mliky due to dirty water. As the water gets deeper, the milky dirt browns take over. Then green got mixed into it (according to some silly plan of mine).

Lots of detail stuff to be added later. Hoping the overall effort will improve the general appearance of the river. We will see.
-
Oh boy, I sure stuffed up the paint job. Only done 1/10th of the water. Started along the river banks. The dirty water look became too brown, opaquish, blotchy, and dark on outer edge.
It's been a long time since doing any painting, and have forgotten basic principles. The rest of the river will contain blues and greens, which is not mixed with the brownish areas already painted. Need to repaint what I have done with a better colour mix. But first, I need to paint a background tone to get rid of that stark white as a comparison.
Hope to improve on this.
- paulsutcliffe, hexnut and lmagna
-
3
-
@lmagna, @Jack12477, @BANYAN, @BenF89, @mcpwilk, @michael mott, @druxey, @oneslim, @mtaylor, @paulsutcliffe, and @DBorgens.
Thank you all so much for your support and encouraging comments. Needed them more than you realise.
_________________________________________________
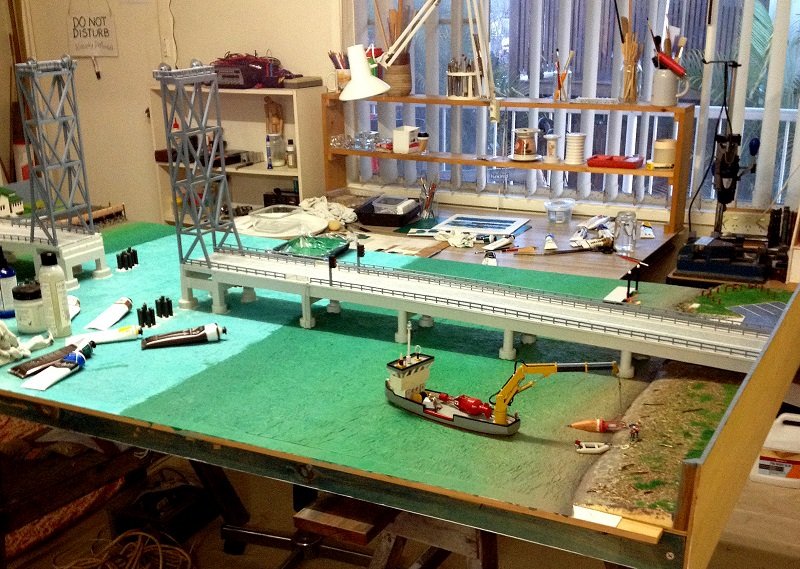
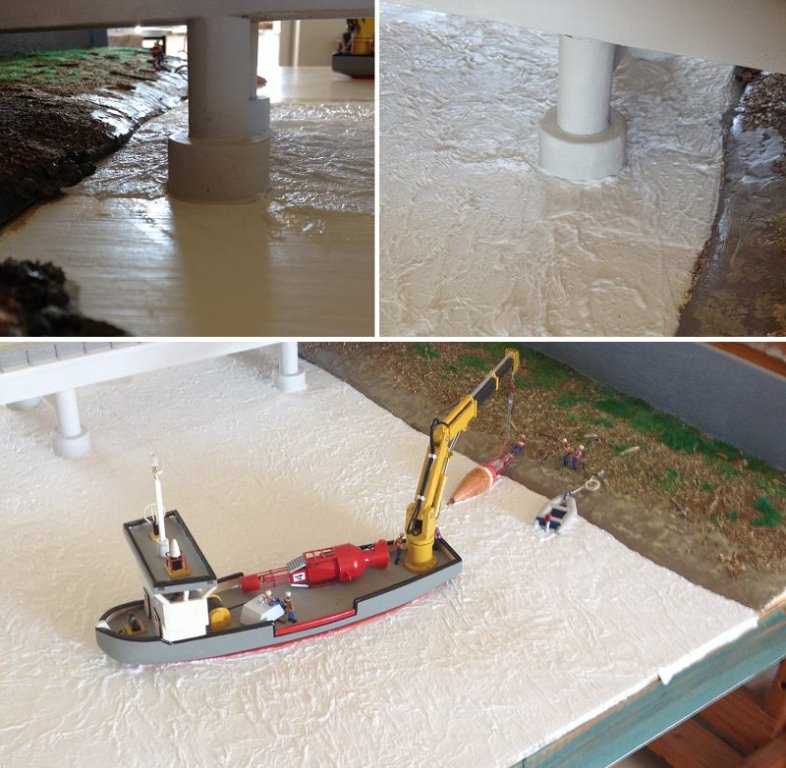
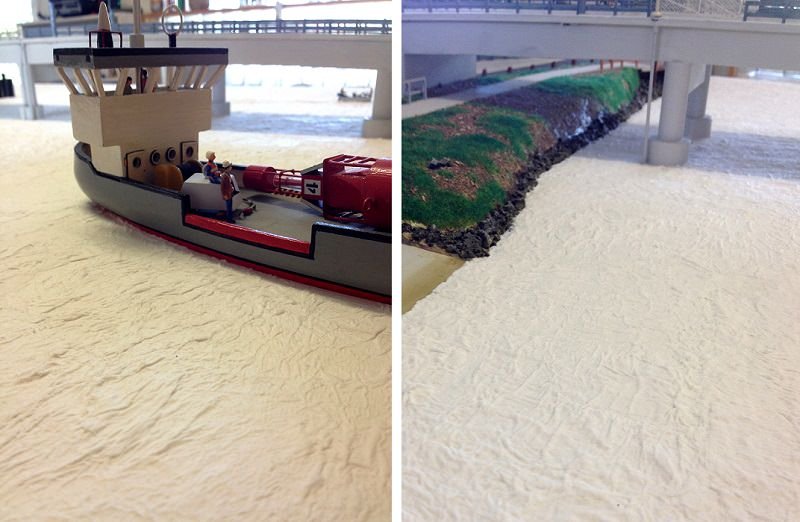
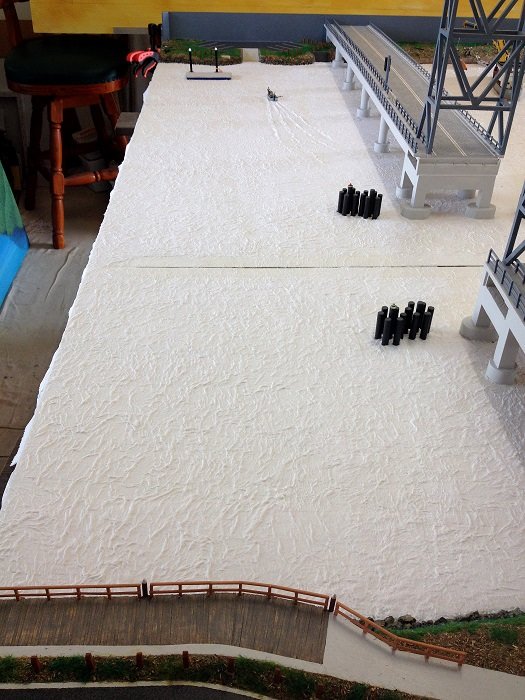
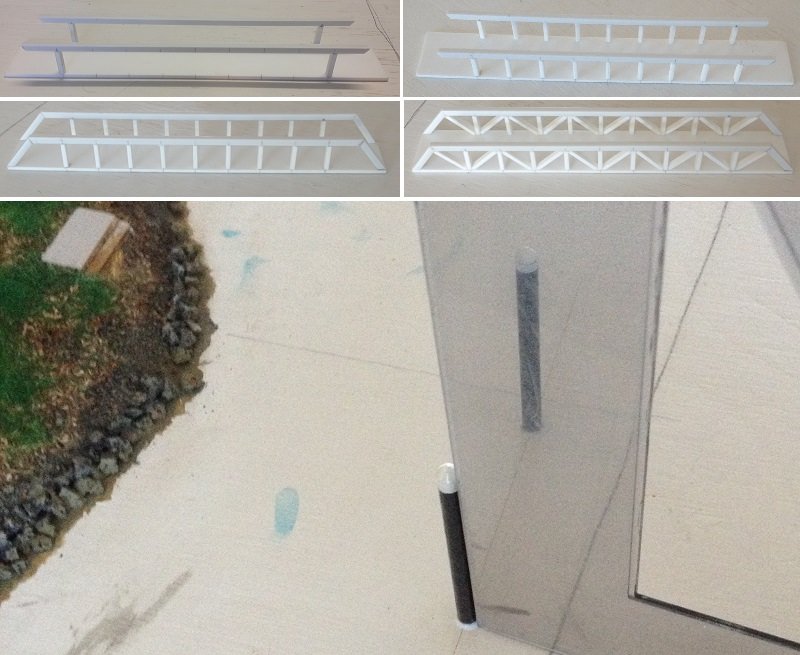
Finally got through making 24 square feet of surafce water by using paper mache technique. It was one job I had lots of apprehension about, but not as intense as the one that is coming up - painting it.
Anyway, as usual I started with the least noticeable section of the display (far left corner) and worked my way to the more noticeable (near right corner). Hoping I will improve the technique as I progress. This became true, and had to return to earlier sections to patch it up a bit.
-
Hello again. My body has been getting regular attacks of low-grade fever from an internal infection. Seems to have subsided.
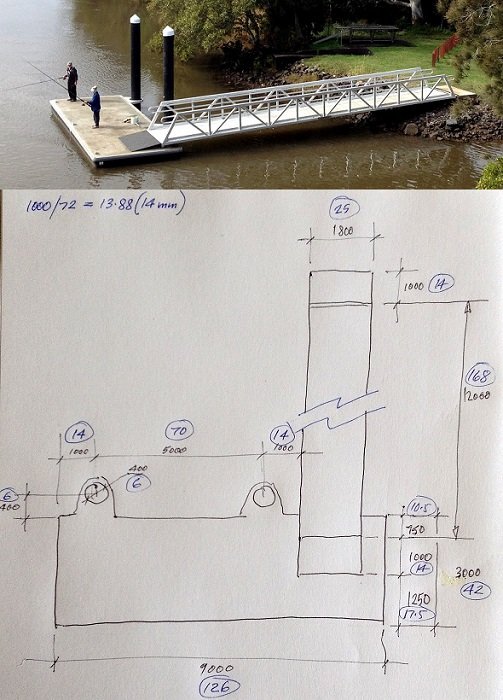
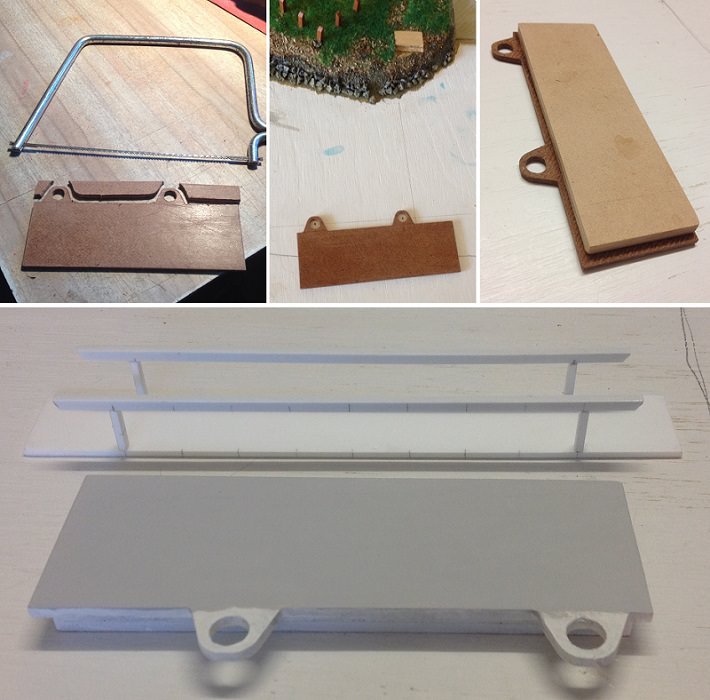
While this was going on the local council snuck in a floating wharf on the south bank.

- Jack12477, paulsutcliffe, mtaylor and 10 others
-
13
-
Thank you @DORIS for the explanation and clarification. That deserves a double chocolate.
I knew you would more than likely have a good reason.
Best regards.
Peter.
-
Hello Doris.
I noticed that the scale of the horse looks smaller than shown by the painting. Did you think, or know, that the painting was not accurate enough? Or was there another reason for your choice of scale?
Best regards.
Peter.
-
Awesome. The rider looks very handsome.
Like the way you made the cradle to suit its insertion to the model.
I feel like asking you what flavor was the ice-cream

-
It is so lovely to see a ship like the Katherine come together by a superb artist.
- FrankWouts, Piet, CDW and 5 others
-
8
-
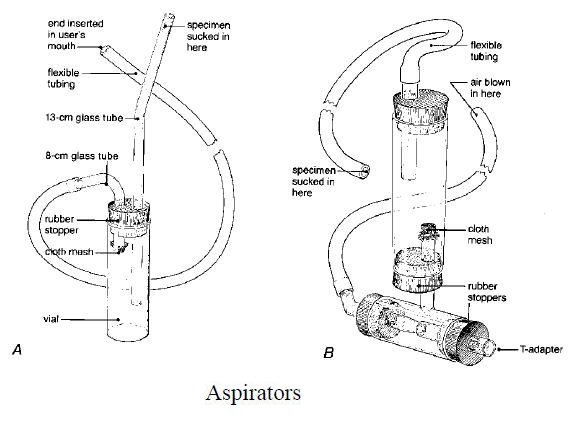
3 hours ago, flying_dutchman2 said:
Small diameter clear tubes can be found at home depot, etc.
This vacuum setup has been used for over a century in Entomology (study of insects). When collections are made for very small insects. Instead of using a vacuum, you can use a bellows or suck really hard.
Insects that are in leaf matter on the forrest floor. I saw a similar setup in one of my Anatomy of Insect books from 1909.
Marcus
Come to think of it, I have seen them too in an entomology catalogue book.
Great idea. So those who were thinking they may have to buy another vacuum cleaner, they don't.
They are called Aspirators.
- lmagna, thibaultron, Canute and 2 others
-
5
-
3 minutes ago, wefalck said:
The separator is a good idea - it is easier to search through a small pile of debris than across the whole workbench (which unlikely is as clean as in a clean-room
") ). I gather the rentention capacity would depend on its length, so a long, narrow jar might be safer than a shallow one, or you would need to put a bit of foam in front of the internal suction pipe.
). I gather the rentention capacity would depend on its length, so a long, narrow jar might be safer than a shallow one, or you would need to put a bit of foam in front of the internal suction pipe.
I would avoid using any further barriers to the negative pressure (suction). The reduction in intake area (small hose) already reduces the suction. I would go for a longer as opposed to a shorter jar. Let gravity assist in this matter.
- mtaylor, Canute, thibaultron and 1 other
-
4
-
1 hour ago, lmagna said:
I would be tempted to make one if I could find hollow tubes small enough. I think the tubes on the one I posted are too large in diameter. They look like the stir sticks you get for your coffee in restaurants you could still suck up items like belaying pins and such.
What you presented looks fine. First of all it is good in the sense that it will only pick up small items (dust, filings, etc) and not larger than a few mm. The disadvantage is that it has no trap for easy retrieval of accidentally sucked up items. That is why I posted a simple and small DIY trap for the workbench.
In the RAAF cleanroom, where they repair delicate instruments, the dirt particles were mainly very small, but one of them could easily effect a bearing or a hairspring, for instance. The traps used were also very small, like the size of a baby food jar, and using a hose with about 3 mm inside diameter. The rule was to suck up foreign matter as soon as it was presented. The immediate work area had to be absolutely clean at all times.
The point is, a small trap can be used. I figured that a modeller would need something a bit bigger, like a pickle jar, and a hose with about 6 mm (1/4 inch) inside diameter.
- thibaultron, Canute and mtaylor
-
3


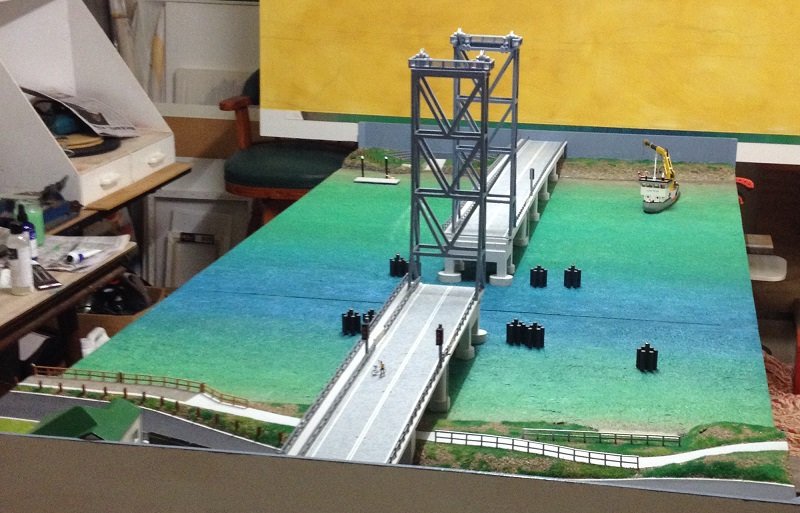
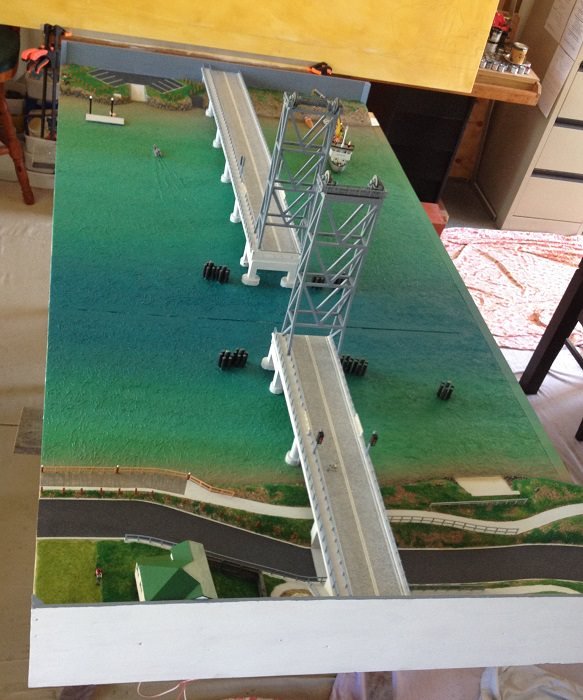
Wardell Bridge and boat by Tecko - 1:72 - diorama
in - Build logs for subjects built 1901 - Present Day
Posted
After three coats of gloss: