Captain Slog
-
Posts
904 -
Joined
Content Type
Profiles
Forums
Gallery
Events
Everything posted by Captain Slog
-
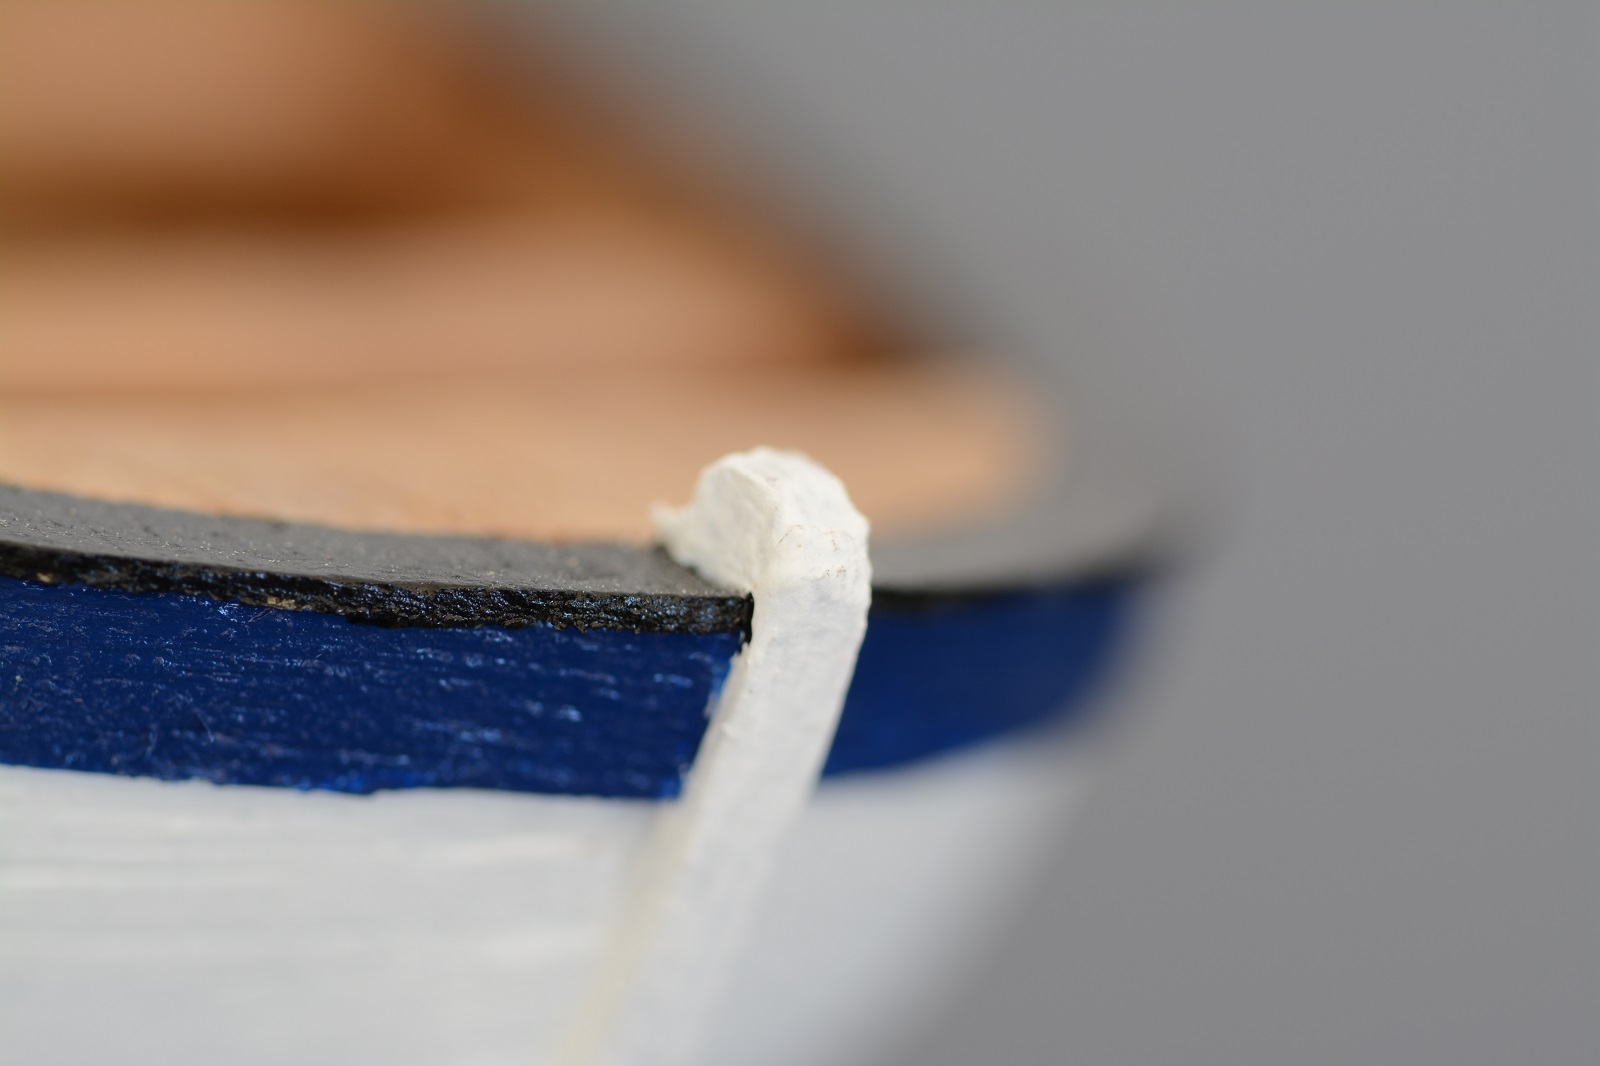
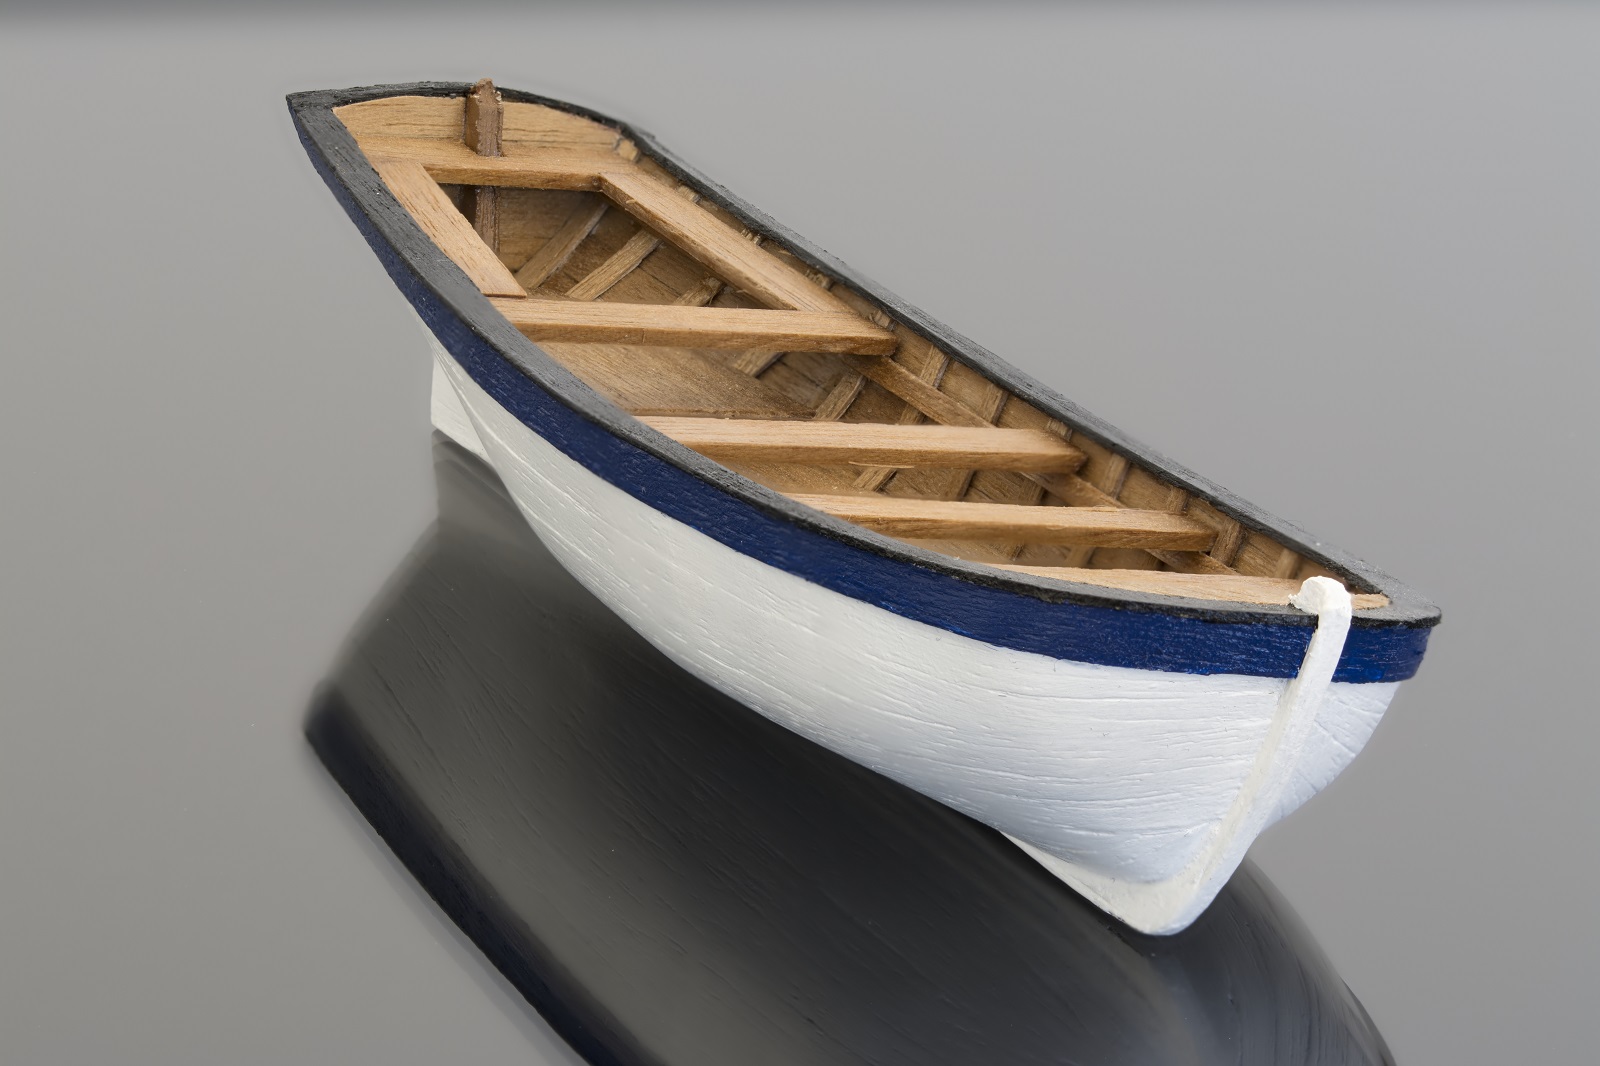
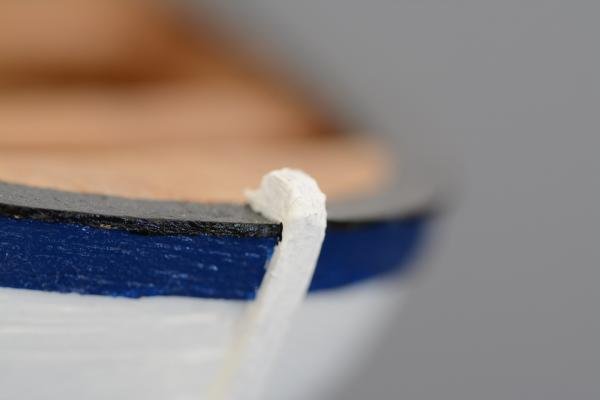
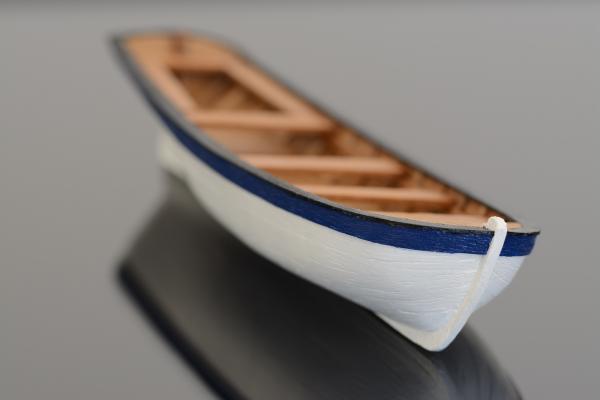
 Firstly I had written up about 8 pages of text covering the principles of photography but afterwards realised that if you aren’t interested in photography then you won’t bother reading it and if you were interested then you probably knew it all anyway so pruned it back to cover only macro. A few decades ago I got into photography in my middle teens and learned the technical aspects (if not the ‘art’) of photography. I had a cheap Eastern European manual only SLR film camera, which although basic did teach me the principles and relationships of settings, light, exposure etc. I would deem myself technically proficient. The artistic side of it I would deem myself as talentless (that’s polite for crap). I have been on quite a long modelling hiatus and decided to get back into photography again after 3 decades and entered the world of DSLR photography. The choice of camera manufacturer can be very polarising (pun intended) like Ford v Holden (probably only Aussies will get this), PC v Mac, Playstation v Xbox, DSLR v mirrorless, full size sensor v crop sensor, Canon v Nikon etc. Well I am an unashamedly Nikon DSLR fanboi. Lastly I must confess to being a pixel peeper (digital camera term and not some kind of pervert), which is a very debilitating illness and results in either expensive therapy (newer lenses and camera bodies) or having little to show for my efforts (deleting 99% of all images taken). Remember you can click on the images below to see them at 1600x1200 (maximum that MSW allows). Actual images where shot at 6000x4000 in 14-bit Raw format. What is Macro and is it necessary? Well apart from making your hard work and super detailed nice part look not so nice due to showing up every little bit of dust, dirt and fluff there are 2 schools of thought on what represents macro photography. Again as with most things people’s ideas are polarised and may cause ‘discussion’. The first school of thought say that zooming in as close as possible for the shot, particularly using a large focal length and filling the frame as much as possible constitutes macro. This could technically be called a ‘close-up’ because although it may fill the frame it doesn’t meet the criteria of the second description. The second school of thought says that the subject being shot needs to be projected on to the sensor (or film) at life size or greater i.e. at a ratio of 1:1 or greater. An example of this is a 15mm long insect will be projected on to the sensor as 15mm long. I personally follow this school of thought. Remember this is the projection of the image on to the sensor and not enlarged due to cropping or perceived enlargement of viewing the photo on a computer screen. It gets messy as a manufacturers tend to write ‘macro’ on their lenses but in actual fact may only give you ‘close-ups’ A true macro lenses will say 1:1 on it somewhere meaning it will produce a full size subject on the sensor. Is it necessary? No not at all. You don’t use it to take shots of the whole model but is useful to show off your hard work on the smaller components but again using ‘true 1:1 macro’ would rarely be used except for the very smallest components. But the macro lenses will allow smaller components to be captured in better ‘Close up’. There are lenses which will give 1:2 reproduction i.e. twice life size. The 15mm insect would now be 30mm long on the sensor. The examples below of my Endeavours ship’s boat were all taken with the macro lens showing close up but only one image is true 1:1 macro. The approx 100mm boat is too large to capture fully on a 24mm sensor as 1:1. Examples showing effect of Aperture I have set the ISO at 100 and made the changes using the aperture only to show the effects on the depth of field and left the camera to change the shutter speed automatically to obtain the correct exposure i.e ‘Aperture Priority’ All lenses have a sweet spot where it gives the sharpest image possible. This is typically around f8-f11 give or take. The focus point on all images was the very tip of the stem post. 1/30s @ f/3.8 ISO 100. Because I wasn’t as close as I could get the DoF is probably around 5mm although the maximum of f/2.8 isn’t available being this close. 1/6s @ f/8 ISO100. Closing down the aperture has given more DoF probably around 10mm but the shutter speed is slowing down to get correct exposure. 5s @ f/45 ISO 100.Closed the aperture right down and as can be seen approx 2/3 of the boat is in focus. The problem with closing down the aperture is that all lenses suffer from diffraction as the aperture is tiny at f/45 so the resulting image is ‘soft’ 1/5s @ f/8 ISO 100. For a bit of fun using the lenses likeliest sweet spot of f/8 this was the closest I could get to the boat. Since I moved a lot closer the depth of field has reduced to around 1mm to 2mm! Focus stacking To overcome some of the problems of very shallow depth of fields in macro photography there is a technique referred to as focus stacking. This is performed by taking multiple shots of the subject but moving the point of focus for each image. The resulting multiple images, each with a different focus point are then combined using software to form a single composite image or stack. The software algorithm works by selecting the sharpest parts of the images to merge as one. Here is an example. It was made up of 13 separate images each one taken at 1/5s @ f/8 ISO 100. I am quite proud of this image as it was the first time I used my new macro lens and the first attempt at focus stacking so turned out not too bad. As can be seen comparing this shot with the one shot at f/45 it is a lot sharper as it is not suffering from diffraction due to very a small aperture. Is it perfect? No, it might not be visible on the above but there are small bands of out of focus parts as my increments in moving the focus were too large. To better this I would try using f/11 (which should still be in its sweet range) and move the focus point in smaller increments to increase the overlap between each image. A doubling of 13 to 26 images should be perfectly in focus the full length of the boat. For focus stacking you will need a tripod and ideally some kind of remote release as being so close in with macro any vibrations are magnified substantially. If you don’t have a remote release then set the camera timer to a few seconds so you don’t need to touch it to fire the shutter and the timer delay will allow any vibration to settle down. I used a remote release and the mirror up function of the camera as it is possible that the mirror slap of the mirror moving up can cause shake. General Hints and Tips for Photographing your Model I want to discuss some general points to think about in photographing your model and not necessary using macro. The 2 main issues we see on build logs are blurry out of focus shots and camera shake. Out of focus All camera lenses have a minimum focus distance and going below this will never be in focus. Firstly move back so the lens is in its working range again. It may not be as close as you would like but a sharp smaller image is 100% better than a larger out of focus image. Still want it to be bigger though? Then move back take the sharp picture and then crop the image. Some detail will be lost and may not be pin sharp as an uncropped image but it will still be in focus! Depending on the megapixels of the sensor you may be able to crop in considerably before degradation. You may not be able to show all the detail you would like but an out of focus shot isn’t showing it anyway. Camera shake A number of reasons for this but the prime culprit is due to taking the picture in low light conditions. What looks like a bright well lit room for the naked eye is actually pretty dark for cameras believe it or not. What to do? Well first rule of thumb if hand holding is to use a shutter speed higher than the focal length of the lens (more to it than this but good starting point). Practice hand holding and get good stance, good hand hold on the camera. Increase pressure on shutter release gently. Some people roll the pad of the finger onto the release but whatever don’t stab it! Good technique and image stabilisation can allow hand holding 3 to 4 stops below optimum. Increase the light to allow an increase in shutter speed. If you can’t do this move the subject closer to the window. Switch on the flash and place some sheets of white paper out of shot to reflect light back reducing shadows. If you are not a pixel peeper increase the ISO a couple of stops to give corresponding increase in shutter speed. Open the aperture (bearing in mind DoF). Stick the camera on a tripod. Don’t have a tripod? Place the camera on a beanbag/box/bundled up jacket and use the self-timer to actuate the shutter so you don’t disturb it pressing the shutter. Some good no cost options above on taking sharp pictures. After all that you still have blurry/shaky images? Then delete the images and try again. Be ruthless. Summary I found the whole macro/ focus stacking great fun and quite challenging. Would I do it for all build log photos? No, far too time consuming for general everyday build progress shots. I would probably reserve it for build log milestones but of course not worth it for overall progress shots of the whole model. I am keen to discuss camera gear and techniques in general and also to see others equipment and photos you are proud of. Although macro shots of flowers and insects etc are great this is a ship modelling forum so please keep the photos to ship modelling. Please, PLEASE DON’T post random pictures taken by random people from facebook, flickr etc (there is enough of that on this forum as it is) If I want to see that there is an infinite amount of photos from countless photo sites I can find for myself. I want to see YOUR photos and YOUR gear. Cheers Slog Edit: just noticed the walnut in the first 4 images has changed colour slighty. I couldn’t be bothered reducing the file size in Light Room for posting here and just used MS Paint. All the full size RAW images have the same colour as the stacked image which is correct.
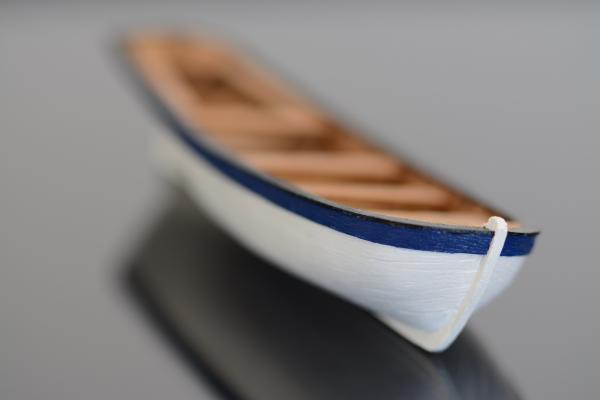


- 36 replies
-
- 11
-

-
Hi Grant, thanks for asking. Haven't done any more since the photos above. Spent a bit of time working on the card vehicle and then all modelling stuff was packed away March/April for selling our current place. Got to do practical completion inspection next week of our new place and then move in first week of October. Will have one of the spare rooms to set up in permanently so should be full steam ahead again so to speak not long after. Can't wait to get stuck in again with some modelling, its been so long now! Cheers Slog
-
Hi Ken, I have quietly been following your build and enjoying your progress. I thought I might stick my oar in now since the topic of edge colouring has come up. I have never quite been satisfied with my edge colouring having tried, acrylic and enamel paints, as well as water colour 'blocks' and water colour pencils but have found a range of Faber Castell Pitt (PITT?) artist pens which have came very close to meeting my needs. The grays also come in cool and warm tones but the good thing is there is very little to no bleeding into the paper. I found using the very tip (less ink) and moving across quite quickly applies just the right amount. A lighter colour can be applied a couple of times to darken the edges. Also if a perfect colour can't been matched, the general consensus from what I can gather is the edge should be darker than the main part. The eye accepts it easier rather than a lighter edge. I covered the PITT pens somewhat in my Bismarck card build log. I found good matches for the different grays, a green and a brown. Cheers Slog
- 80 replies
-
- 7
-
-
- choctaw
- heinkel models
- (and 1 more)
-
Hi Bizibilder, good to see another Caldercraft Endeavour. I've been at mine on and off for 5+ years I think and still haven't started the masts LOL. Looking forward to more. Cheers Slog
-
Shipyard H.M.S. Wolf, 1754 - 1:72 Scale Laser Cut Kit
Captain Slog replied to catopower's topic in Card and Paper Models
Hi Clare and Christian, Thanks for the info and the link, that clears up any confusion I had. Cheers Slog -
Shipyard H.M.S. Wolf, 1754 - 1:72 Scale Laser Cut Kit
Captain Slog replied to catopower's topic in Card and Paper Models
Hi, I have a bit of an ignorant question which I can't work out. Are the Shipyard kits like HMS Wolf, Alert etc all on white paper/card requiring 100% painting of all parts or is the parts pre-printed with colours, details etc. The reason I ask is they always appear to supply paints with there sets but then see Shipyard models which look so good with the colours they appear colour printed. The full painting of all parts would be well outside my skill level I think. Cheers Slog -
Hi Clare, I would go with the comments from Mark and Chris. Unless you are a purist, go with whatever is suitable to achieve the results you desire with-in your skill set. I am in no way a purist and ultimately will use or substitute with whatever I can as ultimately I want the model to be a decent representation of the ship regardless of how I got there. I consider myself a rank amateur when it comes to modelling and have the same concerns as you when it comes to rolling tubes for barrels etc. Looking forward to more progress shots. Cheers Slog
-
Hi Clogger, Welcome aboard and thanks for the comments. Just had a look and the last time I worked on the Endeavour was over 18 months ago I didn't realise it was so long ago. The Endeavour and all my modelling gear is packed away until we move into the new place in October. This has to be a record for the longest house build ever, the builders have dragged their feet at every stage . Thankfully light at the end of the tunnel and can get modelling again. If you start up working on your Endeavour again make sure to start a build log here so we can follow your progress. Cheers Slog
-
Hi Greg, Those little details look great, especially the scale you are working at. Cheers Slog
-
Outstanding work Steve!
-
Fantastic stuff Greg, love all the little PE details. They really add depth to the structures Cheers Slog
-
Hi Jeff, Good to see back at the Victory. You copper plating looks very nice. Cheers Slog
-
Hi Dave, Just catching up on your build and she's looking real good. Cheers Slog
-
Hi Mike, Dropping by after a while and your progress of the masting and rigging is looking fantastic. Cheers Slog
-
Looking good Greg, Looking forward to following along. This ship is available as a card model in 1:200 by a couple of publishers. Cheers Slog
-
Well done Greg, she's looking fantastic, you should be very proud. For the title change, i think you go to the very 1st post and click edit although I might be wrong. Looking forward to what you do next. Cheers Slog
-
Hi Snoepert, Good to see more progress on your Endeavour, looking good. Nice work on the extras you added. Cheers Slog
-
The pliers have got Micro Mark written on them. Isn't that the name of a US tool place? Cheers Slog
-
Wow Steve, very clever (and good looking) mouse! Nice. Cheers Slog
-
Well done Steve, launch looks fantastic. Looking forward to the Connie build now. Cheers Slog
- 625 replies
-
- 3
-
-
- bounty launch
- model shipways
- (and 1 more)
-
Hi Dimitris, What a beautiful smooth paint job. The fibre glass and resin was well worth the effort. Do you mind telling us what hull red paint you used? Cheers Slog
-
Hi Rowan, As others have said a nice clean build. Love the colour combination. They all match the hull colouring nicely. Cheers Slog
-
Same as Brian, I use almost exclusively PVA. I have used CA to stiffen up small or fragile pieces but this can discolour/darken the print. The brand I use comes in both interior and exterior grades and find the interior better as it has a very slightly different viscosity. I have been trying to find Aleene's tacky glue to try as it appears a lot of U.S. builders use this but haven't found it yet. I can't use the clear stringy UHU glue that the majority of Europeans use. The stringiness drives me nuts. Cheers Slog
-
Hi Pat, Your Endeavour is coming along and looking great. Love the cover! My Endeavour is stored away until I have a dedicated work space and can keep it out and covered like you have done. Slog
- 517 replies
-
- 1
-
-
- Endeavour
- Artesania Latina
- (and 1 more)