BANYAN
-
Posts
5,537 -
Joined
-
Last visited
Content Type
Profiles
Forums
Gallery
Events
Everything posted by BANYAN
-
 Perhaps two large shrubs Gaetan? they look well shaped which means less sanding down the line. cheers pat
 -
Hi Ron, that is a great story and I am sure your wife will appreciate the model as much as you. That was a real neat surprise for her. As to the futtock shrouds, I must admit I had some real fun there I made the futtock shrouds up individually off the model with a longer length than needed. By this I mean that I seized the hooks into place on a length of shroud line. I then hooked the futtock shroud onto the upper deadeye strap, wrapped (half hitched) the tail end of the shroud around the futtock spreader bar, pulled it taut (being careful not to pull the lower shrouds out of line in the vertical aspect) and seized the tail up to the closest shroud as close to the spreader as I could. I then dabbed a bit of diluted white glue and trimmed off the rag end after it was dry. BTW, my spreader bar was a length of stiff thin wire with a thread serving along its length - I simulated the leather caps on the end with a dab of leather colour paint. The real jobs had a stiff rope core I think. I found working (fitting the futtock shrouds) from aft to fwd best/easiest for me. I also did this before I did any of the ratlines. As too fat fingers - welcome to the club With the deadeye lanyards I found using much much longer lengths and doing a very loose weave initially, allowed me to get gingers in there without disturbing the other bits and bobs. I was then able to pull the lanyard taut and align the deadeyes using tweezers and a very fine pair of needle point plier. I hope that makes sense for you? cheers Pat
-
Hi again, The wooden mouse form is about 4mm long and 3mm at max across - it had a slightly conical off axis shape if that makes sense? More like a ball/bead with one side drawn out a bit. I was able to turn these on my mini-lathe, but you could take a bead and add some putty, or even two-part epoxy to one side then shape it when dry, redrilling the hole if necessary on one side. cheers Pat
-
Those pics look familiar mate - nice bending work by the way. You are slowly getting there cheers Pat
-
Thanks for looking in and comments Eddie and ST7S Sorry don't know what name to use? The wooden mouse form was about 4mm long and to 3mm at max across - it had a slightly conical off axis shape if that makes sense? More like a ball/bead with one side drawn out a bit. I was able to turn these on my mini-lathe, but you could take a bead and add some putty, or even two-part epoxy to one side then shape it when dry, redrilling the hole if necessary on one side. cheers Pat
-
Hi Steven, just found your log and found myself very impressed and immersed in your development for this build. You have made a great start and will follow with considerable interest. I have some celery top pine that may answer to your needs for pine planks - let me know if interested. I can also mill, or assist you milling, as I have a bandsaw and JB 4" for final cuts. I see Dick has already offered and I do not wish to step on any toes I am heading off on a one month holiday next week but happy to catch up on my return. cheers Pat
-
Those newer plates look good Dave, as Greg said - persistence pays off. I admire your drive for scratch made. cheers Pat
- 742 replies
-
- 6
-

-
- constitution
- frigate
- (and 1 more)
-
Worth every back ache and cramp you experienced Greg; the individual railings are a much better look. I have purchased the PE versions but you have convinced me to change to these for my Vampire. cheers Pat
-
Yet Another Pandora 3D build
BANYAN replied to herask's topic in CAD and 3D Modelling/Drafting Plans with Software
Stunning - that sunlight effect is very effective. A walk through will be really something (oil lights flickering for lighting?) cheers Pat -
Nice progress COG, that PE must have been testing Like the third hand - looks vaguely familiar cheers Pat
-
Looks great Greg. Being a Command ship she will have had a plethora of wire aerials for the long-haul comms. You seem to have deciphered the jig-saw pretty well. cheers Pat
-
Thanks Michael, that is awfully good work at that scale. Great trick to remember for the paper too - thanks cheers Pat
-
Christos, have a look at Chuck's Cheerful build; he shows a great technique. cheers Pat
-
That is simply stunning work; what is the size (diameter) of the compass card Michael? cheers Pat
-
Nice work Ben, hopefully the new gluing arrangement of the frames will prevent further issues. I like the vast expanses of the workshop too Lucky you! cheers Pat
-
Spot on detail - very nice work Rusty cheers Pat
- 310 replies
-
- 2
-
-
- cheerful
- Syren Ship Model Company
- (and 1 more)
-
What!!!!..... you've cut off an ear???? cheers Pat
-
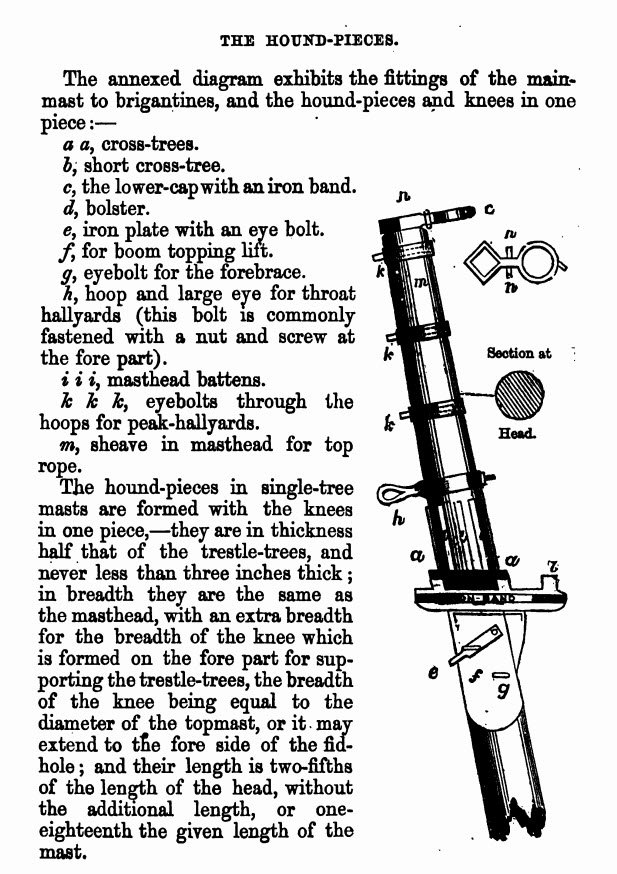
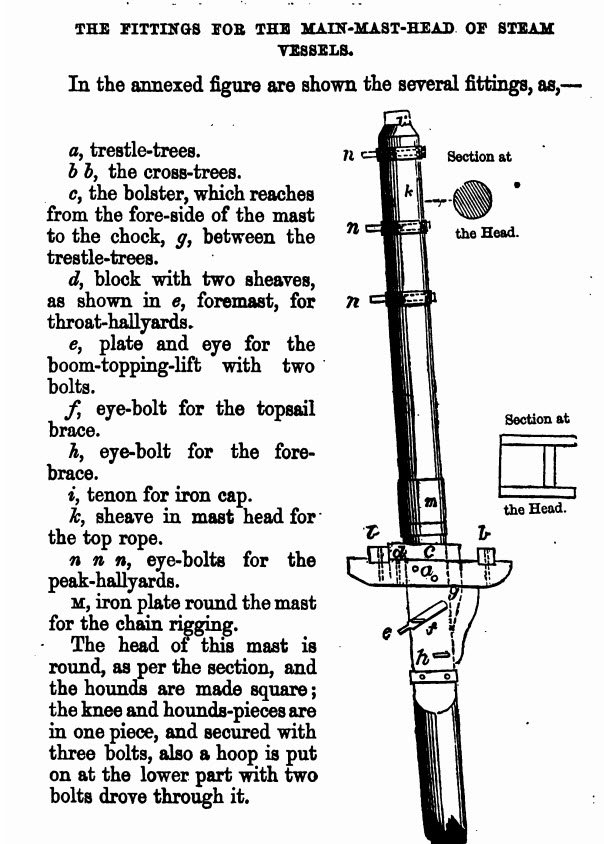
Hi Andrew and Wefalck, I am in the process of sorting the rigging of my 1855 built "Victoria" which has many elements of a three-mast schooner with Aberdeen clipper ship bow even though Barque rigged. Wefalck has been very helpful in sorting this for me. In a series of articles (The Rigging of Clipper Ships by E.A. McCann) in the early editions of the Mariner's Mirror, there is a drawing (Topgallant Rigging) that shows the mast top (lower) with two boom extensions aft like a flat V, each of which carries several piercings with rollers to accept the upper backstays (as sort of fairlead arrangement). I am assuming this was to keep them clear of working the gaffs for the trisails. That may help explain the arrangement shown in the first diagram? As to the squares, unless meant to show as a filler to define the wood of the mast proper, these could be as Wefalck has suggested. The diagrams I have show 3 or 4 iron bands around a circular Mast head for vessels in the mid 19th century; especially for steam/sail vessels. These bands were fastened at the rear with eyes protruding to accept various blocks or stays. At this stage, much of the rigging on the main mast was either chain or wire rope, again as Wefalck suggests) to protect the standing rigging from the funnel heat. The following diagrams are from Robert Kipping (1853-4) "Rudimentary Treatise on the Masting, Mast-Making and Rigging of Ships" which is out of copyright and available as an eBook (Google). cheers Pat


-
Hi Michael, how disappointed I am that I found this build too late I will need to take some time to read back through. That compass is a work(ing) of art; a model in itself. Very much enjoyed seeing how you did this. cheers Pat
-
She looks great Chuck; the rigging colour in particular is top notch (especially as seen in the close up photos). cheers Pat
- 1,048 replies
-
- 6
-
-
- cheerful
- Syren Ship Model Company
- (and 1 more)
-
Yet Another Pandora 3D build
BANYAN replied to herask's topic in CAD and 3D Modelling/Drafting Plans with Software
A very nice trilogy of reference books for that era indeed Wayne; I would also suggest "Seamanship in the Age of Sail" by Harland to the mix. Harland described how the ships were sailed and operated - this gives some valuable insight to the rigging and presentation of models. cheers Pat -
I wouldn't recommend it for a number of reasons. Once glued, then soaked, the planks may come off as the water dissolves the glue (true of steaming also). Also, wood needs to compress or expand as it is bent in one direction or the other. You will have differing rates of compression on the outer and inner sides. Best to place the bulwarks first I think. cheers Pat
-
Thanks Rob, getting to know this I have already doubled the number of pin racks - may even need more. cheers Pat