HOLIDAY DONATION DRIVE - SUPPORT MSW - DO YOUR PART TO KEEP THIS GREAT FORUM GOING! (Only 69 donations so far out of 49,000 members - Can we at least get 100? C'mon guys!)
×


BANYAN
-
Posts
5,946 -
Joined
-
Last visited
Content Type
Profiles
Forums
Gallery
Events
Everything posted by BANYAN
-
 Worth every back ache and cramp you experienced Greg; the individual railings are a much better look. I have purchased the PE versions but you have convinced me to change to these for my Vampire. cheers Pat
 -
Yet Another Pandora 3D build
BANYAN replied to herask's topic in CAD and 3D Modelling/Drafting Plans with Software
Stunning - that sunlight effect is very effective. A walk through will be really something (oil lights flickering for lighting?) cheers Pat -
Nice progress COG, that PE must have been testing Like the third hand - looks vaguely familiar cheers Pat
-
Looks great Greg. Being a Command ship she will have had a plethora of wire aerials for the long-haul comms. You seem to have deciphered the jig-saw pretty well. cheers Pat
-
Thanks Michael, that is awfully good work at that scale. Great trick to remember for the paper too - thanks cheers Pat
-
Christos, have a look at Chuck's Cheerful build; he shows a great technique. cheers Pat
-
That is simply stunning work; what is the size (diameter) of the compass card Michael? cheers Pat
-
Nice work Ben, hopefully the new gluing arrangement of the frames will prevent further issues. I like the vast expanses of the workshop too Lucky you! cheers Pat
-
Spot on detail - very nice work Rusty cheers Pat
- 310 replies
-
- 2
-

-
- cheerful
- Syren Ship Model Company
- (and 1 more)
-
What!!!!..... you've cut off an ear???? cheers Pat
-
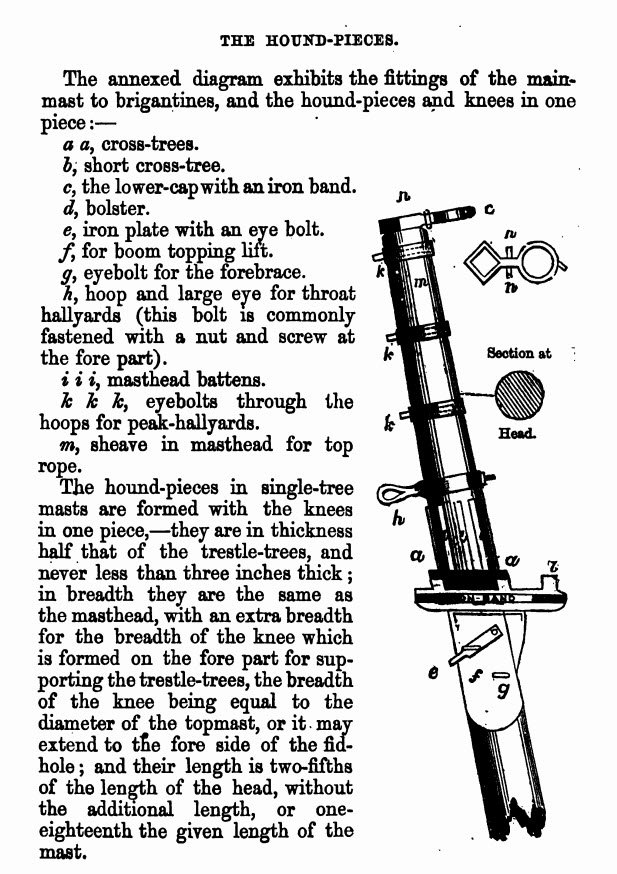
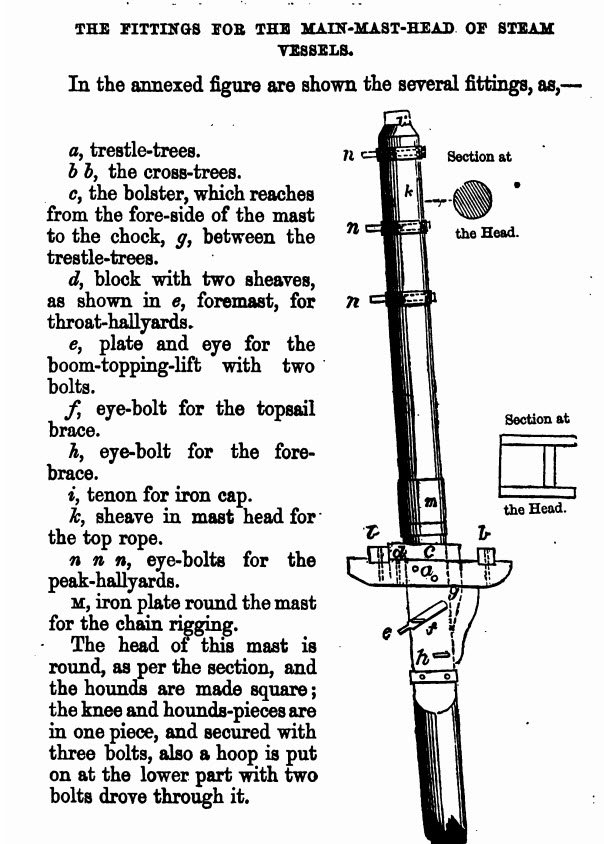
Hi Andrew and Wefalck, I am in the process of sorting the rigging of my 1855 built "Victoria" which has many elements of a three-mast schooner with Aberdeen clipper ship bow even though Barque rigged. Wefalck has been very helpful in sorting this for me. In a series of articles (The Rigging of Clipper Ships by E.A. McCann) in the early editions of the Mariner's Mirror, there is a drawing (Topgallant Rigging) that shows the mast top (lower) with two boom extensions aft like a flat V, each of which carries several piercings with rollers to accept the upper backstays (as sort of fairlead arrangement). I am assuming this was to keep them clear of working the gaffs for the trisails. That may help explain the arrangement shown in the first diagram? As to the squares, unless meant to show as a filler to define the wood of the mast proper, these could be as Wefalck has suggested. The diagrams I have show 3 or 4 iron bands around a circular Mast head for vessels in the mid 19th century; especially for steam/sail vessels. These bands were fastened at the rear with eyes protruding to accept various blocks or stays. At this stage, much of the rigging on the main mast was either chain or wire rope, again as Wefalck suggests) to protect the standing rigging from the funnel heat. The following diagrams are from Robert Kipping (1853-4) "Rudimentary Treatise on the Masting, Mast-Making and Rigging of Ships" which is out of copyright and available as an eBook (Google). cheers Pat


-
Hi Michael, how disappointed I am that I found this build too late I will need to take some time to read back through. That compass is a work(ing) of art; a model in itself. Very much enjoyed seeing how you did this. cheers Pat
-
She looks great Chuck; the rigging colour in particular is top notch (especially as seen in the close up photos). cheers Pat
- 1,051 replies
-
- 6
-
-
- cheerful
- Syren Ship Model Company
- (and 1 more)
-
Yet Another Pandora 3D build
BANYAN replied to herask's topic in CAD and 3D Modelling/Drafting Plans with Software
A very nice trilogy of reference books for that era indeed Wayne; I would also suggest "Seamanship in the Age of Sail" by Harland to the mix. Harland described how the ships were sailed and operated - this gives some valuable insight to the rigging and presentation of models. cheers Pat -
I wouldn't recommend it for a number of reasons. Once glued, then soaked, the planks may come off as the water dissolves the glue (true of steaming also). Also, wood needs to compress or expand as it is bent in one direction or the other. You will have differing rates of compression on the outer and inner sides. Best to place the bulwarks first I think. cheers Pat
-
Thanks Rob, getting to know this I have already doubled the number of pin racks - may even need more. cheers Pat
-
You are making some great progress there mate; looking good. Sorry I cannot offer technical comment as I simply do not have the experience, but I am closely following to learn what I can for when I have the same exercise to do for my build. cheers Pat
-
The 'ole' girl is looking great Denis. Just to complicate things :), the increasing amount of rake of the masts as you head aft is common as John has pointed out; however, the amount can vary (exceptions). The Victoria I am building had quite a lot of rake to the mizzen - yet to measure. cheers Pat
- 453 replies
-
- 5
-
-
- thermopylae
- sergal
- (and 1 more)
-
Welcome aboard Richard; as you have already experienced this is a great forum for learning and getting great advice. cheers Pat
-
HMCSS Victoria 1855 by BANYAN - 1:72
BANYAN replied to BANYAN's topic in - Build logs for subjects built 1851 - 1900
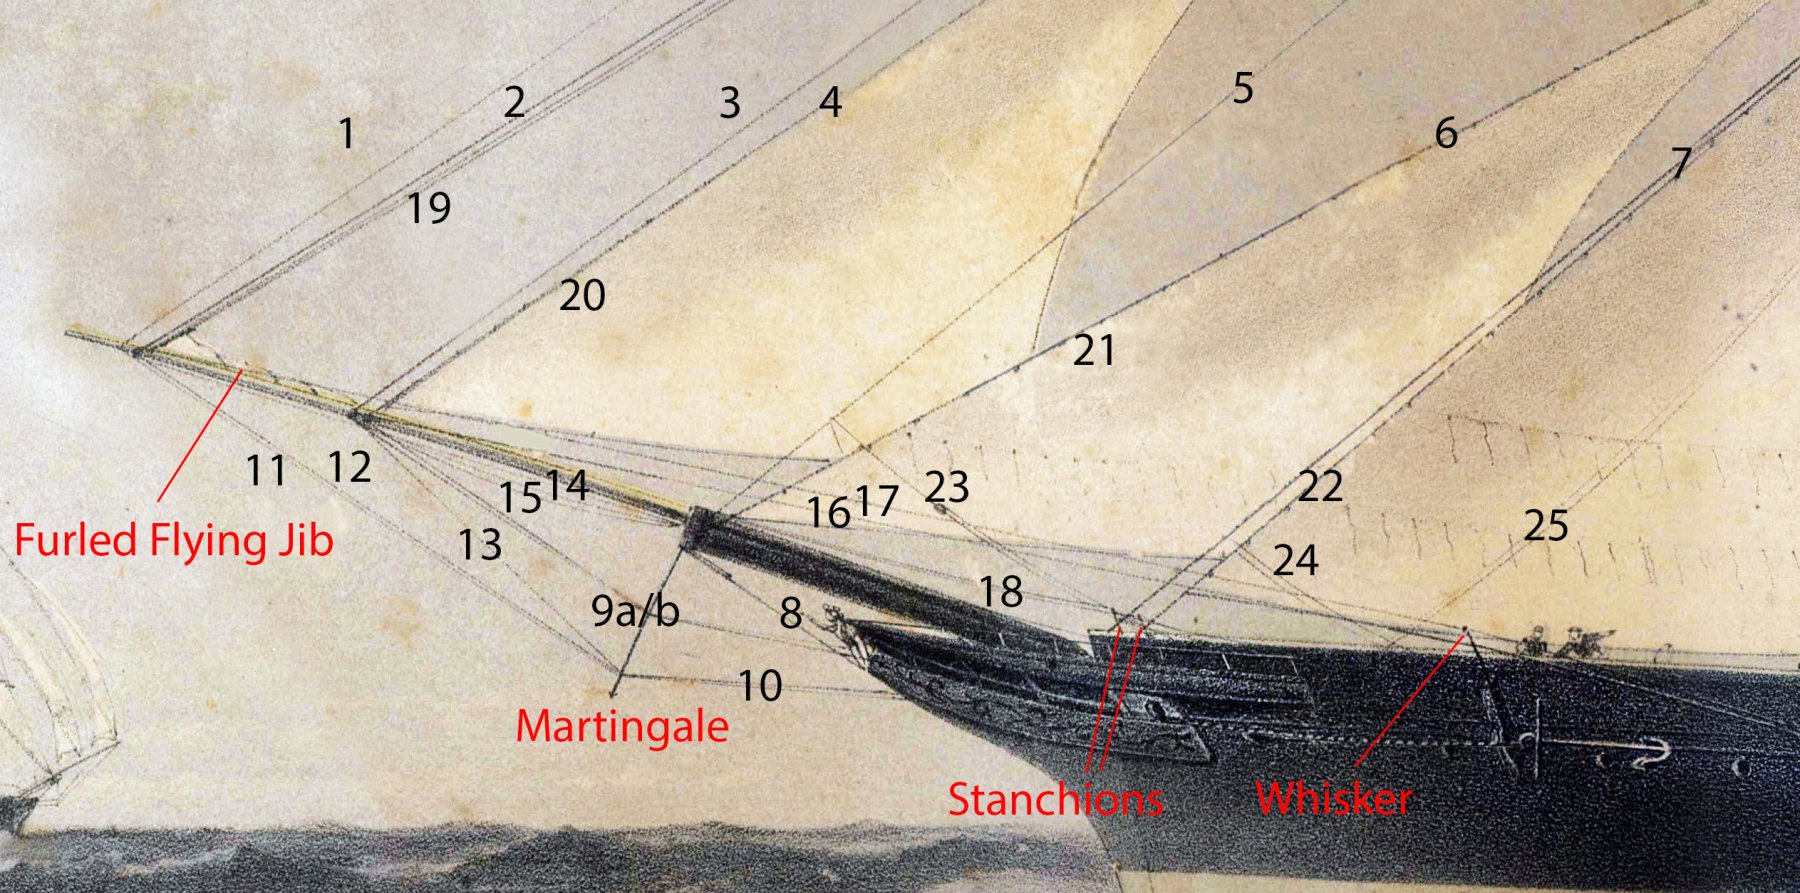
Hi folks, as advised above, i think I have arrived at a likely configuration for the bow rigging of the Victoria. The final layout is basically that of a Clipper Ship (with Flying Jib) and rigged as shown by Harold Underhill in his "Masting and Rigging: the Clipper Ship and Ocean transport" Plate 2. Thanks to Druxey and Wefalck whom provided earlier suggestions that took me down this path. After Wefalcks suggestion, I inspected the lithograph a bit more closely and there is a furled flying jib shown, which would then account for the additional stays I had not identified earlier. The manropes definitely run from the cap back through two stanchions which I had mistakenly thought were whiskers (thanks Druxey). Also, a comment in Underhill's book also allows us to confirm the jib boom guys ran via cleats on whiskers attached top the catheads. I still have a couple of questions and would appreciate further suggestions. I ask these questions below the latest Rigging graphic and legend. First though the following are relevant: 1. "She was a beautifully modelled screw-steamer of 580 tons, built of mahogany, and was barque-rigged to royals." The New Zealand Wars: A History of the Maori Campaigns and the Pioneering Period: Volume I (1845–64) 2. "Lower and all standing rigging to be of wire rope." - IAW Contract (Specification). ID Name Comment Terminations 1 Fore Royal Stay Wire Rope Shackled to spider band with iron heart ..or.. through hole in boom to martingale (see 11) 2 Flying Jib Stay Rope Through hole in jib boom to Martingale (see 12) 3 Fore Top Gallant Stay Wire Rope Through sheave port side of jib boom to Martingale (see 9a) 4 Outer Jib Stay Wire Rope Through sheave stbd side of jib boom to Martingale (see 9b) 5 Fore Topmast Stay Wire Rope Through sheave (port side) of bowsprit near cap then to hearts and lanyard at bow. 6 Jib Stay Wire Rope Through sheave (stbd side) of bowsprit near cap then to hearts and lanyard at bow. 7 Fore Stays (x 2) Wire Rope – P&S Stayplates (padeyes)with iron hearts either side of Bowsprit – Staysail on port stay 8 Bob Stay Chain Shackled to eyebolt at the stem, hearts and lanyard at Cap Band 9a Fore Topgallant Stay Wire Rope Through sheave to martingale then to hearts and lanyard at bow – port (see 3) 9b Outer Jib Stay Wire Rope Through sheave to martingale then to hearts and lanyard at bow – stbd (see 4) 10 Martingale Backstays Chain Hearts and lanyard P&S at the cheek pieces 11 Outer Martingale Stay or Fore Royal Stay Chain Wire Rope Shackles at boom (spiderband) and Martingale (eyeplate) - Underhill Through boom & terminates at Martingale – iron heart in wire 12 Flying Jib Stay Wire Rope 13 Inner Martingale Stay Chain Shackles at boom (spiderband) and Martingale (eyeplate) 14 Flying Jib Sheets P&S Belayed? 15 Foot ropes for Jib Boom (P&S) Knotted foot rope See other Lithograph 16 Inner Jibboom Guy (P&S) Wire Rope Led aft to inner fairlead at cathead whisker, then aft to hearts and lanyard 17 Outer Jibboom Guy (P&S) Wire Rope Led aft to outer fairlead at cathead whisker, then aft to hearts and lanyard 18 Manropes for Bowsprit Hemp Via two vertical stanchions at bow 19 Flying Jib Halliard and Downhaul * Downhaul leads aft and through bulwark fairlead (port) 20 Outer Jib Downhaul * Downhaul leads aft and through bulwark fairlead (stbd) 21 Jib Downhaul * Downhaul leads aft and through bulwark fairlead (port_ 22 Staysail Downhaul * Downhaul leads aft and through bulwark fairlead (stbd) 23 Outer Jib Sheets 24 Jib Sheets 25 Fish Tackle See China Tea Clippers – George Campbell page 49 – bottom left graphic Bowsprit Guys (P&S) – No shown Chain Shackled to eyebolts at cathead *Downhauls to bow through fairleads in the chock block, then to cleats. Notes: 1. Campbell (China tea Clippers) and Underhill (Masting and Rigging the Clipper…) shows order of jibs from fwd to aft as: Flying, Outer, Jib, Staysail. (Drawing of Foochow – proposed Clipper). 2. Paasche Plate 83 shows order of jibs fwd to aft as: Flying, Jib, Inner, Staysail (Drawing of three masted fore and aft schooner). 3. Campbell (China tea Clippers) page 143 (Plate 51) illustrates stayplates with iron hearts. 4. Campbell (China tea Clippers) page 80/81 (Plate 27) illustrates hearts and lanyard, and the Martingale, Cap and Jib Boom Spider bands. 5. Campbell (China tea Clippers) page 78/79 (Plate 26) illustrates Bowsprit and Jib Boom stays, guys etc 6. Underhill (Masting and Rigging the Clipper…) illustrates Bowsprit and Jib Boom stays, guys etc Questions: 1. I am assuming that as wire does not stretch as natural fiber does, that some stays etc would be secured at both ends with out the need of hearts and lanyard for tightening? I am also assuming that by tightening the martingale stays and bowsprit bobstay, that sufficient pressure was applied to fixed length stays from the masts to the jib boom. This is certainly borne out in the Underhill and Campbell drawings. Is this a fair assumption? 2. Are there any other running ends of lines I have not accounted for that need to be led to the bow fairleads (only downhauls at this point))? 3. Noting the use of wire rope for stays, I am assuming there would be too little 'meat' left in the jibboom timber (especially at the outer end) to take the pressure of the sheave pin for sheaves fitted in the boom for these stays? I am therefore assuming that greased holes would have been used if needed. This is why I think the lines 11 and 12 are an Outer Martingale stay and the Flying Jib stay, with the royal terminated at a spinder band on the outer end of the jib boom? (this is how Underhill also shows it). Any further suggestions or corrections gratefully accepted cheers Pat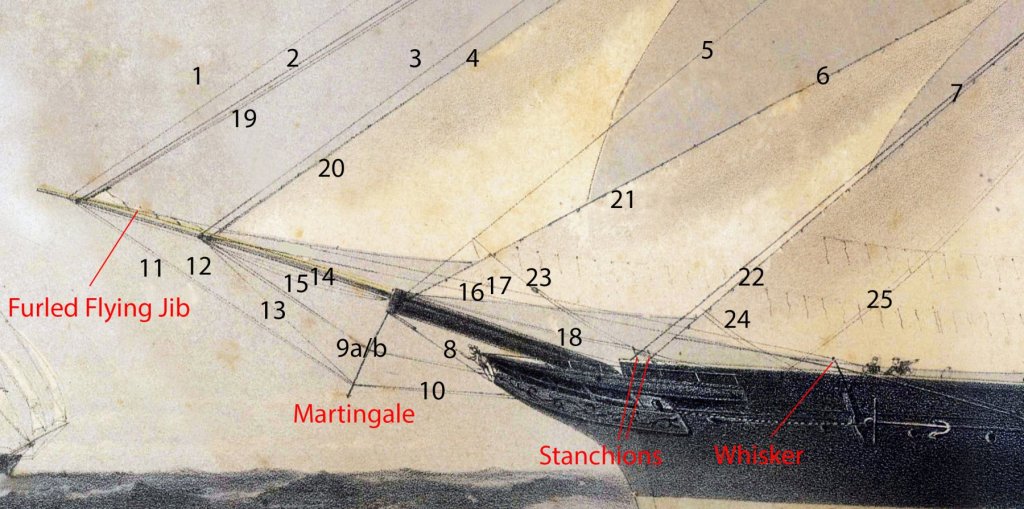
- 1,013 replies
-
- 8
-
-
- gun dispatch vessel
- victoria
- (and 2 more)
-
Nice work on the decorations Sjors, that will be a stunning model when completed. cheers Pat
-
That is excellent work Greg, if we didn't know this was your first go at weathering, we would think you were a master with a ton of experience. cheers Pat
-
Thanks Dan, I will check that out. the cutter is on the backburner at the moment as I am heavy into research for the HMCSS Victoria and prepping for a holiday in May. Will hopefully get back into this on my return Thanks for the link. cheers Pat
- 517 replies
-
- 4
-
-
- Endeavour
- Artesania Latina
- (and 1 more)