
HOLIDAY DONATION DRIVE - SUPPORT MSW - DO YOUR PART TO KEEP THIS GREAT FORUM GOING! (Only 51 donations so far out of 49,000 members - C'mon guys!)
×


BANYAN
-
Posts
5,939 -
Joined
-
Last visited
Content Type
Profiles
Forums
Gallery
Events
Everything posted by BANYAN
-
Further to this discussion I am now determining the actual rigging plan and belay points using the excellent plans provided by Andrew Bowcock in his book CSS Alabama: Anatomy of a confederate Raider. As this section seems to attract a wider visit I am linking back to my log to seek comments and suggestions on my current interpretation of contemporary lithographs/photos and try to match to the book to determine a LIKELY rigging and belaying plan for Victoria. All comments, suggestions etc most welcomed. cheers Pat
-

HMCSS Victoria 1855 by BANYAN - 1:72
BANYAN replied to BANYAN's topic in - Build logs for subjects built 1851 - 1900
Hi again folks. After closer inspection of the lithographs and photo I have of the Victoria, and using the belaying and rigging info in the CSS Alabama book, I have derived the following possible rigging arrangement for the bow. Please see this in context with the attached annotated extract of one of the litho graphs. Click on graphic for a larger view. Please note: a. presence of vertical whiskers (2) at the bow b. presence of whiskers on the cat heads (for two lines) - very thin line denotes these (hard to see sorry) c. only one line (at the moment) identified as passing through the bulwark fairleads at the bow. d. the forestays (2) pass inboard of the vertical whiskers and I assume will terminate via tackle at deck eyebolts either side of the bowsprit (inboard) e. stays are terminated via deadeye and heart to eyebolts outboard (as shown in the Alabama belaying plans - not included here). f. cathead whiskers have fairleads for two lines either side. One for Jib sheets? other? I have yet to identify a few of the lines, and some of the lines I have identified may be the wrong interpretation, so ALL comments and suggestions most welcomed. The current interpretation (question marks denote some clarification or confirmation required; and, TBD = to be determined) 1. Fore Royal Stay 2. Fore Top Gallant Stay 3. Outer Jib Stay 4. Fore Topmast Stays (x 2) 5. Fore Stays (x 2) 6. Fore Royal Stay (starboard side of martingale) 7. Fore Topgallant Stay (port side of martingale) 8. Martingale Stay (chain) 9. Outer Jib Stay (starboard side of martingale)? 10. TBD 11. Fore Topmast Staysail Downhaul (leads aft and through bulwark fairlead at bow)? 12. TBD (x 2) 13. Martingale backstays (x 2) - chain 14. Fore Staysail Downhaul - leads aft over vertical whiskers? Why two?? 15. Jib Sheets (aft via cathead whiskers - outer fairlead)? 16. Fore Topmast Staysail Sheets 17. TBD 18. Fore Staysail Sheets 19. TBD (possibly guys but nor extended forward?) I would appreciate any feedback on these. cheers Pat
- 1,006 replies
-
- 8
-

-

-
- gun dispatch vessel
- victoria
- (and 2 more)
-
Tiny perhaps Greg, but anyone giving a close look will notice. The detail and finish you are putting in will attracty people to look so I am sure you will get plenty of comment on the smaller details. cheers Pat
-
Just found this very interesting build. Great craftsmanship and good quality finish. Those cowls for the vents are huge Thanks for sharing some of your techniques. Cheers Pat
-
Those elm tree pump (trunk risers and pump handles) look great Rusty; nicely done! cheers Pat
- 310 replies
-
- 3
-
-
- cheerful
- Syren Ship Model Company
- (and 1 more)
-
Those chain plates sit very nicely and look good Denis; nice work. cheers Pat
- 453 replies
-
- 5
-
-
- thermopylae
- sergal
- (and 1 more)
-
Nice work Jason, the launch is looking good. I am surprised that with that amount of humidity that the varnish did not start to go "cloudy" on you also. cheers Pat
-
Of late I have taken to a new author in this genre by the name of Sean Thomas Russell. For my tastes in reading, I find it a very refreshing take with the main character having to fight off not only the French (Napoleonic era) but also people within the RN, as his wife was French and his loyalty is often challenged. The first book in the series is "Under Enemy Colours". cheers Pat
-
Yet Another Pandora 3D build
BANYAN replied to herask's topic in CAD and 3D Modelling/Drafting Plans with Software
Very nice work; if I did not know this was 3D I could swear this was a wood framed model. That takes some talent! cheers Pat -
HMCSS Victoria 1855 by BANYAN - 1:72
BANYAN replied to BANYAN's topic in - Build logs for subjects built 1851 - 1900
Thanks Denis and Druxey. Appreciate the feedback. Denis, I assume you are referring to the guys? If so, as far as I can determine these had a tackle or double heart arrangement, the former with a lead through a fairlead and secured inboard as 'running rigging' - this is shown in the HMS Harrier arrangement (1860) - so that may be a viable way to go - thanks. Druxey, many thanks for your helpful PM; that arrangement for a chock block (my bow block) seems a likely candidate. cheers Pat- 1,006 replies
-
- 3
-
-
- gun dispatch vessel
- victoria
- (and 2 more)
-
Nicely constructed whiskers Denis; but, as John said - take some care these are just begging to be snagged cheers Pat
- 453 replies
-
- 6
-
-
- thermopylae
- sergal
- (and 1 more)
-
HMCSS Victoria 1855 by BANYAN - 1:72
BANYAN replied to BANYAN's topic in - Build logs for subjects built 1851 - 1900
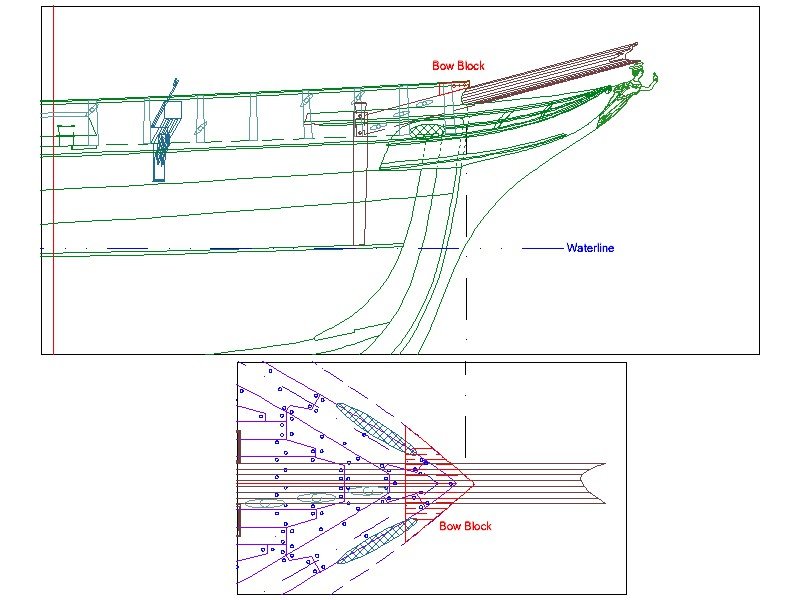
Hi folks, My long-awaited copy of the CSS Alabama: Anatonomy of a Confederate Raider arrived a couple of days ago. Great book with some excellent belaying and rigging/sail plans for a Barque rigged ship. As she is relatively contemporary with Victoria, I am using the Alabama belaying plan as the basis for Victoria's rigging and belaying plan. There will be some difference in the plan based on the size of the ship, different design aspects (bow / sprit) etc. I am also using the internal arrangements plan of HMS Harrier (1860) to identify some cleat/belaying pin locations and leads; as well as using the arrangements shown for HMS Immortalite (1860) and HMS Warrior (1862) for some guidance. I have two immediate issues I wish to clarify and hope someone can assist me in deciding a likely arrangement for the bow related rigging and belaying points. Victoria was barque Rigged. First, I need to devise a likely arrangement for belaying the running ends of ropes passing through the bulwark timbers at the bow. The attached graphic extracts (Immortalite and Warrior) and my drawings for HMS Victoria show some of the arrangement alternatives. In drawing the likely arrangements for Victoria I need to account for the much more sharply angled junction of the bulwark timbers at the bow and the fact that her jib had more of itself exposed above deck than the other ships. Other drawing also show the use of metal (iron) straps in thejunction of the bulwark timbers to provide strengthening and support. My current concept is that the jib will have need some substantial support at the bow also hence the use of the bow block (as I have called it - please advise proper name?). As with the other ships I will use the fairleads through this bow support block, but I remain open to any of the three belaying options shown in the three graphics below, or a fourth as used in HMS Harrier: 1. Pins in a rack fitted athwart the roughtree timbers at the bow (second preference) 2. Cleats immediately below the fairleads. 3. Cleats on the bowsprit (in line with the fairleads) 4. Cleats on the bulwark timbers (similar as those leading away as shown in the Immortalite graphic and similar to HMS Harrier) I have selected the bowsprit option as there are only 6 ropes (three each side) for me to worry about and this provides a direct lead (no chafing of the ropes as they would be subject to some abrading if the led is angled away. One thing that has ne puzzled though is that these graphics show 9 fairleads and lines; whereas, the Alabama only has three each side - what is missing? Open to ideas/suggestions. I know that any would be OK but I am looking for the most likely. Secondly, I am trying to identify what line/rope would have been lead via the whiskers on the cathead? Any assistance greatly appreciated. cheers Pat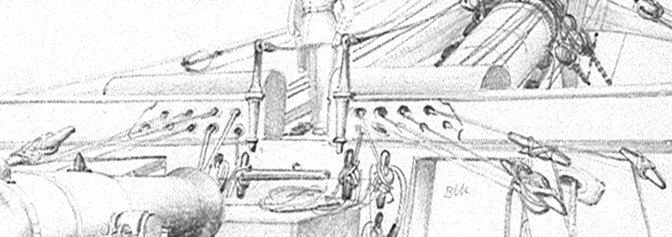
- 1,006 replies
-
- 10
-
-
- gun dispatch vessel
- victoria
- (and 2 more)
-
Hi Greg; why weather it? if it was only painted black for its last mission it would not have had time to weather? The deck replacement piece looks great! cheers Pat
-
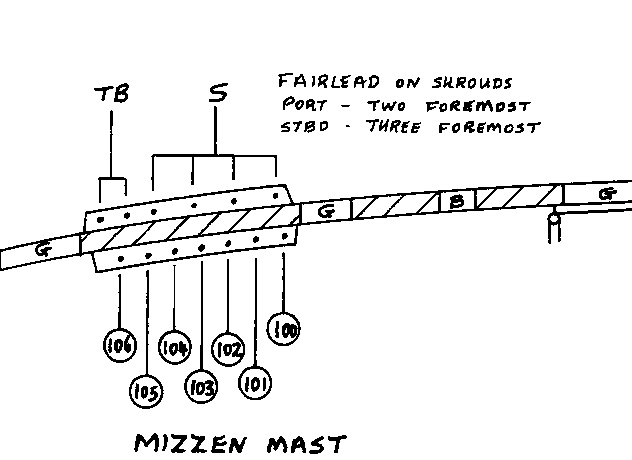
Many thanks again all. I am now confident the author was referring to fairleads on the shrouds rather than a lead for the shrouds. I have yet to determine which running rigging would have been led through these but should be able to do so using the belaying /pin plan cheers Pat
-
Great techniques for the decoration Dave; they turned out great! She is looking good and you seem top have achieved a nice even coat of black. cheers Pat
- 742 replies
-
- 6
-
-
- constitution
- frigate
- (and 1 more)
-
Hi Thanasis and Frank, Many thanks for your contributions to the discussion and building a much clearer understanding of rigging practices. cheers Pat
-
Glad to see you progressing Mark. That's quite a bit of char to clean off, or are you painting them? WRT the front ports, I am not sure of this, but weren't they there so the forward two guns could be manoeuvred and used in that position as sort of bow chasers? That would then allow enough room - Even if not true - agood enough story to explain their absence cheers Pat
-
Hi all and thanks for looking in and the comments. Mark T, thanks for that pointer - I will try through them. Mark P - thanks and I agree, that is why I thought it so strange. I think your interpretation may be exactly that. I will have a look at the legend to see which 'running ends' of ropes might have need of a 'fair' lead to secure them properly at the pins without fouling other ropes. That should prove a good pointer to the likely candidates. HMCS Victoria had steel wire shrouds which alone would make fairleads unlikely, so the idea of a shroud fairlead truck (see John's earlier comment and my response below) to create a 'fair' lead for running rigging to belay points is most likely what the author was inferring. John, thanks again; I actually used a couple of those on the Endeavour and should have clicked - Marquardt calls them shroud fairlead trucks. I think you may be right and it is these trucks using a slightly different terminology. Now to to determine their correct positioning which will be governed by where the 'running end' of the rope is to be lead from S.Coleman - many thanks mate, these are shroud cleats but I very much appreciate the input. cheers Pat
-
Keep you going....? Make you go nuts more like it - good luck with the folding. At least you have the right weather to be doing this cheers Pat
-
Further to my last, I am also trying to contact the author "Andrew Bowcock" but have had no luck trying - I have tried Chatham Publishing but they either do not exist anymore, or changed emails. If anyone can provide contact details, or put the author in touch with me it would be greatly appreciated. cheers Pat
-
Thanks John, As you can see from the extract, I am not sure whether he refers to leads for other ropes fitted to the shroud, or to lead the shroud itself? In other parts of the drawings, he usually references whether a rope passes through a lead etc, and he does not reference these other than on this drawing. I have checked Lees, Marquardt and Falconer with no luck so far. An internet search brings up all sorts of things but nothing for a fairlead on the shrouds??? cheers Pat
-
Hi all, While researching a likely /representative rigging and belaying plan (Barque Rigged) for the HMCS Victoria, I came across the terminology "fairleads" in reference to some of the shrouds. The terminology/discussion from the CSS Alabama: Anatomy of a Confederate Raider by Andrew Bowcock, infers that the lower shrouds were led through fairleads (possibly to clear, or lead, the shroud clear of the roughtree rail, rather than fairleads attached to the shrouds for other rigging. Is this device/rigging technique familiar to anyone? regards Pat
-
Very nice work Dan, she is looking very much a grand lady of the sea already. I like the way you steadily build up the surfaces; makes an excellent base for the final coats. cheers Pat
- 287 replies
-
- 2
-
-
- michelangelo
- ocean liner
- (and 1 more)
-
Keep plugging away Sjors, you'll see the end of the decoration painting before you know it cheers Pat
