


popeye the sailor
-
Posts
16,007 -
Joined
-
Last visited
Content Type
Profiles
Forums
Gallery
Events
Everything posted by popeye the sailor
-
 huh? well....he mentioned that he hadn't posted in a while jes' welcoming him back amonst the build'in I need to toggle between the kit builds and scratch logs a bit more frequently
 -
WOW! nice start on the super structures and the guns! they look great you made some mention of using your undies for blast bags..........saw this and I HAD to take a look like the way you made the recoiling parts
- 83 replies
-
- 2
-

-
- melvin
- blue devil
- (and 2 more)
-
amazing progress since I last looked in Nils! I'm also amazed with how you assembled the lower the deck........must have been a bit harder to do through the framework. she's coming along great.........guess I'll have to toggle between the kit builds and scratch a bit more frequently
- 692 replies
-
- 4
-
-
- eagle of algier
- chebec
- (and 2 more)
-
Cutty Sark by NenadM
popeye the sailor replied to NenadM's topic in - Build logs for subjects built 1851 - 1900
I hope you find your 'new norm' soon!- 4,152 replies
-
- 6
-
-
- cutty sark
- tehnodidakta
- (and 1 more)
-
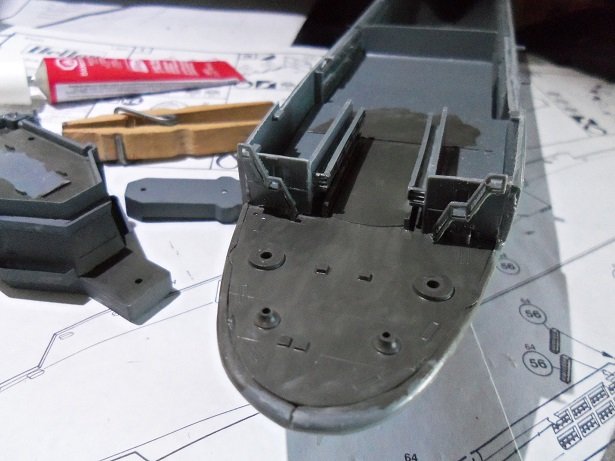
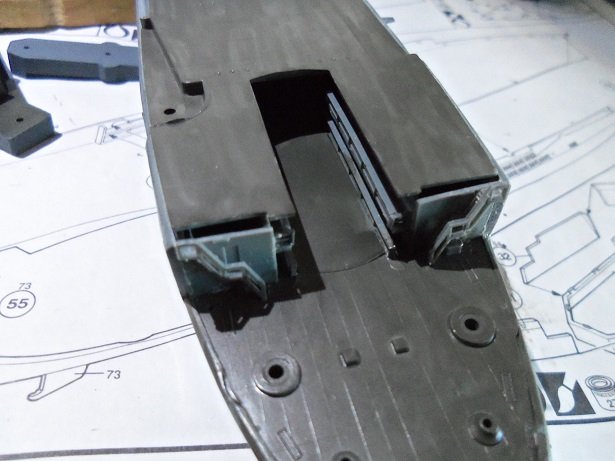
oh.......before I forget I mentioned earlier, that there is a sort of slot, toward the back of the elevator well, if you look below deck. I was unsure if there was anything there, since I did not see a 'back wall' in the parts sprues. I noticed today that there are these two doors.........part number 21. for some reason or another, these parts are nowhere to be seen in the instructions. I haven't fitted them yet, but I believe they go there. just a little info for those who have this kit.
- 133 replies
-
- 3
-
-
- jeanne d arc
- heller
- (and 2 more)
-
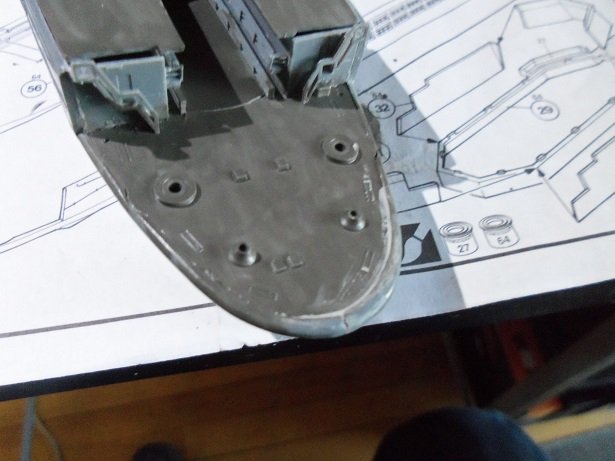
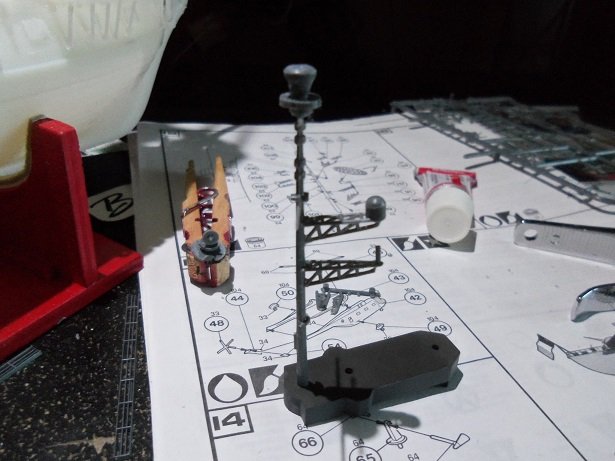
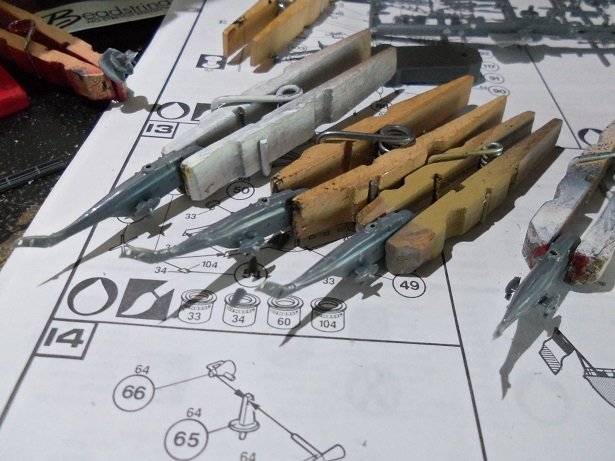
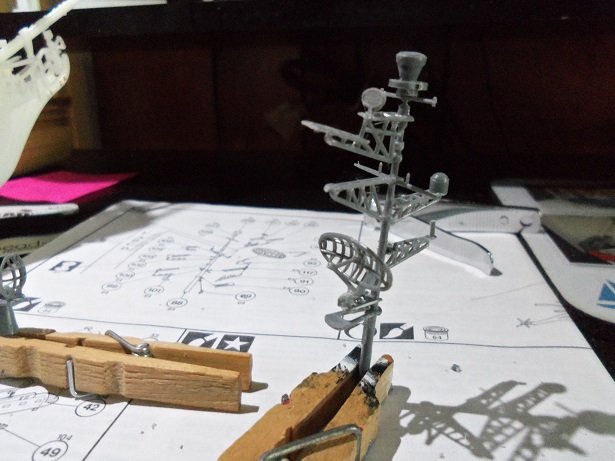
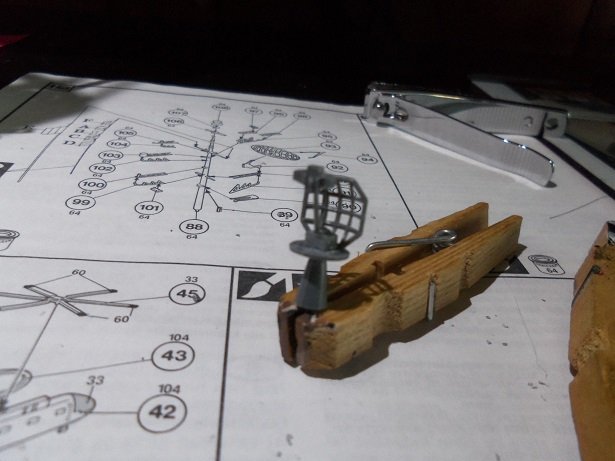
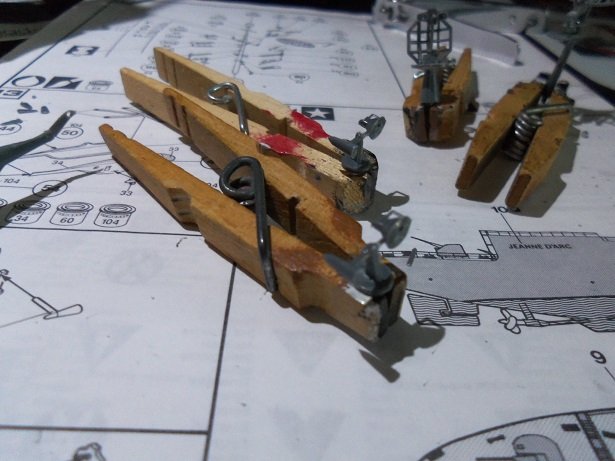
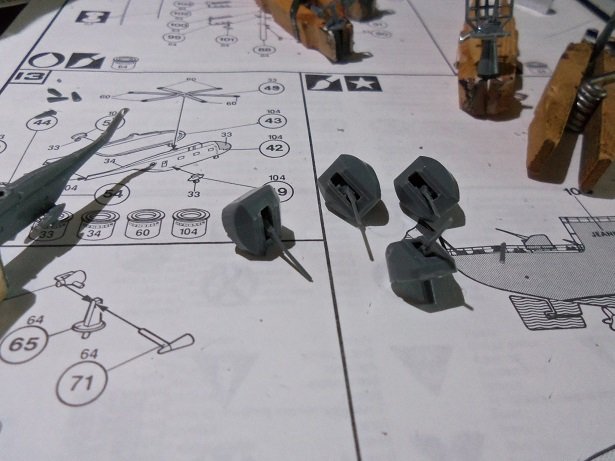
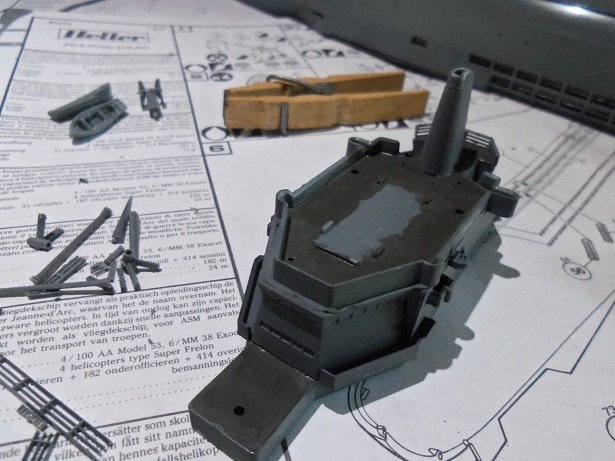
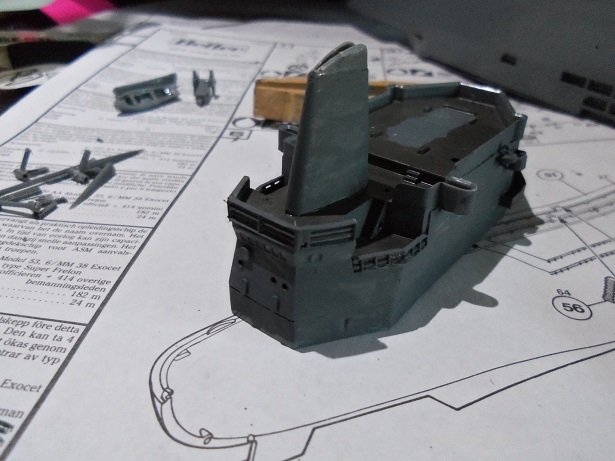
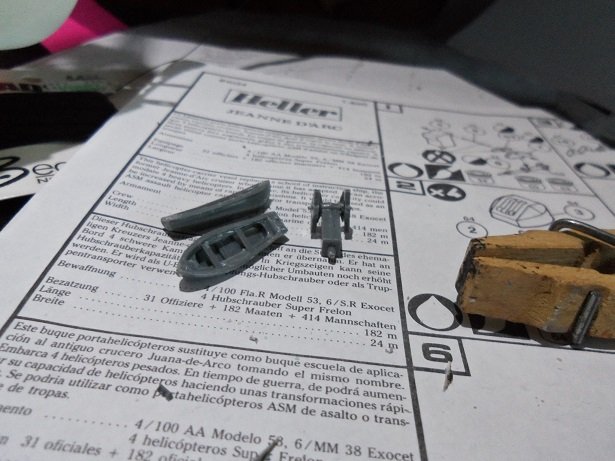
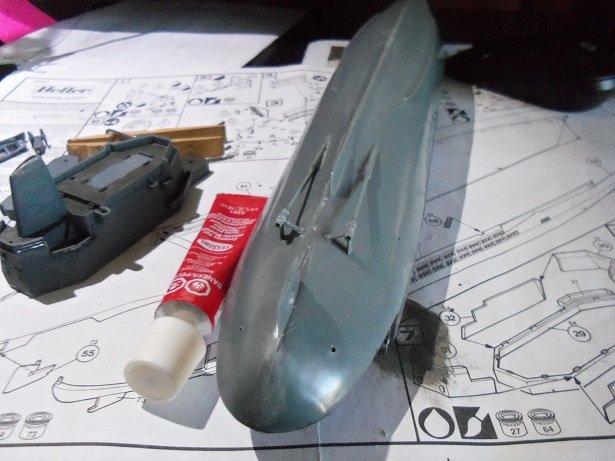
so.......yes, I did make some more progress on this project. the first thing was to fill in that gap in the stern. when I touch up the decks, I can address this. the main mast has a lot of small pieces......the tree was starting to take shape. along side there is one of the DRBC-32A fire control radar units........there are three on the upper structure. the four Super Frelon Helicopters supplied in the kit, are made up with a number of small parts as well. trimming the assembly joints took some care.......that little dimple you may have seen in the front, is actually the front wheel. I had to be careful not to cut it off! a pair of aft wheels {pods and tires}......giving them a tripod landing gear, were cemented in place. the tail section was also cemented in place......a tiny stabilizer is still to be added after they are dry......overnight. the rotors will be added last, after they are painted. still some clean up to do on them..........more was done to the mast tree. the DBRN-34A navigational radar unit I think these are the two other DBRC-32A radar units ......and I don't think I showed you the 100 mm guns assembled.......they are ready for paint. with a bit more clean up, these should be ready for paint. more soon thanks for look'in in and also for the likes.....glad to have ya follow'in along
- 133 replies
-
- 12
-
-
- jeanne d arc
- heller
- (and 2 more)
-
thanks for the encouraging comments gents.......I appreciate the interest this must be an updated kit Yves.......it gives her complete history, right to when it was decommissioned in 2010. what still bugs me though, is why would she be modeled with the SAM missiles, and not the two triple Exocet launchers that she ended up with for most of her career. the kit does have it's faults, but it's coming out OK so far.......I'm only having to make a few minor adjustments. Lou......the SAM missiles and launcher looks like this........the Exocet launcher is encased. American warships have these launchers too.....the missiles are externally attached to the trajectory arms {pods}. Edwards has the Titanic railings and stuff.....I have a few other places where they can be found. there's a wonderful site that I will send you regarding the Titanic, I think you might like it I won't give up on it Greg........I'm too far into it. even though I could use any of those different sheets, I think I'll just use the supplied railings and stuff. given the time factor {and the cost of some of them made the admiral flip}...I'll wait till I get.......lets say.......a better subject to expend the effort into. you are the guru of P.E. ......it's sage advice coming from you I truly enjoy what you do to your vessels. besides, I think I spent my allowance for the time being.......a future project that got put away for Christmas {anything that will keep my grubby paws out of it}.
- 133 replies
-
- 7
-
-
- jeanne d arc
- heller
- (and 2 more)
-
she's look'in pretty sweet!
-
the Sopwith is coming along great John! amazing bit of rigging....and yes......it does look tedious very well done! sorry to hear about your dad...my condolences to you and your family.
-
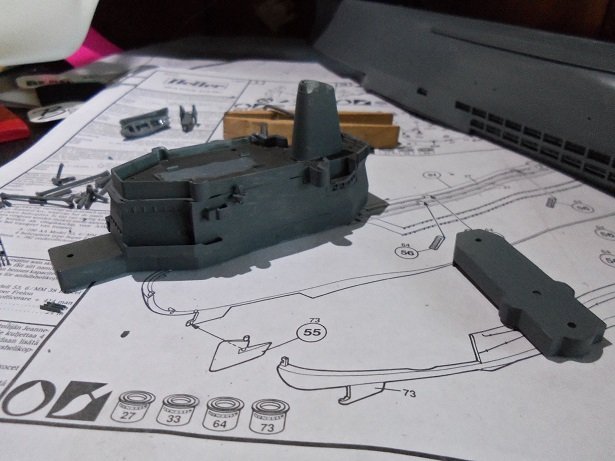
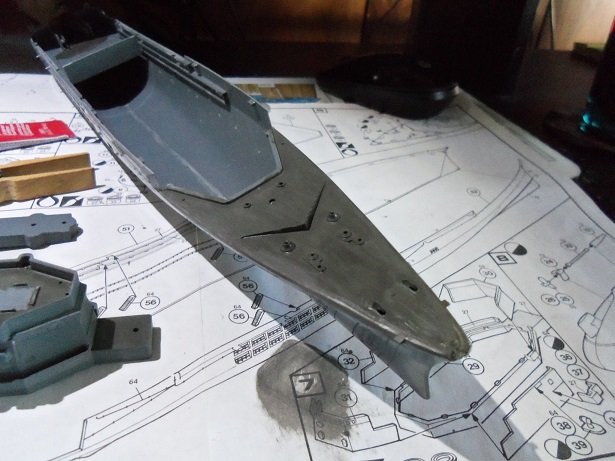
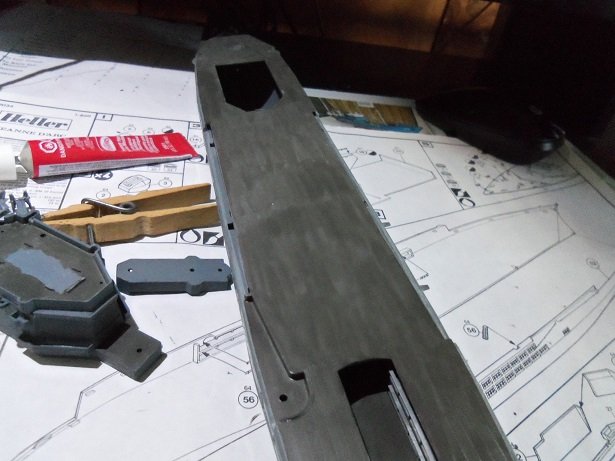
thanks Mobbsie........and yes, the filler came in handy. I happen to have some of the plastic filler. I haven't used it much since I got into the wooden models, so I had to knead the tube a little to get it mixed again....pliable too there are only three places so far, where it will be needed. more work was done to the super structure......the front bridge area needed to have some filler around the top lip. with it sanded and fixed up, I chose a better alternative to the deck paint. they suggest a darker gray, but in the pictures I've seen, it looks to be more of an asphalt color......kind of gray, but more towards a blackish color. the decks were painted in this new paint I mixed up, and the sides were painted the darker gray....a battleship gray. the funnel was added after the paint was dry....the top section to the super structure {to the right} was painted with the darker gray. all that needs to be done now, are the inner bulwarks and railings, which have bee added to the aft end. a pair of life boats and the SAM launcher was assembled.....the missiles are to be another color, so they will be added later after everything is painted, the parts for the props were added to the stern. once cleaned up, I can begin on the outer hull painting. the tip of the bow needed some filler...that was done and then painted with the mixed paint. I probably should have used the air brush for this.......the main deck shows the streaking real good. flash has been a problem.......finding more than I thought. the walls were added to the elevator area, as well as the railings along the inner area. the elevator will be in the down position. odd thing I see here, is that there is a depression line {a slot}, for a wall........not included in the kit?!?! I could add something here, but not sure what would be logical. I forgot to fill in the third imperfection when I painted it......I'll do that when I touch it up the main deck was dry fitted after it was painted. as I suspected......I will have to do some trimming to fit the aft end of the main deck, to fit where these two walls are. there's still more painting to be done here as well. we'll see how much I get done today
- 133 replies
-
- 11
-
-
- jeanne d arc
- heller
- (and 2 more)
-
very nice Dave........great progress!
-
very nice progress since I last looked in Jesse! the home made cleats are super......very nice work on the mast as well glad to see your still getting to the table....
- 1,306 replies
-
- 6
-
-
- syren
- model shipways
- (and 1 more)
-
the redo of the ratlines / shrouds looks really great Glenn! the rest of the rigging looks good too. super looking vessel
- 101 replies
-
- 1
-
-
- L Toile
- Billing Boats
- (and 1 more)
-
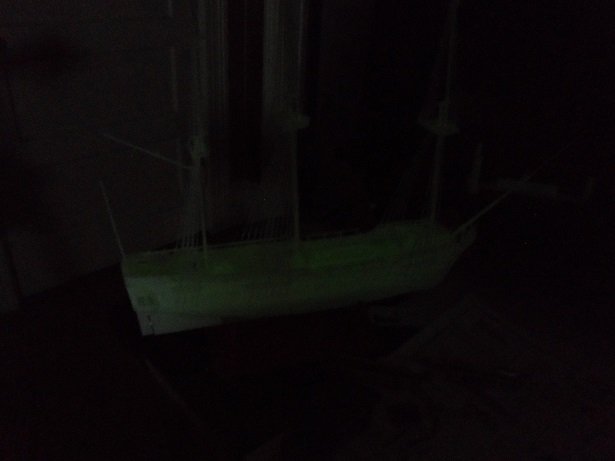
thanks Mobbsie......it's not the best picture. when it's done, I'll try and get the best picture. perhaps I'll even use the big crane lights. not to worry, I can never change. thanks thunder....I think this kit / series is a lindberg offering. the other day, I saw one of the older kits, that requires to be painted with a glow juice solution. I don't think Heller or Revell are in this group.....they are still going strong in today's market. older now defunct companies are where the bulk of the molds came from......but that's not to say that Revell hasn't sold off a mold in it's day kits do change through the use of different plastics......the glow in the dark process isn't that new......Revell and Aurora used the process in their figure models. the witch, the creature from the black lagoon, early star trek {yea..I've even built some of these}. now you have new companies coming out.....picking up what's left over and bringing back the older models {which I'm glad to see}. the other one I have uses the Henry Morgan.....I though it was a whaling vessel. the model can actually be modeled after the Wappen Von Hamberg, and other similar vessels....this one I'm Definitely going to paint. welcome to the fray
- 140 replies
-
- 3
-
-
- jolly roger
- lindberg
- (and 1 more)
-
that is a really nice job on the transom Bob! the decorations came out look'in sweet
- 682 replies
-
- 4
-
-
- halifax
- lumberyard
- (and 1 more)
-
the other night, I stopped and went to shut down....figured to get some TV time in. the hull was glowing pretty good, so I snapped a picture of it. it will look better when I get the yards and sails on her,
- 140 replies
-
- 5
-
-
- jolly roger
- lindberg
- (and 1 more)
-
crow's nest came out perfect! hull looks ready to cover too.
-
if an ink jet printer was used, water would not be a good idea........the ink is ready soluble with water. I did some sail embossing using an ink jet printer...what I used is Testor's decal bonder. it dries rather quickly and will not cause the colors to run.......do it in light coats. a flat lacquer can also be used as well. the flag is still positional after it dries.