


popeye the sailor
-
Posts
16,007 -
Joined
-
Last visited
Content Type
Profiles
Forums
Gallery
Events
Everything posted by popeye the sailor
-
 look'in really good KP........hope that isn't a nick at the corner of your display stand. is that a hull made out of match sticks?
 -
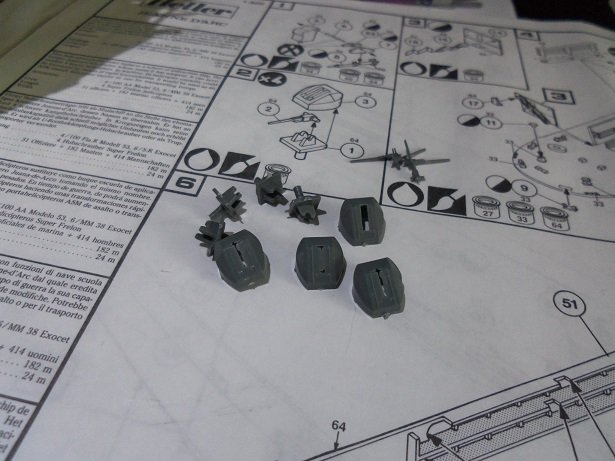
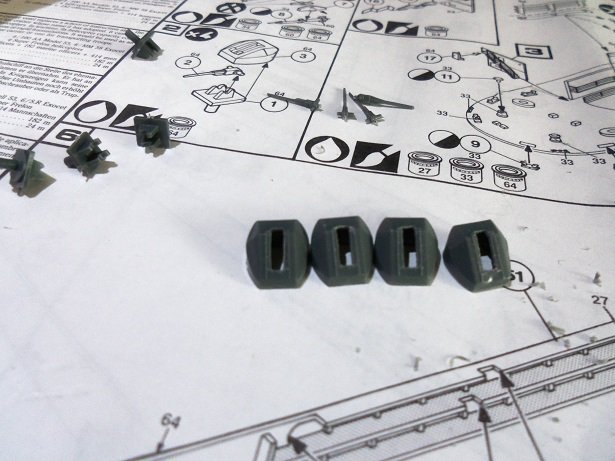
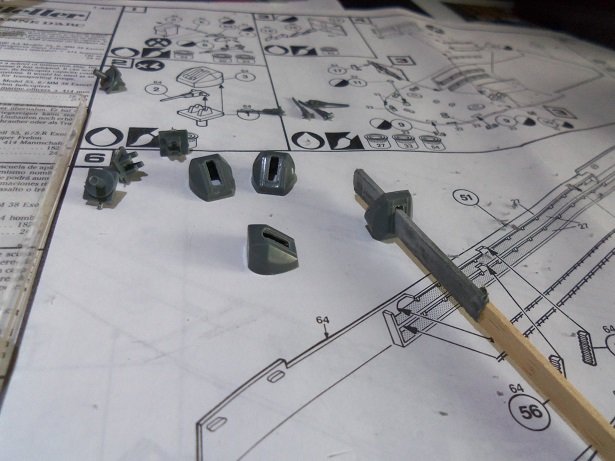
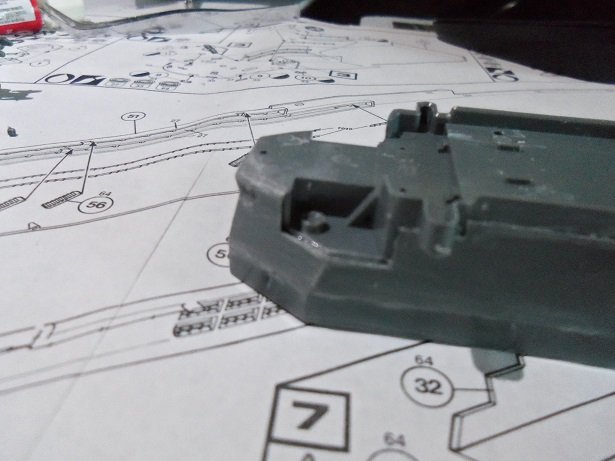
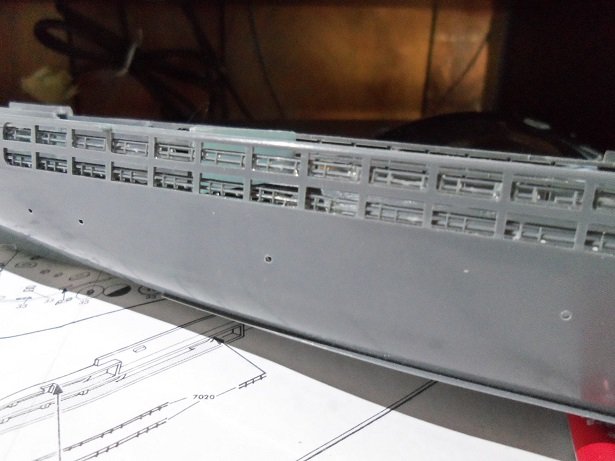
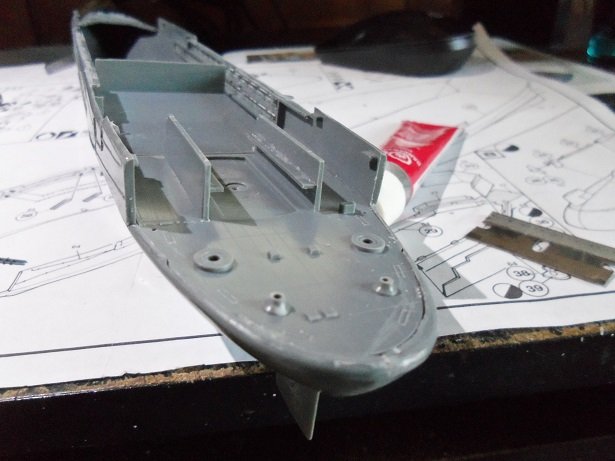
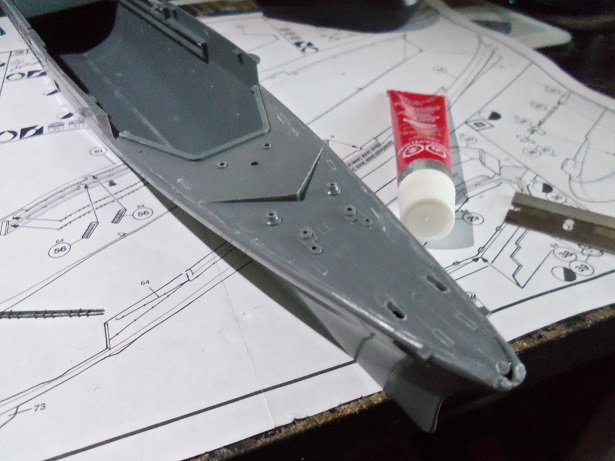
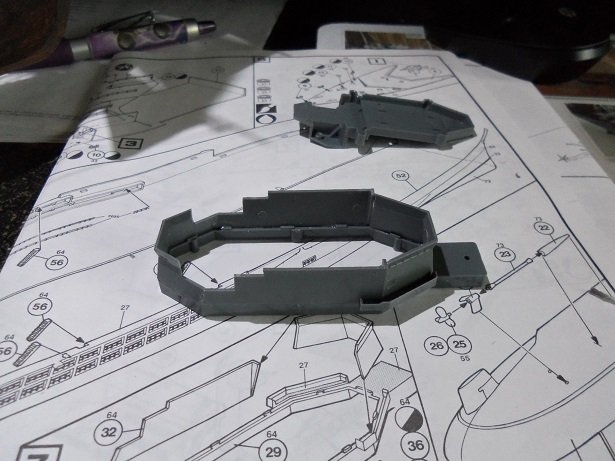
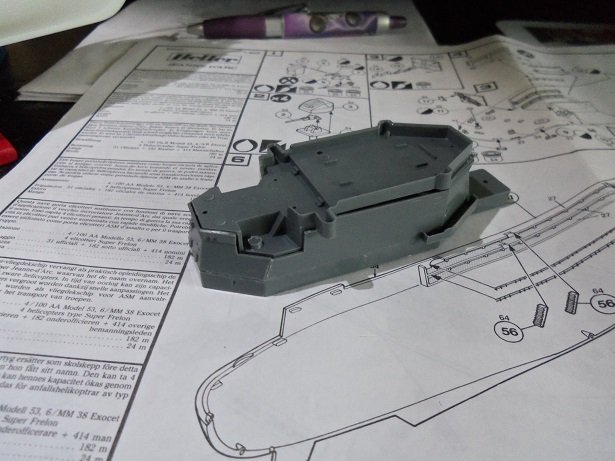
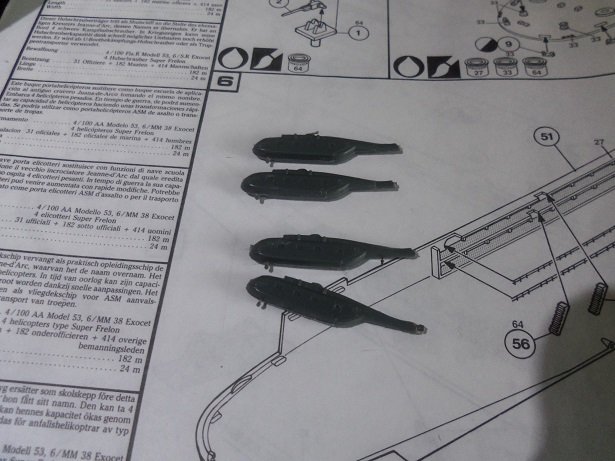
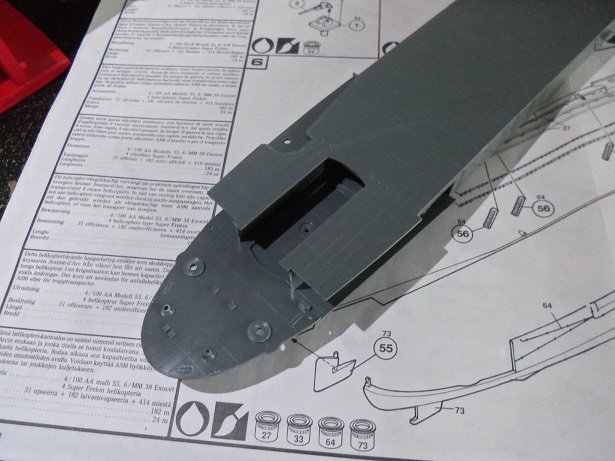
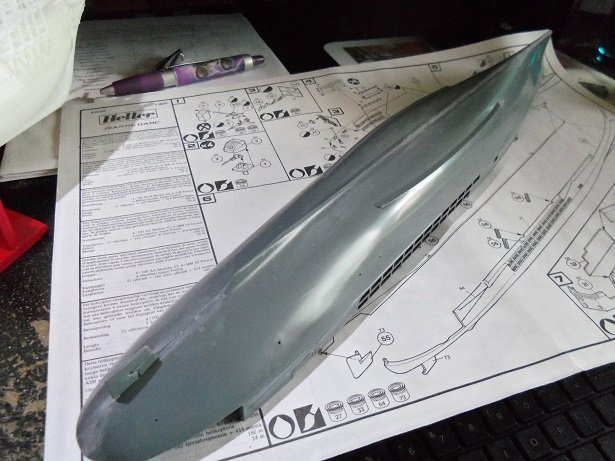
going a bit further with the ship, I thought to assemble some of the sub assemblies. the 100mm guns were first......the parts were found and laid out. if you read through the article I posted on this vessel, there was to be quite a bit of armament aboard. for starters..there were to be six 100 mm guns. the two guns aft of the super structure were eliminated, leaving only the two fore of the super structure, and the two at the stern. she was also to have a quadruple 305 mm mortar launcher on the fore deck, but this was never installed. the openings of the gun shells have a lot of flash that must be trimmed out. I have partially done one of them. once they were all trimmed out, gauging the openings by eye, I made up a sanding stick for them. planking comes in different thicknesses......I chose one and CA'd some fine sandpaper to it. sticking it in the openings, I found {and was glad to see} that all four openings were the same size. once all the other parts are trimmed of sprue marks, they can be assembled. a strange thing to note about this kit......the actual ship is fitted with twin triple mm38 Exocet anti ship launchers at the front of the super structure, at the fore deck. earlier in her concept, she was to have a twin Masurca SAM Launcher mounted there instead. these were never installed. the kit features the SAM launcher...the only picture shown in the article, is an artist's depiction of what she would have looked like. the Exocet Launchers were installed in 1974. {same year I graduated high school} the top part was cemented on the super structure.........what a pain it was to fit.....it's not perfect. at the aft section in a recess, were can only be described as injection pin marks. for the marks to be this pronounce, the knock out pins must have been too short for the mold. my intention is to trim them off. yea......there's a lot of sanding scars. hard to figure out why they made the super structure to have this many parts........counting the top part, six in all. I removed some pin marks from the deck on top as well. they will be sanded to insure a smooth deck. along the sides of inner wallsthe hull, there are two levels.....walkways below the main deck. these are to be filled in with railings. the kit comes with two types of railings.......neither one is numbered to tell you which one to use. I used my better judgement here......I'm sure I am correct. both sides are done....with a little cleaning up, they should be good. along the top of this section, the hull cuts away from the main deck and there is a heavy mold line down the middle of it. I did my best to eradicate these lines. the decks are ill fitting as well. the stern section has a wall on both sides of the elevator area.....they connect to the outer hull. I cemented the stern section into the hull so I can line them up better.....then I can fit them to the main deck section. walkway / shelves needed to be installed along the elevator's inner walls. I used a piece of suitable width planking for spacing. the appendage that runs toward the mid ship hangs free. the main deck is to fit over this, creating the outer walls for the side hull walkways. I was going to cut and add a length of sprue as a support for it, but it would get in the way of the walls, molded on the main deck part. the fore deck fits pretty much in the same way. I will need to use a little bit of filler to fill in the small imperfection. still a lot of tiny pieces to go.
- 133 replies
-
- 12
-

-
- jeanne d arc
- heller
- (and 2 more)
-
thanks Greg for looking in.....I took a look at the site you mentioned.......they have the super frelon helicopters w/radar {SA321G} and the Lynx choppers..and I'm sure one of the P.E. sheet could be used. I might have gone too far though, opting to use what is supplied in the kit. makes me want to find a carrier though thanks for the tip I bookmarked the site! thanks Mobbsie wood or plastic, any kit can pose problems. I've made it a bit further, thinking up some strategy for the assembly....some parts are not lining up very good. another thing I see in this kit is the ejection pin marks...some protrude quite a bit. I've trimmed most of them off and cleaning them up with sanding, so they might not look too bad when I get around to painting. I have some update pictures handy......still in the camera at the moment. I'll be back.
- 133 replies
-
- 3
-
-
- jeanne d arc
- heller
- (and 2 more)
-
looking good with the coppering....will be nice when done
- 258 replies
-
- 3
-
-
- harriet lane
- model shipways
- (and 1 more)
-
nice bit of progress J simple and easy way to emboss your sails.........gotta get off my duff one day and perfect how to do it in a printer. started, but never continued. how many sizes do you get with the punch?....I see they are interchangeable.
-
I still think you don't give yourself enough credit......she looks awesome! the funnel structure looks so realistic.....WOW! now if I can only learn a fraction of what you do with these vessels.......I think I'm too old to learn new tricks beautifully done Greg!
-
your not going to be able to remove it now, are you? will be harder to work on the deck fittings? looks really neat
-
WOW Sjors! she looks great.......glad to see your back
-
I found your new build Kees! you had me right up to the point where you added the expando foam {I use it too at work}.........but with the revelation that this is a plug for another vacuum form hull, I understand fully! I like the way your doing this........it's so cool! you really have a knack for these hulls......really nice progress so far!
- 193 replies
-
- 6
-
-
- wilhelmina vii
- fishing
- (and 1 more)
-
sweet looking model! I was wondering when some one would do something with Popsicle sticks.......your not going by the 'eat and use method are you. that would take some time to accumulate that many sticks craft stores carry them by the bag....some are wider than others too! I will follow long.......you've done great job so far
- 15 replies
-
- 2
-
-
- riva aquarama
- launch
- (and 1 more)
-
rigging looks super nice........as with the rest of the model
- 653 replies
-
- 4
-
-
- trabakul
- marisstella
- (and 1 more)
-
Occre Golden Hind 1/85 quality and difficulty
popeye the sailor replied to dydale's topic in Wood ship model kits
sometimes, the skill level of a kit can be deceiving. the wood model medium is a two headed coin....the kit may be more complex, but it also relies that the modeler has the knowledge of basic hull/ship construction and is willing to do the research, filling in the extra detail that the kit doesn't include. how interested you are in the subject is a great motivator as well. I too used to be a plastic modeler......I'd see the wood kits and I never thought I could pull one off. I was given an old partially started Billing's expert kit from a friend of mine, and I've got to say...it was the most fun I ever had with a kit. from what I've seen with a lot of builds, the instructions can be a crap shoot. Billings has vague instructions.....I'm also working on a Sergal kit, and theirs isn't much better. I guess you could say that i've become a Billing's fan, having built a number of their kits.....most of them being advanced beginner. they offer just as much of a challenge, as a higher level kit, and adding extra detail to them makes them look all the better -
I did make a bit more progress with this one........but I'm beginning to see some ill fittings here and there. not only that, but there's a lack of locator holes, tabs and pins, to guide where the parts go. I'll point them out as I go along, for those who either have this kit, or kits like this one. they might not be intended for the faint at heart
- 133 replies
-
- 8
-
-
- jeanne d arc
- heller
- (and 2 more)
-
thanks all for the comments........I was sure most would think me daft or something I don't plan on painting the Dutchman......I do plan on showing her finished and with a full moon glow. I think once it's complete and dosed with light, it will look much better. I will save it for the last couple of pictures. I'm working on the anchors for the J.R. ....now I need to cut out the sails for the Dutchman and sew them on the yards. I need to make another spanker sail, since I messed up the one for the J.R. I'm not at a loss though, cuz I still have quite a selection of the Cutty sails....I'm sure one will make a dandy spanker. Piet......with the early glow models, they had to be painted with a glow solution to get the effect. I recall having to do that with one I built in my younger days. once they figures out how to add color to the plastic, they changed over. I would hate like the dickens to do these ratlines Tom thanks for the likes!
- 140 replies
-
- 3
-
-
- jolly roger
- lindberg
- (and 1 more)
-
looks super Kevin........WOw!
-
I see what you mean Danny......I would have imagined they would match better since the deck was probably printed as one piece, then split up later. still looks quite impressive though....the hull has some 'beefcake' now
-
hello Piet....thanks for look'in in and the good word yea......I haven't updated my signature. just look'in for the day when I can retire......I'll have plenty to do by that time I'm finally finding the time to get back to business......it feels pretty good
- 133 replies
-
- 5
-
-
- jeanne d arc
- heller
- (and 2 more)
-
really nice work Mark.....belaying and seizings look very good!
- 652 replies
-
- 2
-
-
- royal william
- euromodel
- (and 1 more)
-
very nice work Pat.......the rudder, gungeons and pintles look super!
- 1,013 replies
-
- 3
-
-
- gun dispatch vessel
- victoria
- (and 2 more)
-
with how nice your yawl boat looks, perhaps you should try your hand at a few miniatures Kathryn has a beautiful child. have a great trip!
-
I hoping the move is going well......I don't envy you with all that equipment. strength to you my friend as you continue just keep thinking of the new workshop........plan it well
-
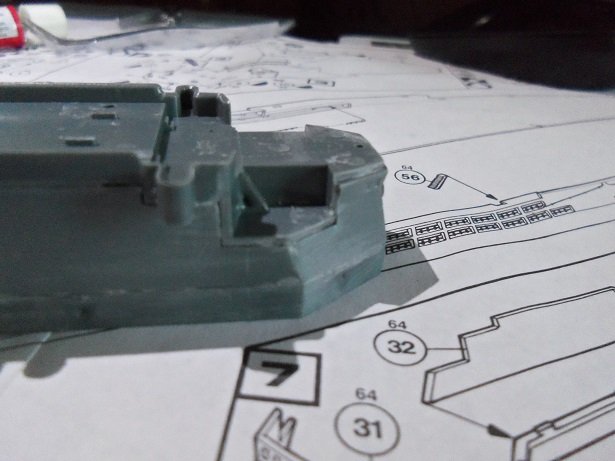
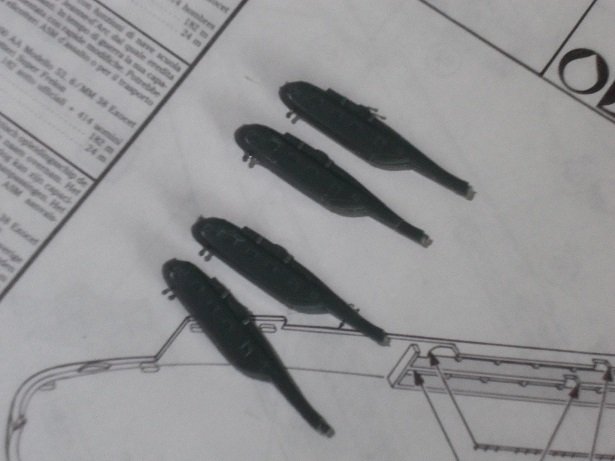
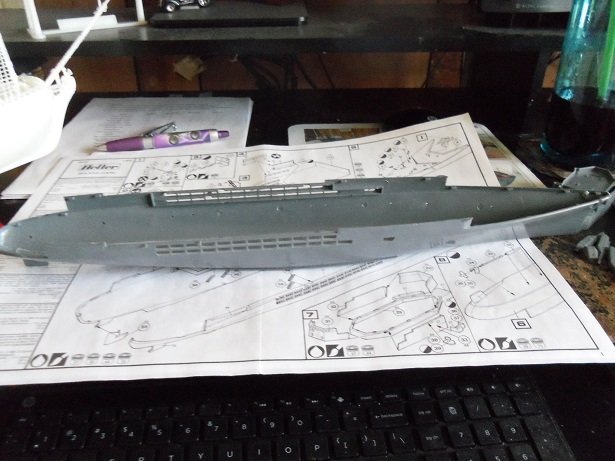
yesterday, after going as far as I could with the Jolly Rogers, I assembled the super structure....part of it, anyway. it's made up of five parts, and the fit was kinda wonky. I might have to use a little putty to fill the bigger imperfections. the top part will be equally as tough to add to it.......these kits aren't like the good old days, when the superstructure usually consisted of two parts {halves}. they most likely still do....haven't done one of these modern ship in quite a while. then I figured that I would assemble the main parts of the helicopters. for those with eagle eyes, you might have seen it.....but I didn't. as I was removing the halves from the sprues, I saw that a tail section was broken off one of the halves I didn't find it in the box itself, so I looked in the bag. nestled in the odd bits was the broken piece!---------->RELIEF!!! you might be able to see the break line. through some dry fitting, I got to see how the elevator will look. I do have some flash to deal with and the mold edges are a little flared......I'll be sand'in 'em down and squar'in them off. more soon
- 133 replies
-
- 15
-
-
- jeanne d arc
- heller
- (and 2 more)
-
last week, I was sitting at my desk, puttering 'round with Jeanne's hull........added the rudder and cemented them together. I did some sanding to the assembly joint.........waiting for paint now.
- 133 replies
-
- 12
-
-
- jeanne d arc
- heller
- (and 2 more)