


mtaylor
-
Posts
26,273 -
Joined
-
Last visited
Content Type
Profiles
Forums
Gallery
Events
Everything posted by mtaylor
-
Finding sheaves for small functional blocks?
mtaylor replied to FoxtrotHotel's topic in Masting, rigging and sails
You'd probably have to make the sheave, unless you can find some at one of the on-line shops. You might have a look at this log (last page shows some he's making: -
Look great Carl, though it does seem to have list to the port side. A bit of counter flooding needed? Man the pumps? I'll get my coat....

- 361 replies
-
- 10
-

-
Teddy, If you want to check email for responses, on any topic at the upper right hand side, next to the title, you'll see a little box with the word "follow" in it. If you have your profile set up to send you email notifications, you'll get them. When done and you decide not to have emails from a given topic go back up hit the box and click on the "unfollow" button. Sorry to hear about the injuries and hope you can have a full recovery.
-
Mamoli kit planking help
mtaylor replied to kscadman's topic in Building, Framing, Planking and plating a ships hull and deck
Hi Richard, Go to the top of this subforum (link below) and there's pinned posts with planking tutorials. They should be a great help. https://modelshipworld.com/forum/14-building-framing-planking-and-plating-a-ships-hull-and-deck/ -
It's funny, to me anyways, one would think that the navy would have the blue and army would have they yellow. Looking good, Jack. At 1:48 that still a tiny little thing isn't it? Hmmm... build a wooden 18th century frigate with a Stearman on board.
-
Nice work on the small boat. It came out looking great.
- 219 replies
-
- 4
-
-
- smack
- cross-section
- (and 2 more)
-
Gary, Alfred was "first of the class" so it stands to reason that while the rest of the class kept to basics like hull shape and dimensions, deck shapes, etc. there would be changes as they built more ships of the class. This seems to apply from back then to the current day as new ships of a given class always seem to have some "improvements". With some ships those changes may have pretty radical.
-
Quite so. Looks like the crew working on her has dropped popcorn in a few places. Seriously, I love the detail you've done at such a small scale.
-
Gaetan, This has been an education in more ways than just a ship. Thanks.
-
Dick, I'd say partially plank it like you did the hull. It sounds like deck fittings will be a "best guess" type of thing. Really looks good even as it sits now.
- 263 replies
-
- 2
-
-
- nave tonda
- round ship
- (and 2 more)
-
Maybe curved low wall in front of the cannon on the edge of the base?
-
Looking good from here. A bit of cleanup with a round file or wrap a piece of fine sandpaper around a dowel of appropriate size and Bob's your uncle.
-
Oskar, I sent you a PM.
-
Lowes is good for brass but I've found the local hobbyshop carries a larger selection. I've not tried Home Depot for brass.... yet.
-
Beyond apprentice, Carl. At least journeyman and probably more like master.
- 446 replies
-
- 3
-
-
- zebulon b vance
- deans marine
- (and 3 more)
-
You'll have to contact the The Lumberyard. Here's the link: http://www.dlumberyard.com/shipkits.html As for plans, generally we don't show plans in our logs unless reduced in size. Part of it is due to piracy and other is when you shrink the plans down to the size for image in log, nothing is legible.
-
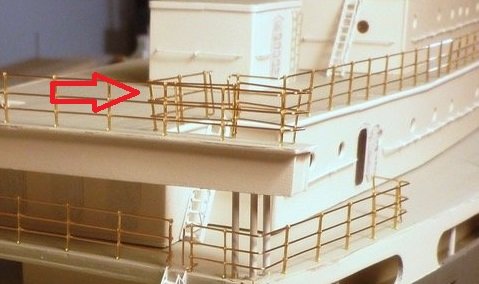
Steve, I have question... is the railing in pic below glued in place? I looks to be askew. Otherwise, all looks perfect.
- 446 replies
-
- 3
-
-
- zebulon b vance
- deans marine
- (and 3 more)
-
Nicolas, You might even think about building a model using Harold Hahn plans. The frames are stylized as far as method and the spacing isn't true to the real ships as this was stylized also.
-
Hi Jo, Looks good from here. Try this though.. close your eyes and run your fingers lightly over the hull. What you want to find out is if there any bumps, dips, or plank ends sticking. As for thinking about your next model, that's not uncommon. I daresay you're getting hooked on this hobby. Edit: Looks like John and I cross-posted. The cat is right.
-
Thanks Mark, and to every one else. I'll be starting the next 2 boats in the morning. I'm going to work them at the same time as it'll save me some repetition time like having to reset the laser for each thickness of wood since I can cut two with one setting. I'm finishing up tweaking the drawings from what I learned on the first one. So diving off the deep end again but into familiar waters.
-
Teddy, It's not an uncommon fear and many us probably didn't recognize it. But I'll offer the same advice that many of us offer to those just starting out on wooden models. Start small. Maybe a rowboat or similar and no more than one mast. Definitely start a build log. The folks here have all been there and are very supportive. After you complete that one, go to one with two masts and keep it fairly simple, maybe a couple of cannon. Then go for three masts. Your skiff would be a good one to start with. But depending on the age of the kit, the wood might too brittle (dried out) to work with. The most important thing is: "have fun". Don't sweat mistakes, everyone makes them even the advanced scratch builders. But from your years in woodworking, I'm sure you know that "it's wood, it can be fixed".
-
I'd go with what Frankie said and recommend that you take a sample of the thread with you.
-
Now that is a tale for the ages, Vossie. I needed a good laugh and got it from the part about being on the ground after flying back and senior officer pops his head into the cockpit.