
HOLIDAY DONATION DRIVE - SUPPORT MSW - DO YOUR PART TO KEEP THIS GREAT FORUM GOING! (Only 27 donations so far out of 49,000 members - C'mon guys!)
×


mtaylor
-
Posts
26,273 -
Joined
-
Last visited
Content Type
Profiles
Forums
Gallery
Events
Everything posted by mtaylor
-
Chris, There's two kinds of pear wood. The pear cut from the tree and allowed to dry and swiss pear which is the same wood but steamed which gives it the pink color. Both Hobbymill and the Lumberyard have both.
-
The most silent disk sander
mtaylor replied to Mike Y's topic in Modeling tools and Workshop Equipment
Mike, Since you have a dremel, you can make it into a disk sander. Here's I use for small stuff... I took a mandrel and recessed the center area a bit. Then attached a felt pad to it. I then rubber cemented a piece of sandpaper to the pad and shaped it. When the paper wears out, I pull it off (sometimes with the assistance of a bit of acetone) and glue on a new piece. It works pretty well, in my opinion. I also use it for sanding decks and certain areas of the hull while fairing.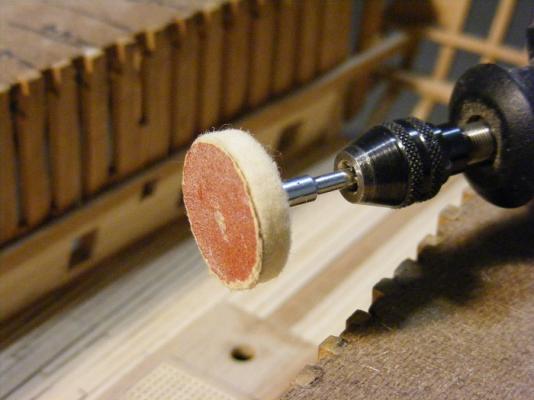
-
Congratulations and a very well done, Hamilton. I don't have a clue on the missing part what I see is great!!!!!

-
Sam, If you find the secret to not breaking bits and taps, you'll make a fortune.
-
Nicely modified on the ladders. I always thought AL put in too many. For my money, you could have removed all the side ladders and just left the ones from the fore deck and quarterdeck. The gunports on the fore and quarter deck? Correct, no lids as there would have no need to have them. Ok... a hog.. it's when the ship sags at the bow and stern. This kit has a slight curve in the bottom where it's high in the middle and low at the ends as was the original when AL designed the kit. Overall, AL didn't do a bad job on her, just got the scale a bit off and some odds and ends (like cannon barrels) but they did get the look that the Constellation had until it was rebuilt to it's original design.
-
Excellent rebuild and Grant is right... add the title "Professional".
-
Keep the beans, Augie and surprise us. Confed is looking great. Nice work on those clamps.
- 2,191 replies
-
- 1
-

-
- confederacy
- Model Shipways
- (and 1 more)
-
Nice work and good plan it seems. And yes, this is very good practice for when you cross over to the darkside.
- 1,616 replies
-
- 1
-
-
- caldercraft
- agamemnon
- (and 1 more)
-
Thanks Druxey.
-
1mm? Diameter? <does low whistle> Amazing work.
-
I didn't even know there was such a thing... and you've done them beautifully. So in real life, they were made is sections? Interesting.
-
Hi Tom, I'm pulling up a chair also. I hope you'll have fun with this build.
-
I wonder how it compares to the book by David Cordingly (The Billy Rufian)???? Looks like it might be an interesting book.
-
The power of the Internet.... It got Sjors windows right. Seriously... I love MSW for this very reason. All those eyes help when we miss something. Nicely fixed Sjors.
- 1,616 replies
-
- 3
-
-
- caldercraft
- agamemnon
- (and 1 more)
-
Have a great trip and see you on the flip side...
-
Jason, I think you can pretty much do it any way you want. One of MSW's tenets is: "You're the captain and it's your ship. Do it your way.". We might disagree based on historical evidence but it still comes down to the fact you have to be happy with it. On the ladders... the only historical significance of all those ladders was the "con job" (for lack of a better phrase) that was being foisted on folks to make them think that what sat in Baltimore harbor was the 1797 frigate and not the 1854 sloop of war that she actually was. You can take out the middle two on each side to allow viewing of the guns without issue. Side note, if you'll look carefully at the hull near the keel, you can see the hog that AL picked up from the ship when they designed the kit. It's interesting and also sad that AL has never changed the kit to reflect what it actually is. Nor did they bother to examine the few drawings/paintings of the 1797 frigate for accuracy. The 1797 is a square stern. The 1854 is a rounded stern. You're having a great time and doing a good job on her. So keep up the nice work and the fun.
-
Scott, Have a look here: http://modelshipworld.com/index.php?/topic/6735-the-wreck-of-the-santa-maria-may-have-been-found/
-
Nice work... love the paint and detail. On losing parts... ahem... I've found that bit of double-sided tape stuck to a spot on the workbench will keep them safe. Put them on the tape. However, some delicate parts don't come off very easily so you have to use care in what you stick to the tape. On the upside, they don't blow off...or get knocked off to the floor.
-
Sweet bitts, Sam. As for the ladders... good practice for when you step over to the darkside.
-
Yikes... that is tiny. Well done, Dave!!!
-
Sjors has it at his place, but I don't think he's here yet.
-
Cutty Sark by NenadM
mtaylor replied to NenadM's topic in - Build logs for subjects built 1851 - 1900
Nenad, I know exactly where your are mentally. Back in 1994, I lived near the Mississippi River and that was the year of the great flood. All you can do is watch the news and see familiar things being swallowed by the river. I did volunteer to sandbag quite a bit and often was turned away as they had too many volunteers. Still.. it's sad, overpowering to watch and not be able to focus on anything else. Hold fast. My thoughts are with you and your country.- 4,152 replies
-
- 3
-
-
- cutty sark
- tehnodidakta
- (and 1 more)
-
I'm grabbing a chair also.
-
NIce work, Piet. Very nice... I don't see those imperfections as I see a masterpiece in progress.
