


mtaylor
-
Posts
26,273 -
Joined
-
Last visited
Content Type
Profiles
Forums
Gallery
Events
Everything posted by mtaylor
-
And "yes those are cann...." <sound of hammers being cocked and running feet of SWAT team>
- 421 replies
-
- 2
-

-
- granado
- bomb ketch
- (and 2 more)
-
Thanks for the likes and comments... Wayne, I'm at the step where take the re-made big pieces into small pieces with curves. Michiel, You are correct. There should be something we can make from all the sawdust... maybe mix it with glue and do sculptures? Grant, Luckily, I didn't do production line work when I worked... But there is a lot of satisfaction in turning out a piece, checking it, and putting it on the "good" pile. I had my share of "oh crap" pieces that are in the scrap box, but not as many as I thought I would.
-
Joss, Aldo is doing a POB but ran into issues as I recall. I don't know if he was able to sort them out.
-
So far, so good... Looking ship-shape! Here's a hint on that pesky rudder hardware... heat the brass redhot and then let it cool. It anneals the brass and makes it easier (a lot easier actually) to bend. If it work hardens while bending, repeat the heating process. You'll need to clean and blacken it or clean and paint it as the heat discolors it.
-
Hank, Those frames look pretty darned professional to this eye. And I'm not seeing the differences. Pretty fantastic!
-
HMS Druid by Krug - FINISHED - 1:48 - Hahn
mtaylor replied to kruginmi's topic in - Build logs for subjects built 1751 - 1800
Lovely and precise work, Mark. They look great! -
Nice work on small tricky piece, Piet.
-
Sjors, Looking good there. When ports and cannons start to drive you nuts, remind yourself that it's only 64 guns and not a 74-gun ship or a 100 gun ship.
-
Jud, With all the museum ships, replicas, and various research documents one would think we have all the knowledge. Do we? I don't know. Is possible the handspikes were used to prevent movement? Plus the trucks were just wood on wood, no bearings. It's possible that Newton's Law about object at rest, tends to stay rest played a big part also. Hmm... we really do need a time machine.
-
Blowtorch, Denis????? Isn't that the prelude to a Viking Funeral??
-
Band Saw Question... or two
mtaylor replied to mtaylor's topic in Modeling tools and Workshop Equipment
Steve and Duff, I've been considering that approach. I just need to sort out where to put it and how often I'd use it. I haven't had a need until now. Meantime, I'm going to head to Lowe's and see about blades.... and there's a furniture maker on the way I'll stop and talk to. -
177x ships - British vs US design, what are the differences?
mtaylor replied to Mike Y's topic in Nautical/Naval History
I've got just a few observations... The Americans tended to towards taller masting carrying more sail. Probably because they could and had a good supply of tall trees. England actually had to start importing timber for many things around that time frame. The Americans also preferred the bigger is better theory in frigates (possibly other types also) as they started building them longer than the British. Layout of the decks was pretty similar but there were minor variations such as sail room, slops room, etc. locations. -
More amazing metal work..... wow. I knew about subs and even the one they were designing or building (or maybe there were a bunch) that were extremely large for haul cargo and troops. As I recall from my old defense contractor engineering days, there was more stuff still classified (back in the 70's) than unclassified.
-
Beautiful work and you've achieved a rather large milepost. Congratulations on a job well done. Ah.. rigging and masting next? You'll do fine if you approach it like you've approached everything else.
-
Michael, You're doing some excellent work on the Halifax. I'm enjoying watching your build.
-
Thanks for the likes and comments. Sam, Two layers with the joins offset. Hahn provides a plan for the blank layout which I think can be seen under the blanks. I hang onto those also just in case... David, I was on the path of no return a long time ago... Augie, I think I found out why my aeromodeling and flying didn't work. I never perfected the flat spin. Mine spiraled in... It will probably be a while before the next update (or not). I'm going to cut out all 60 frames first before trying to mount them in the jig permanently. I've found that doing "production run" methods on things is keeping me focused and allows for re-making parts easier.
-
what is the ideal modelling table?
mtaylor replied to AON's topic in Modeling tools and Workshop Equipment
Granite??? Rats... tossed the scrap we had. I'm using 1/4" glass for those perfectly flat gluing operations. -
We do generate a lot of sawdust, don't we? I dump mine in the biowaste recycle can when the shop vac gets full. I'd be afraid to figure out how much I spent just on the sawdust.
-
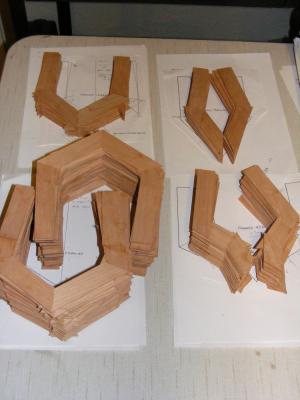
Let's see if I got this right... first we make lots of little pieces of wood from big pieces, then we make big pieces of wood from the little pieces so we can cut and shape and make little pieces of wood from those big pieces. er.. right? Ok.. I think I got it. I finished making all the bigger pieces of wood from the small pieces. All 60 frame blanks are ready to go. Now to start cutting the frames from them.

-
Looks like it belongs there, PIet. Got another one of my "I know diddly about subs question". Did the gantry stay raised all the time or did it fold down to the deck?
-
Beautiful work, Rusty. Congrats on finishing her as she looks super.
- 421 replies
-
- 1
-
-
- granado
- bomb ketch
- (and 2 more)
-
Alan, The only thing I can offer is that 1:64 is about as small as I can handle with full frames, etc. There's also an issue of going smaller and things like deadeyes and block, etc. getting too small. But you're the judge of your eye/hand co-ordination. I'd say 1:48 sounds good and if things get too large or out of hand, think stub masts...
-
Beautiful work with wonderful details. Congratulations on finishing her.
-
Pops, You'll have to paint them.
