Beef Wellington
-
Posts
2,249 -
Joined
-
Last visited
Content Type
Profiles
Forums
Gallery
Events
Everything posted by Beef Wellington
-
 Congrats Grant, beautiful result, and such a great build log to learn from. Thanks!
- 456 replies
-
- 4
-

-
- finished
- bomb ketch
- (and 2 more)
-
Nice fix Peter - painful, but definitely worth it. Looking really good.
- 293 replies
-
- 2
-
-
- pickle
- caldercraft
- (and 1 more)
-
That is a great solution!
-
Mark - looking really nice, planking is now really showing off. How did you make the window frames (in lubber parlance) - looks like you cut from sheet?
-
Christian - I think its an error on the plans. Part 107 is the mizzen cap (not part 48 as indicated), part 48 the bowsprit cap. I don't like the way that that bowsprit cap is predrilled because as you say, it needs to be corrected to the angle of the bowsprit and its harder to do that properly as supplied - just my opinion. Everything is looking great by the way. In Mount Everest terminology, you're up at Camp 3, I'm still making breakfast at basecamp Where did you get the ramin wood, is it straighter than the dowel provided? - mine is quite bent.
-
Starting to get worried Eamonn, glad to see you're back!
- 1,039 replies
-
- 1
-
-
- ballahoo
- caldercraft
- (and 2 more)
-
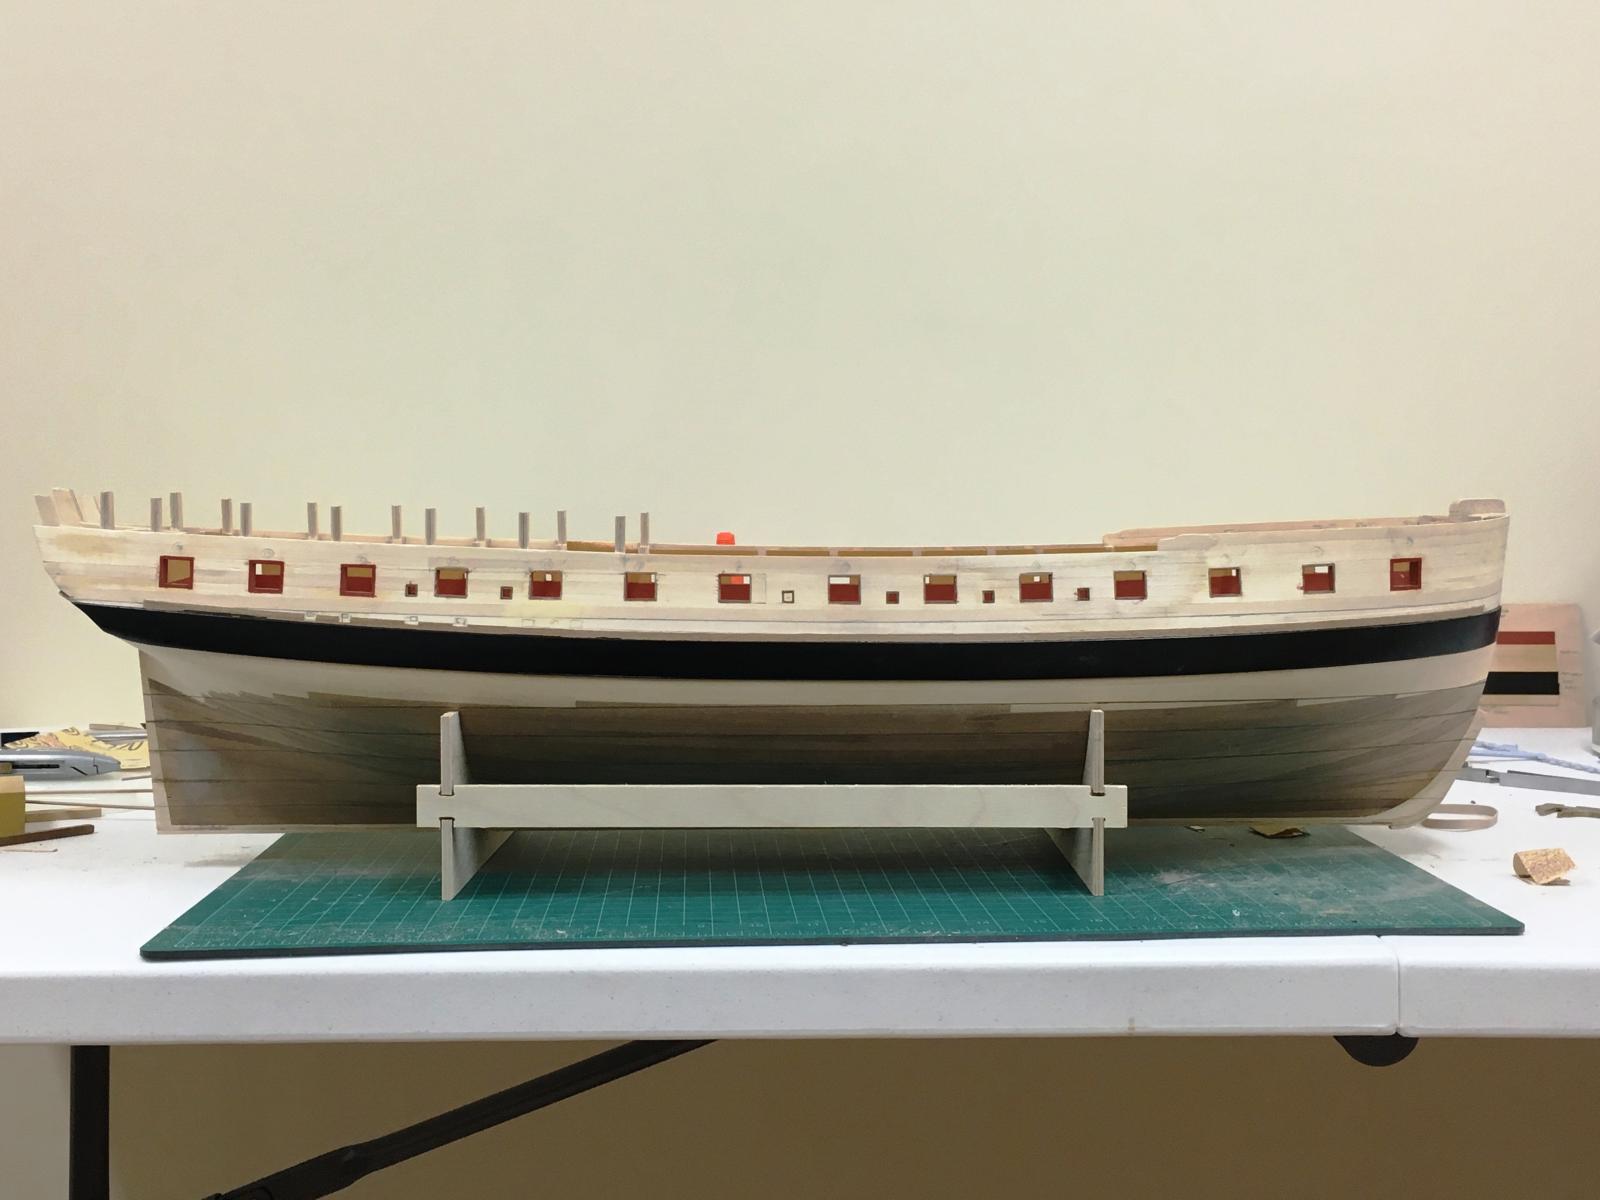
Too kind Sjors Quick update...I'd mentioned earlier that I had been trying to decide on whether to install the venting ports. Well, I could delay no longer and had to make a decision....and decided to go for it. Hopefully pictures below are self explanatory, but the reason I was wary was because these ports need to integrate into the thickstuff of the wale. Positioning proved to be a challenge as these should follow the line of the deck, not the wale. Of course once the lids are installed these will blend into the hull, but, as always...figuring it all out was a nice way to pass an evening. The position on planks were marked on the ship as the planking is curved but cut off the ship with LOTS of fine tuning. The black colouring was marker pen on the first planking simply to allow me to see the outline more clearly. Now to continue planking, and do the port side, progress is a little more pleasant now as every step is now visibly moving her forward.

-
Also for tensioning the shrouds - Lever has a very nice picture on page 24. Basically the lanyard between the shroud deadeyes would be run through various tackles, but ultimately through a block attached to the pendants...
- 1,616 replies
-
- 5
-
-
- caldercraft
- agamemnon
- (and 1 more)
-
Rigging looks great Sjors! Something to maybe consider for the 'flyaway' pendants is to weigh them down and soak in diluted PVA which might make them hang a little more naturally. Also, my mind was doing a "spot the difference" with post #893 - seems one of the knights has gone missing??
- 1,616 replies
-
- 4
-
-
- caldercraft
- agamemnon
- (and 1 more)
-
Nicely done getting that hull shaped Charlie, you should be set up nicely for the planking. Very precise work, must have taken a while to get everything so perfect.
-
Clearly I'm late to the party, hadn't noticed you'd started. Following closely Ray as I find these small boats a little intimidating. Looking great.
- 8 replies
-
- 2
-
-
- diana
- ships boat
- (and 1 more)
-
Thanks chaps, BIG weight off my mind...
-
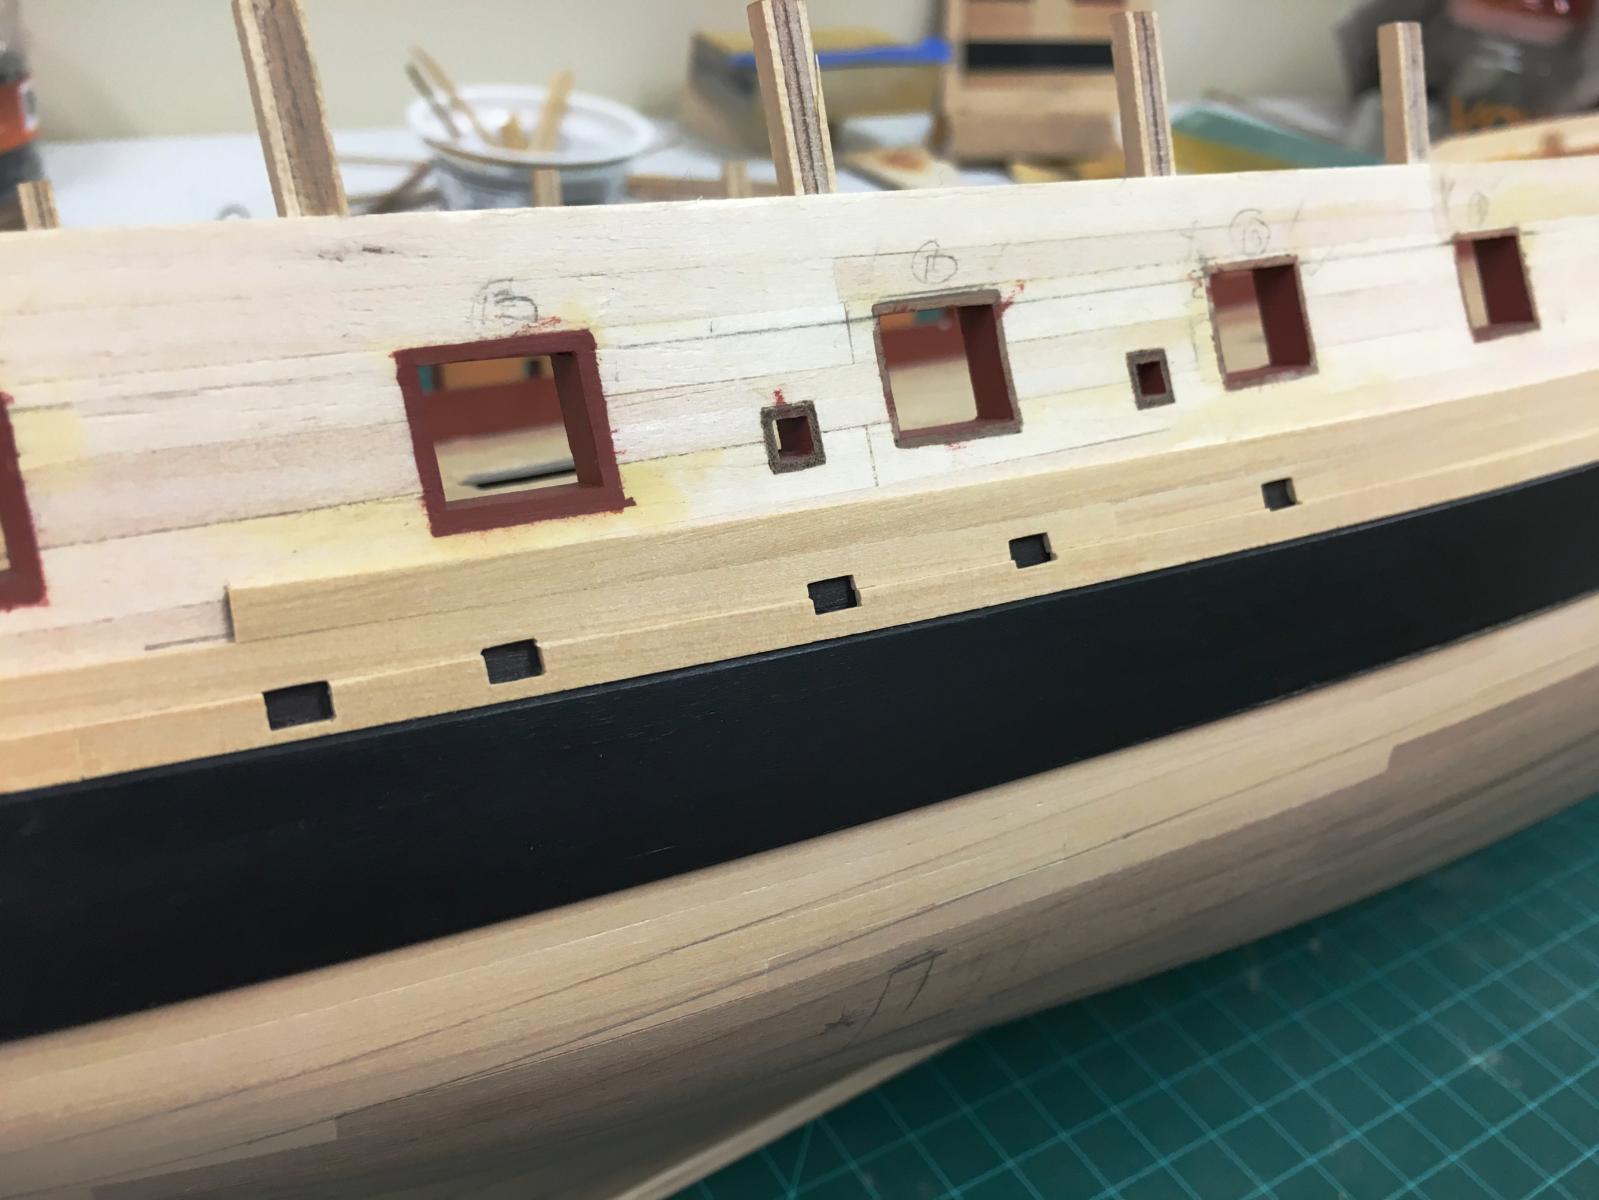
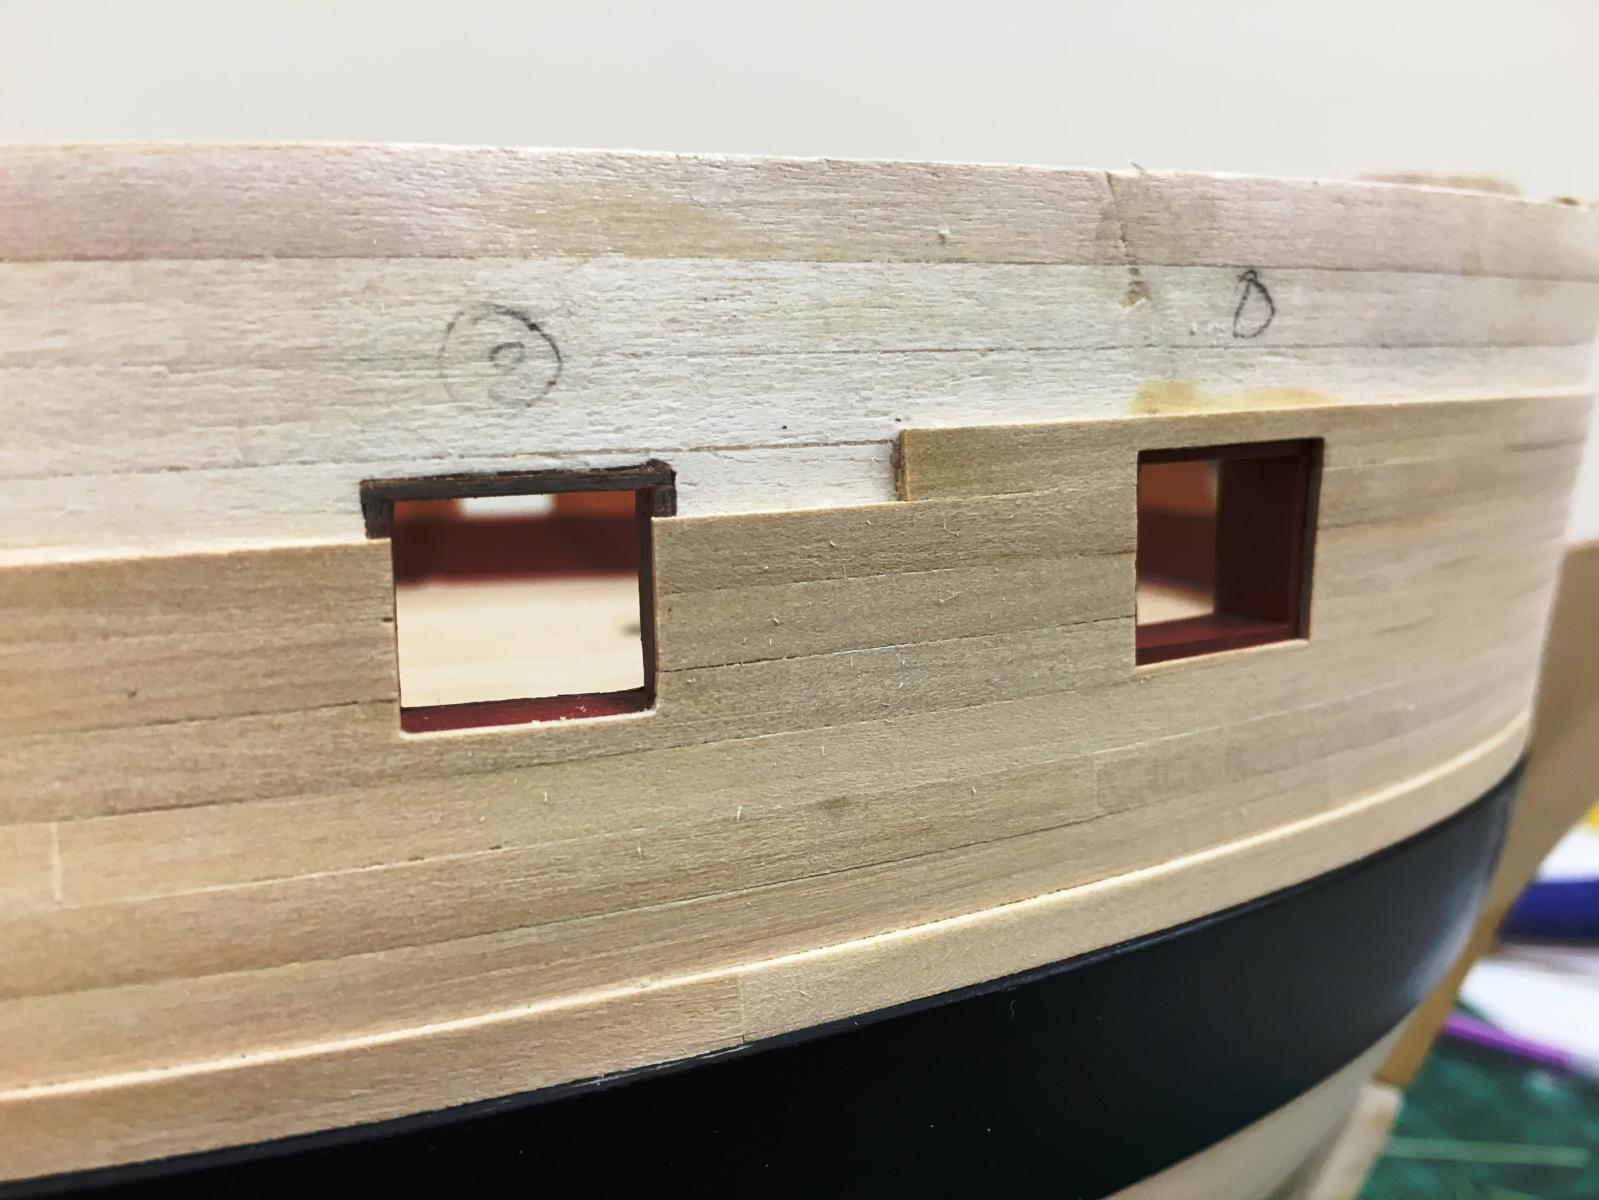
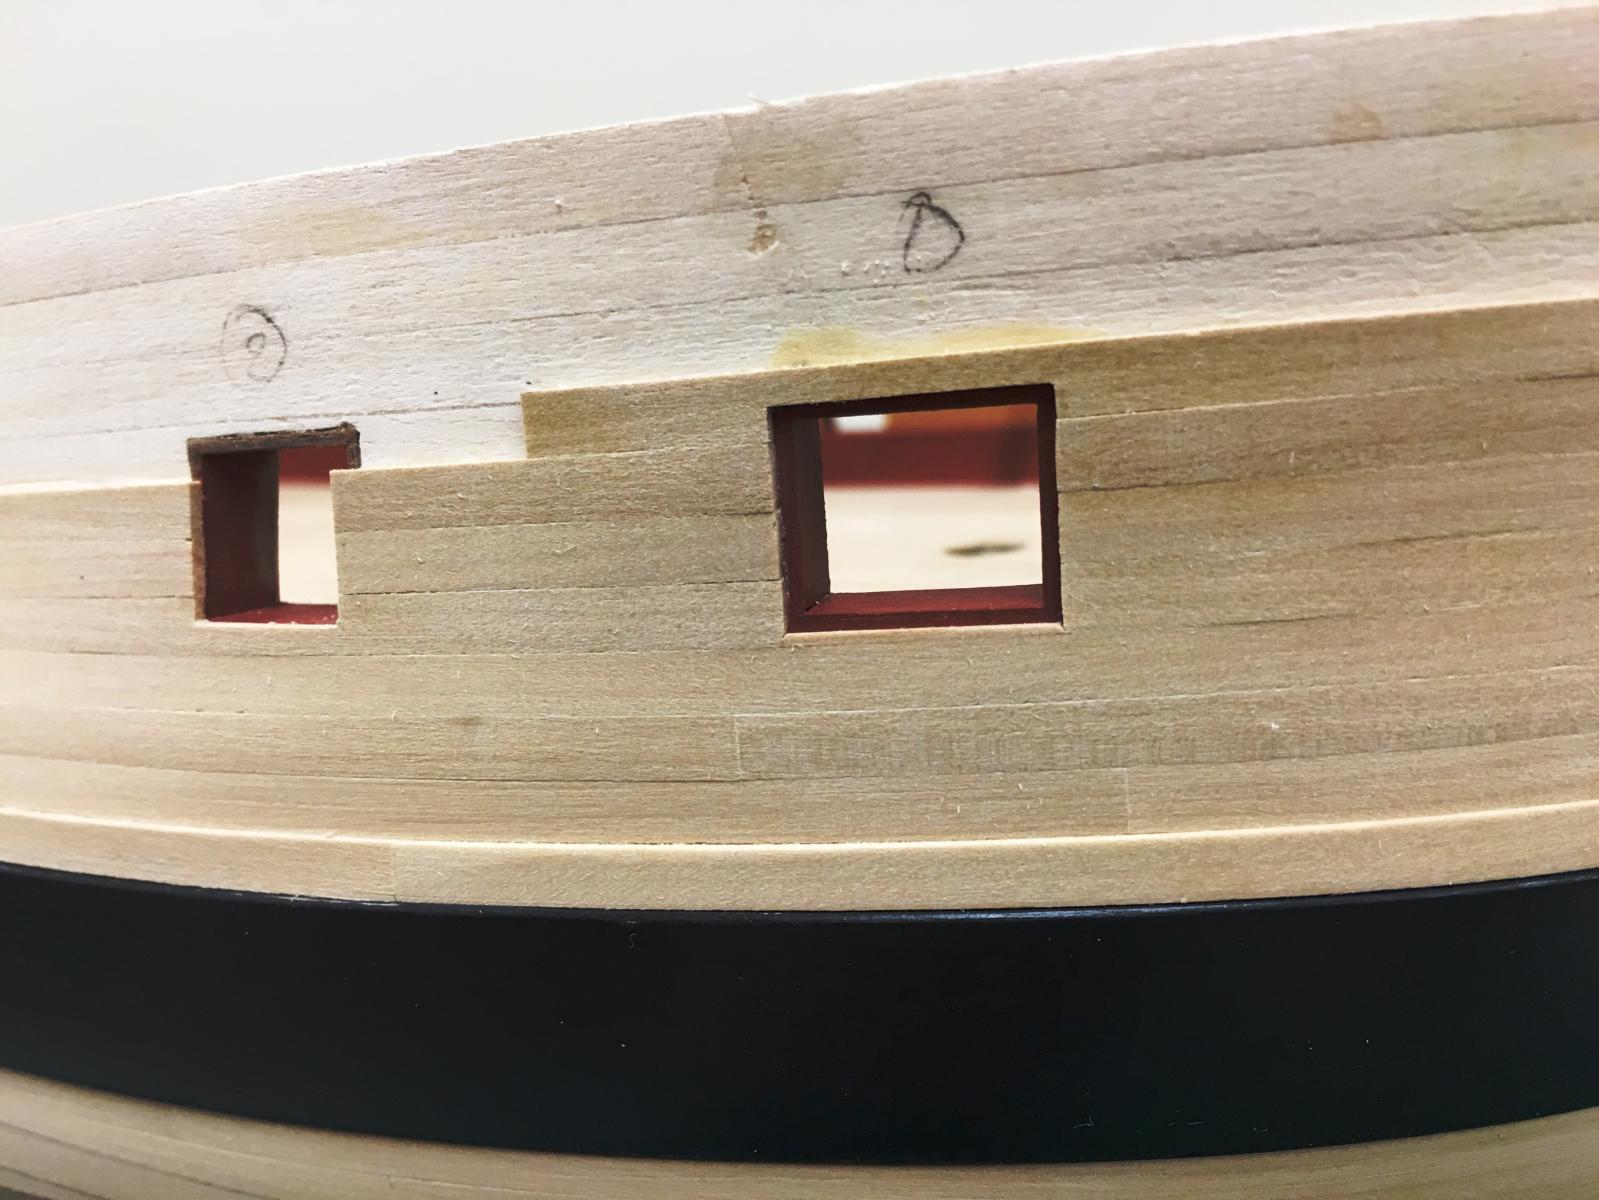
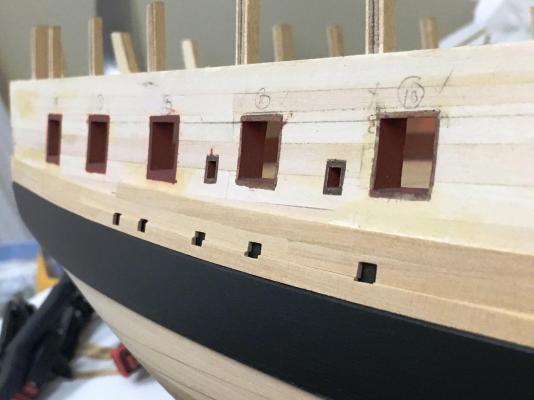
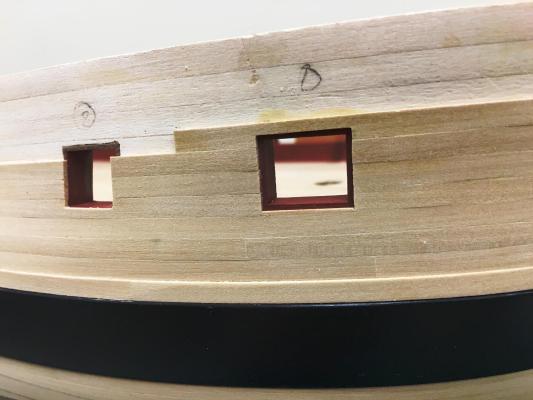
Cheers Captgino, Pat, Mike and the 'likes'.... Have started planking above the wales. I'm going to use primarily wood strip where I can, so will not be following the planking scheme laid out in the AOTS book religiously. Question below that I would appreciate insight into.... Relatively straightforward, initial challenge was to ensure the smooth run of planks around the curve of the wales which was a bit trickier than I expected but will likely turn out fine with a little sanding down the road. The first gun port presented the first real challenge as this needed to be recessed as it has a lid, and also would have had a very thin sliver of wood at the base. I got round this by simply gluing a small section of strip to the side of a longer length and then cutting back to size - saved a lot of time cutting from scratch. The second gun port does not have a lid so I took the planks to the lip of the port. Once dried, my heart then suddenly leapt into my mouth. The approach I took seemed intuitive as the second port does not have a lid, but I was overcome with doubt so I perused a load of photos to confirm or deny whether this was correct, or whether the ports without a lid should also be recessed with a lip. After looking at many pictures, I'm none the wiser... My questions: Have I messed up??? Gun port 1 has a lid and logically has a lip that the lid would sit in. Gun port 2 (and most others) do not have a lid, so should the planking extend fully to the edge of the port as I have done? Less critically, should the ends of these planks be painted red? Chuck and others seem to leave the planking natural, but I'm pretty sure that on real ships the inside face is also painted red. Hmmm...

-
Do you mean 'served' rather than seized? The foremost shroud was served to help prevent chaffing, although I'm not sure if this was also done on the mizzen.
- 1,616 replies
-
- 3
-
-
- caldercraft
- agamemnon
- (and 1 more)
-
Sjors - As you know, I'm far from the experienced hand here....but I'd start with the shrouds. And I took the same approach as Bob...
- 1,616 replies
-
- 4
-
-
- caldercraft
- agamemnon
- (and 1 more)
-
I marvel at your ingenuity Nils, great solution for the vents. The interior red colour is very striking, I'd thought these had always been painted white, but of course that is a silly assumption. I really like the yellow/red combination.
- 2,625 replies
-
- 4
-
-
- kaiser wilhelm der grosse
- passenger steamer
- (and 1 more)
-
Peter - very nice neat and précises rigging - well done...and nice fix to the broken strop. That was exactly the situation I feared, but thankfully avoided on Snake by filling the slot in the channels with a small dab of epoxy. It completely hidden when the battens are attached. Bowsprit is looking very good, the phrase 'less is more' comes to mind
- 293 replies
-
- 1
-
-
- pickle
- caldercraft
- (and 1 more)
-
Mike - you really are a prolific builder, obviously I'm pulling up a seat!
-
I love everything about what you have done here Siggi, the beautiful wood choice for the case, the waterline display style and of course 'Dragon' the centerpiece looks even more amazing. Well done sir!
-
Hi Dave, if its any help, if I were in your shoes faced with the same information I'm pretty sure I'd go with the 44' bowsprit. I can't see any complications, and its nice to know that your build will be a little different, and perhaps more historically accurate, than the typical one following the instructions.
-
Caldercraft Agamemnon riding bitts
Beef Wellington replied to sharkscanner's topic in Wood ship model kits
You can view the NMM plans here - http://collections.rmg.co.uk/collections/objects/81071.html. They seem to show bitts on the lower deck, but there is a possibility that it ALSO shows bitts around the stove,the outline is rather faint. On page 119 of Peter Goodwins "Nelson's Ships", it also shows an extra set of bitts near the stove. Unfortunately I can't help with why this is the case, or what evidence there is to support this, or whether it is a unique feature that fed into the Agamemnon kit design. -
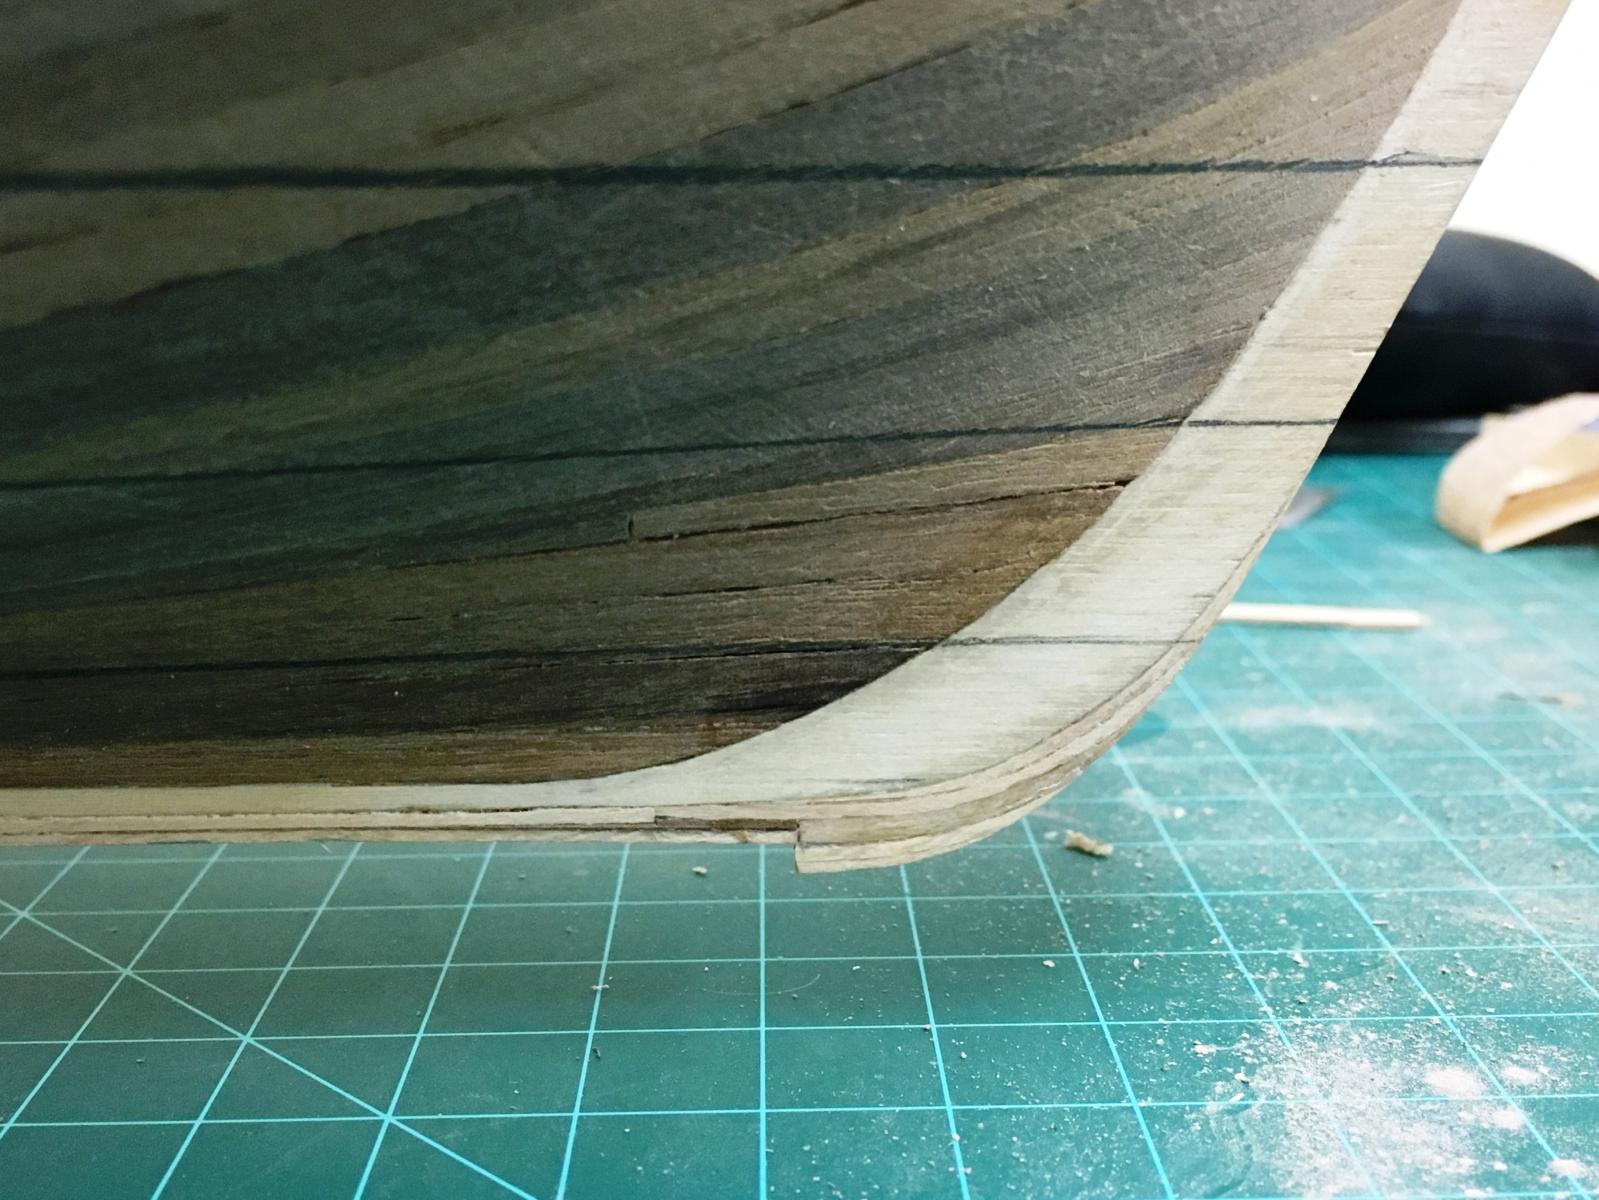
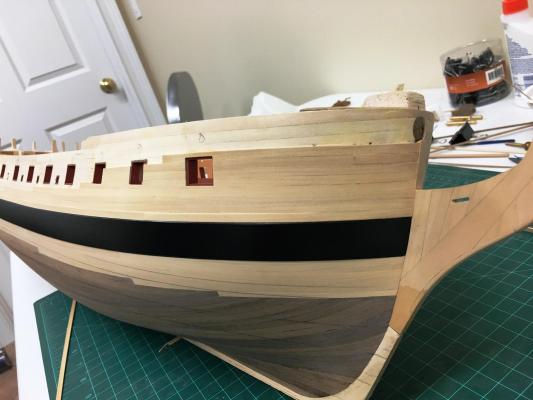
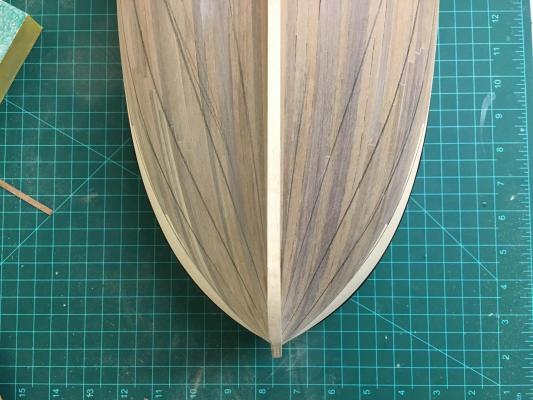
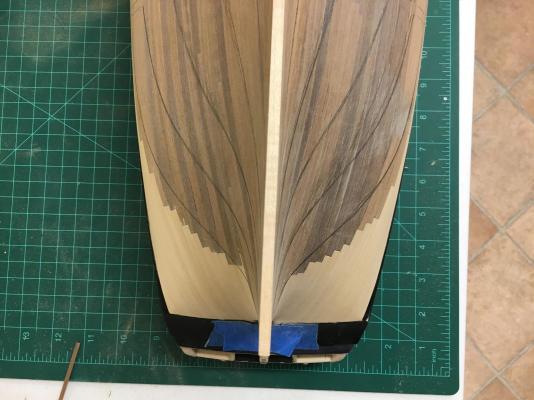
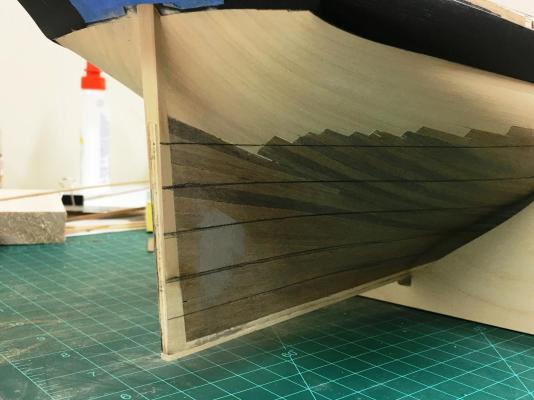
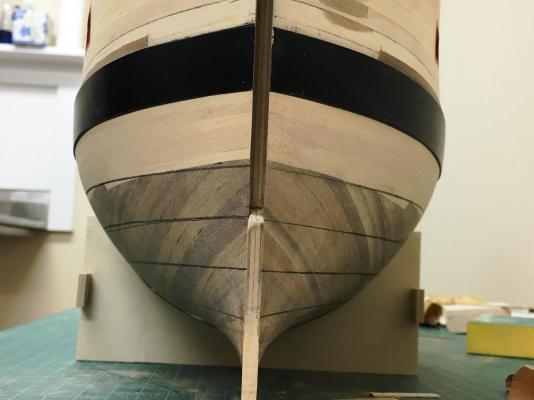
Thanks everyone for the kind posts, it seems its been forever since my last update! Have been working on getting the second planking complete, which is now is below the wale. Frankenstein's monster may be the best analogy right now. Didn't really want to obsess over the area beneath the waterline, planked with walnut as this will be covered. This is most definitely not exhibit A in a 'how to plank' lesson. I found planking the round stern challenging, especially as I'm not going to use paint so wanted to get all the planks as tight as possible, and fit into the sternpost rabbet. I knew I still had work to do finalizing the hull shape to elimate some small 'waviness' and ensure smooth curvature. In some cases I had already sanded the first planking almost to zero, so I had to get the second layer on to continue to refine. In one spot I did actually make a very small hole....This of course suggest I needed to have done a better job shaping/tapering/shimming the bulkheads in the first place, but I really don't think I cut a corner there and certainly did my best to get it right. Think this boils down to the challenges of a larger hull. Honestly, I did not enjoy planking with the walnut. Despite buying a replacement wood which was better than that provided in the kit, it was still of poor quality; splintery edges, inconsistent dimensions and colour. Don't really care too much about the latter, but only because it will not be visible. Thankfully, its done. I've drawn level lines to help confirm symmetry and flow of lines compared to AOTS plans. Pretty happy, but some final fettling needed in some places...pretty easy. As mentioned before, the keel is nowhere near thick enough and needs to be built up. This is especially true at the bow and I added yet more maple strip to build this up. This will ultimastely also receive a false keel, hence the step. And the overall shot in all its horror. The patient's looks can only improve from here :-)


-
Hi Nils, many will be jealous of such room, you have a beautiful collection of wonderful models - and that's an understatement :-) Could you show some more pictures of your other models.