Jump to content

Recommended Posts

Posted (edited)
3 hours ago, Chuck said:

really good example of this is shown below on this contemporary model.


drop plank swan.jpeg


Chuck, I’m glad you liked and used the pic I took of the Rodgers Collection Frigate. I took it specifically because I liked the planking and stealer in the bow. I guess it was worth while. Interesting note is the hawes holes. It looks like the builder used some lead to line the holes like the full size but you can see the lead sickness. 


The planking is looking great by the way. 👌


Edited by Dowmer


Able bodied seaman, subject to the requirements of the service.

"I may very well sink, but I'm damned if I'll Strike!" JPJ


My Pacific Northwest Discovery Series:

On the slipways in the lumberyard

Union, 1792 - 1:48 scale - POF Scratch build

18th Century Longboat - circa 1790 as used in the PNW fur trade - FINISHED


Future Builds (Wish List)

Columbia Redidiva, 1787

HM Armed Tender Chatham, 1788

HMS Discovery, 1789 Captain Vancouver

Santiago, 1775 - Spanish Frigate of Explorer Bruno de Hezeta

Lady Washington, 1787 - Original Sloop Rig


Posted

Happy 4th to all my fellow countryman.....☺️  I think I will spend this holiday working on the Winnie.


With the drop planks completed, I could add the second layer of wales and the black strake.   I used 3/64" thick planks for the wales and just 1/64" thick planks for the black strake.  One thing I see a lot on kit models are the wales made really thick.  They stand proud of the planking by 1/16".  This was not the case usually and so the on this model the wales followed this actual practice.


Here is a great example on this contemporary model from the same period.  This is the Amazon....note the wales and how thick they are in relation to the planking.  By the way..this is how I plan to show the quarter deck modeled with exposed beams...at least as of today.

amazon1.jpg

So here is the Winnie with wales and black strake completed on the port side.  It makes the world of difference in its appearance.


waleson.jpg

waleson1.jpg

waleson2.jpg

And one other thing I would like to mention.  The wales and black strake would fit into the rabbet at the stem.  It wouldnt stand proud as is shown on most kits and models these days.  Its another typical oversight.  To fix this, I simply reduced their thickness gradually up to the rabbet so it looks like it fits into the rabbet.  I used a sharp chisel and some fine sandpaper.  


waleson3.jpg

Comments and questions are always welcomed!!!


Posted

Oh so sweet! Very nice explanation and pictures of the wales and black strake.

26 minutes ago, Chuck said:

I plan to show the quarter deck modeled with exposed beams...at least as of today.


I've been pondering that too. I'm torn between the picture of the Amazon and how we did the deck on the Confederacy. 

1131873605_IMG_2062-Copy.JPG.7956fd2bb211b4536408c1c64e1e5d46.JPG


It's fun to ponder these decisions. Enjoy your building time and a happy 4th to you too!

Rusty

"So Long For Now" B) 


Current Builds: Speedwell


Completed Build Logs:  HMS Winchelsea 1/48   Duchess of Kingston USF Confederacy , US Brig Syren , Triton Cross Section , Bomb Vessel Cross SectionCutter CheerfulQueen Anne Barge, Medway Longboat


Completed Build Gallery: Brig Syren , 1870 Mississippi Riverboat , 1949 Chris-Craft 19' Runabout


Posted

Originally that is how I intended to do it.  But I thought it would be a nice change to have guns on both sides.  I would also be able to skip making and adding all of those knees.  Nobody would ever see them.   LOL...but we shall see.  I may change my mind from now till then.

Posted

When I finish planking her.  That is when I will release the starter package and second installment.  I just want to get well ahead of the crowd.  

It will be available in Alaskan Yellow Cedar and Cherry.  Depending on what you like better .....both wood choices will be available.  I would love to see a cherry version built.

Posted

Thank You very much for saying....The wales look odd otherwise. 


The wales were just painted by hand.  Nothing special ....no dye or pickling.  I used black acrylic paint.  The wales were painted before the black strake was glued into position....so no need to be too careful with the top edge.  The black strake which was left natural covers any errors and gives you a nice clean edge.  I am a gluten for punishment... I could have painted the bottom edge before gluing it, but I just painted the wales after I sanded them very smooth and filled every crack.   


The trick is just to go slow and use many many coats of thinned paint.  Sand with 400 grit before the last few coats.   I did buff to a dull sheen.   I am sure many more coats and additional sanding will be done before the model is completed.


Chuck

Posted

Nice job Chuck,

Which brand and type of black paint are you using these days?  


Able bodied seaman, subject to the requirements of the service.

"I may very well sink, but I'm damned if I'll Strike!" JPJ


My Pacific Northwest Discovery Series:

On the slipways in the lumberyard

Union, 1792 - 1:48 scale - POF Scratch build

18th Century Longboat - circa 1790 as used in the PNW fur trade - FINISHED


Future Builds (Wish List)

Columbia Redidiva, 1787

HM Armed Tender Chatham, 1788

HMS Discovery, 1789 Captain Vancouver

Santiago, 1775 - Spanish Frigate of Explorer Bruno de Hezeta

Lady Washington, 1787 - Original Sloop Rig


Posted

grumbacher mars black....thought i would try something new.  Works fine and really cant tell any difference from Windsor and Newton I used to use.

Posted

Hello Chuck, as usual I am late to the party, oh well. Your model here is absolutely beautiful and you are very quickly making a convert out of me to use Yellow Ceder for my next project. A question I would like to ask if I may.  I am considering adding a model of the Long Boat to go with the ship I plan to build next. By chance do you plan to offer the Long Boat kit out of Ceder as well as the ships wheel kit? Major potential purchases coming up. Keep up the great model building as well as supply store.


Brian D :)

Posted

My longboat is already cedar.  The 1/2" scale kit.  I have 3 in stock.  


Some elements are better suited for other woods however.  I am certain the ships wheel could be made out of cedar.  The same is true for the lantern and a few other things.  But having said this, the color difference can barely be noticed.  In fact, in many cases you could never tell the difference between box and cedar on the model.


If you look at the Medway Longboat, the molding and a few other elements are boxwood rather than cedar.  You cant tell and the boxwood is best suited for scraping molding.  I plan to use it for such details on this model too.


For example....the molding, ships wheel, stern and quarter gallery windows.  The beauty of cedar is that it is not so different than boxwood that it cant be mixed on one project without being noticeable in order to take advantage of the best qualities of each of them. 


The Winnie will have a longboat and a Pinnace.  These will be afded and designed much later.  They will be very simular ti the two ships boats I made for Confederacy.

Posted

Case in point about the similarity between Cedar and boxwood.  Mike hasnt applied any Wipe on Poly to his Winnie yet.  That will be a really good comparison.  Hopefully in a Couple of weeks.   But to illustrate the color and texture between these two fine woods I can post the images below.  The first smaller (3/16" Boxwood) version of Winnie from seven years ago is on the bottom.


The Winnie in Cedar clearly has a richer, deeper warm tone.  But they are very similar.  When mixing some boxwood for the finer details, it blends so well that is is so difficult to tell where the boxwood was used.  This helps me exploit the use of boxwood on the thinner more delicate parts of the model without them sticking out like a sore thumb.  They will just blend in perfectly.  


waleson1.jpg

portsideplank.jpg

Posted

I agree Chuck, the cedar has a bit more warm tone to it.  A real joy to work with. But due to its softness, box is a much better choice for the moldings and carving.  Lucky us that we can mix them since they are so close in color. 😁


Able bodied seaman, subject to the requirements of the service.

"I may very well sink, but I'm damned if I'll Strike!" JPJ


My Pacific Northwest Discovery Series:

On the slipways in the lumberyard

Union, 1792 - 1:48 scale - POF Scratch build

18th Century Longboat - circa 1790 as used in the PNW fur trade - FINISHED


Future Builds (Wish List)

Columbia Redidiva, 1787

HM Armed Tender Chatham, 1788

HMS Discovery, 1789 Captain Vancouver

Santiago, 1775 - Spanish Frigate of Explorer Bruno de Hezeta

Lady Washington, 1787 - Original Sloop Rig


Posted

I forgot I had the pictures from seven years ago of the smaller version in boxwood.....it is freaky looking at them right next to the newer version.  I made several small changes in the design and appearance but they look like they could be pictures of the same model even though the wood is completely different.

Posted

I also just got a wonderful batch of raw cherry lumber.  I thought I would show you guys.   The Winnie will also be available in cherry.   From this very cherry board.  Its really nice stuff and some of the best I have bought.  Very clear cherry with little to no gum pockets and sap spots.  Once I get some of this milled along with a few more boards of cedar I will actually start laser cutting parts for the first two Winnie parts.  This way I have a bunch in stock when I am ready to launch.


cherry.JPG


Posted

Good looking wood! I really like the thought of doing the Winnie in cherry.

I've used cherry on a few models and it is nice to work with and looks really nice when finished!

Rusty

"So Long For Now" B) 


Current Builds: Speedwell


Completed Build Logs:  HMS Winchelsea 1/48   Duchess of Kingston USF Confederacy , US Brig Syren , Triton Cross Section , Bomb Vessel Cross SectionCutter CheerfulQueen Anne Barge, Medway Longboat


Completed Build Gallery: Brig Syren , 1870 Mississippi Riverboat , 1949 Chris-Craft 19' Runabout


Posted

Winchelseasheet4.jpg

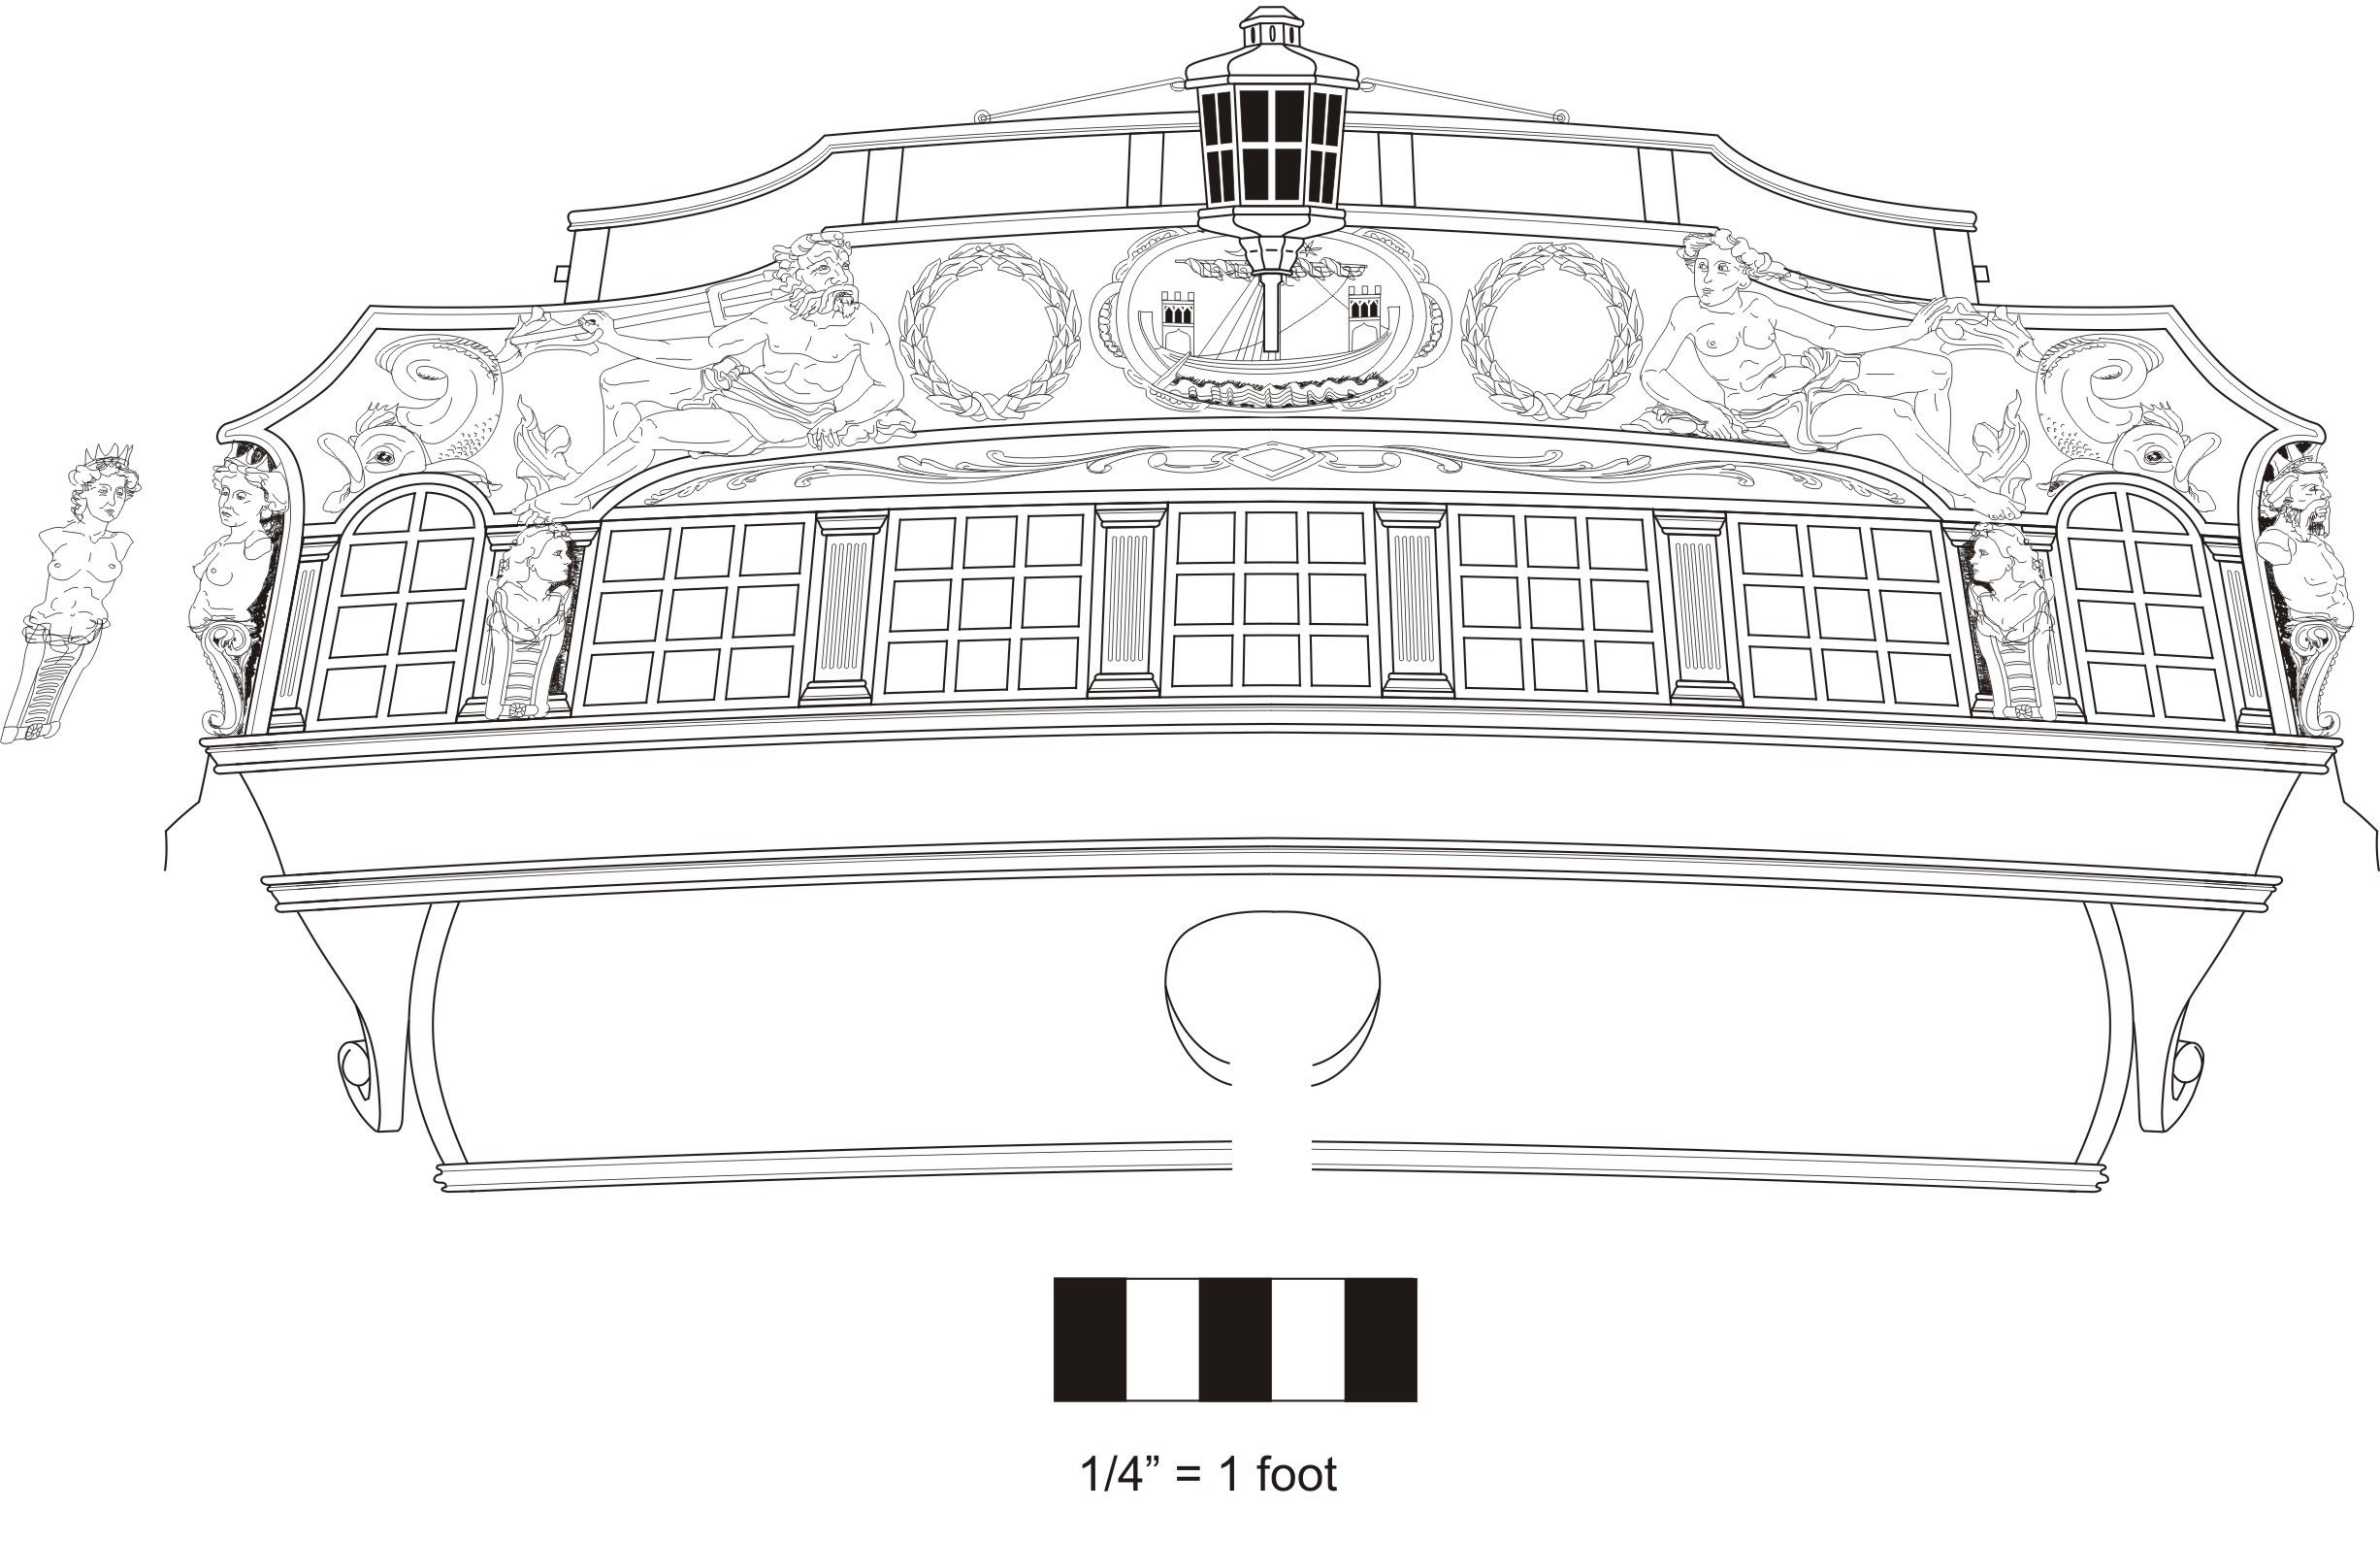
I am not sure if I posted this yet but I want to give everyone a detailed view of the model as it will ultimately appear....hopefully.   Here is a link to download sheet one of the plans.  I am going to shoot for launching this before it is completed so it is important that you guys see what the Frigate Winchelsea will ultimately look like.   This shows the profile and stern view.   Dont worry, like all of my plans, this first sheet wont contain any parts so no need to worry about pirating.


Download and have a look!!!  Because the image has very fine lines so a jpg like posted above is just too light.  Click below for full size sheet.


Winchelseaplanone.pdf


Posted

Ah just as beautiful as I remember her.

Rusty

"So Long For Now" B) 


Current Builds: Speedwell


Completed Build Logs:  HMS Winchelsea 1/48   Duchess of Kingston USF Confederacy , US Brig Syren , Triton Cross Section , Bomb Vessel Cross SectionCutter CheerfulQueen Anne Barge, Medway Longboat


Completed Build Gallery: Brig Syren , 1870 Mississippi Riverboat , 1949 Chris-Craft 19' Runabout


  • 2 weeks later...
Posted

I finished the wales and black strake on both sides and painted them black.   But I still had to add the anchor lining.  Rather than use individual boards I just laser cut the shape from some 1/32" sheet.  This will cover the wales but then an additional strip of thicker wood must placed on top of this to cover the black strake.  They are all flush outboard but the strip on top of the black strake for the lining remains bright.


The 1/32" sheet for the lining was gradually sanded thinner as it worked down towards the bottom of the wales.


anchorlining.jpg

anchorlining1.jpg

Now before I start planking below the wales, I have a few things to do first.  One of them is to fair inboard.  This is not a fun task and it will make a mess.  But I want to get it out of the way now so all of the dust falls through the hull rather than just fall into one that is fully planked.  


One thing I notice when folks build my kits (or any kit for that matter) is how they fair inboard.  They never quite know how thick to make the bulwarks.  In most cases they are left way too wide which makes the entire model look clumsy and kit-like.  To help with this on the Winnie, I designed a "fairing cap" that will be 3/16" wide.  This needs to be placed on the top of the sheer.  Then when I start fairing inboard I will be better able to maintain that 3/16" measurement consistently for the bulwarks.  Some portions of this "fairing cap" were laser cut like the area above the hances and at the bow.  For the remainder a 3/16" x 1/16" strip was used.  See below.


NOTE!!!!  IMPORTANT NOTE!!!!  DO NOT place the 3/16" x 1/16" fairing cap in the waste.  It is only to be used on the hance pieces and along the quarter deck.  AND in addition......along the forecastle at the bow.  Using it along the waste which I show in the photo below will make the waist too high and screw up the placement of the molding.  The top of the external planking will be the sheer along the waste and the 1/16" strip would make it too high.  I made this mistake and later removed this strip along the waist.


fairingcap.jpg

This may look odd at this point but dont worry....this "cap" will be completely covered by the fancy molding and volutes.   These wont be added to much later in the project but here is a look at some prototype "scrolls"  I worked on.  One of the things that was troubling me was how I was going to handle these scrolls.   Sure, many people can carve them and they look great.  But these are difficult for most.  I could have provided castings but then the profile molding would be impossible to match so it looks good.


So I have been experimenting.  This is what I have at this point and I think it looks pretty good.  This of course means that I know have to provide all of the molding for this project along with the carved scrolls.  They may not be as good as those that are hand carved or scraped, but I think they look better than most and will do the job nicely.  I still have to tweak a few things.  What do you guys think?  By the way...the top aft scroll and molding behind it is made from boxwood.   The forward scroll and molding below it were made with the same process but out of Yellow cedar.  I think the results are pretty similar although the boxwood version is slightly darker.  The Cedar version of the scroll was much more fragile to sand than the box version.  I will have to decide which to include.


There was no carving what-so-ever or scraping.   The scrolls and molding were laser cut.  I just sanded the sides to remove the char and rounded the sides off a bit using 420 grit sandpaper.  The notches or grooves were laser etched at various depths and I just left the char in those untouched.   I applied wipe on poly over them and it looks pretty good.  These are just test fit against the hull to see how they look.  

fairingcap1.jpg


Posted

Thanks...by the way, the molding in the last photo is just 3/32 wide and 1/32" thick. The etched grooves vary both in width and depth to simulate that profile.  This was rather difficult and required about eight hours of testing, cutting and retesting.


The etched grooves on the volutes had to match as they turned into the molding and they have the added difficulty of narrowing even more until they reached the "button".  It was quite the challenge.  Here is an earlier test run....I must have made about 60 of these tweaking it each time.   Boxwood is on top....cedar is below it.  I still have to reduce the volute by about 3%.  It just a hair too big.


volutes.jpg

  • Recently Browsing   0 members

    • No registered users viewing this page.
×
×
  • Create New...