usedtosail
-
Posts
2,423 -
Joined
-
Last visited
Content Type
Profiles
Forums
Gallery
Events
Everything posted by usedtosail
-
 Thanks vossiewulf. I had thought of that but I was not sure I could get the new tops to line up nicely, especially centered on the old mast. Making new topmasts is not that hard - I remade the mizzen topmast last night. Now that I have the process it goes quickly. I have wood for the main and fore topmasts coming, which should be delivered today. If not, I will rip down a wider piece and make them from that. I did use your suggested technique on the mizzen topG/royal mast. The sky sail portion was slightly bent to one side, but very noticeable, with no lines on it that I could use to pull it into straightness while rigging. So, I got brave and cut it off, bore out the octagon section just under it, and filed off some of the bottom of the sky pole so it fit in the hole, I glued it and lined it up before the glue set, and now it looks straight over the whole length.
- 1,354 replies
-
- 1
-

-
- constitution
- model shipways
- (and 1 more)
-
Thanks Al. As you will see in this post, I have more lathe work to do. Vossiewulf - thanks for the tip on the float. I will have to look into getting one. I am such an idiot! I made the four topmast sheaves last night which attach to the sides of the top of the topmasts and as I held them up to one of the masts, I realized I had made the tops of all three topmasts round and they should be square! ARGH!!!! So, I get to remake all three of them. And here I thought I had made such good progress over the weekend. Oh well, at least I had a lot of practice.
-
Nice work on the yards, Geoff. it looks like you have captured the present day color of those smaller yards very well.
-
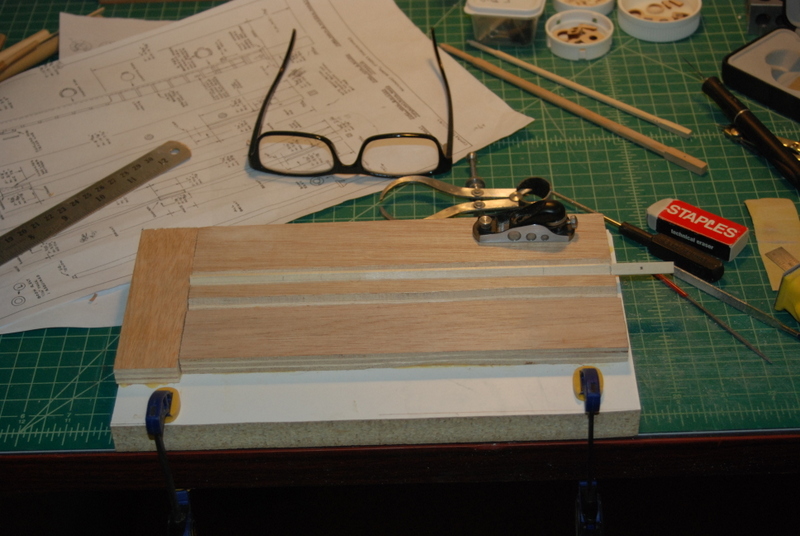
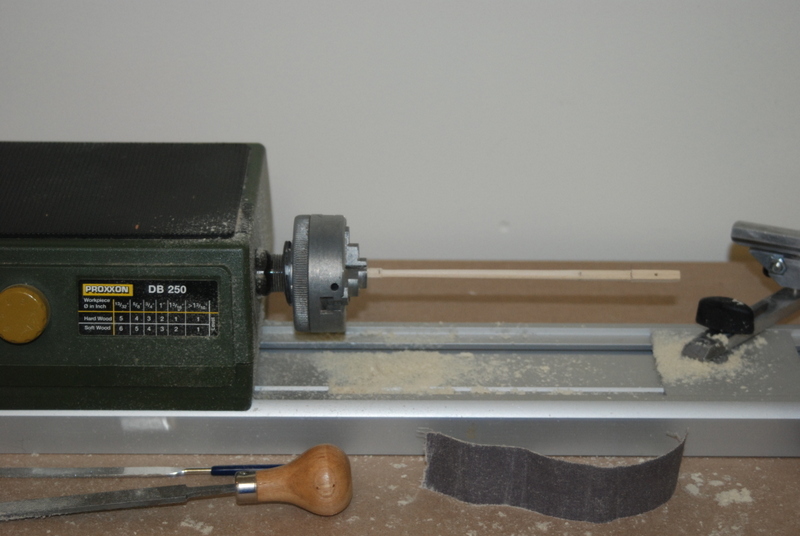
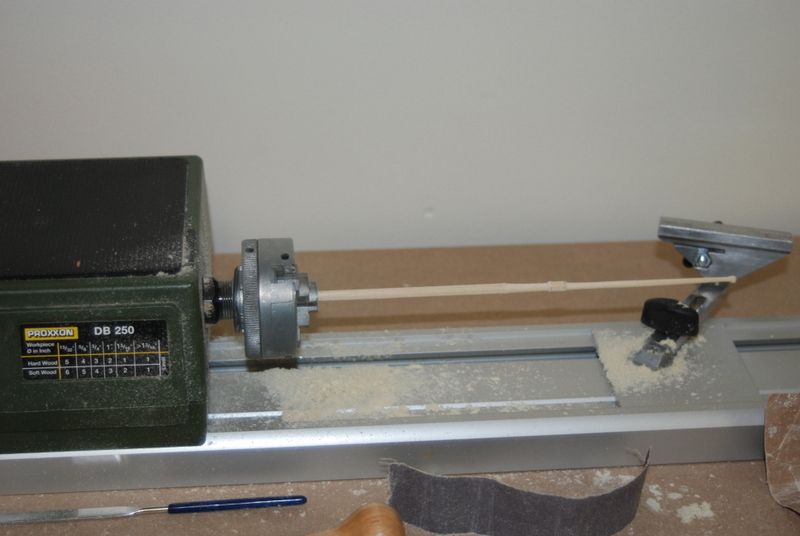
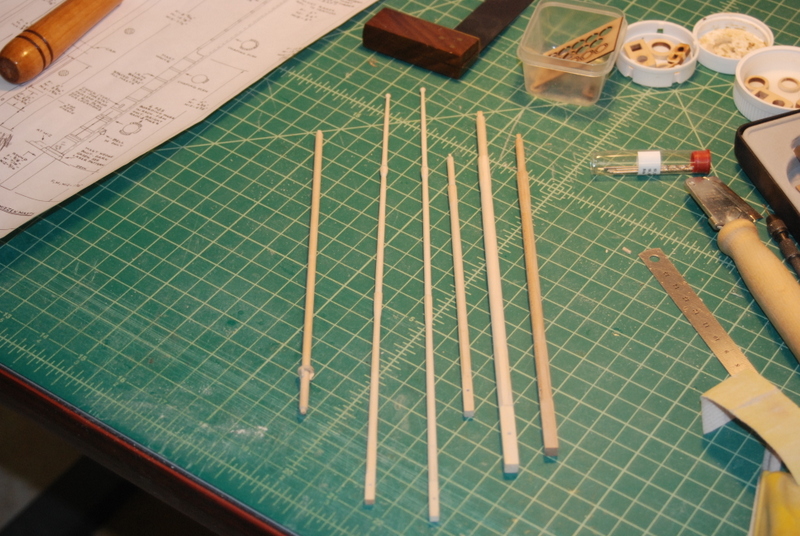
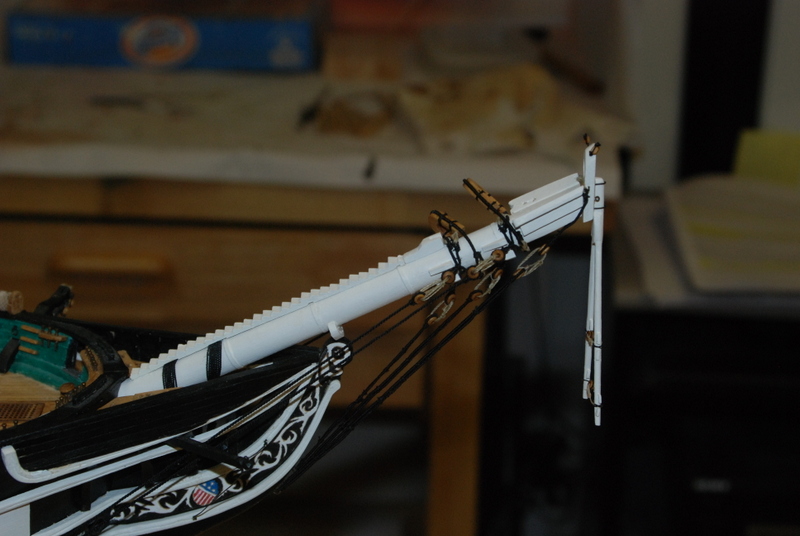
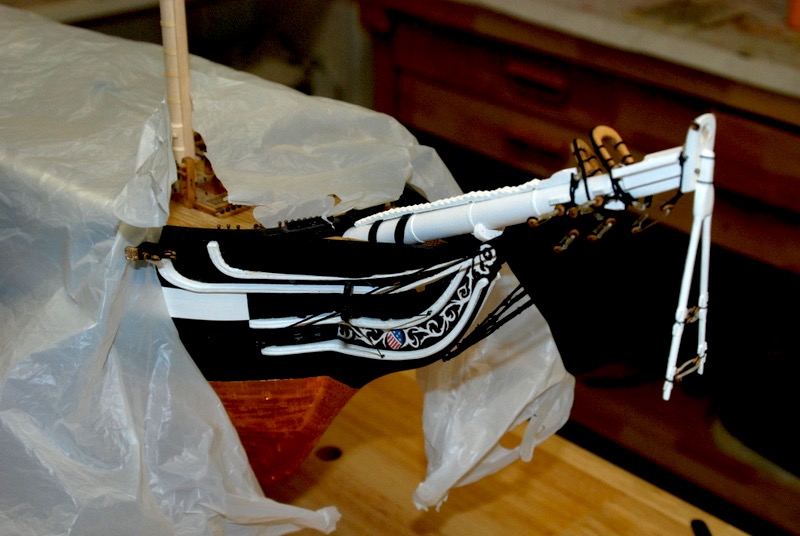
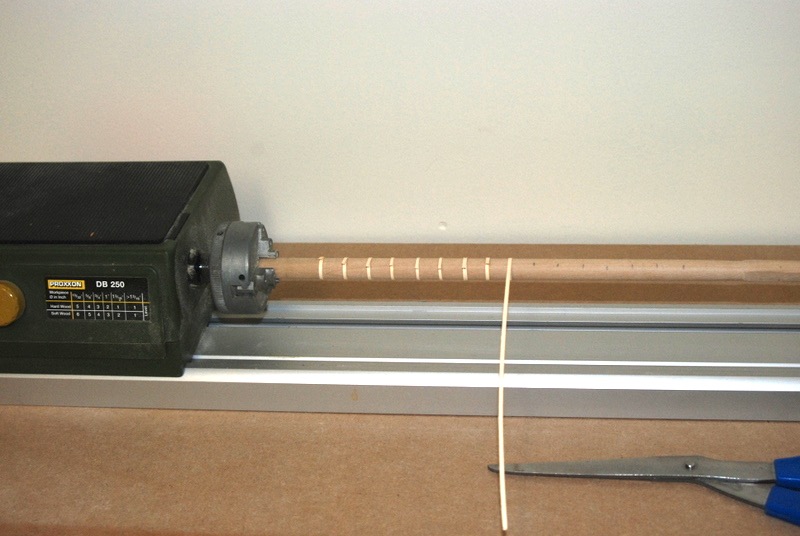
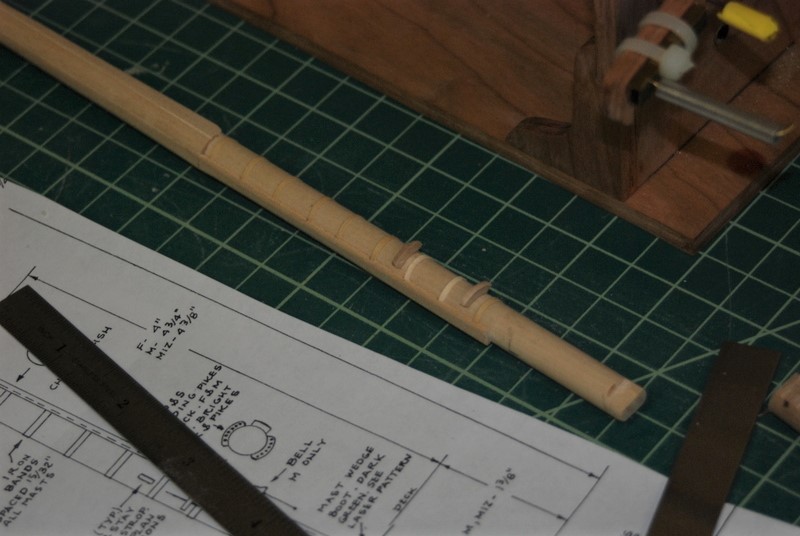
Thanks for the update popeye2sea. I will have to make a point of getting down to see her this summer. And thanks for the encouragement popeye the sailor. Wow - 2 popeyes in one post. We stayed home this weekend so I had a bunch of time in the shop yesterday and this morning. I finished the topmasts and am in the process of making the topGallant/royal/skysail masts. I was going to do something different than the MS plans, and make separate topG and royal masts, like those shown in the AOS book. But then Tim I sent me the 1817 sail plan, which clearly shows a single mast for all three, just like the MS plans. I did use the dimensions from the 1817 sail plan which are slightly longer than the MS plans show. Nothing like having to make the case even taller. It is going to be a behemoth anyway so why not a bit taller? I made this jig to hold the square stock as I planed the octagon profile into the masts. It was fine for the shorter lower masts but these topG masts are pretty long. I did manage to work them with it, but I am going to make a longer version sometime for future builds. Here are some in progress shots of the main topG mast in the lathe. I worked in sections between the octagon sections, starting with the top first, since this area had to be reduced a lot. I wasn't sure if the basswood would hold up to being thinned so small, but I had no problem. I did support the top end of the mast in the tail stock, which turned out to be a bonus, since when I took the mast out of the lathe, I had a small block of wood on the very top to make a truck out of. I mostly used fines and sandpaper outside the lathe to make it. After doing the top section, I turned the mast around in the lathe and turned the lowest round section. When that was done. I turned the mast around again and did the middle section. I found that flat metal file worked great for removing large amounts of wood. I didn't dare use any cutting tools on these masts, just files and sandpaper. I have trouble with pieces this thin breaking when using cutting chisels. So here is what I have so far -the spanker mast with boom rest, the main and fore topG/royal masts, and all of the topmasts. I still have the mizzen topG mast to do, then the crosstrees and trestle trees.
- 1,354 replies
-
- 8
-
-
- constitution
- model shipways
- (and 1 more)
-
Model Shipways Constitution Topmast Dimensions
usedtosail replied to usedtosail's topic in Masting, rigging and sails
Hi Tim. Thanks for the 1817 rigging plan. I had that in my reference material but forgot I did. I am now using it for the topgallant/royal/skysail mast dimensions, which are a little different than the MS plans. I am having trouble deciphering the scale at the bottom of the plans though. At first I though it was in feet, but that would make the ship only about 40 feet long, so it must be something else. Do you happen to know what it might be? My other alternative is take a measurement of something known off this plan and the MS plans and scale them that way. Thanks. -
Thanks Don. It is supposed to be finished sometime this year, but I don't know when exactly. It is in dry dock this time, I don't think it was in 1997. They are replacing a lot of planking.
- 1,354 replies
-
- 2
-
-
- constitution
- model shipways
- (and 1 more)
-
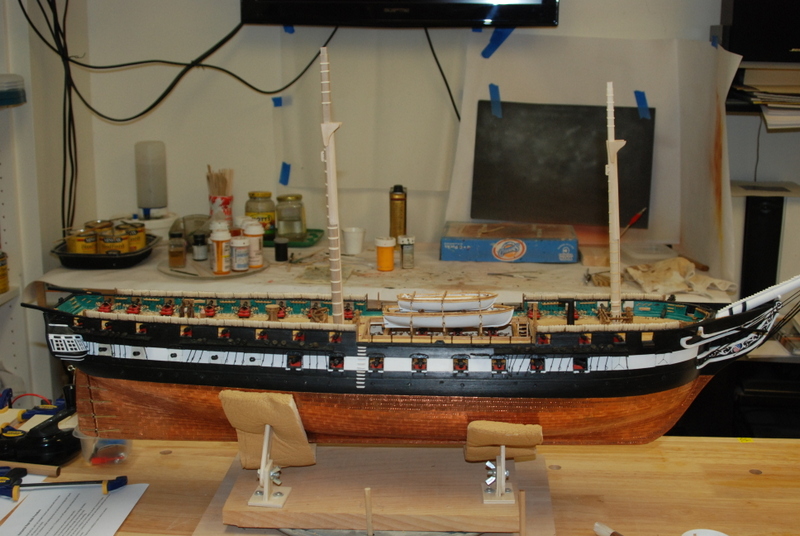
I haven't had an update in a while, but I have been working on the masts. Here are the fore and main lower masts ready to paint. I am currently working on the mizzen mast and mizzen topmast. In this picture you can see the mizzen mast clamped to hold one cheek as it is drying. You can also see the mizzen topmast and the blanks marked for the fore and main topmasts. Also, the pin rail that goes on the mizzen mast is done. It only goes 3/4 of the way around the mast to leave room for the spanker mast behind it. I made the topmast by starting with a square piece of wood that was the correct size at the base. I then used Chuck's 7-10-7 fan to mark lines on all four faces for an octagon shape. I used a small plane with the wood in a holder that has a 45 degree groove in it, to cut the corners off, making an octagon shape all the way up the mast from the square section at the bottom. I then put the mast in the lathe and sanded the round section between the bottom and top octagon sections, tapering the mast as I rounded it. I turned the mast around in the lathe and cut the shoulder above the upper octagon section, and turned down the round section at the top to its diameter. I removed the mast from the lathe, then used a small file to taper the faces of the upper octagon into the lower round section. I also had to remove some wood from the faces so the mast would fit through the hole in mast cap. After that I filed the square tenon into the top for the topmast cap. With this method I didn't have to add any wood to build up the sections. I am still not sure about adding the cheeks to the topmasts, so I am leaving them off for now. I may add them when I install the upper crosstrees. Here are some more pictures from the real Constitution. Enjoy!


- 1,354 replies
-
- 3
-
-
- constitution
- model shipways
- (and 1 more)
-
Yes, Happy Belated Birthday. Let me know when you will be in Boston and maybe we can get together for a beer.
- 742 replies
-
- 8
-
-
- constitution
- frigate
- (and 1 more)
-
Model Shipways Constitution Topmast Dimensions
usedtosail replied to usedtosail's topic in Masting, rigging and sails
Captain Steve, I am now thinking that 5/16" for the main topmast may be too big, as the hole in the mast cap is not near that size. I may go with something between 1/4 and 5/16 for mine, or maybe 1/4 for both the main and the fore, as I have that size in stock and that is what the plan shows. BUT, to all, here is my other question. The plans show an octagonal section just below the upper crosstrees, which flares out from the mast to form a shoulder. The size on the plans makes this too big to pass through the lower mast cap hole, but that is OK as I can just sand this down until it fits. But, the plans also show cheeks added to this octagon section, which in no way would pass through the mast cap hole. So either the topmast can't be brought down through the lower mast cap like all other ships of this period do, or the cheeks are removable somehow? Could this be a modern addition when fastener technology got better? If so, I am going to leave the cheeks off since I am building an 1812-ish version. or add them after the lower and topmast masts are put together. Thoughts? -
Really nice work on those masts, Geoff. I'll bet your rigging is going to look equally as good.
-
Model Shipways Constitution Topmast Dimensions
usedtosail replied to usedtosail's topic in Masting, rigging and sails
Thanks guys, but I think I have an answer to my own question. I realized that the topmast shown on the plans is the full size version of the main mast topmast, so I could measure the dimensions directly off the plan and ignore the dimensions written on the plan. Then I could use the written dimensions on the plan to figure out the corresponding scaled down dimensions of the mizzen and fore topmasts. Here is what I came up with: Square section at bottom: Fore 1/4" Main 5/16" Mizzen 3/16" Transition from octagon to round Fore 1/4" Main 5/16" Mizzen 3/16" Round section under cheeks Fore 7/32" Main 1/4" Mizzen 5/32" Round section above cheeks (here the plan shows this to be narrower than below the cheeks but the dimensions are the same on the plans) Fore 5/32" Main 3/16" Mizzen 1/8" Tenon at top (these correspond to the size of the holes in the caps) Fore 3/32" Main 1/8" Mizzen 1/16" Hopefully future builders will find this post when they get to this part of the build and scratch their heads trying to use the dimensions written on the plans. -
I am about to build the topmasts for the Constitution but the dimensions on the plans are not right. I made some notes to that effect on the plans but even my notes don't seem right. I searched for where I had gotten the information but can't find that either. So, any of you previous Constitution builders know what the dimensions are supposed to be. I am most concerned with the diameters of the topmasts at the various points along the length. Thanks.
-
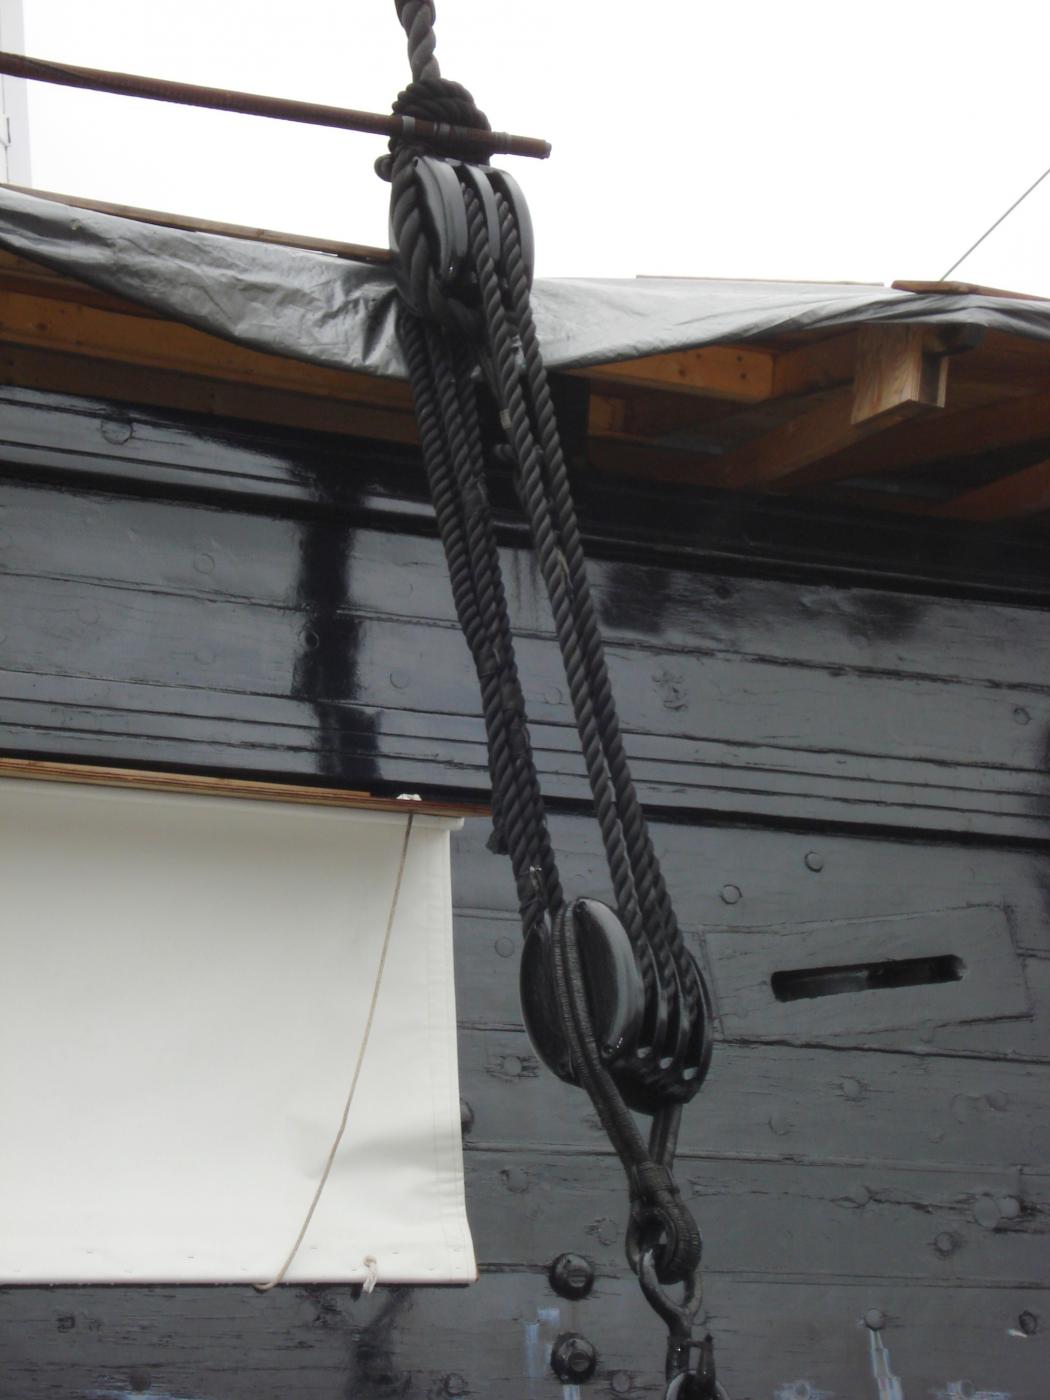
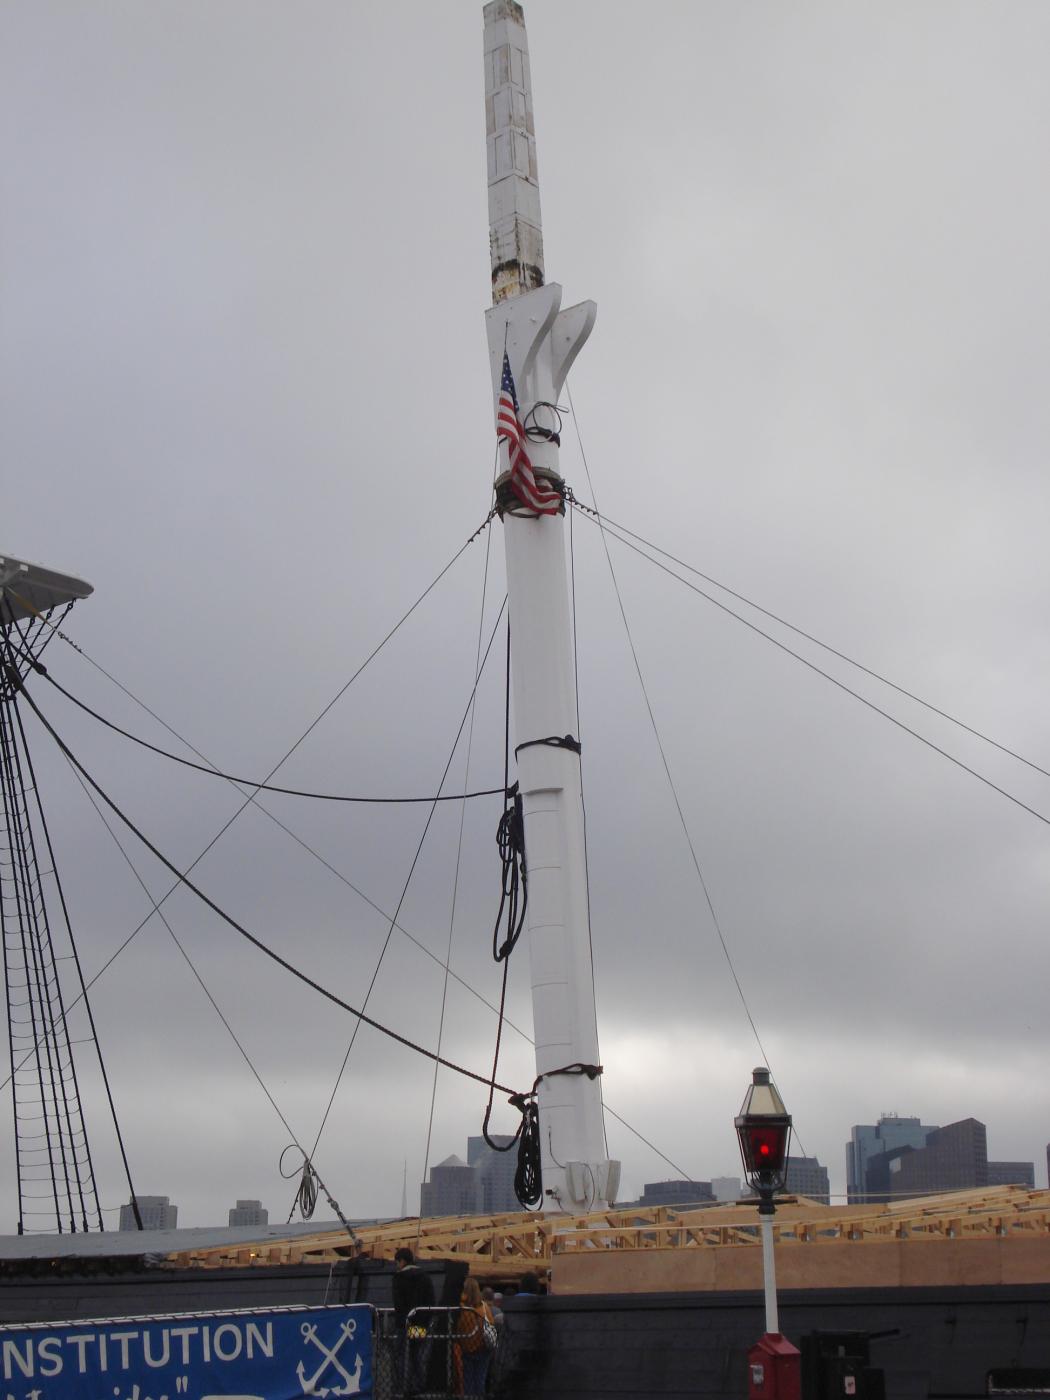
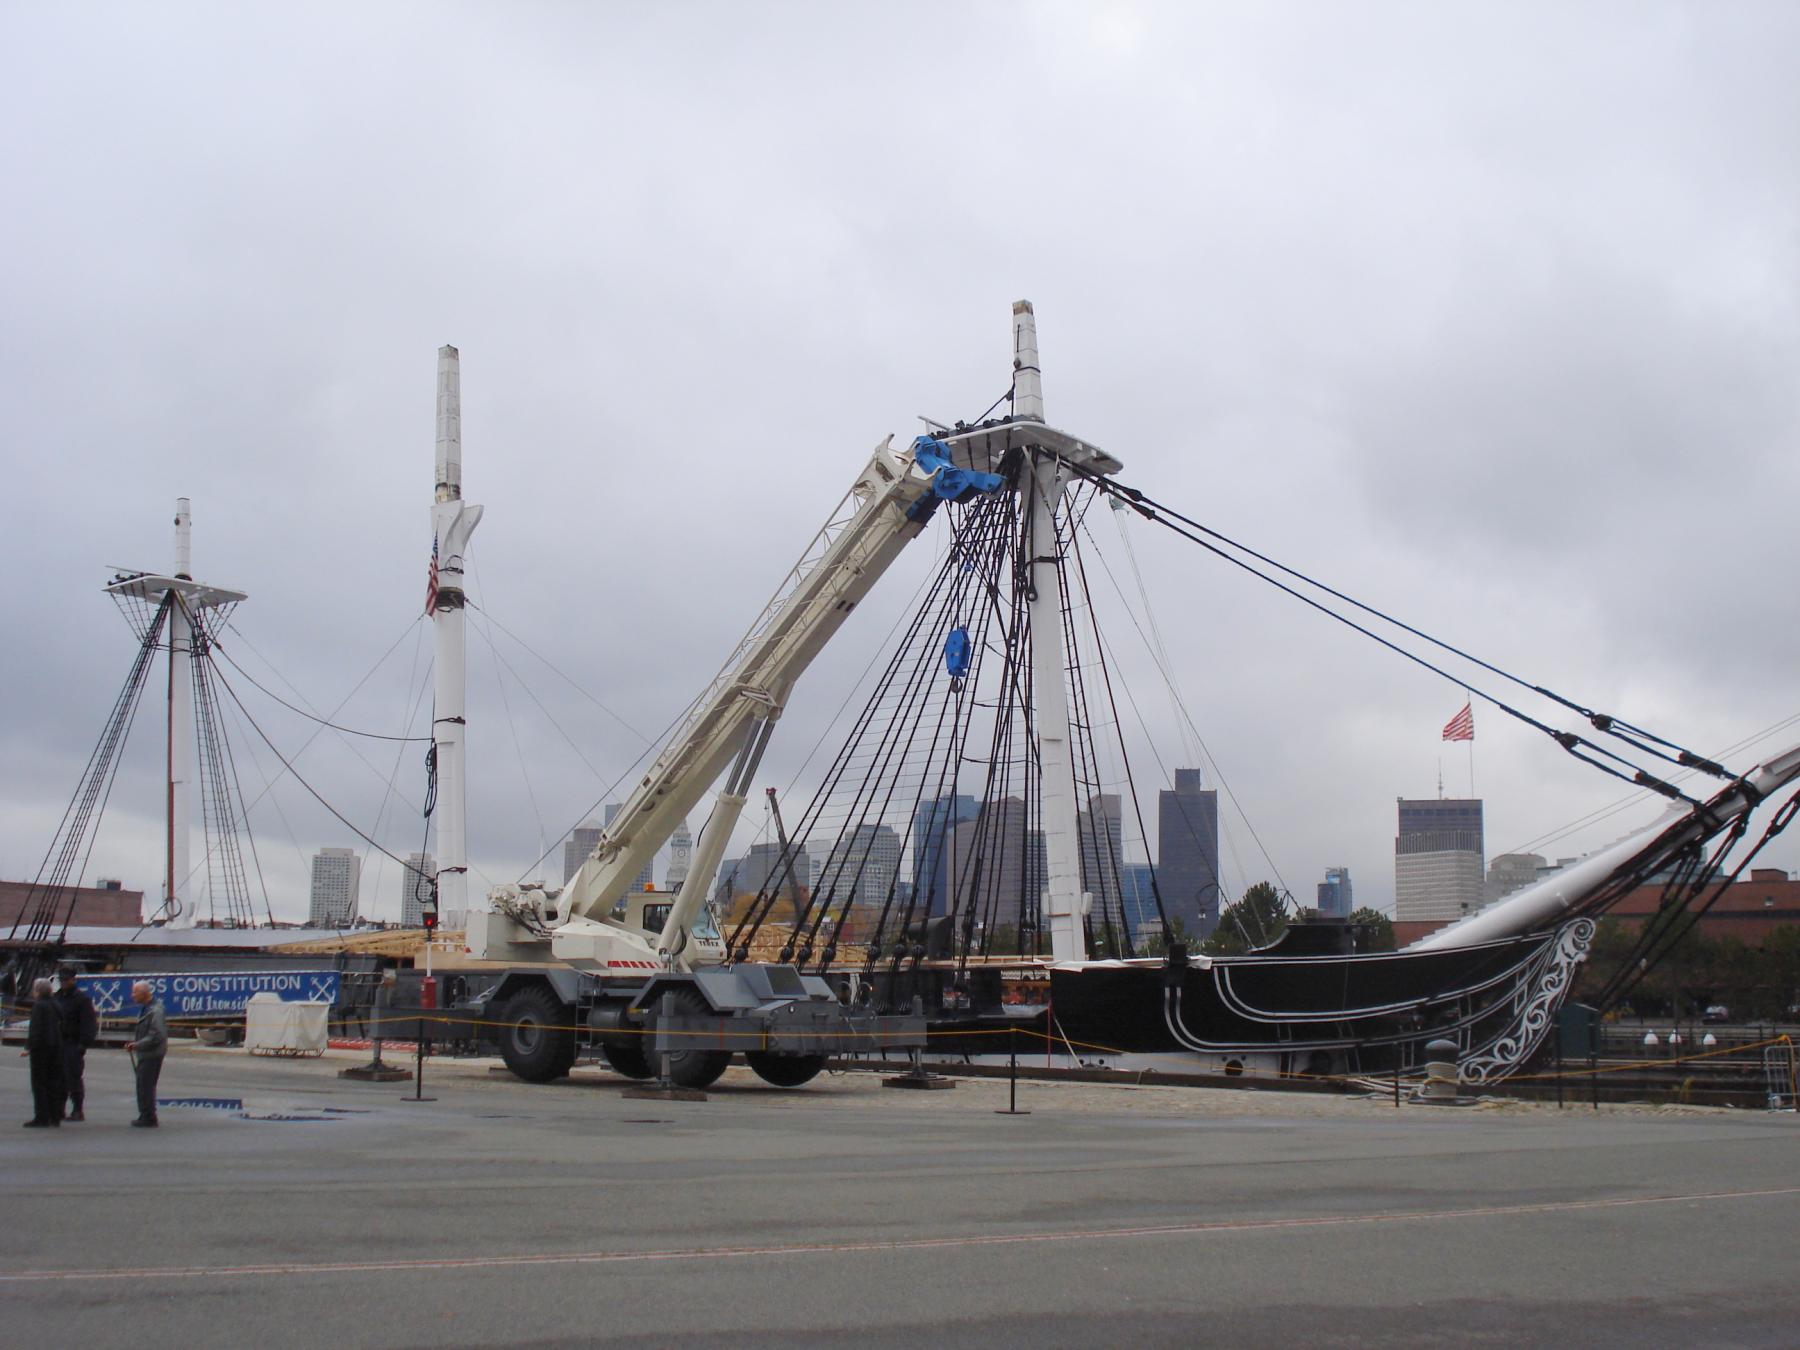
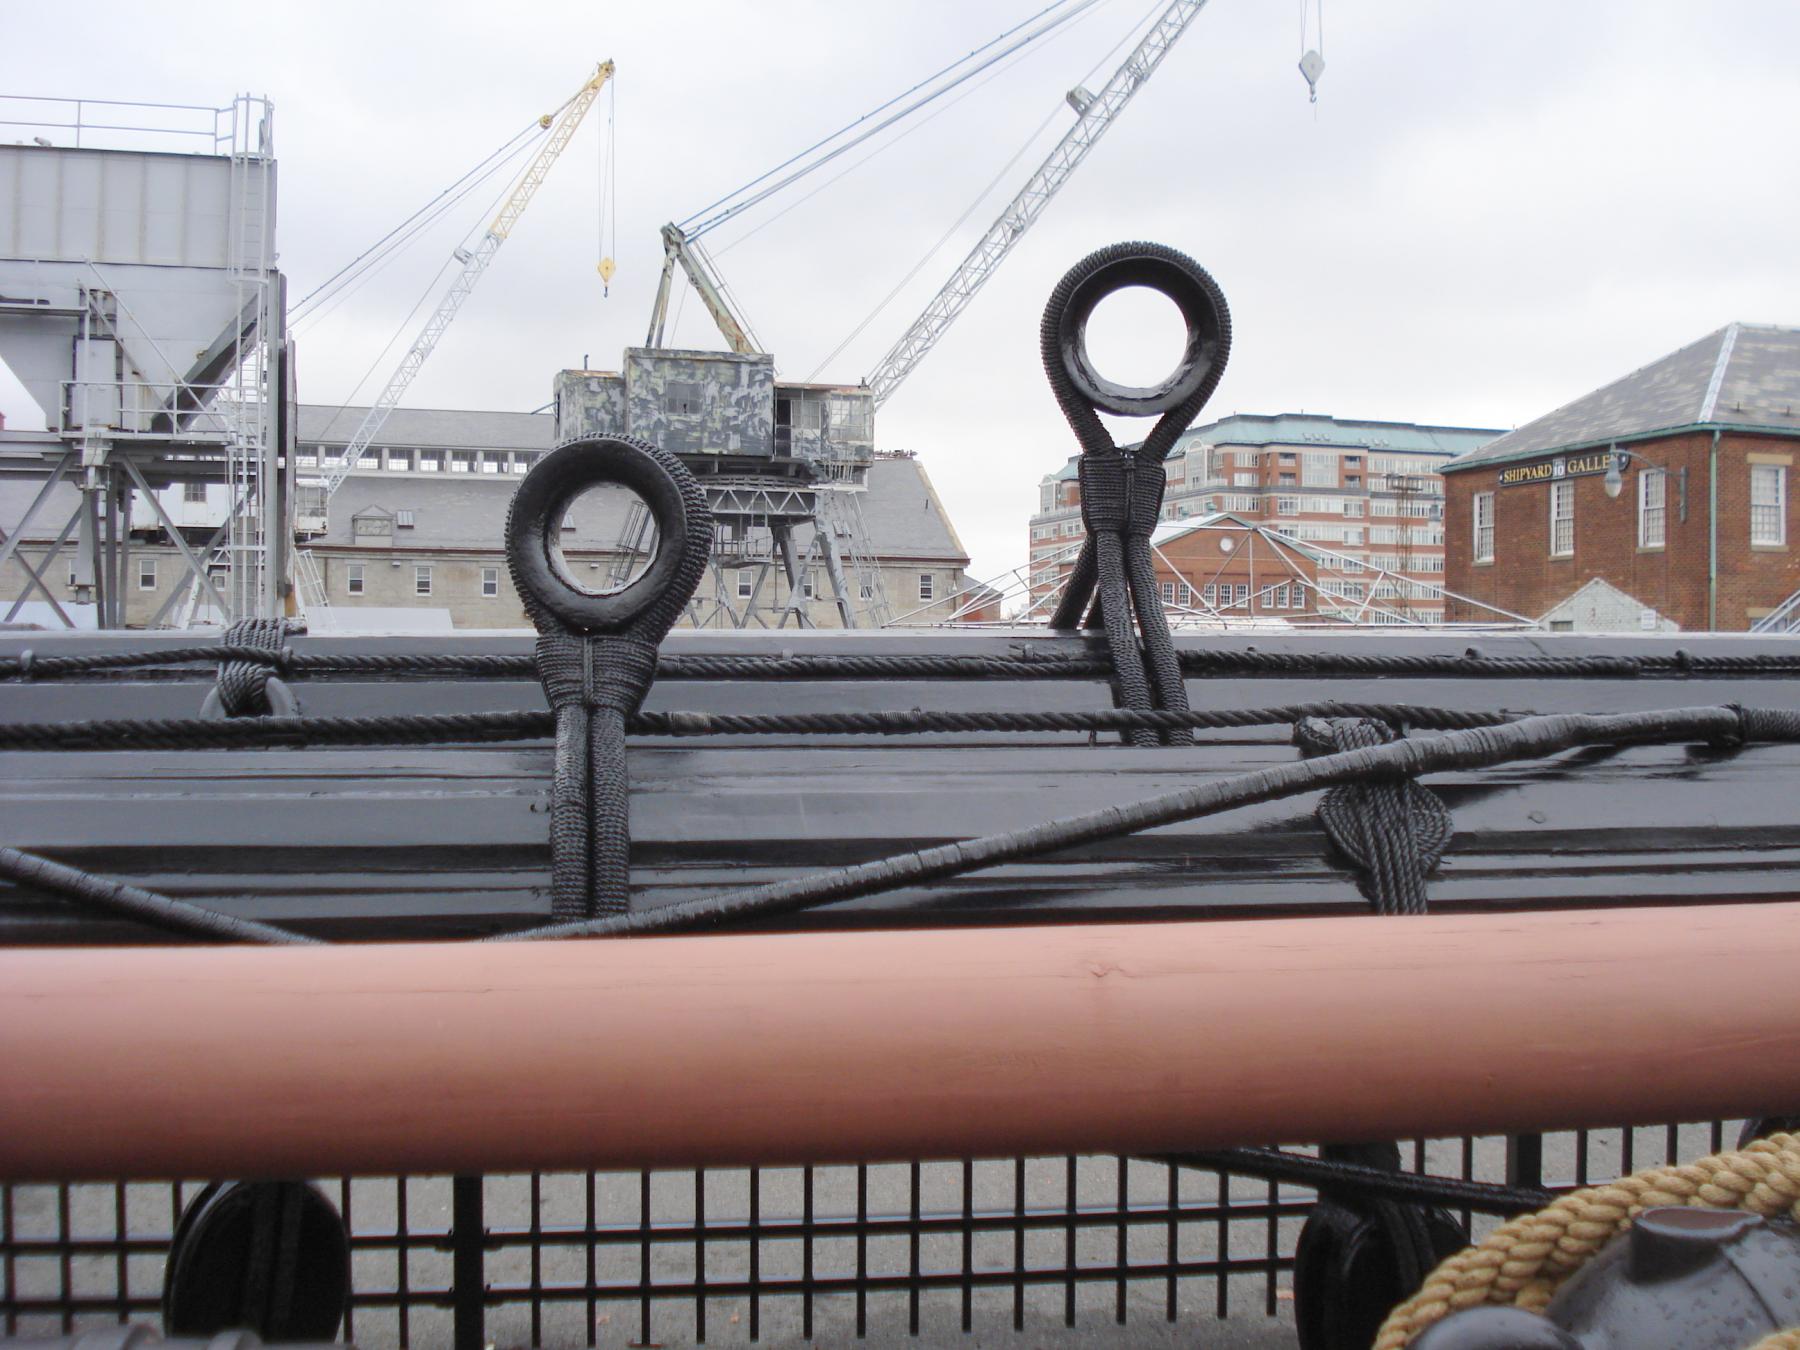
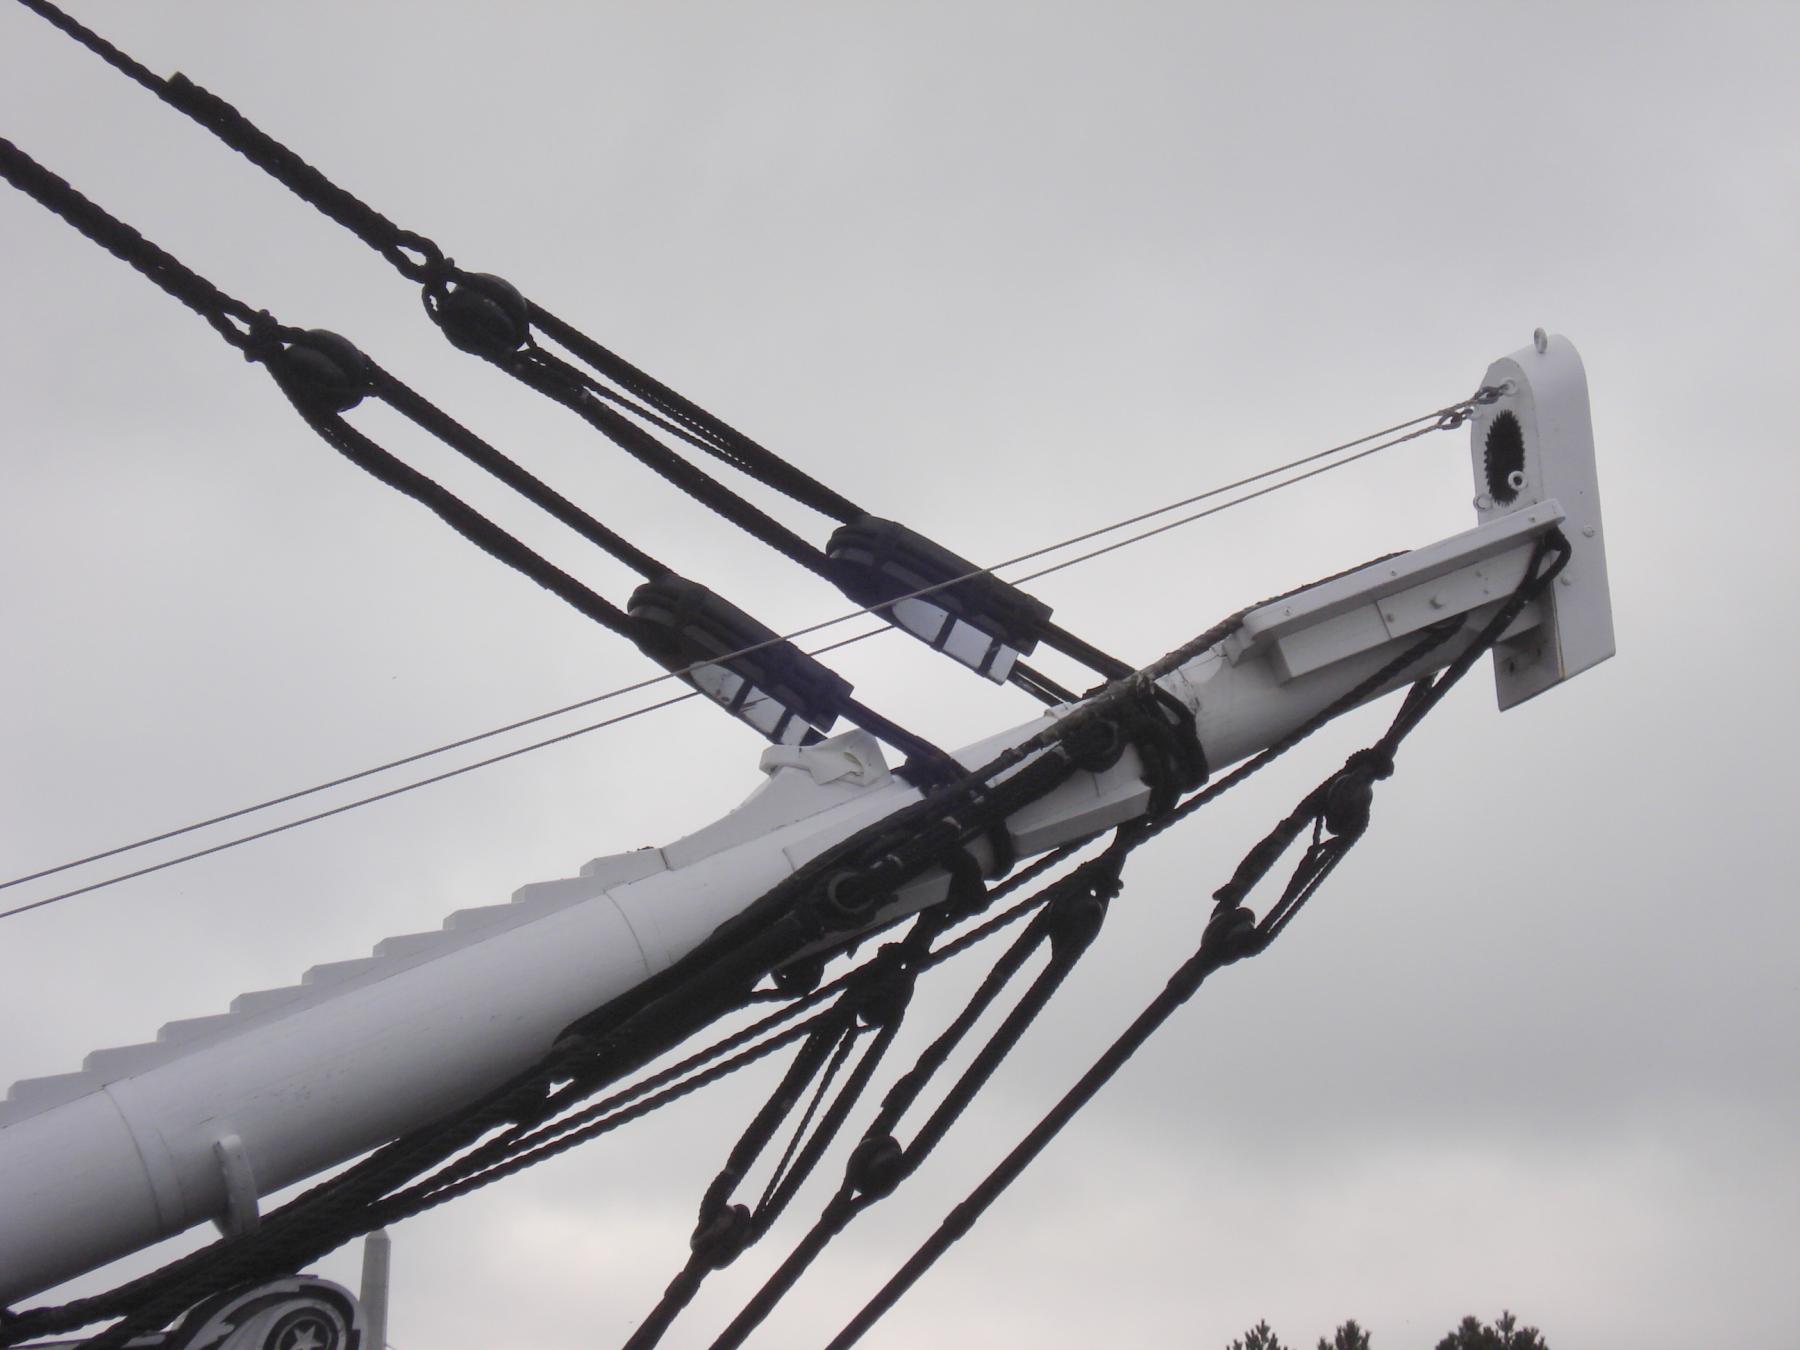
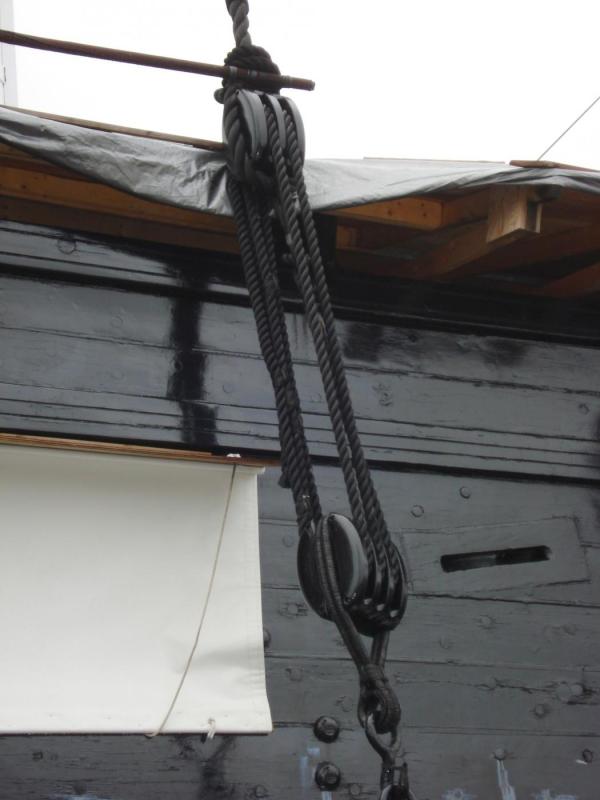
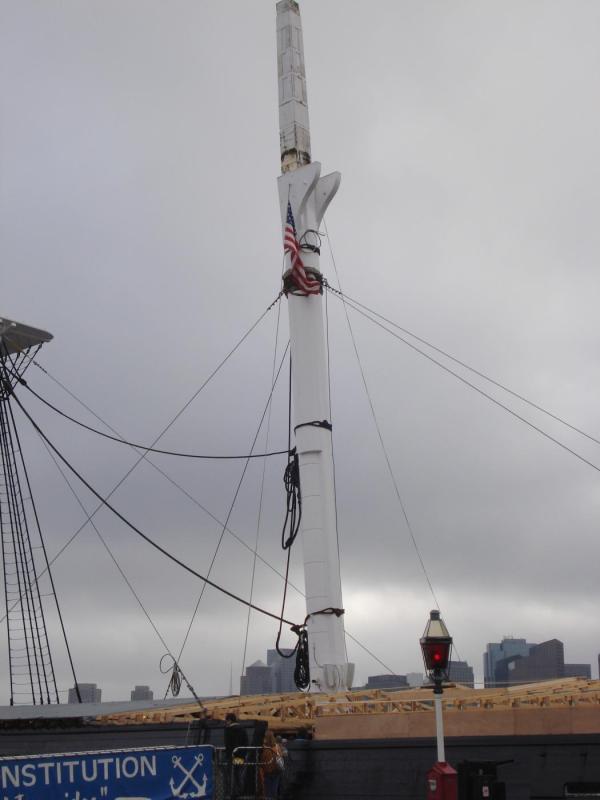
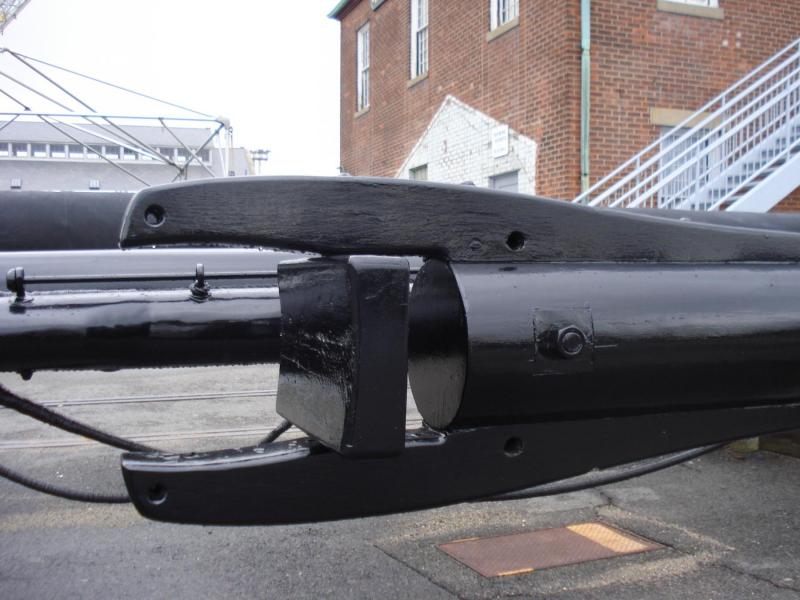
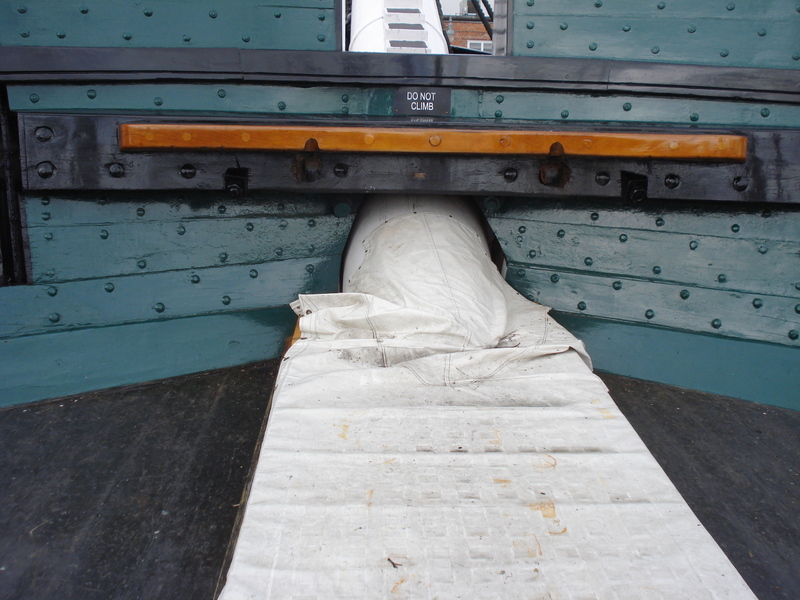
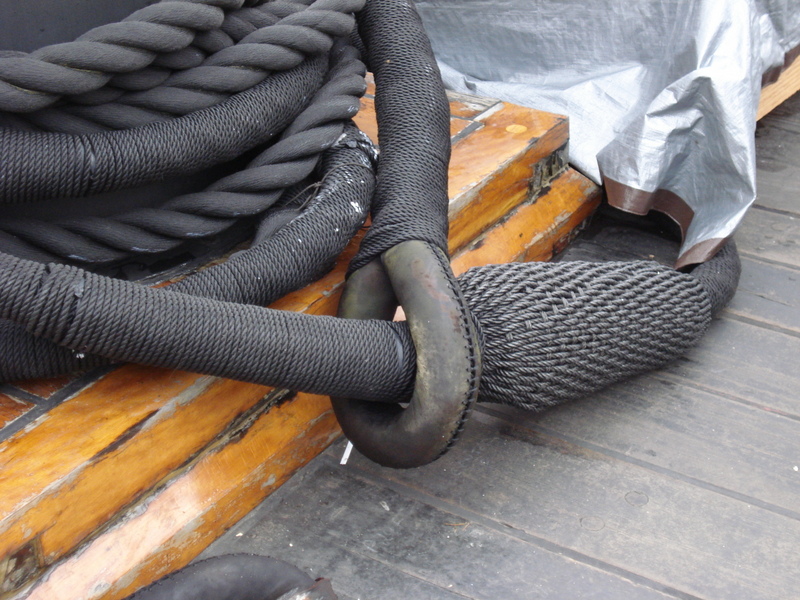
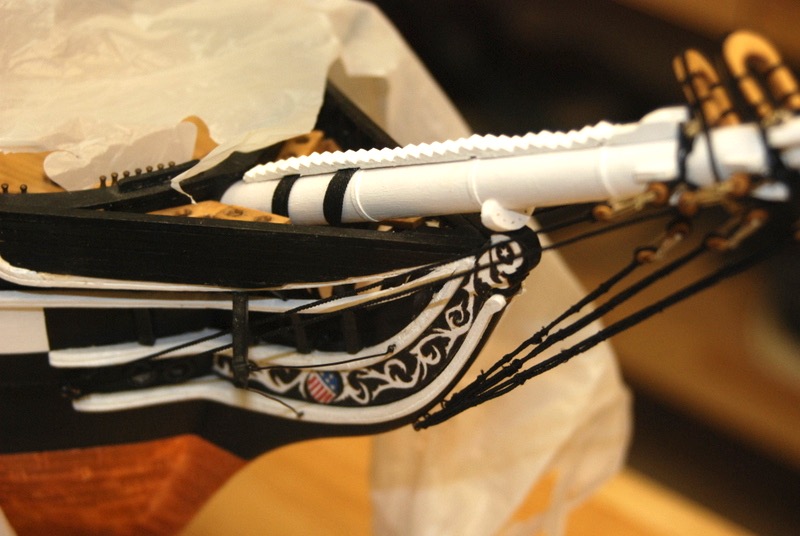
Here are some more pictures from the real Constitution: The base of the bowsprit inboard, covered with canvas: Close ups of some mouses (mice?) on served stays: Martingale (at the time I took this I had no idea what this was): Tressel trees (not sure what mast this came from): More to come later, but these may be the most interesting.

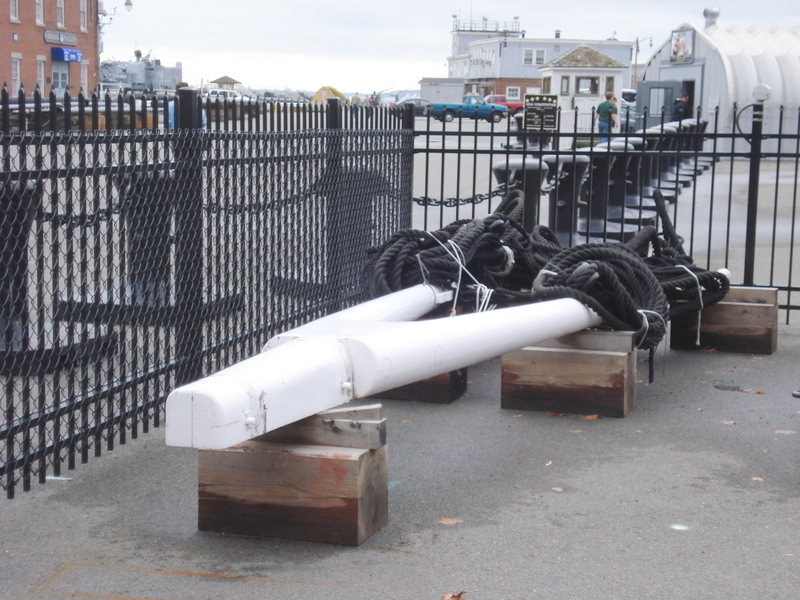
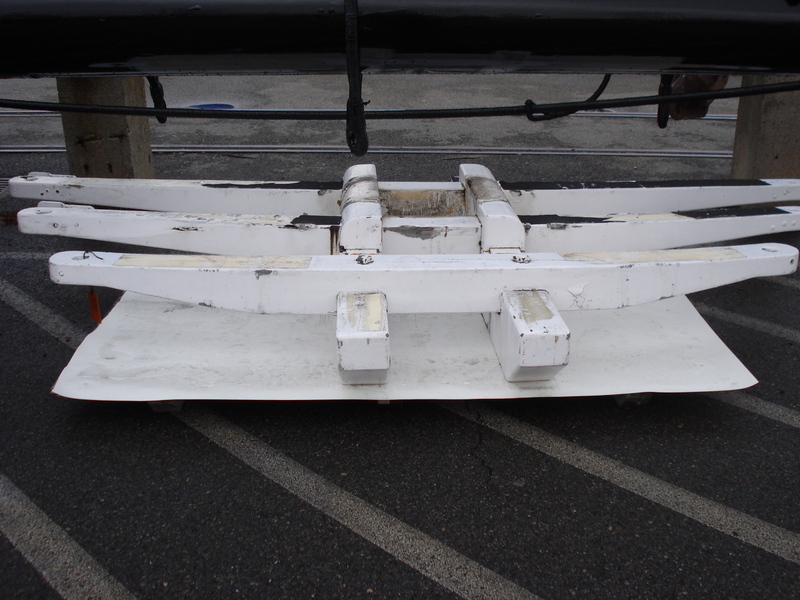
- 1,354 replies
-
- 7
-
-
- constitution
- model shipways
- (and 1 more)
-
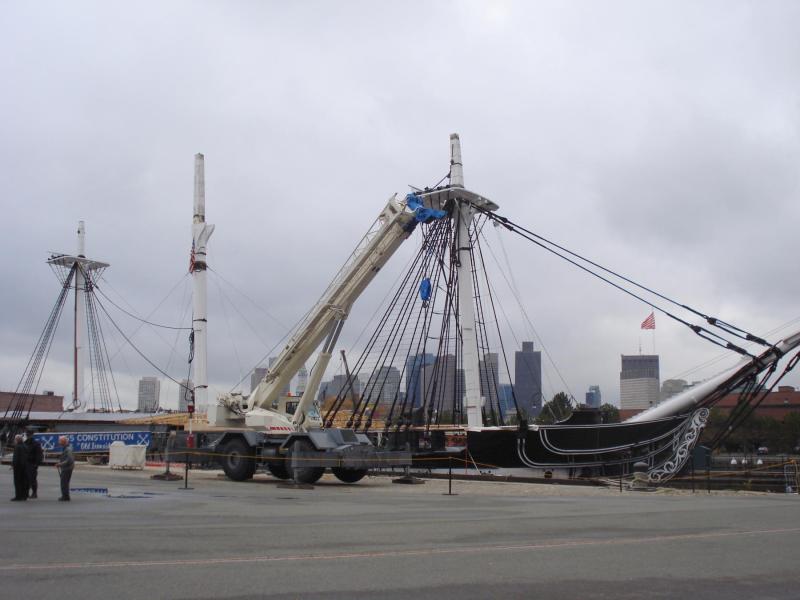
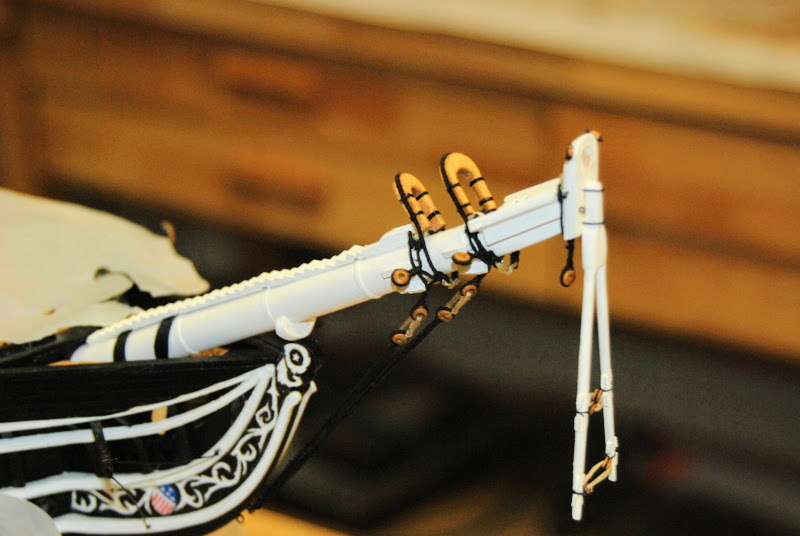
Steve - I think my notes would be too raw for most folks to have to wade through. Many entries are like - today i glued on the port main mast chafing fish piece, then made the starboard piece. Bla, bla, bla. I enjoy writing it down because it helps me remember what I did when I get around to that step on the next model. To me, it would be like having the raw notes an author takes to write a book. Not that I am going to be writing any books. On the other hand, the workplan probably would have value to other modelers. The problem with that is the parts I haven't gotten to yet are just an outline. I fill in details as I start planning those steps, so it won't be complete until the model is done. Rob - it is like having an extra hand, almost. Back in 2008, I visited the real Constitution one cloudy Saturday afternoon. Everyone else in the family was busy doing their own thing, so I had lots of time to myself to walk around and take pictures. It happened that they were in the process of taking down the top masts, which they do in the winter if I remember right, and the rigging and yards were laying on the wharf. I guess I wasn't supposed to be walking around them, but I had about 20 minutes before a guard kicked me out, and I took a lot of pictures. I just went through them again the other night, and I realized there are some good shots that will be useful to me and to others. I will include some in future posts as I get to those sections, but I will include some now so you can see what I mean. Here is one that jumped out to me as I was looking through them, because when I was rigging the third bob stay I wasn't sure how the collar went around the bees. When I rigged my collar, the eye loops were on the bees, not hanging below like shown above, so I removed the lashings and redid it. It now looks more like the above picture. I am much happier with the new rigging. I notice that the real ship used black line for lashings, but I have always used tan line for some reason. Should I be using black line for the lashings? More pictures in the next post.

- 1,354 replies
-
- 4
-
-
- constitution
- model shipways
- (and 1 more)
-
You are welcome Dave. The plans leave much to be desired. For instance, some drawings on the plans are not symmetrical port to starboard when they are supposed to be, so keep an eye out for this.
- 742 replies
-
- 6
-
-
- constitution
- frigate
- (and 1 more)
-
OK, now that I am home I looked at the plans and I think I see the problem. If I measure the width of the template for the stern filler piece from the plans it is 1 5/8" wide at the center. If you measure the length of the filler piece on the side view part of the plans it is only 1 1/2" wide. I think this may be showing the length of the filler piece at the sides which is shorter than the middle, but it is misleading (really it is wrong) I think that is where the 1/4" or so is coming from. If you make the filler piece using the template you should not have to remove the 1/4" from the transom frames. BTW - I used the free volume of the Launk Street Shipyard tutorial for this part of the build, which helped me a lot getting started. I am not sure if it is still available on line.


- 742 replies
-
- 10
-
-
- constitution
- frigate
- (and 1 more)
-
Hummm. If it works for you, go for it. I just didn't have that problem.
- 742 replies
-
- 5
-
-
- constitution
- frigate
- (and 1 more)
-
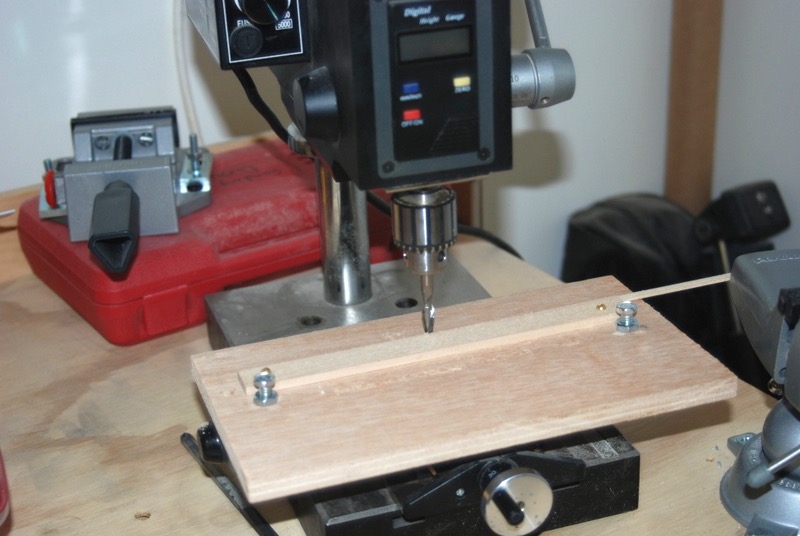
Those last images are pretty dark. I have to figure out how to take flash pictures with the Aperture Preferred mode. I was doing better but lately they are all too dark. Good thing I can lighten them up on the computer. I have now started the fourth year of this build. I had thought when I started this journey that it would take me three years to build it, but now I think it is going to be another two until it is done and in its case. That is not a problem for me though as I am really getting my money's worth from this kit. I probably average about 10 hours a week, so if I were to look at this as a full time job, I am working about a quarter time. That is time in the workshop and does not include all the time I am thinking about what I am working on or planning for future work on this model. That probably takes another 5 hours a week. I keep a pretty extensive build log as a MS Word document which is up to over 600 pages already. I also keep an Excel spreadsheet of all the steps and in what order I need to do as a work plan, which is also maintained weekly or so. That is 27 pages so far for the work plan, with other spreadsheets in the same document for things like the painting scheme, rigging lines and there sizes, and a rigging plan. All in all it is a lot of work, but fun and keeps me out of trouble and away from the TV! I got the bow sprit shrouds installed. I had one seizing let go when doing the lashing, so I had to remake one of them. The fore mast is ready to go and the main mast work continues. I have the square section milled and the mast tapered. I put on the manila bands on the round section, but tried something different this time. I chucked the mast in my lathe and hand turned it as I wrapped the manila strips around the mast, after gluing the end of the strip to the mast. I think they came out straighter than when I was just wrapping them with the mast on the work bench. I milled more strip wood for the chafing fish (as opposed to chafing dish). I bought a larger round end mill bit that matches the curvature of the masts pretty well. It was too big to put into the mill though, because the Proxxon mill only takes bits up to a 1/8 inch shaft size. It does fit in my drill press though, so I bolted the fence I made for the mill to the XY table on the drill press. The tricky part was setting the height, as I had to do that by moving the whole drill head up and down by hand. It was a lot of trial and error to get it to the right height, but once there I was able to mill multiple strips repeatably for all the main and mizzen masts. It made a big difference which direction I fed the strip wood in from, due to the direction of travel of the mill bit (climb milling vs. regular milling, I think it is called). Anyway from the right the strip stayed right up against the fence but from the left it wanted to wander off the fence pretty violently. I need to come up with a mechanism to make small adjustments in the drill head height, but haven't thought too much about it yet. If anyone has an idea or knows of something that would work, please let me know.
- 1,354 replies
-
- 5
-
-
- constitution
- model shipways
- (and 1 more)
-
Dave, I did not have this problem. Check the length of your stern filler block to the templates on the plans. In the picture above the filler block looks too short. The back edge of the transom frame should be flush with the back end of the filler block, which is not what your diagram shows above either.
- 742 replies
-
- 3
-
-
- constitution
- frigate
- (and 1 more)
-
That's a great method Geoff.
-
I find these pliers helpful when pushing in nails: http://www.micromark.com/pin-insertion-plier,10735.html
-
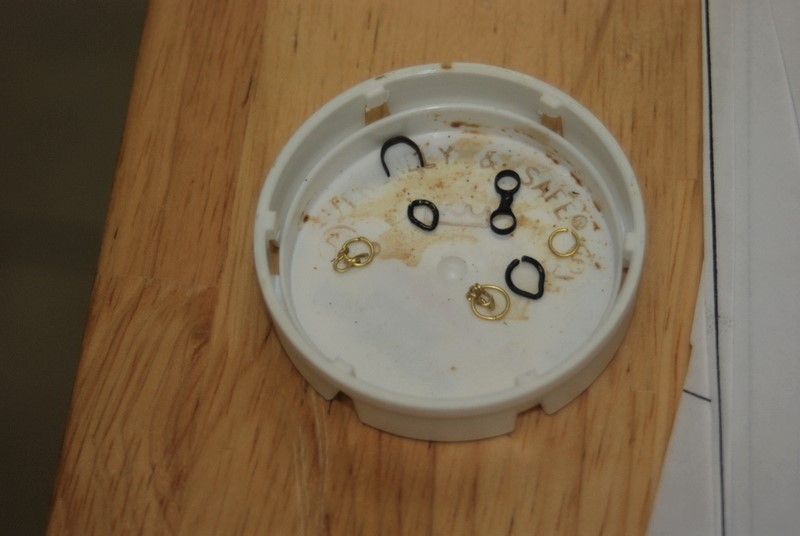
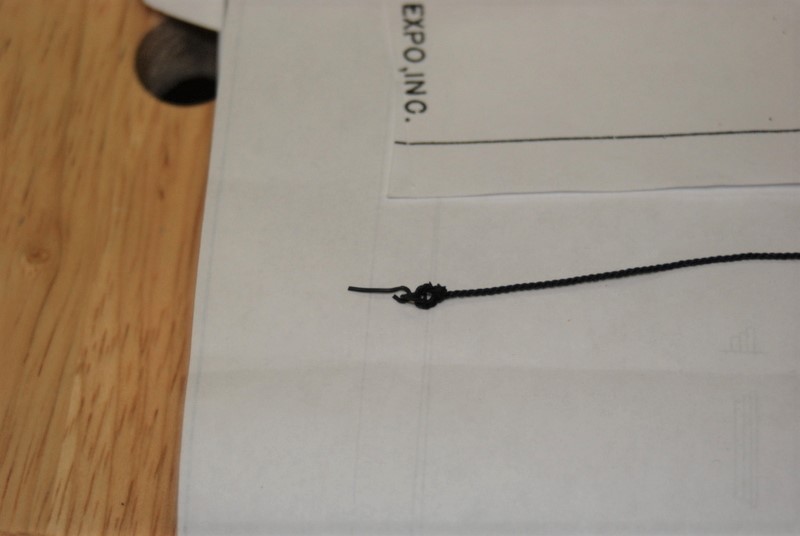
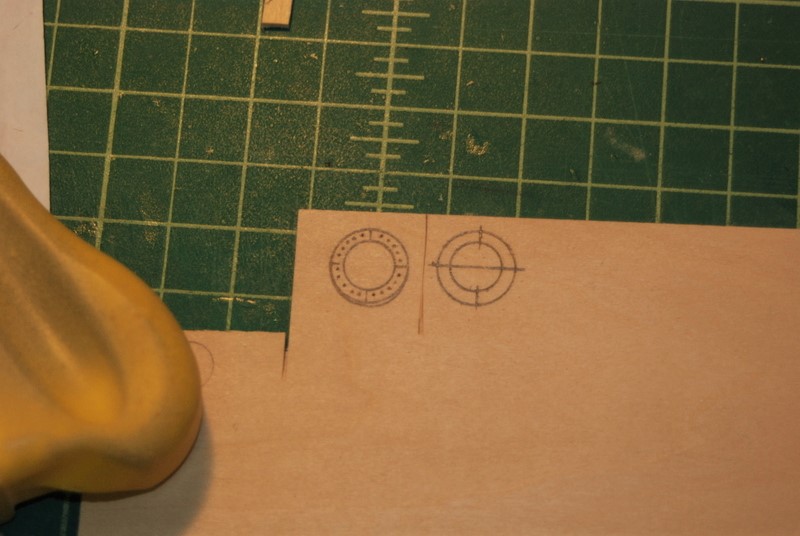
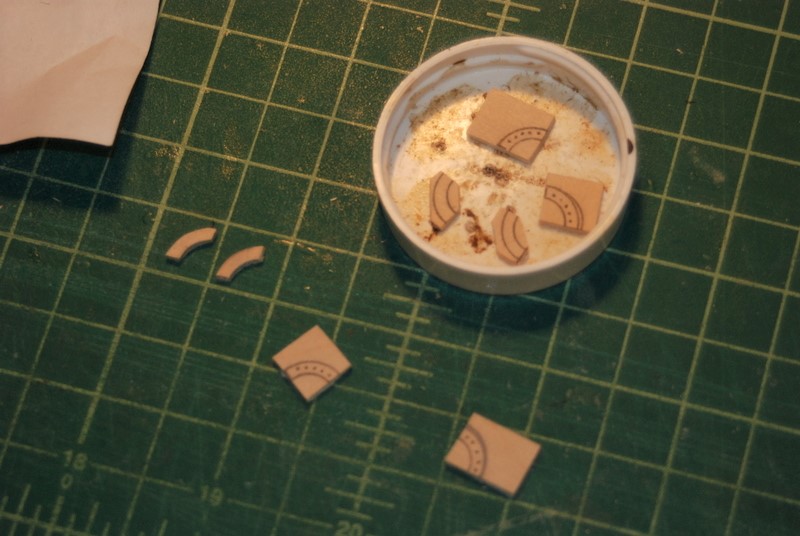
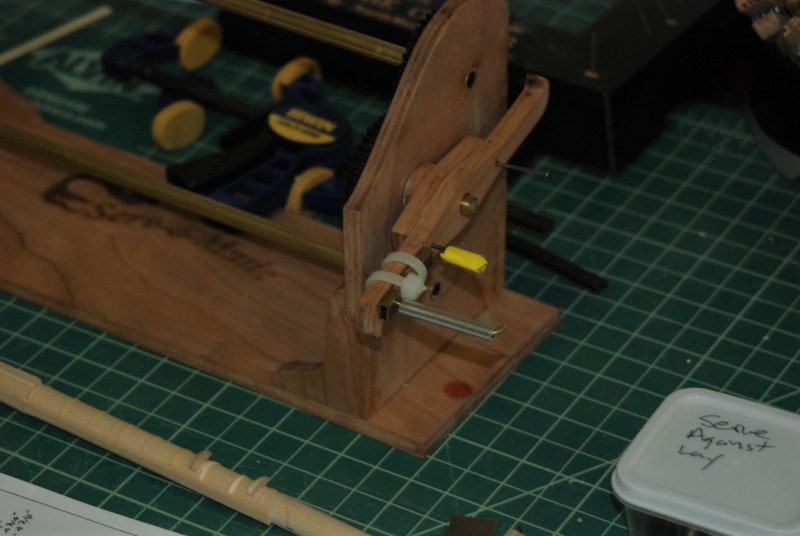
I find I am working on a number of small projects at the same time - finishing up the lower fore mast, starting the lower main mast, making and rigging the bow sprit shrouds, and a few other things. I had made the traveler rings for the jibbooms a while ago but since those spars are not installed yet, neither are the rings. I recently saw a picture of the rings that Syren is now selling and thought I'd give it a try to make mine look like those. I used wire for the rings instead of tubing that Chuck uses, but it worked out pretty well. I used a smaller size wire for the shackle and hook. The rings are glued with a small bit of medium CA instead of soldered. I still need to blacken them. Here they are in comparison to the previous rings I made, which were just rings with a bump for the stays to fit under. Here is one of the bow sprit shrouds. I made the eye bolts that will go into the hull, since the eye bolts I had were either too big or too small. I made the eye splice in the line around a small piece of brass tubing, and instead of a shackle between the eye splice and eye bolt, I used a ring. I think it is hard to see the difference, since these are all black against a black hull. The fore mast and main mast have boarding pike racks which I made using some sheet wood. I first used a circle template to draw two concentric circles, then divided them up into four parts. In one set I drilled holes for the pikes and the other set is left solid for the ends to rest on. I am going to use straight pins with the heads cut off for the pikes, after I blacken or brown them. i cut out the sections using a razor knife and sanded them round. For the inside curves, I used a piece of dowel with sandpaper wrapped around it. Here I have glued one set to the fore mast. You can also see the completed chafing fish. Finally, I have been making and serving line for the bow sprit rigging. The line on the bow sprit shroud above is some that I made. I was having a problem with the Serv-O-Matic in that my finger was getting really tired cranking with it. I found this crank that I had made for something else and thought to try it on the serving machine. I didn't want to drill into the machine in case it didn't work, so I just zip tied it on. It seems to work really well and now my finger is much happier. I may improve on this in the future. The main mast is marked out and I have started milling the square section. No pictures of it yet.
- 1,354 replies
-
- 7
-
-
- constitution
- model shipways
- (and 1 more)
-
Thanks for the likes. I am working on the chafing fish for the fore mast, adding one piece at a time, so I have time to work on other things while the glue is drying. I lashed the bob stay, bow shroud, and fore stay collars to the bow sprit, after gluing the cap and martingale in place. I then made the first and second bobstays and lashed them in place. These are doubled, served line, that I first put through the eye bolts that go in the stem, then did all the seizings along the length, with a seized bullseye in the end. I seized each end at the splice, then wrapped some of the seizing line over the joint. I then glued the eyebolt into the stem and added the lashing to the bullseye in the collars. The third bobstay is next, as well as starting to shape the main mast.

- 1,354 replies
-
- 6
-
-
- constitution
- model shipways
- (and 1 more)
-
One suggestion, Dave. When you cut the beams off (the uppermost cut in your picture above), I cut them at an angle so that the new beam had a place to sit when I put it back in. You will be happy adding a gun deck. And I like that you are going to make new cannons too.
- 742 replies
-
- 6
-
-
- constitution
- frigate
- (and 1 more)