
.JPG.ca33079f5815b861e67b9c2cccd37982.JPG)

Blue Ensign
-
Posts
4,248 -
Joined
-
Last visited
Content Type
Profiles
Forums
Gallery
Events
Everything posted by Blue Ensign
-
 Thank you Kirill, I must have missed your April post; the old forum with the full build log no longer exists, but I do have all the details fortunately. JPAM, glad you like the build B.E.
- 126 replies
-
- 1
-

-
- le superbe
- heller
- (and 2 more)
-
Lol the mast pins were the last thing I saw before Jason's reply, now it makes perfect sense. That belay pin arrangement on the Mizen is the same as shown on the Pegasus kit plans, but I opted for the cleat arrangement. Glad we cleared that up B.E.
-
Very nice work on the masts Bob. Re the mast 'pin' is that simply to secure the yard to the mast as a modellers aid to rigging? I am a bit confused because you mention cleats as the usual fitting, The only cleats I am aware of in that area are the sling cleats on the yards. I have used small pins on my Pegasus to hold the yards whilst I rig the parrels etc. it makes life easier. B.E.
-
Syren is a beautiful model subject Thomas, and you surely have done her justice. B.E.
-
Good decision re the cradle Mark, a finished model cradle doesn't have to be as heavy as a build cradle, and I prefer them to the pedestal look. B.E.
-
I am also embroiled in rigging in tight places at present and it can be a frustrating exercise; snagging previously rigged lines is an ever present hazard. Personally I don't mind a degree of slackness in the centre line stays, provided the slackness looks natural, in fact I try to contrive it to impart a look of 'weightiness' on my models, the same thing applies to the braces and pendants. I take it that the slackness has nothing to do with humidity, and as you say re-rigging can be very difficult without backtracking many stages, without any guarantee that the same thing won't happen again. In the past, given such circumstances, I have resorted to using very fine line attached to either the collars or leads of stays to pull them tighter to the mast, and tried to hide the means in the mass of other rigging. Cutting the line to re-attach rather depends on how much slack you have, I can't imagine that you would have sufficient to make re-attachment an easy option, or sufficient to make an authentic seizing or eye around the mast. Slack Backstays are not such an issue because the lanyards to the deadeyes can be re-rigged. I rather think there is no magic bullet to address this problem. B.E.
-
Nice result Don, a sweet little model B.E.
-
Fabulous work on the pumps Thomas, B.E.
-
Nice detailing Daniel, those Foc'sle rail sheaves are very necessary, so many lines to belay in that area. M.
-
Kleenex is an option because it can be split into layers and has better water retention properties than some tissues. However Silkspan is the best option, it can be obtained in different weights, and works well when painted with diluted pva. It makes realistic sails particularly at smaller scales. B.E.
-
Looking very smart Doug, nice contrasting colours on the hull, walnut looks great against the white hull and blue of the topsides. B.E.
-
You must be well satisfied Pat, a fine model The masthead pennant looks just right, and nicely arranged . Well done. B.E.
- 517 replies
-
- 4
-
-
- Endeavour
- Artesania Latina
- (and 1 more)
-
Fine looking build Doug, and she looks splendid in her case. Very well done B.E.
- 92 replies
-
- 1
-
-
- finished
- caldercraft
- (and 1 more)
-
Shrouds and ratlines look spot on to my eye now Christian B.E.
-
Neat work Andy, hull looks in fine fettle for the next stage B.E.
-
This project is so fascinating to follow Nils, wait impatiently for the next update. B.E.
- 2,625 replies
-
- 7
-
-
- kaiser wilhelm der grosse
- passenger steamer
- (and 1 more)
-
Love these snippets of information about life on the plains B.E.
- 467 replies
-
- 2
-
-
- fly
- victory models
- (and 1 more)
-
Our discussions regarding pennants has led me here Pat, don't know how I missed this one but what a treat to read your log, and what a fine model you have created. Your Ensigns look good to my eye, nice work. B.E.
- 517 replies
-
- 4
-
-
- Endeavour
- Artesania Latina
- (and 1 more)
-
Pennants Flown from Mastheads c1770
Blue Ensign replied to BANYAN's topic in Masting, rigging and sails
I'm a bit confused Pat, as far as the 18th century is concerned my understanding is that the 'commissioning ' pennant is raised at the start of a commission and is kept aloft for the duration of that commission. That pennant took the form of either a common pennant or one of the squadron colours. I am not aware of a separate pennant also being at the masthead, nor have I seen such an example in contemporary art of the period, I would be interested if evidence of this is available. Cheers, B.E. -
Pennants Flown from Mastheads c1770
Blue Ensign replied to BANYAN's topic in Masting, rigging and sails
Sorry, sloppy English, I was of course referring to the Common pennant, which is the subject of this discussion. B.E. -
Pennants Flown from Mastheads c1770
Blue Ensign replied to BANYAN's topic in Masting, rigging and sails
Hi Pat, Commissioning Pennants came into use around 1661 probably earlier and continued to 1850 (Flags at Sea) As for size, there were given proportions based on breadths of cloth at given widths used to make up the flag size. - see. (p87/88 flags at sea) As an experiment I took the given 6th rate breadth of 9" x the number for the largest Ensign (14) which gave me a depth at the hoist of 50mm (at 1:64 scale.) I then used the drawings in the book on page 20 to work out the length to breadth (fly to hoist)) ratio in percentage terms - 68.42% which gave a scale length of 85mm. So my Ensign had depth at the hoist of 50mm and length at the fly of 85mm. Same principal applied to the Jack drawing which gave me scale size of 30mm x 45mm For the Common Pennant I used the given figure of 16 yards which scaled to 230mm. The depth of the Pennant I estimated at 12mm which gave me 4mm for each of the three colours. The acid test is how they look on the model for size. The first important factor is how do they relate to the Ensign and Jack staffs. Here's a trial fit on my Pegasus, not too bad to my eye for an opening attempt. The jack could be a tad smaller I think in relation to the staff, but the Ensign looks close. The Pennant looks ok to me for length, maybe needs tweaking a tad in the hoist depth, but not much. (A tricky issue if trying to replicate the Common pennant.) Endeavour and Pegasus were close in size, so if you scale up for your build this may at least give you a starting point. When I get around to it I will make the flags out of tissue, but they will be draped rather than flying as I prefer the look. Hope this helps. ps: If you would like to contact Robin, you may get to him thro' his web site. http://www.robin-brooks.com/ Cheers, B.E.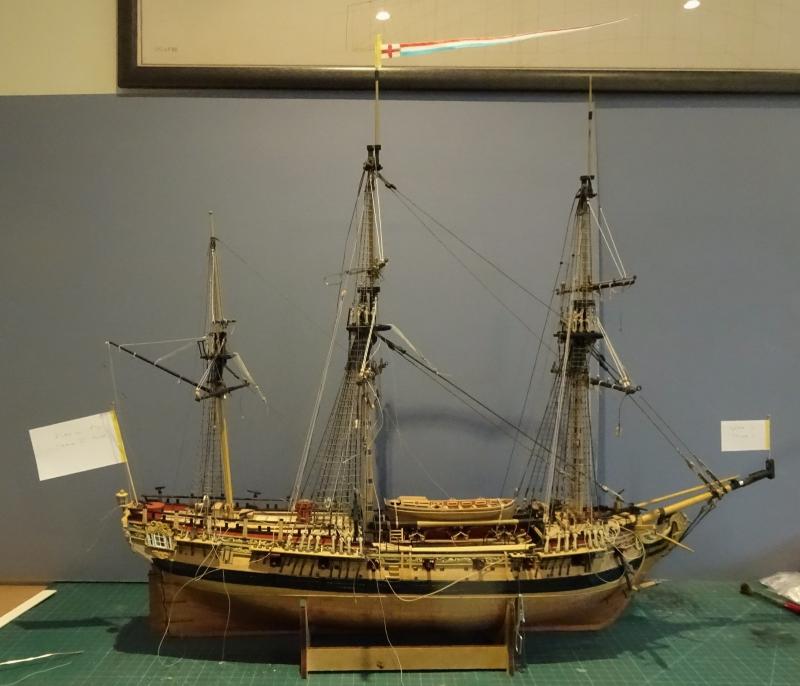
-
Nice work Martin, neat job on those stanchion sheaves and I love the belfry. Great view from your window, looks just like an English woodland scene I am so familiar with. Ps: Where is the rolling prairie and corn as high as an elephants eye B.E.
- 467 replies
-
- 1
-
-
- fly
- victory models
- (and 1 more)
-
Pennants Flown from Mastheads c1770
Blue Ensign replied to BANYAN's topic in Masting, rigging and sails
Hi Pat, One of my main reference sources for flags useage is Flags at Sea by Timothy Wilson, well worth getting if you don't already have it. The Common or Union Pennant was apparently a feature of an independent command, so may well have been worn by Endeavour. The Main masthead was the usual place, and it was kept flying at all times, unless struck on the raising of a command flag or a broad pennant. (not applicable in the case of Endeavour.) On a bare stick model I would certainly add the Jack, Ensign, and Pennant at the Main, but Pennants at the Fore and Mizen are less clear to me. There is a reference in the book to the wearing of Vanes (short blunt pennants) at empty mastheads, and many contemporary paintings show shorter Pennants at the Fore and Mizen, usually red in colour. (Charles Brooking / Nicholas Pocock) There is also mention of Vanes being of squadron colours, and sometimes of different colours to identify a specific ship. All a bit of a fog I'm afraid, and a quick check of contemporary paintings of Endeavour lack detail in this area, -isn't it always the case. I don't think anyone would gainsay you if you had the Common Pennant at the Main, and in the absence of any specific evidence, smaller Red Vanes at the Fore and Mizen, if you choose to do so. Regards, B.E. -
Pennants Flown from Mastheads c1770
Blue Ensign replied to BANYAN's topic in Masting, rigging and sails
Hi Pat, I rather think that the Commissioning Pennant would have been worn at the Main Masthead. As the Endeavour was on a scientific expedition under the auspices of the Admiralty I would think she would have sailed under the Red Ensign and worn a pennant of that squadron colour. As an alternative she could I suppose have worn the Union Pennant at the masthead. I have read that for sixth rates, (smallest rate I have information on) a pennant of some 16 yards in length was authorised for early in the 19th c; would probably have been somewhat longer in the 18th c. Ensign sizes on models are always a little tricky, and trials with paper templates are necessary to suit both the model and your eye. Cheers, B.E.
