
.JPG.ca33079f5815b861e67b9c2cccd37982.JPG)

Blue Ensign
-
Posts
4,286 -
Joined
-
Last visited
Content Type
Profiles
Forums
Gallery
Events
Posts posted by Blue Ensign
-
-
Not sure enjoyment is the right word Glenn, but there is a satisfaction to be had from a nicely completed set of guns.
A bit of overkill with Indy where there are 40 of the beggars to assemble, of which 28 are long guns. There is a lot of work in doing the guns properly - char cleaning, assembly, painting, blackening and adding ironwork, weathering the barrels, rectifying flaws, ........
How would it look without guns I wonder😉
I'm starting with the long guns, and hope to basic assemble four or five per day.
Five already done, Twenty-one to go.🙄
onwards...
B.E.
- hollowneck, AJohnson, Thukydides and 9 others
-
 12
12
-
Your ingenuity knows no bounds Nils, and I just love the look of the painted hull, such realism.
Regards,
B.E.
- Keith Black, Canute, mtaylor and 1 other
-
4
-
-
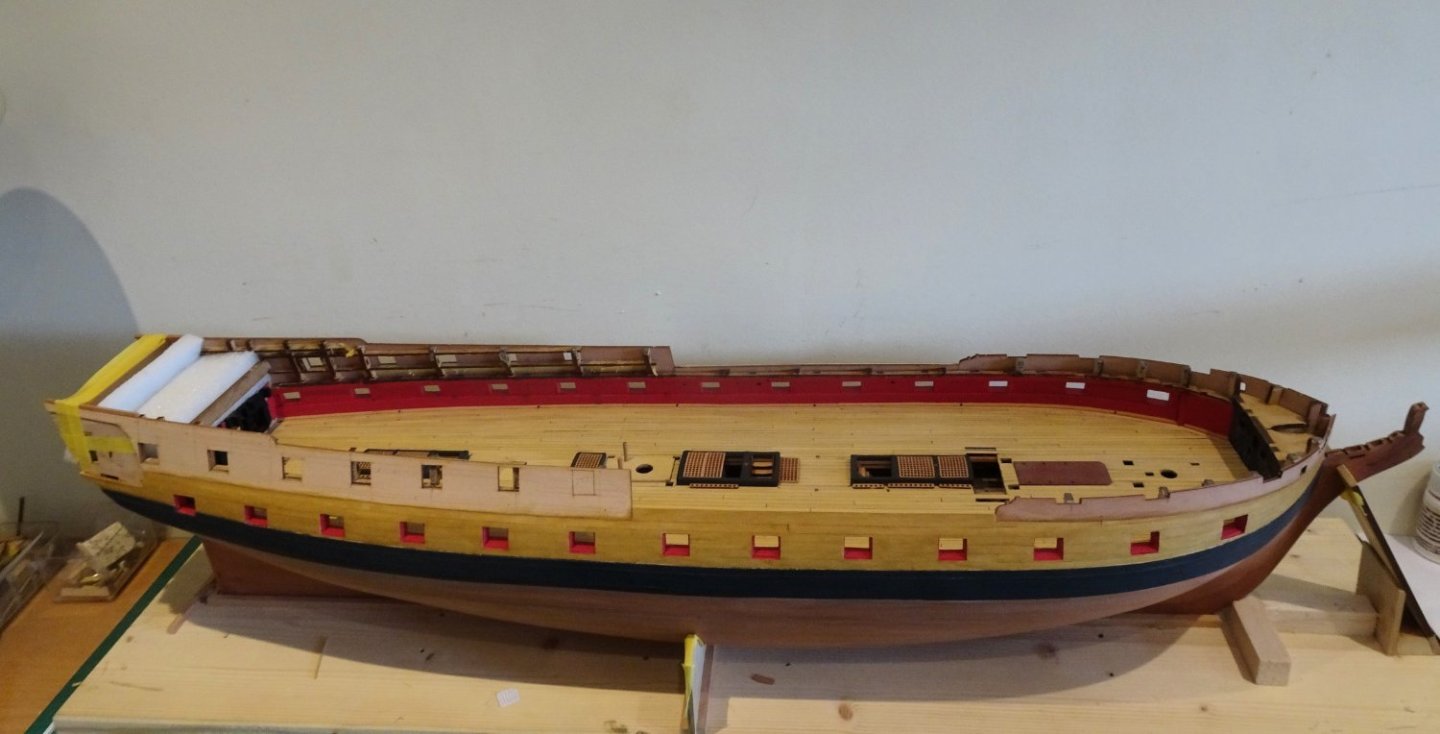
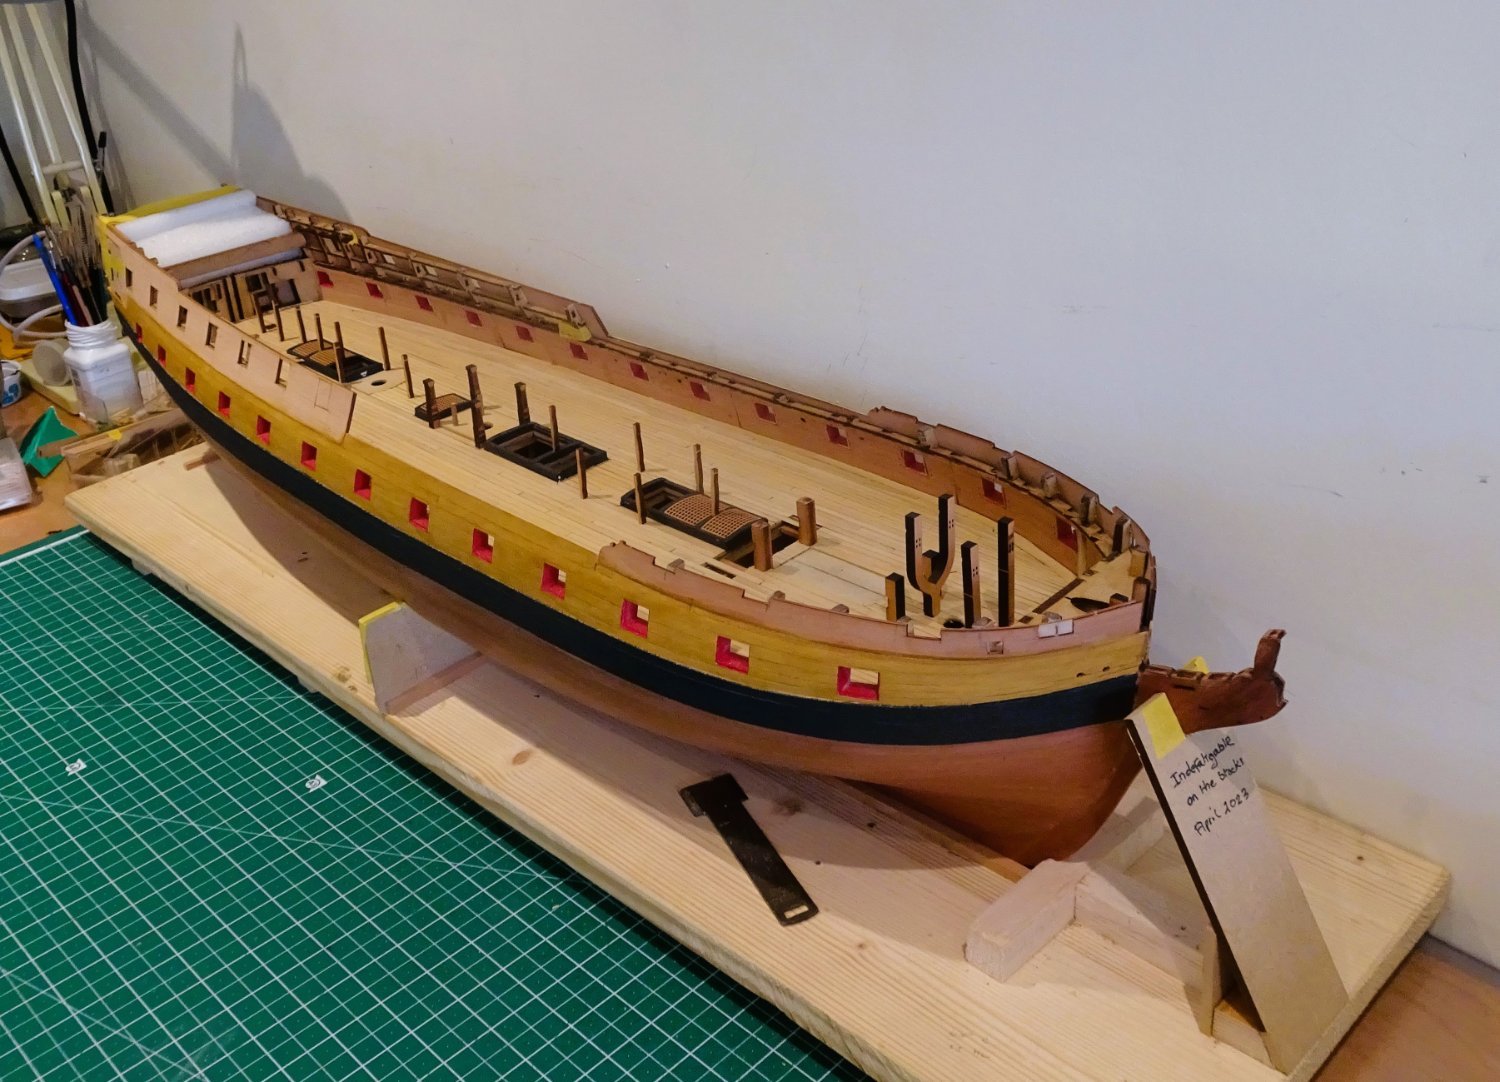
Post Sixty-one
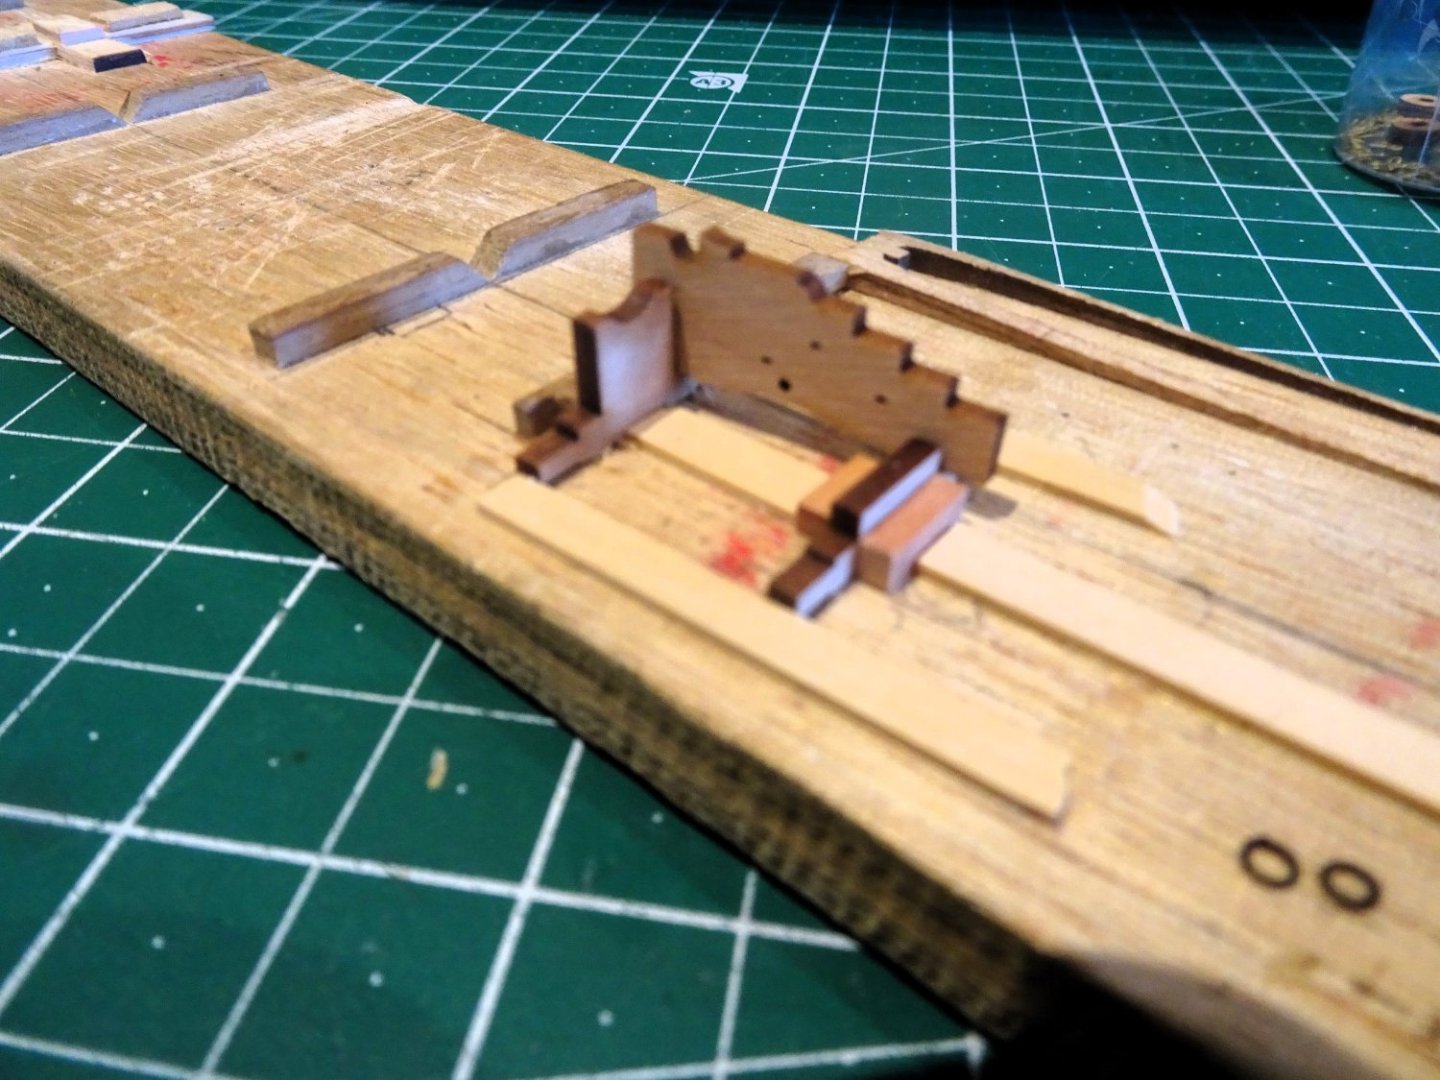
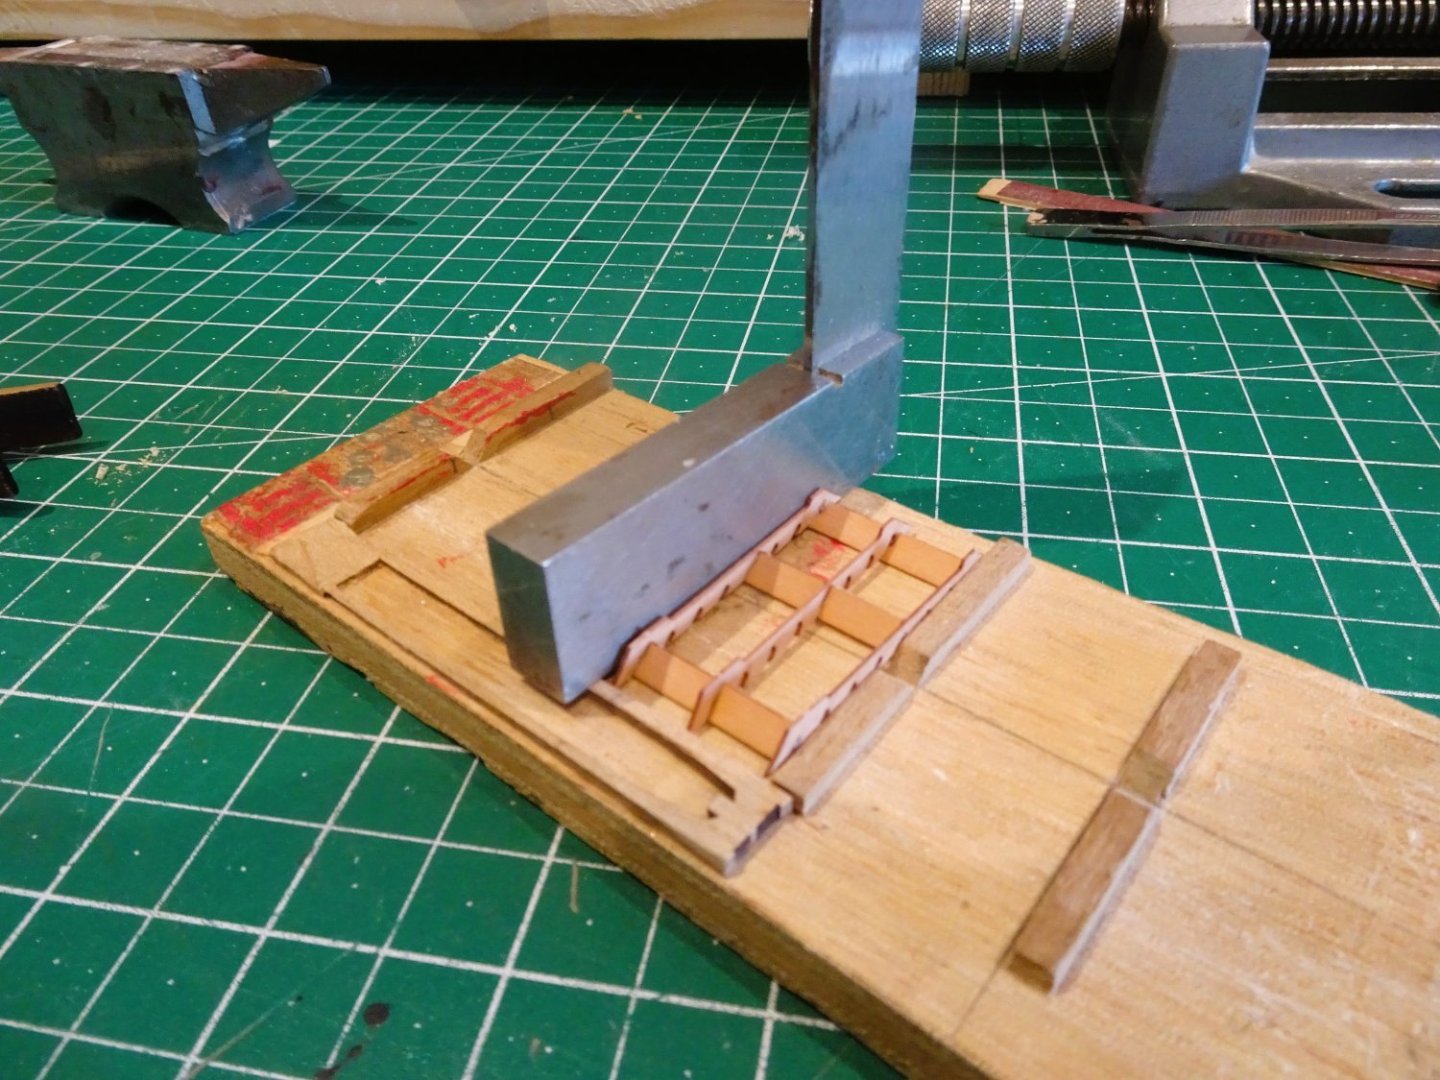
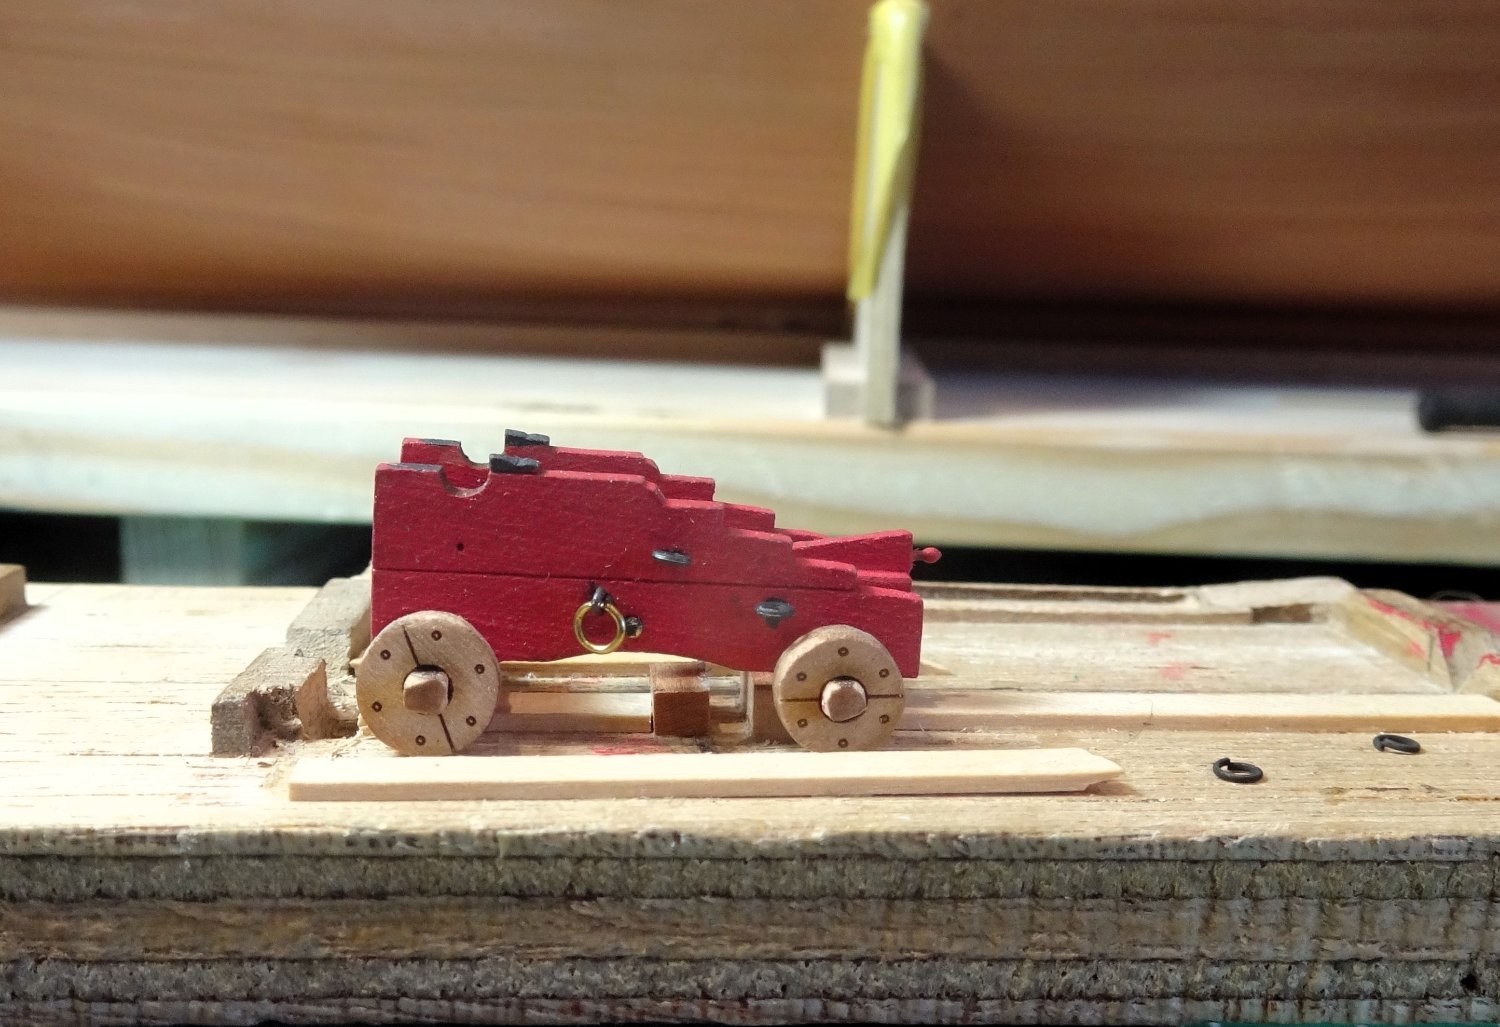
Looking at the guns - Part One
The carriages are laser cut from 2mm pear and are nicely detailed, incorporating the bracket lines.
Part of the design includes a tab at the front end to slot into a mortise in the deck to hold the carriage in place. (The guns are added later)
The system should go a long way towards preventing the rattle of loose guns rolling around the lower decks in places they can’t be retrieved.
The drawback of this system is that cap squares are of necessity omitted as the guns are fed thro’ the ports to be glued into place.
Not much of a loss where the decks are to be closed in, and better than loose cannon.

1687
My first job is to make a simple jig to hold the parts that make up the carriages which consist of four separate pieces for the main structure.
1688
1689
A jig speeds up assembly, and there are a lot to assemble.
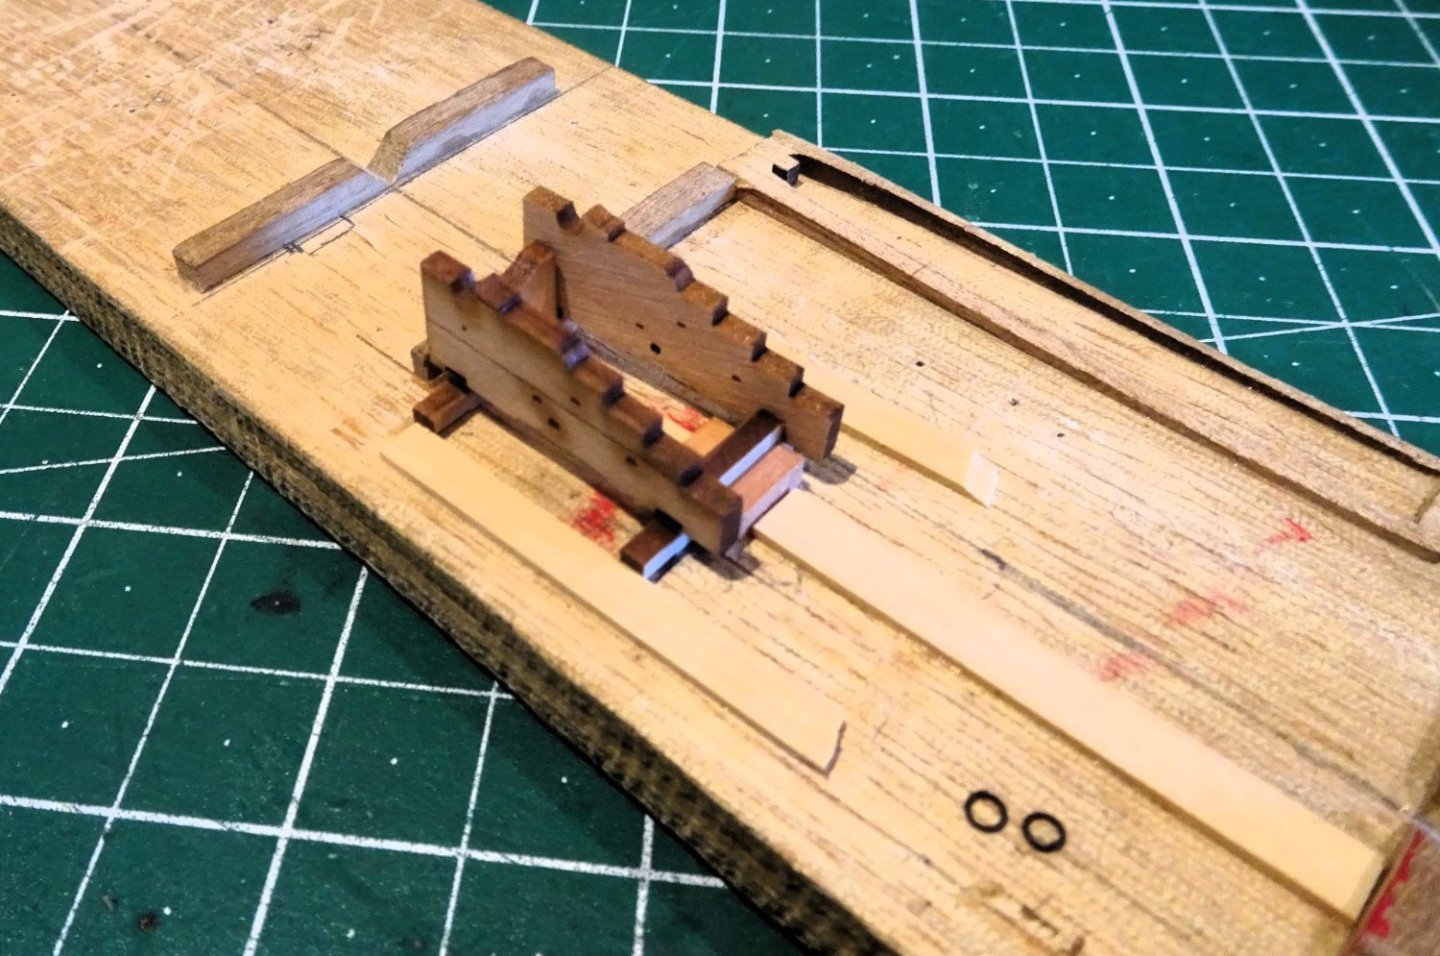
There is the usual issue of square axles fitting round holes on the trucks. The merest pass with a sanding stick is required to knock the corners off the axles to allow fitment of the trucks. It is a fine line between fit and the square peg in a round hole image.
1691
It is impossible to get a proper fit to the truck with undersized square axles, as the above photo shows.
Ideally the axles should be slightly over size to allow for accurate rounding. I suppose they could be shimmed, but that’s a lot of extra work.
On a practical note, this deficiency will not stand out once the guns are fitted.
The trucks are a miniature delight complete with engraved bolt holes and section joints. There is enough room on the axles for the addition of truck keys for über detailers.
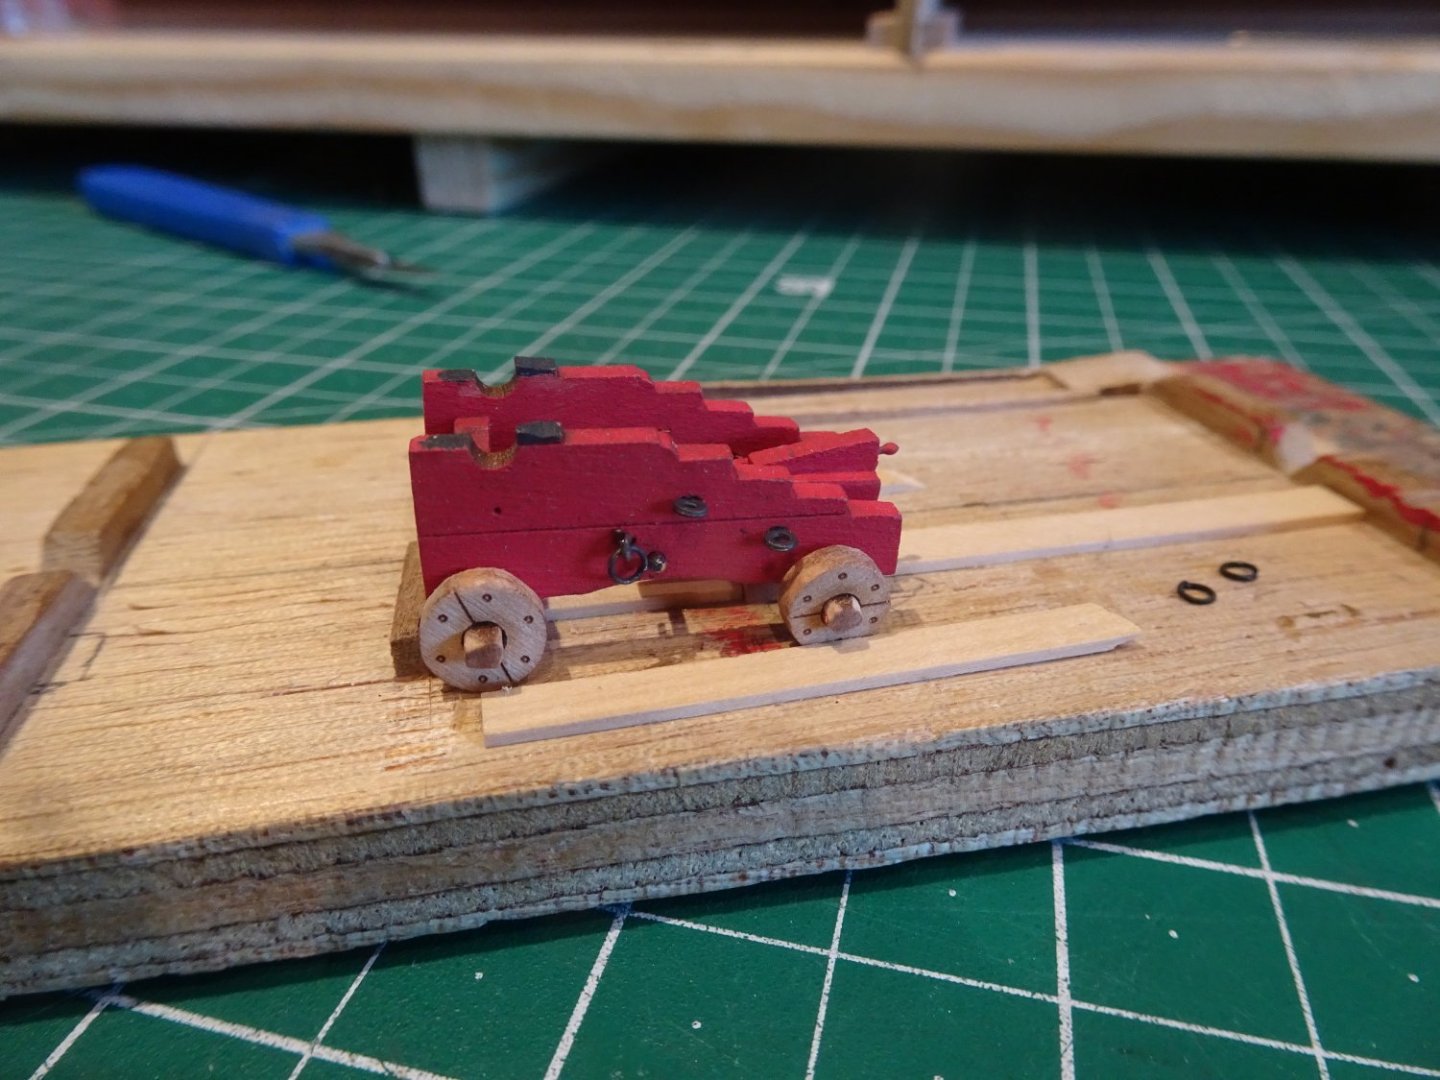
As with previous kits I am not generally keen on the supplied eyebolts that represent the hoops on the carriages sides that take the tackle hooks, but with this chunky 24 pdr carriage, they don’t look too bad.
I did feel it necessary to modify the one fitting to a ring bolt to take the breeching rope.

1697
In this shot the yet to be blackened ringbolt has replaced one of the supplied eyebolts.
The sharp eyed may also notice the handle added to the Quoin.
This is simply a short length of wire with a blob of pva on the end.
I won’t be using the peg and slot system for gun securing as access to all decks will be available on my build.
The tab did prove useful to hold the carriages during painting, and scored each side it snaps cleanly away when finished.
In part two I will be looking at the Resin gun barrels.
B.E.
10/08/2023
-
-
-
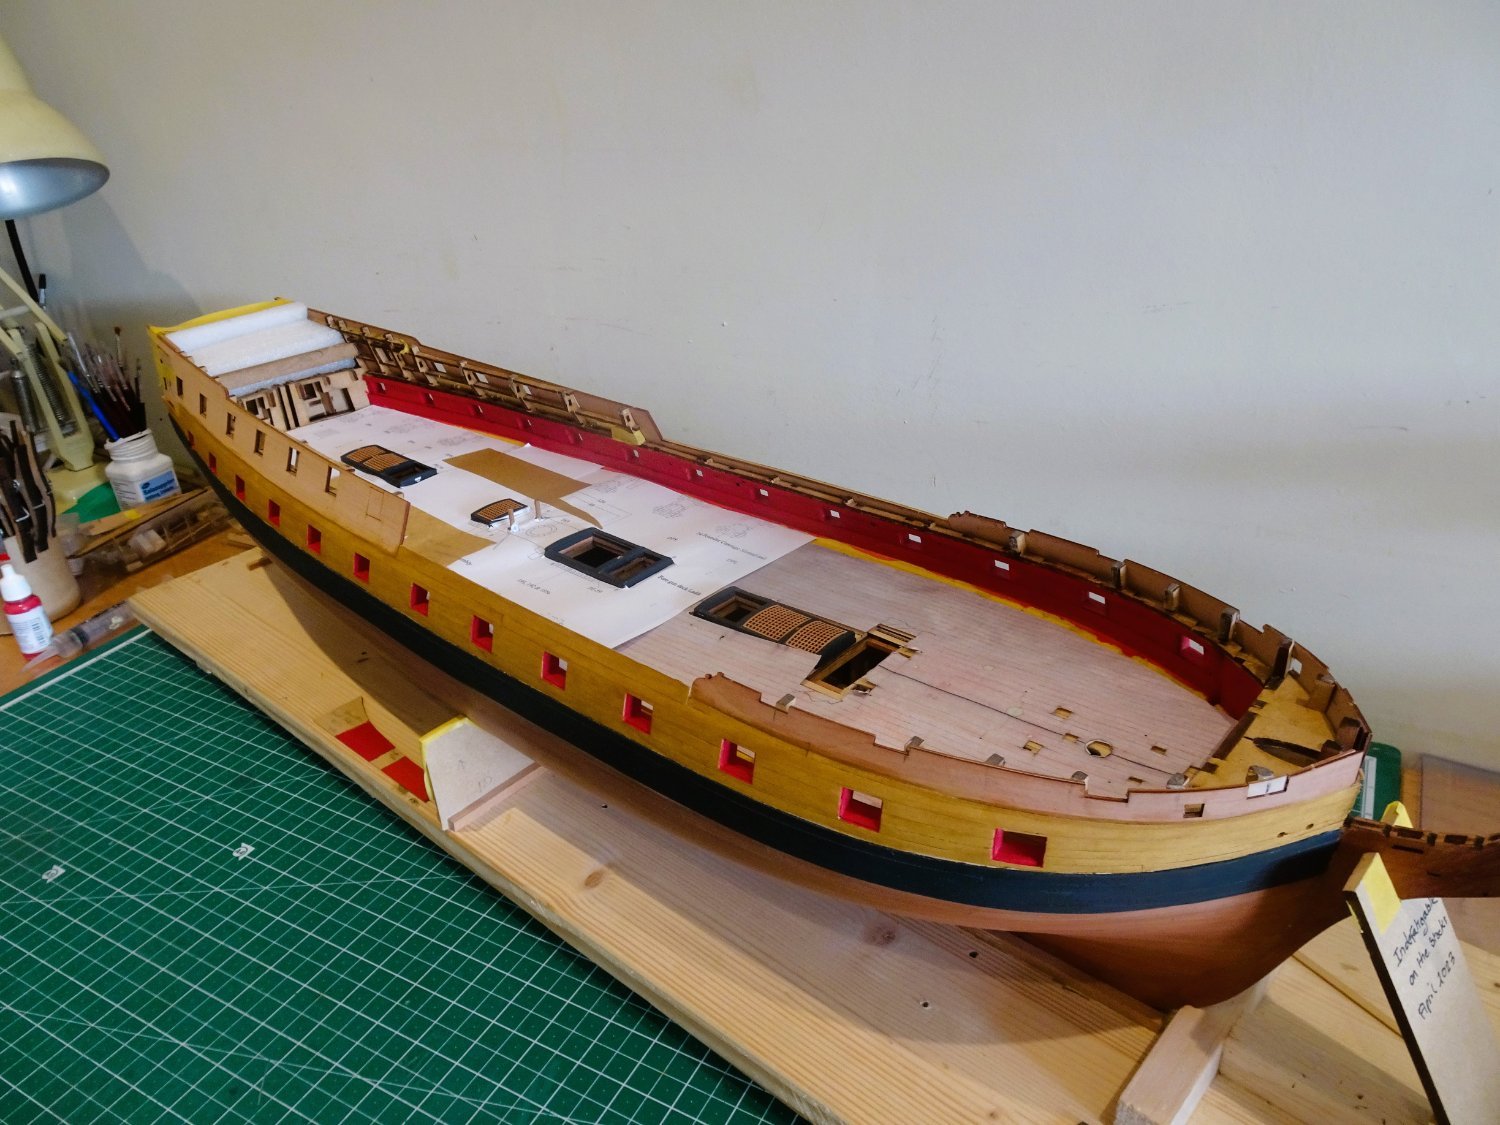
Well, thank you Gentlemen, with such advice from my fellow modellers, including Chris who designed and supplied the makings, I feel I must accept.
Mrs W has also added her vote for an unadorned hull.
So, the hull will be left au naturel.
Thanks again for helping me to resolve this issue, the decision to copper is a lot easier to make when the eye is less than satisfied with the planking.
I still quite like the coppered look and there are good examples of 'Indy' builds using both tape and plate to inform any decision, but as has been said, a plain hull perhaps better suits a Navy Board style.
As it happens the colour of the Pearwood is very close to that of a tarnished copper penny.
I will invert the hull to apply a final coat of w-o-p, and then get on with it.
Cheers,
B.E.
-
I’m so in tune with that aesthetic Chris, 17th/18th c is my favourite period.
Love your idea of a Royal George.
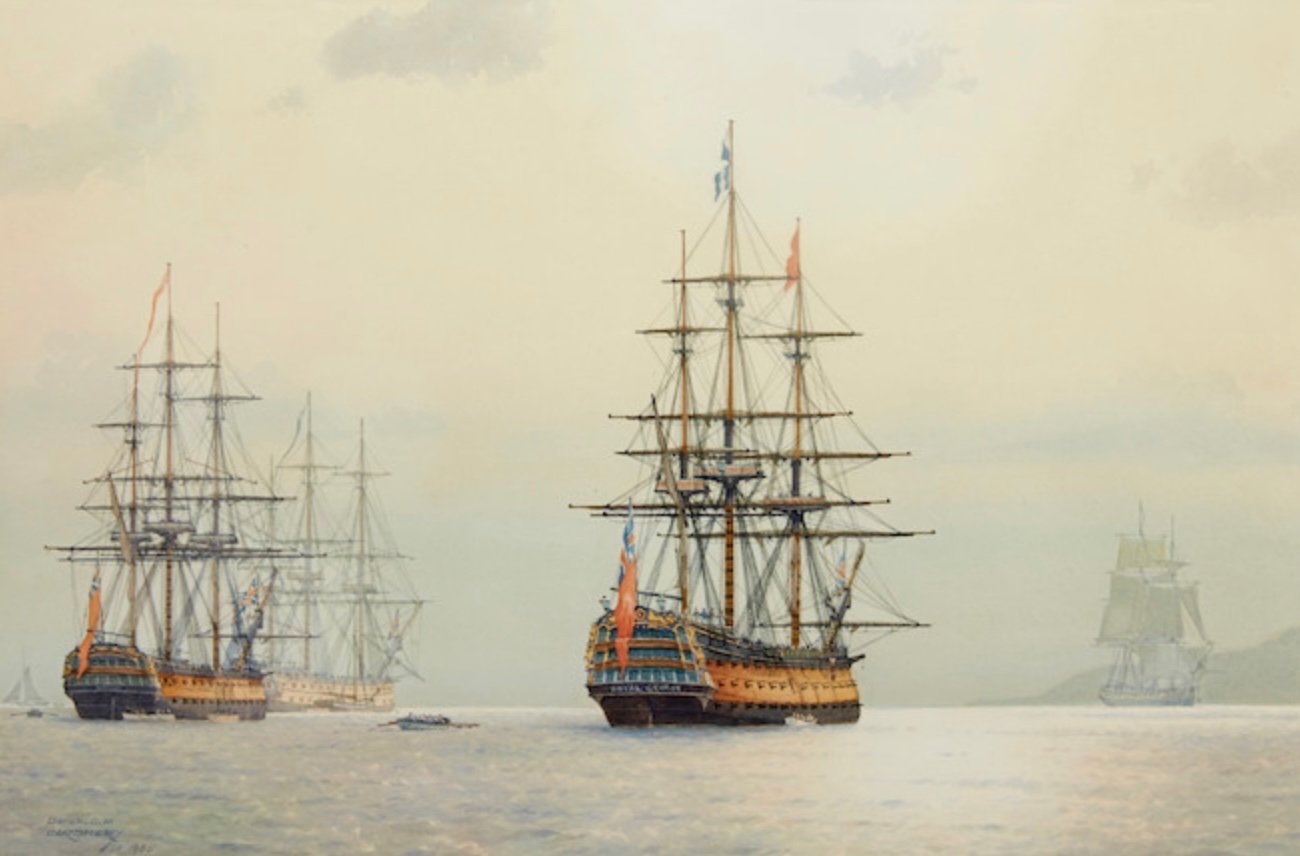
One of my most cherished watercolour prints by Derek Gardner, a great subject for a model.B.E.
-
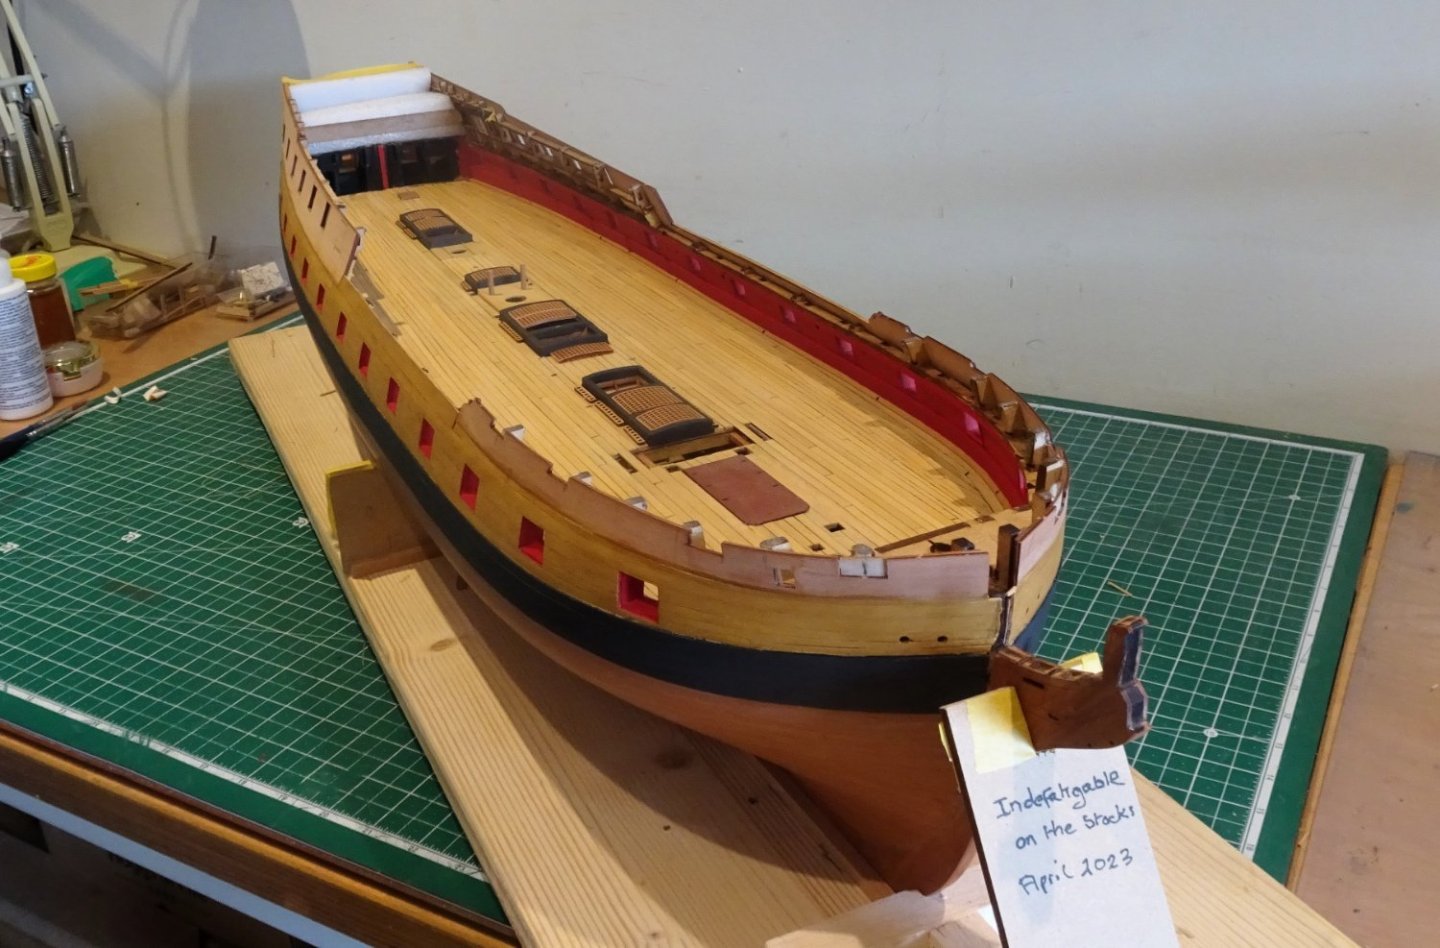
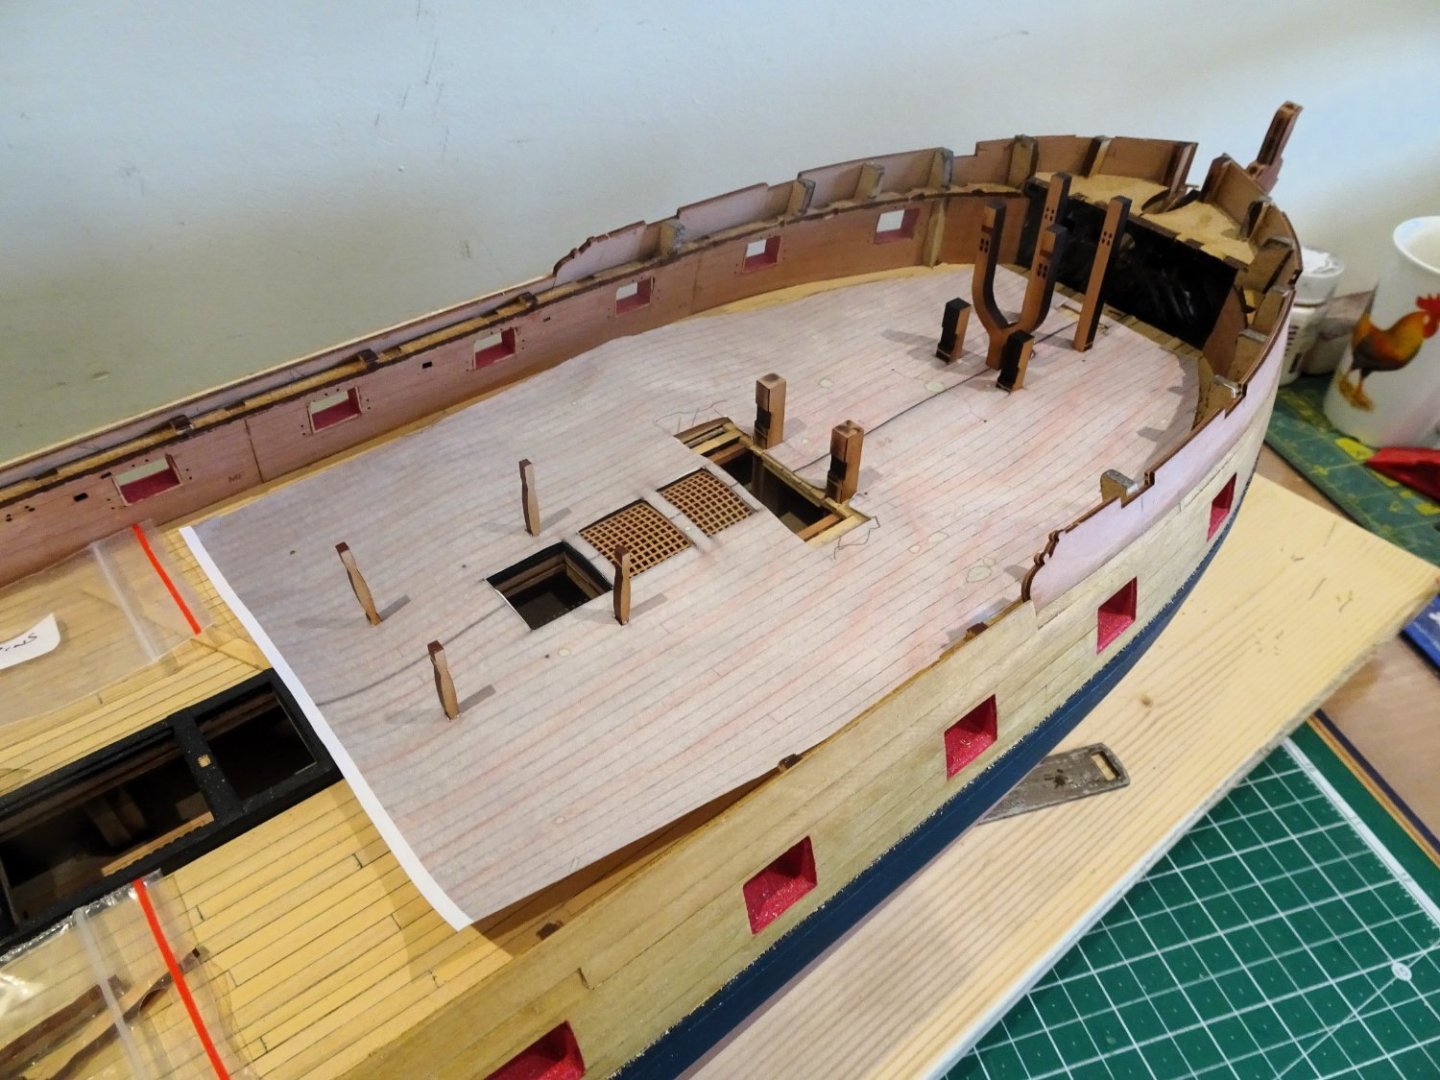
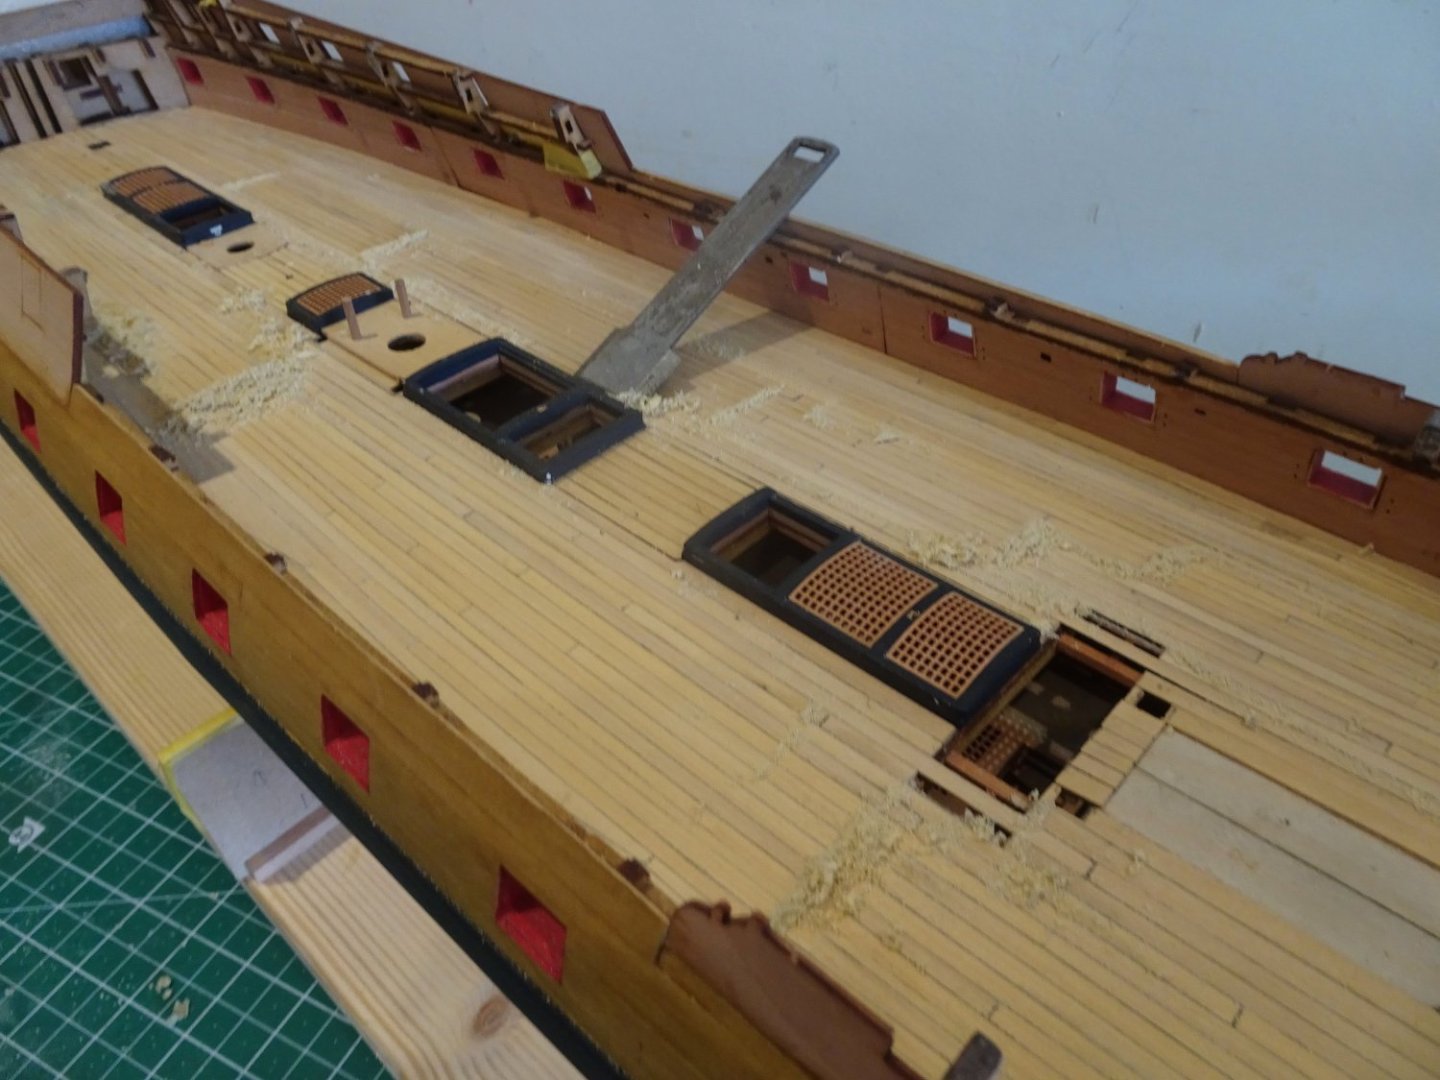
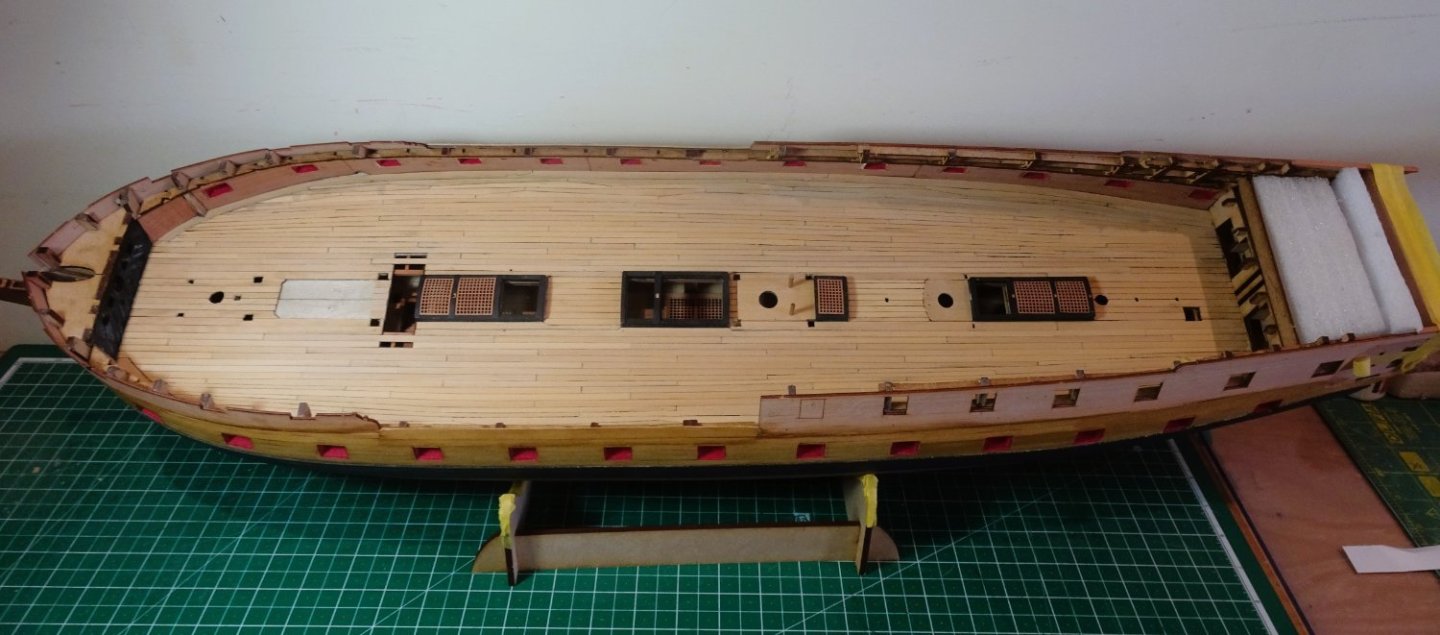
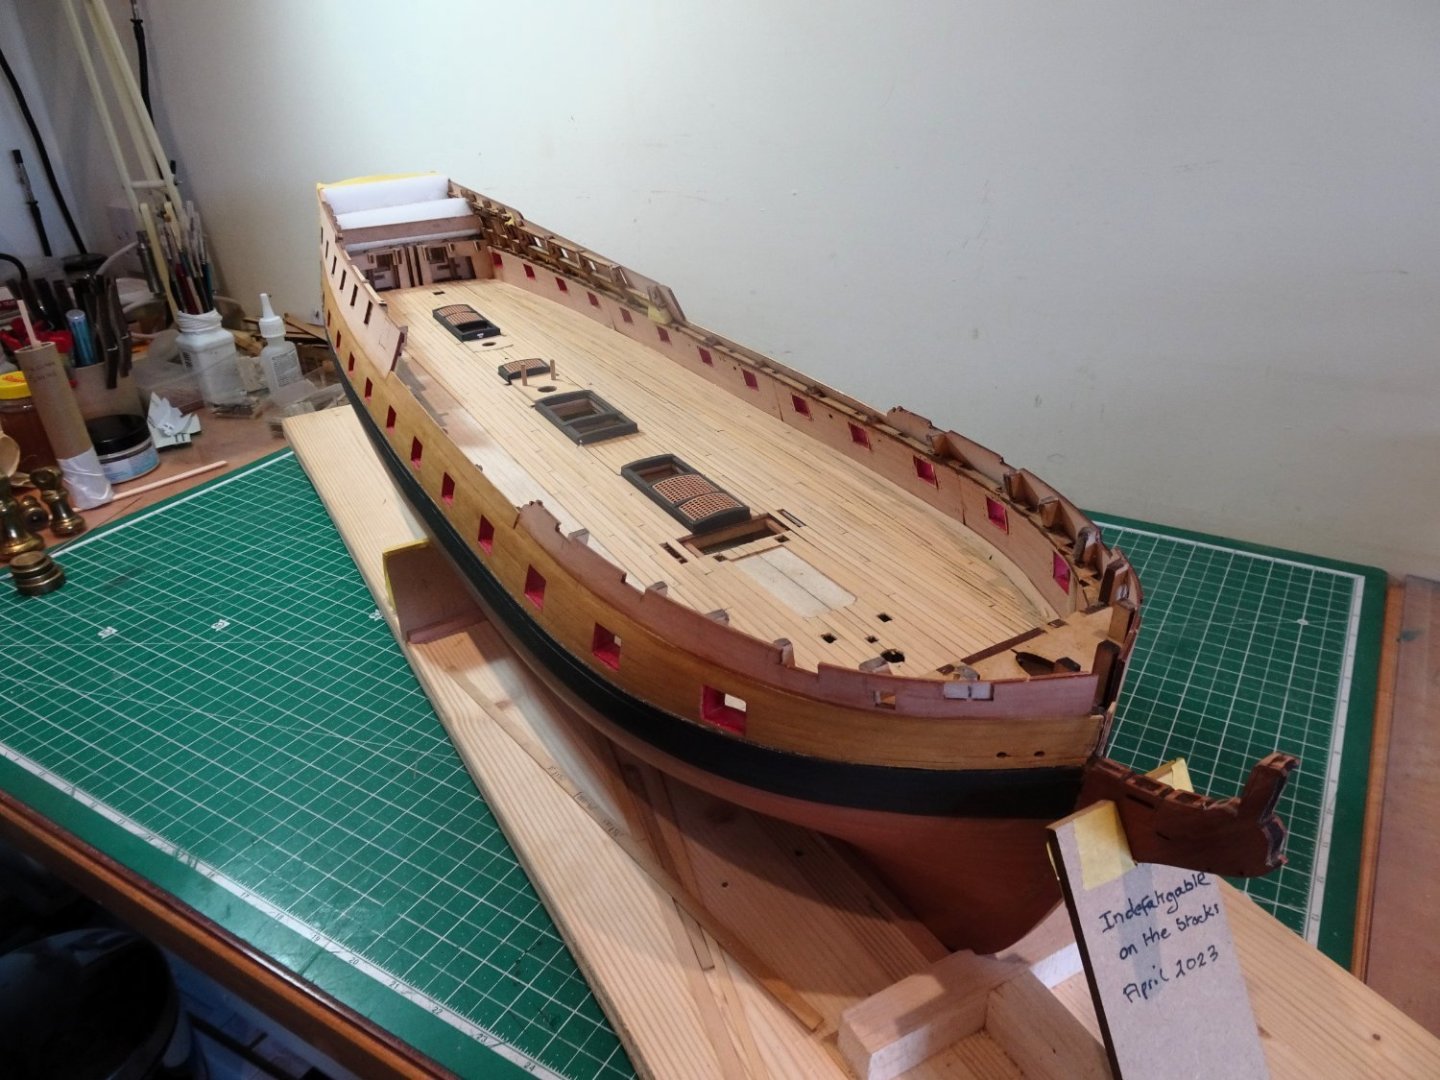
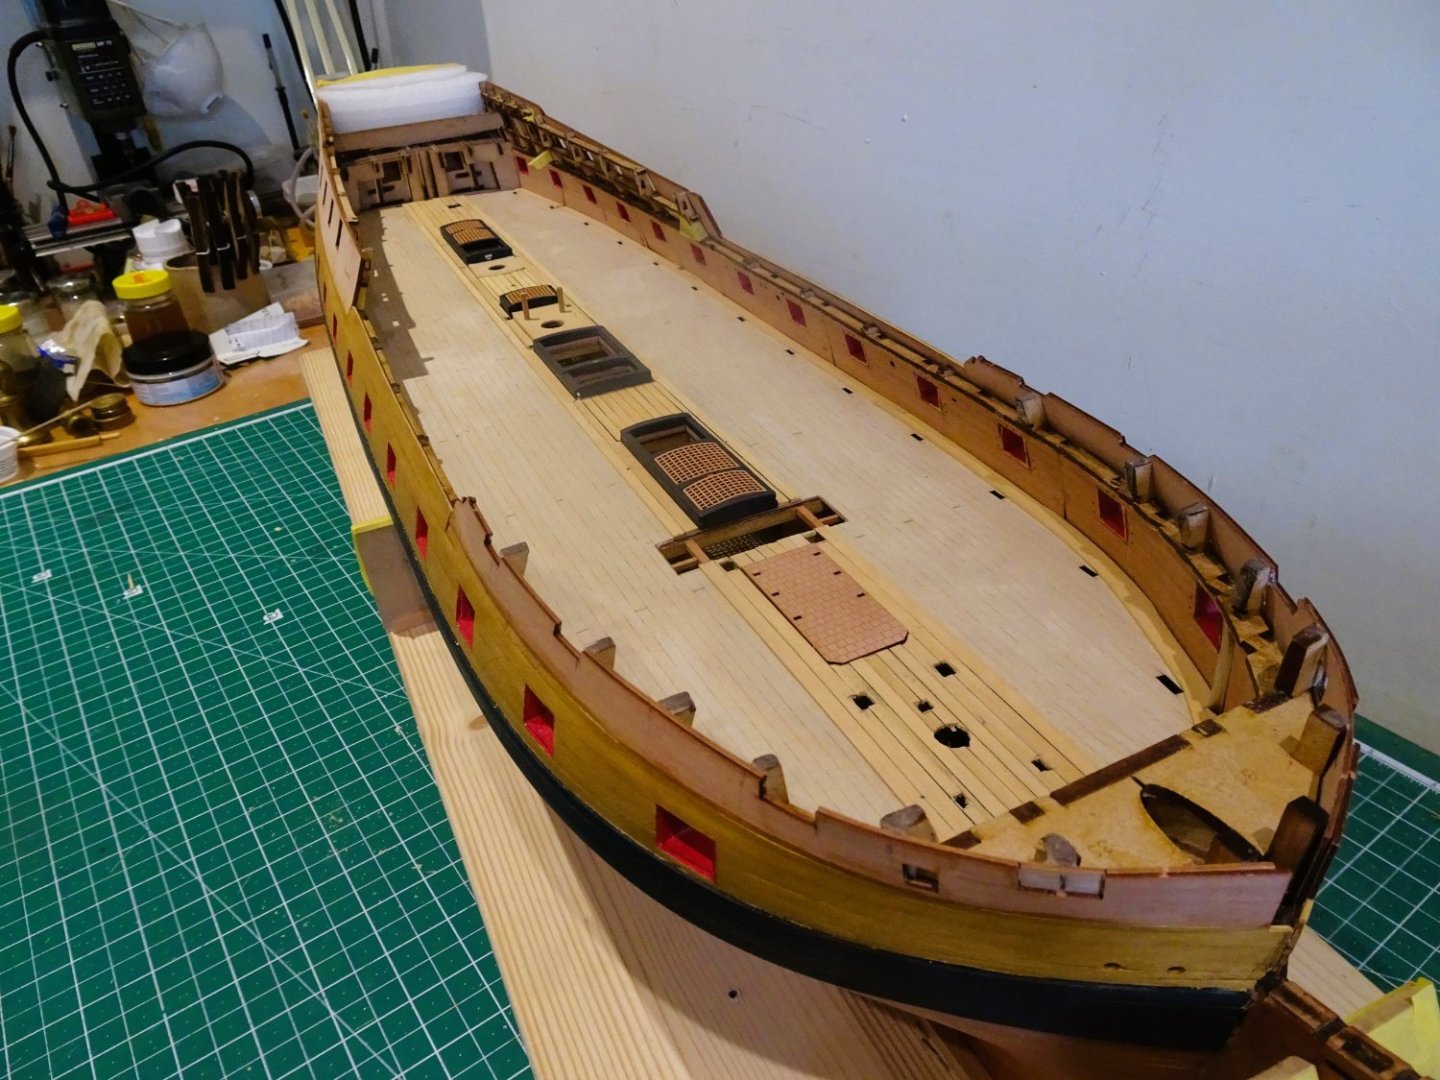
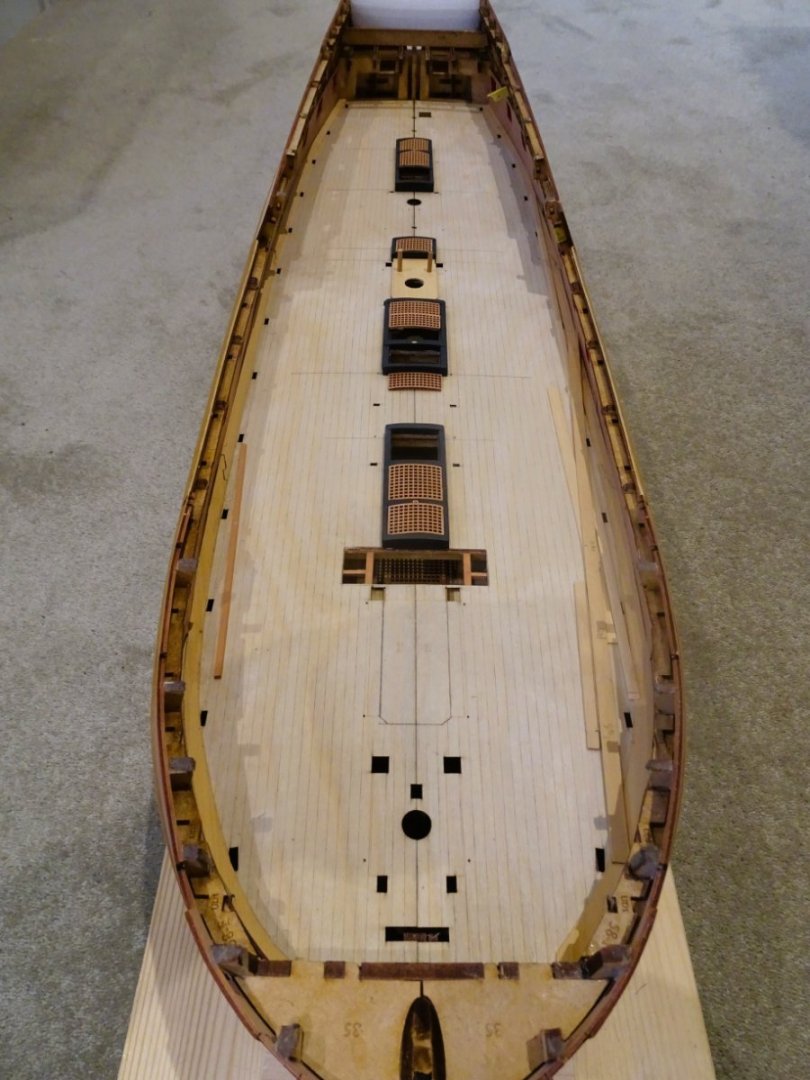
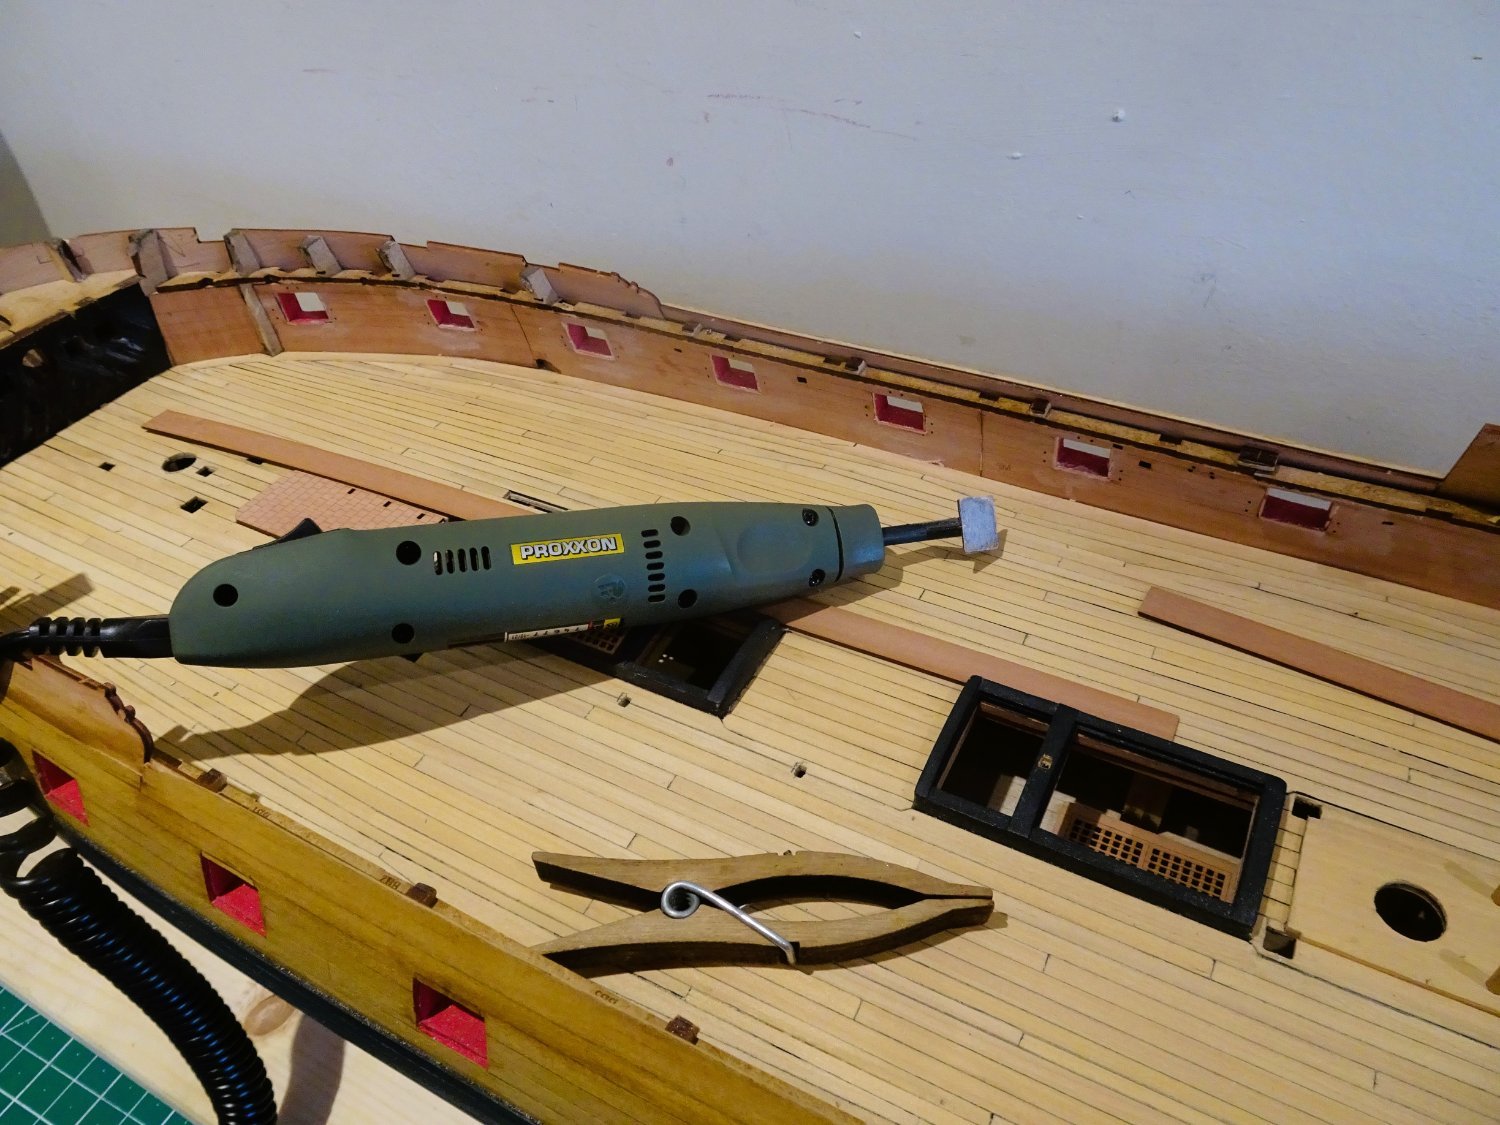
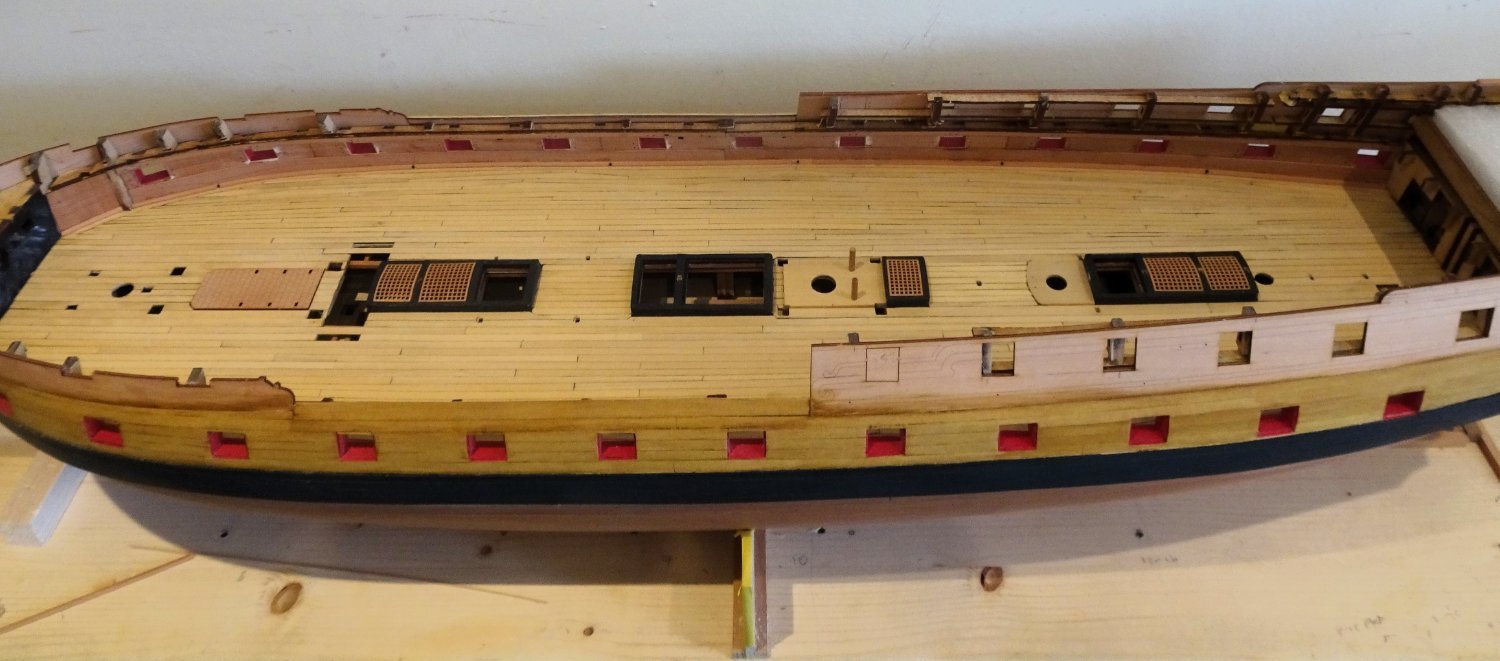
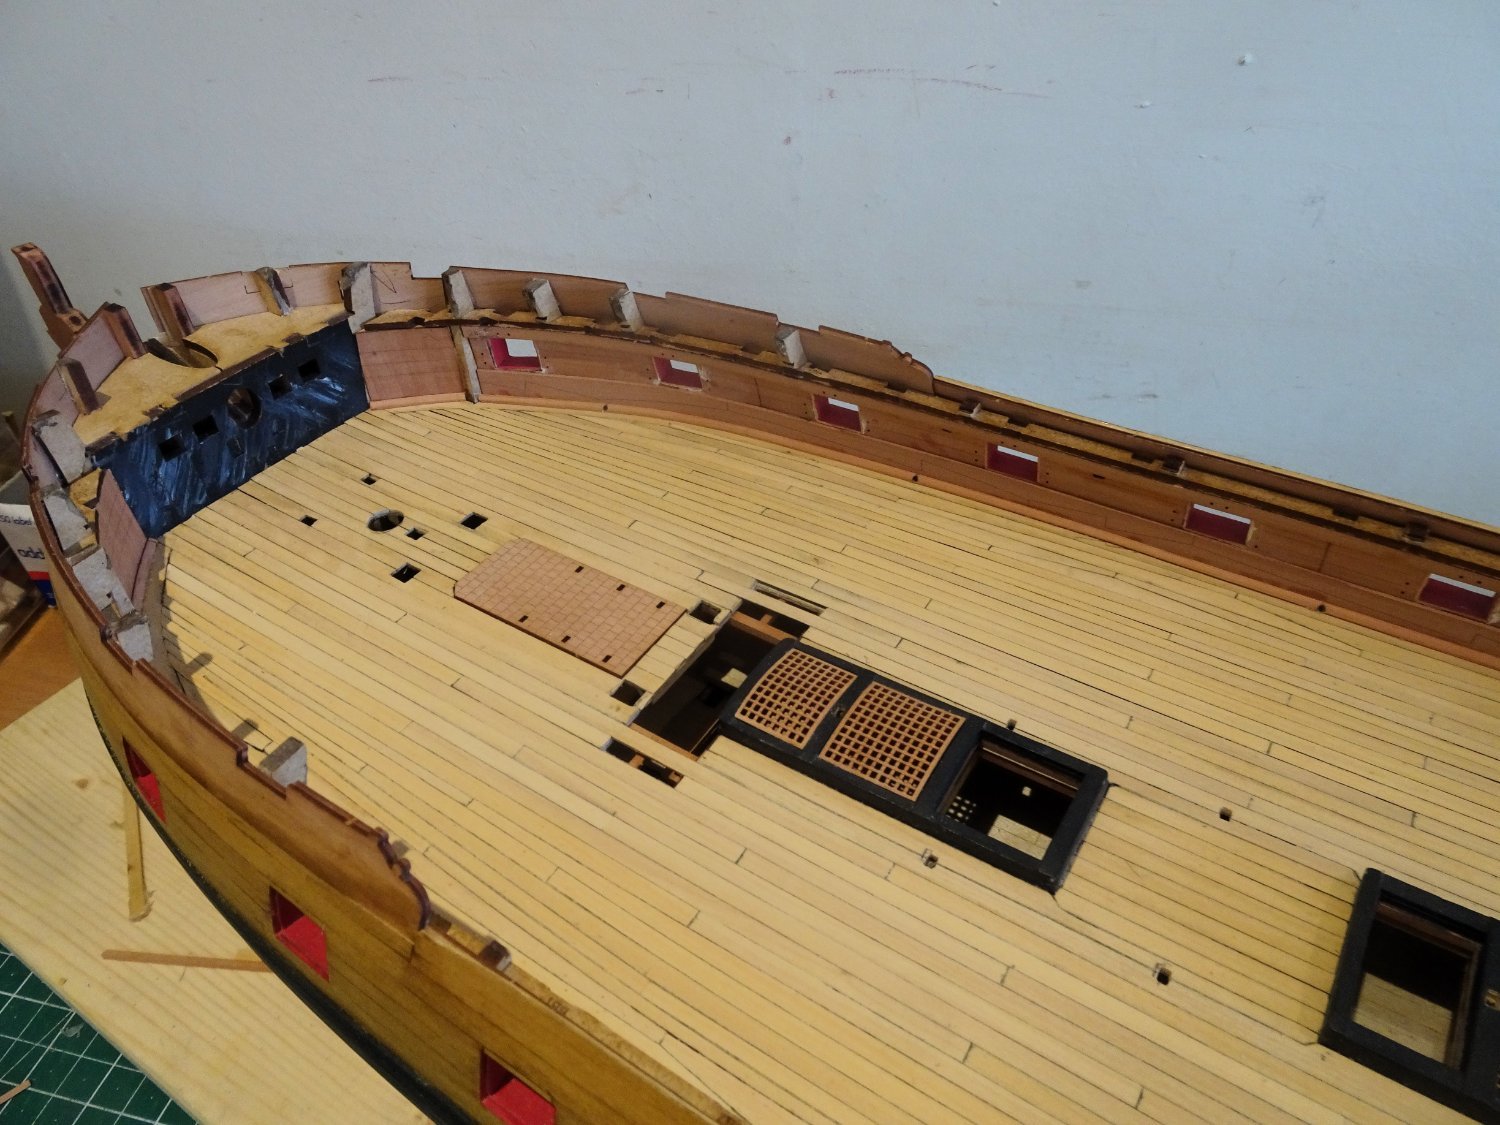
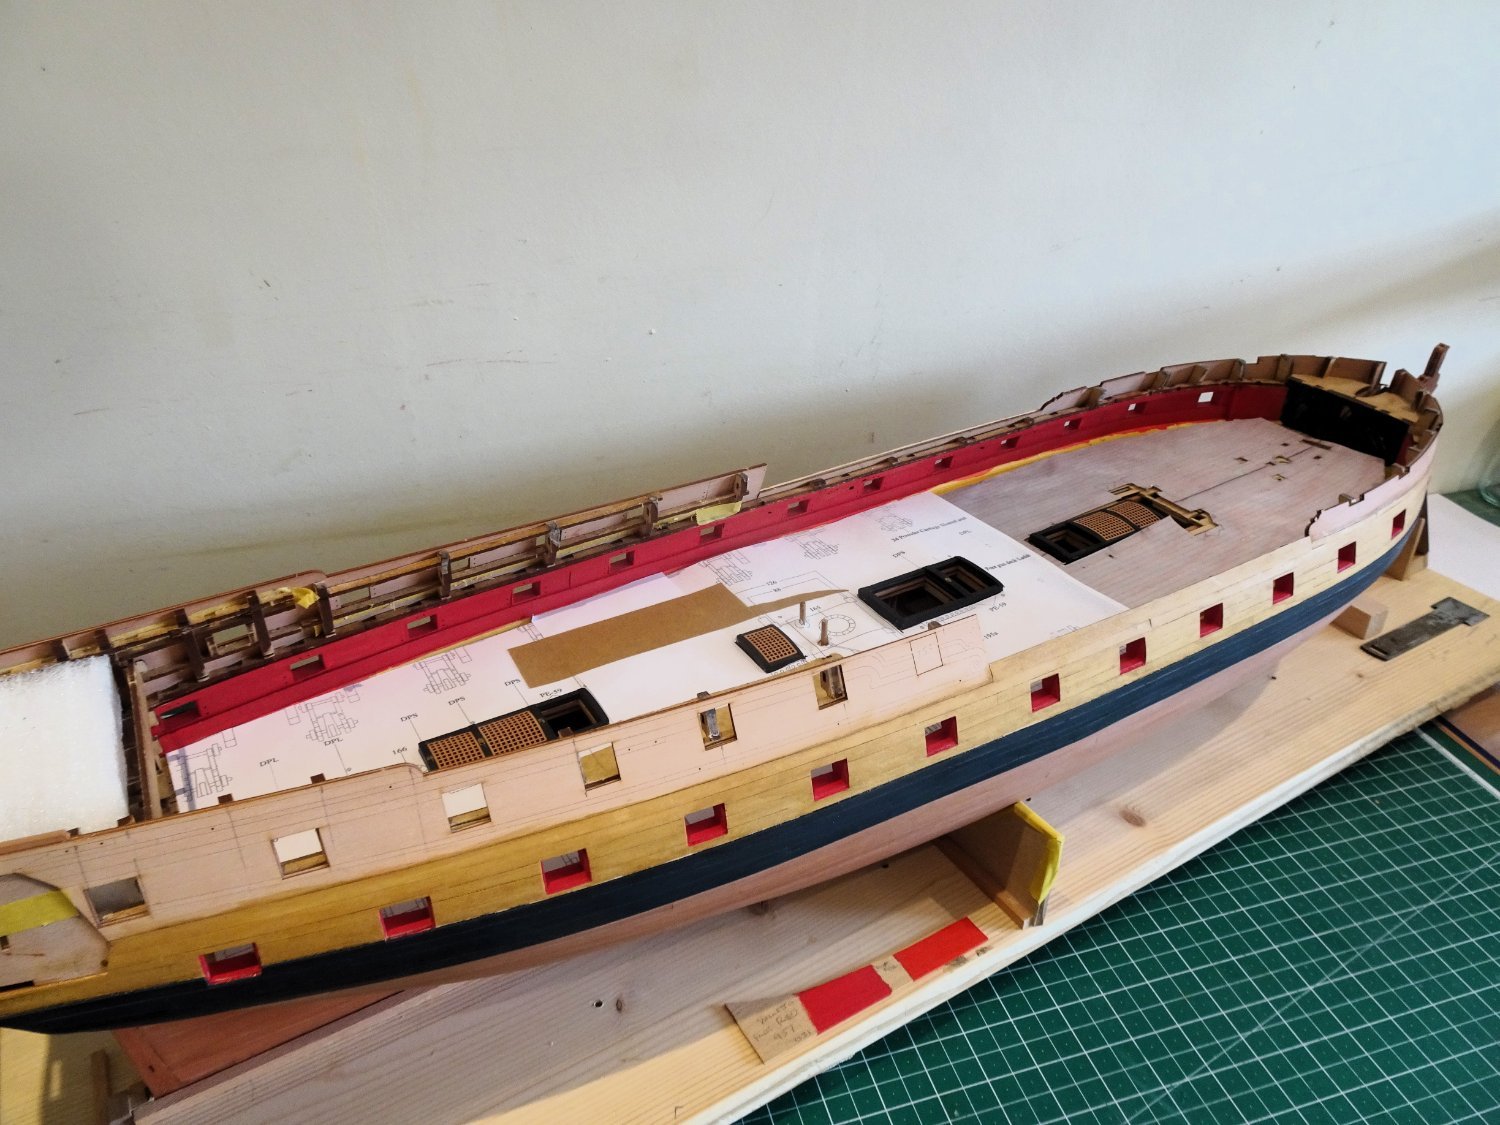
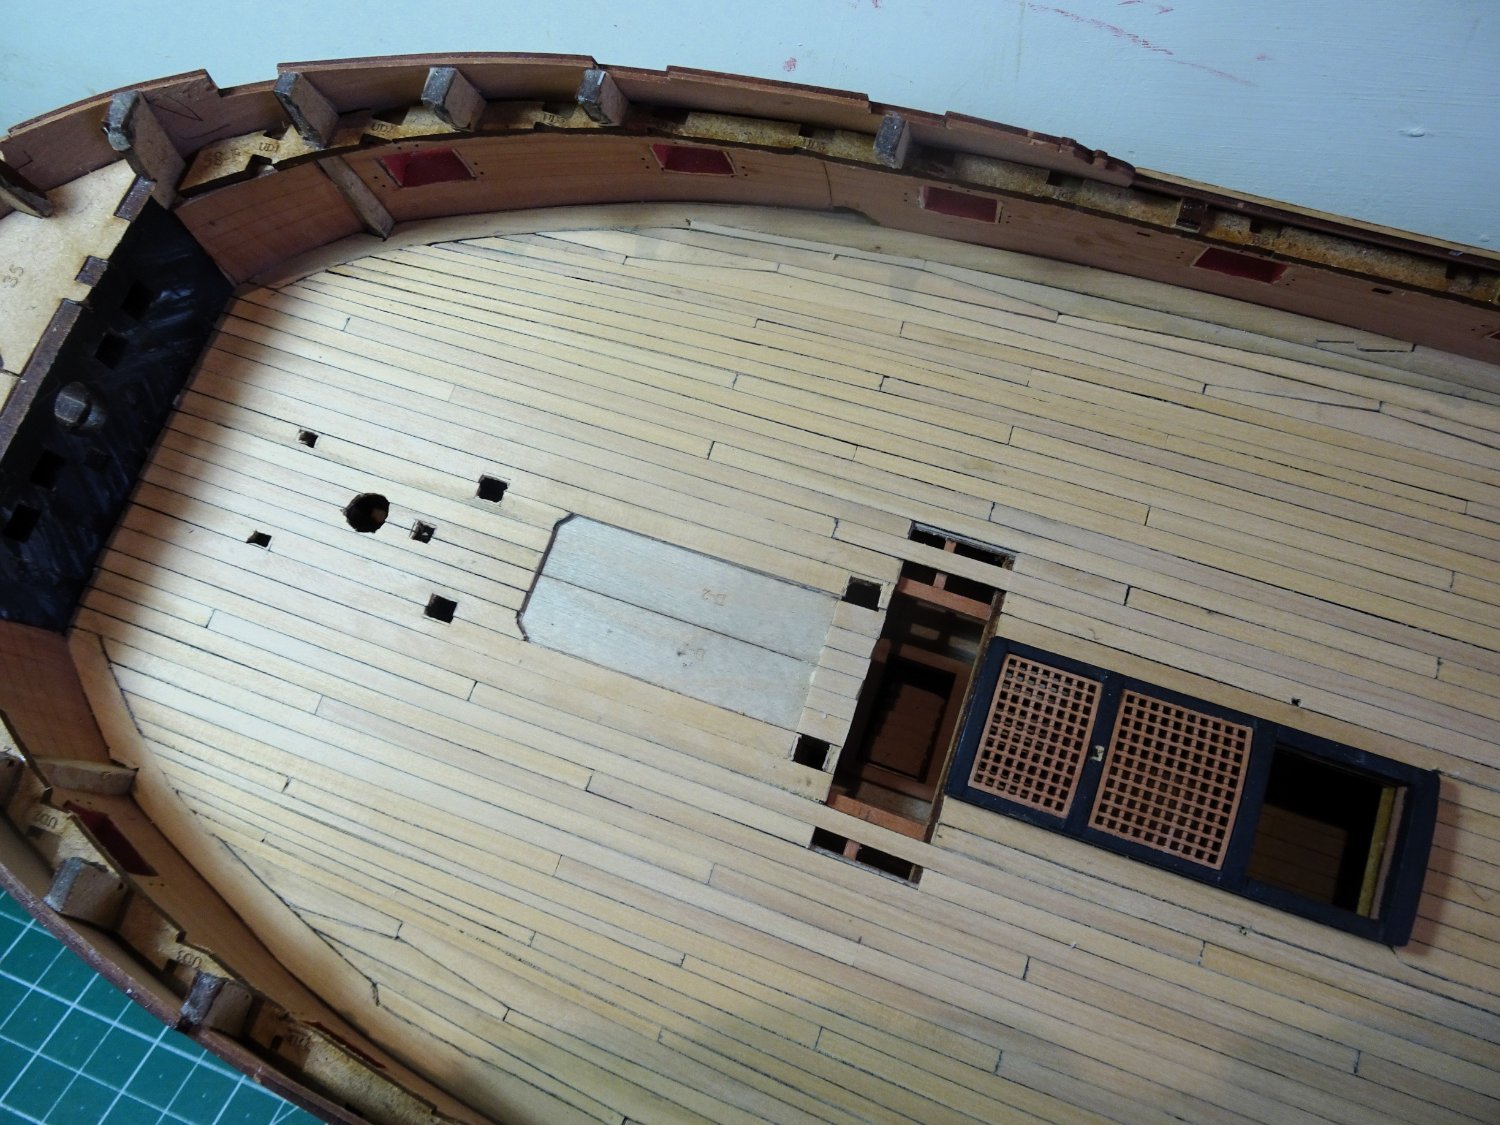
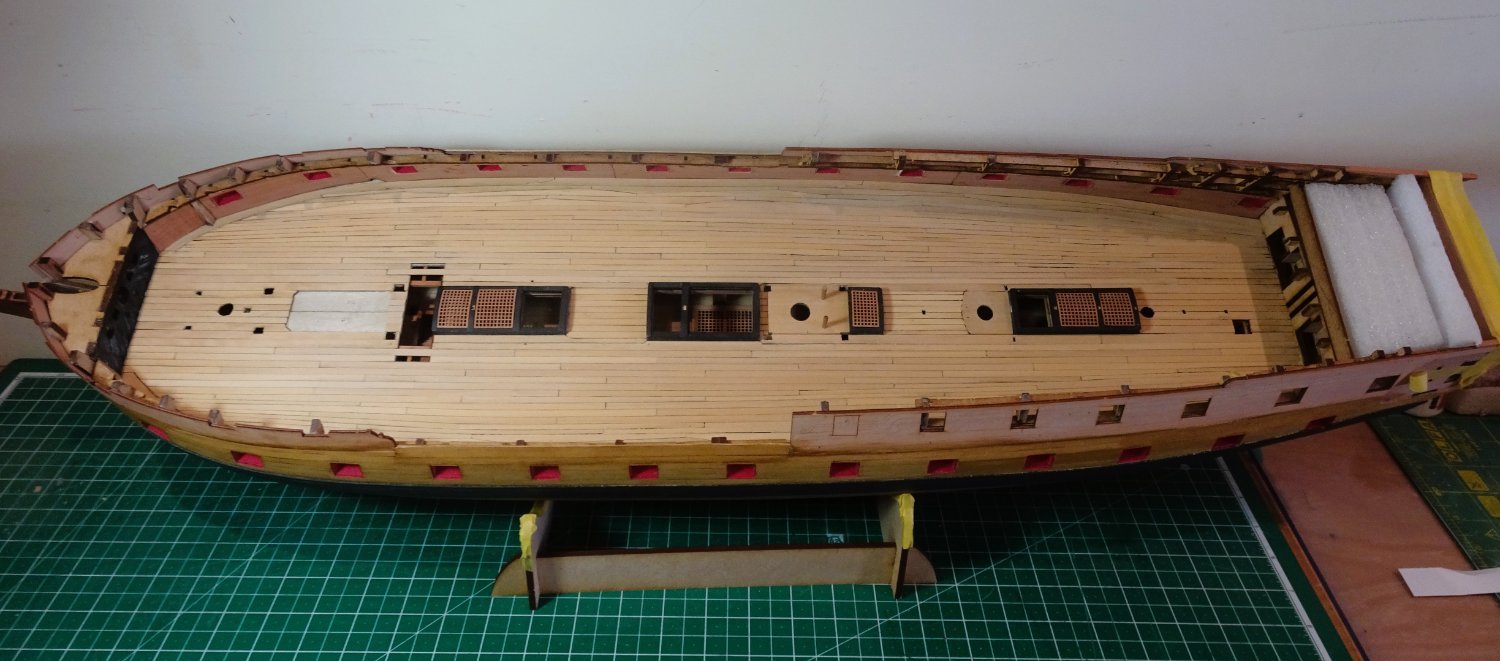
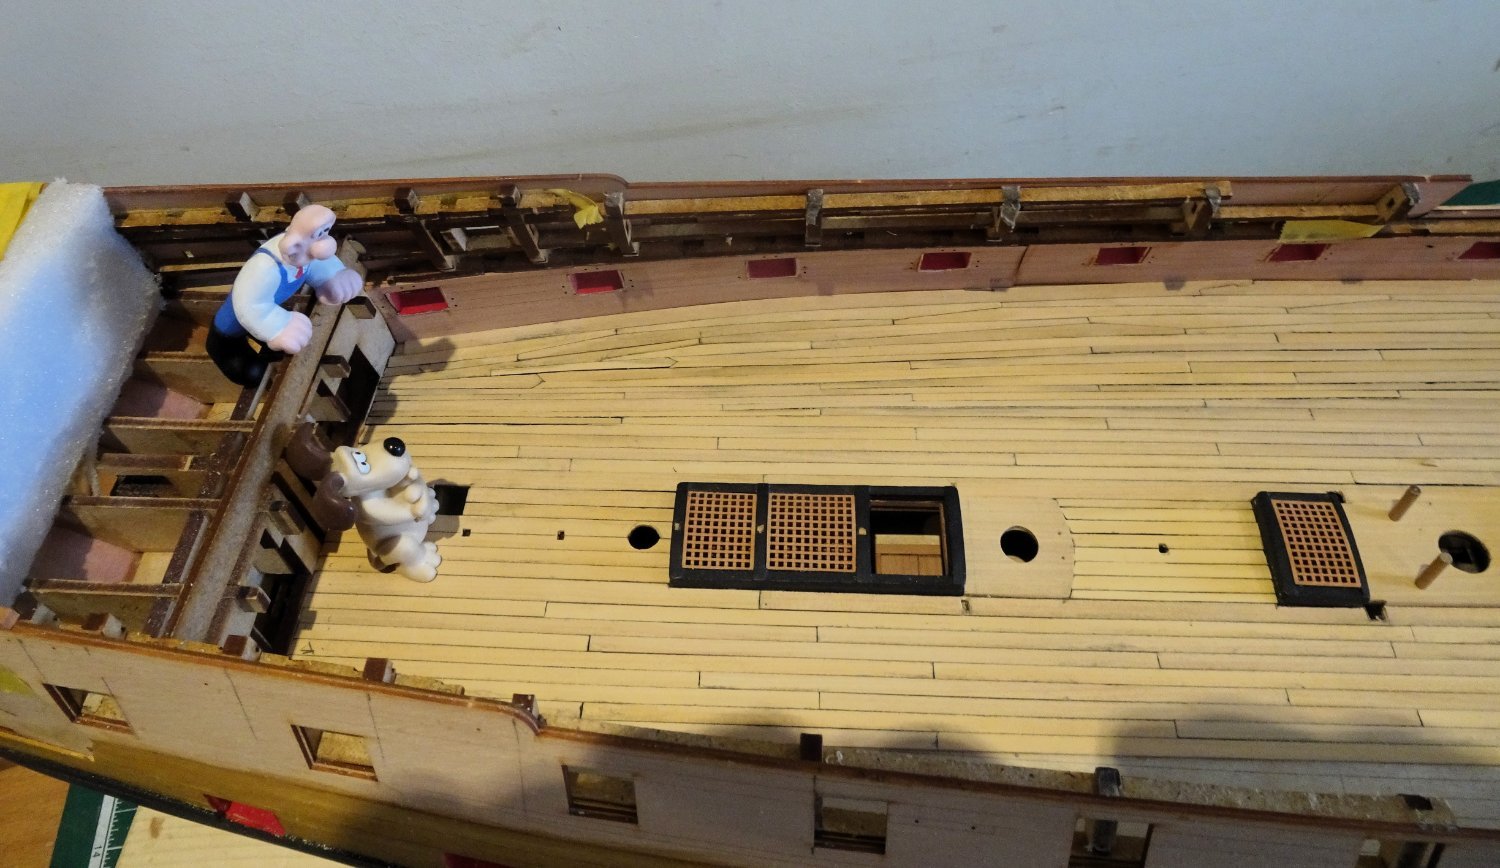
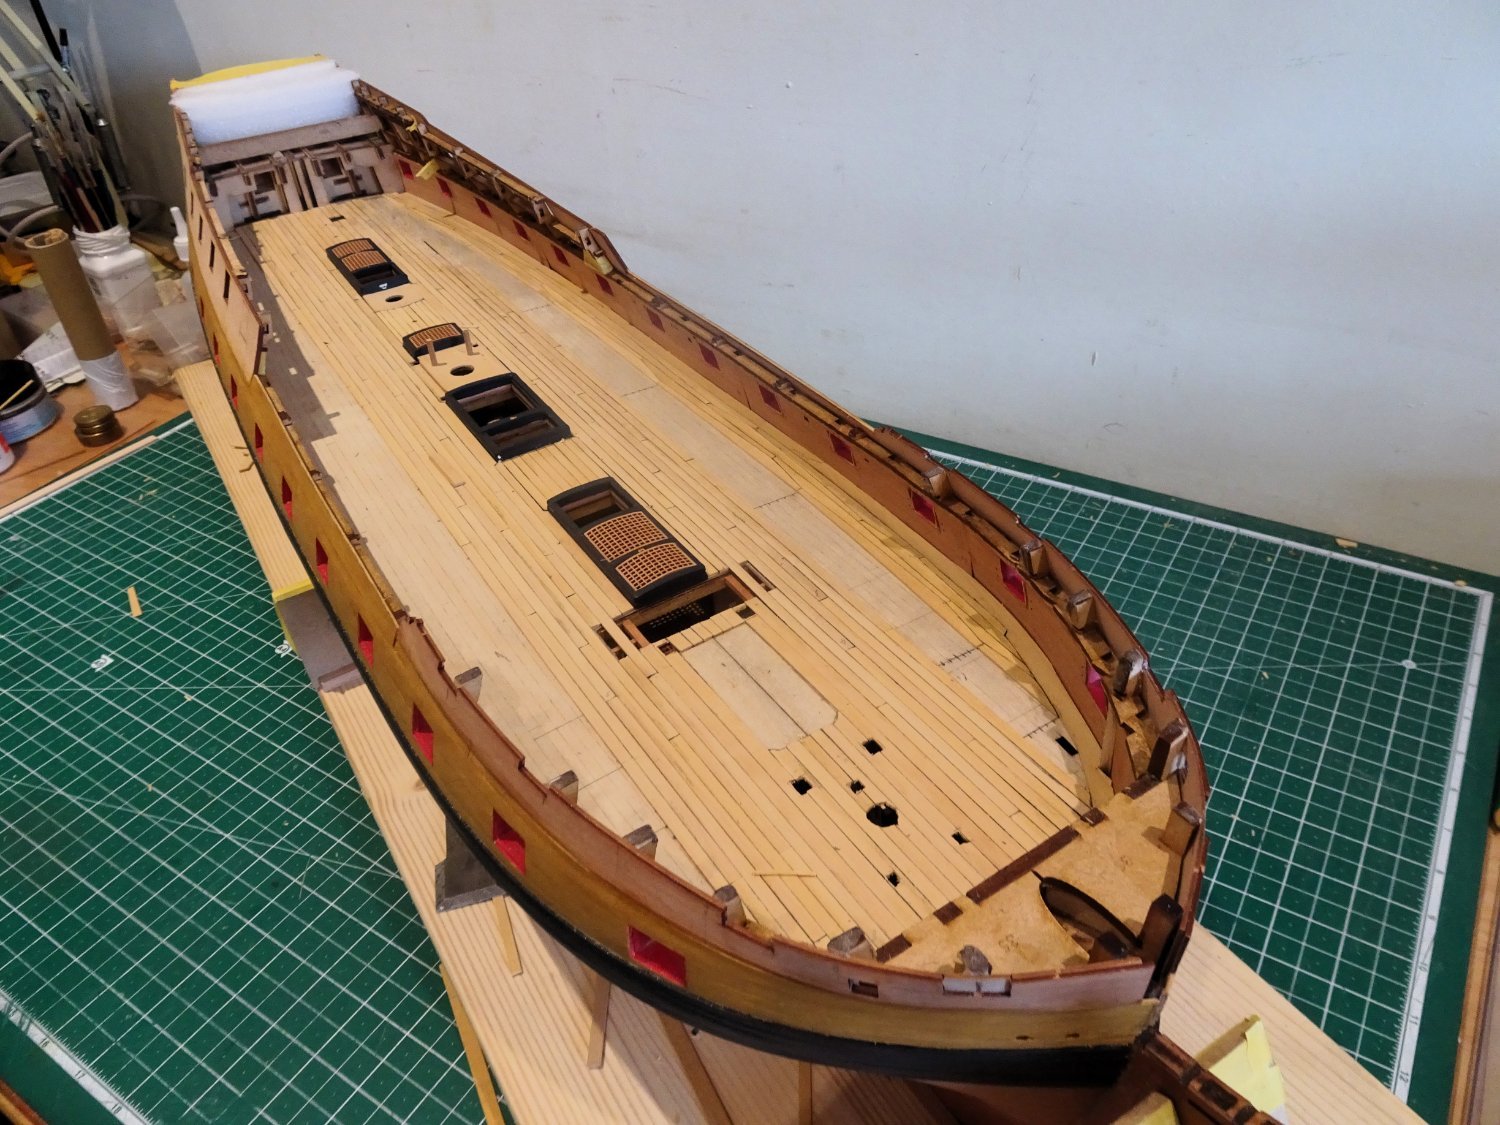
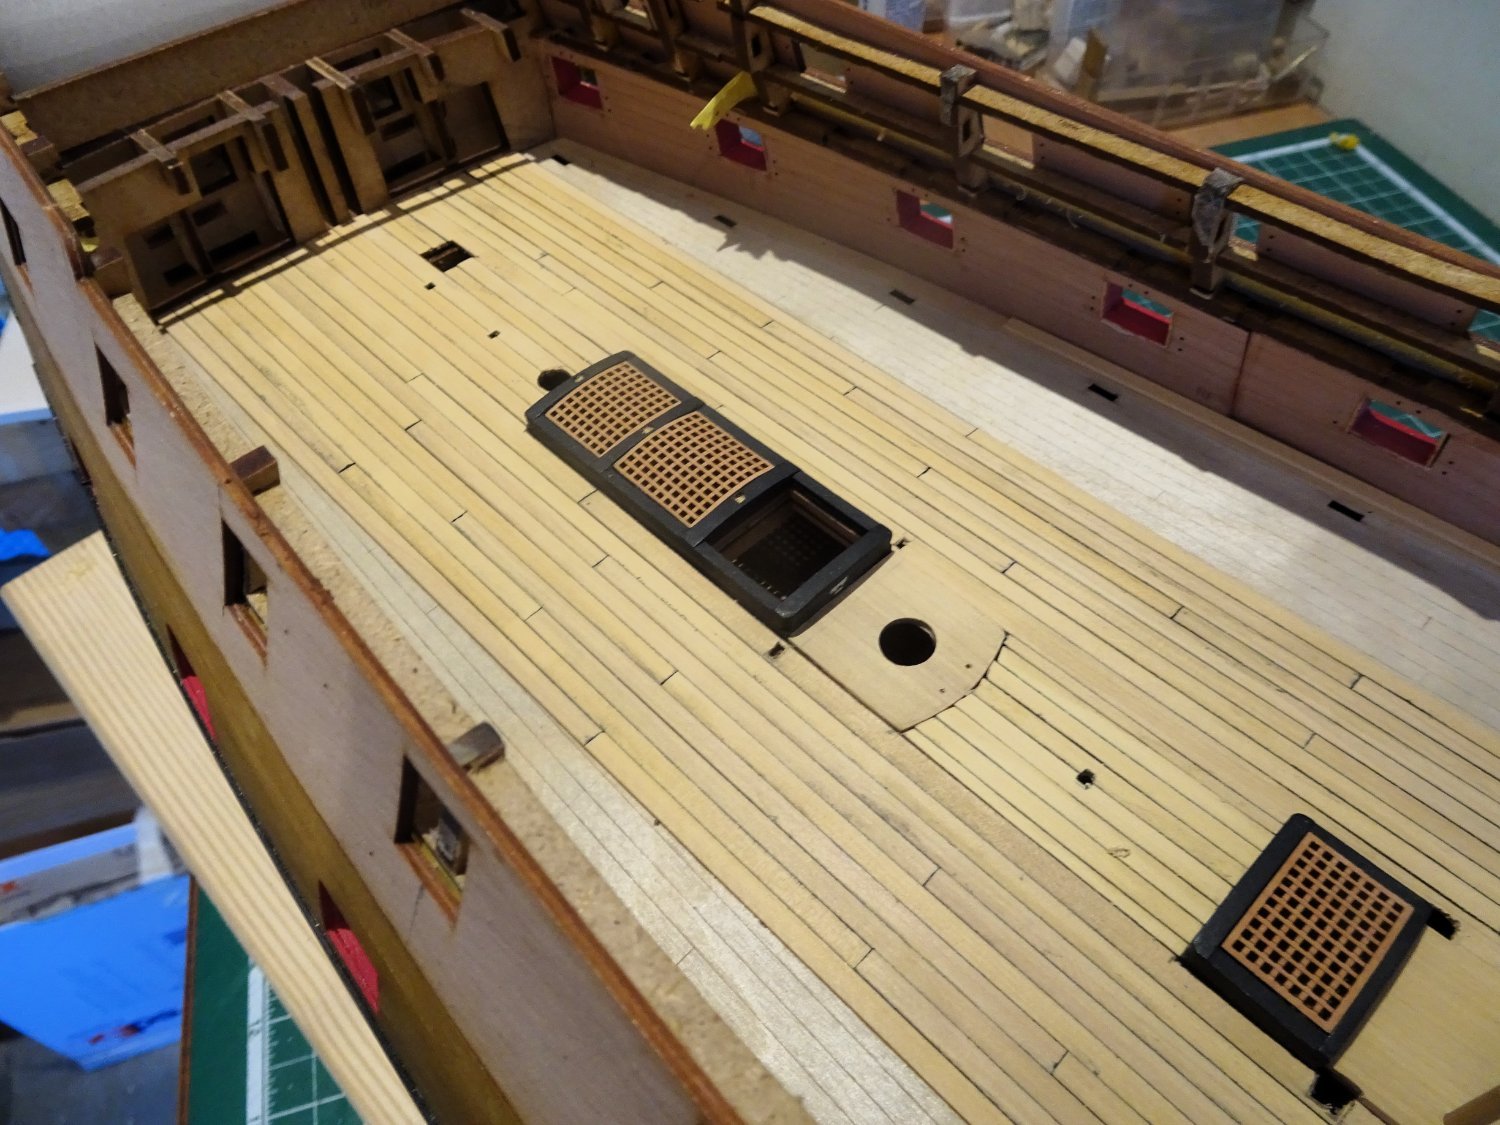
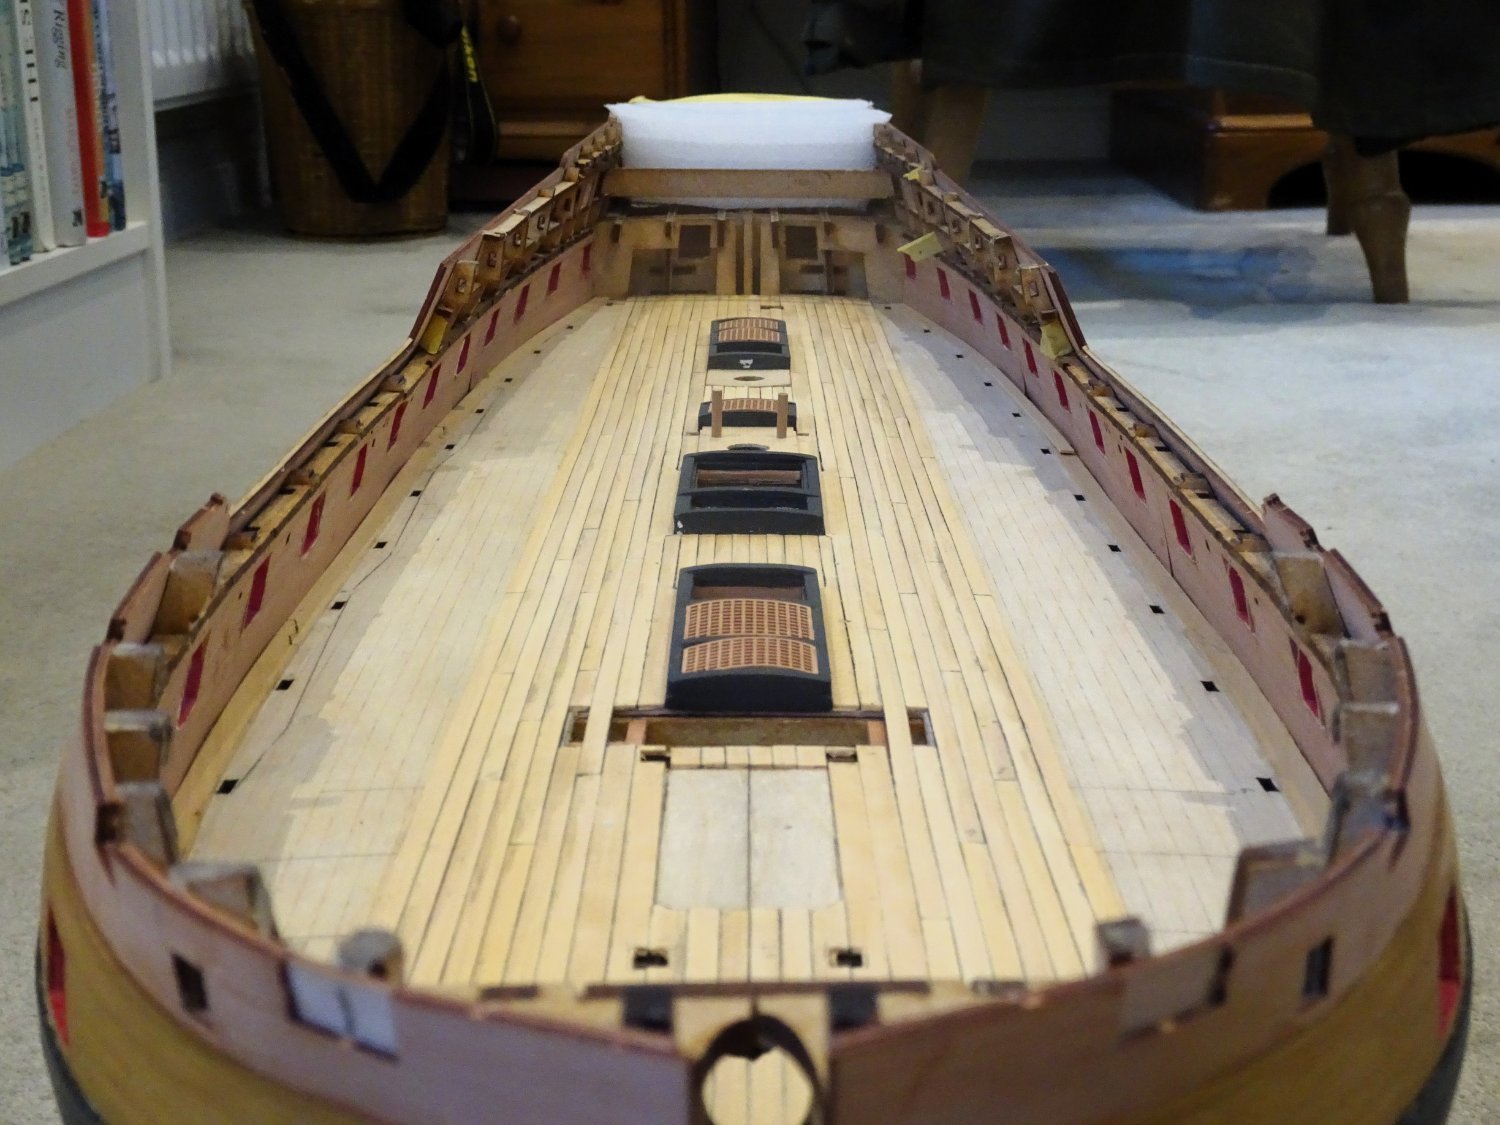
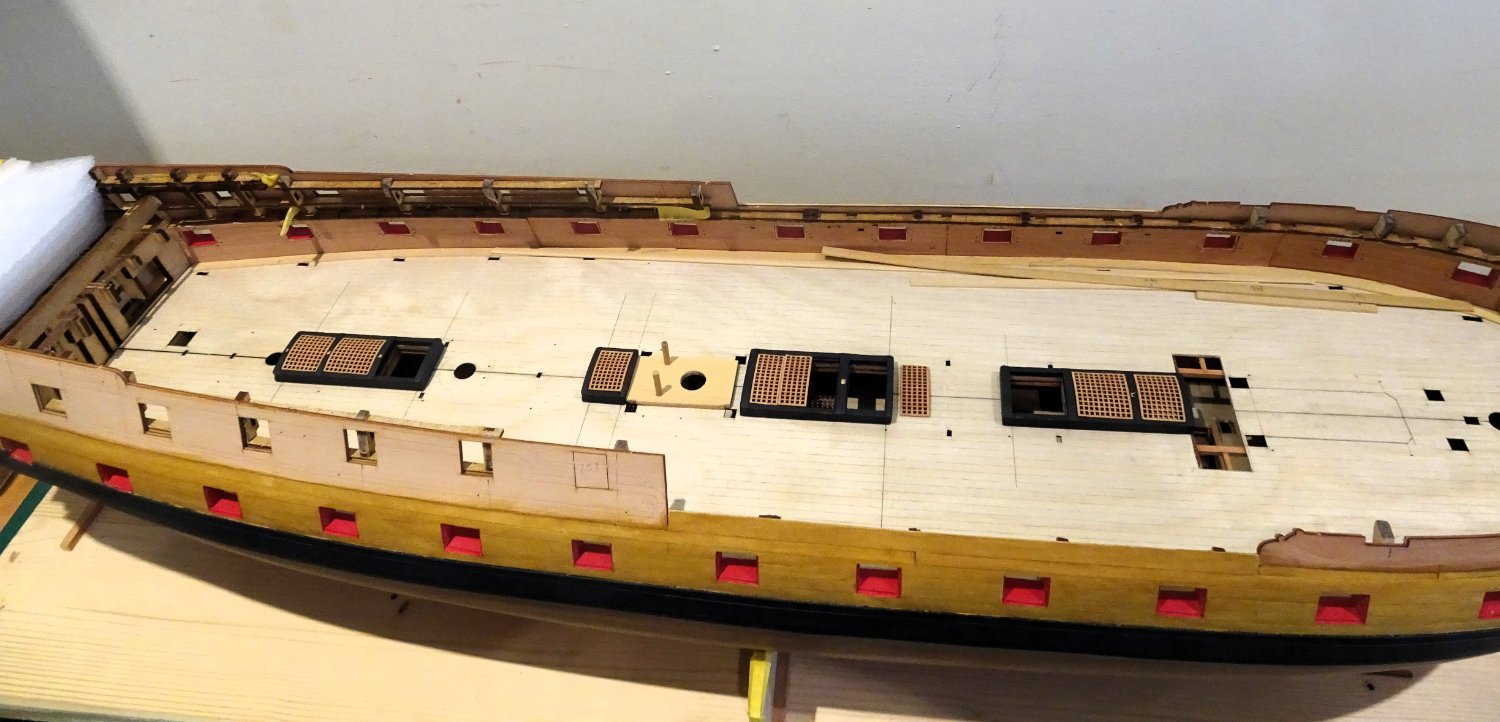
Post Sixty
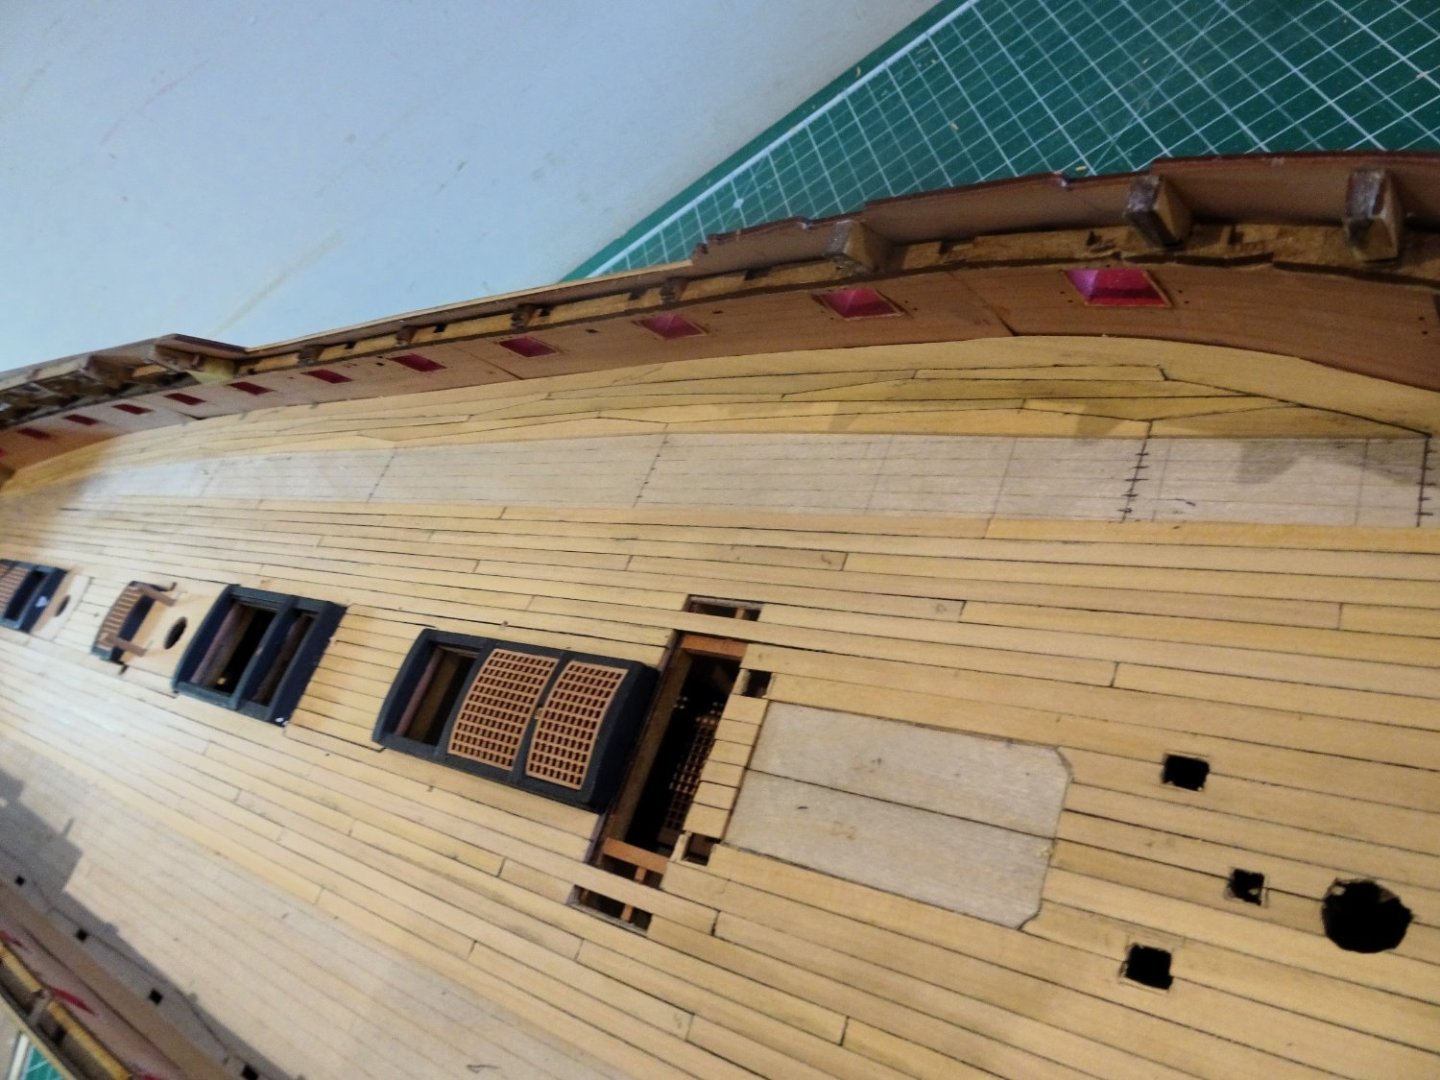
Dressing the Gun-deck
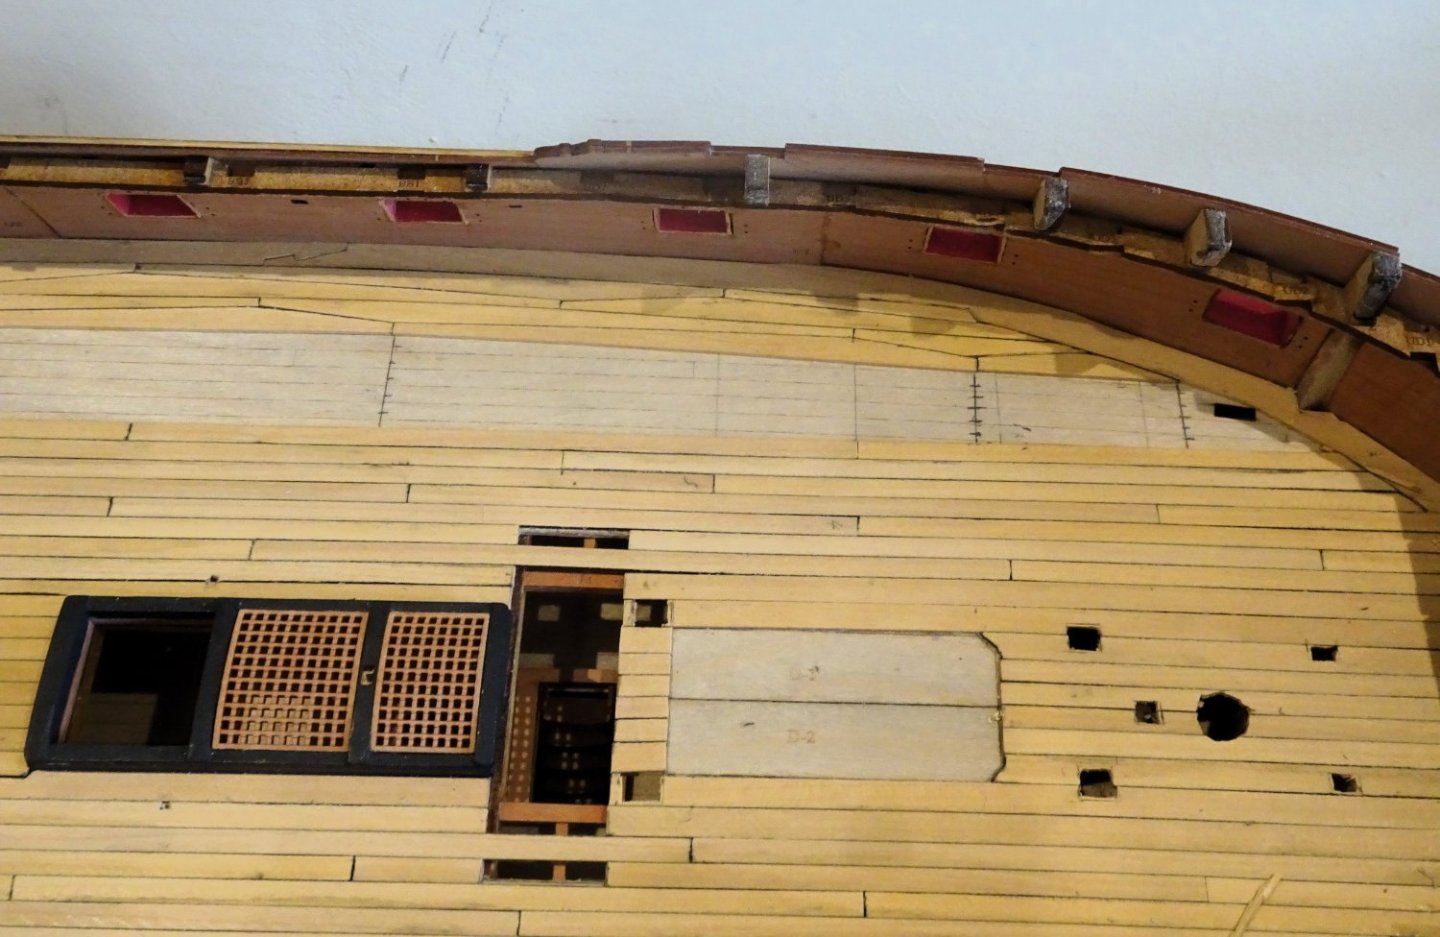
The inner bulwark painting has been completed and the coamings re-coated to cover blemishes resulting during the planking process.
The deck was then given a final scrape before varnished using Vallejo matt varnish.
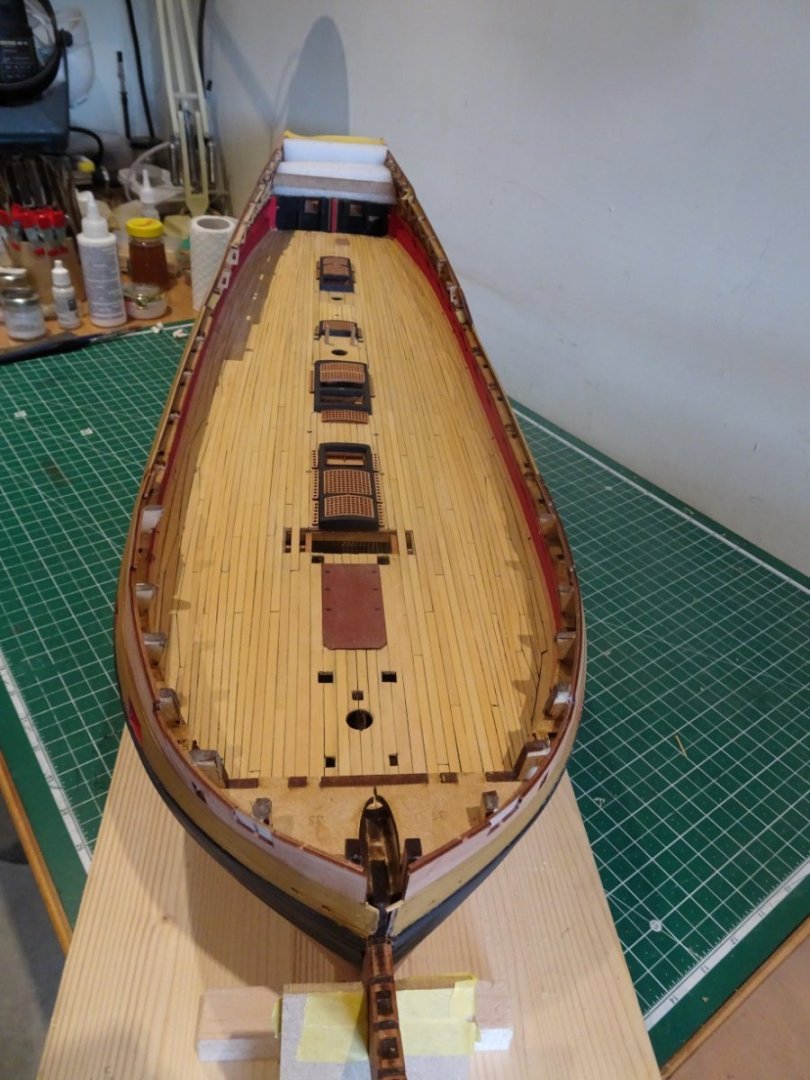
1643
The bright red brick stove base as shown in the manual didn’t appeal to my eye, I used darker tones and weathering powders to create a more muted look.
It was then onto a ladder fest, tricky little beggars to assemble and one of my least favourite tasks I always seem to be fingers and thumbs trying to keep them square.
1639

1641
These are quite flimsy to assemble as the scale dictates, ‘soft hands’ a definite requirement.
1651
1652
Finally, I added the shot garlands which I had previously removed from the coamings.
1646
1647
The crunch point has now arrived where I must decide whether to copper, as any further fittings will impede the inversion of the hull.
I remain torn on the subject, so to maintain impetus I will clean up and paint the numerous deck fittings to defer the decision a while longer.
B.E.
06/08/2023
-
Post Fifty-nine
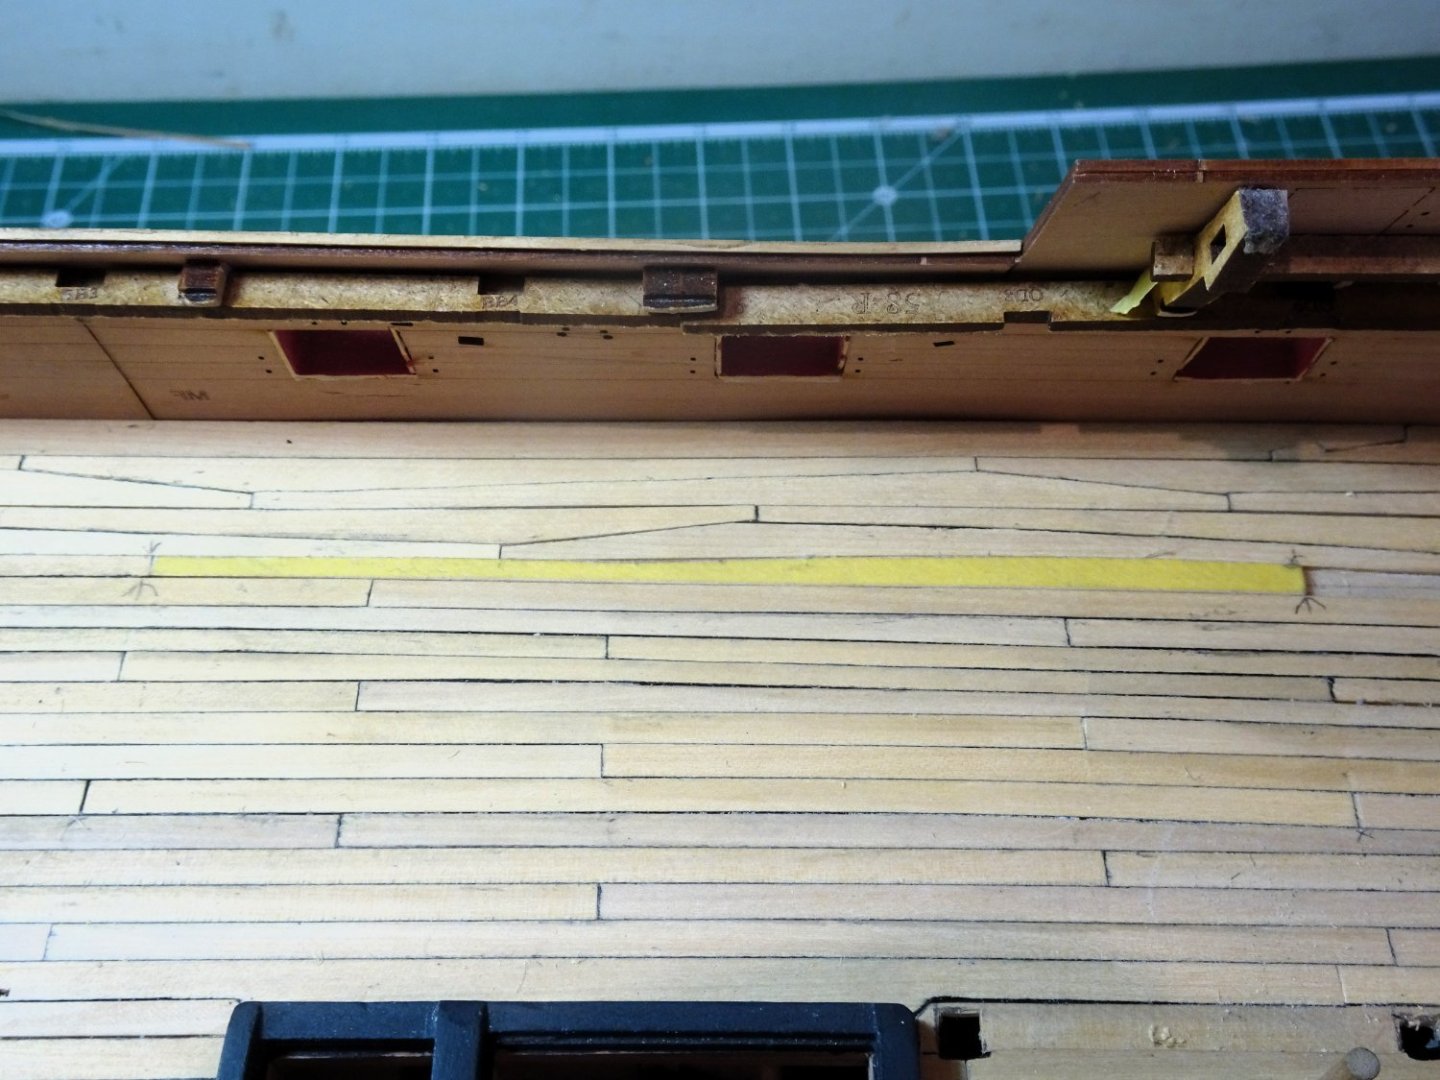
Inner bulwarks
Time to give these some attention.

1633
Firstly, the Proxxon Pen sander with angled arbors proved very useful to clean up around the inner gunports prior to painting.

1635
The Spirketting and upper ledges which border the gunports are fitted before painting.
Don’t know how much will eventually show but Chris has taken the trouble to engrave the spirketting with a Hook and butt planking pattern, a nice touch.

1634
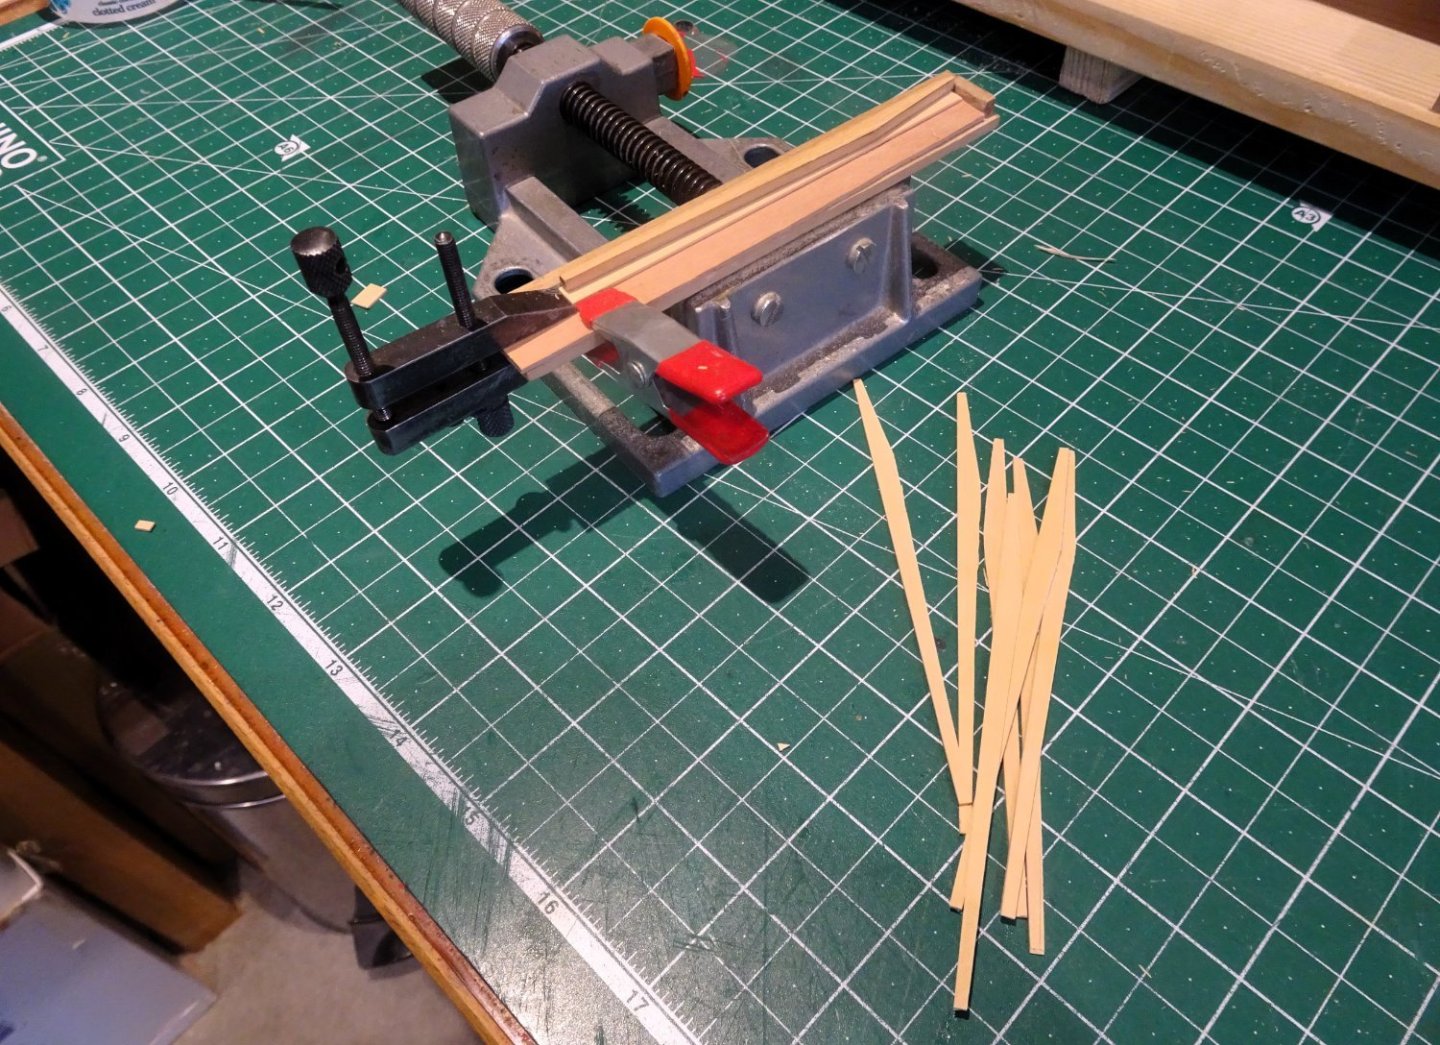
My final action is to fit the waterway representation using lengths of angled 2mm Pear strip.
I settled on six scuppers along waterway, with a diameter of 1.5mm.

1636

1638
A first coat of diluted paint is applied using Vallejo Flat Red.
I will be faffing around with this over the weekend to get a finish I am happy with.
B.E.
04/08/2023
-
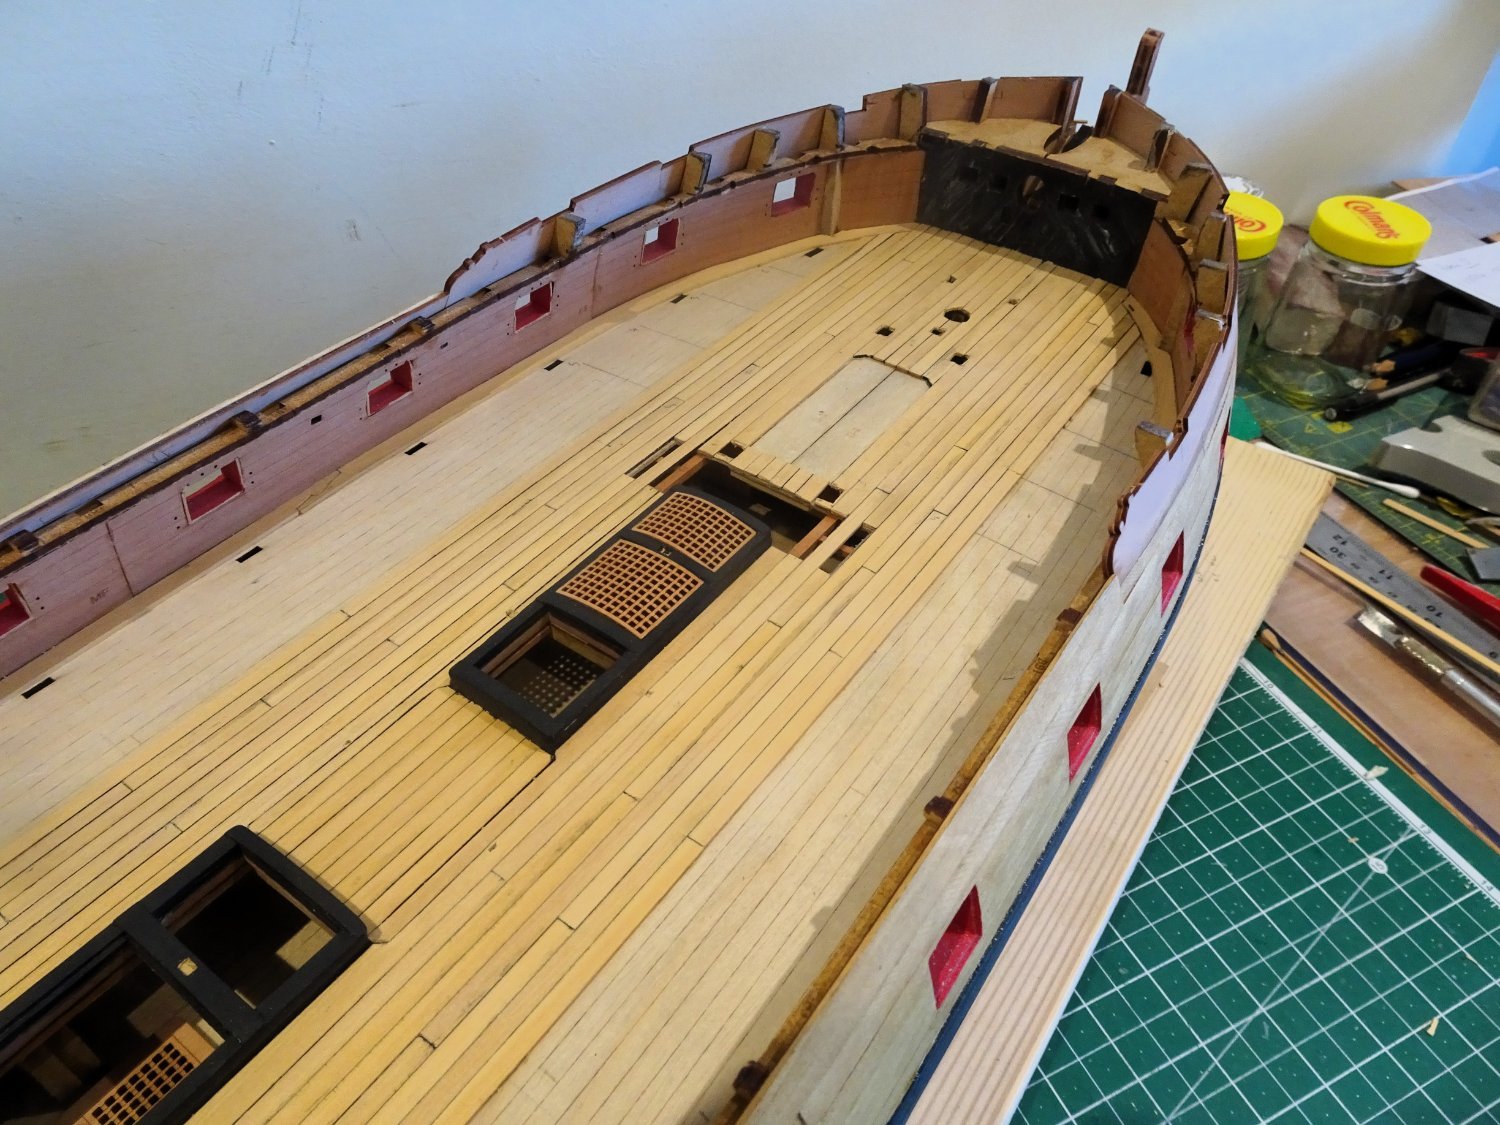
Post Fifty-eight
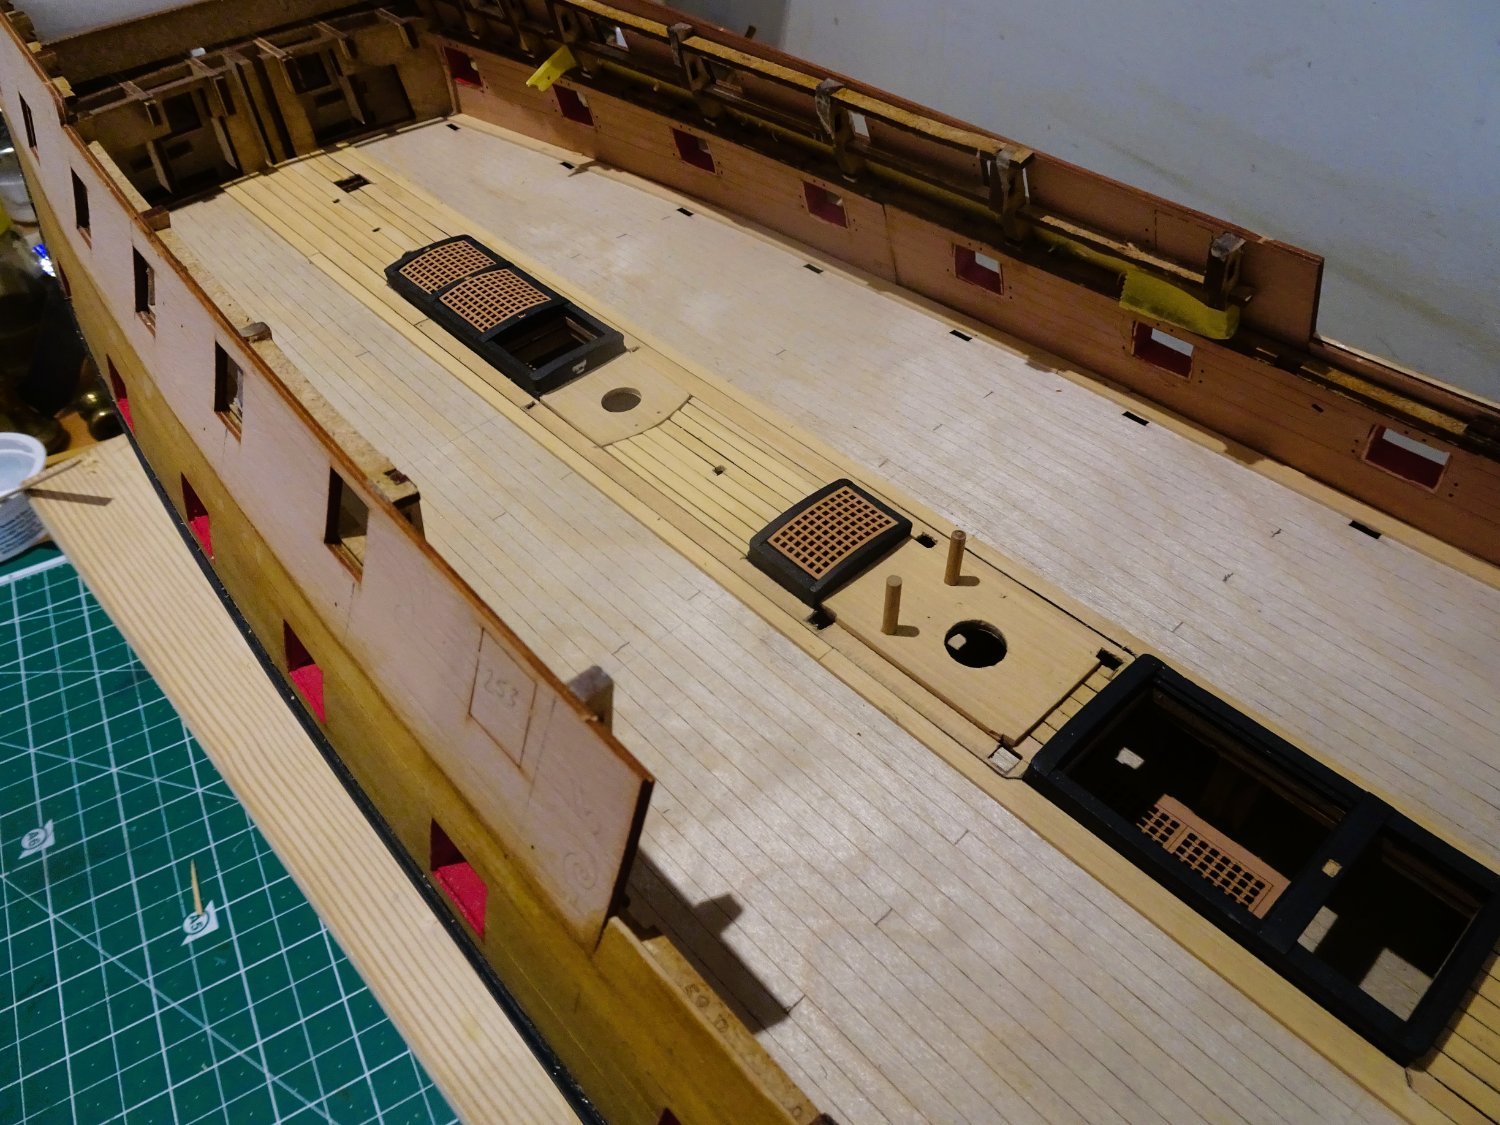
Ensure everything fits.
A few hours spent fettlin’ the mortises.
1616
I used my deck template to ensure the locations particularly of the deck pillars.

1619
The Swann-Morton micro chisels proved very useful for clearing the pillar mortises on the modified head ledges.

1631
I’m thinking that the wooden pillars fore and aft of the Capstan step might be better represented by hinged iron stanchions.

1622

1623

1628

1626
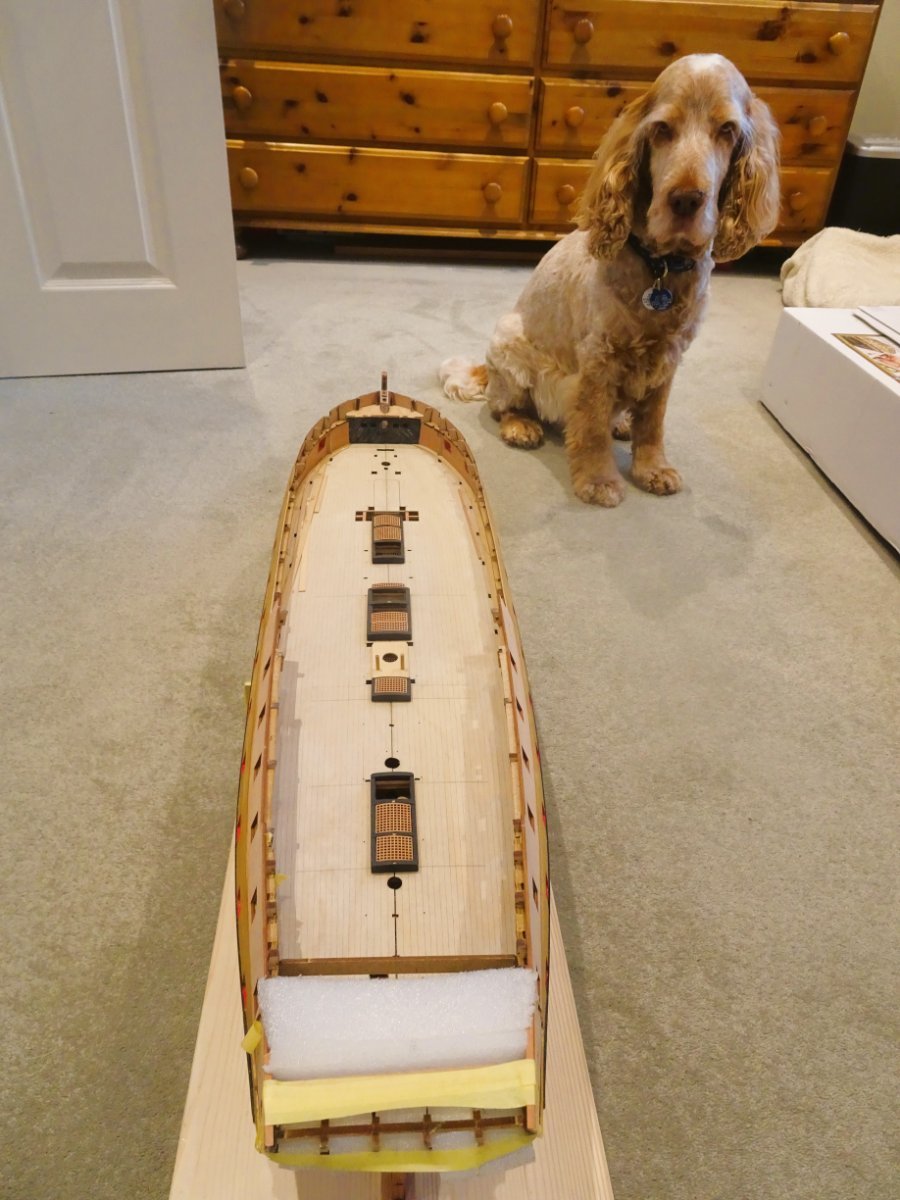
The masts and Bowsprit are cut to full kit size and tested for fit.
Fully rigged she is going to take up a lot of room, but will no doubt look magnificent.
I hasten to add I will not be going down that road.
B.E.
03/08/2023
- Knocklouder, mtaylor, rybakov and 15 others
-
18
-
18 hours ago, CaptnBirdseye said:
Hi B.E.
Must say she is looking a real beauty!
Do you mind me asking why you prefer scraping rather than sanding? Apologies if you've answered this elsewhere
")
Each to their own I suppose Capt. but I find scraping gives me a better finish and more control. It is also easier to work between the centre line hatches etc;
I also find it very satisfying, sort of like planning.☺️
B.E.
- Nipper, mtaylor and CaptnBirdseye
-
2
-
 1
1
-
Thankyou Glenn and Shipman.
@ Glenn - Not even thought about gun fixing yet, but there are ways and means, other than deck slots.
@ Shipman - It's the aesthetics that appeal to me but tricky to provide in a kit with laser parts, even for someone with such ingenuity as Mr Watton.
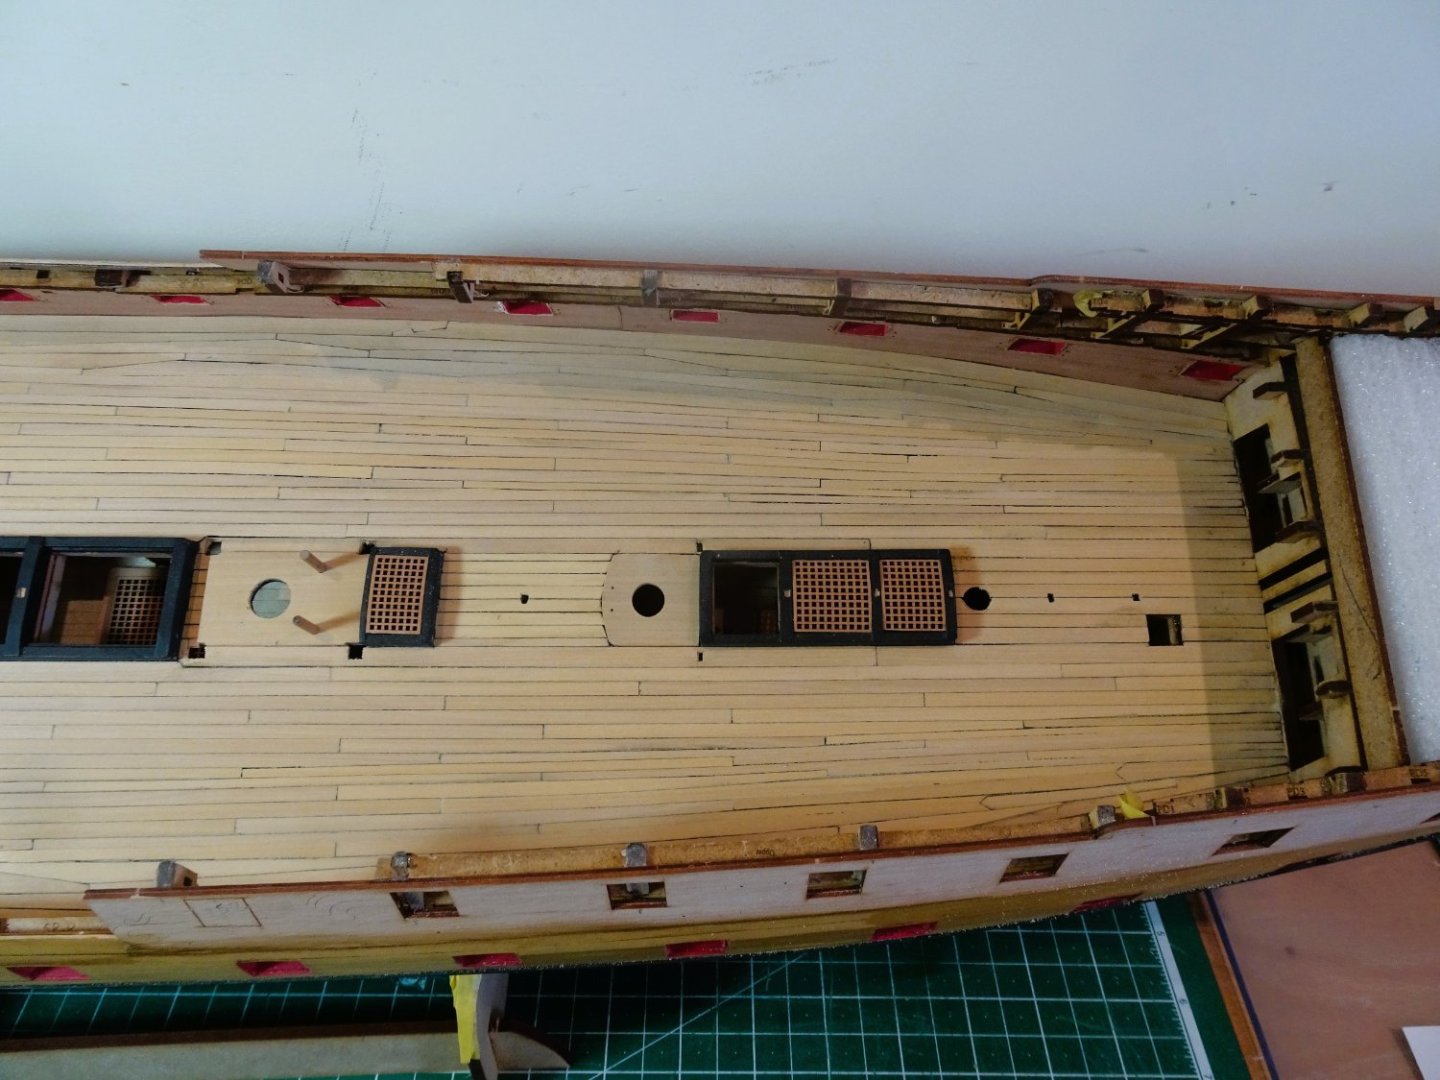
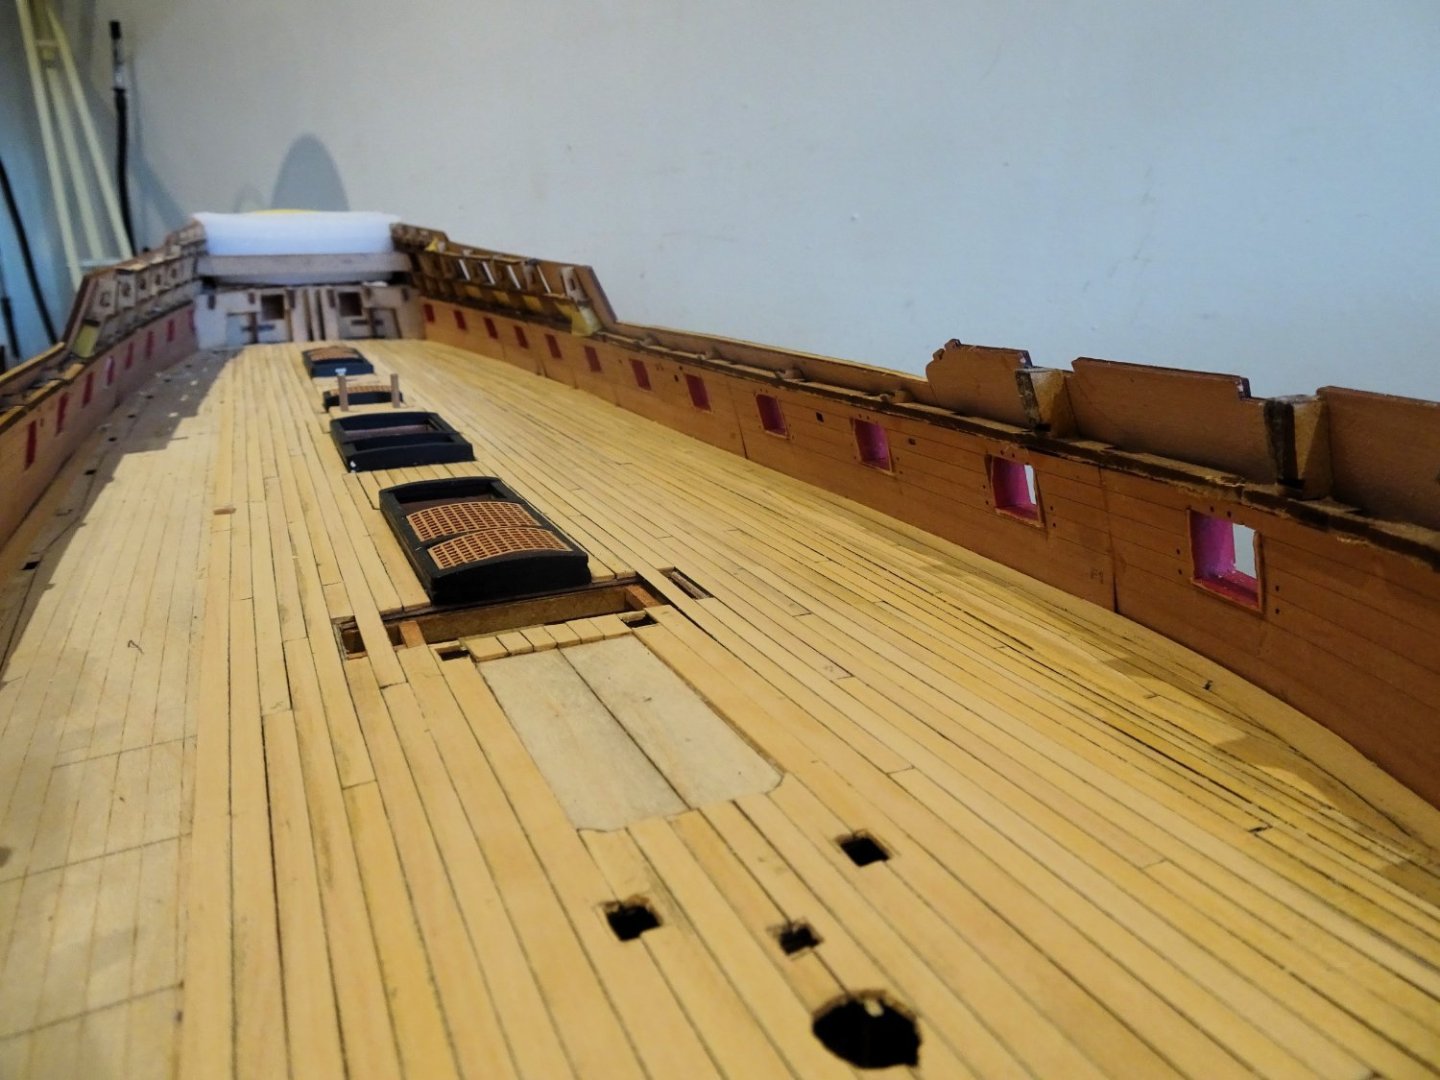
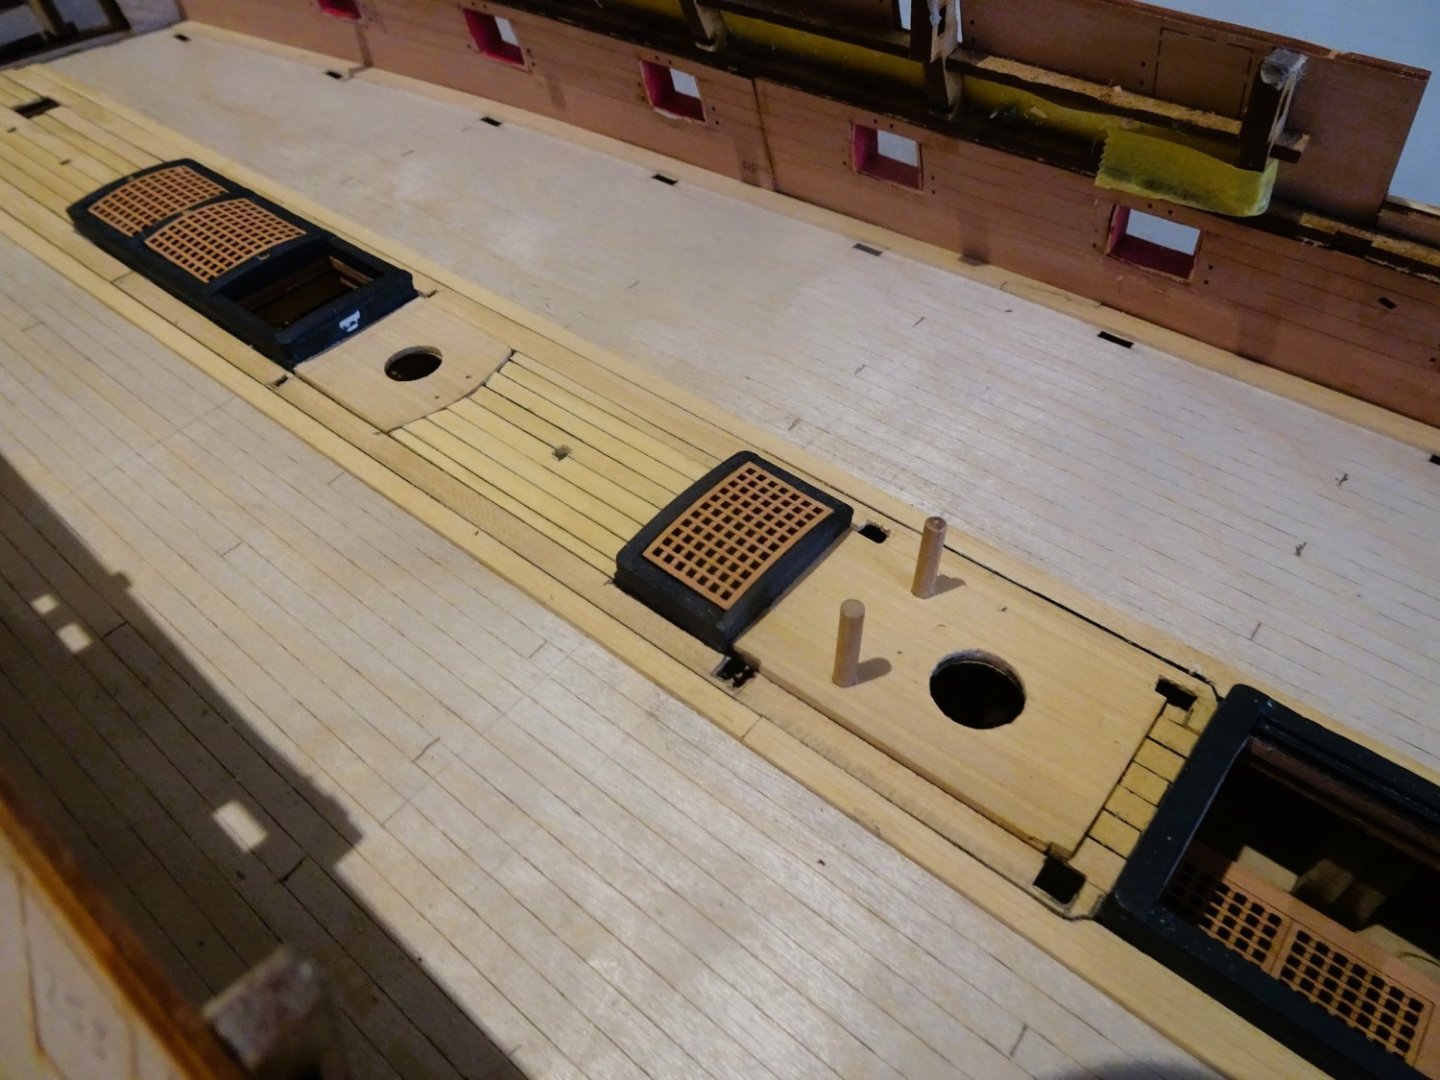
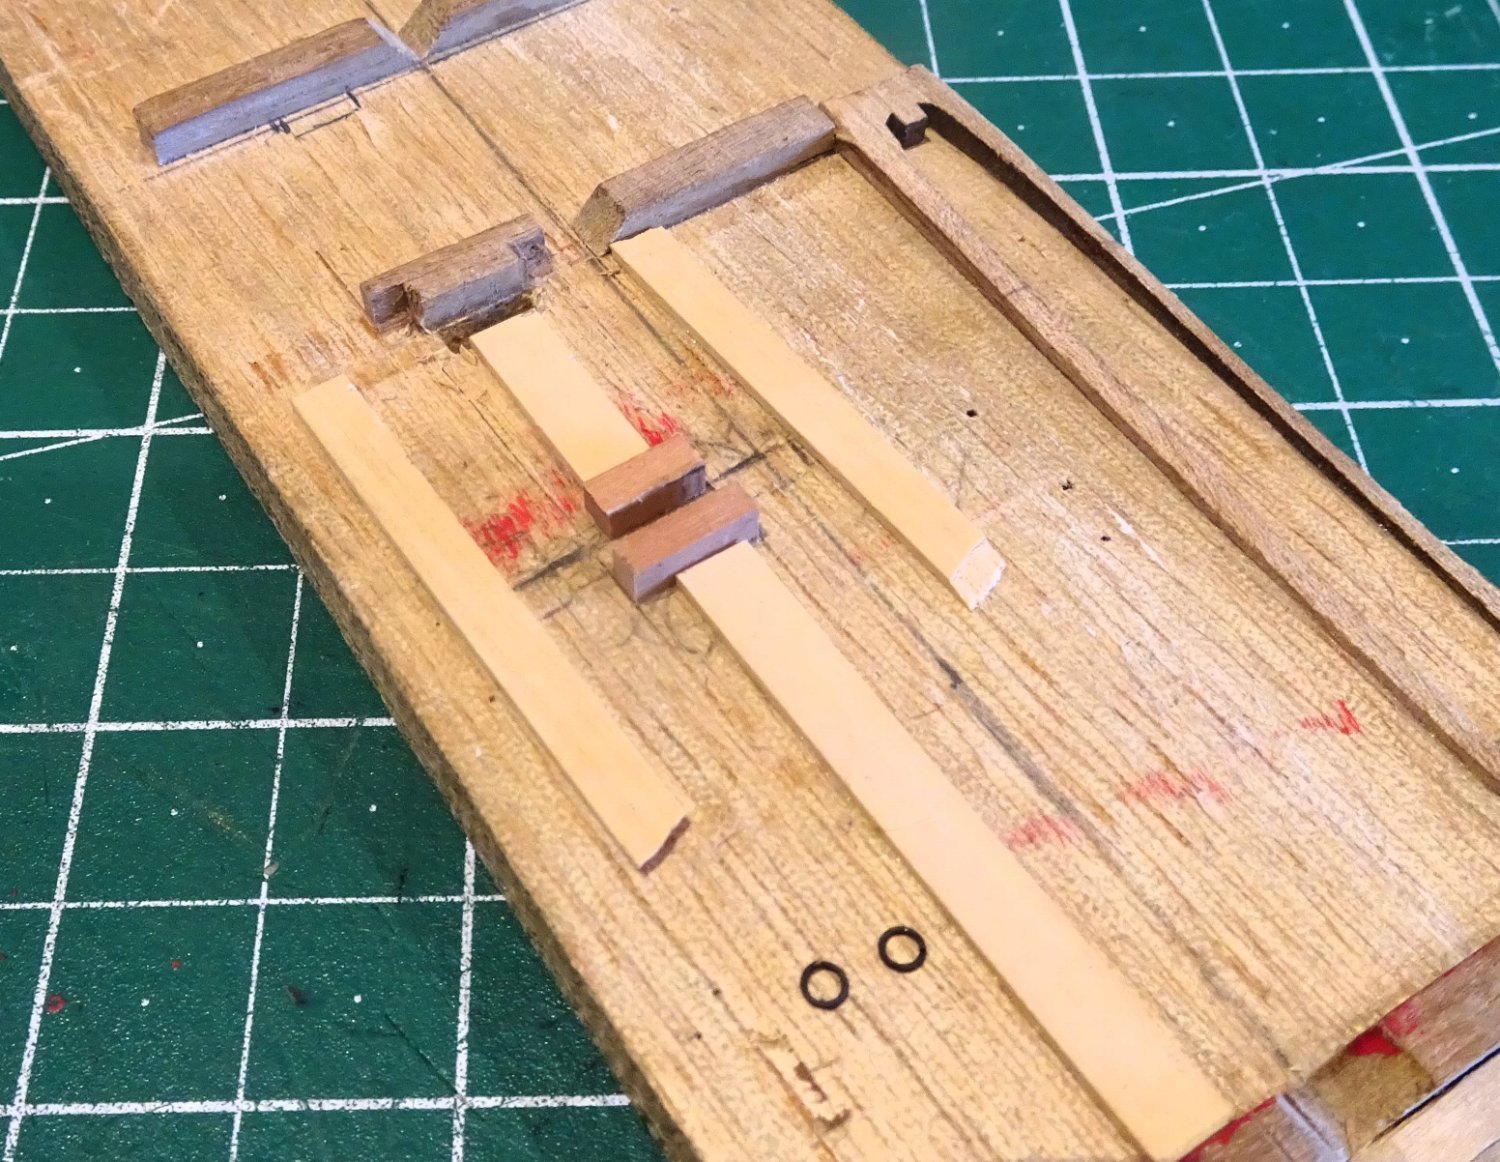
Post Fifty-seven
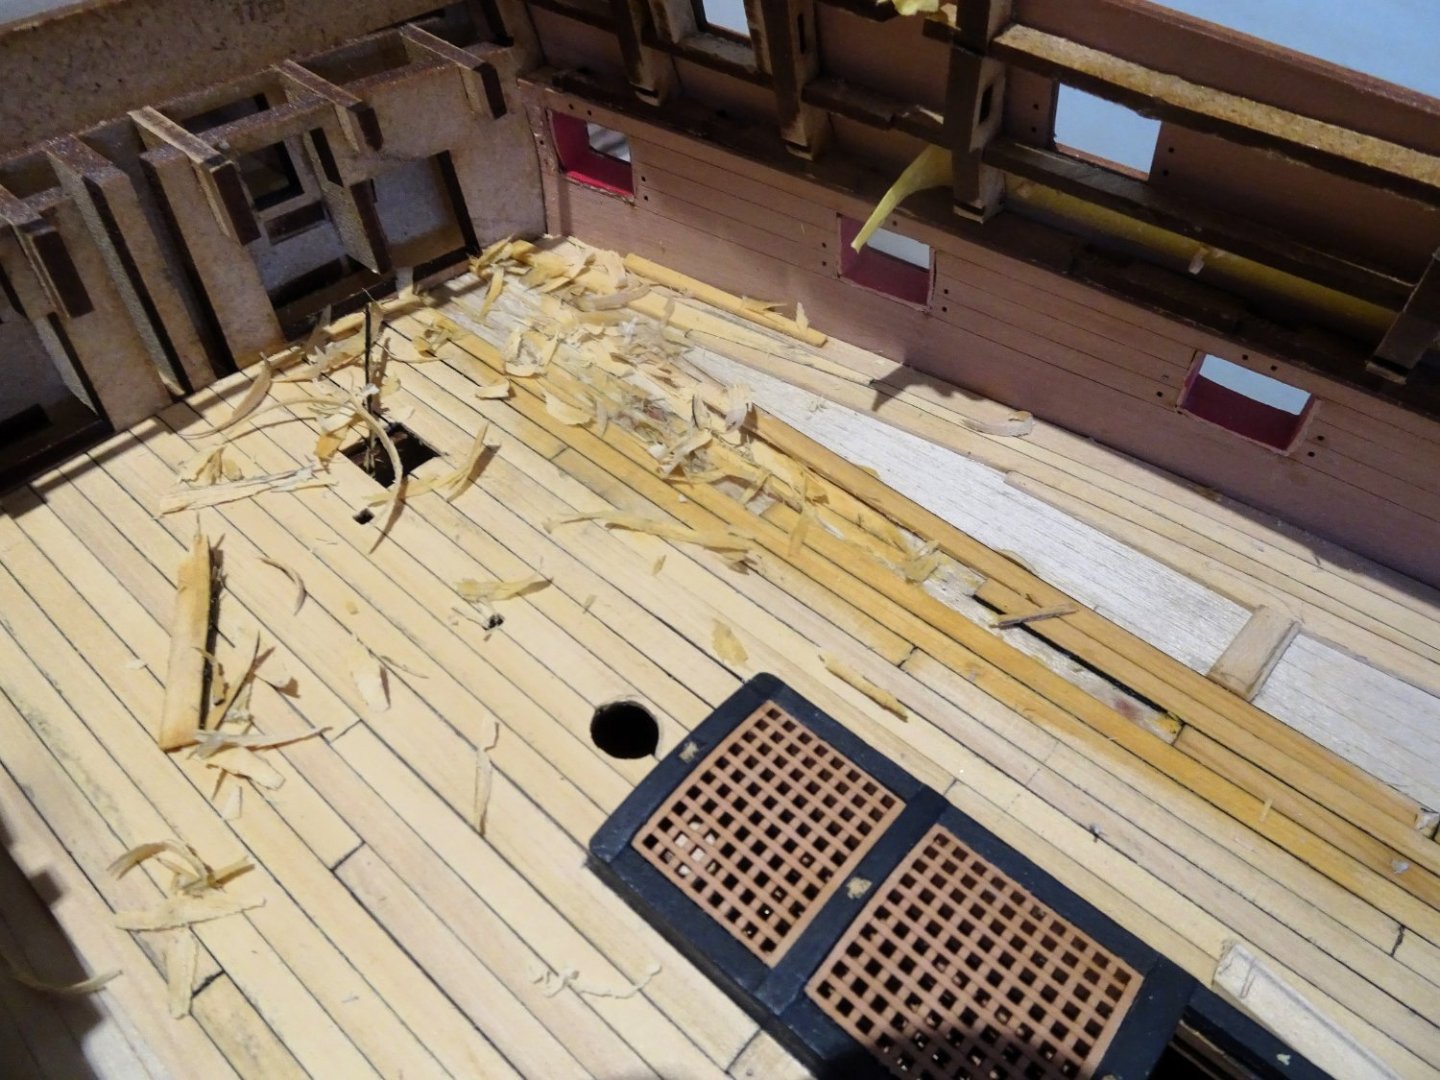
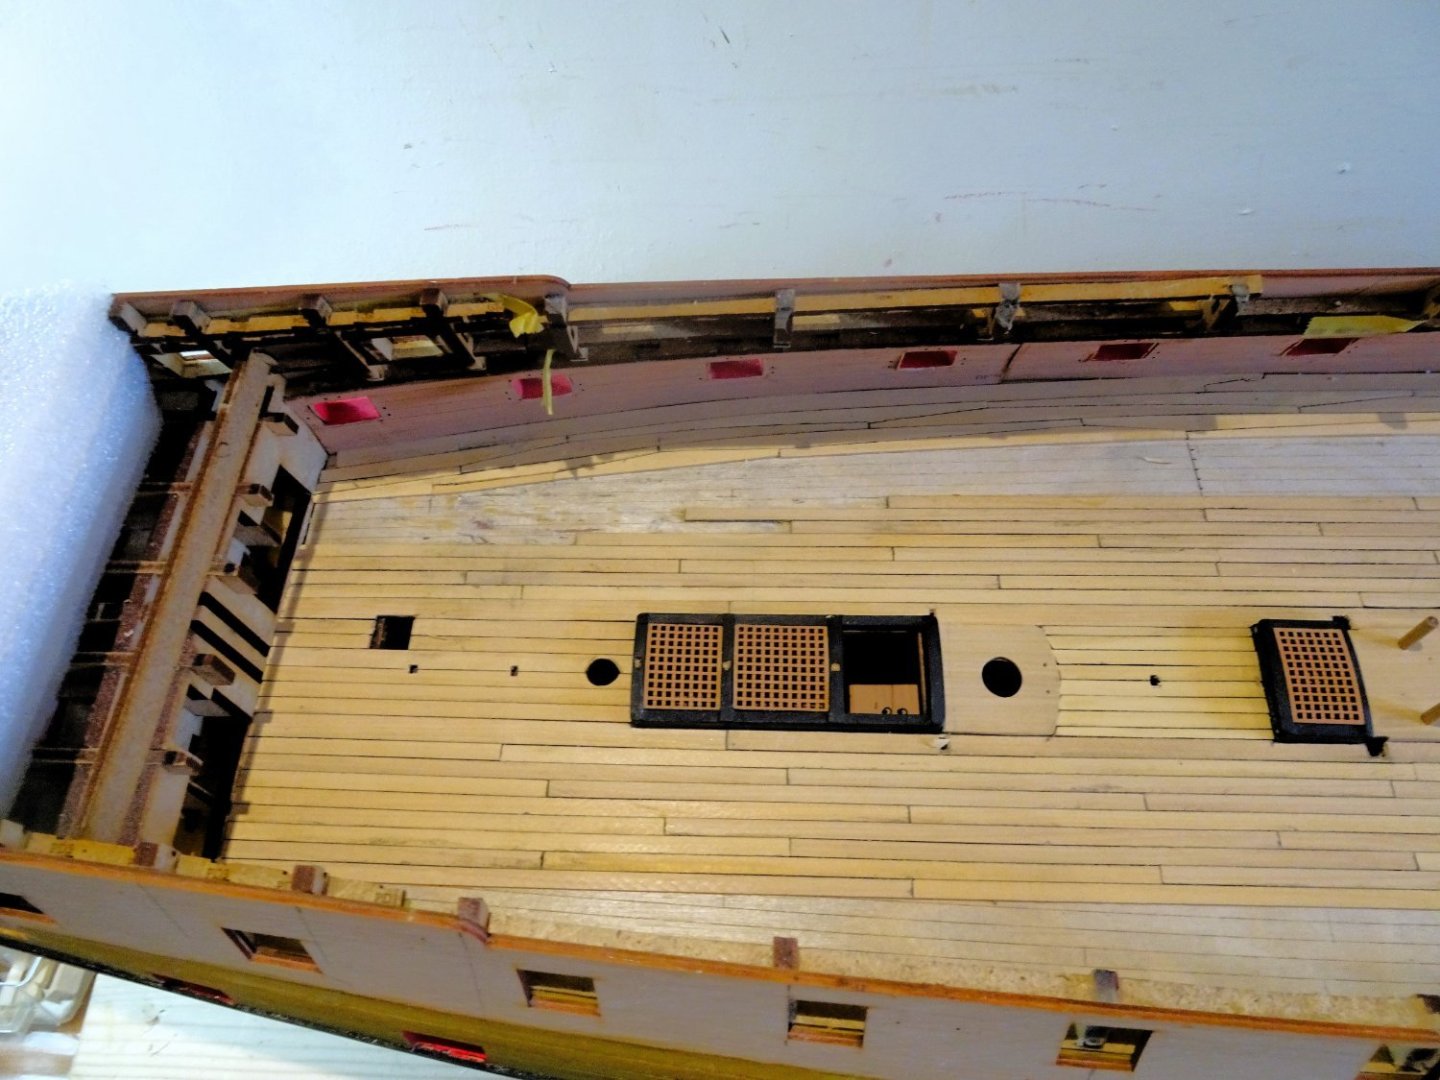
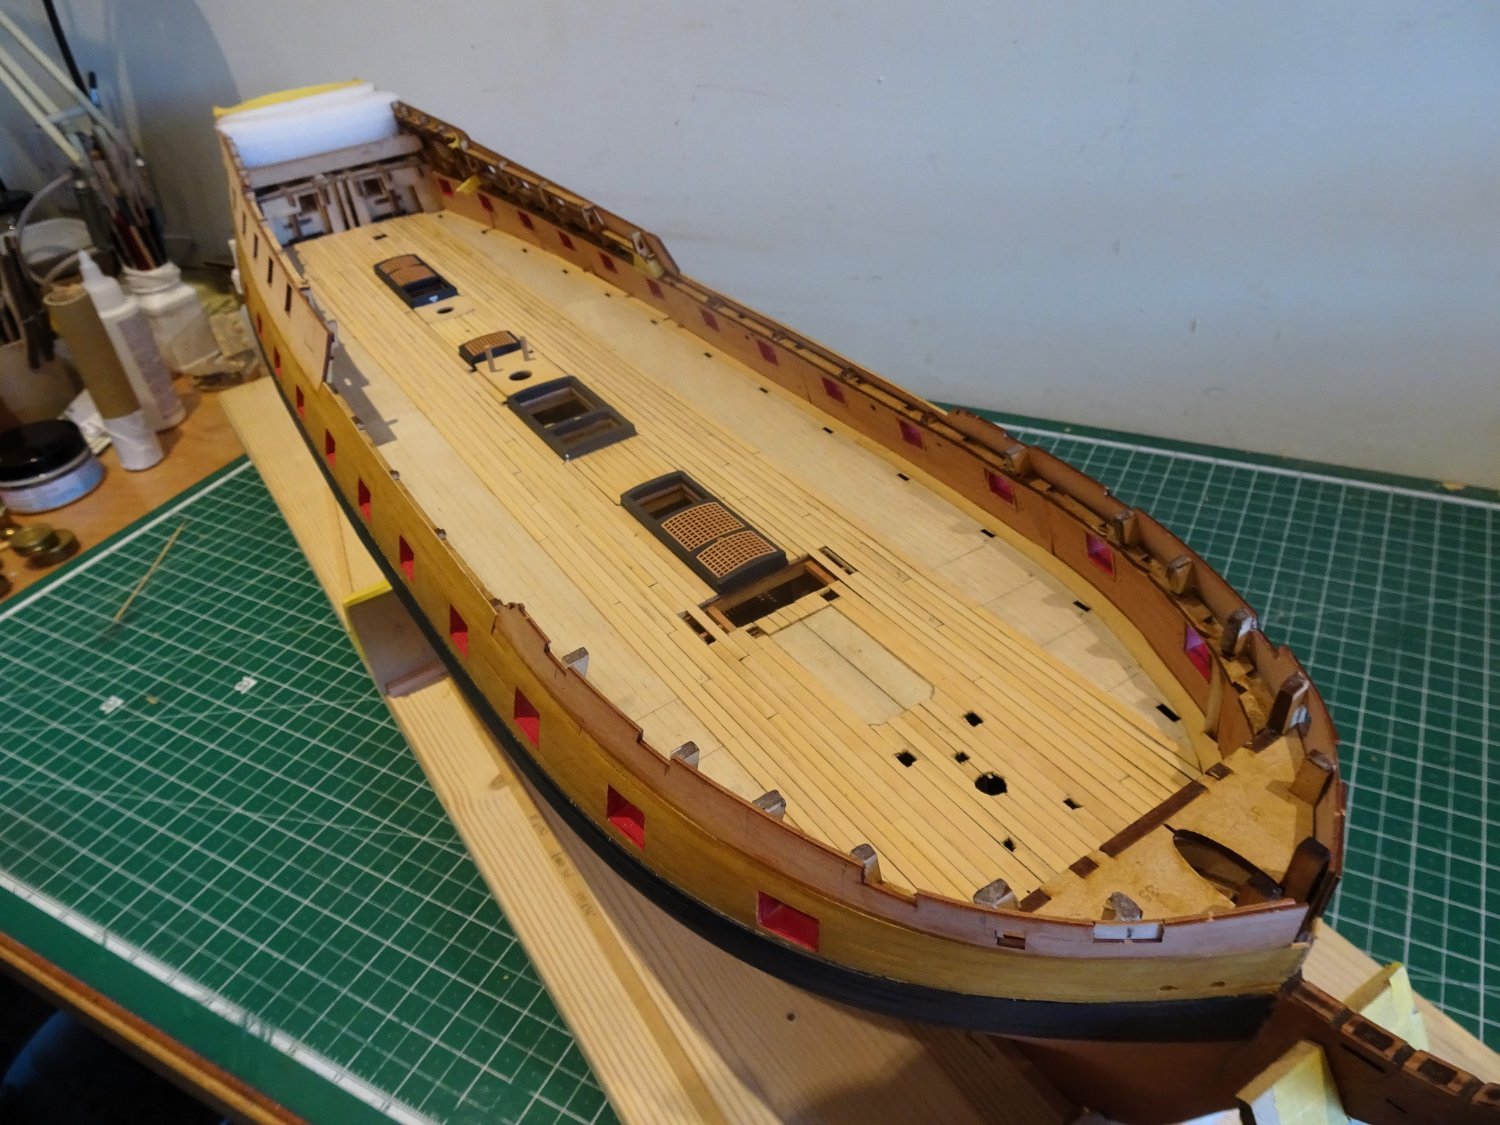
Completion of gundeck planking.
Four more days and the last strakes are put into place.
1593
The final strakes meet the top & butt planking and require individual spiling for a good fit.
1602
The deck now requires scraping (not sanding) and my tool of choice is an old plane blade. It has the right weight and feel for drawing along the deck.

1610
1611

1613
Quite amazing the improvement a good scraping makes to a deck, and with 1mm depth of board there is little fear of over doing it.
1607
1606
1609
Not quite done yet, I now need to enlarge the mortises and trial fit the deck impediments before the deck is given a final scrape and a matt varnish finish.
B.E.
02/08/2023
- Theodosius, mgatrost, jpalmer1970 and 19 others
-
22
-
A very fine job, and well worth the effort, well done.👍
B.E.
- Glen McGuire, Peanut6, Thukydides and 2 others
-
4
-
1
-
The headworks look so much better Kevin,👍, I like the shading you've achieved on the figure's cloak, well done.
B.E.
- Old Collingwood, Obormotov and Kevin
-
3
-
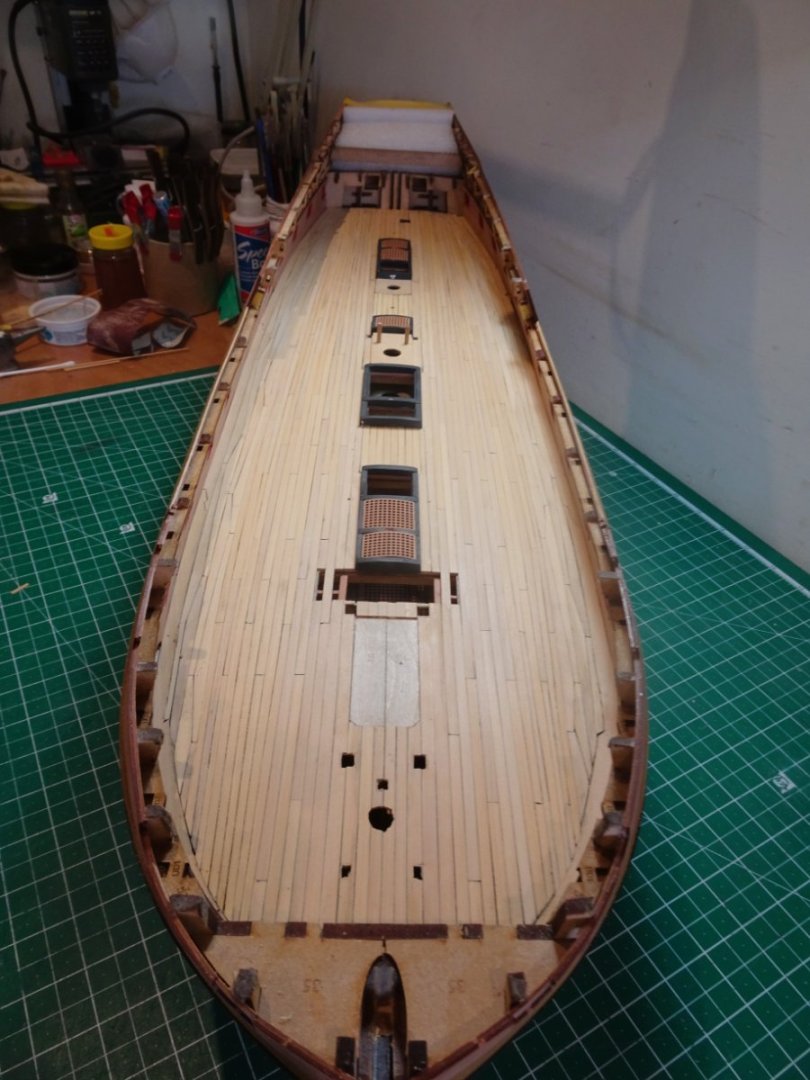
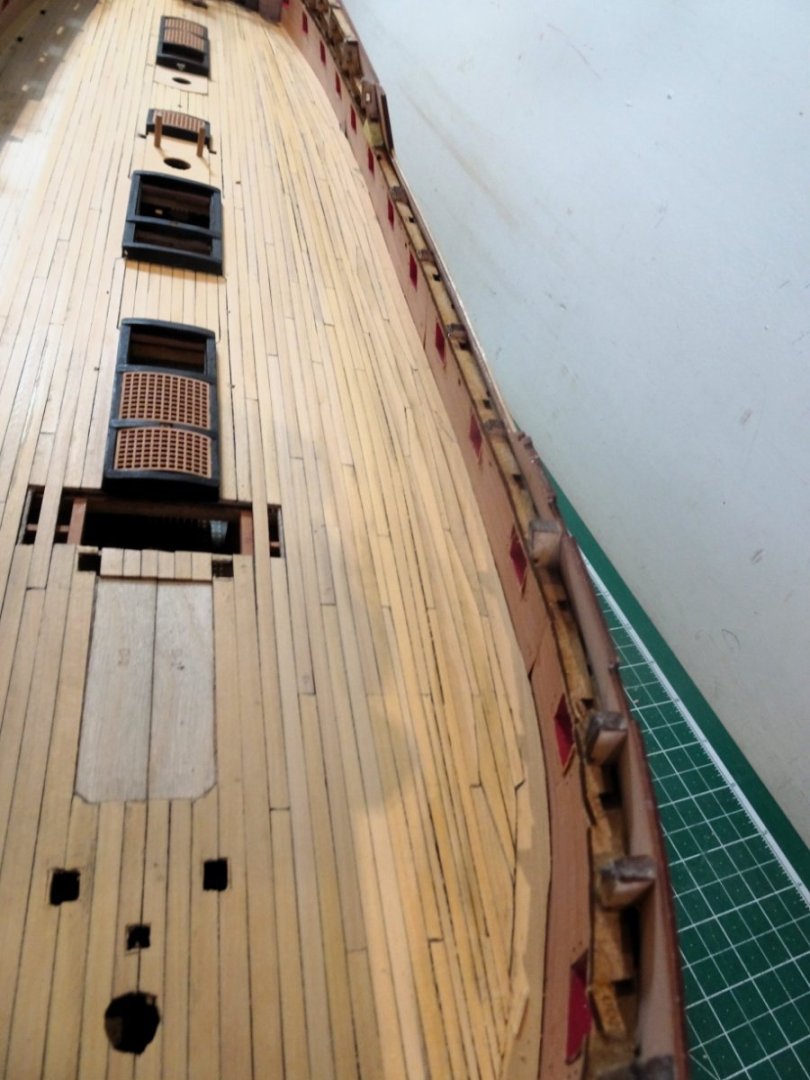
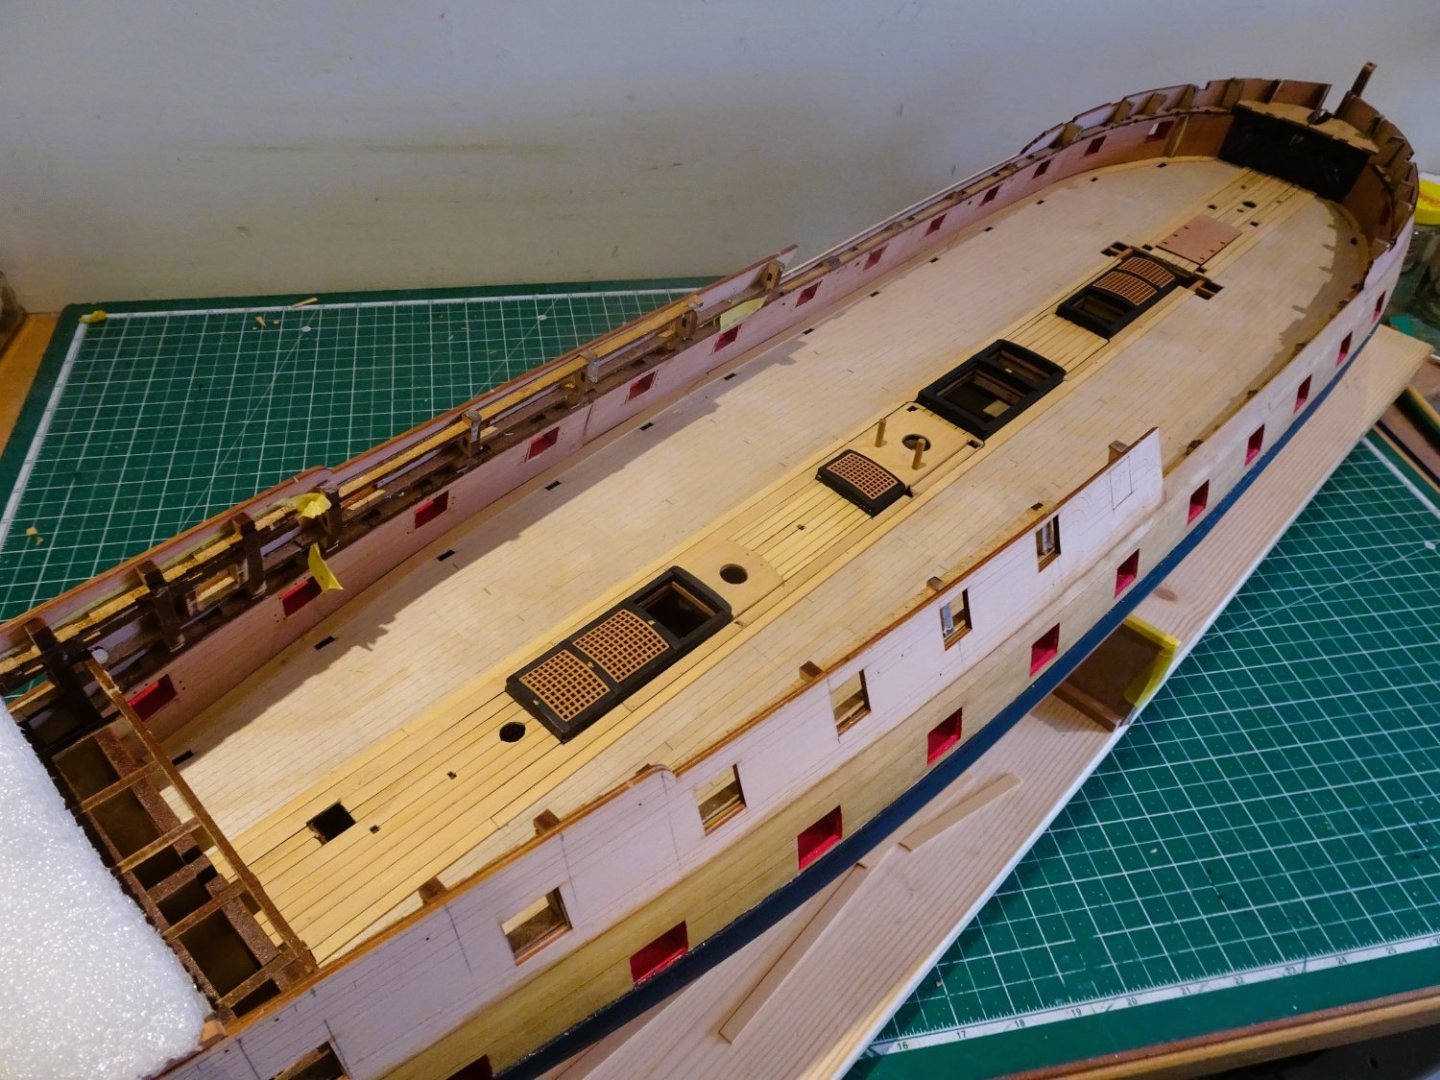
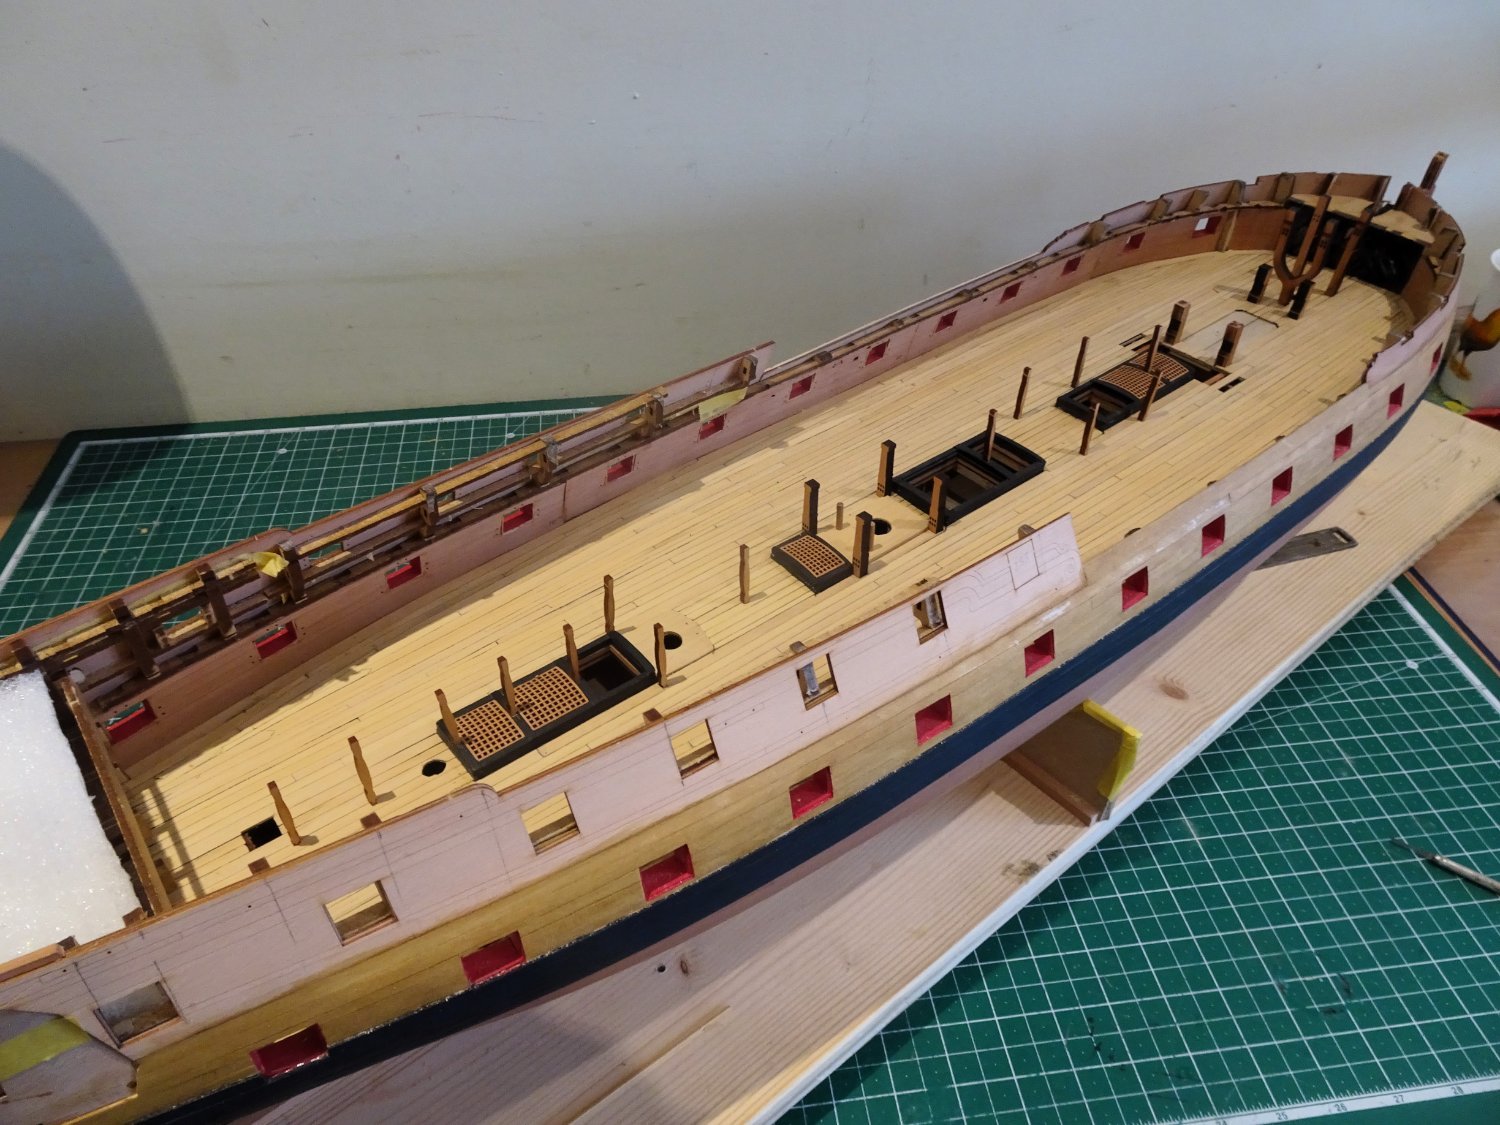
Post Fifty-six
…and more deck planking.
Another three days, and the Port side planking is completed.
1569
By removing a number of the existing planks I had hoped to then infill to the top and butt without too much trouble.
In retrospect it would have been far better not to plank beyond the central belt before fitting the t&b strakes.
The result is that the available space towards the stern was insufficient to accommodate the required number of planks, without an eclectic mix of shapes and sizes.
1584
As Mr Spock may say it’s planking Jim but not as we know it.

1576
So Guys what d’ye think. - Don’t give up the day job Boss!
Unfortunately this is my day job now, but on balance I decided not to rip it all up and start again, that would throw me short of planking, and I'm otherwise ok with what will be the visible element.

1570
Spot the double drop planks, necessary because of lack of planking foresight.
Annoying, but on the positive side the suspect area will be mostly hidden by the Qtr deck and aftermost 24 pounder guns.
1578

1582
The forward end of the planking and the top and butt strakes are ok.
1579
I generally enjoy deck planking, I find it therapeutic, but one of the downsides with 'Indy' is because of the hull size, and high bulwarks, the planking has to be done standing up.
Leaning over the hull, gives me back, neck, and shoulder ache, but it will all be worth it in the end.🤞
Onto the Starboard side, and more hours of fun.
B.E.
29/07/2023
- jpalmer1970, davyboy, rybakov and 13 others
-
16
-
-
Post Fifty-six
That Top and Butt deck planking.
Having a jig on hand gave me the impetus to play around with Top and Butt.
1553
Having cut out a stock of planks I found it useful to play around applying them to the deck in the manner of a jigsaw puzzle to help visualise of what is required, particularly at the bow and stern.
1559
I concluded it was doable and I started at the bow.
1556
At the stern I realised that some de-constructed was required to avoid running out of planking space.
1562
Removing some of the already laid planks not too troublesome with the application of water and use of a sharp micro chisel.

1560
Tapering of the planks as they run towards the stern, will be required, ideally with a finished butt width of not less than 3mm. Removal of further existing planks will also be involved.
1564
Tick strips will be used to facilitate the tapering.

1563

1557
A fair bit of extra work, but I’m fairly content with progress.
B.E.
27/07/2023
-
Post Fifty-five
Planking cont’d
I am now outside of the central run of planking, and from this point on I will be using 4mm planks.
I have decided on 30’ planks equating to around 140mm at scale, using a three-butt shift pattern.
Planking continues and the photos below show the state of play after a couple of days solid work.
1536

1533

1534

1532

1531

1540
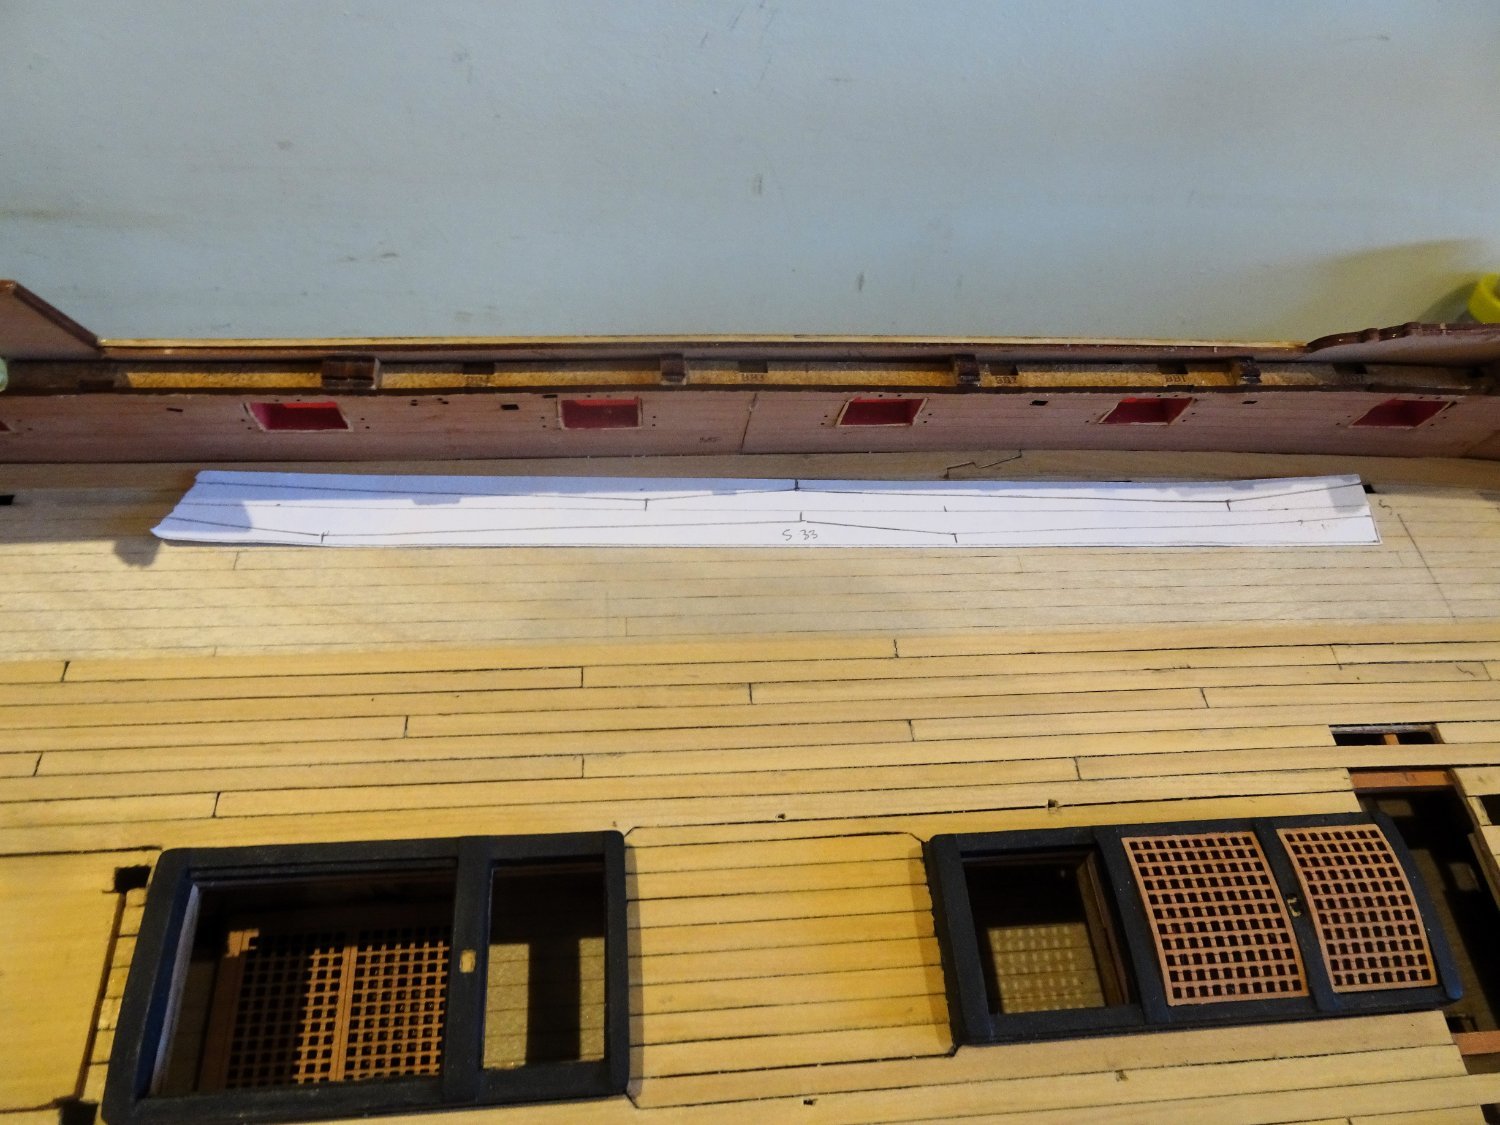
I now need to decide on the form of the strakes that abut the margin plank.
I am aware that two strakes of Top and Butt deck planking for the outer strakes were used during this period.
Goodwin (Construction and Fitting…) makes mention of this style of planking the gundeck but indicates that most vessels were planked with parallel strakes. He adds that the practise was probably adopted towards the end of the 18thc and its purpose to resist athwartships compression when the vessel was in heavy seas.
I have no knowledge whether 'Indy' was so planked, but I suspect that with a full battery of 24 pounders on a ‘64’ hull it may have been the case.
The only visual reference source I have is Vol 11 of the TFFM for the sixth-rate sloop. The book contains drawings of Top and butt planking combined with hooded planks.

1545
At this point I don’t have a clear idea of how to approach the fitting of t&b particularly at the curvature of the margin plank towards the bow.
1546
Another important issue is if I manage to cobble together a set of t&b, how will that impact on planking the remaining space.
1544
The simple option would be to continue the planking and joggle the planks ends into the margin. I’m tempted, but I do have a jig for t&b…..
I’ll take some time out and have a play around.
B.E.
25/07/2023
-
-
Very nicely presented Chris, and well worth completing.
You must hold the record for the MSW longest build on the stocks to be completed award.
I thought my Pegasus build of seven years was a marathon.
Regards,
B.E.
- Canute, Ryland Craze, mtaylor and 3 others
-
6
-
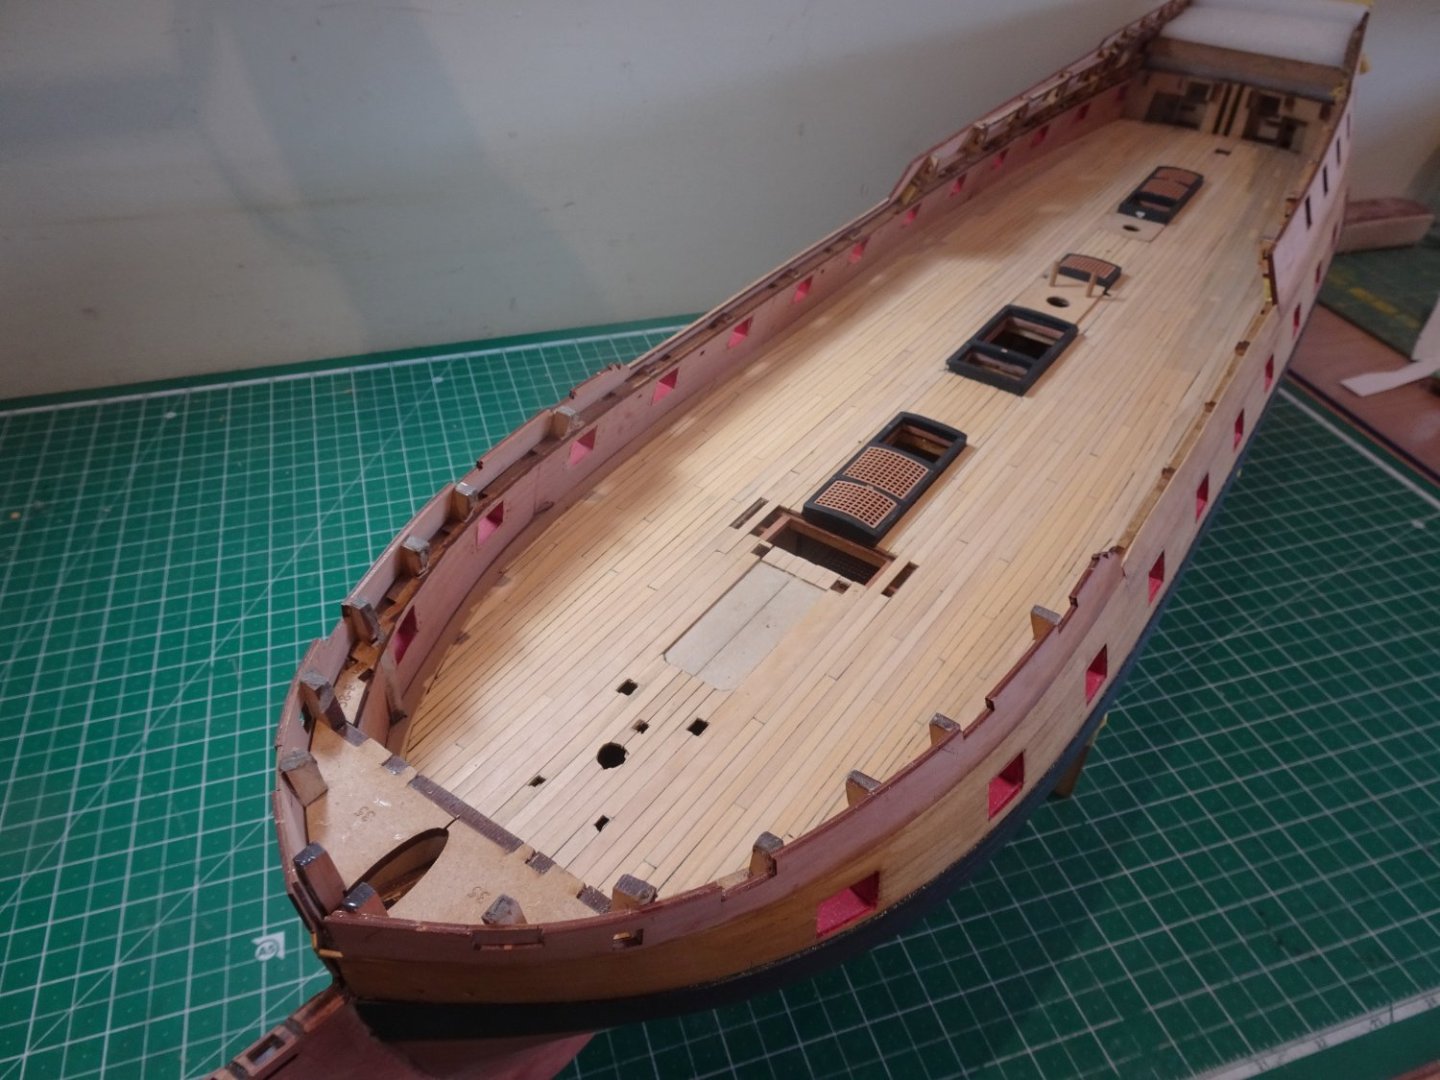
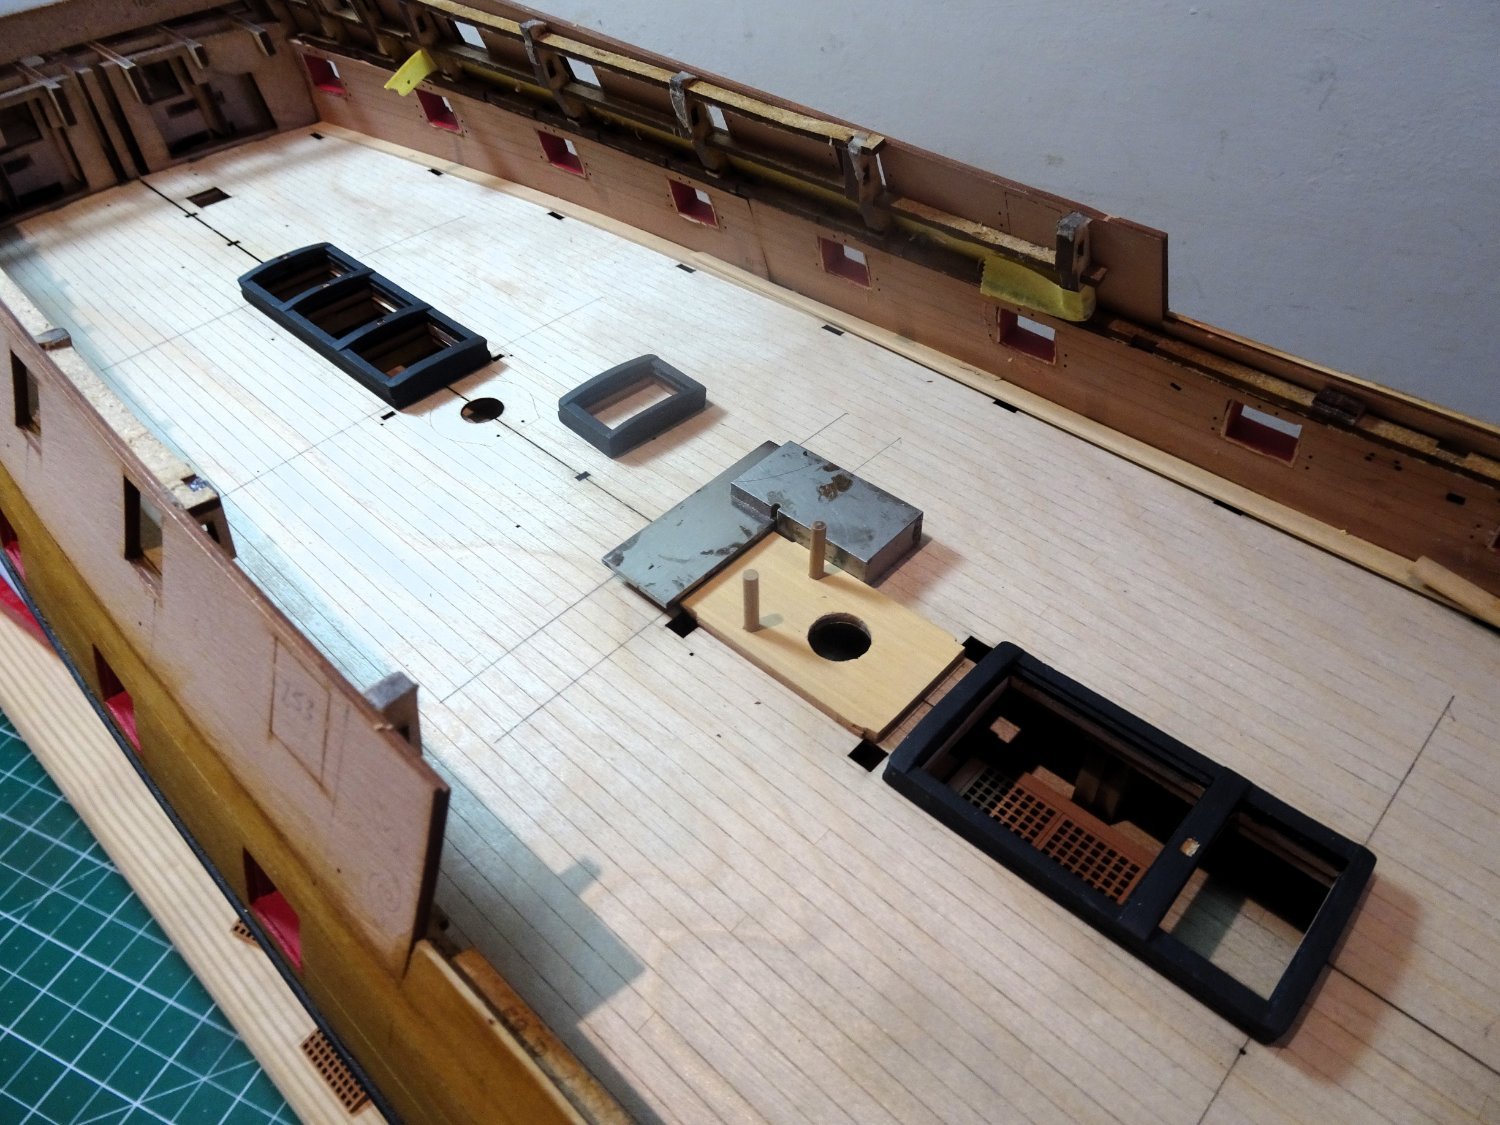
Post Fifty-four
Onto the deck planking
A very wet weekend in these ‘ere parts allowed for good progress in planking the gundeck.
Before I start, I forgot to mention the Capstan step for the Upper deck, or lower Capstan.
The kit provided part (278) looked a little unusual to me, of a shape reminiscent of a toilet seat.
1512
Of minor relevance if the area is to be decked over, but in my version it is likely to be unplanked.
I replaced the kit version with a more conventional set-up, made from Box sheet. The kit version sits atop it in this photo.
For the deck planking I am using 1mm Boxwood strip obtained from Hobbycraft EU. The main supply is of 4mm width but I will also be using 5mm and 6mm widths in various areas.

1517
I start the job at the stern and work forward; for this first phase I am planking between and around the centre line deck fittings.
1515
When it came to the brick base for the Gally stove I wasn’t too sure whether to plank around the base guidelines on the sub deck or fit the base atop the planking. The manual pics which used the engraved deck pattern indicates that the base is inset the deck pattern.
I decided to temporarily fit a dummy brick base, and plank around it.
One of the tenets or principles of deck planking is that very thin strips are undesirable, such as abutting the coamings of hatches. These would present areas of weakness subject to rot.
In these areas broader planks are required, so a range of planking widths are required. If the fittings are applied post decking then it is often a question of pot luck where the planking lines fall.
1523
1529
The broader planks bordering the Main and Fore hatchways can be seen in the above shots.

1520
I have used 4mm,5mm,and 6mm strips in completing this area.
1522
1524
1525

1527
Once past the central section the planking tends to regularise., until at least it approaches the margin/waterway planks.
At that point there is another decision to be made.
B.E.
23/07/2023
-
Thanks for your comments and 'likes' guys 👍
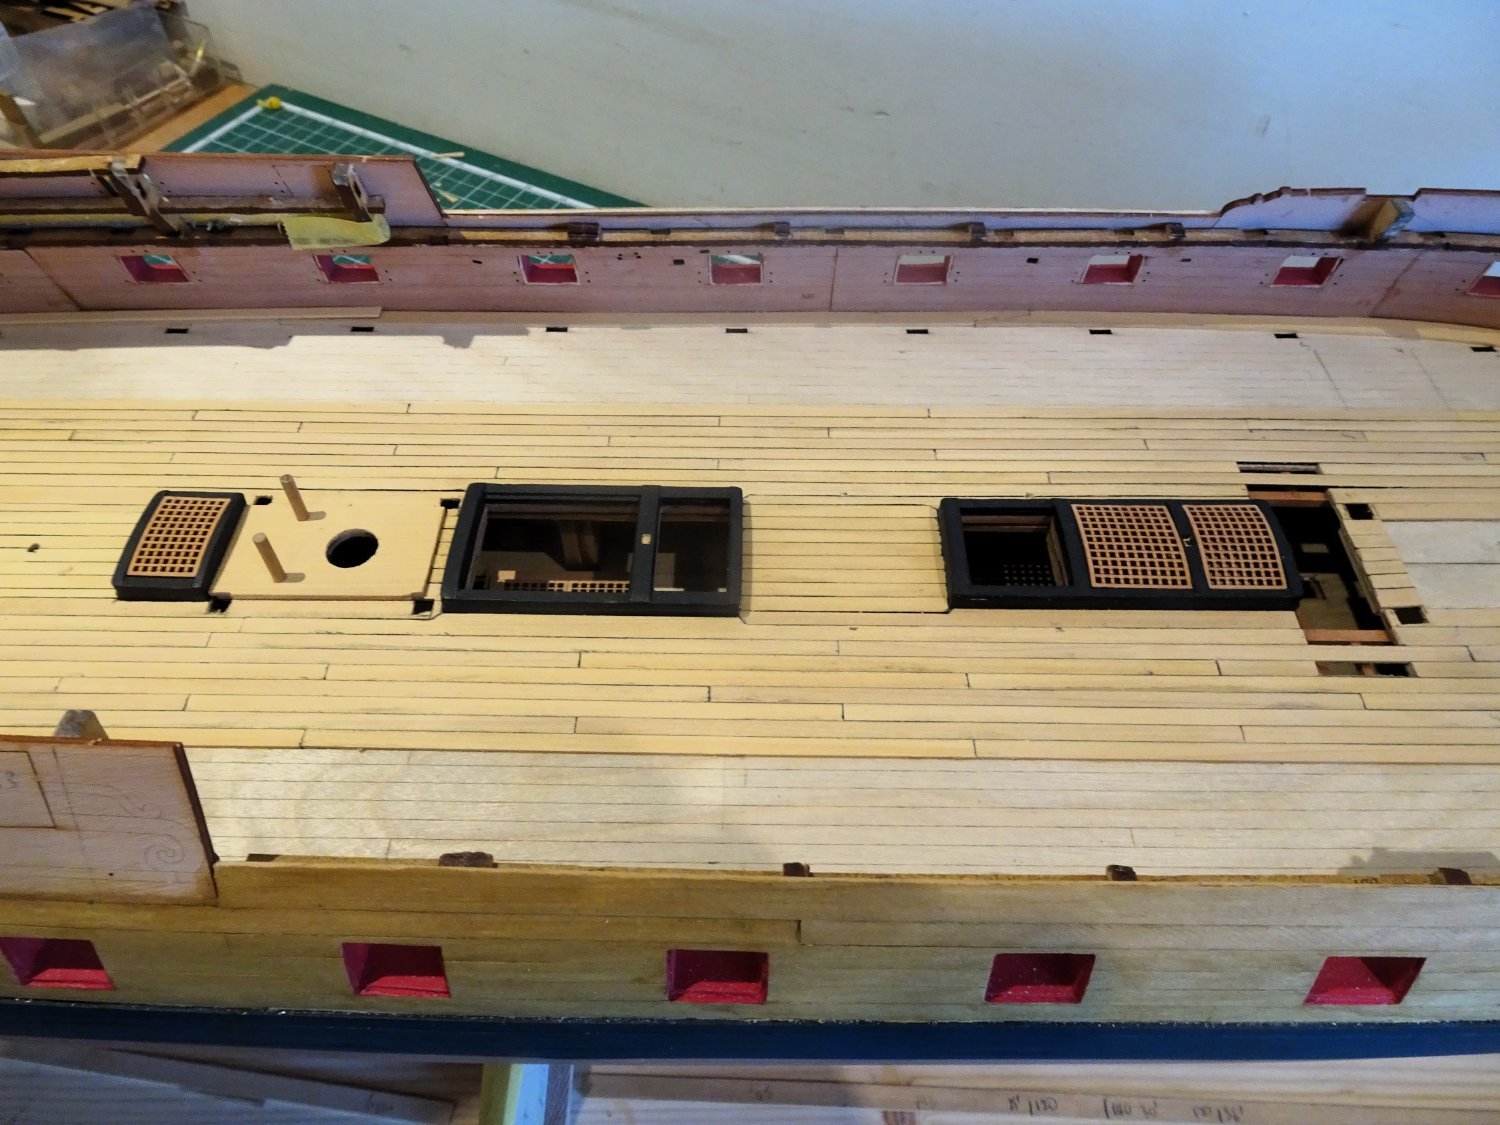
Post Fifty-three
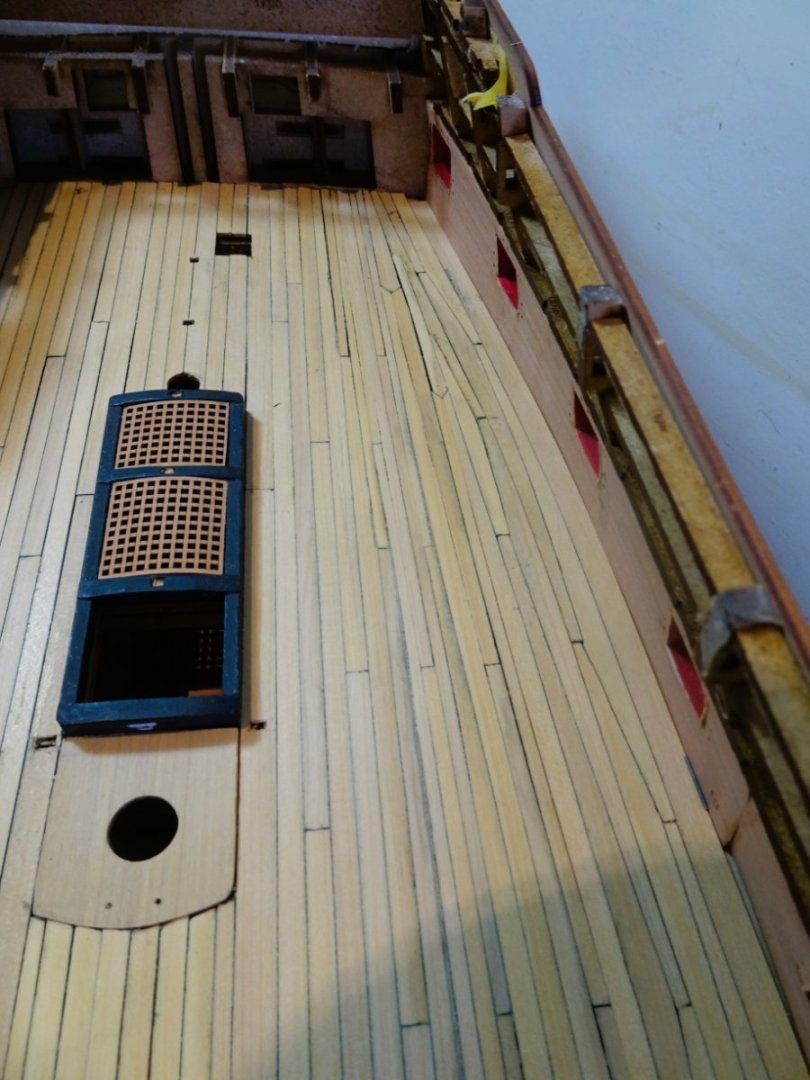
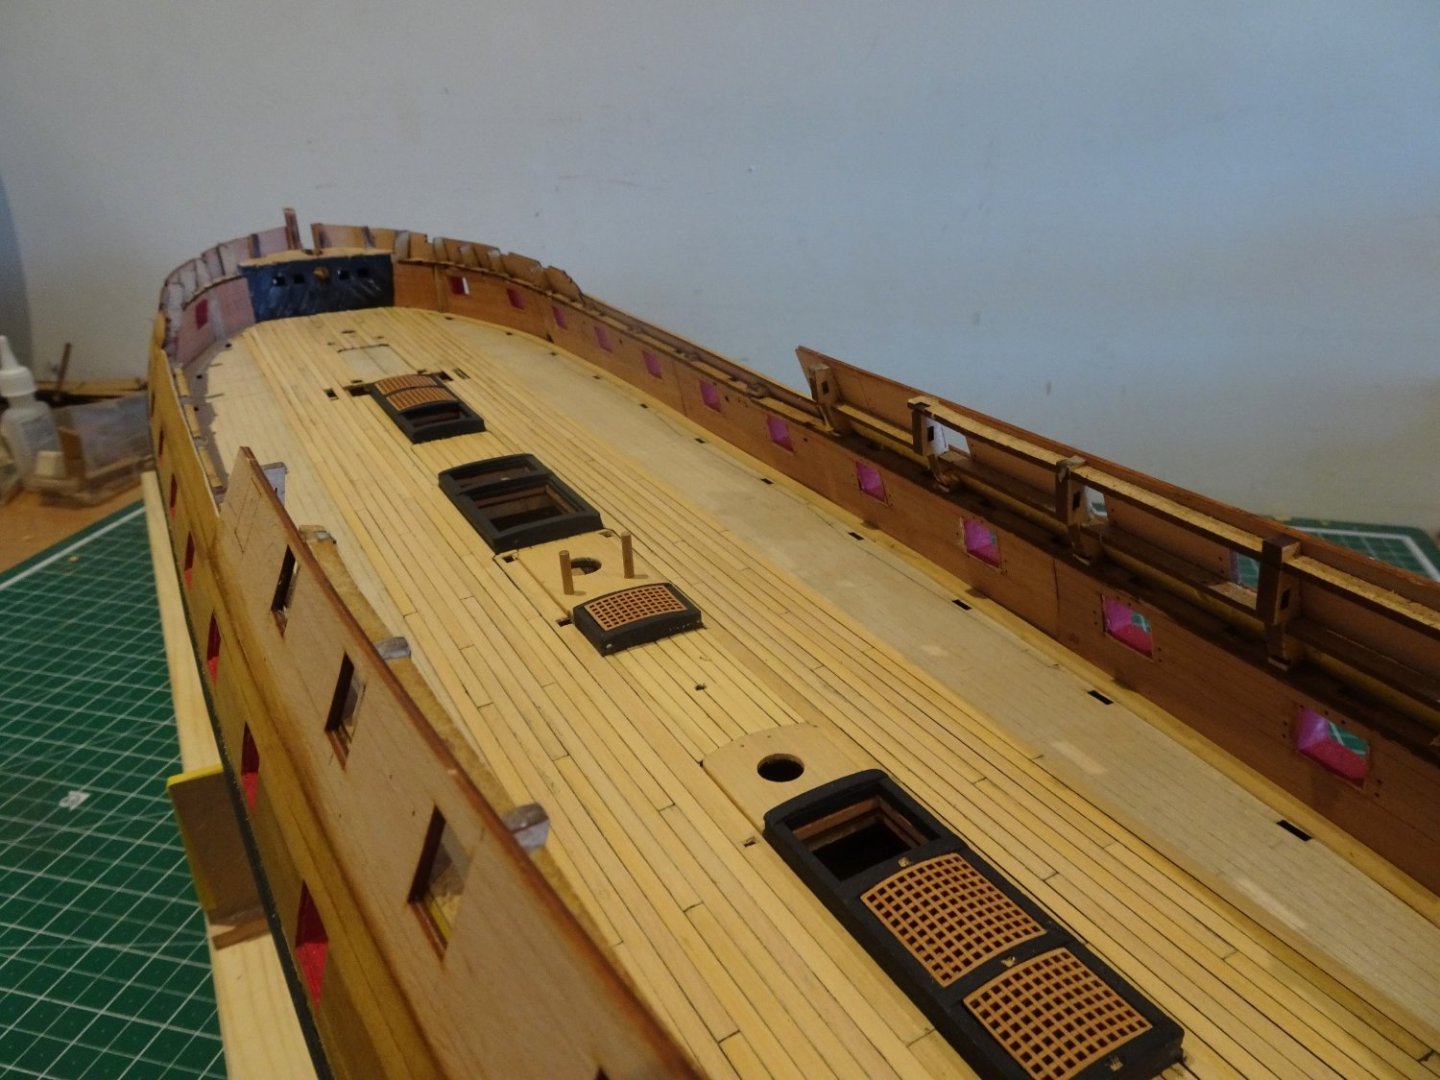
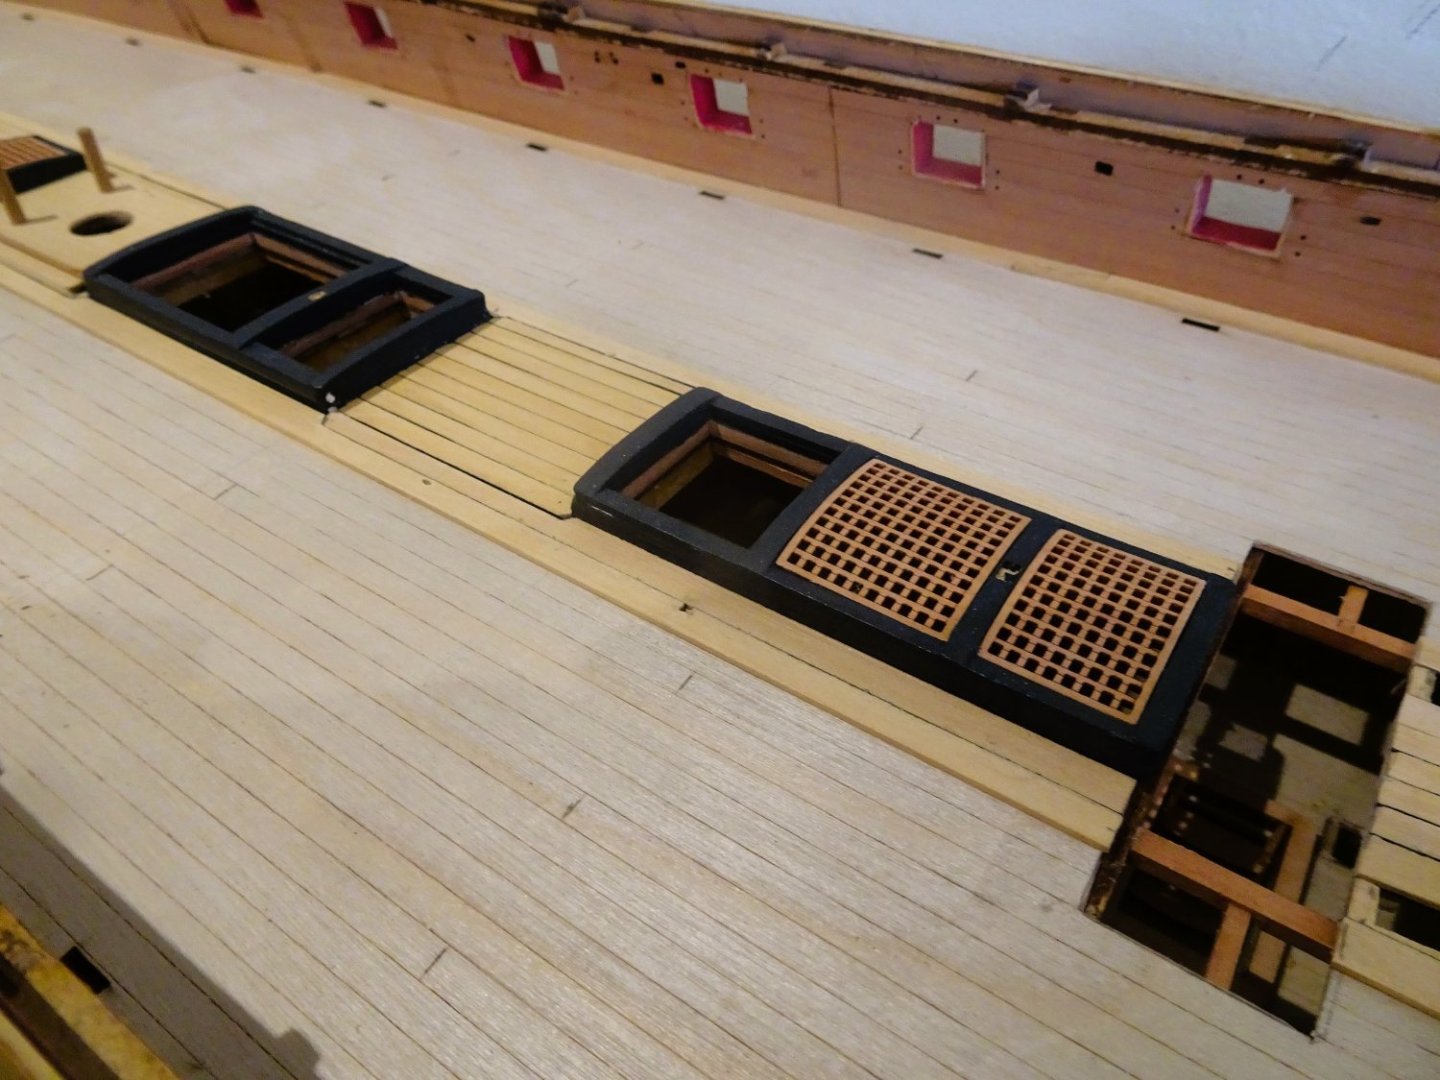
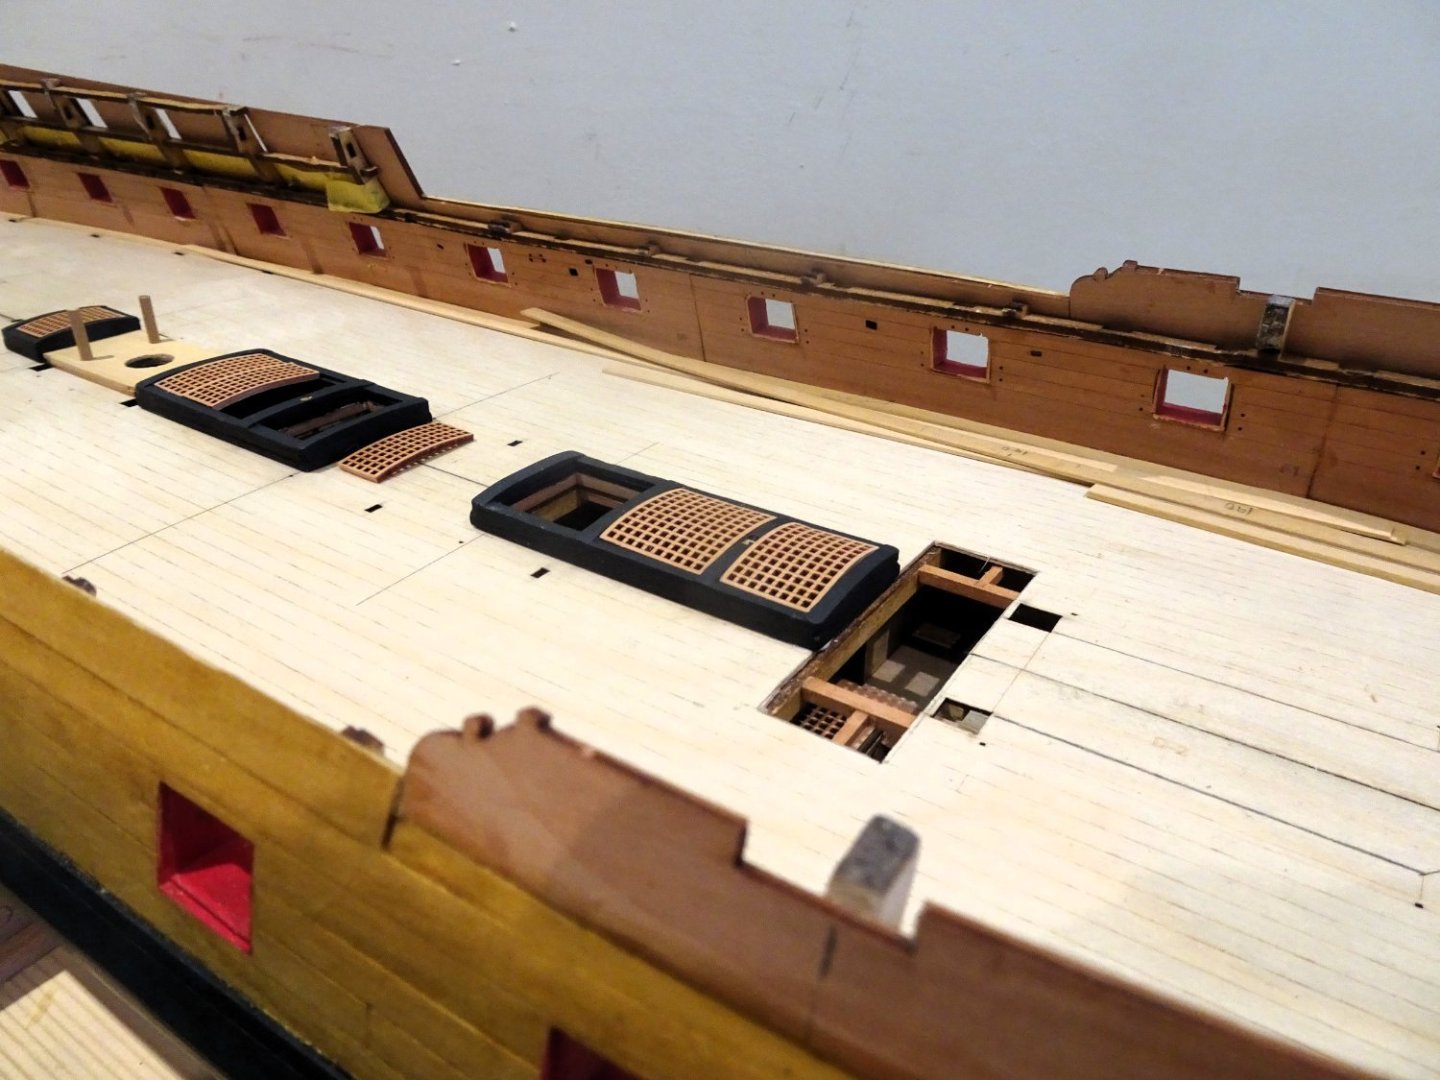
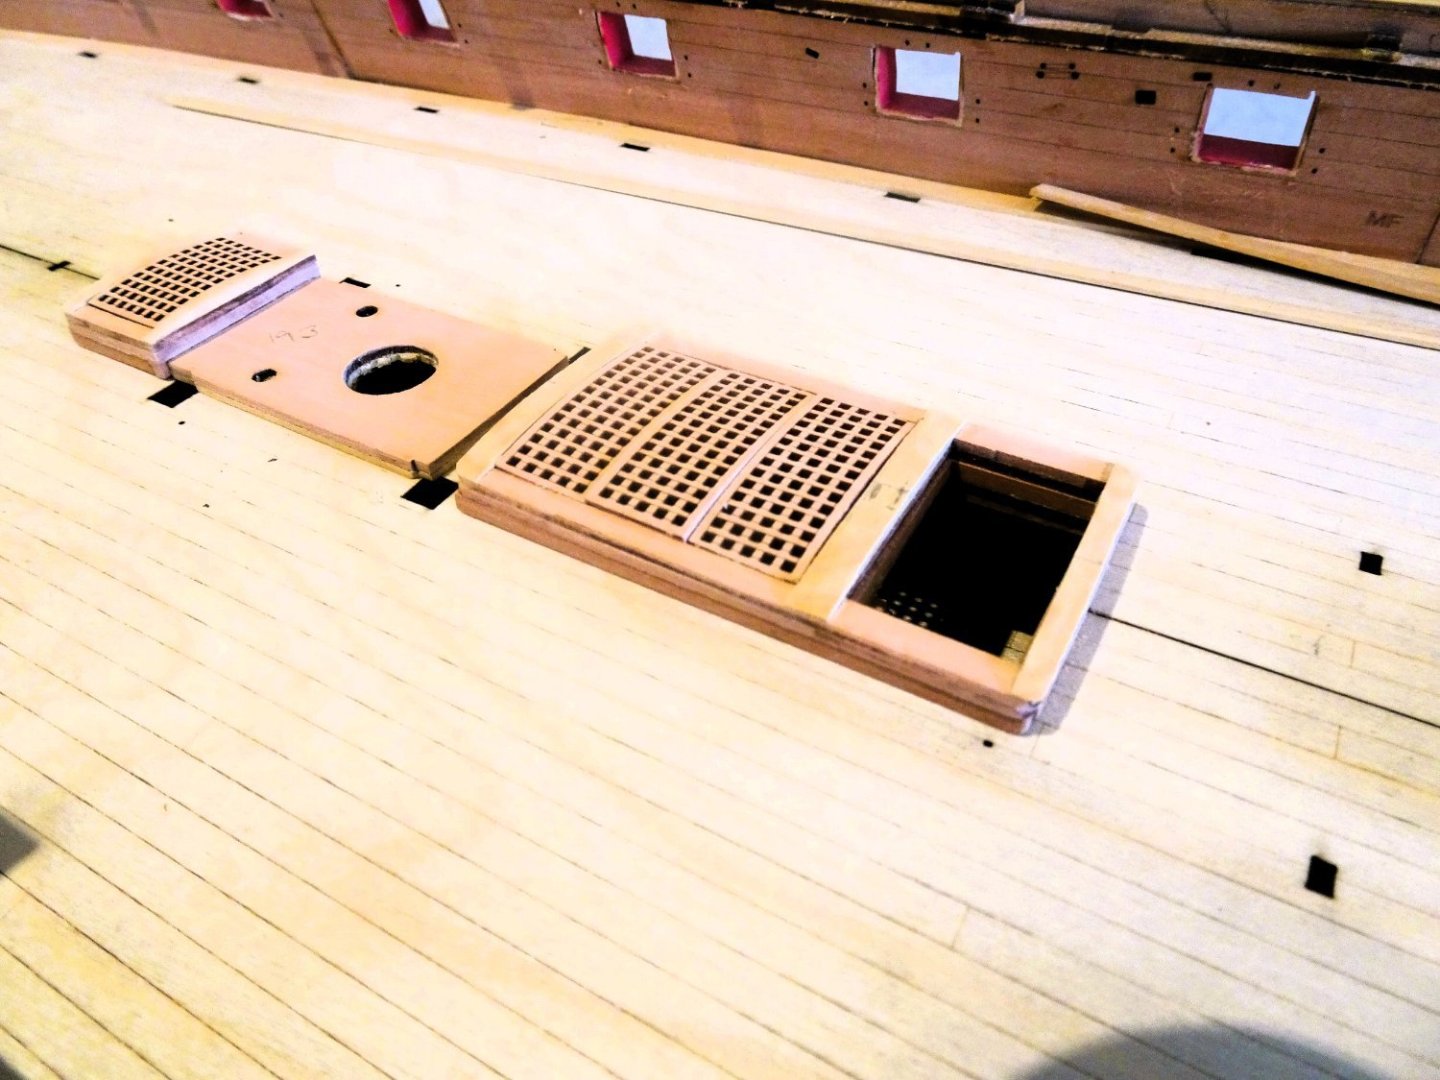
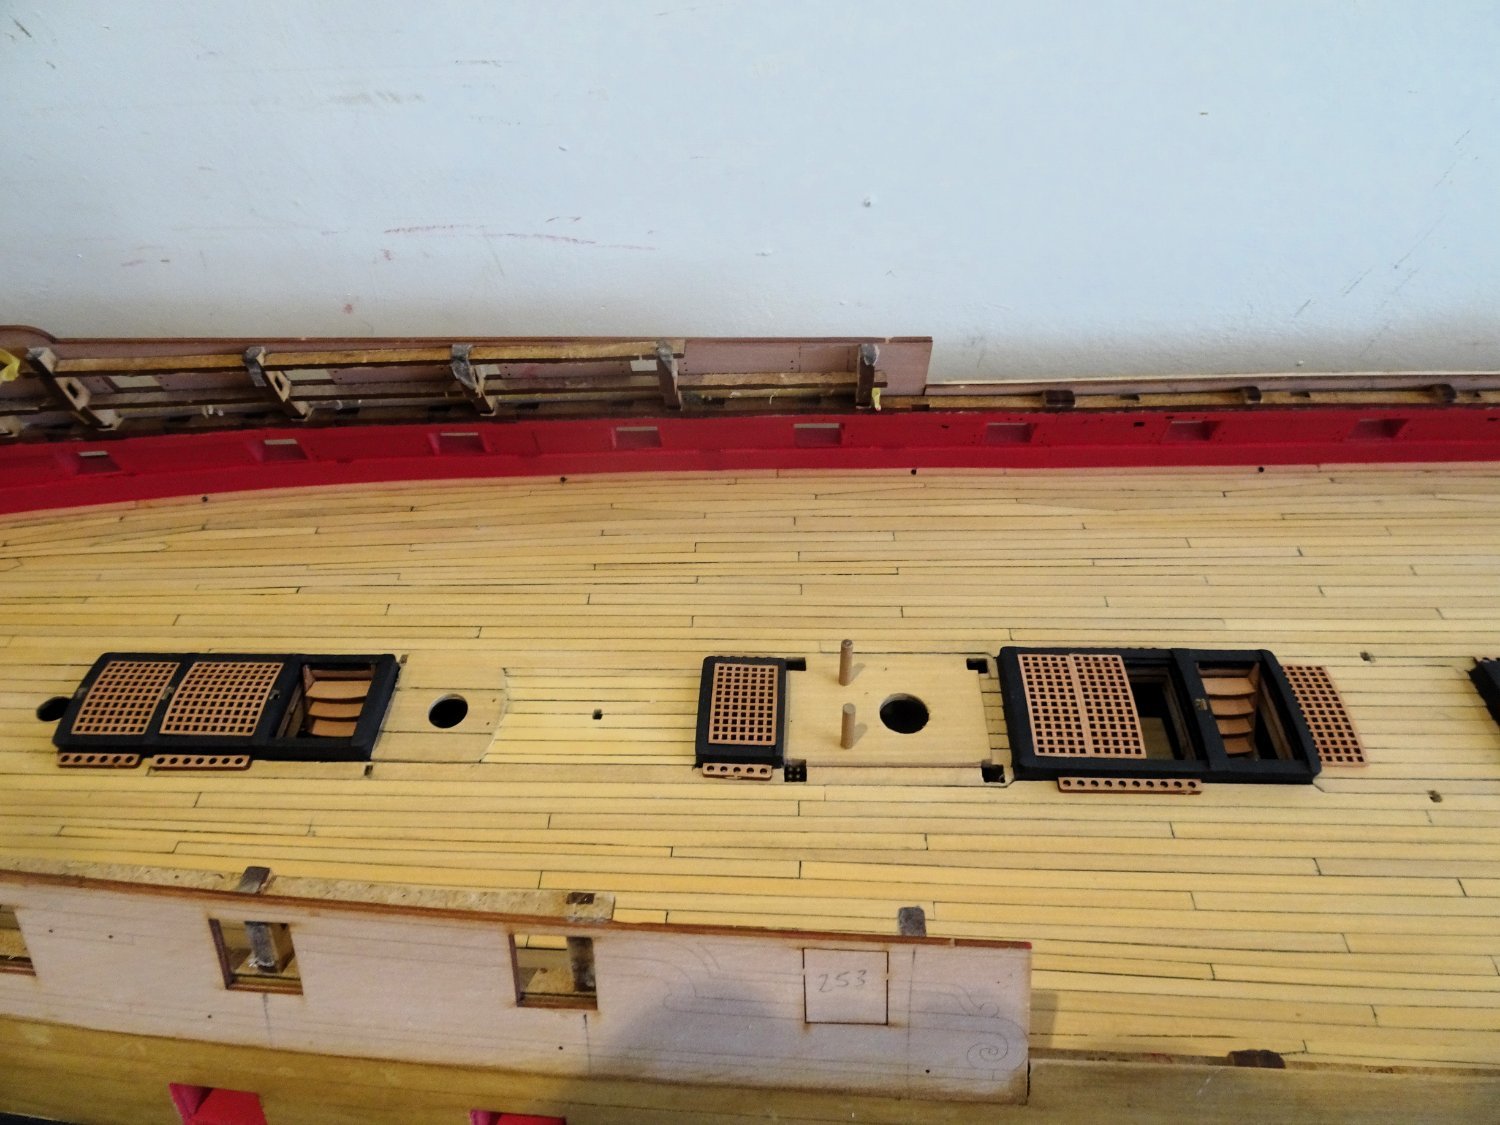
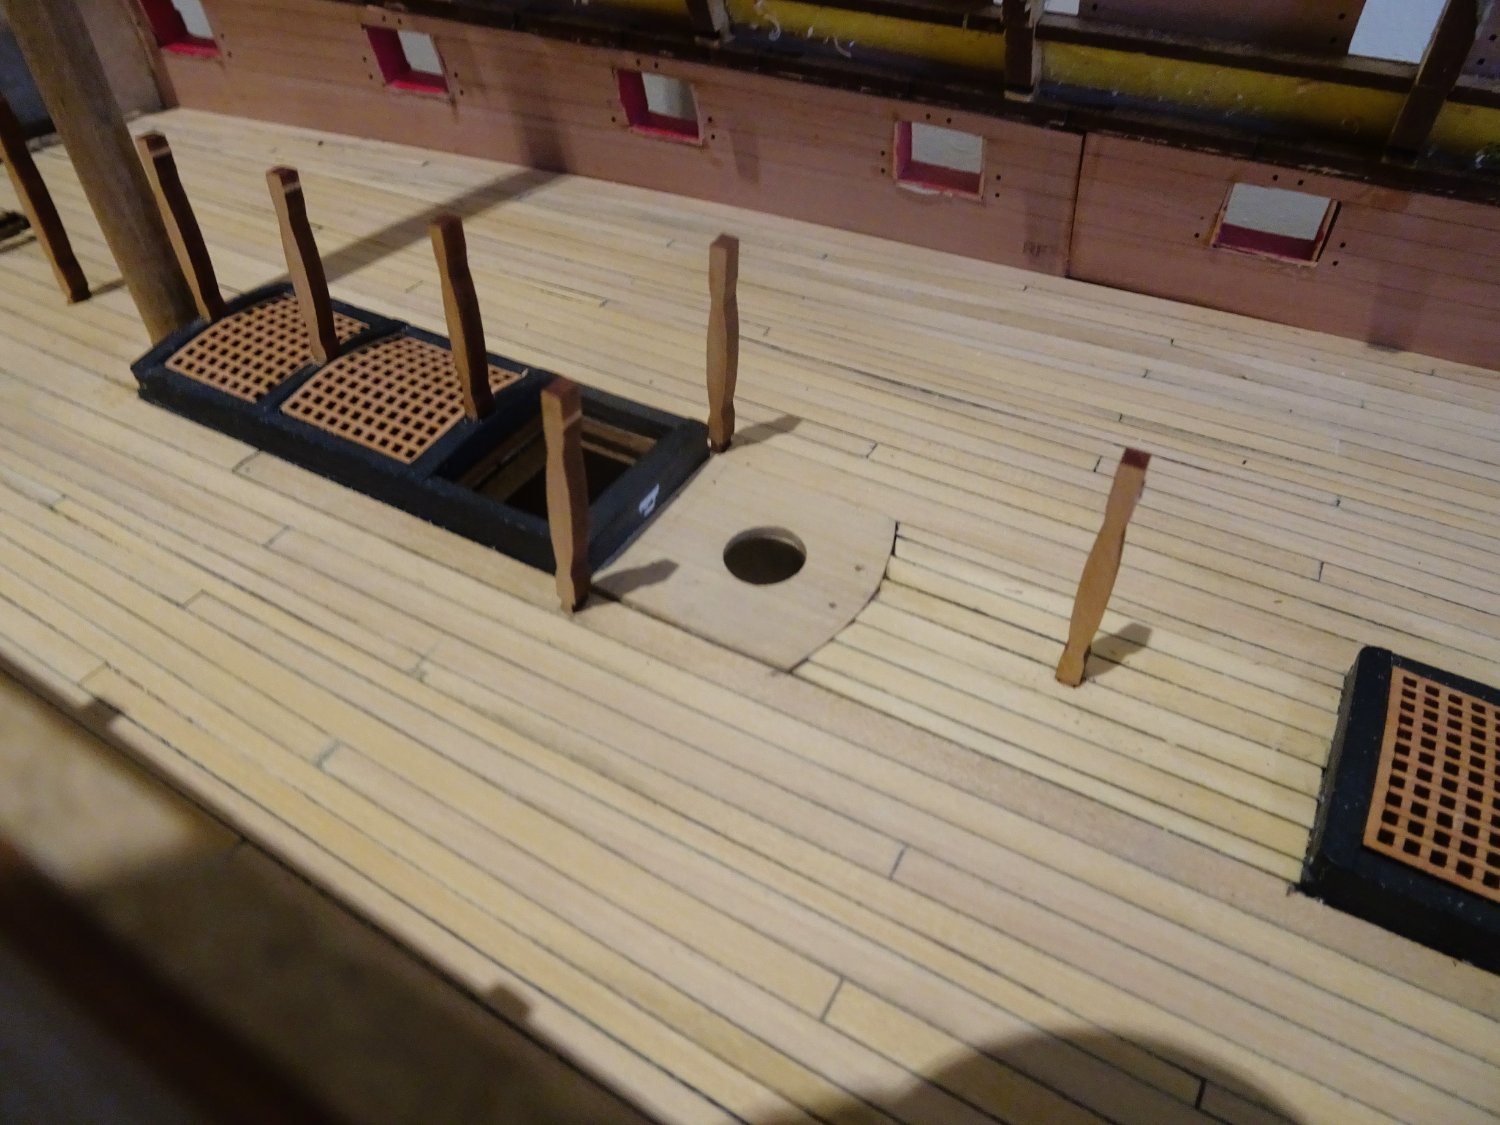
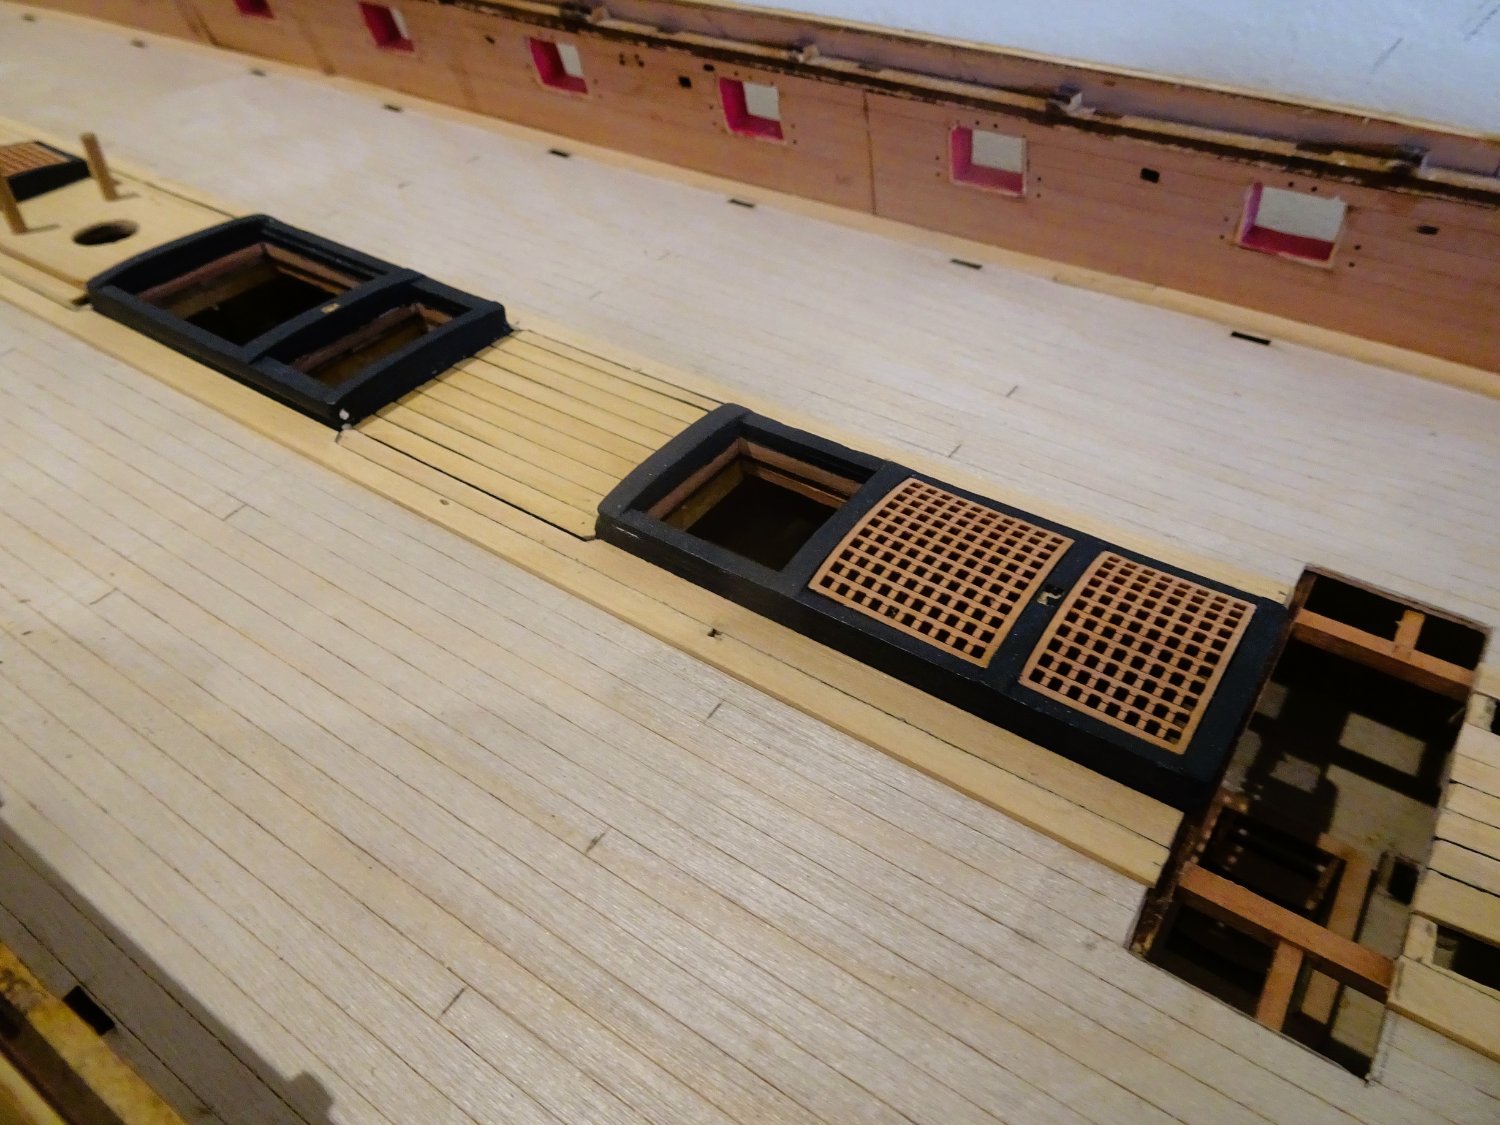
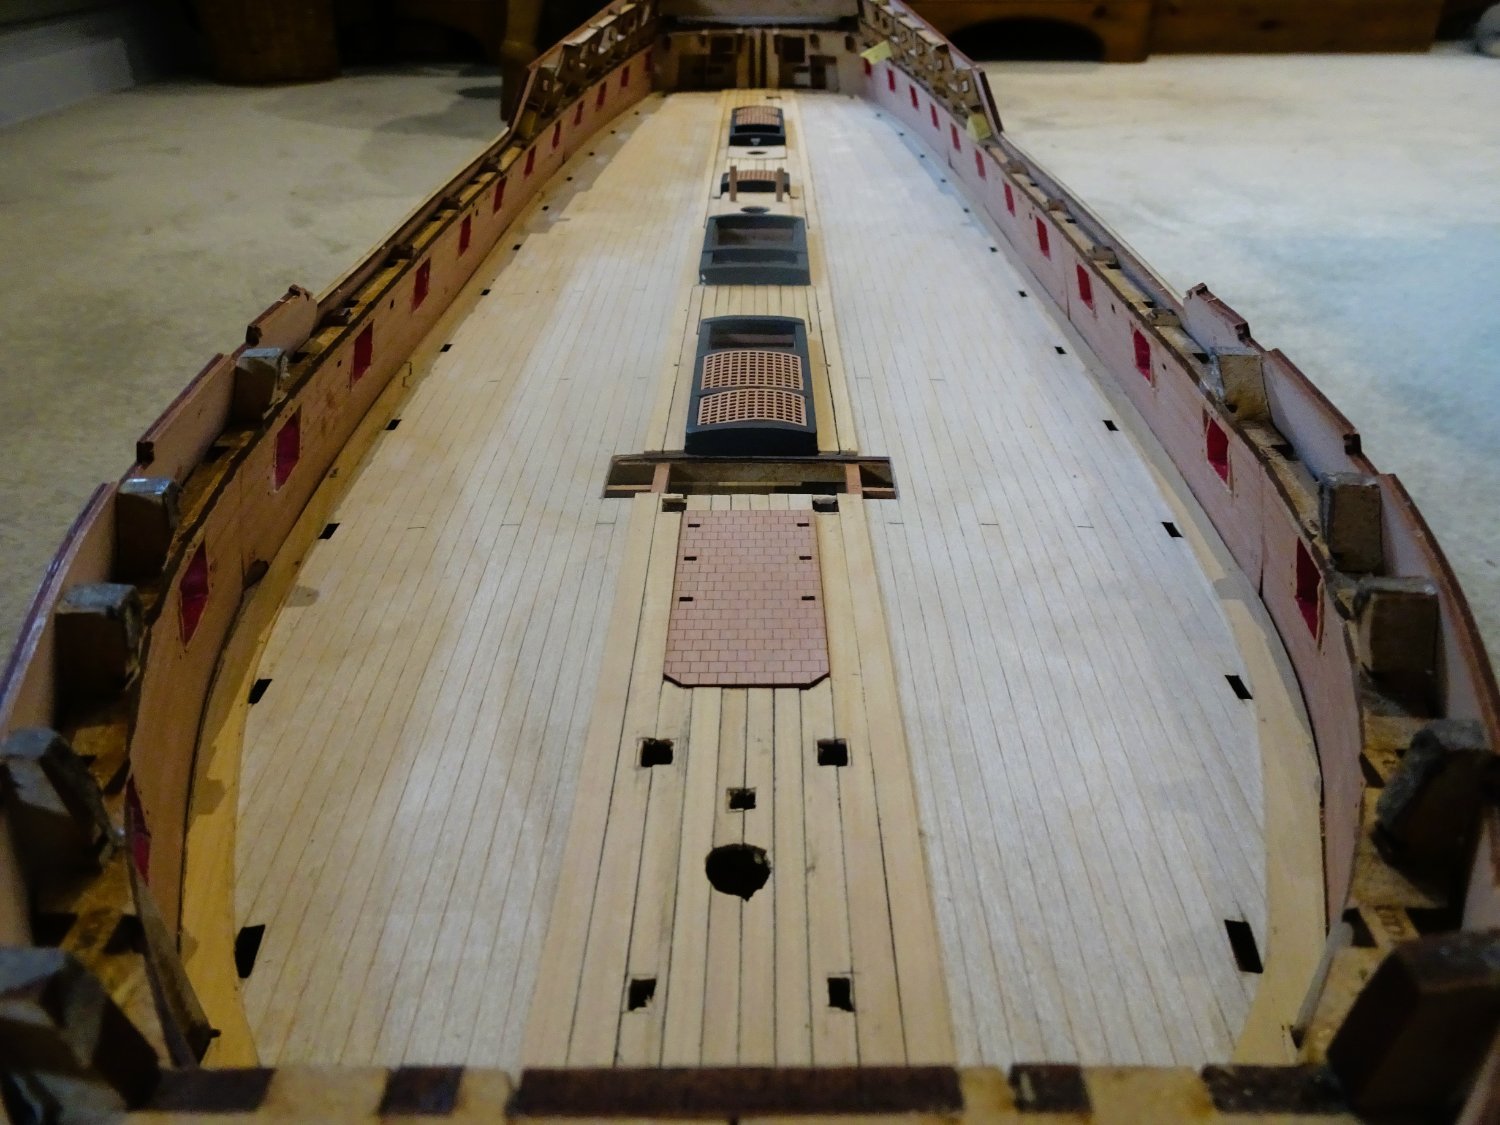
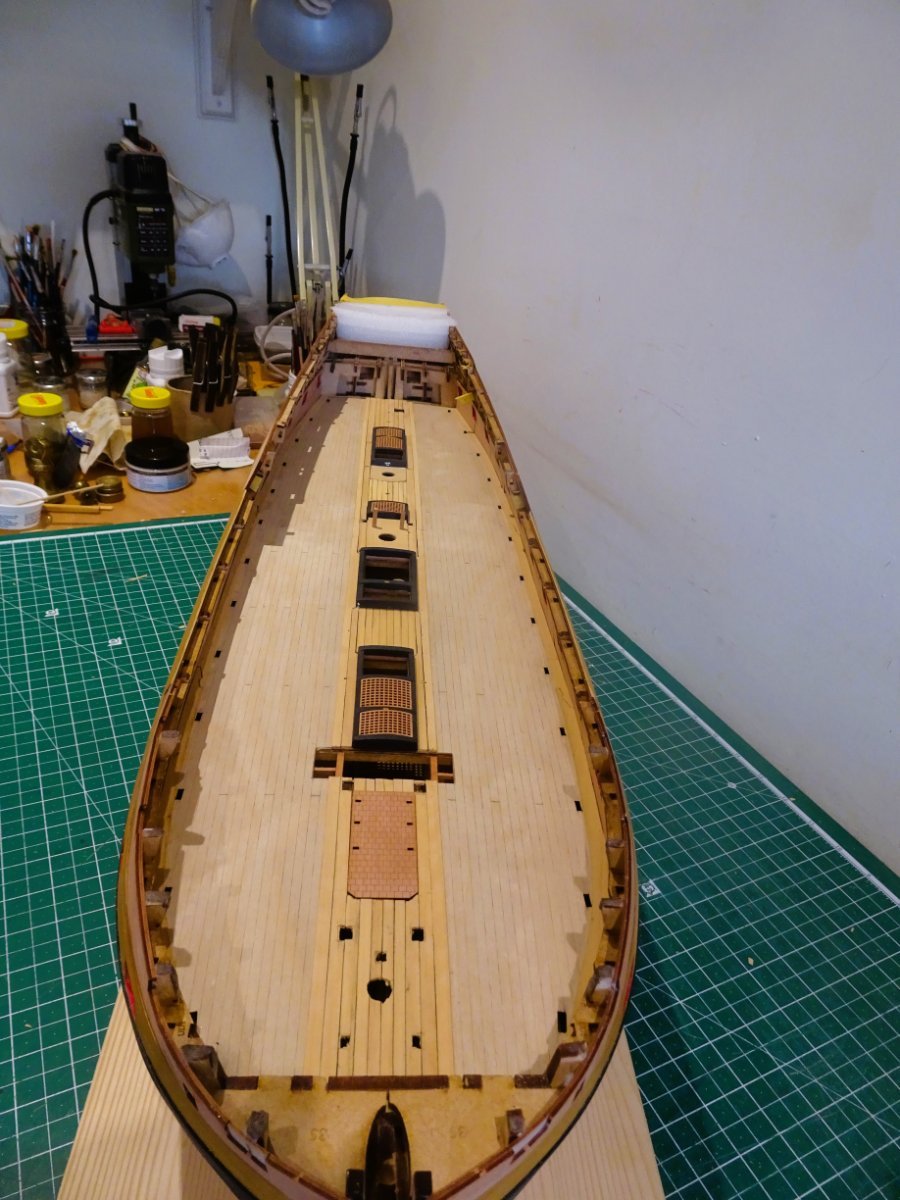
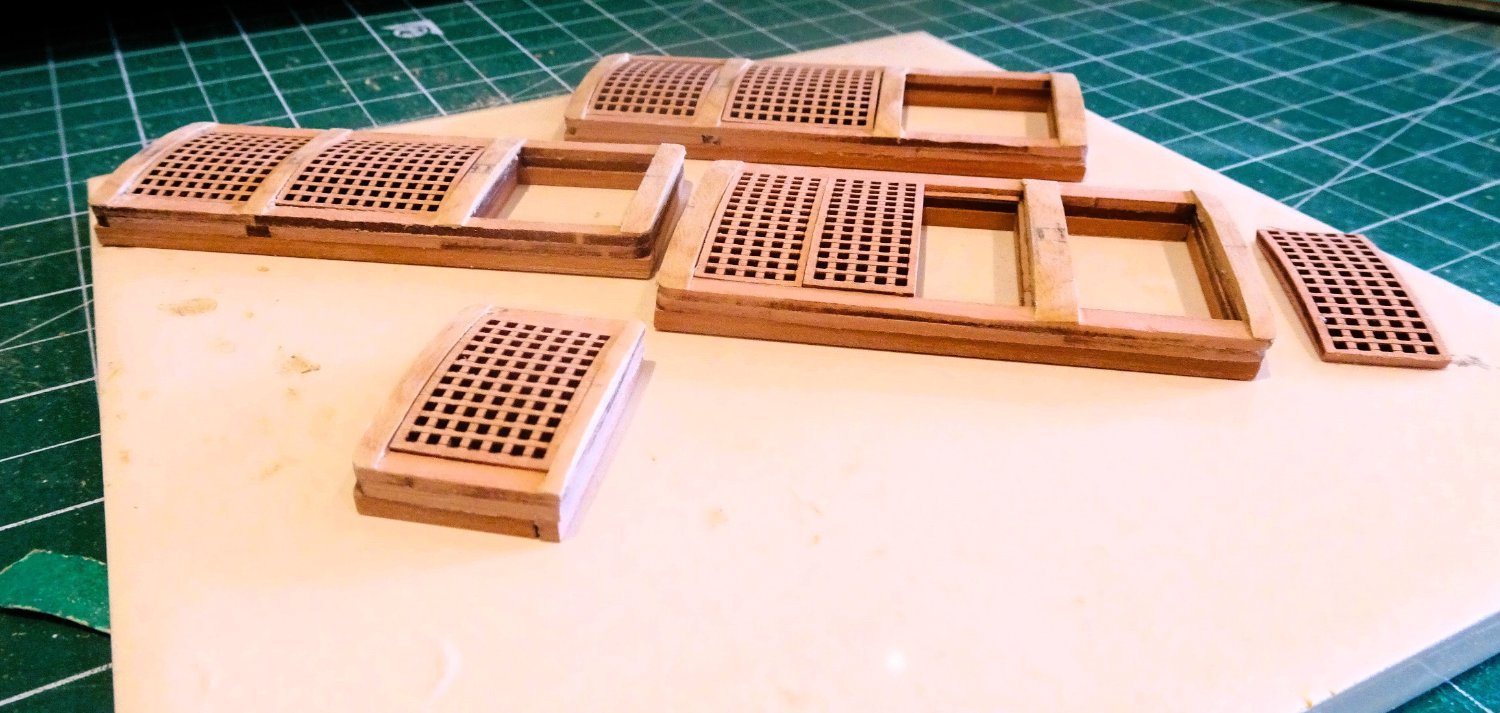
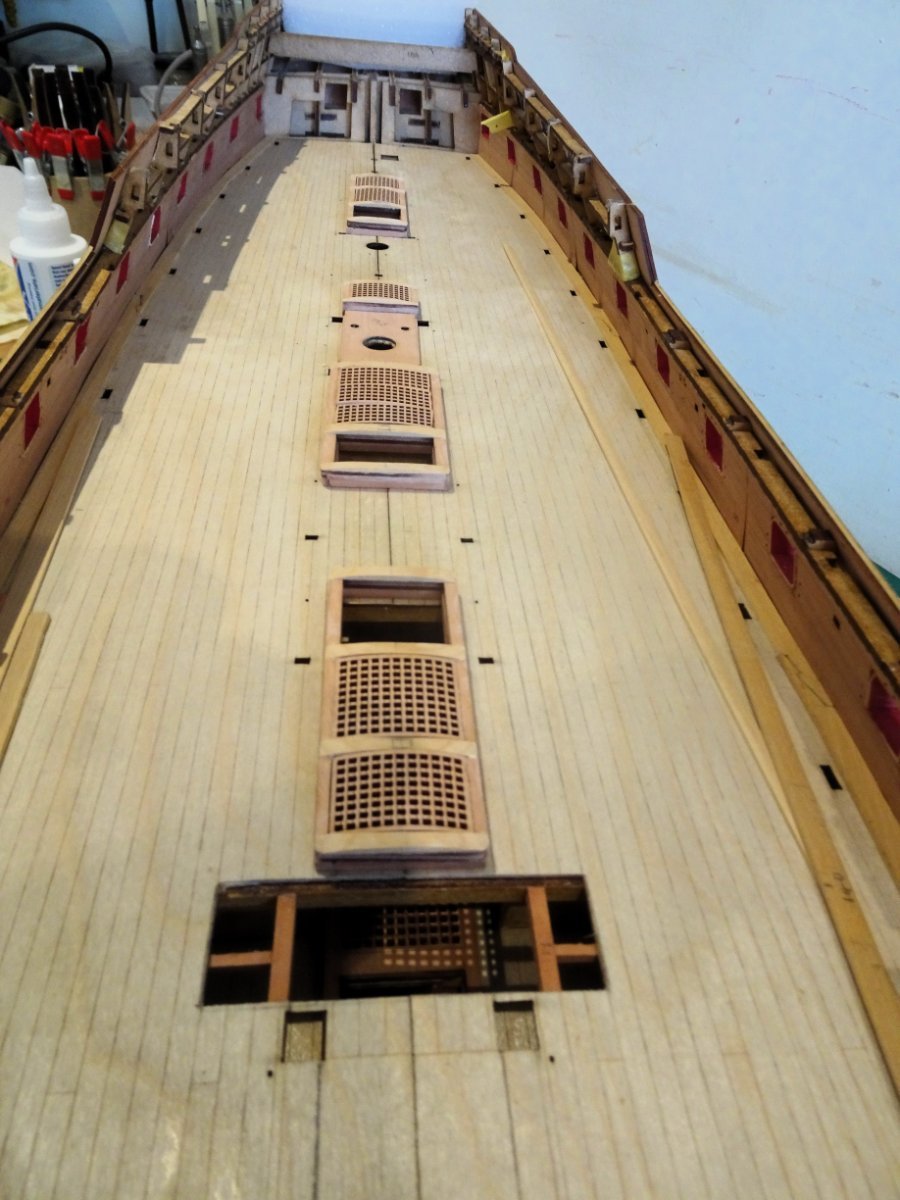
Completion of gundeck hatches.
1491
The modified hatches are painted, and the gratings given the w-o-p treatment.

1495
I always approach the gluing of fittings along the centre line with some anxiety. Particularly on a large length of deck as on Indy it can be tricky to ensure that they are all in true alignment.
I spend a lot of time dry fitting the hatch sets before I commit to glue.
Whether you plank before or after, this same issue will be encountered.
Fitting the hatches before planking allows for a more accurate and interesting deck layout around the coamings, albeit a more fiddly and time-consuming approach.
1493
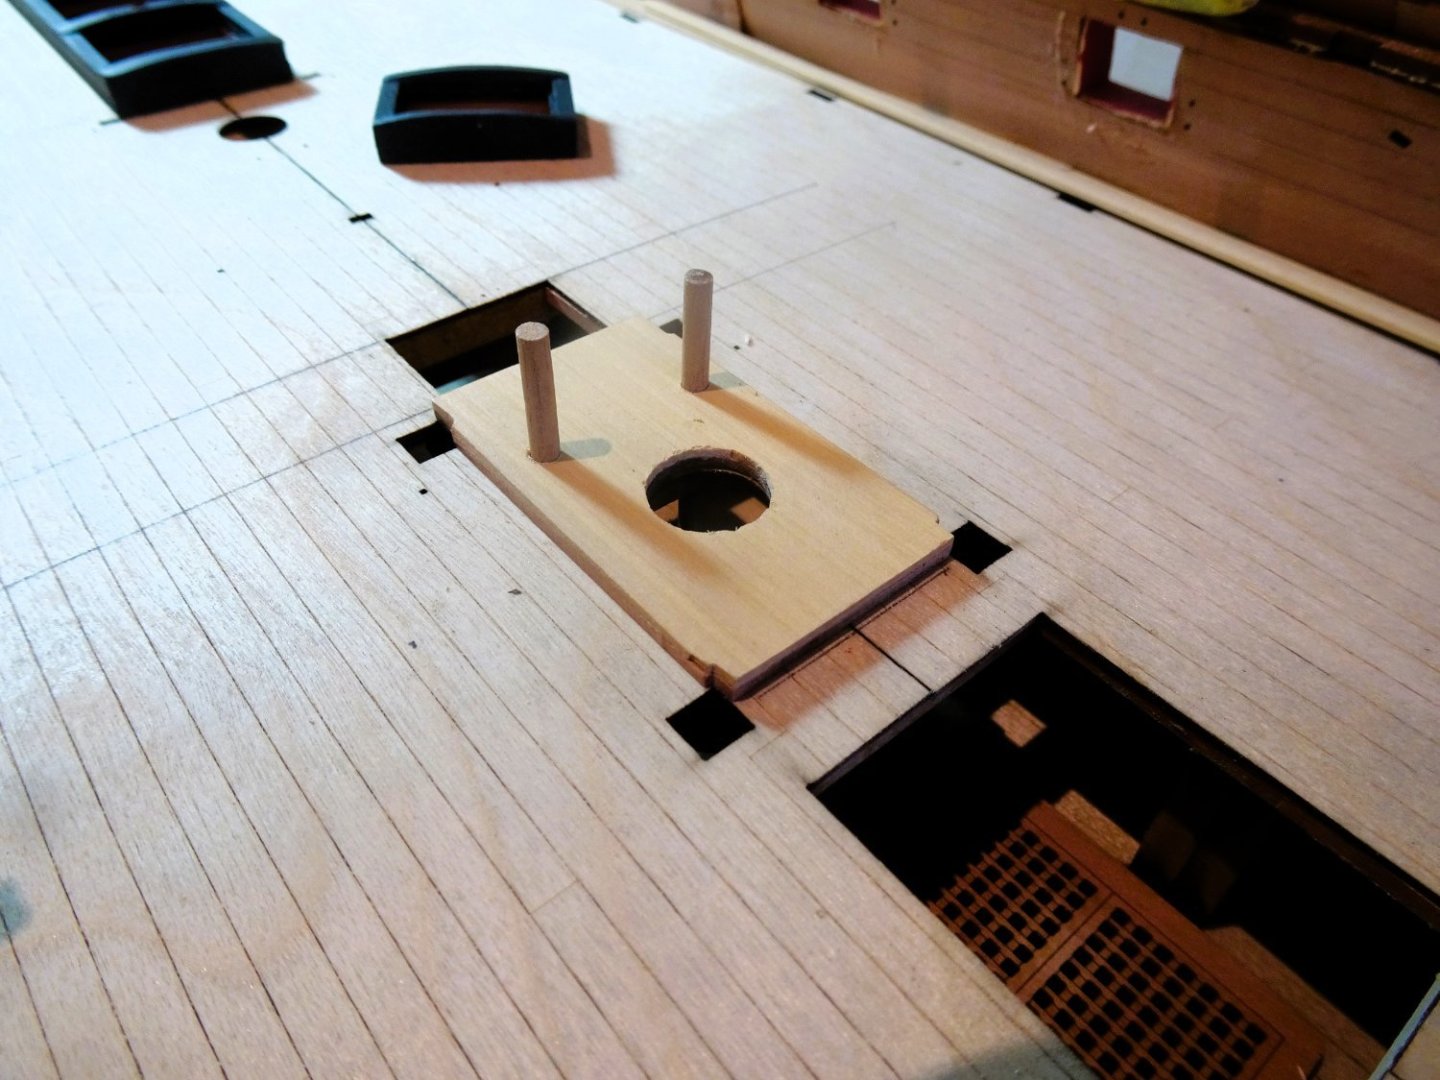
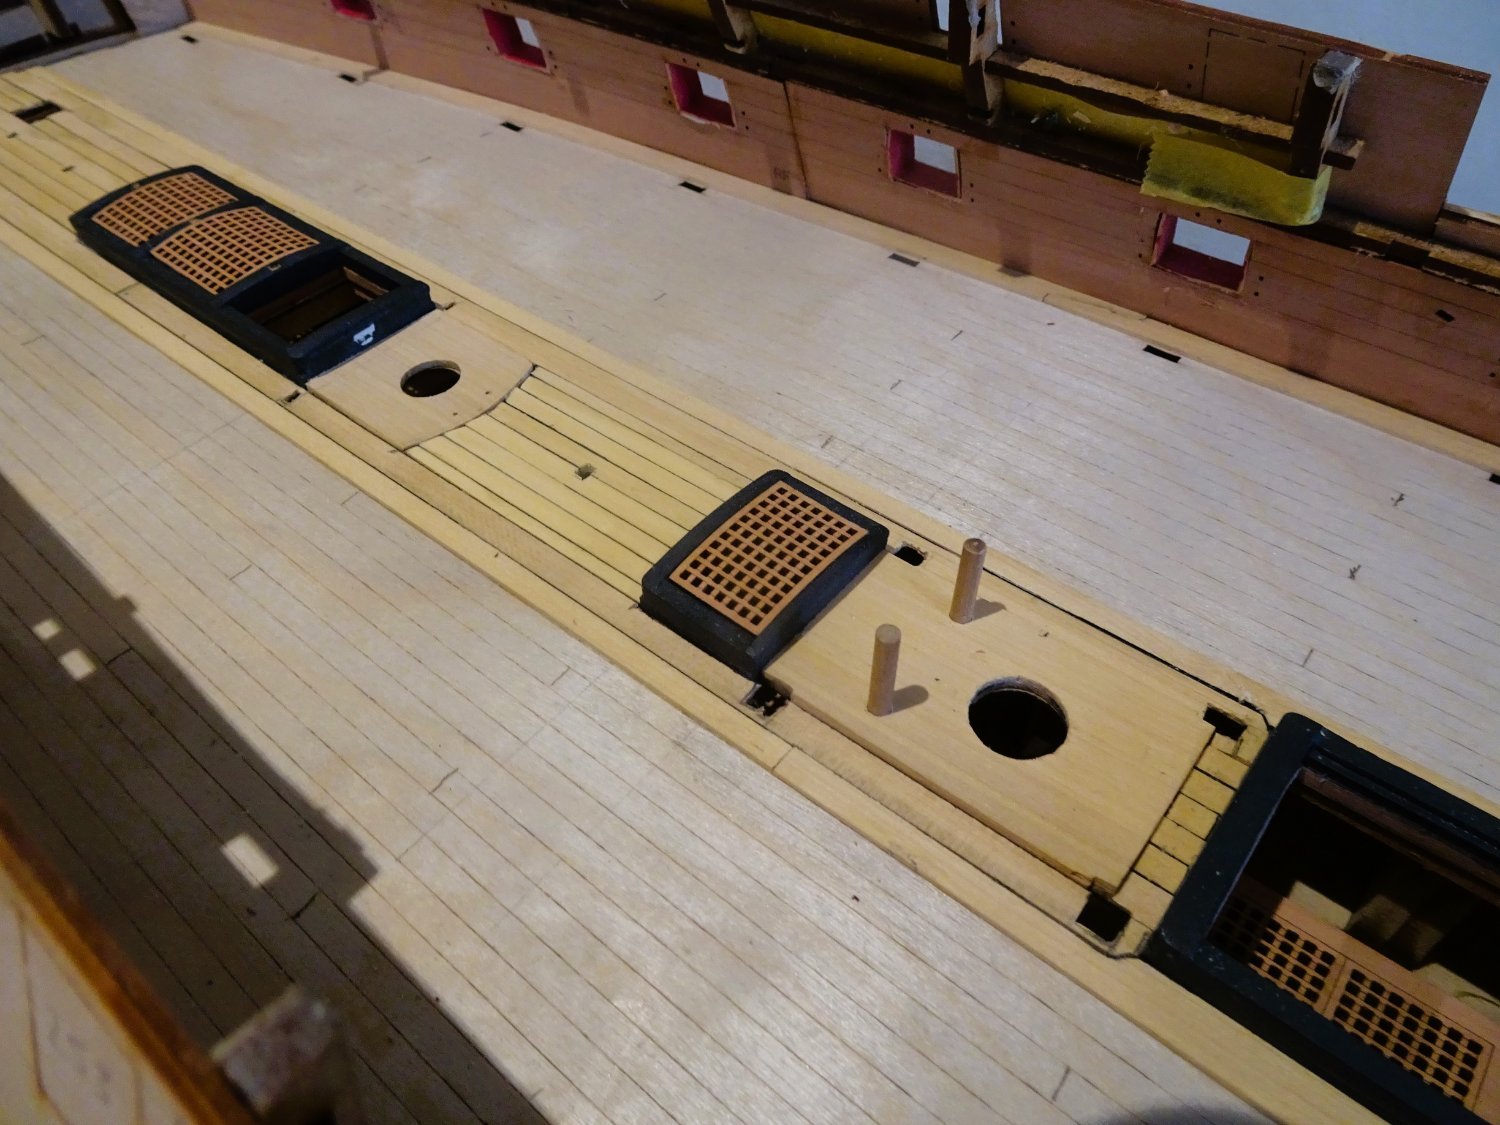
I start by fixing the mainmast partner base. On the kit this is attached to the hatchway abaft the Mainmast, (193) but I separated them. This base also has the holes to take the elmtree pumps.
I use small diameter round dowel to secure the base in the correct position, this will also double up as pump fixings.
As on the original these pump trunks run thro’ all decks to the bilges, pity they ain’t hollow.
The sets are now glued into place on the deck centre -line.
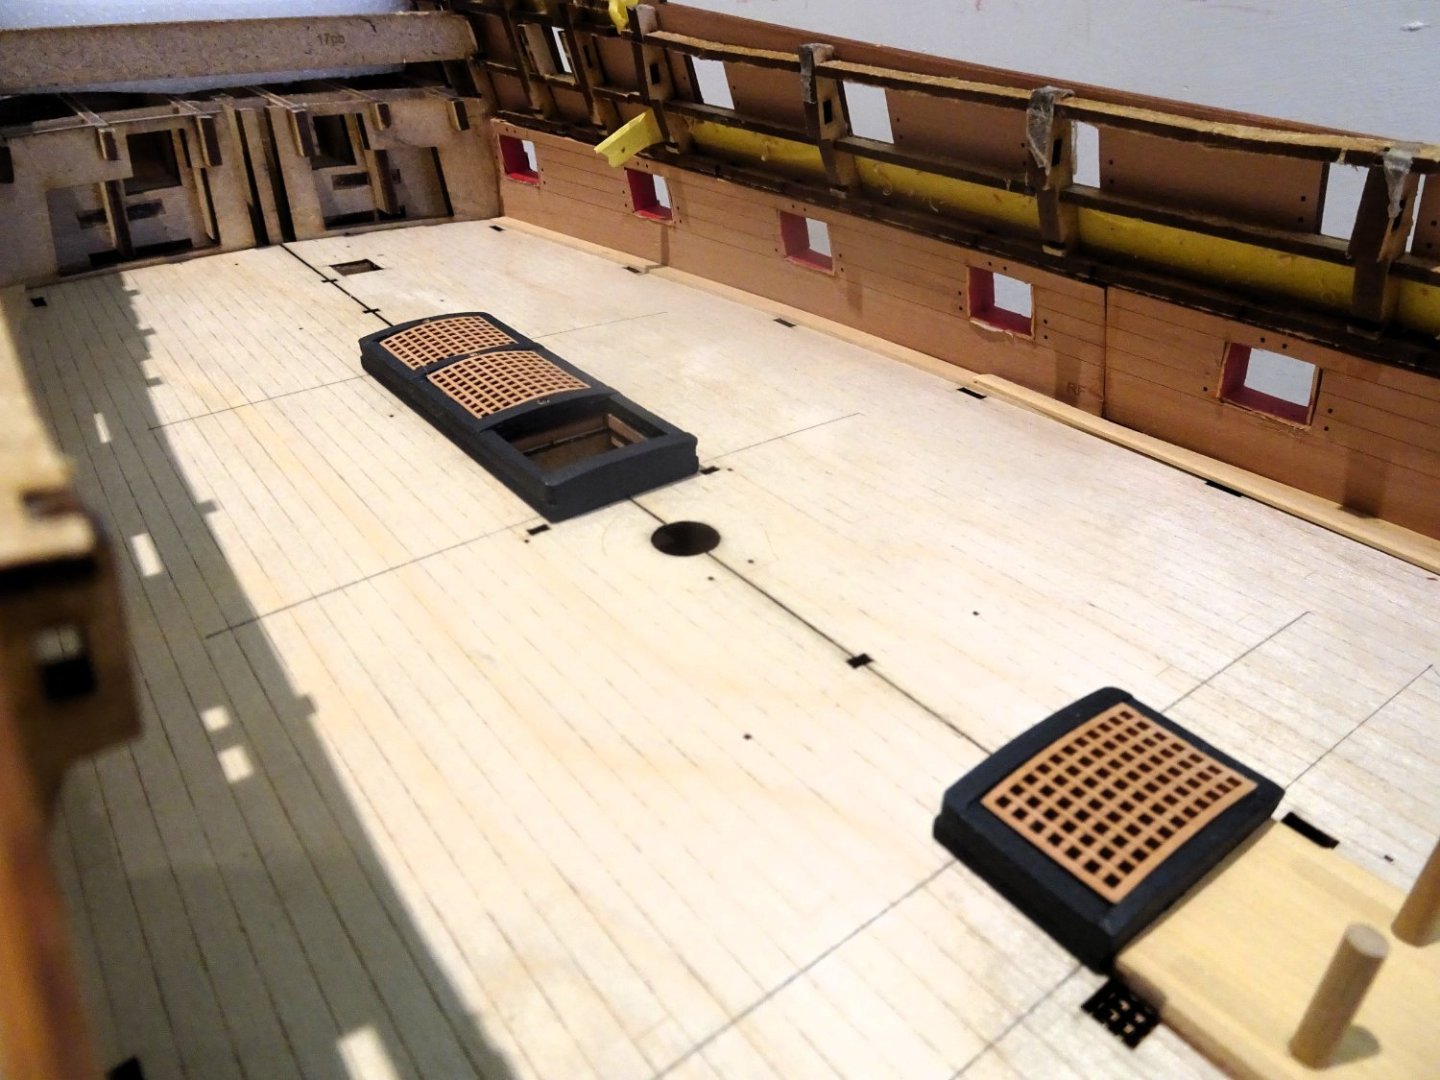
1499
The hatchway aft of the Mainmast butts against the partners. This is followed by the aft ladderway set.
1498
The main and Fore sets follow.

1502
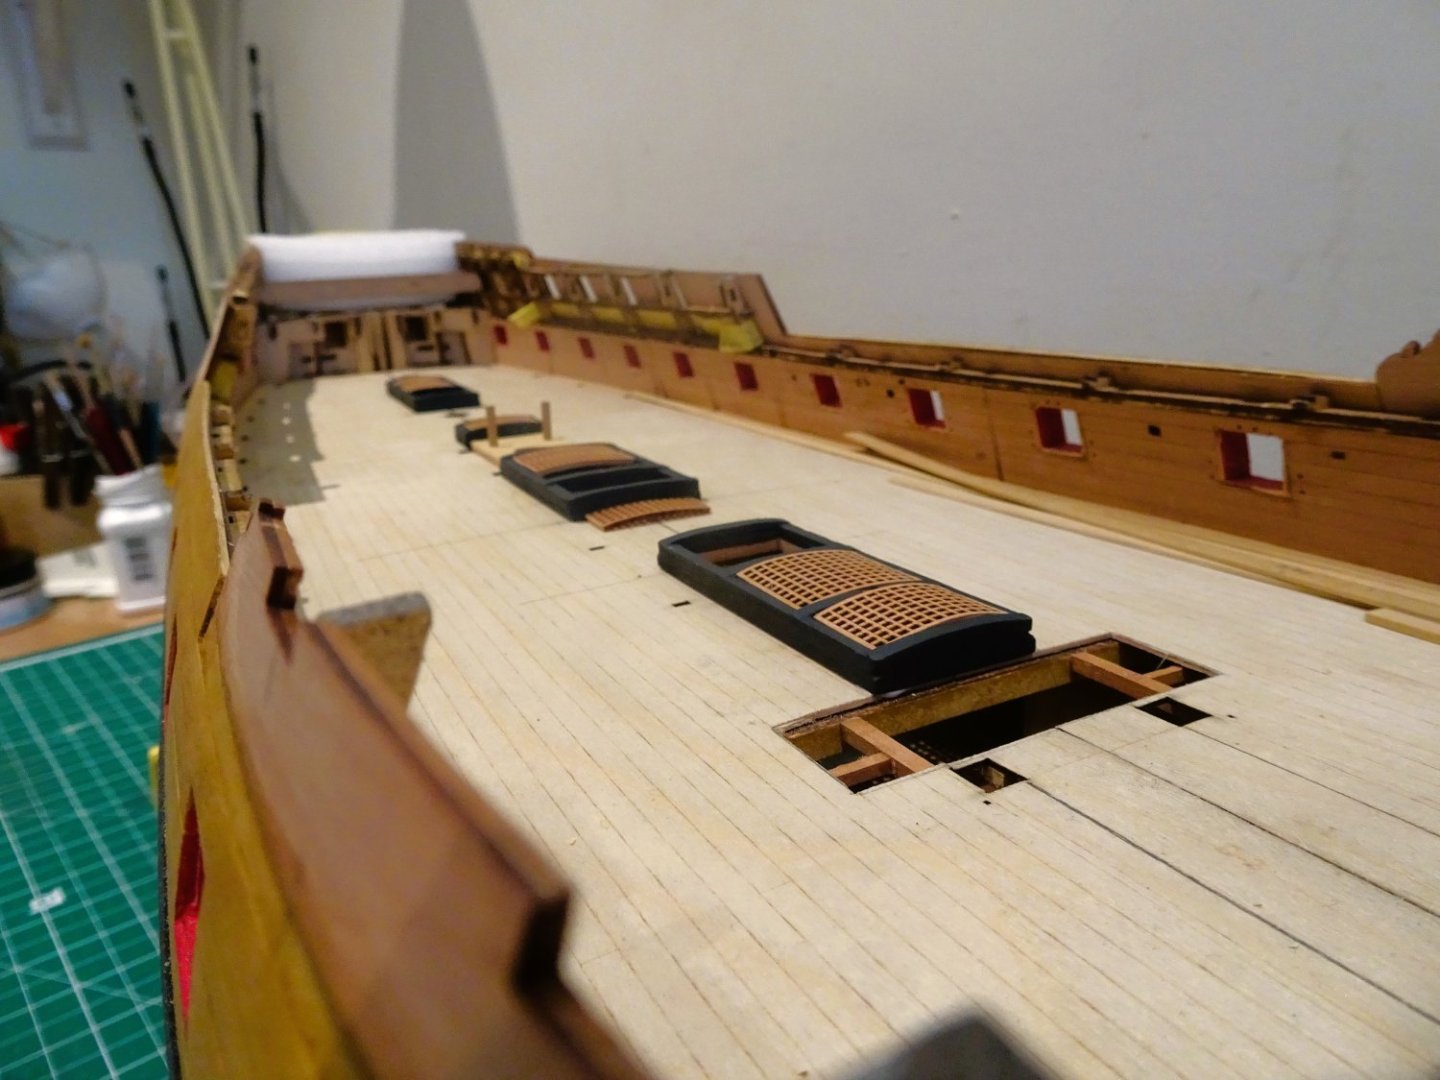
1511
At each stage I sight along the deck and from all angles to check the run.
1506
The run is also sighted from distance along the floor.
With this it’s not the getting down that’s the problem, it’s getting back up again, taking this behemoth with you. 🙄

1508
Time to move on Wills.
B.E.
21/07/2023
- Thukydides, mtaylor, CiscoH and 17 others
-
20
-
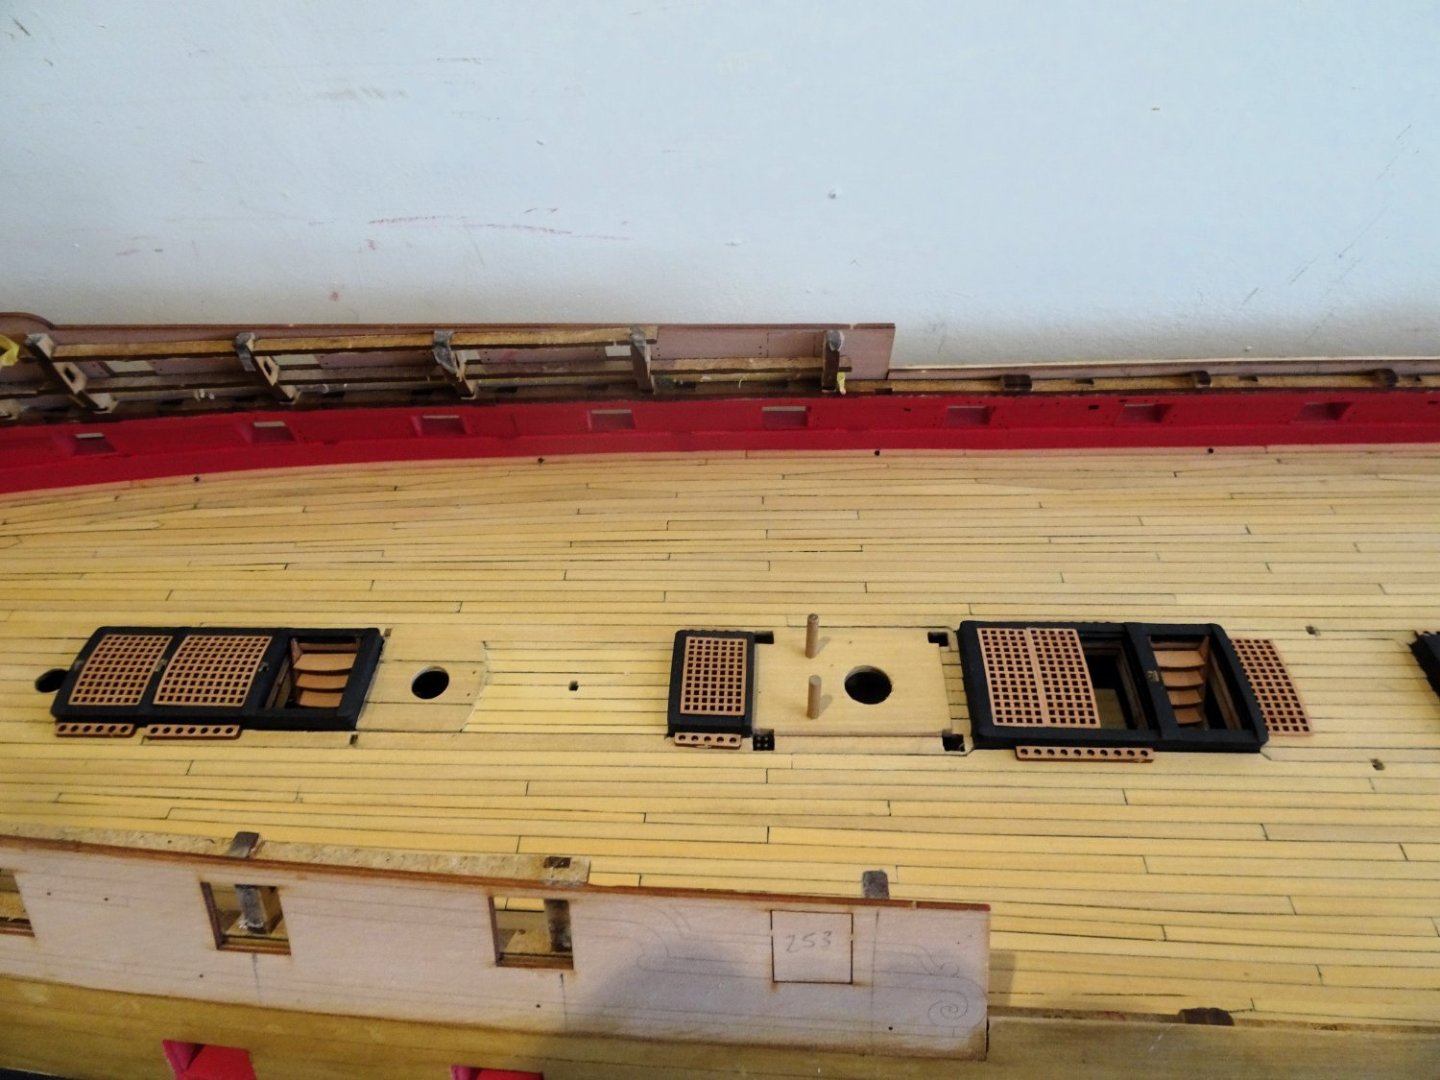
Post Fifty-five
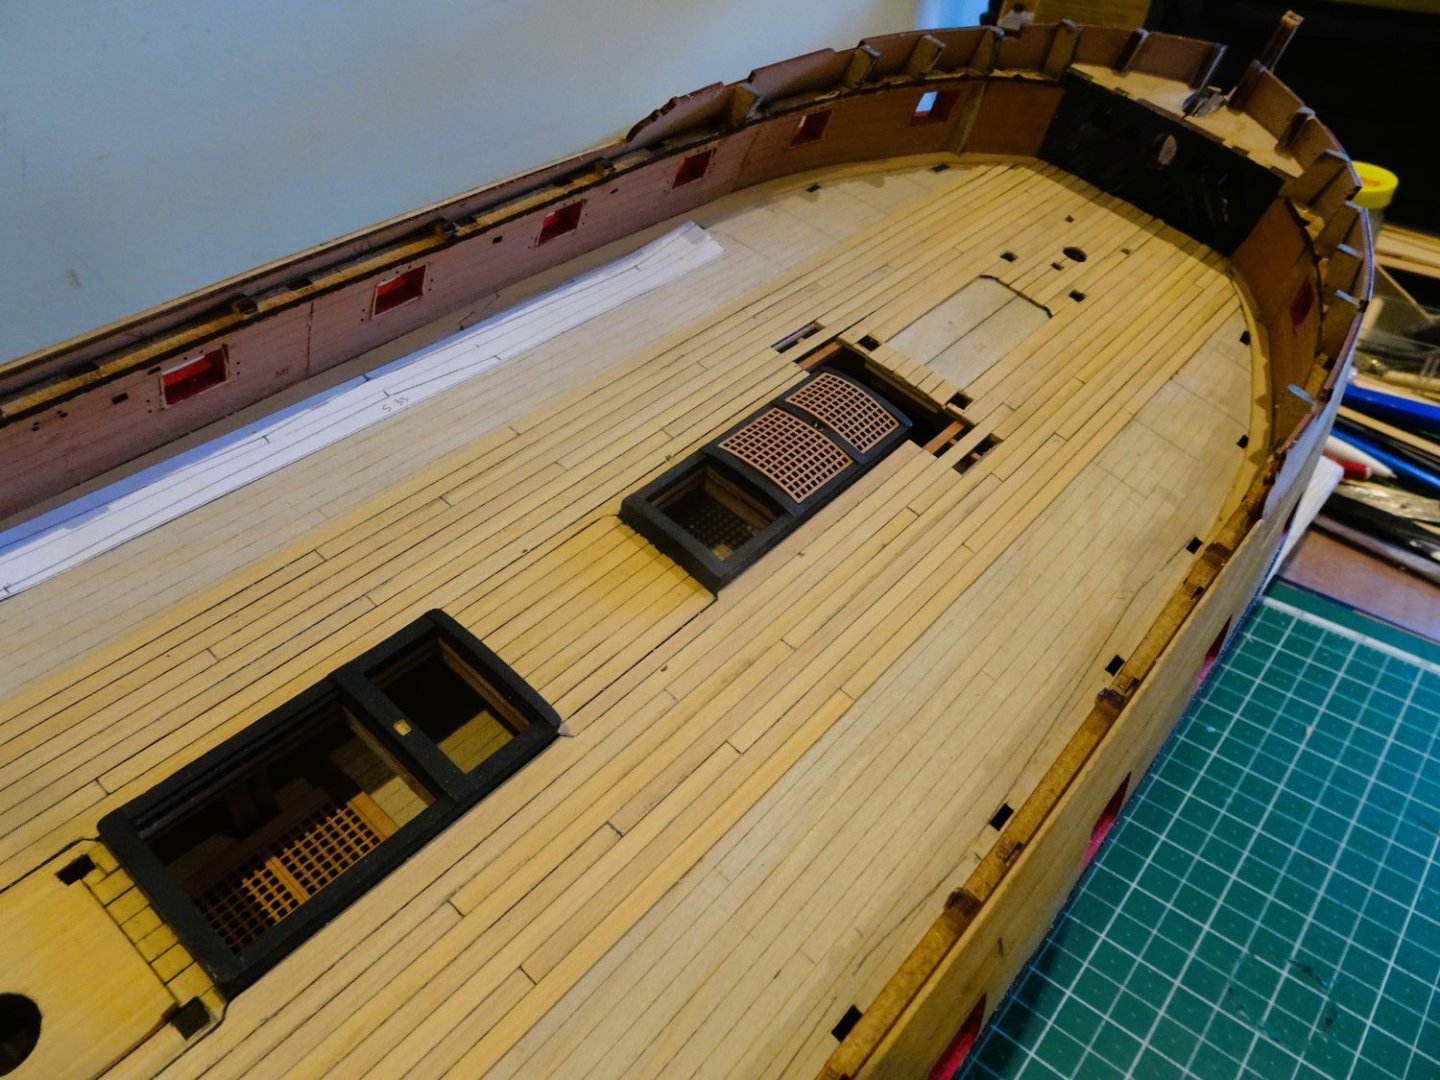
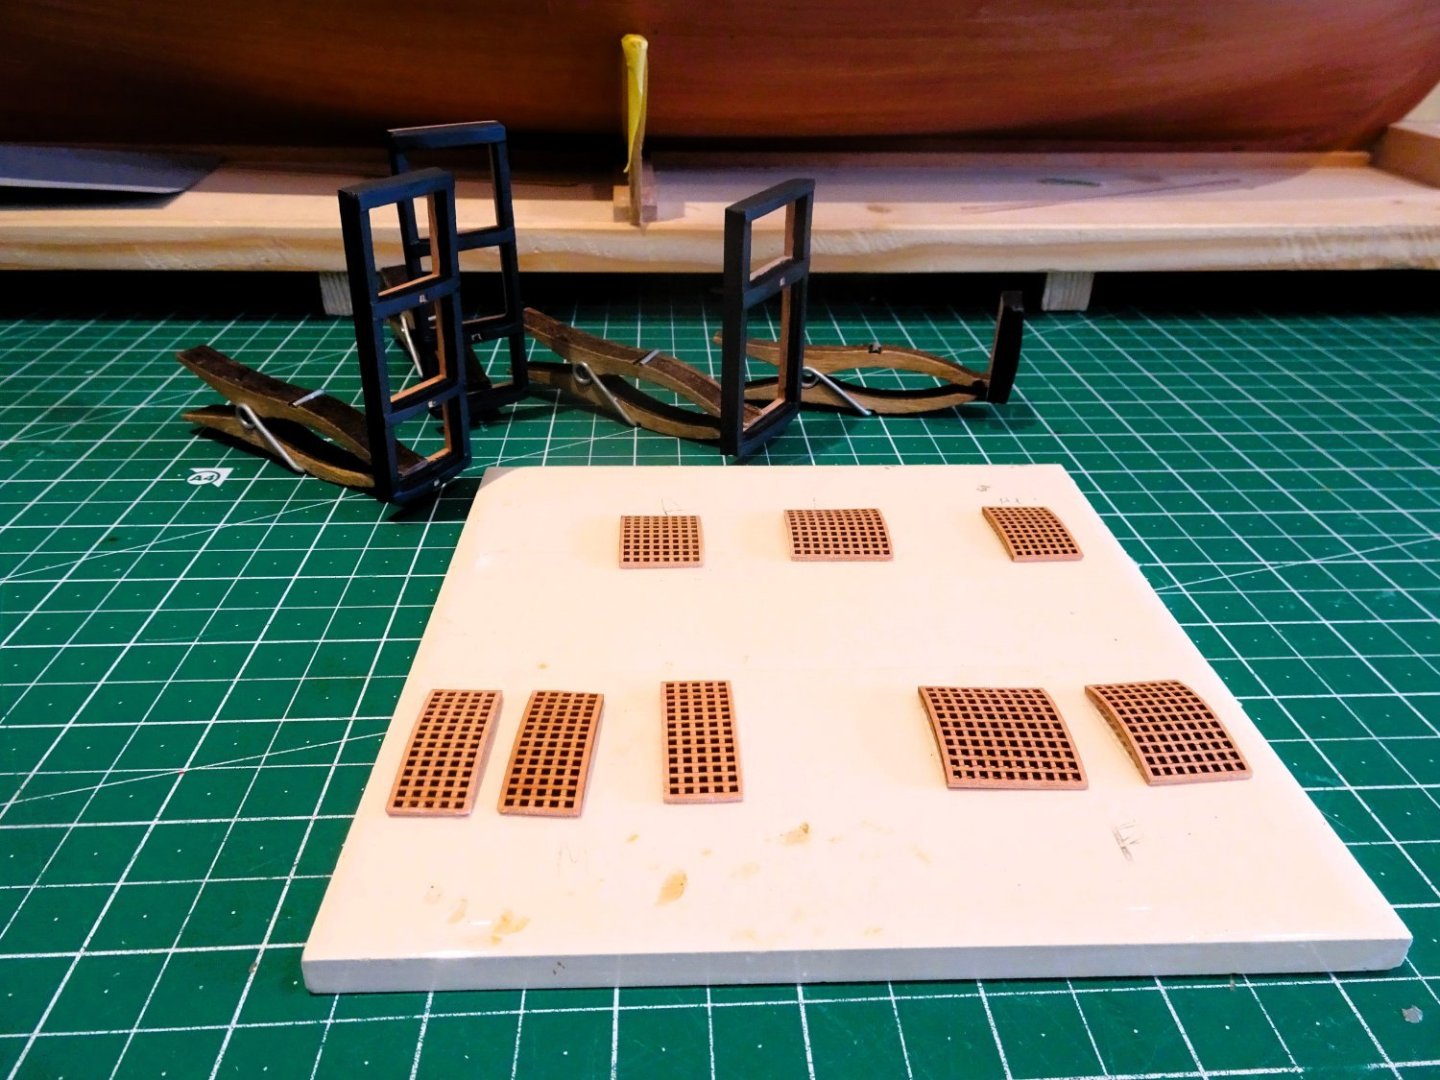
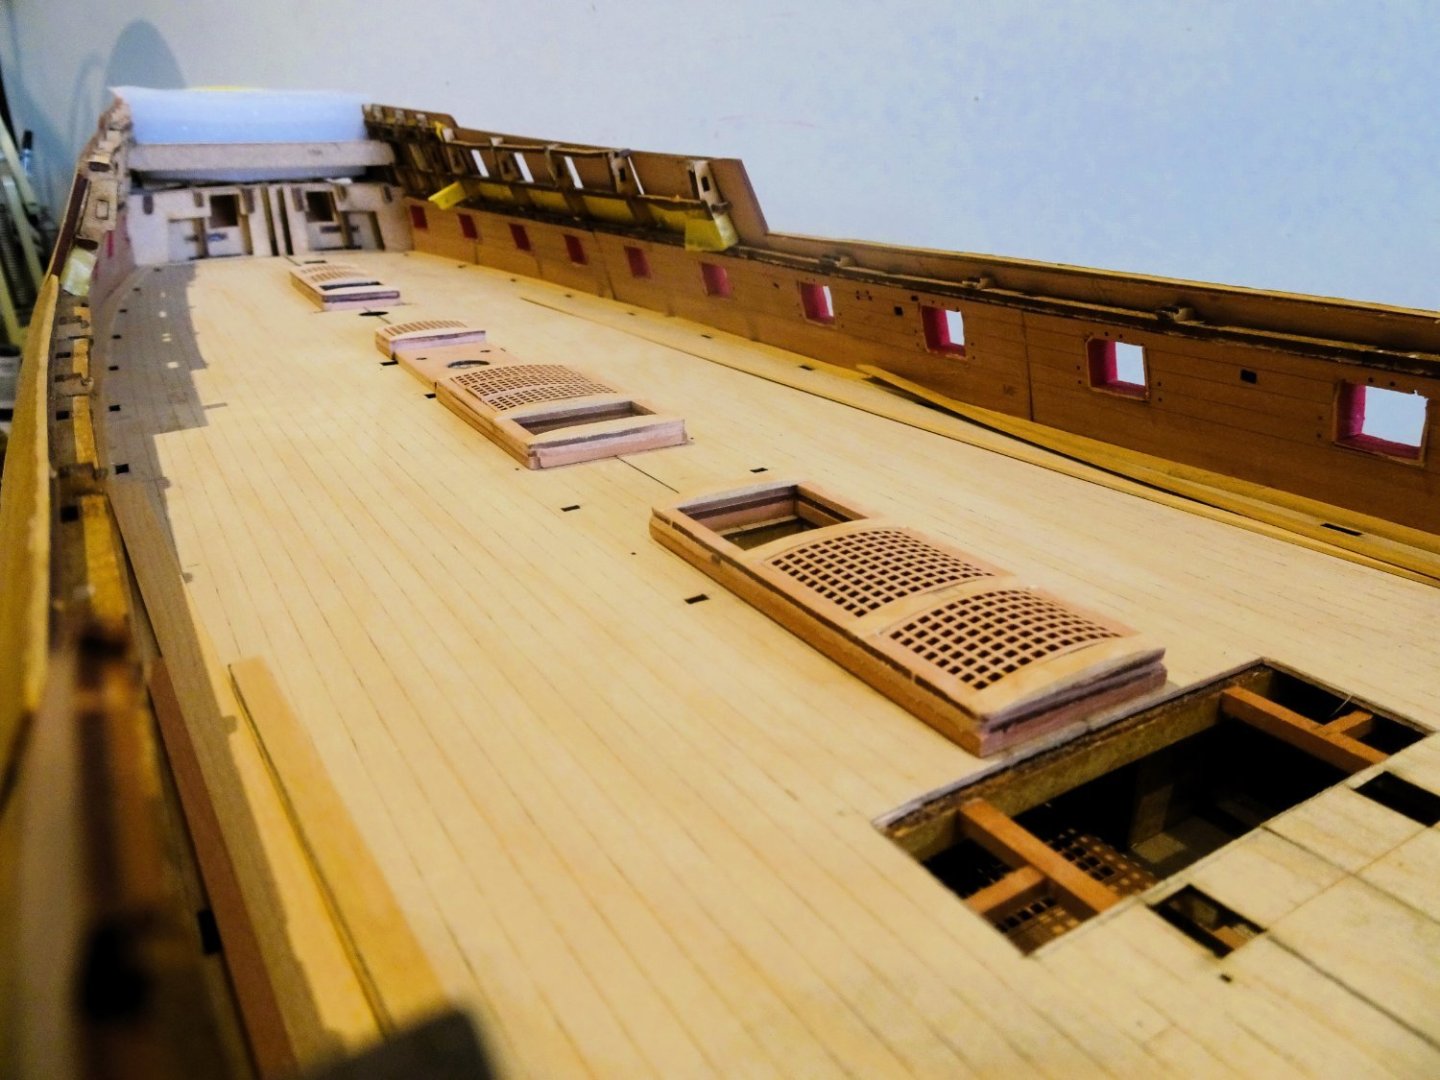
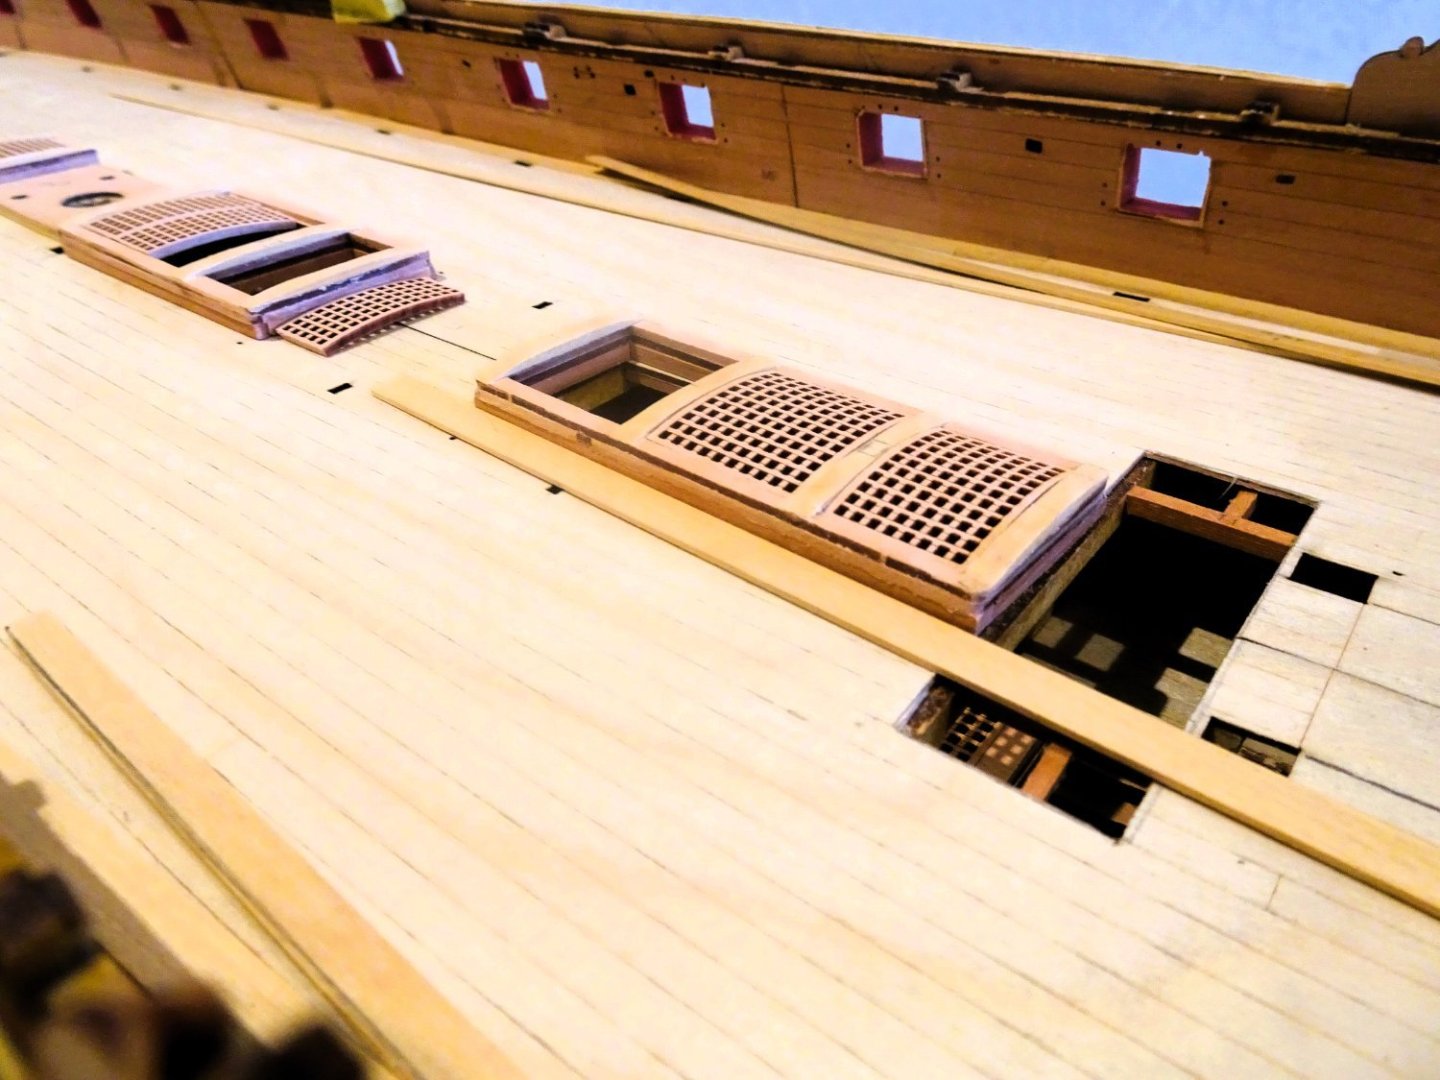
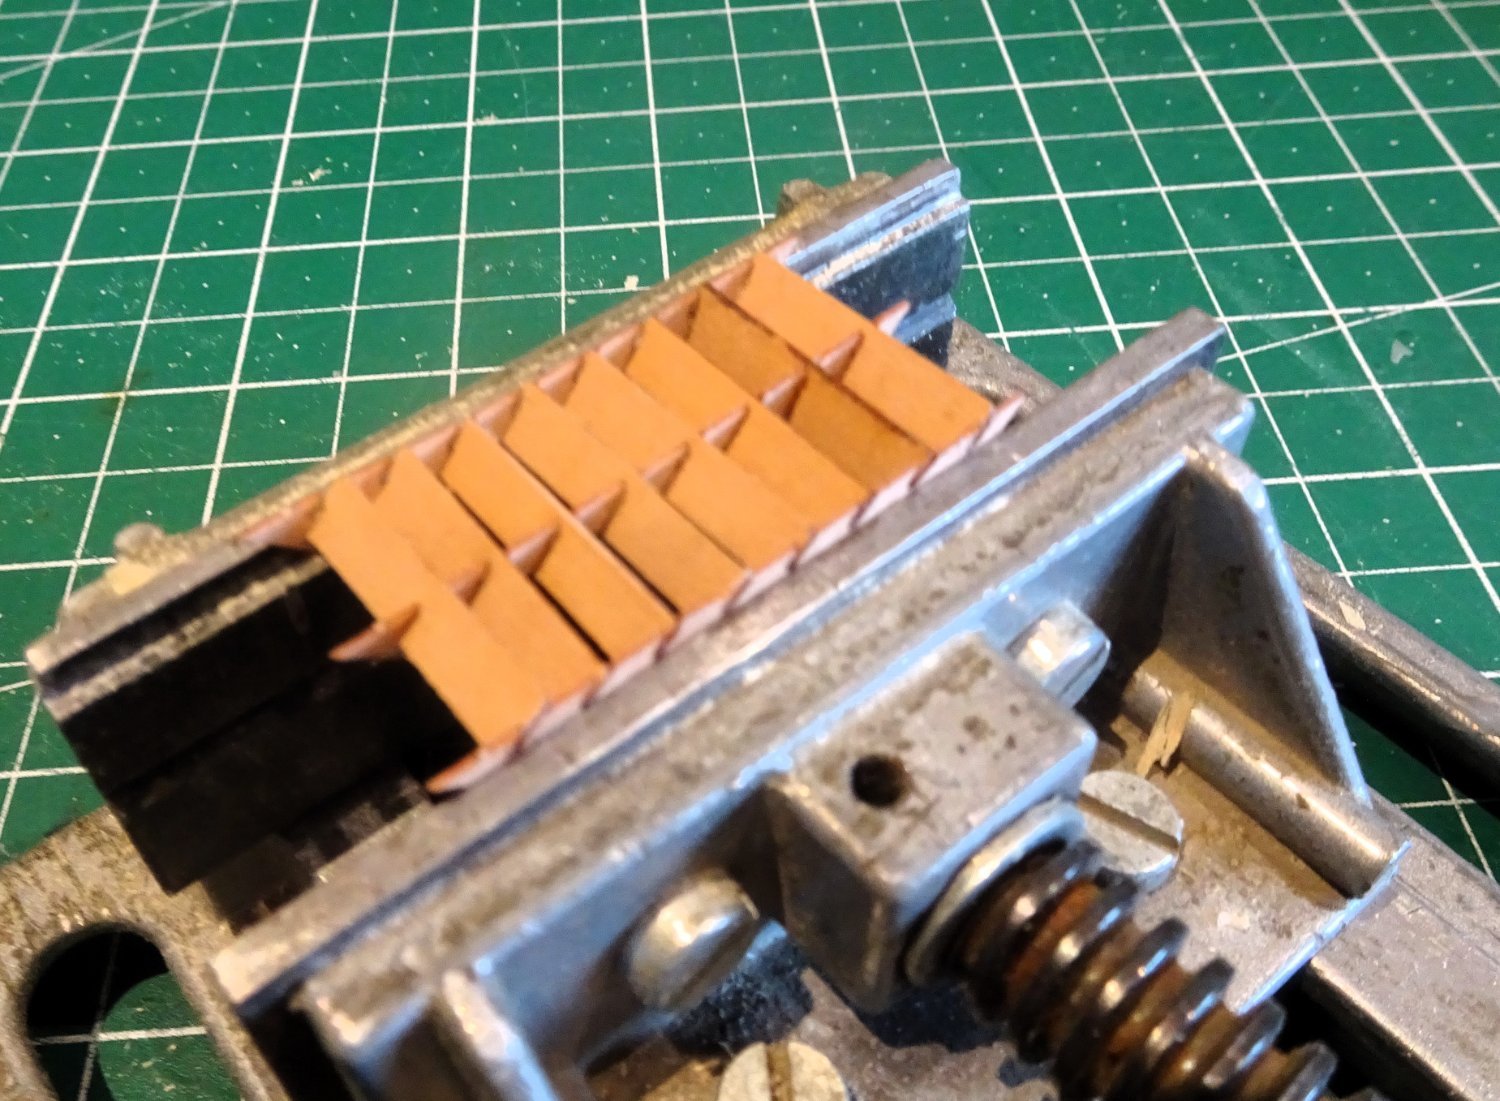
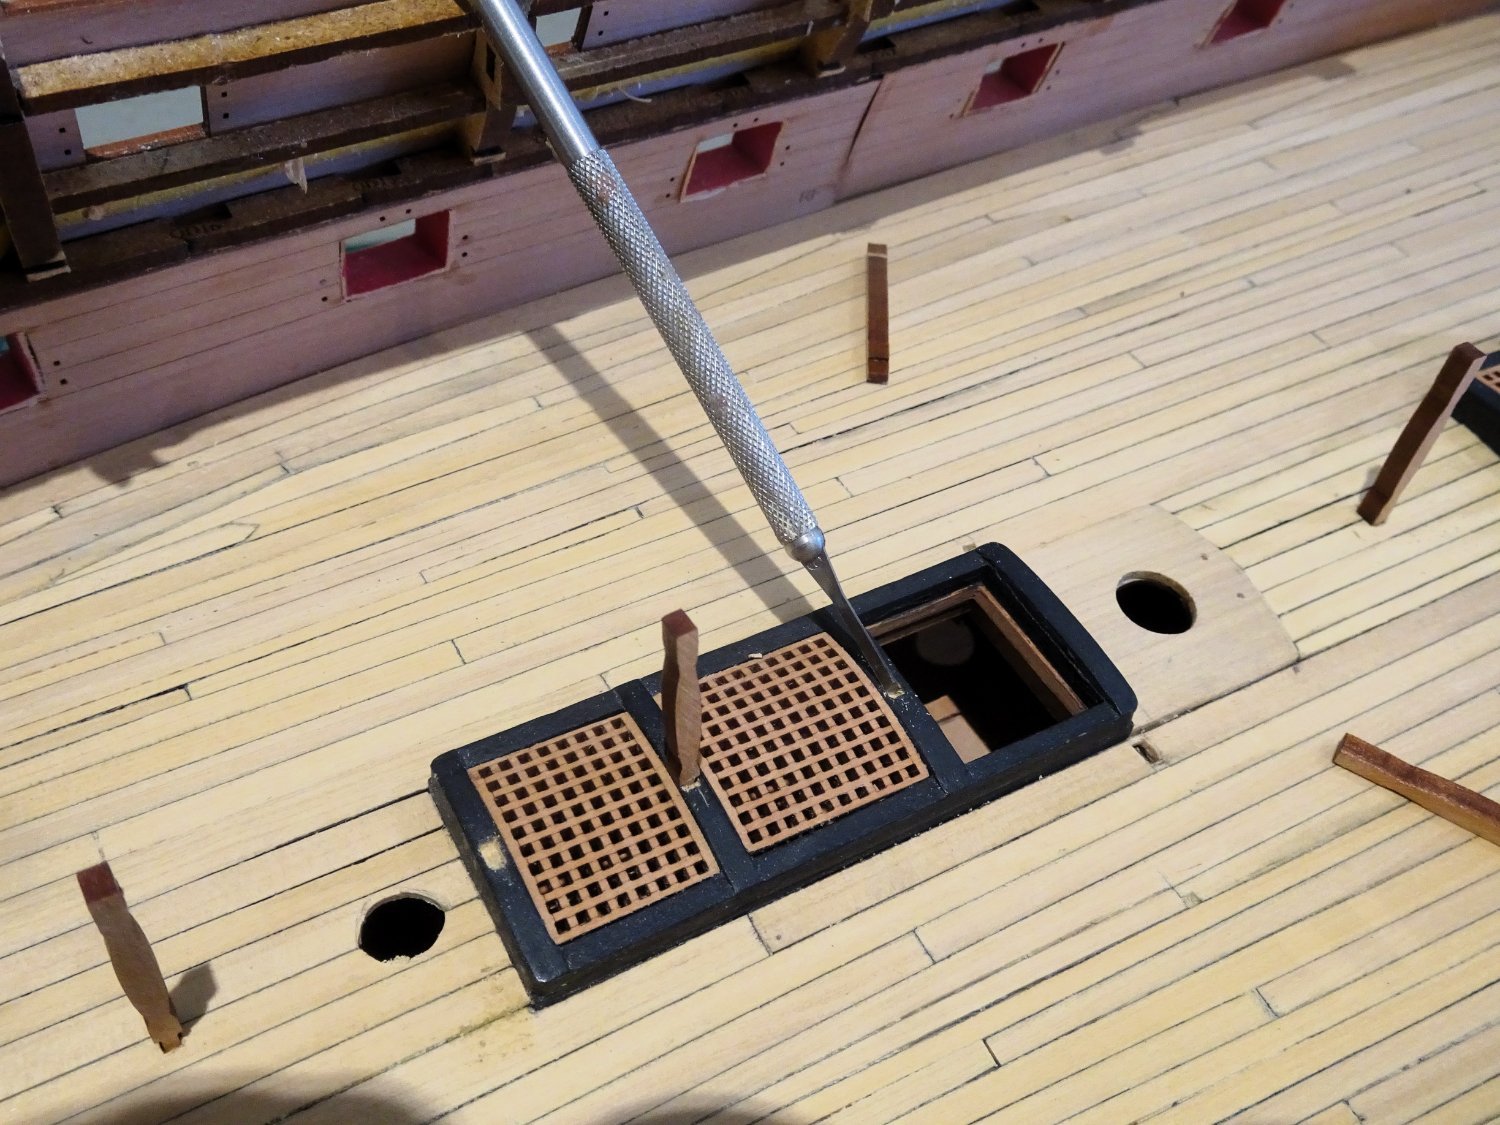
Hatches and gratings – Part Two
Modifying the hatches was fairly straightforward on Sphinx, not quite so on 'Indy.'
On all three of the hatch/ladderway sets there are support pillars central to the head ledges; adding a round-up complicates the fitting.
Apart from any other consideration, I think a slight round-up and camber to the gratings provides a much more pleasing aspect.
Whether the coamings are high or low, a camber appeared to apply.
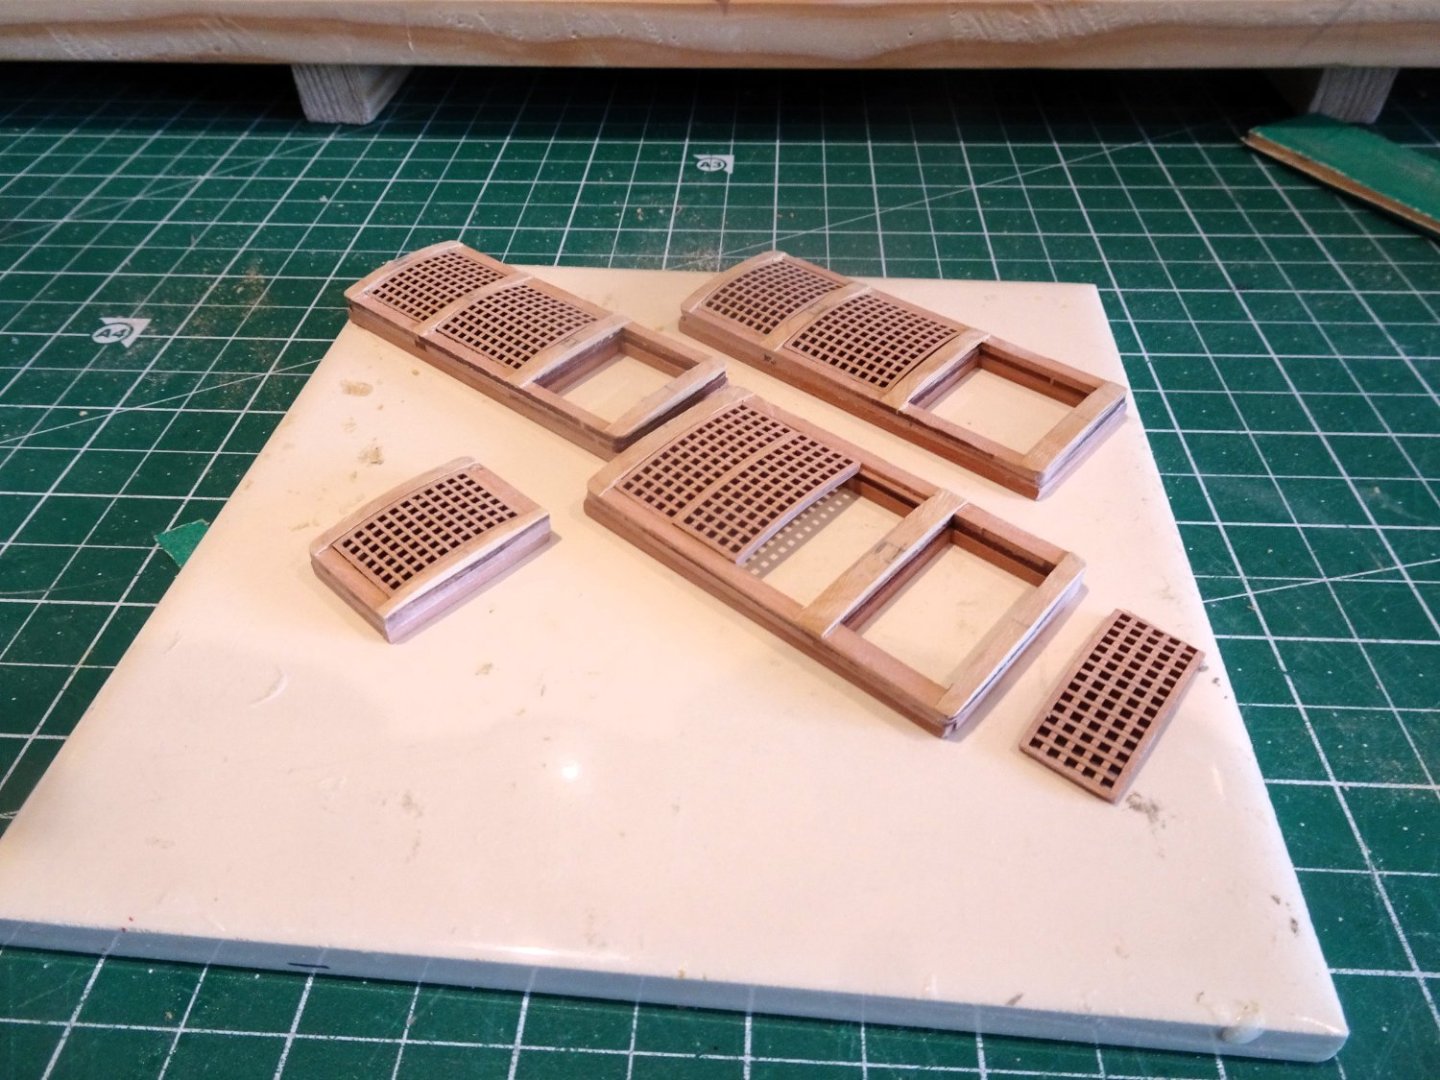
1478
To create the camber, I attach strips of Boxwood atop the ledges. This is then shaped down to a feather edge where it meets the coamings.

1480
Cleaning up still required but you get the idea.
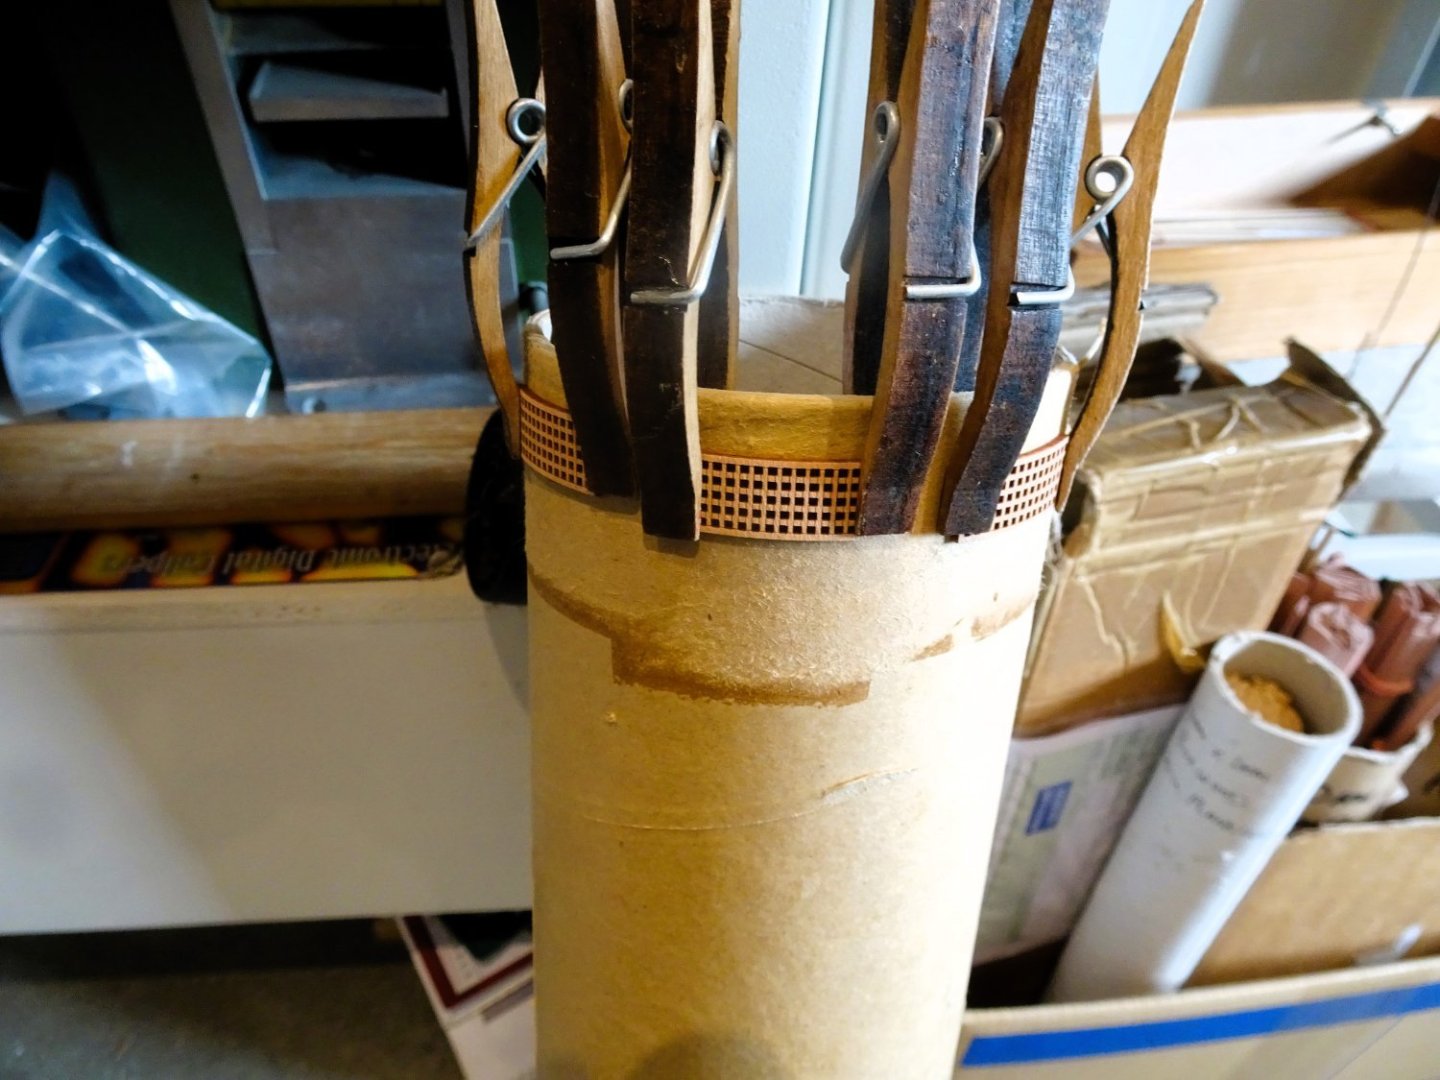
1468
The gratings camber was formed around a large diameter cardboard tube (4¼”)
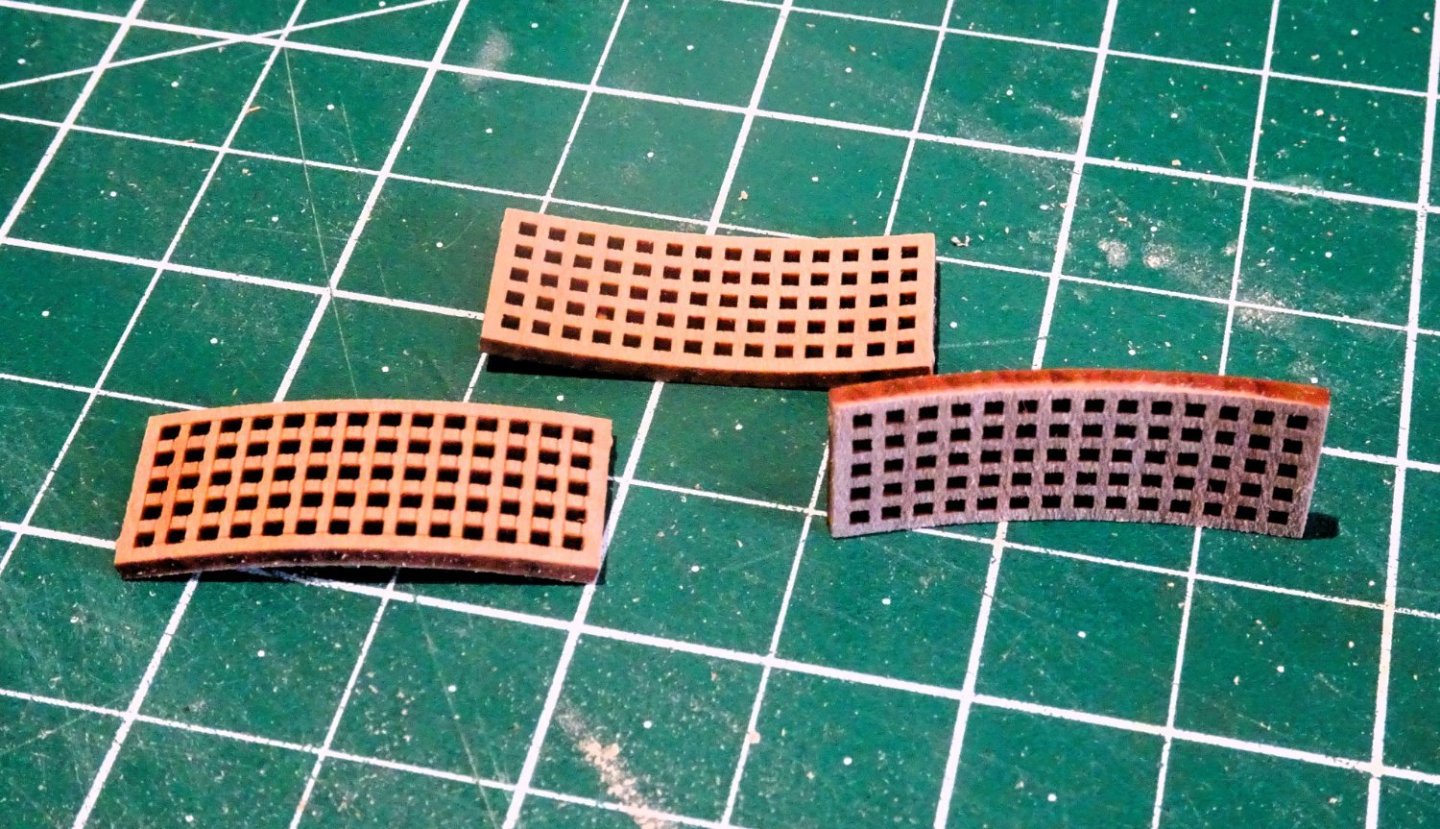
1469
Bit of a leap of faith this, you never know until the job is done whether the grating will fall apart having been given the water and heat treatment.
1484
The Main hatch was supplied with three sections of gratings. I’m pleased Chris provided this arrangement, I had to do it myself on Sphinx, and tricky little beggars they were to make.

1486
1487
1472
In my version the coamings rise 4.4mm (11”) above the deck with the Head ledges higher by 1mm.
Once fully cleaned up the coamings will be painted black and the gratings left bright.
B.E.
20/07/2023


HMS Indefatigable 1794 by Blue Ensign - FINISHED - Vanguard Models - 1:64 scale
in - Kit build logs for subjects built from 1751 - 1800
Posted
Cheers Chris - worse than I thought. 😄
B.E.