


Ian_Grant
-
Posts
2,028 -
Joined
-
Last visited
Content Type
Profiles
Forums
Gallery
Events
Everything posted by Ian_Grant
-
 Condolences to the family. What a pity Monsieur Saunier did not have the chance to complete his work of art. Comparable to an author passing away part way through writing a masterpiece (think "The Master Mariner Book II"). His family will always wonder what might have been, at the same time as having this magnificent reminder of him.
 -
Beautiful model!! I notice that no two clocks show the same time. Not functioning?
-
Ole, just a thought: for rigging your Passat or any of the windjammers, a good book to have is "Masting and Rigging the Clipper Ship and Ocean Carrier" by Harold Underhill.
-
Marc, I'm flabbergasted!!! Viewing your brilliant SR's progress, I just assumed you had built many full-rigged ships in the past! Fortunately, the SR's 17th century rig is nowhere near as complex as the Victory. On the other hand there are all the crow's feet to rig without distorting the stays 🤪. Are you aware of RC Anderson's book to help rig her?
- 2,623 replies
-
- 4
-

-
- heller
- soleil royal
- (and 9 more)
-
I know exactly what you mean. I went through the same experience building my Victory while reading Blue Ensign's and Dafi's very informative logs on, all together now: "the old Pete Coleman Victory Modeling Site". Mine wouldn't be a patch on how it did turn out without such inspiration. Even such basic things as the existence of Longridge's book; how ever else would I have discovered it?
- 2,623 replies
-
- 5
-
-
- heller
- soleil royal
- (and 9 more)
-
Looking nice. I may have missed it - did you fiberglass cloth the outside of the hull before applying strips etc?
-
Robert, On my Heller Victory I could not find black thread of the correct size for the mainstay. I bought natural colour and used black fabric dye to colour it. You could colour the brown thread if its manufacturer is on your approved list.
-
She's beautiful! Looks like you cut sheet lead to fit; how did you cut it? I remember trying to saw lead once and it was near impossible. And lead shot is now rare.
-
Super super model! I still think it would make a magnificent RC model. Pardon my ignorance on corvettes, but I'd have thought they'd carry as many depth charges as possible. The visible count seems low to me. Were more reloads stored below deck? EDIT Out of curiosity I googled it 🙄 the flower class carried 70. I guess some were below.
- 321 replies
-
- 5
-
-
- Finished
- Flower-class
- (and 1 more)
-
Beautiful model. Doesn't she need a float for the trap line? 🙂
-
Plan 7 shows those needed for running rigging. You can pick the lines out then look them up in the index for text description. Plan 6 tries to show those needed for standing rigging but it's obscured by deadeyes. Eyebolts are needed for topmast shifting backstays, topgallant shifting backstays on fore and main, and royal backstays. Shifting backstays are those with a block in them at the bottom end as shown in Plan 6. Relevant text is pp 231-233. Good luck!
-
Very nice!! Did you happen to provide a drain for the cockpit? I recently took my old M-Class yacht and restored it more like a real one and discovered my poor helmsman sitting up to his bum in water after voyaging on a choppy sea 🙄. Also what kind of winch are you using? I kept my 70's drum winch but maybe it should be replaced.
-
I love pipe bands. The first sound of a drone starting I can feel the tingle run down my spine - must be hereditary memory, the call to grab a claymore and run to the action. Took the kids to Scotland and the Edinburgh tattoo a few years back. When the massed pipes marched out across the drawbridge and fanned out along the parade ground, my son turned to me and said, "This is cool!" 🙂
- 63 replies
-
- 3
-
-
- Dapper Tom
- Model Shipways
- (and 1 more)
-
What a gorgeous model! The era was so ornate....she looks like the inside of the Linderhof Palace in Bavaria which we visited on a bicycle trip. Our jaws were dropped throughout the whole tour. https://www.google.com/search?q=linderhof+palace+images&tbm=isch&chips=q:linderhof+palace,g_1:inside:7N3vfeD-GQ0%3D&client=firefox-b-d&hl=en-US&sa=X&ved=2ahUKEwiU3d6X4Nn1AhVGqXIEHWFFB8oQ4lYoAHoECAEQGg&biw=1103&bih=507
-
Chief, you're the first person I've ever heard, apart from my Scottish parents, to use the word "mankey" (I think it is actually "manky"). Some Scots in you? Regards, Ian
- 63 replies
-
- 1
-
-
- Dapper Tom
- Model Shipways
- (and 1 more)
-
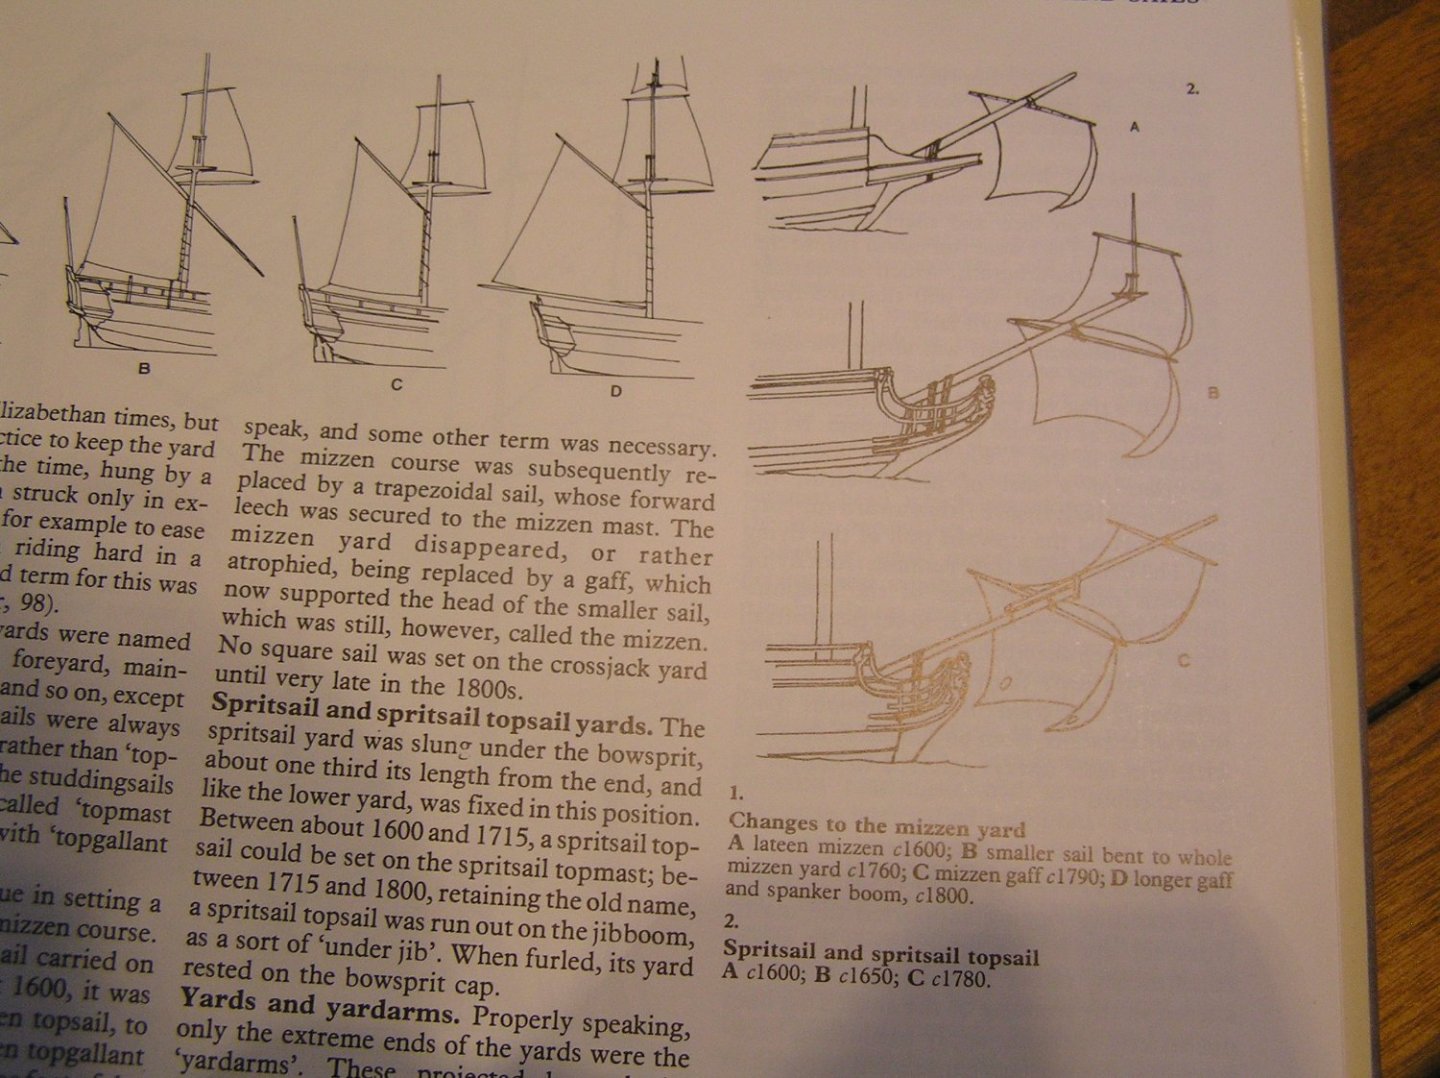
Bill, regarding the sprit topsail, I was not able to find any detailed descriptions in the books I have, but I did find these diagrams in Harland. As you can see the topsail went from vertically set in the days of the sprit topmast, to more flatted out between sprit topsail yard and spritsail yard in the days of the jib boom.
-
Bill, looks good. You're still moving quickly.
-
I like the green too. Ironically it's pretty close to British racing green...😀
-
Touche!! (Don't know how to put the accent over the "e"). Don't know where that's from, and I only have a few books, but Hackney, Longridge, and Lees place the traveller out near the end of the jib boom. It is also placed there in Geoff Hunt's many paintings of Victory (I have his book "The Marine Art of Geoff Hunt"). In fact, Lees mentions that the traveller was abolished about 1815, and the jib stay just led through a sheave at the end of the jib boom.
-
Sprit topsail yard's parral is on the jib boom. I've never seen a pic of Victory's traveller inboard of the yard. Reference Longridge running rigging plan.
-
Yes that is a good visual summary of my previous post. You're right about it seeming odd that each inhaul is on the opposite side from the associated outhaul. I think I was wrong again....sheesh. The jib traveller pg 235 has the inhaul block to starboard. The belay diagram pg 266 lists the jib inhaul on a timberhead slightly to starboard of centre. So far so good since we also have the inhaul eyebolt to starboard. But it lists the jib outhaul belayed also to starboard. I think I got confused because mine was to port by mistake as I said before. So, to correct myself yet again 🙄, on your diagram just swap the connections to your two blocks on the front of the cap. That makes more sense and leads more conveniently to the belaying points given on pg 266. All your guys etc are correct as shown. The block at top left is flying inhaul not outhaul. The only remaining "funny" I see is that the downhauls remain on the opposite sides from their associated in- and outhauls. 🤪 This seems unavoidable since the downhaul and inhaul blocks are on opposite sides of the travellers. Unless they crossed the downhauls over the bowsprit somewhere? We'll never know as Longridge omitted them. God only knows where I eventually belayed them all.....evidently I don't! Bill, sorry for all the confusion. Order, counter-order, dis-order!
-
OK Bill I managed to confuse myself re-reading about xxxhaul lines last night but now I have it sorted. That photo is not mine; it is incorrectly rigged. As shown on pg 235 the jib stay attaches to a thimble which is located between the arms of the shackle for the outhaul. Yes your thimbles are too big. I used eyes cut off from my etched brass eyebolts. For the flying traveller I gave up and had no thimbles. As for rigging, I now remember that by mistake I rigged the jib outhaul using the block on the left side of the traveller, which should have been for the downhaul. But after realizing this I just decided to leave it and rig the downhaul to starboard. The run-off effect of this was I rigged the flying outhaul to starboard, not to port, since they're supposed to be on opposite sides. So don't get misled by my earlier comments above regarding the jib outhaul being to port. But I made another mistake. For the outhauls, the block on the bowsprit cap should be on its lower front face, not the side. See Longridge pg 234, "....a single 9in block, hooked to an eyebolt in the lower end of the fore face of the bowsprit cap." This makes sense since the outhaul exits the sheave at the bottom of the round jib boom. On the same page he states two sentences later that the standing end of the inhaul is made fast to an eyebolt in starboard side of the bowsprit cap i.e. the opposite side of the outhaul. The jib outhaul eyebolt being on the front face of the cap is shown by Petersson in the drawing I posted in post #804. So to summarize, you need two eyebolts at the lower end of the front face of the cap, each having a single block attached. Port is for the jib outhaul, starboard for the flying jib outhaul. You also need an eyebolt on each side of the cap. Port is for the flying jib inhaul, starboard for the jib inhaul. When you make your flying traveller the block on its right is for the flying downhaul, its left for the flying outhaul i.e. opposite to the jib traveller. Longridge did not show a drawing for the flying traveller. As for the outhaul tending to lie in the thimble for the martingale at the bottom of your traveller, I would simply tweak it to port since it uses the port eyebolt on the cap's front face. One more thing to note - all flying jib lines running in and out along the bowsprit must pass above the sprit topsail yard or it would not be possible to set the sail. Good luck Mr. Phelps.


