


flyer
-
Posts
1,004 -
Joined
-
Last visited
Content Type
Profiles
Forums
Gallery
Events
Posts posted by flyer
-
-
It was quiet in the wharf lately because I was away on holidays - despite some dear friends asking why retirees would need holydays.
 We visited the Seychelles where we not only met wonderful people, largely intact nature and interesting weather but also the Aldabran giant tortoises which I believe to be close cousins to Stephen Maturins world famous Testudo Aubreii.

Interesting tropical sailing weather with a waterspout left of that rain shower...

not Testudo aubreii but Aldabrachelys gigantea
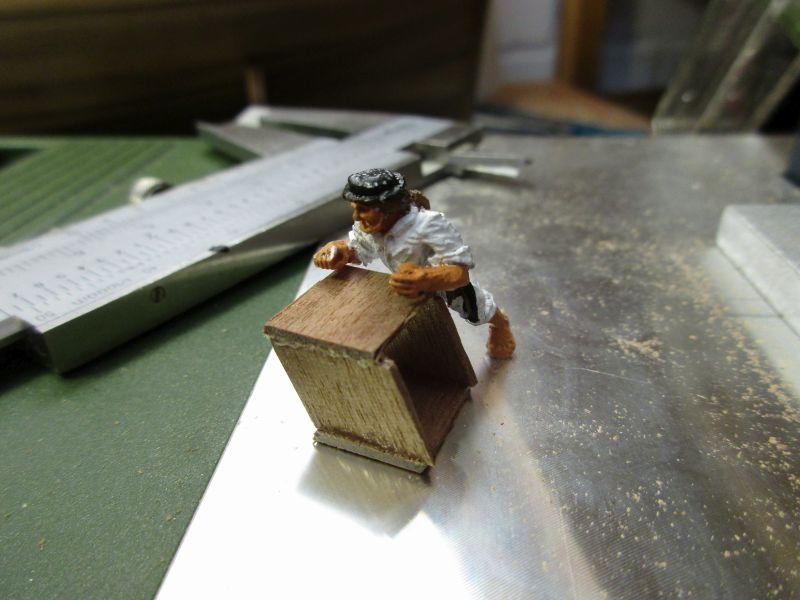
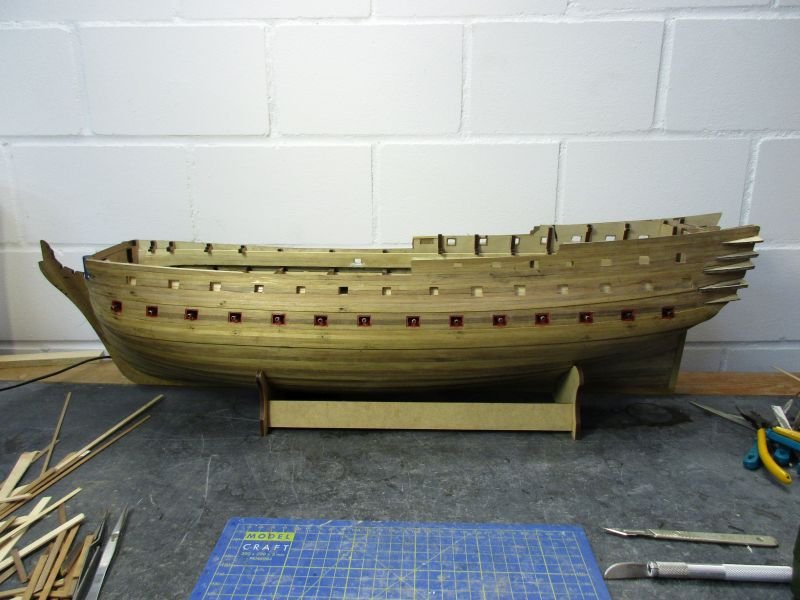
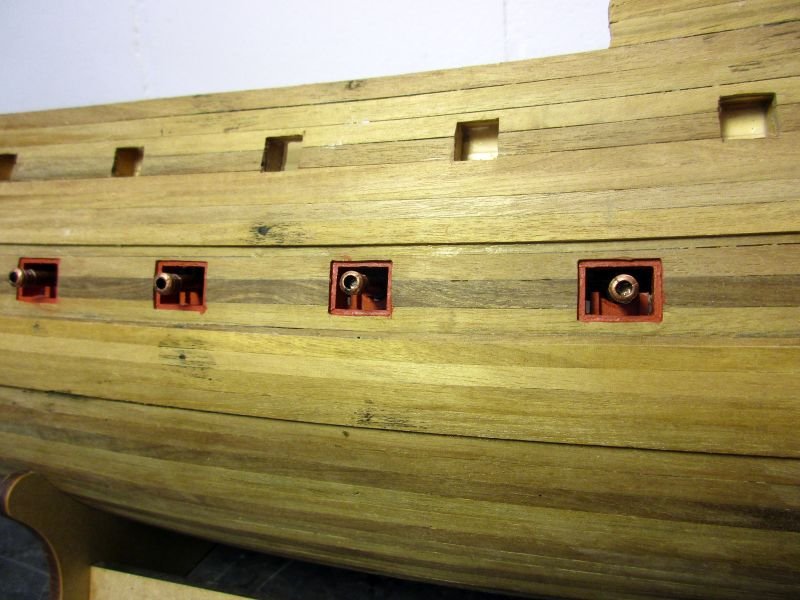
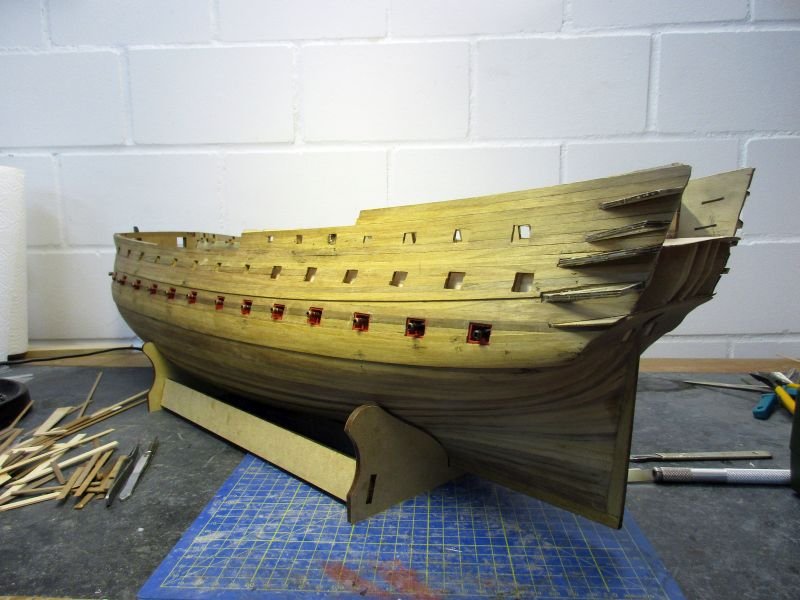
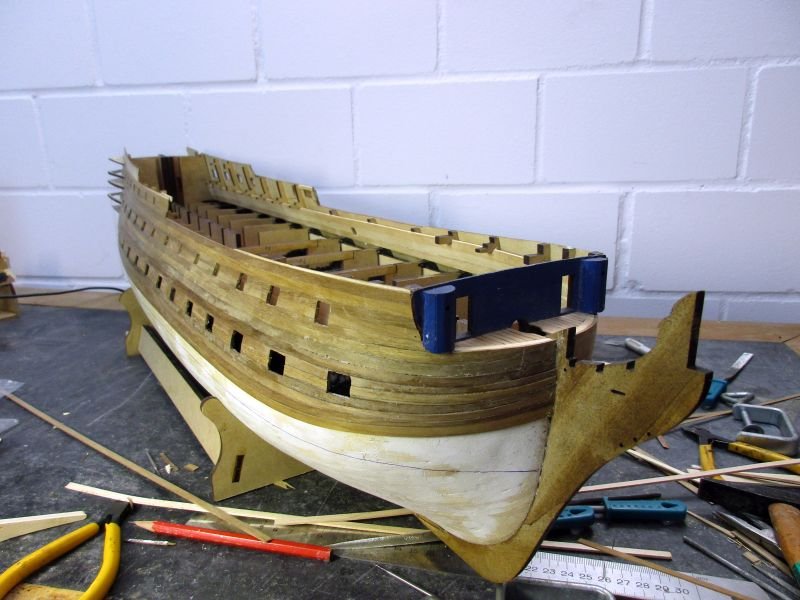
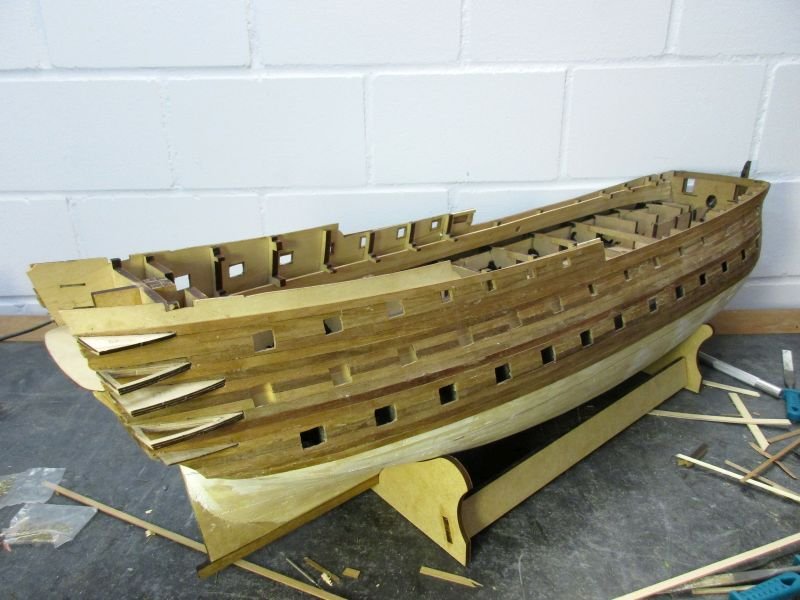
Back home the framing of the upper gun ports with lids was started. The beginning was a bit hard - or as somebody else said in his log: I liked the work so much that I did the first frame three times. Finally the routine was established as follows:
- measure the angle of the tumblehome to the deck
-cut a rough frame with that angle, glue (and wait long enough for the glue to set - otherwise you may happily do the same work again.
-cut the outer opening in the hull to the exact size of the particular frame
-cut the frame to a thickness that it sits on the inner bulwark and finishes 1 mm within the outer hull
-glue the frame into the opening and onto the inner bulwark
-open the inner bulwark through the frame
-check with a gun and hope for the best
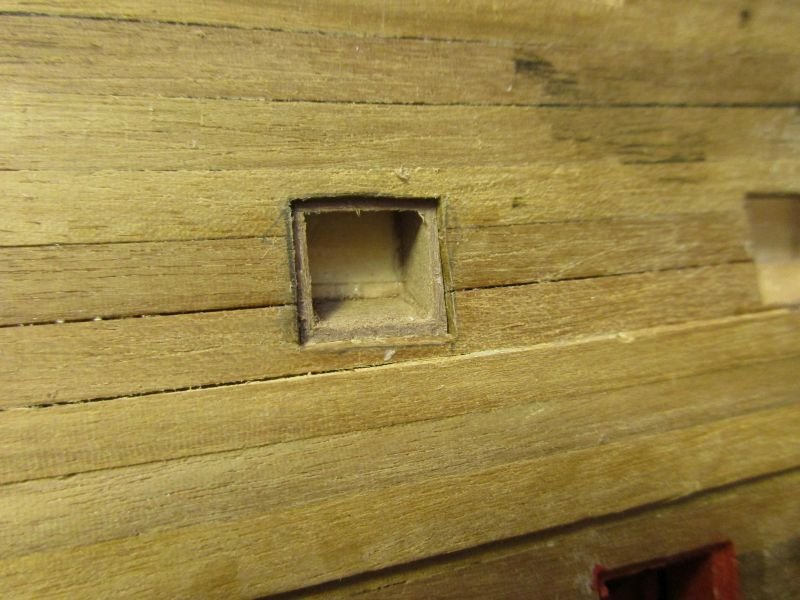
This way the planks of the inner bulwark cover the frame as it should be - not that it will be noticeable on the finished model but anyhow. The pictures show that the frames still need some cleaning before painting.
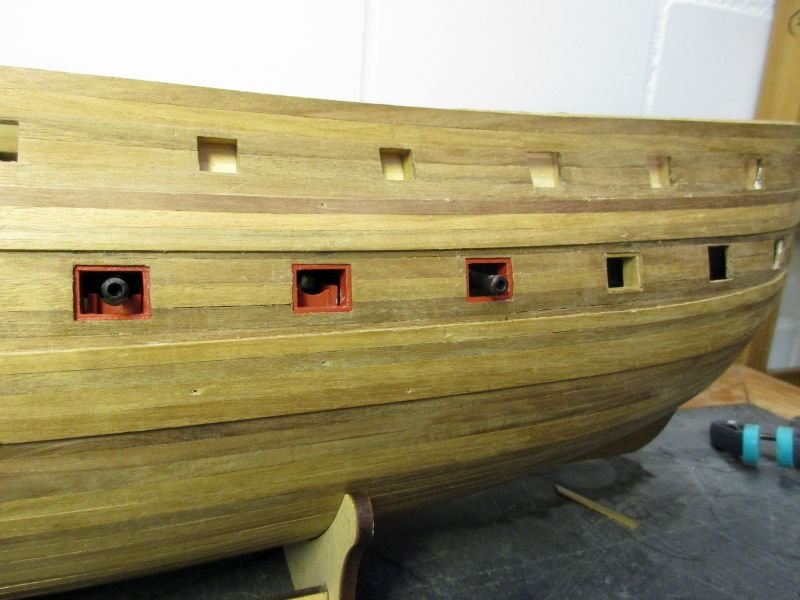
In this context a remark to the Amati plans concerning gun ports with and without lids. On the plans they are drawn in the same size, a fact which lead to a mistake on my Pegasus. You should consider, that when building the hull with its frames all the gun port frames have the same size. Those without lids are then covered with the planking up to the opening while the planks around those with lids stop short of the opening to leave some room for the lids to overlap the opening. But the CLEAR OPENING of all gun ports for the same calibre guns should have the same size.
raw gun port frame...
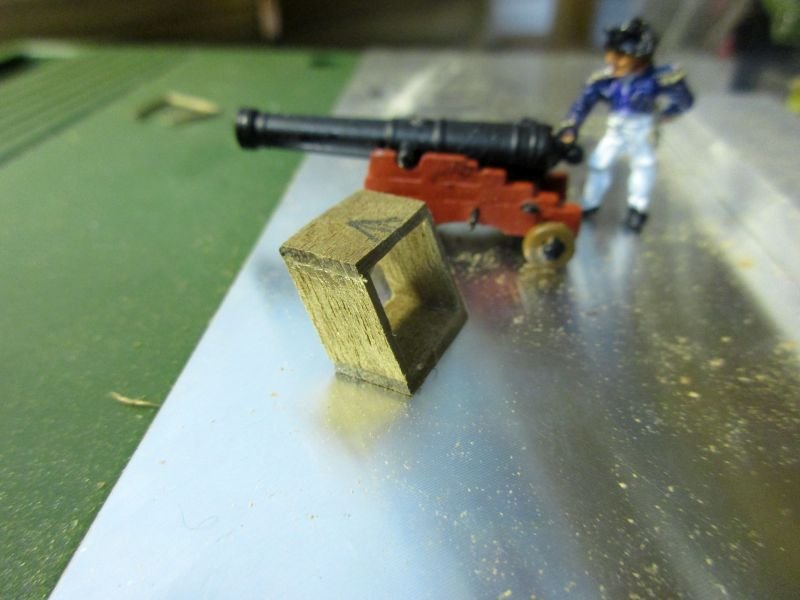
...and trimmed to fit
frame glued in
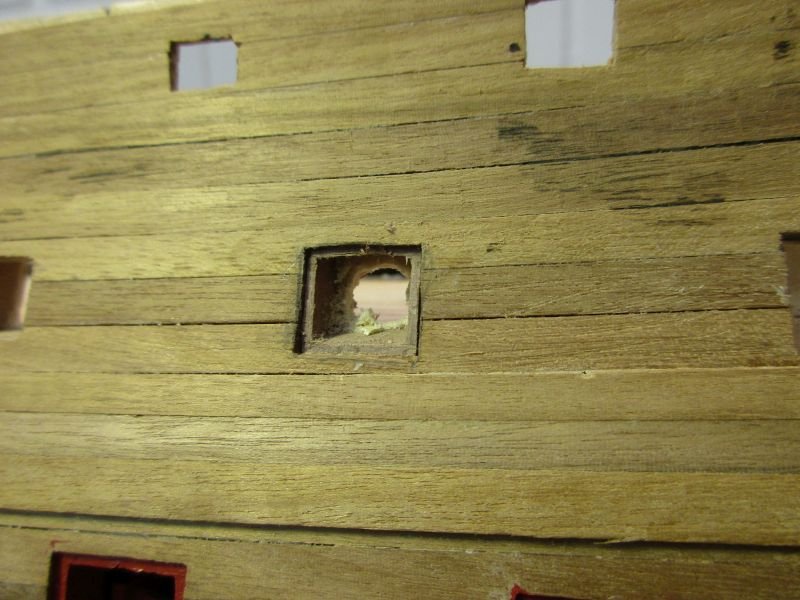
opening of the inner bulwark
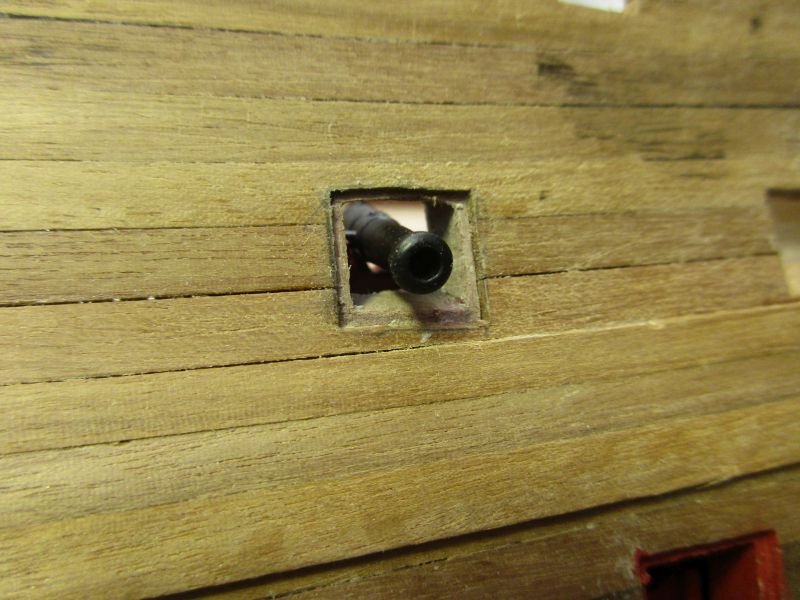
test with a gun
- OrLiN, Dwight, Mirabell61 and 5 others
-
 8
8
-
Hi Peter
While building my Pickle one of the alterations I made to the kit was changing the copper plates. I used those from Amati which are designed to put on overlapping as it should be according to different sources. Those from Caldercraft have - in my opinion - much too prominent nail heads giving the hull an rather badly shaved appearance. I think the nail heads had to be rather flat to reduce water resistance.
Your Pickle looks fine. Have fun!
Peter
- Canute, md1400cs, Mirabell61 and 4 others
-
7
-
Hi Martin
Prego cento!
Hi Rob
That Bridge is between 3 and 4 centuries old. Some daring people (e.g. Martin W) jump from it into the water some 15 meters below. Not only is the water of this mountain torrent ice cold, you also have to find a spot of water deep enough between the rocks...
And you are absolutely right about the focus on the overall effect. However, sometimes I find it difficult to judge beforehand which details will blend in with the background and which will stand out like a sore tooth when tinkered inaccurately.
The cannons will be rigged with breech rope and tackles - at least those visible from above.Cheers
Peter
-
Hi B.E.
Did you see such carriages anywhere else - not on British ships?
It is a pity that Amati has such finely detailed and well cast carriages but nobody seems to know where they found the prototype for them...
And - Thank you.
Hi Martin
Thank you. BTW I just came back from hiking in the Vercasca Valley and I guess you know that bridge. The Merlot is still fine...

Cheers
Peter
- Dwight, Landlubber Mike, Martin W and 2 others
-
5
-
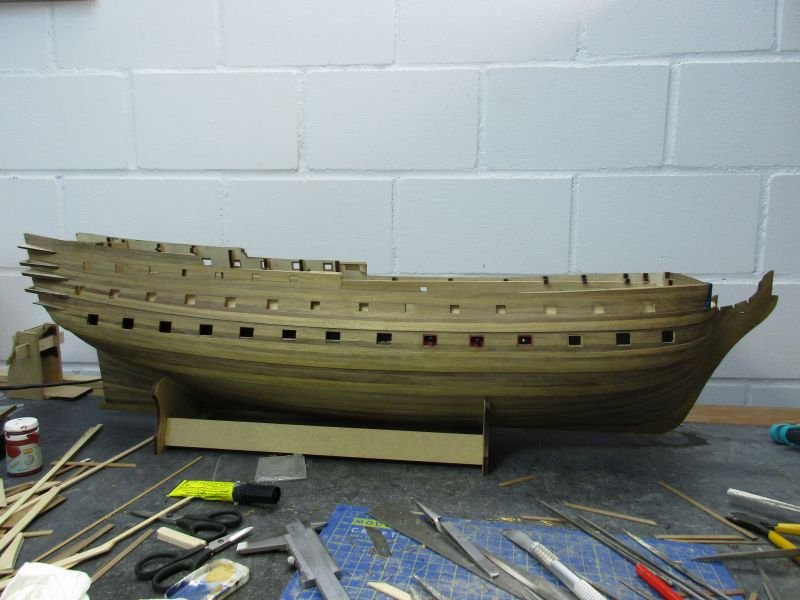
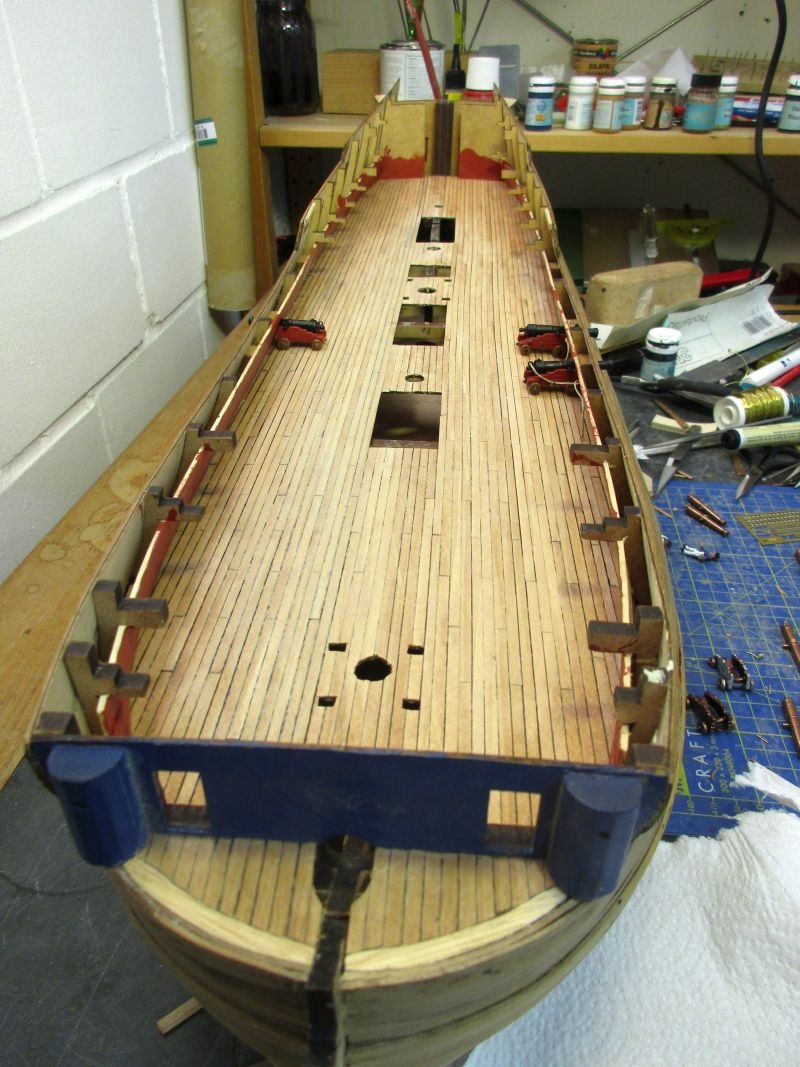
upper deck
The plywood deck was installed and then planked in place. Only those parts which will remain visible got deck planks cut to length and laid in a appropriate pattern. As the outer edges will hardly be visible as well I didn't install margin planks or waterways. The deck planking continues below the previously installed inner bulwark planking.
Then I started to cut the gun ports, first those without lids where the frames were already installed.

finished deck with some guns provisionally in place

the captain checks preparation of the gun installation
upper deck guns
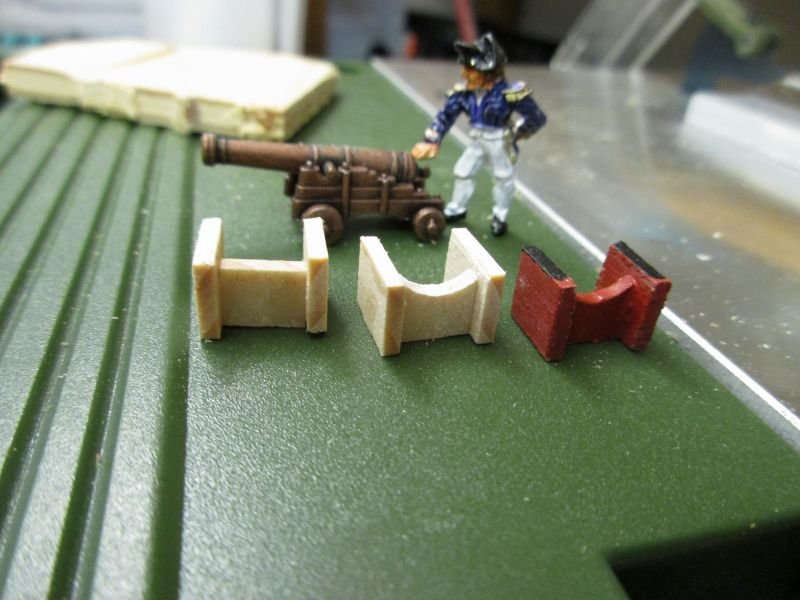
To get some change I also started to rework the gun carriages and to finish the guns. The carriages were filed as flat as possible on the outsides, the front grommet removed and the protruding bolts on top filed flat. Then four holes were drilled for eyebolts, two for the tackles and two for the breech rope. A little paint was added and I think the result is an improvement over those wonderfully detailed but very strangely casted kit carriages.
The barrels got the stamp and lock details provided by the kit. An additional ring for the breech rope, formed of brass wire, was glued above the cascabel for the breech robe. A coat of black metal paint finishes the barrel.
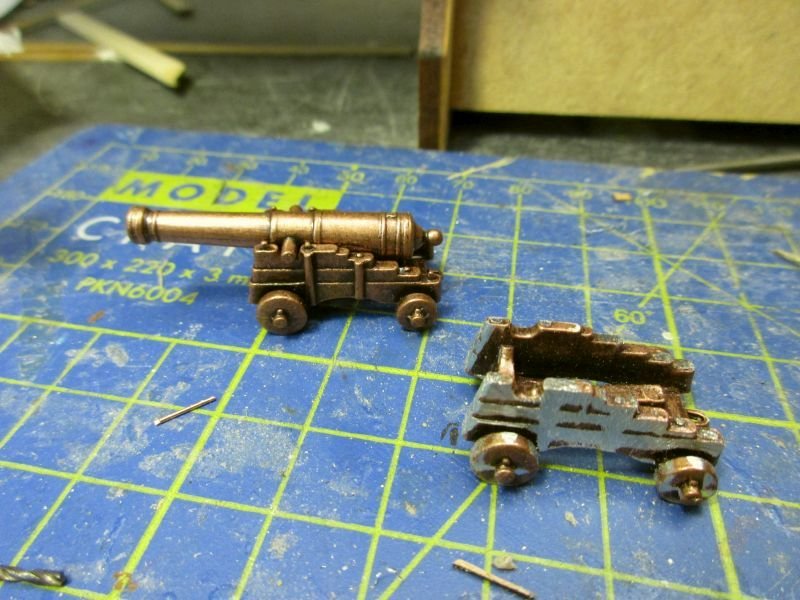
gun out of the kit and reworked carriage
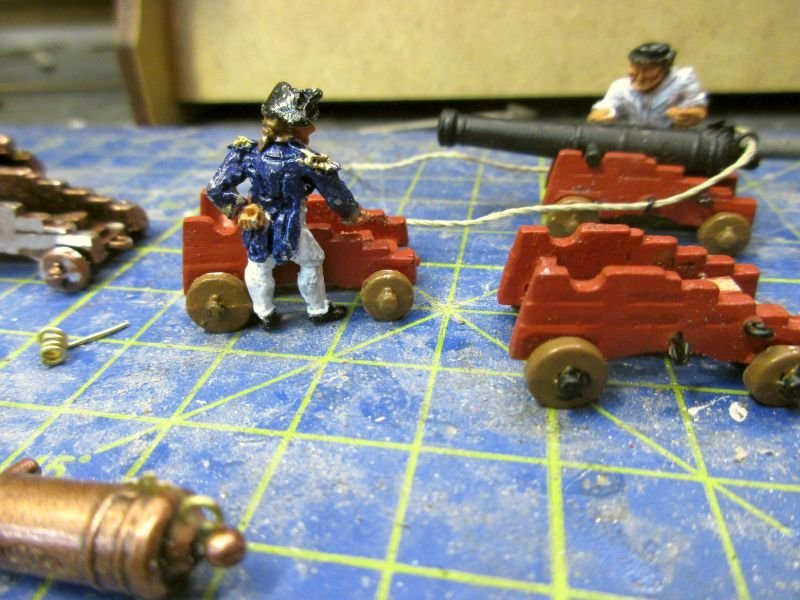
paint and eyebolts added - the captain approves the work
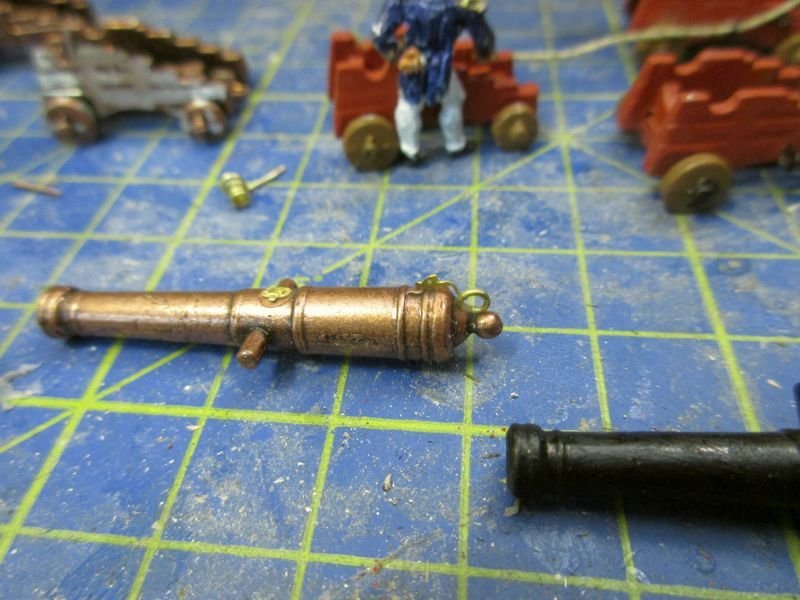
barrel with glued on additions
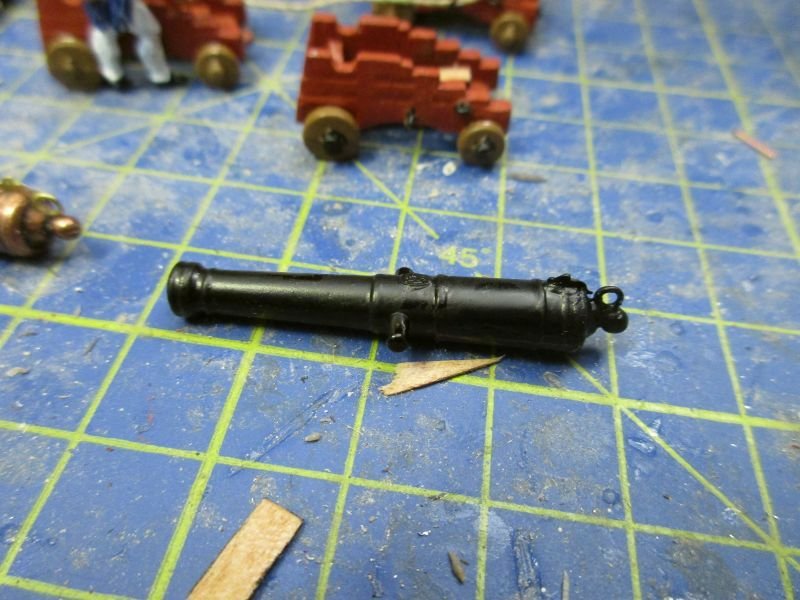
finished barrel
-
As a big fan of sail ship models with sails I want to congratulate you on that absolutely beautiful sail. Only about ten more to go.
") Keep up the good work.
Keep up the good work.Cheers Peter
- aviaamator, Mirabell61 and mtaylor
-
3
-
Hi All, many thanks for the likes and comments.
Michael, the credit for the dummies' idea goes to you and your Vasa. The credit for the deck lines goes to the kit and the gun port stripes.
Jason, yes, I did consider it but buying dozens of better carriages over stresses my budget and building them myself over stresses my endurance. I tried to rework one a bit to make it smoother and tried light ochre and red paint. The red covers the superfluous details better and will be used. It really is a pity that the kit has these strange carriages.
Hi MartinYes, ladies without teeth do look rather old fashioned...
Thank you, Mike. Yes I love that kit and really look forward to how the finished model will look - in five years or so.Cheers
Peter
-
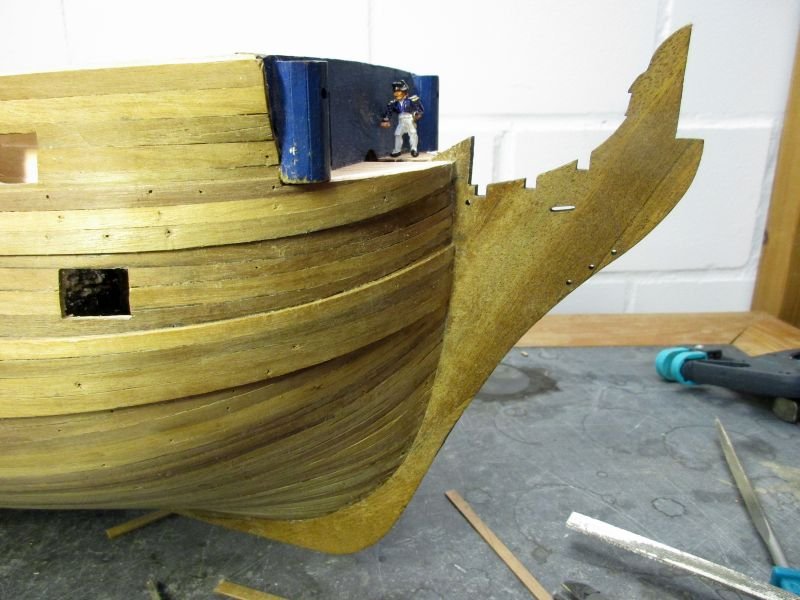
The first of the decks, the gun deck, is now fully equipped with frames and dummy carriages. I decided to do a test run and arm one side with all the dummy guns. (I'm presently reading The Martian again and Mark Watney repeatedly stresses the need for test runs as 'No plan survives the first contact with the enemy' (perhaps quoting General Tacticus or a similar authority) and so a test run was done.)
I only broke off three dummy carriages and therefore it was a successful test because it showed the need for more glue to fix them to the port frame before I close the space with the upper deck.
One deck finished, two more to go but this was by far the most simple one...
she is showing some teeth...
the dummies - although rather simplified - improve the overall impression
-
Don't give up the ship!
You could try to take off those offending stripes of the second planking. Soaking them in water would help to loosen them a bit and then you could get a scalpel between first and second planking and lever the stripes off. Then scratch the first planking clean and try again.
Sometimes when trying to get a smooth finish for the planks I get better results by scratching them clean with a very sharp knife (scalpel) held vertical and moved like a plane (the tool, not the aircraft).
You could also try to order some better quality wood from outside of Australia. E.g.
https://www.cornwallmodelboats.co.uk
delivers worldwide - perhaps even to former colonies. At least you shouldn't be treated worse than me as we belong both to the same group of customers: 'Rest of the World'.
Cheers
Peter
- paulsutcliffe and OrLiN
-
2
-
Hi Martin
Retirement is now just a faint echo in my past. Having now more time for building means that I make my mistakes more frequently - and the workbench still is as organized as it was before. But still - being a retired gentleman is cool too.
")
Judging by your pictures you have some excess length on your rails. Couldn't you fix the timbers, then adjust the rails on the timbers and then cut the rails to the correct length and finally file the upper ends of the rails to the correct form?
Cheers
Peter
-
Looking at those pictures of the second planking I can understand your slight frustration - especially after your fantastic Vanguard. But allow me a perhaps stupid question: Are you sure that your wood stripes for the second planking are truly boxwood? Judging by the pictures it looks more like lime to me, which would be rather coarse-grained for a second planking.
I had much fun with my Granado kit myself and would like you to have too. Please feel free to ask for more information or pictures. Unfortunately I made no build log - only a gallery file.
Cheers
Peter
- Beef Wellington and cog
-
2
-
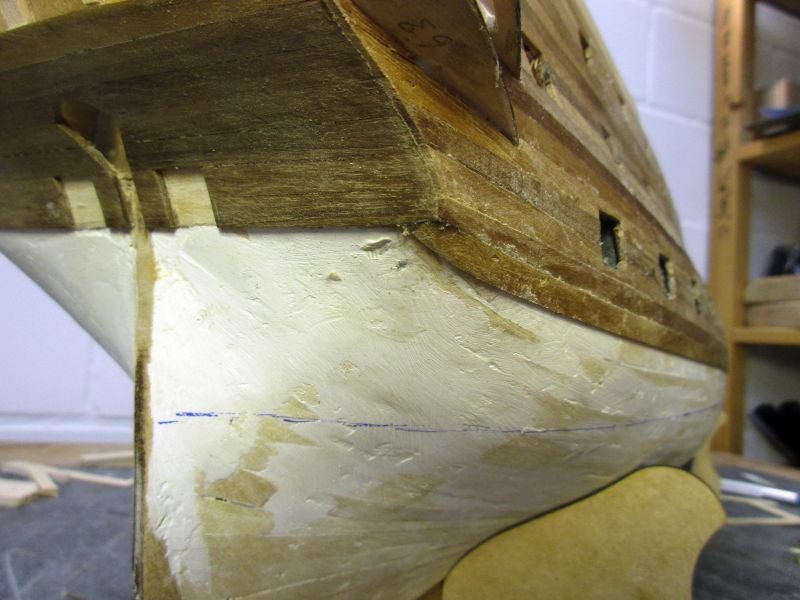
The second planking is now completed and the hull 'sanded'. I used mainly a sharp knife to plane the plank seams and sanding paper only at the stem and stern. Planning gives a smoother surface.
The main and upper wales are in place as well. While marking the correct main wale positions I stumbled over the first big mistake I made. There are two different instructions where to start the second planking. In the 'hull assembly instructions' the start is at the upper edge of the gun port pattern - which I followed. In the 'building instructions' however was the correct way to start at the position of the main wale - which I didn't. According to some of Captain Aubrey's remarks there are two ways to do something: the right way and the navy way. At least I did it somehow the navy way...
I hope that the fact that the wales aren't running fully in parallel with the planking will be overlooked once the hull is painted. I intend to put on the painting scheme 'after 1800' with the 'Nelson checker' where the painting runs across the plank edges and thus irritate the eye sufficiently to overlook my mistake.
for the photo session I tried to get the workbench into some order...

the misalignment of planking and wales is hardly visible here...
..but more obvious here. The visiting captain however seems more interested in the bowsprit position.
gun deck
Installing the gun port frames and the dummy carriages for the dummy guns has begun. For the parts I make full use of my new proxxon saw. Presently the fourth gun port frame is installed and I have only a few dozen more to go. So far I was several times quite happy to still have access to the deck from the inside and I think leaving off the upper deck till later was a good idea.
The frames are completed and trimmed a bit to follow the inclination of the hull at their actual position. After adjusting the hull opening they are glued in. Then the dummy carriage is carefully inserted and glued from the inside to the lower sill of the frame. The glued connections are then generously painted with more glue from the inside - I hope this holds.
The frames will be painted red. For the carriages I tried several colours: red, dark ochre and a light ochre as it is used on Victory. I think the traditional red (which I personally don't like much) is the best solution to keep the makeshift dummy carriages visually in the background. I will later on also help to mask details on the kit's a bit strange cast carriages.
gunport finished, with -carriage and gun - carriage and no gun - gun and no carriage - just the unpainted frame
making of dummy carriages.
-
Congratulations, Michael on reaching the end of a wonderful journey. Thank you for taking us along. And yes, I'm as well eagerly looking forward to your next masterpiece.
Peter

- popeye the sailor, EJ_L, John Allen and 3 others
-
6
-
Congratulations on a beautiful model, a fast and yet very accurate build. Thanks for sharing.
A year ago I built the same kit with a rather different result. You are right about the quality (or lack thereof) but still the kit is a very interesting one to work with - but a difficult one for beginners.
Those Marisstella kits seem to be quite interesting and I'm looking forward to your build log.
Cheers
Peter
-
A pessimist, huh? Would a real pessimist start a project which takes years to finish? Imagine all the disasters which could happen to stop it - then why start it? No, you still have far to go, to become a real pessimist. I'm quite optimistic about that.
Found those clamps. when you google 'planking clamps', they show up as: https://www.micromark.com/Planking-Clamps-10
Shipped to Europe they would cost me about 30$.
Cheers
Peter
-
Hi Bob
I'm eagerly looking forward to follow you on your Granado adventure.
")
I still think it's a great kit but then I didn't have any problems with the wood quality. However with the Pickle kit from the same manufacturer I had some. It seems that the quality may differ but it's wood after all and never perfect.
Cheers
Peter
-
Hi Andy
Sorry for being quiet that long, but I mislaid your log somehow.
And I'm very sorry to hear about your 'grounding'. I was in your shoes twice - once a hearing problem where a very helpful doctor finally found a way to get an special concession from our FAA to permit continuation of flying and then the financial grounding of our company where after a few weeks a new one could be restarted with government help. Twice I was in limbo for weeks and twice a solution was found.
I'm positive, that for you, as a dedicated craftsman, a similar outcome will happen.
Good luck, merry Christmas and a very happy new year.
Peter
-
Hi B.E., welcome to the party.
Oh yes, it's a beast - sometimes even one who is kicking. So far I suffered a few splinters (a common injury when fighting (on) wooden ships, I read), a few cuts and a 0,5mm hole, drilled through one finger nail. Or perhaps it was a shot from a scale 1/72 2pounder into my left thumb.

I have the same problem with dummy guns, but building in an additional deck and arming it with 28 guns was too much for me - work wise and moneywise. Besides that I didn't find any 1/72 32pounder models.
As mentioned earlier, I stole the idea for the dummy carriages from Michael (md1400cs) - thanks again.

Cheers
Peter
-
Second planking
The first plank on each side, which determines the general run of the planks, was carefully put on with white glue. Thus I had enough time to correct. Then I tried to glue the next (soaked) planks with CA as I did on the last 2 projects. However it was messy work, did hold too early or not good enough and used a lot of rather expensive stuff. When cutting away the part over the gun ports the planks sometimes fell off again. Therefore I reverted to PVA and rather tedious fixing with clamps. However the clamps reach only down to the lower gun ports and below I had to fix the new planks with nails - mostly just below the lower side, in order not to leave holes, and a large vice. When one plank holds, I lay the next one in its natural run along and over the previous and mark the edge with a pencil. The superfluous part of the fixed plank is cut away with a sharp scalpel and the edge smoothed with a file. While gluing on plank by plank I started to cut open the gun ports.
The blue line is a provisional waterline. Once below it I can freely use nails to fix the planks. The holes will be covered by the coppering.
Still looking quite good...but the side galleries will be tricky work, I think.
the lower corners of the lower counter are difficult terrain...
The lower planks are fixed with nails below and the end with a big vice. So far, it worked 3 times.
- Jobbie, mobbsie, Mirabell61 and 9 others
-
12
-
Hi Bob
After seeing your new gun carriages I had to compare them with those on my Granado. I'm sure that the difference will still be visible even in the mace of details on the finished model and the new things will be well worth the extra effort. Good idea!
Cheers
Peter
-
Hi Bob
Me, I would very much like to follow a Granado log of yours.
Seeing what you made of the Vanguard, your Granado should become something well worth her own diary. Not only might your followers learn some new tricks or new views, sometimes it's also nice to see somebody else struggling with the same problems
 I had and hopefully come to good and perhaps different solutions.
And besides that it would be a nice place to chat a bit.

Cheers
Peter
-
Congratulations Bob! A beautiful ship and very clean, precise work.
Cheers
Peter
-
Hi Bob
Once again I must congratulate you on a superb and very clean build.
I'm wondering where you would let evolution attach the third arm. For ship modelling purposes a good place would probably be on top of the head to be able to hold your piece of ship in a triangular grip...
While stowing that anchor on my Pegasus I simply put a line around the base of one of the lower deadeyes.
BTW why don't you like Granado's gun carriages?
Cheers
Peter
-
Hi Martin
Bellerophon is a ship of the Arrogant class which was designed as a development of the Bellona class, sharing the same basic dimensions. All were based on the lines of Sir Thomas Slade's designs. As he was also the designer of the Victory I use her plans for confirmation of his general ways.
The Bellona's plan - in the book you mentioned - is very similar to the plan of the arrogant class ship Edgar, published in 'The Billy Ruffian', but shows more details.
The convex, smooth form of the taffrail, for example, is visible in both and differs from the kits rather flat one.
I think that the kit is a great one but some simplifications, mistakes or misunderstandings may occur as well as financially motivated shortcuts. Therefore, if I am in doubt about the correctness of the kits instructions, I try to alter the model coinciding with my other sources. If in doubt I work towards what I think to be more pleasing to the eye because very often efficient war machines look quite elegant - a contradiction which is a little disturbing but nevertheless exists.
So far this is the theory behind my building attempts. What I then manage to tinker together is the practise...
Cheers
peter
1/72 HMS Vanguard 1787 - Victory Models/Amati
in REVIEWS: Model kits
Posted
What you say is all true. Being about a year into the build of Belllerophon I would like to share some additional impressions.
The big black mark on this kit are those cast carriages for guns and carronades. Very detailed made they fit no known prototype and I can only wonder that so much resources went into so obviously wrong and pretty useless parts. I still hope for a correction by Amati as it was done for the Fly/Pegasus kit although it would be too late for my build anyhow.
I didn't particularly like the dummy guns for the lower gun deck and I think with some slight alterations to the kit it would be possible to rise the false deck onto the level of the gun deck, provide some simplified carriages and have full guns on that deck.
Another problem is that the stern decorations for Bellerophon are still white metal. Nevertheless I will try to use them and I thrust Amati so far that I hope to find an acceptable solution with them although I will have to bend them even more as I increased the bulge of the stern.
Generally you should look at the plans somewhat critically as there are several questionable details. Not only details of the stern could be reworked. Another question is also why the upper gun deck and the deck part in front of the beakhead bulkhead are not on the same level. I left that open and built as instructed by the kit but I think this detail is wrong.
I'm sure there will be more questions as the build goes on. However I would like to confirm that this is a great kit offering the possibility to build wonderful models and I never regretted to have bought it - but please change the gun carriages.
Have fun!
Peter