


popeye the sailor
-
Posts
16,007 -
Joined
-
Last visited
Content Type
Profiles
Forums
Gallery
Events
Everything posted by popeye the sailor
-
 thank you Nils. I still have more to do before I can add more. I hope to get more done today
- 378 replies
-
- 7
-

-
- t78 norden
- billing boats
- (and 1 more)
-
you'll muddle through it Doug.......once you fine the right method, it will go much better. I've seen many way to build these small boats....I'm not that great at them either. keep in mind....when you see the finished boat, your going to wonder what you were worried about. remember Doug and David...build logs not only show your triumphs, but they also can yield good advice to make you better modelers. I might suggest moving all of the bulkheads further back on the keel, to give the first bulkhead, the one connected to the bow stem, the ability to better taper the bow. it also looks like it might not do to build it with the ribbing.......create the shell and add in the ribs afterwards.
-
hello all....back for another {hopefully} exciting week of modeling. work is changing over to a whole new direction.......I'm positive I can do the work involved, but the question is, will I enjoy it enough to stay. part of me is very doubtful, given by what I've seen through the years I've been there...this will be my 14th year. I want to thank you for the positive comments...glad to see I'm not making a pig's ear of her thanks Lou and Pat....I've experienced posting problems too. post a comment, later to find that the post never showed, and it's still in the comment box when I go to post another comment. I thought it was just me, not hitting the submit box I'm not nutz after all!!! thanks Zappto......glad to hear you like my planking. I'm not expert at it, but I do my best. thanks Piet.......it was just a cheap school grade paper punch.....I didn't know my own strength! gotta be the spinach! so, let that be a lesson to you all...eat your spinach, 'an yas kin be as strong as me... AK-k-k-kk-kk! thanks Patrick.......I think we all {as modelers} try our best to instill some level of realism in our models. I feel the ability is a good barometer, to measure how we've advanced as modelers. fishing boat really aren't that hard, since there are so many way that they can be enhanced....the Andrea Gail is a good example. I hope to do more when I start the second Nordkap {but that won't be for a while yet}. I'm humbled by your comment. thanks Samson and John. in the generic world of kit models, it's nice to know that we have the upper hand with the finished product. in reference to the 'outer limits'........we can fine tune the functionality, we can change the probability to a soft blur, and raise the concept to crystal clarity. I can't remember the last model that I built out of the box...I have too much fun bashing them. you know me too well John........I still treasure your visit. .....on to the tables!

- 378 replies
-
- 7
-
-
- t78 norden
- billing boats
- (and 1 more)
-
I wonder if a dimmer switch can be added to the circuit. without some sort of regulator, the lights will be at full power, depending on the power supply you decide to use. it's a very nice effect you've achieved
-
yes....you did Hugh. not only that, I have the wood table in the computer room, and a plastic table I set up in the spare bedroom. I've halted any plastic projects now, to do this. I'm still working on the beginnings for the time being......I'll do a log when I have a concept nailed down I've also been looking at Vossy's build, even though it's a different manufacturer......the subject matter is still the same. looking forward in seeing more pictures.
-
bet it feels great to see you've reached a milestone looking good !
-
it's all part of the process EJ........any progress is good progress take care of yourself, and by the time you make your next update....I'm sure it will be a biggie!
-
the bell looks fine......think of it swaying in the breeze in motion of the ship fine progress so far.
-
I notice that the floor fore and aft of the structure is open.....you'll need to fill them in if you want to detail the interior. in the A.L. kit, they don't do this.....it'a a full "floor". the exterior of the structure looks very good are the window inserts solid and closed in?
-
your progress is coming along great! nice work with all the extra detail. very nice job!
- 378 replies
-
- 5
-
-
- java
- pacific crossroads
- (and 2 more)
-
your latest outfit looks great! the depth and detail is amazing and even though this is a static model, shows a lot of action. you've done very well with the model showing these qualities and giving it a life like feel. an impressive model so far
-
quite a few bulkheads...that will insure a nice contour should be a joy to plank when you get the faring done. nice progress so far!
- 359 replies
-
- 4
-
-
- prince de neufchatel
- model shipways
- (and 1 more)
-
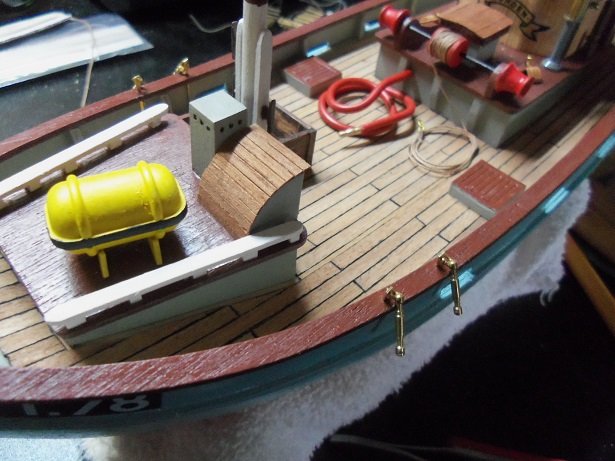
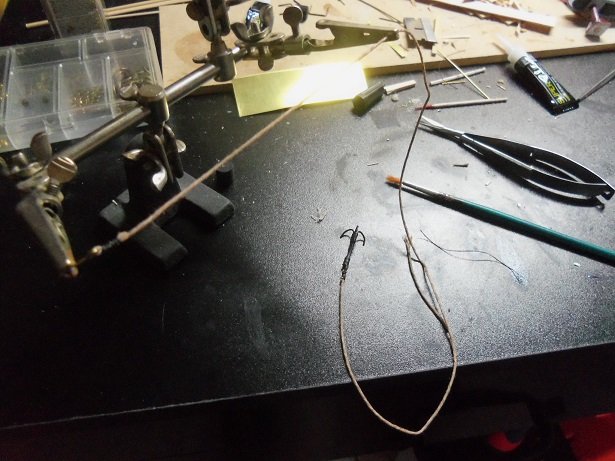
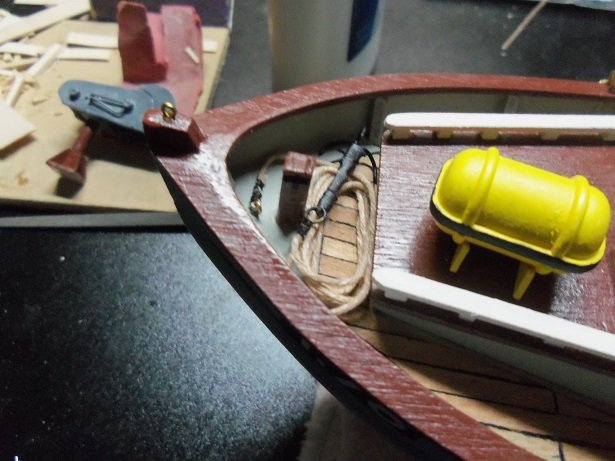
thanks OC........and thanks for all the likes ....couple of new names......well, thanks for look'in in, feel free to follow along. I'm no Picasso, but I do like to have fun. I've got a couple of other aspects done on the Norden today.......I hope to get more done.....that is, if I'm not breaking my tools in the process. I was playing with the flotation balls.......thinking about that little bib round the eyelet. I got it in my head that I could punch out perfect circles with an ordinary paper punch. cutting off a piece of some .005 brass, I put in in the jaws of the paper punch and squeezed so hard, I began to crush the handles together. of course, it wouldn't punch out the circle. after trying to straighten out the handles with a pair of pliers, I took each side and tried to pull it apart like a wishbone. the thing let go, parts flying on the floor! after picking up the pieces, it hit the circular file......guess I'll never know how many holes it will take to fill the Albert Hall anyway........the shroud hardware is in place...almost ready to seat the main mast. taking the larger of the kit supplied 'rope', a length of it was 'stained' with some Testor's flat tan paint. the anchor was lashed onto one end....on the other, an eye bolt. an eye bolt was added to the bow stem, and a hole was drilled into the bow deck. the anchor rope eye bolt was cemented in place, the rope coiled and then cemented on the deck behind the sampson post. the anchor ended up on top of the coil of rope. this brings the time close to supper.........and I'm supposed to make my shaved steak subs. I certainly will try to get more done.......I do, and you'll see it here as always.....thanks for look'in in.
- 378 replies
-
- 16
-
-
- t78 norden
- billing boats
- (and 1 more)
-
that's what it's called........I agree, nice job making it. Krabbenkutter...is that the Cux or the Mary Ann?
- 131 replies
-
- 1
-
-
- finished
- artesania latina
- (and 1 more)
-
I dunno........looks pretty good to me if you have any small gaps you want to get rid of.....here's something easy to do. I lightly rub white glue into the gap and wipe off the excess. them I sand over it.......it will push sawdust into the gap and mix with the glue. instant filler
-
well I hope you find one, or something with what you need for parts. I was faced with a problem that was sort of similar, but came to a better conclusion that the first time. the Nordkap was the first model I built in wood. the owner couldn't find the fitting kit, but later found it after I had gotten a kit from my friend Tom. this past Christmas, I received another kit of the Nprdkap.......older than the first one. it too lacked the fitting kit. I looked high and low for the fitting kit.....to order the kit piece meal, would have been very expensive. happening on the Billing site a few weeks ago......there it was.....a new listing! I ordered that bugger up in a snap! so now I have the entire kit......cool because I have pictures of another boat that can be built from the Nordkap kit. I plan on cloning the hull, so I can build it, but it dawned on me that I will need to order another fitting kit. the admiral's gonna shoot me! glad to hear that your not alone.....admirable......a big brother with a big heart I feel glad knowing you doing OK. be well
-
very interesting planking system.......especially in the plank hold down phase. very nicely done in quite innovative
-
such awesome photos Patrick! she looks so nice all cleaned up........Martha Stewart would be proud {I trust your using some of her furnishings}. so much detail in such a small package...I'm in awe in how you do it. I do have to ask one thing though.......where are the engines?
-
I would call it more like a sill inside the coaming...the lip in which the hatch cover sits on. the deck came out nicely Russ.......I do the same process with the structures. it's easy to overcome the deck camber with the method......it can be seen inside the hatch. very nicely done
- 420 replies
-
- 3
-
-
- captain roy
- lugger
- (and 2 more)
-
amazed with the progress you've been making on this model Nils. every piece added expands the looks of the model so much........it's become such a beautiful show piece your efforts shine so brightly she looks totally awesome!
- 692 replies
-
- 3
-
-
- eagle of algier
- chebec
- (and 2 more)
-
your making some really nice progress .........neat that without ribs, it's able to keep it's shape. very nicely done so far
-
I was waiting patiently for the log to start.....I'm in!
- 359 replies
-
- 5
-
-
- prince de neufchatel
- model shipways
- (and 1 more)