


Bob Cleek
-
Posts
3,374 -
Joined
-
Last visited
Content Type
Profiles
Forums
Gallery
Events
Posts posted by Bob Cleek
-
-
Note that the US Navy Naval Sea Systems Command which includes the Navy's Curator for Ship Models division specifies in their requirements for model contracts that all "masts, antenna masts, yardarms (sic!), boom, etc. less than 3/16" diameter shall be metal."
See: Specifications for Building Model Ships at https://www.navsea.navy.mil/Home/Warfare-Centers/NSWC-Carderock/Resources/Curator-of-Navy-Ship-Models/Specifications-for-Building-Exhibition-Ship-Models/
I believe that in large measure the same specifications have been adopted by the Smithsonian Institution and Mystic Seaport and that they are generally recognized by professional museum curators as defining "museum quality" in so far as that term can be defined. I follow these specifications to the extent possible. Obviously, some requirements are difficult to meet these days, e.g. linen rigging line. They recognize that new materials come along all the time, but caution that they are often of unproven archival quality. I take that caution seriously. What's the point of spending the time it takes to build a good model, only to have it fall apart in a few decades.
See also Mystic's Ship Model Classification Guidelines developed by Howard I. Chapelle: http://www.shipmodel.com/pdfs/ship-model-classification-guidelines-1980.pdf
-
I've never been able to successfully educate my wife about the proper care of my cast iron cookware or my high-carbon steel chef's knives. She throws everything in the dishwasher. God knows I've tried, but to no avail.
I've given up and just stored them separately and care for them myself before anybody else in the house can get their hands on them. I quietly retaliate by leaving the toilet seat up.

- Jack12477, paulsutcliffe, druxey and 4 others
-
 7
7
-
On 1/16/2020 at 5:33 PM, Canute said:
Those dirigible hangars are a sight, Lou. You'd be wowed. Unknown if any still exist on the West Coast.
Moffett Field, formerly a Navy airbase in Mountain View, CA, near San Jose at the southern end of San Francisco Bay, is now called "Moffett Federal Airfield, and is used by a variety of agencies. It has two blimp hangars, on the right in the photo below, and on the left is the huge dirigible hangar, one of the largest free-standing structures in the world. There is at least one blimp hangar at Tillamook, OR, on the coast, as well. There are also a couple of large blimp hangars in Tustin, CA, down south.


- src, Ryland Craze, mtaylor and 4 others
-
7
-
After watching your construction of the door hinges, Michael, I was holding my breath waiting to see whether you'd be able to fabricate operating latches to scale or have to "fake" them. Your Sherman tank answered that question!
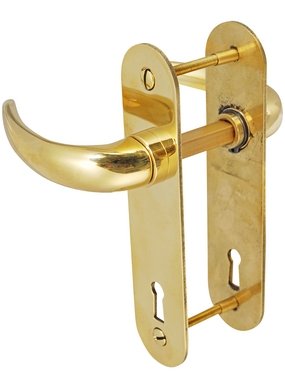
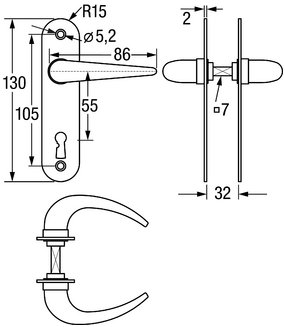
 All from the Toplicht catalog: https://www.toplicht.de/en/shop/schloesser-riegel-und-verschluesse/moebelschloss/druckknopf-verschluesse/druckknopf-kastenschloss-buntbartFor those who are unaware of it, Toplicht is a chandlery firm in Hamburg, Germany, which carries what is probably the most extensive collection of ship and yacht products anywhere in the world. They are in many instances the only source of many traditional yacht and ship fittings left. Their nearly 500 page free catalog is full of photos and engineering drawings for all sorts of bits and pieces of "jewelry" and I'd nominate it for a "must have" in any scratch builder's reference library. https://www.toplicht.de/en/catalog
 -
1 hour ago, Bob Blarney said:
By the way, circuit breakers protect your building's wiring, >not your body<. Which brings us to the idea of installing GFI receptacles. So long as you're in a dry location, then GFI receptacles are not needed - the National Electrical Code only requires them in damp locations or where a plumbing fixture is within an arm's reach of the outlet. It wouldn't hurt to install one, though.
Excellent point. I have ground fault interrupters on all of my shop outlet circuits. Cheap as they are, there's no excuse not to. I'd advise them not only for kitchen and bathroom outlet circuits, as per code, but for every circuit where an outlet might be used for an extension cord that runs outdoors.
-
-
21 hours ago, Jack12477 said:
The bolt rope goes along the entire edge of the sail.
Generally, on other than some storm sails, the leech of sails is not roped. The rope is brought round the corner of the sail for a distance sufficient to reinforce the sail's corner at the cringle and then tapered to a "rat tail" which is sewn onto the leech for that distance alone.
- allanyed, mtaylor, thibaultron and 1 other
-
4
-
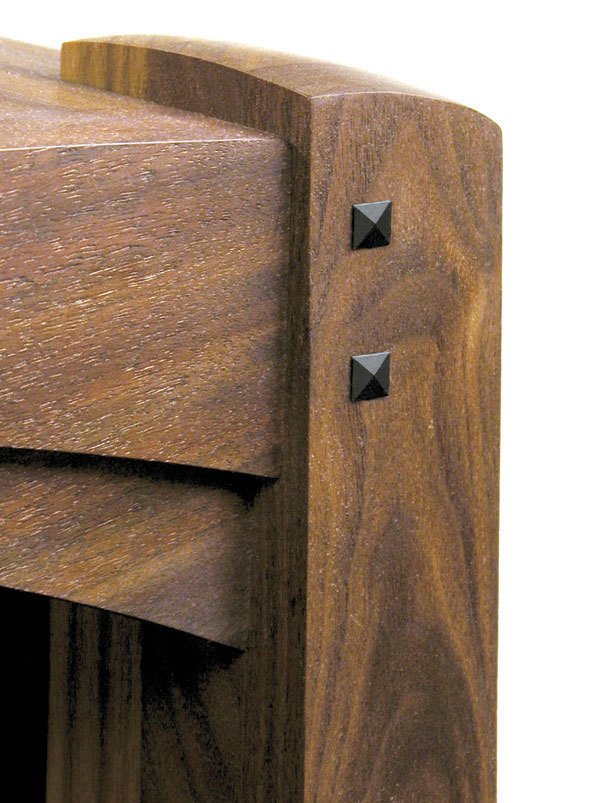
I guess if it's a round hole, the peg that goes into it is a "dowel," even if the peg is square. Square pegs do go into round holes, actually. It's a traditional fastening option. Drill the pilot hole and then take a suitably sized square peg, whittle the lower edges of the peg so it fits to stick in the hole and then give it a good whack with a big mallet. The square peg expands the round hole to a tight fit in the round hole, yielding what appears as a square peg in a square hole. (The pegs should be of a harder wood species than the wood into which they are driven.) They are a characteristic decorative feature of Arts and Crafts furniture construction. Essentially the same principles as the treenail, although treenails are generally blind-wedged at the bottom of the hole and a wedge driven at the exposed end of the peg to lock them in place.
- Duanelaker, lmagna, druxey and 2 others
-
5
-
Over the years, it seems that as soon as I finally get the workshop I want built the way I want it, the occasion to move arises! It's almost like a jinx. I'm afraid to finish my fifth, presently a fifteen year work-in-progress 1,500 square foot "man cave" workshop in a stand-alone building wired with 440 3-phase power, for fear I'll have to leave it! (The wife loved the house. All I cared about was the shop building out back!
)
Designing a workshop is really about personal taste and needs and one's own creativity. In no particular order, here are a few general principles I've discovered over the years.
1. Everything needs to have a place to live. "A place for everything and everything in its place." It all has to be easily returnable to its storage place so its location is always (or pretty much always!) easily accessed. This will save an amazing amount of time otherwise wasted looking for things. Storing small hand tools in rolling tool storage chests is a good way to go, the cost of the chests notwithstanding. There's a reason professional mechanics keep their tools in those big "Snap On" tool chests. Unfortunately, you can drop a few grand on a big one. Harbor Freight has some lighter weight models which are entirely sufficient for lighter weight tool collections such as ours at very reasonable prices. (The professional models are expensive because they have to survive daily use sometimes carrying a ton or two of mechanic's tools.) (See: https://www.harborfreight.com/search?limit=108&q=tool chests)
2. Workbenches are for doing work on, not for storing stuff on. Any flat surface in a workshop is an invitation to family members to pile high with junk they don't want in the house. Vigilantly protect your workbenches from that. The smaller the benches, the easier that is to do. Many workbenches are too big. There's no need to consume scarce shop floor space with a four by eight foot free-standing workbench if you aren't using that much space on a daily basis. If you have a larger job to do, lay some plywood on some sawhorses and reclaim valuable floor space by putting them away when the job is done. (Big workbenches can be placed on heavy-duty casters and the space below the bench top used for storage. There's lots of space for drawers there.)
2. Recycled kitchen and bathroom cabinets are great for workshop building purposes. If you don't have a local building materials recycling place near you, make friends with a local kitchen and bath remodeling contractor. They frequently simply bust up perfectly good cabinets and counter bases and throw them in the dumpster when remodeling kitchens and bathrooms. Get them to save a good set for you. Most will be happy to have you haul them away for free, so long as you promise to pick them up from the job site as soon as they pull them out. It saves them the work of busting them up and paying the dump fees. (In one of my earlier shops, I scored the Formica-covered cabinetwork from a dentist's office. It was full of small, shallow divided drawers designed for storing small dental instruments. I really hated to leave that one behind!)
3. Put anything that isn't fastened to the walls on casters so it can be moved around. There is no reason to have a big Delta Unisaw cabinet saw with table extensions dominating the center of a workshop when it's only used occasionally. If everything is on casters except counters and cabinets on the walls, and if those counter and cabinet faces are sitting flush with the floor, being able to roll everything out of the way gives you an unobstructed floor that is easily swept clean. That's a huge time-saver and a clean shop is a happy shop. (Do as I say, not as I do!)
4. You can't ever have too many electrical outlets. There are uniform electrical codes that dictate how many outlets can be on a circuit, but those codes seem to assume every outlet on a circuit will be used at once. In reality, there is little need for concern about overloading a circuit in a workshop because nobody uses more than one high-amperage tool at a time. It's not about how many outlets you have on a circuit, or how many things are plugged into them, but how many are running at one time. Add up the total amperage of what's running at the same time to see if you have enough juice if you're concerned about that. (If your power service is ancient and insufficient for modern energy use, that will be the exception. If you're tripping circuit breakers or the lights dim when you turn on your table saw, call a licensed electrician. Your electrical system probably needs major surgery.) I place outlets and power strips not only on the wall behind a workbench, but also on the front of the bench, just below the overhang of the bench top. Corded hand-held power tools are almost always easier (and safer) to use on the bench when the cords don't have to be strung across the bench and your working space from a plug in a wall outlet.
5. The better the light, the better the work. I use florescent shop lights supplemented by articulated work lamps, some with magnifying lenses, on my workbenches. I'm going to switch over to LED shop lights in the near future. The cost of the LED lights has dropped tremendously in recent times. The savings in power costs is substantial, as is the increase in their bulb and ballast lifespans, but, best of all, they are super-bright. Hang a lot of them. No more flickering and humming, either. (E.g.: https://www.amazon.com/Barrina-Integrated-Fixture-Utility-Electric/dp/B01HBT3BVM/ref=sr_1_13?hvadid=77721863975721&hvbmt=be&hvdev=c&hvqmt=e&keywords=led+shop+light&qid=1579894392&sr=8-13 )
6. Pegboard is your friend. If there's any unoccupied wall space in your shop, it's best paneled with pegboard. I have dozens of small baby food jars that snap onto plastic holders that hang on pegboards. They store all sorts of small parts and fasteners that are immediately visible when I need to find what I'm looking for. There are a lot of things that don't lend themselves to being stored in a drawer because of size or shape. (E.g.: carpenter's squares, long levels, handsaws, etc.) (See: https://world-axiom.com/pegboard-jars-fanatic/ and https://www.hardwareandtools.com/crawford-jc12-pegboard-jar-organizer-2-pack-jkca-2116.html?utm_source=bing&utm_medium=cpc&utm_campaign=PLA&scid=scbplpJKCA-2116&sc_intid=JKCA-2116&msclkid=10db724b5d881dff92b82c600de48792 )
7. Make it comfortable. Climate control will depend upon one's circumstances. At worst, a sweater and a space heater should suffice to keep one from being uncomfortable in the winter and a fan and open windows in the summer time. Depending upon one's preference, a music system or television is welcome company and a small refrigerator for preferred libations can be welcome additions, so long as they don't distract one while operating dangerous machinery!
8. Finally, every shop needs a comfortable "moaning chair." A moaning chair is essential when one realizes they've made one mistake or another, or can't figure out which way to go next when faced with a problem. Often, sitting down with a tall cold one and just "moaning," inspires a solution to the problem at hand. Also, if it's suitably placed, a visitor can be kept out of the way while your working without risking offending them.
Keep us posted on your project!
- Roger Pellett, trippwj, mtaylor and 2 others
-
5
-
1 hour ago, Nenseth said:
Anyone have some suggestions about how to temporarily fix the frames to the keel?
So it is easier to sand the correct shape. Some kind of glue which can be 'unstuck' somehow later perhaps..?
PVA glue is soluble in isopropol alcohol. Placing a slip of paper between the faying surfaces before gluing a part will make it much easier to separate the part thereafter. the glue and paper can then be scraped from the surfaces and/or soaked off with isopropol alcohol. I've also had success with the judicious use of hot-melt glue from craft glue guns. ("The Martha Stewart school of ship modeling?") The less tenacious hot-melt glue sticks come apart pretty easily and that can be assisted by a bit of gentle heat from a heat gun.
The jig you are using will provide a surprising amount of rigidity when combined with a temporary batten or three to a side. (The battens can be tied to the frames with string or wire. "Spacer sticks" cut to the width of the frame spaces can be hot-melt glued to the top of the upper jig piece, running across between the frames. (These would have eliminated the need to cut all those tedious notches!) A spot of hot-melt glue at the corner between the spacer stick and the frame side will permit the upper jig frame from being removed and turned upside down on the jig base to permit free access to the bottom of the hull. (Providing you've located the threaded rods identically on each side of the jig as should be done.) The temporary longitudinal battens are removed as they are reached in the fairing process and then replaced, or not, as needs be, and similarly removed as the planking progresses, the planks replacing them and maintaining the frame's rigidity.
Once the frames are bound together in such fashion, sanding the frame bevels fair with sandpaper glued to a flexible batten is easily done, although the area obstructed by the top frame of the jig will be inaccessible. That can be left to be attended to after the planking below it is hung. Once that is accomplished, the hull can be removed from the jig entirely and should have no problem holding its shape and can be sanded and planking hung in that area as well. (Don't plank above the upper jig frame while the hull is in the jig frame. If your upper jig frame isn't made in two pieces separated on the centerline or you may not be able to remove the hull from the upper jig frame, of course.)
-
1 hour ago, rwiederrich said:
As I get closer to her completion...details will be added that will harmonize actual practice of ensign and pennant locations....along with artistic license that greatly pleases the model makers own romantic allure to this wonderfully imagined and crafted extreme bark clipper.
And this, Dear Friends, is the difference between just craftsmanship and real art!
- BANYAN and popeye the sailor
-
2
-
4 hours ago, rwiederrich said:
.it was not uncommon for a merchant ship to fly their owners *House* flag on the masthead when in proximity of land...to give recognition to the said owner/s.
Yes, that was supposedly the genesis of the "widow's walks" on coastal homes. The "widows" would watch for their husbands' return from their long whaling voyages and identify the ships from a distance by the house flags they flew. Whether that was actually true, or the balconies were simply an architectural embellishment popular in the era, is a matter of some dispute.

-
2 hours ago, rwiederrich said:
Thanks Bob..so much for your input. Much appreciated as usual.
I should mention, however, that under USN regulations, dressed ship and full-dressed ship are not displayed while the ship is underway. Only at anchor or alongside a dock. That wouldn't necessarily apply to a merchant ship, although they generally followed the Navy practice. If you've got a contemporary photo of her underway, I'd go with that for authority. Even if the display wasn't proper, nobody could fault the portrayal on the model.
-
1 hour ago, michael mott said:
I know but we still want it "perfect"
Indeed. IMHO, the essence of modeling is the exercise of striving for perfection. I certainly didn't mean to imply otherwise. My comments were limited to limitations with the use of CAD programs for drafting as a means to perfection, which is the constant in the equation. The work of a master machinist is a wonder to behold, but there's more to a "perfect" miniature than proper scale measurements. It's the minute, nearly imperceptible imperfections wrought by the free hands of man that give life to a true work of art.
- FriedClams, michael mott, druxey and 1 other
-
4
-
17 hours ago, Hank said:
I like the prospect of this carrier NOT following the current trend as we've both stated in our separate postings.
I much preferred the earlier practice of naming carriers after famous sailing ships of the early US Navy. It's all a hodge-podge these days.
-
5 hours ago, rwiederrich said:
...during her entrance into NY harbor she was bedecked with all manner of duplicate ensign's and pennants....from the tops of all her masts. I will be adding a large national flag from her spanker gaff peak as was her natural location, when that time comes.
I'm considering adding a house flag beneath the mizzen ensign as well, or maybe from the spanker top.
That explains it. I didn't realize the circumstances of your portrayal and that there were more flags coming! However, under the "dressed ship" circumstance you describe, the largest ensign should be flying from the stern flagstaff. There would be another smaller national ensign at the spanker masthead, but none from the gaff peak because only one national ensign is properly flown from any given mast. When a house flag is flown on a "dressed ship, it's always flown alone from the main top.
A ship that is dressed or full-dressed for a U.S. holiday or other special event flies its largest available ensign at the flagstaff and an ensign at each masthead at which a personal flag or command pennant is not hoisted. If it is dressed in honor of a foreign nation, that nation's naval ensign flies at the head of the mainmast. (Navy Regulations 1279)
A merchant ship's personal or "house flag" is always flown from the top of the mainmast unless preempted by a foreign nation's naval ensign (AKA: "courtesy flag.") (Merchant ships do not fly command pennants.)
-
On 1/12/2020 at 12:29 PM, vaddoc said:
I really liked Chapelle's book, the clarity of his thinking and the way he can communicate and explain complex issues is fascinating. So much so that I started CADing one of the boats in the book! Now, the following images I think really illustrate how ruthlessly (and unnecessarily) accurate CAD is.
I'm probably stating the obvious for many, but for those who aren't aware, drawn lines are actually as much as 1/4" thick at full scale, if not more, depending upon the scale of the lines drawing. Offsets are, more often than not, taken from measurements made from the drawings and if taken from a half-model, the scaling issue is no different. (N.G. Herreshoff, perhaps the greatest American naval architect of the late Nineteenth and early Twentieth Centuries, rarely drew lines, designing his creations by carving half models and taking the offsets directly from his models. The loftsmen then lofted from those offsets directly, without any drawn lines or construction plans.) Theoretical accuracy is dependent upon the placement of the dividers' points and reading the distance between them on the scale. As the saying goes, "There's many a slip between the cup and the lip." A table of offsets generated manually from a manually drawn set of lines will never be sufficiently accurate to serve as CAD inputs directly and a lot of CAD "fairing" is always going to be necessary if the CAD drawings are to "work" the way one might desire, but that level of accuracy on paper was never necessary for traditional builders. Manually generated offsets were never expected to translate directly to the loft floor and so produce completely accurate patterns. Rather, it was the loftsman's "eye" that was expected to fair the lines if not outright errors, in the offsets "right on the loft floor"and so correct the inaccuracies inherent in the manual technology, (And outright errors, be they in measurement or entries in the manually developed tables, are not infrequent.) In small boats, the "tweaking parameters" experienced are often measurable in inches, and in large vessels, easily measurable in feet. You're right: The input demands of CAD's close tolerances can indeed be crazy-making. It's high level of accuracy is solely dependent upon the accuracy of the input data, which, if manually generated, will never be up to the task.
This was not so much a problem with model making in the days before highly accurate machine tools came into use among the modeling fraternity. What can be accomplished, and is being accomplished, by modelers today who are working to tolerances of thousandths of an inch is amazing, but a whole lot of the "machinists' approach" to modeling can be dispensed with by employing many of the fitting and joinery techniques of traditional full-size boat and ship building. There used to be a saying about woodworking tolerances: "The house carpenter works to the closest quarter of an inch, the finish carpenter works to the closest eighth of an inch, and the boatbuilder works to the closest boat!" The experienced human eye is far more convenient a mechanism for discerning the fairness of a line and a sprung batten a far more user-friendly tool for generating a fair curve than any CAD program. Or at least that's my story and I'm sticking to it!
-
I believe there was a destroyer named after Doris Miller previously.
The vessels of the Navy shall be named by the Secretary of the Navy under direction of the President according to the following rule: Sailing-vessels of the first class shall be named after the States of the Union, those of the second class after the rivers, those of the third class after the principal cities and towns and those of the fourth class as the President may direct.
13 USC 1531 (1862)Since 1862, many changes in the naming conventions have occurred for a variety of reasons and many exceptions have been made to the existing rules. Since 1968, carriers have been named for presidents, beginning with the JFK, although exceptions have been the rule. From all indications in practice, the Secretary of the Navy makes the name call and, given the increasing politicizing of the DOD, a lot of names seem to be chosen to satisfy the dictates of the political party of the presidential administration that's in power at the time of the naming. Remarkably, we have in recent years seen ships, including the George H. W. Bush and Ronald Reagan, named for living persons, which previously was never done.- Canute, uss frolick, el cid and 1 other
-
4
-
-
I'm curious why a small ensign is flying from the mizzen top instead of the aftermost gaff peak. I know there must be a reason. I've just never seen that before. How come?
-
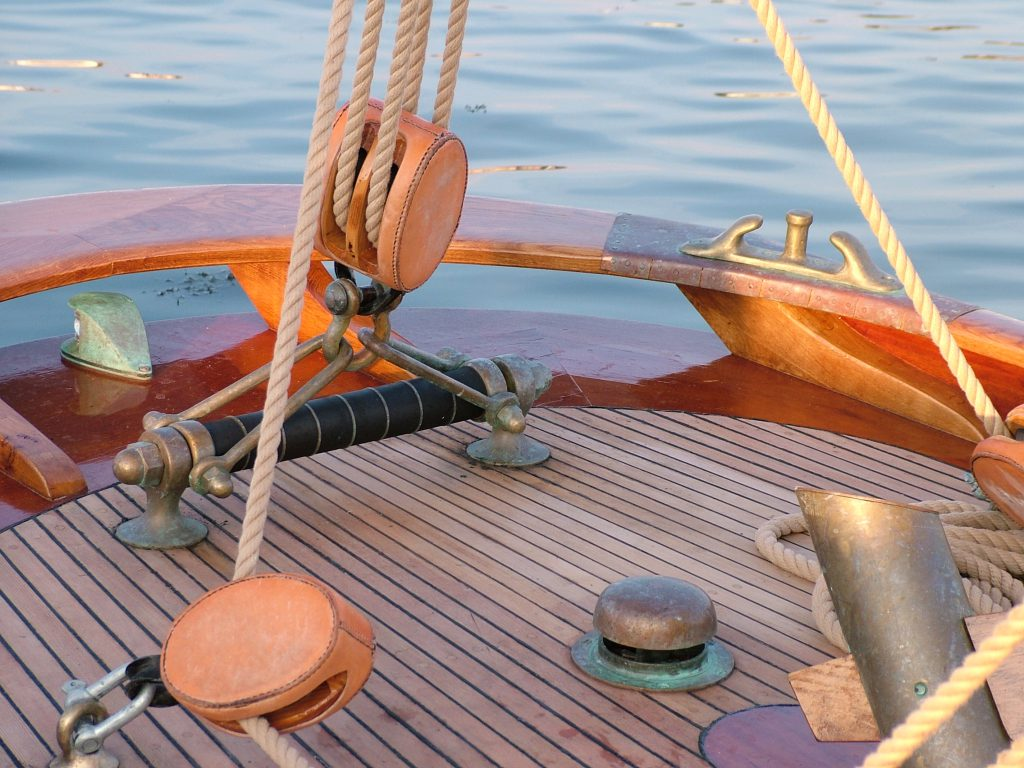
Those rubber donut and springed sheet horses are quite common on larger top-end yachts of the "Golden Age," but I never really understood the point of them. I've never come across anything on them in the literature. Maybe they were a fad and wealthy owners commissioning their yachts came to expect them, so the architects satisfied their expectations. They are unquestionably impressive, but the springs I've seen have always been quite strong. You'd have a hard time compressing one by hand, and the rubber donuts were hard, like tire rubber, and no more "compressible" than the springs. (After a few decades in the weather, the old rubber was hard as a rock, too!) Maybe they served to remind helmsmen that in boats of that size an uncontrolled jibe was to be avoided at all costs, but in the event of one, those shock absorbers wouldn't have made much difference. Generally, the stretch in the sheets and the flexibility of the spars provide all the "shock absorbing" that's needed in regular operation. (The stresses aren't sharp shocks, like when tires hit potholes, but rather fluctuations in tension.) On the other hand, they may have been developed to compensate for the lack of stretch in more modern construction when wire cable standing rigging and better cordage with less stretch came into use (and certainly later, when synthetic cordage came along.) I do recall an old timer from the "Big Boat" ocean racing fraternity telling me how a lot of the large ocean racers suffered a lot of busted gear, broken frames, deck leaks, and such when everybody went to Dacron line and sailcloth and hydraulic backstay tensioners and big geared deck winches to squeeze a bit more speed out of their boats. They were then able to really crank down on the rigging far beyond what the boats had ever been engineered to handle. Those "buffered" sheet horses may have been some attempt to compensate for some of that. I don't know, but they are certainly an interesting and impressive fitting.
-
9 hours ago, shipman said:
Looking at the last photo, someone cashed up big time on the leather clad blocks, yet look at all that tarnished brass! Pure neglect.
Perhaps you're joking. If not, actually, the fittings are bronze (always bronze, never brass) and, properly, they are left unpolished and left to weather and form a patina, as with bronze statues.
- mtaylor, FriedClams, GrandpaPhil and 1 other
-
4
-
-
17 hours ago, michael mott said:
I've seen more "gold platers" in my day than most, having once worked for a classic yacht brokerage many years ago, and I thought I'd seen everything, but I have to say that I've never, ever, seen blocks with fitted leather covers sewn on them to keep them from getting nicked up! I guess they're the nautical equivalent of the old Porsche hood "bras." (That application generally is addressed by a "thump mat," a Turk's head spread flat and placed with the eye bolt passing through the middle.)
-
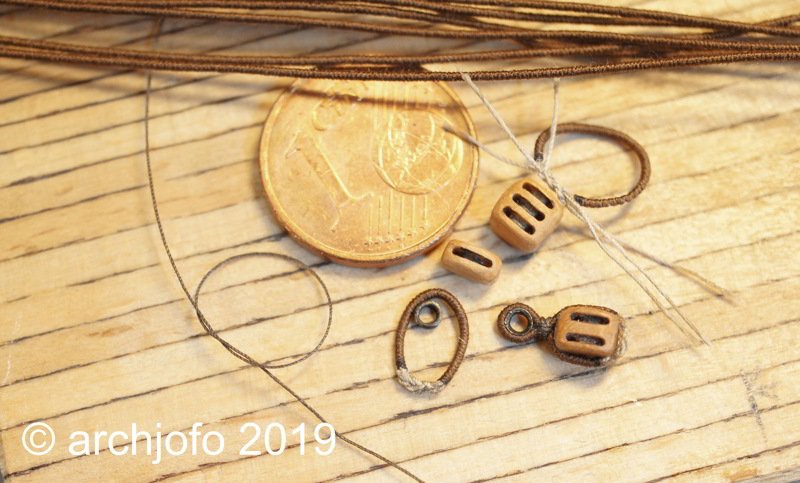
There are various ways of doing it. The problem, of course, is that full-sized blocks are stropped with strops that are laid up from a single strand of rope laid back on itself to form a continuous loop.
A seizing is then worked around a thimble which tightens the strop around the block and the thimble. (The thimble in the photo is incorrect. It is a thimble made for modern wire cable, not fiber cordage. I got the photo off of google images, so...)
You can lay up your own strops if you are really anal about it, but that's very difficult at small scales. I used to say "impossible," but from what I've seen of some people's work on this forum, I don't use that word when speaking about ship modeling anymore! Frankly, I've always found even making strops for full-size blocks a difficult bit of work, primarily because the modern synthetic rope used for it modernly does not hold it's shape or "twist" the way hemp rope does.
Others have their favorite methods of depicting a stropped blocks for models. Some books recommend gluing the line together on the block, generally at the bottom, opposite the thimble or wetting the end of a tail with some glue and then whipping it, for tailed blocks. I've never liked that option so much because I don't trust glue to hold the kinds of stresses rigging lines are sometimes subject to. I try to devise a way to knot the line so as to achieve a real "strop" that holds the block as in full-size rigging practice. I tie a loop the size of the strop I need, and then place the knot (usually a square knot) at the point of the juncture between the thimble (or the loop in the strop, if a thimble isn't being used,) and then tie the customary racking seizing on top of the knot so that it is hidden from view. Whether the strop is served depends on the scale. If it's to be served, it has to be done before it is placed over the block and thimble. The connecting knot can be hidden in the service, obviously, and then concealed by the seizing. I then apply a clear shellac to the cordage. The shellac sold in paint and hardware stores is "two pound cut," (the thickness of the mixture ratio of alcohol and shellac flakes) and this is generally very thin, so it wicks in easily with just a touch of a paintbrush. There's no need to mask the block, if you are careful applying the shellac. It will be invisible when dry and will "cement" the strop and seizing very well. (Some swear by CA ("super glue") for this application. It's just my preference, but I avoid using CA for anything unless absolutely necessary. I follow the USN/Mystic Seaport archival materials standards to the greatest extent possible. Shellac is soluble in alcohol and can be washed off and undone, unlike some other adhesives.
See post #1572 and following on page 53 of archjofo's scratch-build log for La Creole (1827) if you want to learn how to make blocks that will knock your lights out. He's working at a quarter inch to the foot. Note how he actually splices his strops at the bottom, leaving the splice unserved so it appears as a "pudding" at the bottom of the block, which is perfectly accurate. The puddings were used to protect the strop where it was exposed to the most chafe and impacts.


Great Republic 1853 by rwiederrich - FINISHED - four masted extreme clipper
in - Build logs for subjects built 1851 - 1900
Posted
I have a model in a similar situation. It's about twelve years old now in front of a the north-facing window. It's positioned so no direct sunlight ever hits it. It's in a case with UV filtering picture-framing glass. The UV issue concerns me, too, but in all that time, I've never seen the slightest evidence of UV deterioration. I do rotate it every so often so the exposure is even, just to be on the safe side.