mtaylor
-
Posts
26,273 -
Joined
-
Last visited
Content Type
Profiles
Forums
Gallery
Events
Everything posted by mtaylor
-
Thanks again for the likes... Welcome aboard gentlemen. Carl, What else do I have to do besides read MSW and play with the pup? Druxey, I this better? I think I got it.
-
Daniel (Dafi here on MSW) has some on his site. You might check with him. http://www.dafinismus.de/plates_en.html#anker7 There might be other sources also but I've used some of his photo etch and it's excellent. See "plate 7" at the above link. His are all in mm so you'll need to do a conversion to see if the size is correct.
-
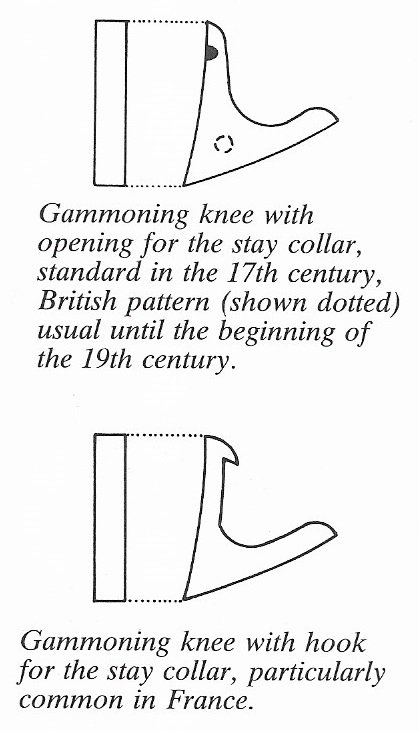
Yes. Ah.... the inside of the hook then? Got it.

-
Best & Strongest wood glues.
mtaylor replied to irishrover1970's topic in Modeling tools and Workshop Equipment
You'll get lots of answers as to everyone's preference... including mine.. I use either Elmer's Glue-All or Wood Glue mostly and some CA. -
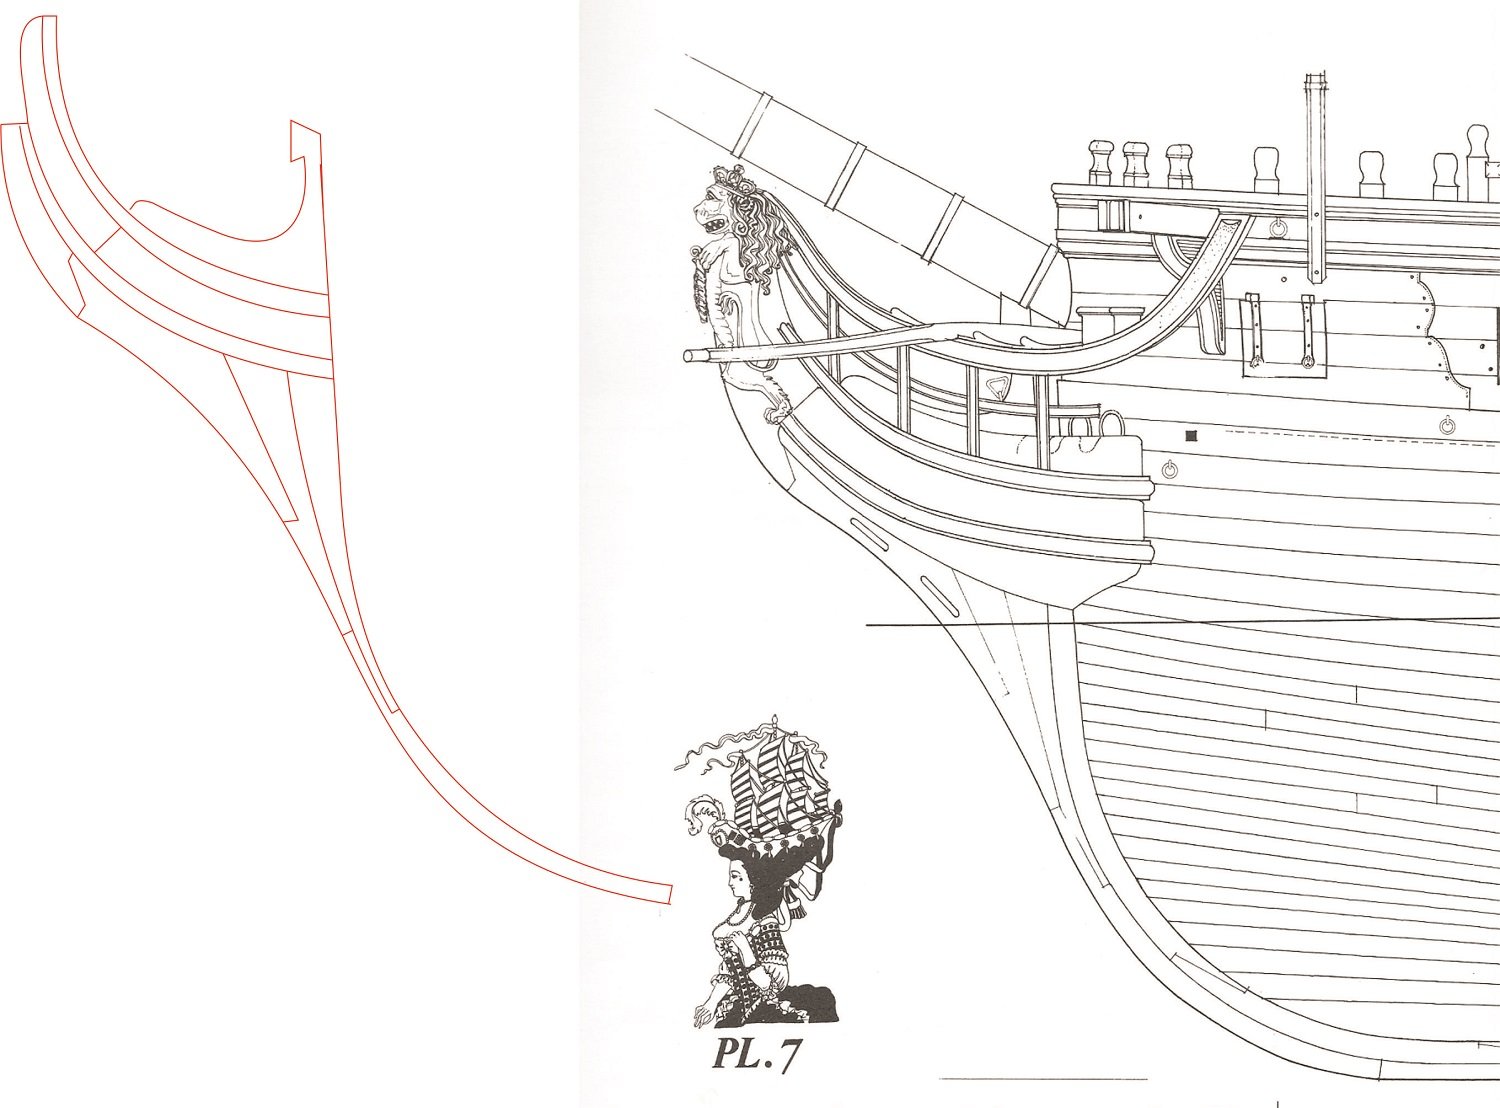
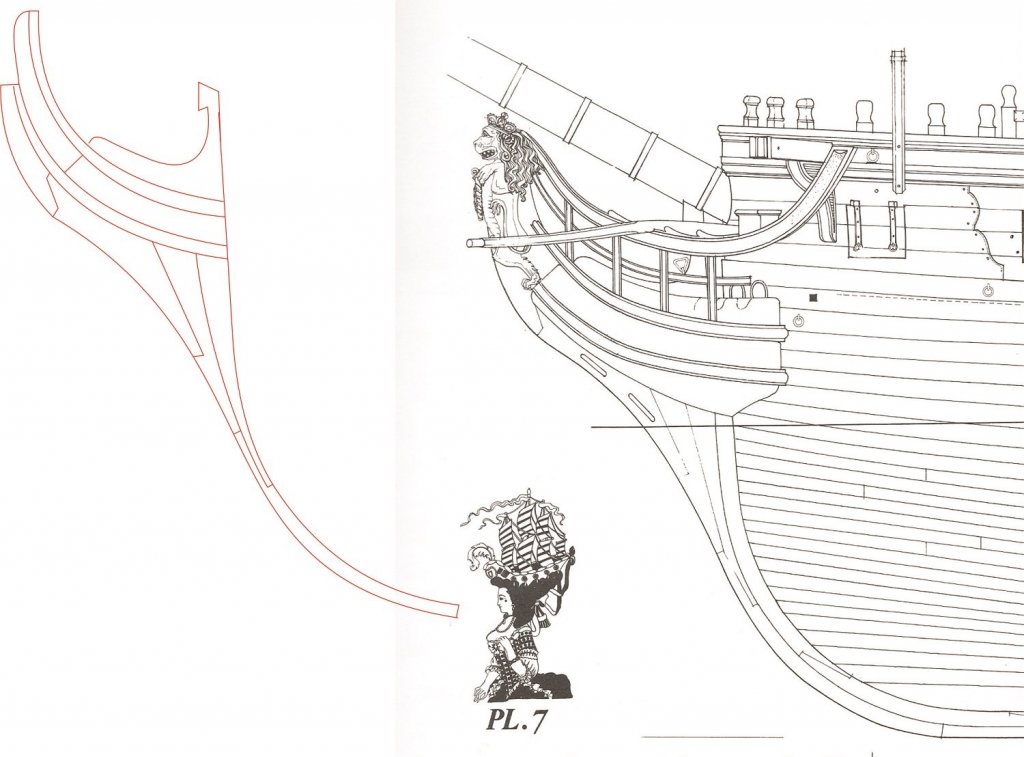
Thanks for the likes and comments. I discovered that on Licorne, I messed up the knee of the head a bit but it's fixable. Making some progress on keel, and false keel but still flipping drawings back and forth to get answers. Seems the info isn't in one place but I consider that normal for any project. Now to the comments.... That's true on the English (and maybe other countries) but the French seem to like doing some things differently. The upper edge seems to also support the bowspit. Here's a reference: Those will be sorted. I saw one that's off but for the most part, I'm still reconciling the drawings (both NMM and ANCRE). There's a lot of cross referencing that needs sorting out between the various plan sheets. Thanks, I've printed it out and will be checking it out. I've heard the Danish have lots of these items but how did they acquire it? There's one characteristic "step" about the same location on the hull as that on Licorne. The thinner planks come down to the lower end of the gun ports and then go to thicker ones. They then taper down from that to the keel. I saw that one Chris but didn't make the connection. I remember Keith well.
-
You can buy plaster casting material online. Or check with prosthetics companies and orthopedists.
-
Kevin, Some did pass through, others didn't. If the wheel, etc. broke, this gave the crew a backup for steering. It also served as a connection to keep the rudder attached to the ship in case bad weather unshipped it. If it's passing through the hull, there should be a belaying point such as a small cleat.
-
Almost 30 Years since my last build!
mtaylor replied to Todd Hart's topic in New member Introductions
Todd, There's a whole topic with 27 pages of where we do our hobby: -
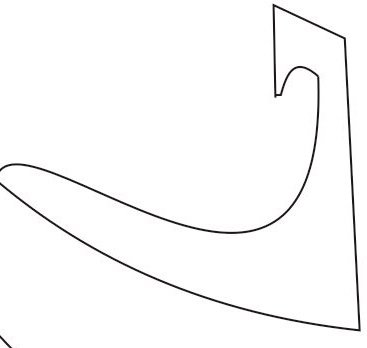
First hurdle leaped and landed.... I think. The knee of the head. See pics below. Note that they have been distorted a bit for "security" reasons. I won't be detailing every drawing, but just to give an idea and see if anyone thinks I'm on the wrong track. The first drawings show what I had as source and what I drew. The exploded view is food for the DeathStar. I'll move the bits and pieces around for the most efficient (and to take the grain into consideration) use of the wood. Next up will be the keel, false keel for mounting the bulkheads, and the stern post. Should be fun....

-
Thanks for the like and comments. The plans have already given me a headache.... no plans on the knee of the head. I've had to research the French, German, and Russian sites which is entertaining as I don't speak or read those languages but Google came to the rescue. I now have a drawing in work for that. After that will be the false keel along with the keel itself and sternpost. Might as well jump in with both feet. The side view seems to be correct when compared against the NMM plans so I'll work with those and sort everything else out as I go. So far, so good. It's been frustrating researching but rewarding.
-
Nice save Dave. For copper, look into Liver of Sulfur as it doesn't affect the wood. EdT uses it in his models with great success. You brush it on, give it a bit and then wipe it off with a damp cloth.
-
Looks very good, Konrad. I'm looking forward to seeing more.
-
What Peter said... no such thing as dumb question around here.
-
I'll be in for watching this one. I hope that at 13 inches long, you're eyes don't cross as the brass work has to be really tiny.
-
About the model: As they say, "No time like the present" and as I'm stalled on Licorne by several non-hobby issues, I'm starting this one to take my mind off things. I have the plans scaled down from 1:48 to 1:64 I'll be drafting plans for building the ship as the ANCRE monograph doesn't have drawings pre-made for such things a frames, keel, etc. As the title states it will be a POB build as there's next to nothing in the plans of the below deck area. I'm making decisions at this point will working on lofting the bulkheads, keel, etc. on the types of woods. Most likely I'll Swiss pear for the external planking, some ebony or ebony stained wood for the wales and other bits and pieces, boxwood for the keel, stern post, and bowspit. Not sure yet about the decks. As for the bulkheads and some internal bits that won't be seen, I'm deciding whether to use Baltic Birch plywood or Yellow Ceder. It may come down to cost on this though. I'll be using the DeathStar for at least marking the wood to be cut for the bulkheads but not ruling out cutting as that will depend on the wood selection. I selected this ship as "next" as it was the more famous of the ships involved in the battle that brought the French into American Revolutionary War. Here's the history of Belle Poule and some pictures of the plans and the monograph. La Belle Poule is a 12-pounder class of frigate with 26 12-pdrs on the gun deck and 10 6-pdrs on the forecastle and sterncastle. History: La Belle Poule was built in the shipyard at Bordeaux starting in 1765 and launched in 1767. \ From 1772 to 1776, she was on hydrographic missions around India. She returned to Brest in 1776 . At the time, France wasn't engaged in War, but there were numerous incidents. April, 1777, Belle Poule was chased by a British ship of the line (unknown which one) and after evading her, returned to Brest. December, 1777, Belle Poule transported Silas Deane back to America along with the news of the French-American Alliance. On 7 January, 1778, she was stopped by two Britich ships of the line which demanded to inspect her and her Captian, Charles de Bernard de Marigny replied: "I am the Belle Poule, frigate of the King of France; I sail from sea and I sail to sea. Vessels of the King, my master, never allow inspections." 17 June, 1778. The famous battle between Belle Poule and Arethusa occurred which was actually celebrated by both countries. It was this battle that brought France into the American Revolutionary War. Note that Licorne was captured by the British. After this battle, she did numerous patrols. 14 July 1780. Belle Poule was overhauled and after a two hour battle with Noncuch (64), she surrendered. Feburary, 1781. Belle Poule was commissioned by the British. She participated in the Battle of Dogger Bank later that year. A footnote is that her Master during this period was William Bligh. November 1782. Belle Poule went to ordinary and also served as a British recieving ship. 1801. She was sold off. Plans, etc. I'm using the following references: Le Belle Poule Monograh by Boudriot and Berti The Art of Ship Modeling by Frolich and lastly, the only build log I could find that actually is showing the process unlike most that just show the finished ship: https://5500.forumactif.org/t3216-la-belle-poule-de-1765-au-1-48-par-guydal Anyway, a bit long winded but I'll be back when I have my cut sheets, plans, etc. ready and start making sawdust.
-
Pop that tank into here and you should get some advice and help if you want: https://modelshipworld.com/forum/73-non-shipcategorised-builds/
-
Looks great, Mike. I like the corner workspace with the windows on each side.
- 969 replies
-
- 3
-

-
- hahn
- oliver cromwell
- (and 1 more)
-
Almost 30 Years since my last build!
mtaylor replied to Todd Hart's topic in New member Introductions
I'm happy with what I have, but here's a list: Big enough for all your benches so sort out a floor plan ahead of time. Heat and A/C (depending on where you live). At least one window or more. Linolium or tile floor. Ventilation - even it's just an exhaust fan (or window fan) stuck in a window. A desk and chair (I have my computer in my hobby room). Lights... the more the better. In other words, not just a ceiling light. Those would be my minimums. Everything else, power tools, etc., buy them as you need them. -
If I had to guess what that stick is, it's possible it's flag pole. Otherwise, maybe it's a tool for installing the life rings? Or installing the portholes? Just don't toss it out because Murphy will come laughing at you when you realize what it was and it's long gone.
-
Looks great, Semorebutts.... I changed the title for you. If you need to do it on another project, open the very first post and scroll to the bottom of it. Hit "edit" and you'll see that the title can be changed.
-
Interesting concept. I went the other way on my build of this kit to the 1854 version. I'll curious to see how this goes.
-
That's a great gift and a great recovery from two disasters.
- 10 replies
-
- 1
-
-
- flying dutchman
- bottle
- (and 1 more)
-
Adapting DRO Devices To Shop Tools
mtaylor replied to Thistle17's topic in Modeling tools and Workshop Equipment
In the process of this experiment I have to admit that I may be taking this a bit far as I wonder just how much one needs .001 accuracy to make model ship parts. Only you can answer that. One place I worked in engineering decades ago had a saying: "How tight a tolerance do you want? The standard here is measure with a laser laser interferometer, mark it with a piece of chalk, and cut it with an axe." The usually brought a laugh in any meeting with customers but the answer is as above... "how accurate do you want to be?". And maybe should add: "How accurate do you NEED to be?"