mtaylor
-
Posts
26,273 -
Joined
-
Last visited
Content Type
Profiles
Forums
Gallery
Events
Everything posted by mtaylor
-
Unless you're on the receiving end...
-
This might help, Clare: http://nautarch.tamu.edu/Theses/abstracts/miyashita.html I don't know if you've seen it. BTW, that site has a lot of good info. Sadly, some of the papers have disappeared as I think the authors may have turned them into books.
-
His site is up and still at the "old" address: http://www.crowntimberyard.com/
-
It's possible that they were secured in the "run out" position. Many of the French frigates (particularly the 8-pdr and 12-pdr) did not have port covers as we know them but buckler types. The guns were secured in the run-out position to give more room on the gundeck.
-
Beautiful work, Bob. And welcome back to MSW.
-
Hi Mike, Welcome to MSW. A lot of your questions will be answered once you have a model in your hands. The best way to get answers and help is open a build log. Fairing the hull means to sand/shape it such that there are not dips, bumps, etc. All curves are smooth and follow the lines drawing. Garboard plank is the plank at the keel.... Rabbit line is a line that the garboard will fit into in the keel. A good, inexpensive reference book (there are errors in it but it give a good overview) is zuMondfeld's "Historic Ship Models". Fairly inexpensive depending where you look online.
-
I think the planking is your choice, Al. I've seen where one side is completely open, other with varying degrees of planking. There's also complete planking on both sides but leave some strakes off on one side. Have look at Hahn's builds and see what you think.
-
Wonderful work, Piet. Looks like you're on the right track. Lou has a good idea but I wonder what the model RR guys use for their static displays. That second to the last photo looks very realistic, IMO, as does the water and the shell splash.
- 378 replies
-
- 11
-

-
- java
- pacific crossroads
- (and 2 more)
-
Early on, with depth charges, they were rolled off the stern with (usually) two racks, one on each side. I find that rather unsettling (and I fear for the world) if I have a doppelganger. Or maybe I'm his doppelganger.
- 1,090 replies
-
- 7
-
-
- showcase models
- vendetta
- (and 2 more)
-
Looking darn good, Al. Are you sure you've not done this before? IF (big if) you decide to cut the rabbet, do it before you glue it to the frames. Don't ask how I know. So carry on as you are, checking, re-checking, and hopefully having some fun.
-
Fascinating, Clare. You have some very artistic and wonderful work going on there. The Japanese boats/ships seem to reflect upon much of the culture of grace in movement, or that's my impression anyway, along with historical reasons (something maybe like "that's the way we've always done it"?). In many ways, the Japanese gardens are the same way such that every plant and rock/boulder has meaning. I could be full of it but that's my sense.
-
I hope you won't be too hasty, Al. This is still an "experiment in work". It does seem promising as I'm beginning the planking.
-
Al, The wood was old to begin with as I think I've had these two kits floating around the shop for maybe 10 years. And basswood is a bear to bend. The boxwood is sliced thin, about 1/32" thick and will get steamed and preshaped. I'm going to try to minimize all the spring back I can.
-
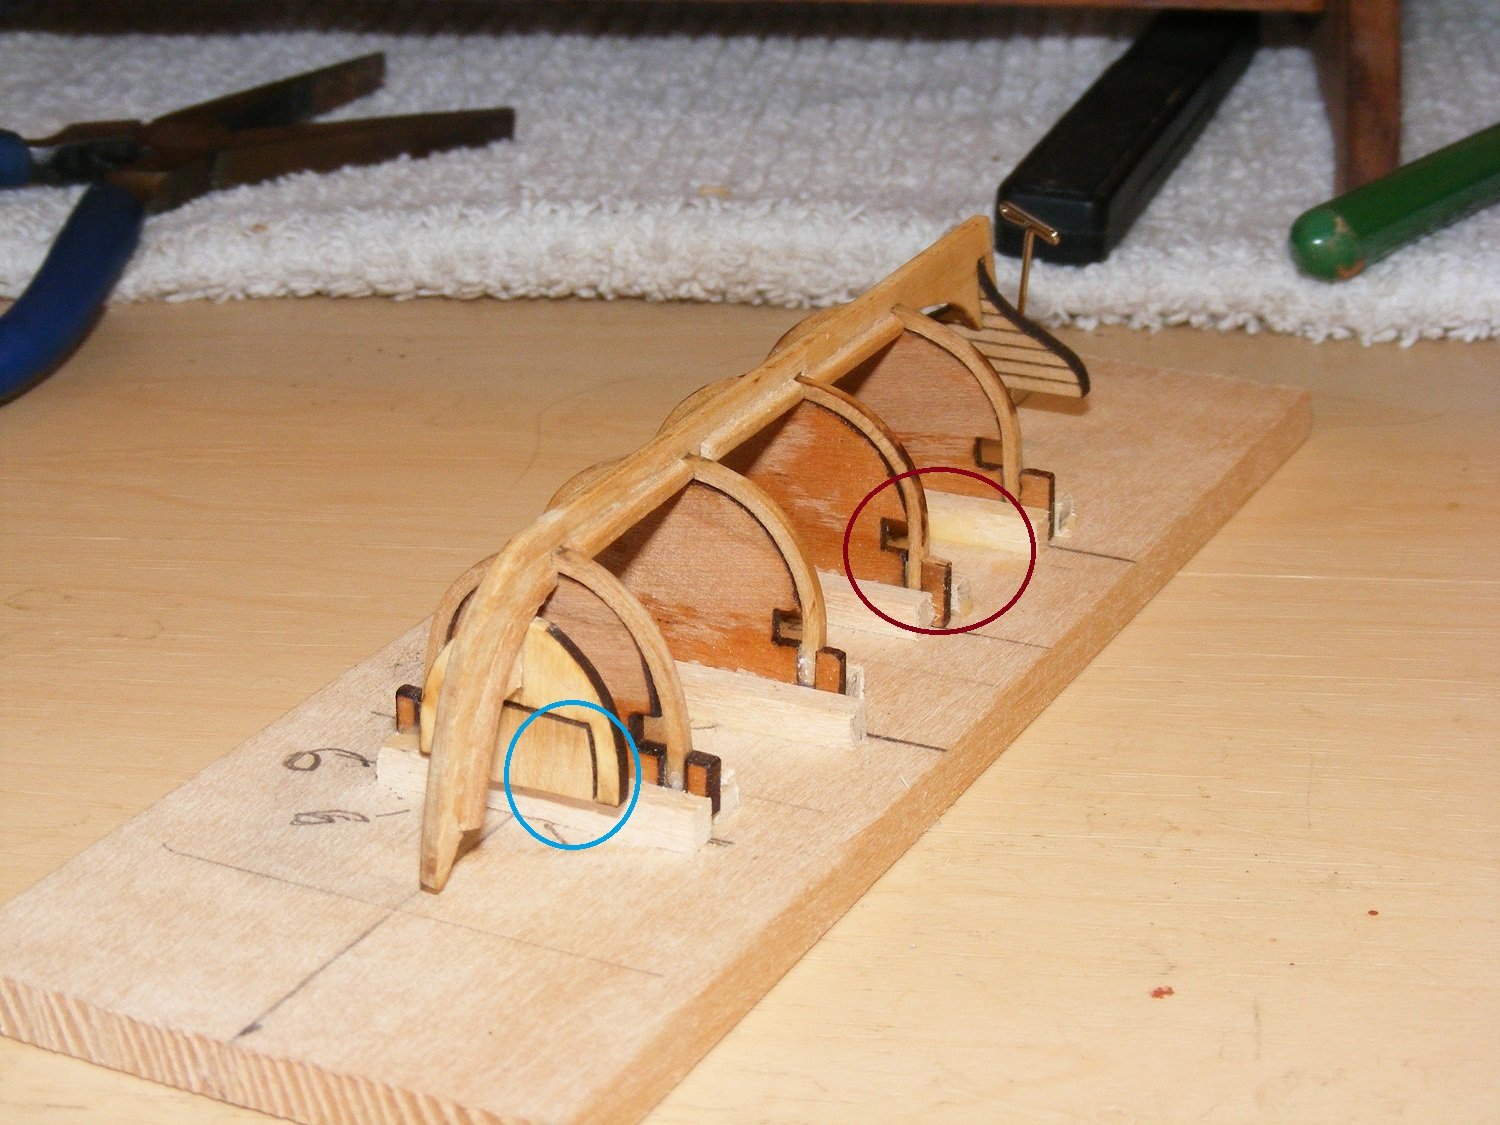
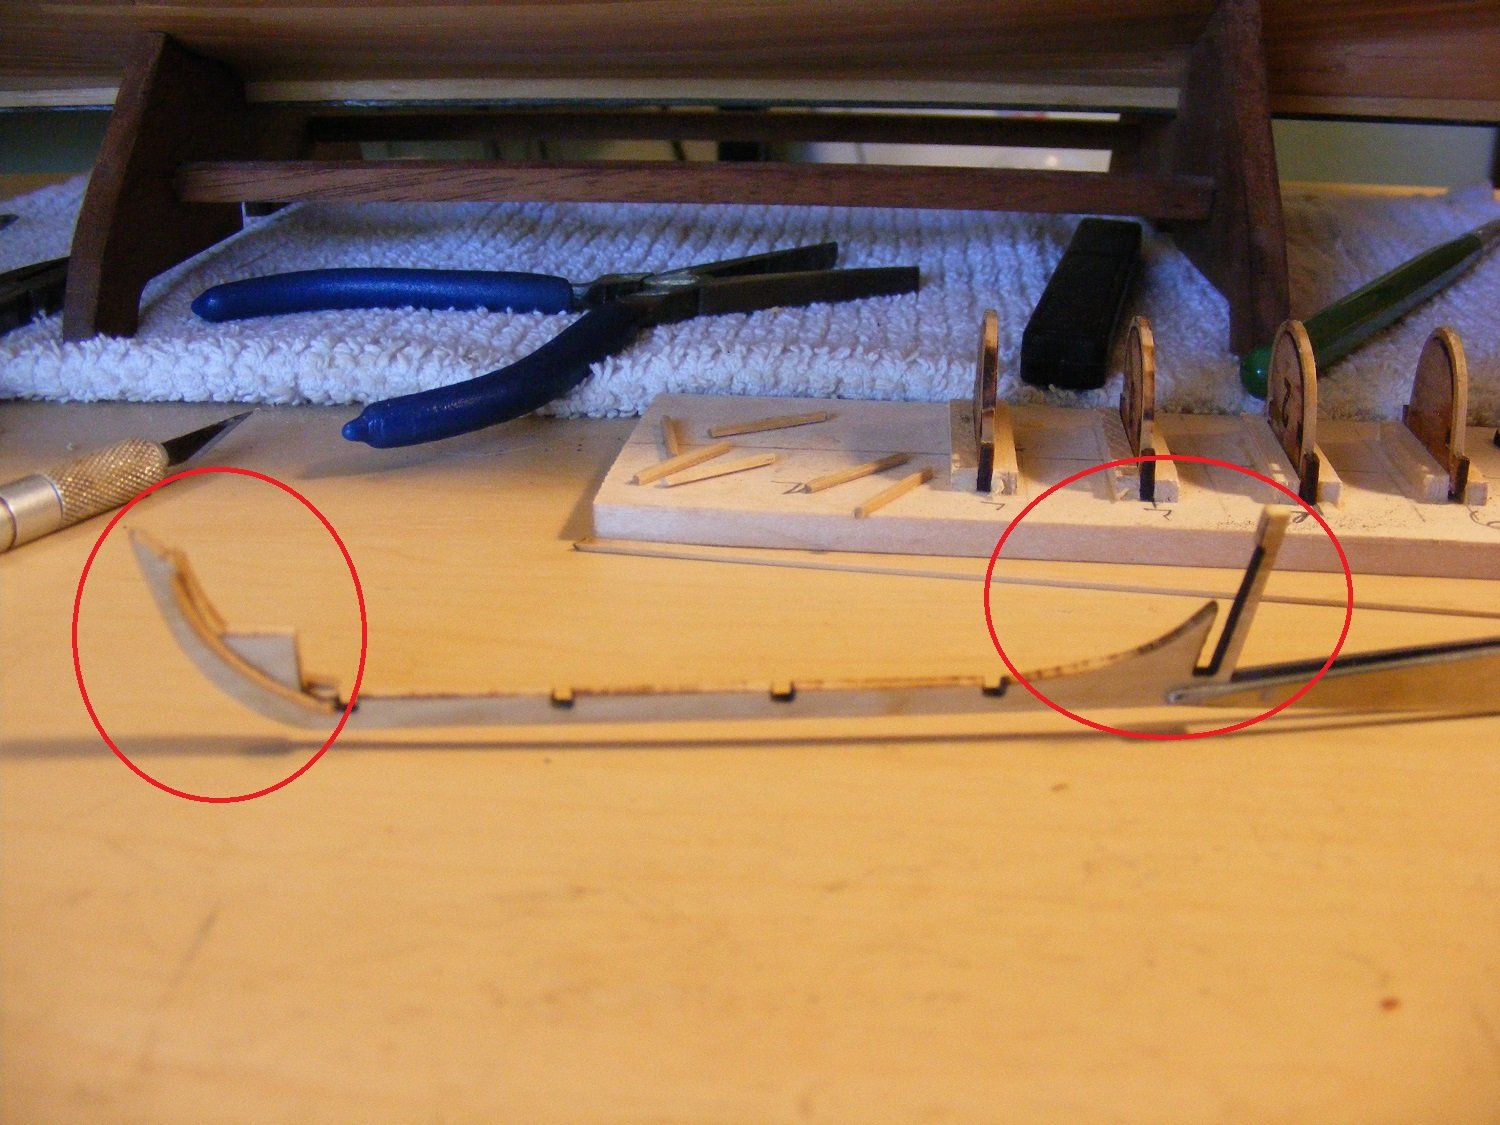
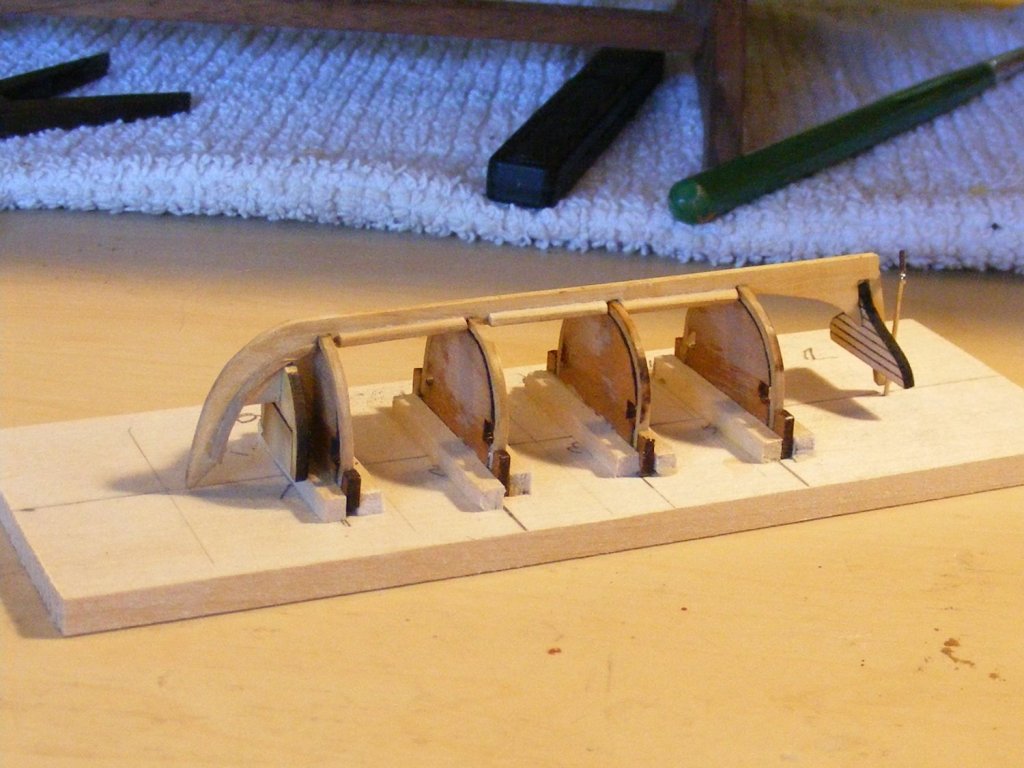
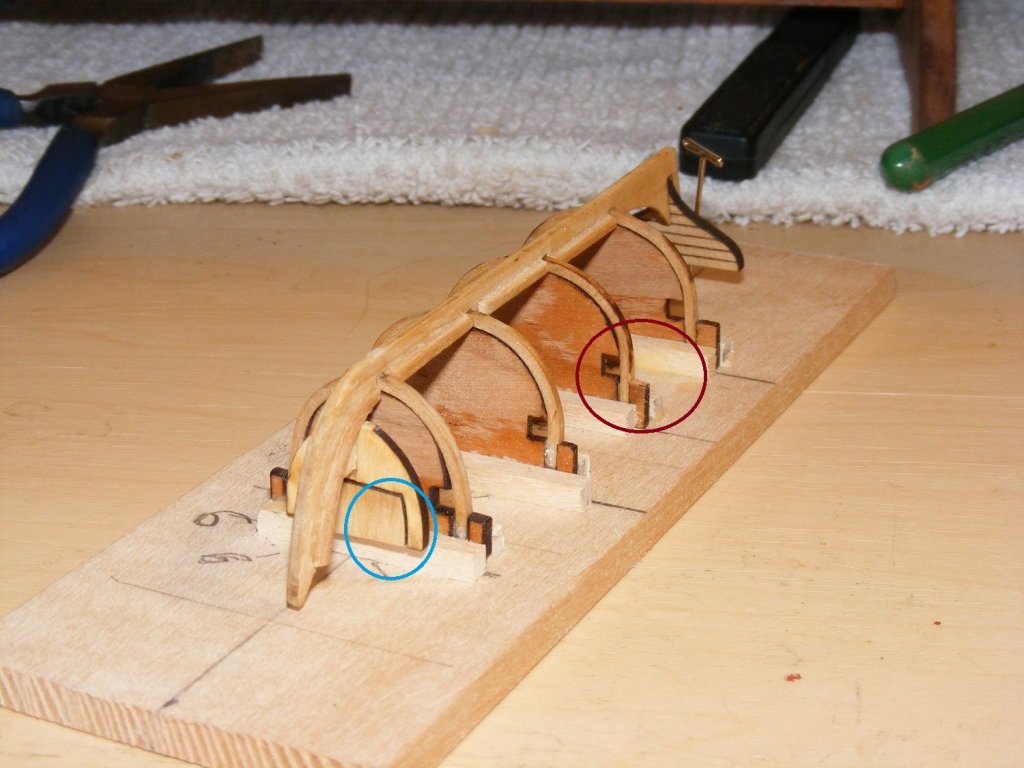
Hi Lou, Yes, this is one of the MS plans but not parts. Their wood os basswood and I'm using boxwood. I took their plans and modified them for the size, bow, stern, keel, and the molds for the frames (including the stern). So, here's where I am... the 4 frames are mounted to the four jigs. They are prebent such that there's no springback. I found out in testing that they actually need to be overbent a bit or things get "interesting" when you cut the boat free of the jig. As for the jig, the area circled in red is where the ship gets cut loose. It should lift right off as I've made sure there's no overflow on to the jig from the keel/frame joining point. The area circled in blue will be broken out (it's being held in with a small drop of glue). If Im not happy with the fit once planked, I'll take the whole thing out and use dummy frames. Speaking of which... once the hull is cut loose, there will be 3 "dummy" frames added between the base frames. I do still have to fair the stern piece after I plank the exterior before doing the frames. Back up plan for those curious... I have a plug style mold that I carved that I'll finish work on and use it more like others have done. For some reason, I think this might be simpler and I won't have to carve out two plugs for the other boats, just scale this one up and tweek it as needed. Depending on point of view, I'm either getting more efficient or lazier as I get older. I'm going to wander off a bit and let the glue cure out. Maybe fiddle with something else on the model...
-
Interesting new model ship company
mtaylor replied to Erebus and Terror's topic in Wood ship model kits
Judging from the pics, I'm thinking that's the prototype. It does look, on the assembled pictures, that the char was cleaned off at some point. The Hanna looks to be a Hahn style from the way the frames are set. As for the others... Le Couronne might be ANCRE. The rest, I'm not so sure. They may not be copies but heavily "influenced"? Still, it's a good way to get into plank on frame. -
Deadwood.... Duh!!!! Somedays the words just don't seem to be there. I've got my fingers crossed. I think the technique will work if the initial tests that I've done are valid.
-
Thanks for the likes, the comments, and just checking up... I'm there... the keel is now where I want it to be. The two main mods are the bow and the stern areas. I've also reworked the formers for the ribs. The red circles show the areas that were the problem children and how they ended up. I eased the arc of the bow, made it a bit wider for the planking. The stern was the most radical change with the angle, and the (not sure of the word) bit where it now curves up into the sternpost. I'm putting it together so hopefully later this week, it'll be finished externally. I'm still deciding how much detailing of the interior such as seats, rudder stowage, oars, etc. Almost all of this was stowed in the hold when not in use, but I'm thinking "visual interest".

-
Patrick, The mast coat was usually leather or canvas. I'm not sure how the canvas was treated to make it waterproof or if it even was. But I think mostly they used leather.
-
Wonderful work, Johann. Very inspirational.
-
Very ingenious, Tom. Looks good and since it works well..that makes it great. Try some sealer on the guns..might help with the grain problem. I ran into that recently on a none ship project.
-
I do hope you had some fun, Jerry. Somehow I don't think she would have fit in that pond....
- 553 replies
-
- 1
-
-
- sloop of war
- constellation
- (and 3 more)
-
I too, am catching up Nils. The crew brings her to life and gives the ship character. The detailing of the penents is a great touch.
- 692 replies
-
- 5
-
-
- eagle of algier
- chebec
- (and 2 more)
-
You have captured what Hemingway wrote, Igor. Looking great!
- 131 replies
-
- 5
-
-
- bottle
- the old man and the sea
- (and 1 more)
-
Druxey beat me too it. Fascinating and the education on these vessels is inspiring.