mtaylor
-
Posts
26,273 -
Joined
-
Last visited
Content Type
Profiles
Forums
Gallery
Events
Everything posted by mtaylor
-
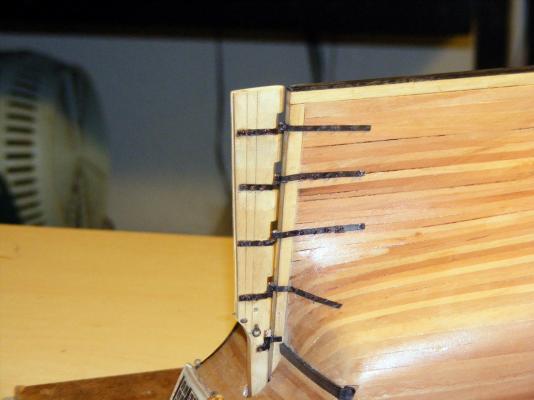
Thanks for the likes, comments, and suggestions including those via PM. After many attempts and much aggravation, I'm giving up on the rudder coat. I've learned a few lessons on this and presumably the time spent counts towards the 10,000 hours that Druxey mentions. I've tried silkspan, paper, cloth, even foil. I considered sculpy clay and may still try that but for now... I'll move on. It boils down to at this moment, there's not enough room to work. I went too far on the stern build out and rudder installation. The lessons.. 1) Think not just 100 steps but a 1000. When I planked the counter, I put on Wipe-on-Poly.... errr.. no. Should have waited. (Not thinking far enough ahead). Possibly I needed to sort the rudder coat at this time but definitely before fitting the rudder into place. 2) When I buildt the rudder, the pins on the rudder irons should have been a bit longer and tapered before soldering up the irons. (Lack of knowledge.. need deeper research early on). 3) By tapering the pins and opening up the recesses in the rudder, the rudder could be removed and re-installed easily. (Doooh... moment). Anyway, for now, I'll take a pass, not worry about it but continue to think. If I get an "ah-ha" moment, I'll add it later. Meantime, I'm adding the strop and the chains.
-
Beautiful, Patrick. And here I am thinking that some of what I'm trying to do is "too small".... yikes! BTW, I found the remote but sneezed. For all I know, it's floating around on the wind currents and headed to the east coast of the States.
-
Thank you Alejandro. I too have downloaded it and am taking a look. By the way, if you open it in Chrome, highlight the text (I do a couple of paragraphs at a time) right click and "Google Translate". It will do a passable but not 100% accurate translation.
-
What many of the scratch builders do also is leave a gap in the external planking. This gives a slot that the channel can fit right into to help support it.
-
Alex, I stumbled across this while looking for something else... I don't know if you saw it: http://www.aamm.fr/boutique/index.php?main_page=product_info&cPath=65&products_id=250
-
The line would have been tarred after seizing and the line put into place from what I've read. Otherwise it makes a big mess on things. The tarring was Stockholm Tar which is a light brown when fresh. It does darken with age but from the previous discussions here on MSW, it really never goes black.
-
Great looking hull, Rusty. I agree on "doing it twice makes everything twice as nice". My grandmother used to say that and didn't get it until I started model ship building.
- 310 replies
-
- 3
-

-
- cheerful
- Syren Ship Model Company
- (and 1 more)
-
Beautiful, Wim. These ships remind of some of the early (like da Vinci) drawings for tanks.
- 97 replies
-
- 2
-
-
- Turtle Ship;
- Korean Turtle War Ship
- (and 1 more)
-
Just lovely, Mike. Yeah, ebony is a pain.. but when you see the results it's worth it.
- 969 replies
-
- 3
-
-
- hahn
- oliver cromwell
- (and 1 more)
-
Just incredible, Dave. I think it looks perfect.
- 962 replies
-
- 7
-
-
- sovereign of the seas
- ship of the line
- (and 1 more)
-
I think there's a USS United States, a Half-Moon and a Gothenburg in there also.... I didn't get scorecard so I may be missing some myself.
-
Thanks Pat. I'm aiming for a canvas look. I'm waiting for the color to dry on the latest bit of silkspan and then I'll fit and take a hard look. Even though this is under the counter, I still want it looking "right" and nice.
-
Proxxon Micro Planer DH40 - owner feedback??
mtaylor replied to rtropp's topic in Modeling tools and Workshop Equipment
Thanks Mike. I was just wondering. I prefer a good planer to a sander for the same reason.. dust although the current shop vac does get almost all of it. Plus, a planer's finish just looks so much nicer than the sander's. -
Thanks for the likes and the comments... I've done 3 rudder coats so far and no joy. I'm not sure if it's me and fat fingers, the scale, or the material. But I will persevere on this endeavor for a bit longer. I'm going to try a different material. I suspect you're right about when it's right side up, Carl. I like the logic anyway. Reasons or excuses? I have the plans ready for a build cradle. I've been staring at the inside and what needs to be done to the outside... I may just bite the bullet in the near future. I do like the solid feeling of the build board. Sort of like hiding out in a blanket fort. The build is still young Sam. I could easily end up with 5 also.
-
You've got lots of fun times sitting there, Denis.
-
Tools and Supplies for My "Shipyard"
mtaylor replied to daveward's topic in Modeling tools and Workshop Equipment
I have both an Optivisor and a magnifying desk light. Both have their uses and to me are equally valuable. As I recall, I go the desk lamp on sale at one of the office supply stores. -
Proxxon Micro Planer DH40 - owner feedback??
mtaylor replied to rtropp's topic in Modeling tools and Workshop Equipment
Is the Proxxon the only "small" planer out there? I have a full-size Porter-Cable but it's pretty useless for what we do. -
Not an illusion, Carl. It's off a tad.... I think I found the "wall side".... It looks better on the other side.
-
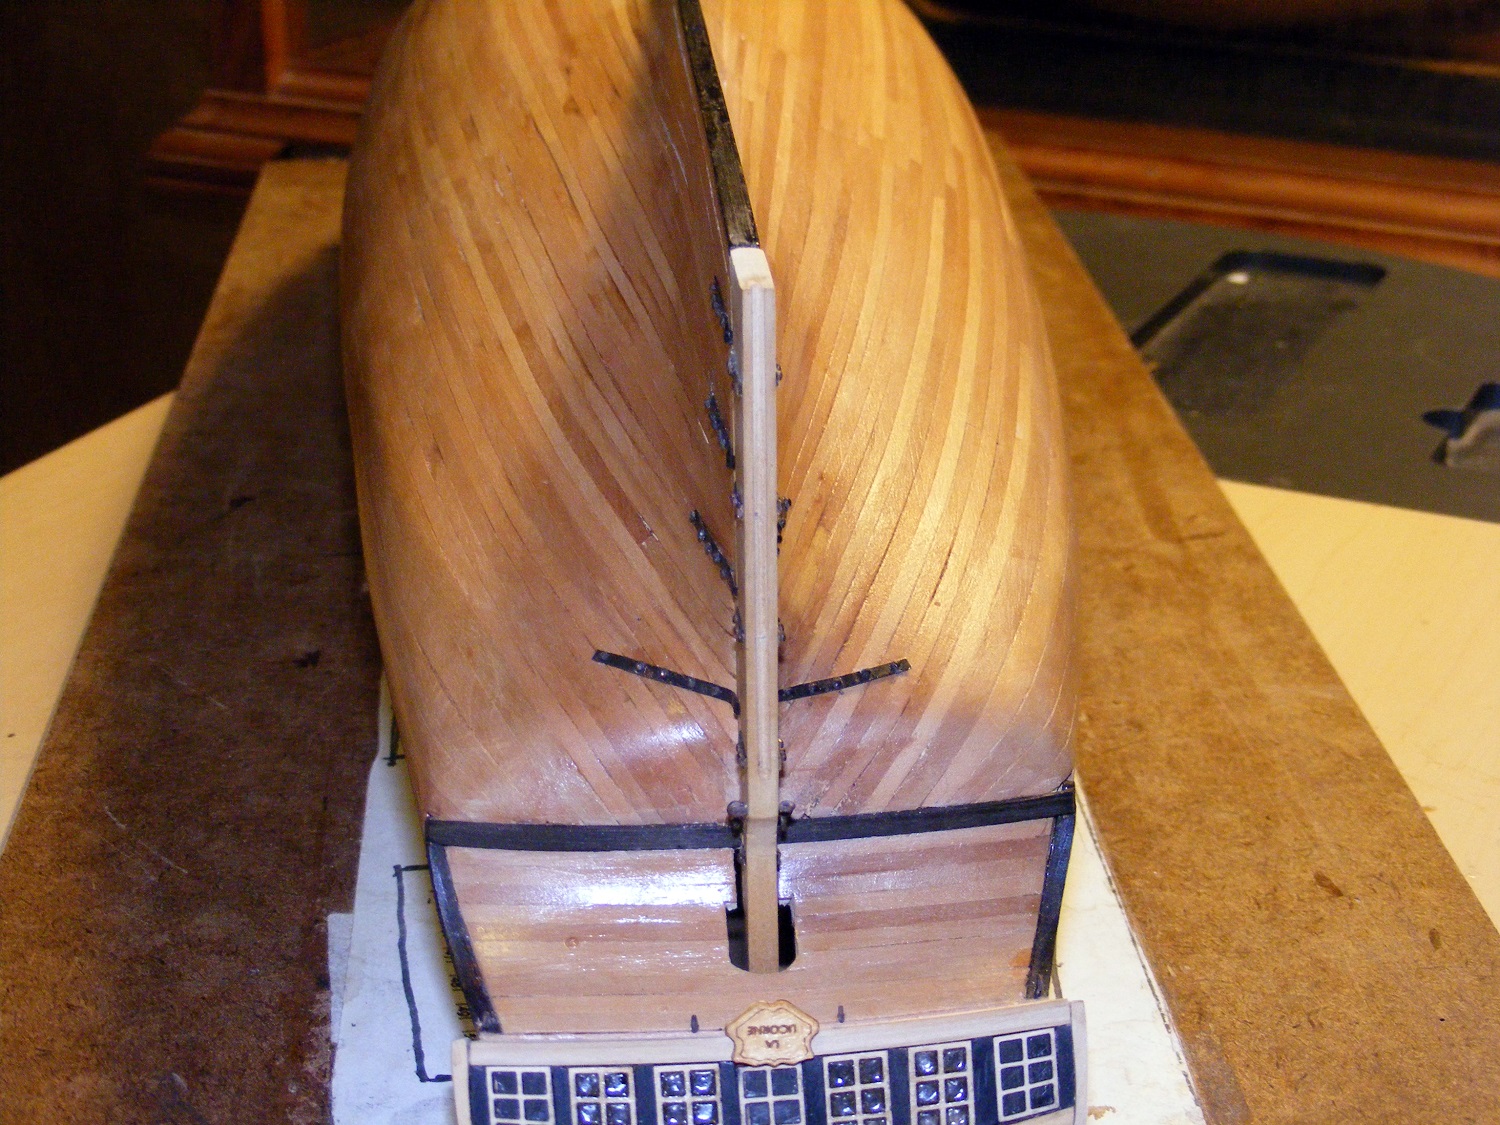
Thank you for the "likes" and the comments. Well.. to paraphrase Clement Moore... "The rudder was hung on the sternpost with care in hopes that I won't pull out my hair". Yeah.. bad verse.. Oh well. This part took some sorting out on exactly how to hang it properly rather than sort of cobbled like I did the kit models... Thank heavens for the Optivisor as the holes for the bolts were pretty tiny. I've half a mind to build the next one at 1:48 or 1:36 even just so I can see without eyestrain. Like the Admiralty would be receptive to that. Next up will be the rudder coat (hopefully), the strop, and the chains. Thanks to seeing Giampero's rudder coat, he gave me some ideas on how the Licorne's should look. Anyway, pictures.....

-
Amati/Victory Models Lady Nelson - Bearding Line?
mtaylor replied to daveward's topic in Wood ship model kits
Have you looked at the build logs yet? If not, here's three links for builds the might help as they seem to be pretty far along. http://modelshipworld.com/index.php/topic/1416-lady-nelson-by-holty-victory-models-scale-1-64/ http://modelshipworld.com/index.php/topic/7244-lady-nelson-by-bibounde-victory-models-scale-164 http://modelshipworld.com/index.php/topic/9496-lady-nelson-by-leo-zd-1119-small -
Getting crowded in here.. I'll grab the barrel in back use my binoculars. Looking good so far, Jack.
- 250 replies
-
- 5
-
-
- willie l bennett
- model shipways
- (and 1 more)
-
As always, beautiful metalwork, Michael.