DONATION DRIVE - SUPPORT MSW - DO YOUR PART TO KEEP THIS GREAT FORUM GOING!
×


mtaylor
-
Posts
26,273 -
Joined
-
Last visited
Content Type
Profiles
Forums
Gallery
Events
Everything posted by mtaylor
-
Ah, but they do, Druxey. http://www.crowntimberyard.com/custom-orders.php Bottom row, next to the redheart. Jason got a pile (maybe a small one, I'm not sure) in and it's nice wood. Very nice.
-
Mike, That is one super nice and clean hull. The planking and paint pop when you look at it.
- 452 replies
-
- 5
-

-
- cheerful
- Syren Ship Model Company
- (and 1 more)
-
That joint looks perfect!!! I haven't tried it but some say black tissue, others say any black paper. But do test it first as I remember someone (I forget who) had the paper bleed when they added the finish. And be sure to punch a number of holes for the glue to have access to the wood on both sides of the joint. For the "squelch".. use a rag with alcohol or water and wipe immediately before it sets. That seems to be of some help with blackened glue.
-
A workshop you can be comfortable is everything... well... maybe not "everything".. Get it the way you want it, Ben.
-
Thanks for the "likes" and the comments. 6 planks left to go... Hopefully, life will let up and let me get them done this week. Hi John, Yeah.. the more I got into the planking, the more I learned. Maybe next time although the planking on this one has been a bit of a snot, so to speak. I back up the Hahn plans with the NMM and the Belle Poule monograph. I'm not spot on... maybe close, I hope. After sanding and gap filling it should look pretty good, but as always.. it's a case of "we'll see". The planking does go from "thick to thin" with the only "break" being the top wale does stand proud at its upper edge per the drawings. But even the narrowing of the width of each strake as it goes down the side has been problematic due to the small dimension a model. Still on the learning curve... but the next model will be glorious!
-
Fittings/Accessories to Billing Boats Meta af Byxelkrok
mtaylor replied to samaka's topic in Wood ship model kits
Hi, Please read the guidelines in this... http://modelshipworld.com/index.php/topic/3493-mandatory-for-sellers-new-to-msw/ And then start a new topic. -
Will do, Janos. I'm working on the main carving (and probably in over my head ) while letting glue dry on the planking.
-
Janos, I have some European Boxwood from Crown that I'm using for the stern carving, the nameplate on the stern (finished) and the leaves at the catheads. That stuff is a might harder than the pear I was originally going to use. I will probably also use it for the leaves on the quarter gallery drops.
-
Eagerly awaiting the new paint here also, Piet.
-
That is some incredible work, John. I like the sliding panels for the windows. Nice touch.
- 745 replies
-
- 3
-
-
- francis pritt
- mission ship
- (and 1 more)
-
Cutter Cheerful by iosto - 1/4" scale
mtaylor replied to iosto's topic in - Build logs for subjects built 1801 - 1850
Nicely done, Iosto. Will you be adding masts and rigging? -
Looks like a consensus is forming ... I'll use the one I'm doing as practice and go for the 4" thick wood for the real deal. The new dental burs give me some really nice control compared to the sanding burs but they are slow. Or maybe it's me.
-
Thanks Janos. Shiloh, I've glued the piece to a sacrificial chunk of wood so I can hold it and also give some strength during the process. The spears I'm thinning the thickness down to their width (they come out looking mostly round). But I'm taking off lots of wood all over. When done, I'll soak it in alcohol and remove it from the backing. I guess I'll carry on for now (unless I really cobble it) and go for what looks right. If I do cobble it, I'll go for some 4" (scale) and save some aggrevation.
-
Bolt Heads on Brass Strips
mtaylor replied to mikiek's topic in Metal Work, Soldering and Metal Fittings
Mike, Google this (without the quotes) "photo etch hardware". Much of what is out there is for the RR, cars, armor, and aircraft stuff. But it will work. There's also several places that sell real honest to goodness nuts and bolts at very tine scales. -
There's also these rulers which have the common scales for the ships we build. http://modelshipworld.com/index.php/topic/10427-scale-ruler-from-msw-10
-
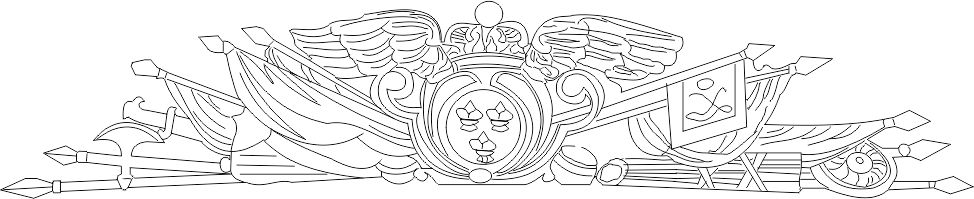
Here's the pictures Janos. Both the carving layout and the "on ship" layout although that one is for a different ship. I've got it on scale 6" thick but I'm wondering if that's not too thick.

-
Chuck, Like a lot of other things, you'll have to find out what works for you as there's usually more than one way to get to same goal. I've done it both ways and depending on the ship, framing, etc. I make my choice. For a POB, I plank the whole thing and then cut. For POF, I do it in bits and pieces and trim it up. Others will have their methods....
-
Crackers, The false keel was meant to be sacrificial and coppering would have impeded it breaking loose on a grounding. I suspect they didn't worry about and also (IIRC) it was elm which was worm resistant. The false keel wasn't treenailed or spiked but used staples at the side and were angled to allow this wood to be shed. Fam, Yes, it would have covered the bottom of the keel and then the false keel laid over it. There's been some discussion of the coppering using the Vic and Constitution as photographic examples.
-
This is a pretty off the wall question, but I thought I would ask. I also realize the answer may very well be... "depends". The main stern carvings above the window on a frigate namely. How thick would the wood be typically? The drawings give no indication of this. This is for the "Arms of France" on the Licorne, a French Frigate.
-
1600 grit... hit the local auto supply shop.. in the paint section. There's sandpaper all the way to (ready for this...?) 6000 grit. That last I think would have to be from a machine tool supply house as it's used in polishing.
-
I like the jig. If it works... it's great and it looks like it worked. Jerry-rig or jury-rig... http://www.word-detective.com/2012/01/jerry-rig-jury-rig/
- 287 replies
-
- 1
-
-
- niagara
- Model Shipways
- (and 1 more)
-
Beautiful craftsmanship on this ship. It's a joy to follow along.
-
It's great to see the SOS back on the bench, Dave.
- 962 replies
-
- 5
-
-
- sovereign of the seas
- ship of the line
- (and 1 more)