HOLIDAY DONATION DRIVE - SUPPORT MSW - DO YOUR PART TO KEEP THIS GREAT FORUM GOING! (Only 20 donations so far - C'mon guys!)
×


GuntherMT
-
Posts
2,213 -
Joined
-
Last visited
Content Type
Profiles
Forums
Gallery
Events
Everything posted by GuntherMT
-
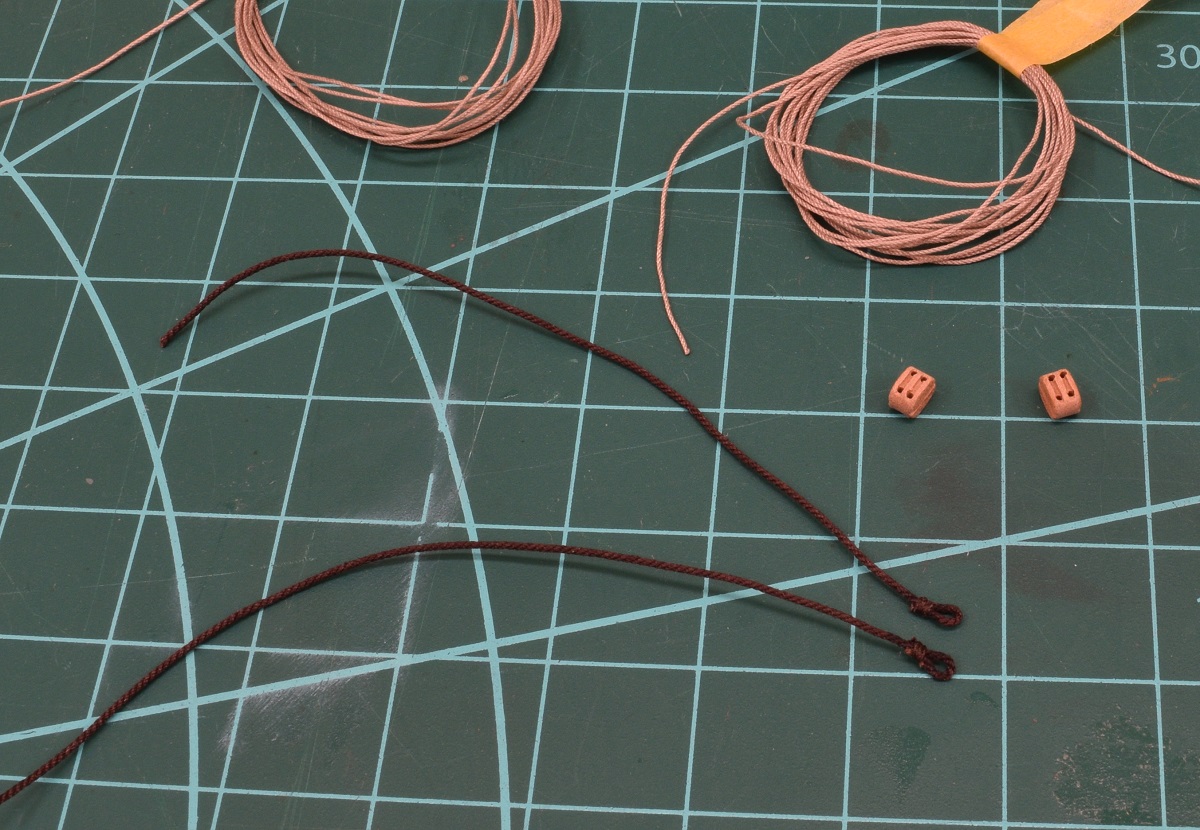
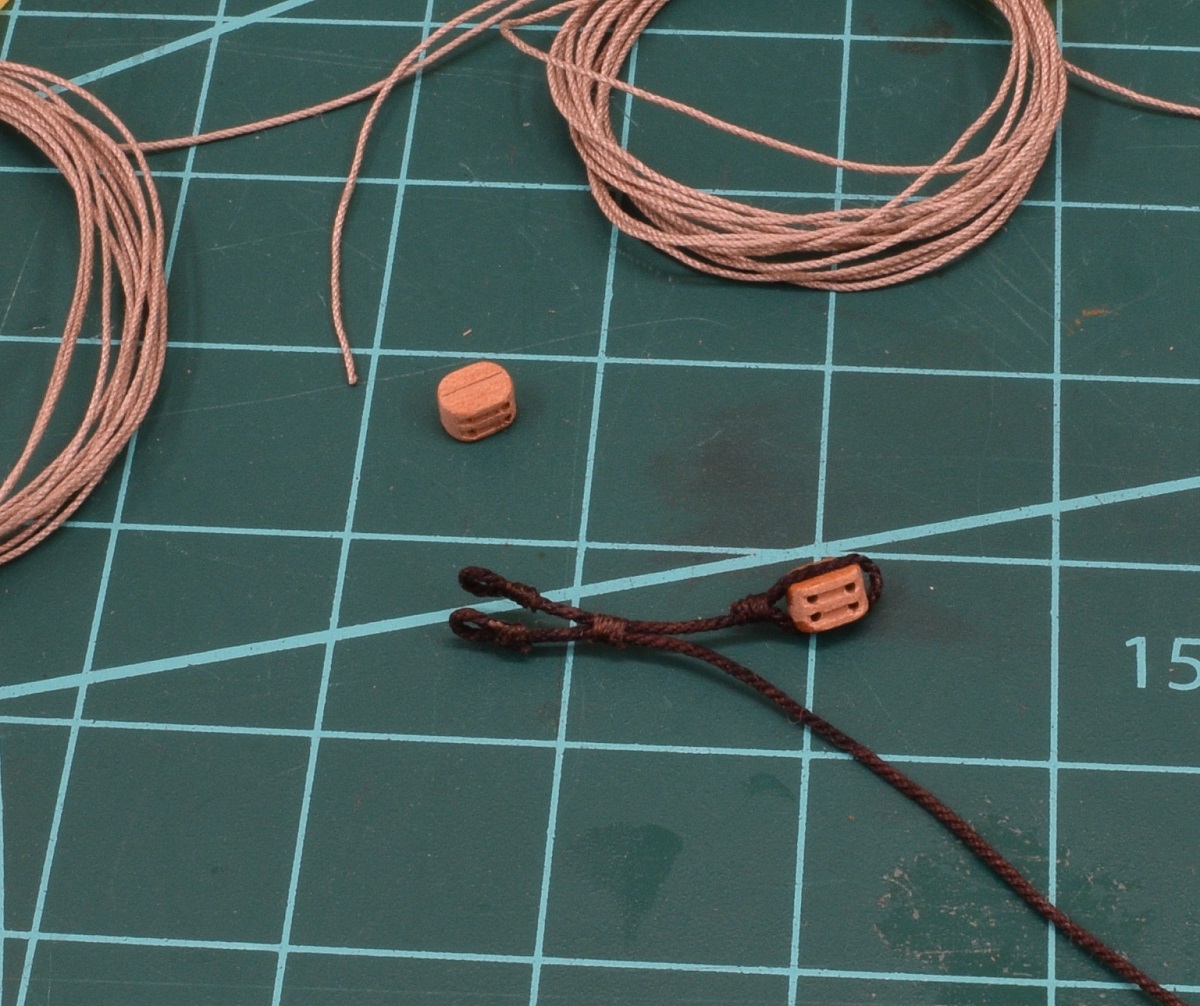
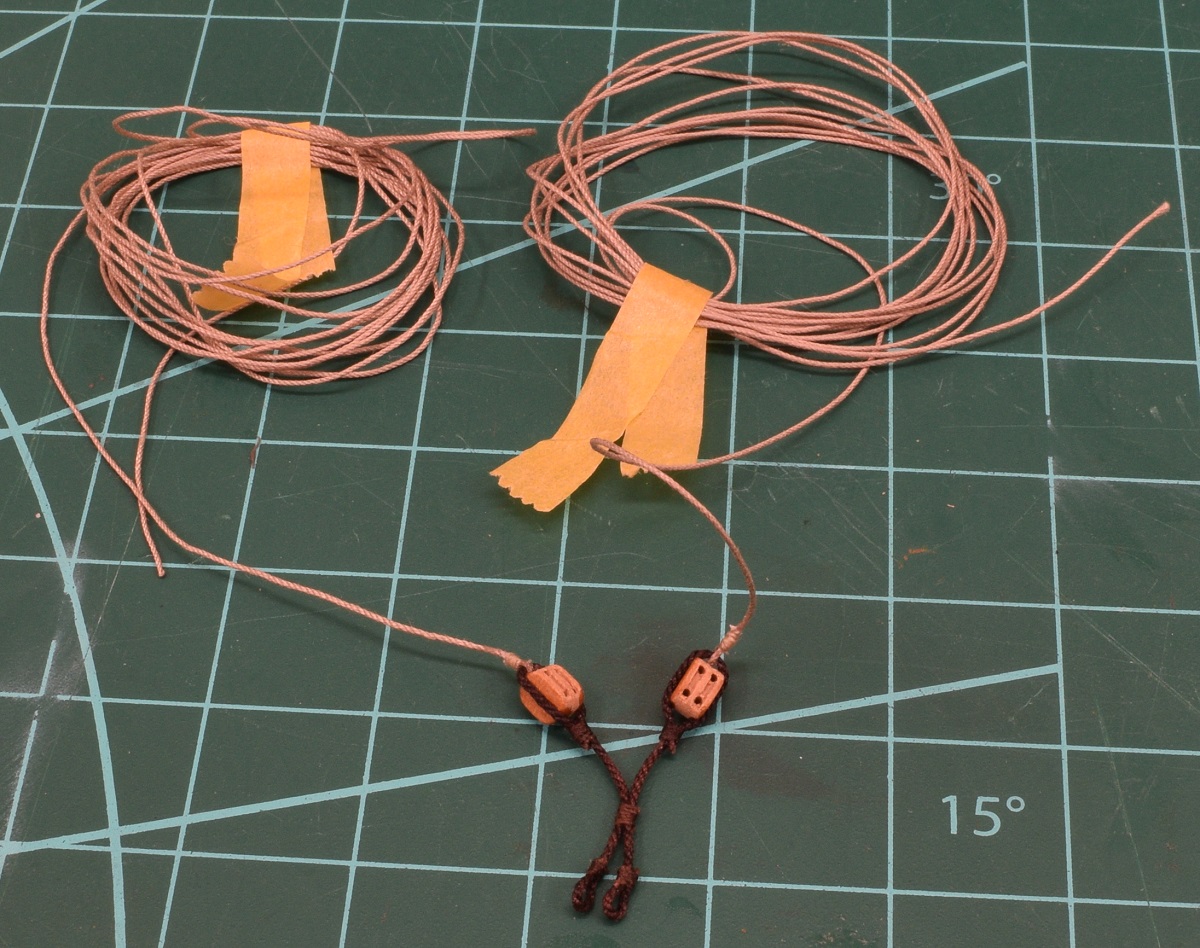
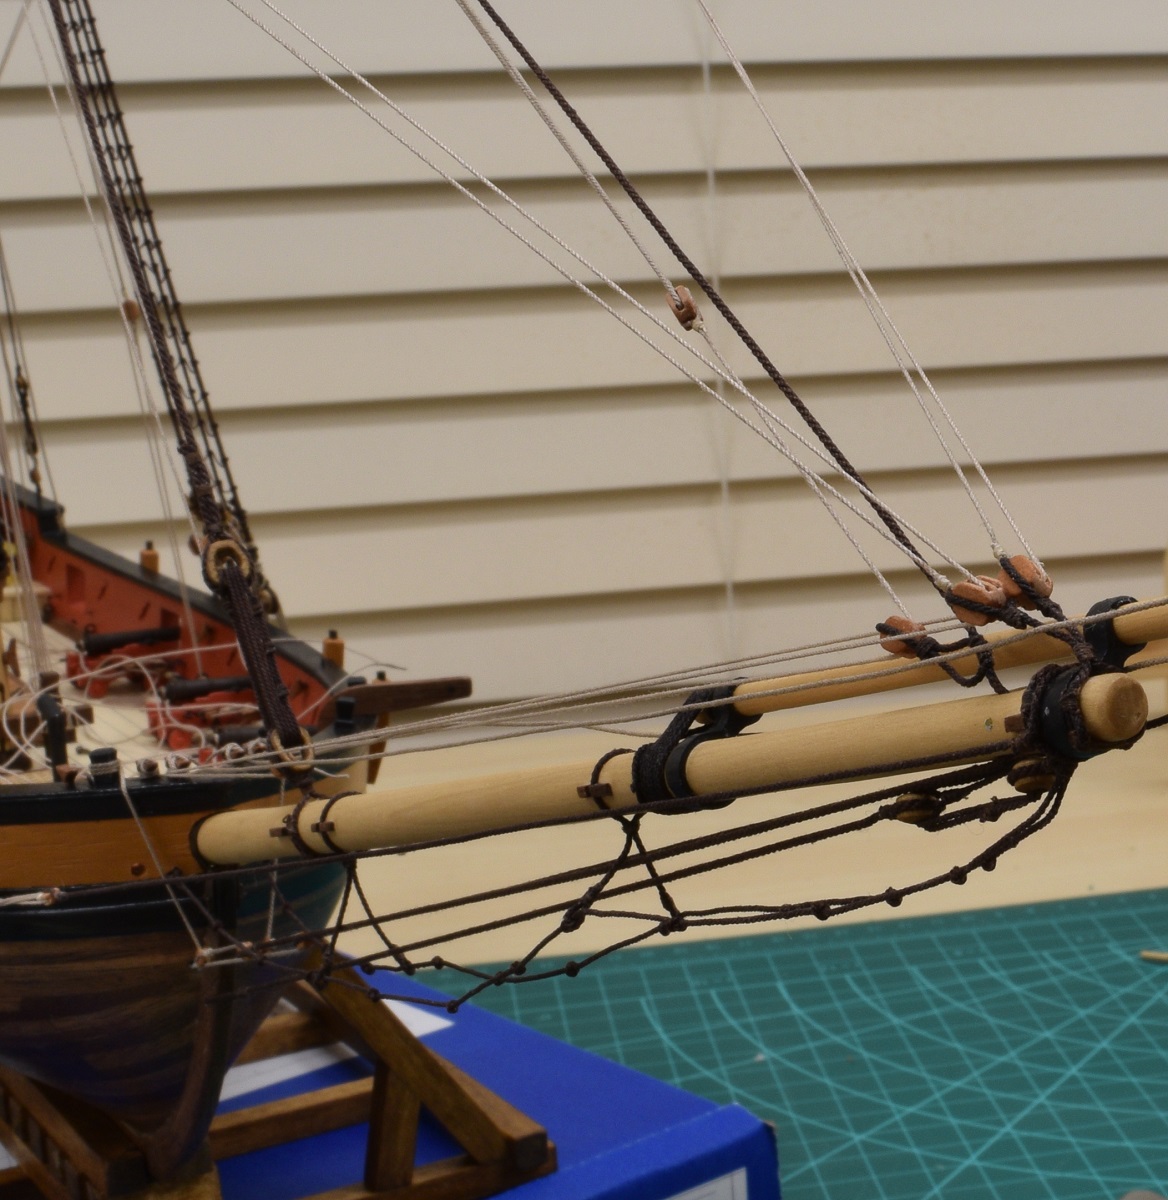
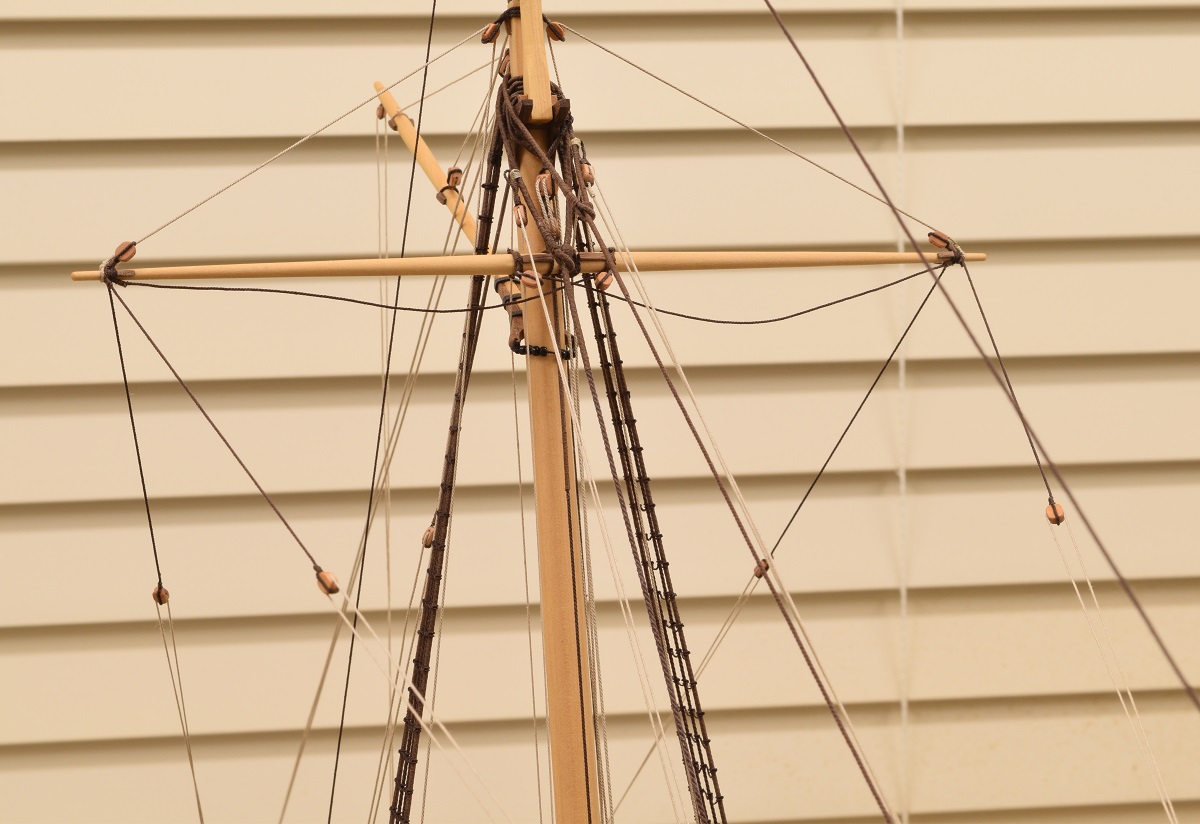
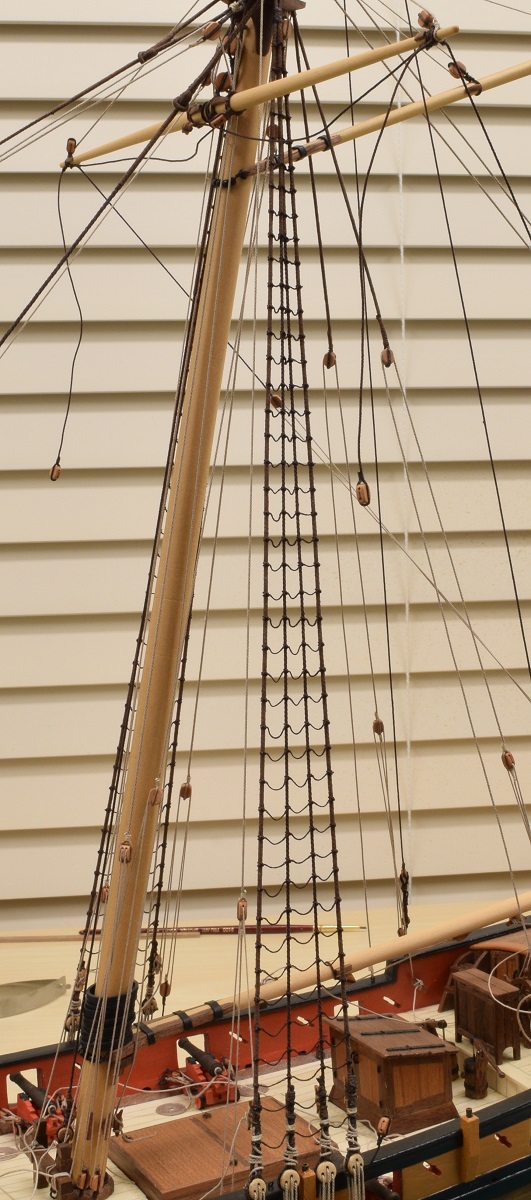
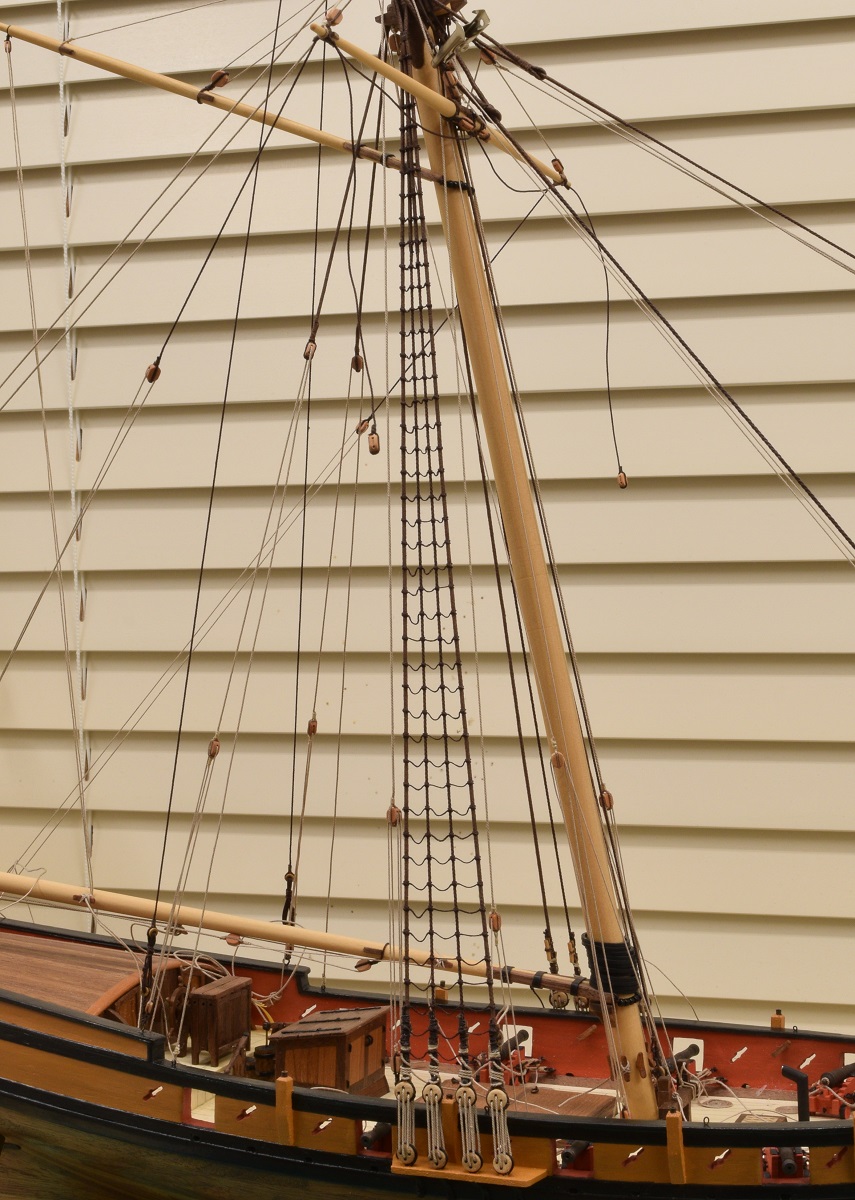
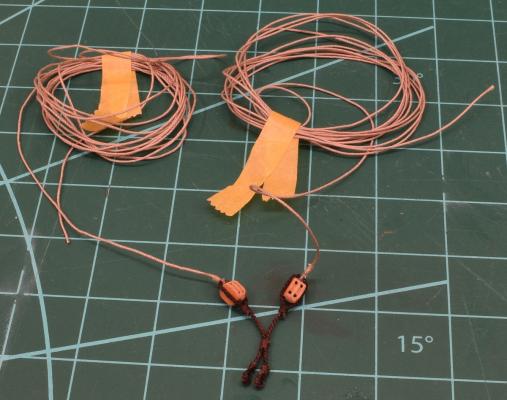
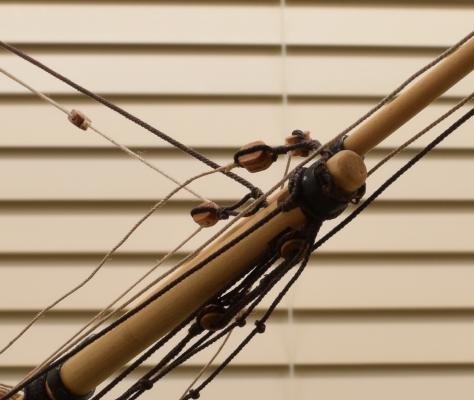
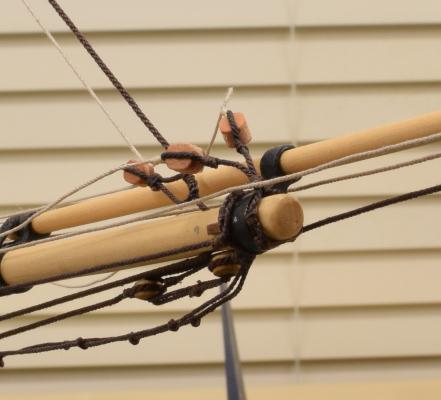
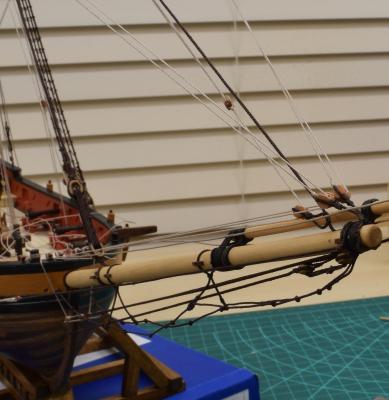
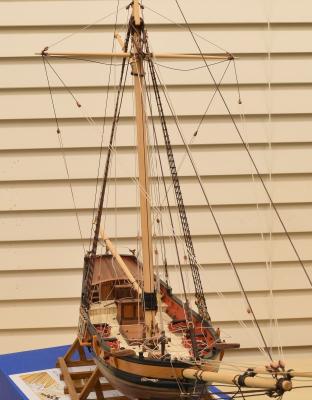
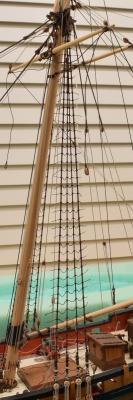
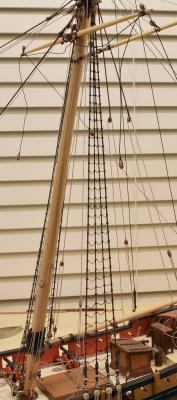
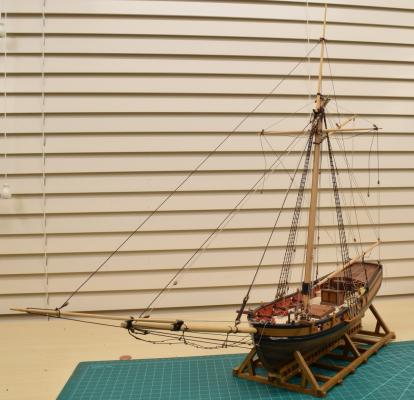
Now that I'm done with the ratlines, it's back to the other rigging. I had previously rigged the aft braces, and needed to do the fore braces. The fore braces attach to the bowsprit with a collar, which is supposed to go between the bowsprit chocks and the iron ring. Well, I placed the chocks and the ring per the plans, rather than figuring out before-hand how much crap was supposed to go in that space (lesson learned here). There are already ropes doubled up in this space, and there was no way that a collar was going to fit here as well, so I placed the collar on the forward side of the iron ring, simply because there's just nowhere else to put it without going all the way back and remaking the bowsprit, which I'm just not going to do as that would set me back months. "Good Enough" time. Making the collar... Starting with a pair of 5/32" double blocks, and a couple of 6" lengths of .025" dark brown rope, and a couple of long pieces (48") of .012" tan rope. Step 1 - Make a couple of eyes in the ends of both brown ropes for the lashing. Step 2 - Seize the two brown ropes together to form the bottom of the collar that will be lashed around the bowsprit. Step 3 - Seize the double blocks into the brown ropes. Step 4 - Seize the long tan lines under the brown ropes. These will the the standing ends of the fore braces. Step 5 - Lash the collar to the bowsprit with brown thread. I still haven't figured out a decent way to take pictures of these lashings under the bowsprit. Now it's ready to actually rig the fore braces. These lines run from the standing end at the collar up to the pendants handing from the ends of the Spreader Yard, then back through the outside hole in the double blocks in the collar, and then to the bow where they are belayed on the inner cleats on the bulwarks next to the bowsprit. I'll have to get a shot against a darker backgroud at some point. The deck is getting really covered by loose rope ends now, cleaning all of them up and making coils is going to be quite a project. Next I need to rig the top yard, but that will likely be Saturday, as I have plans after work tomorrow.


- 831 replies
-
- 19
-

-
- Armed Virginia Sloop
- Model Shipways
- (and 1 more)
-
Most excellent looking model. I had no idea that MS ever made a Vanguard kit. What scale is it?
-
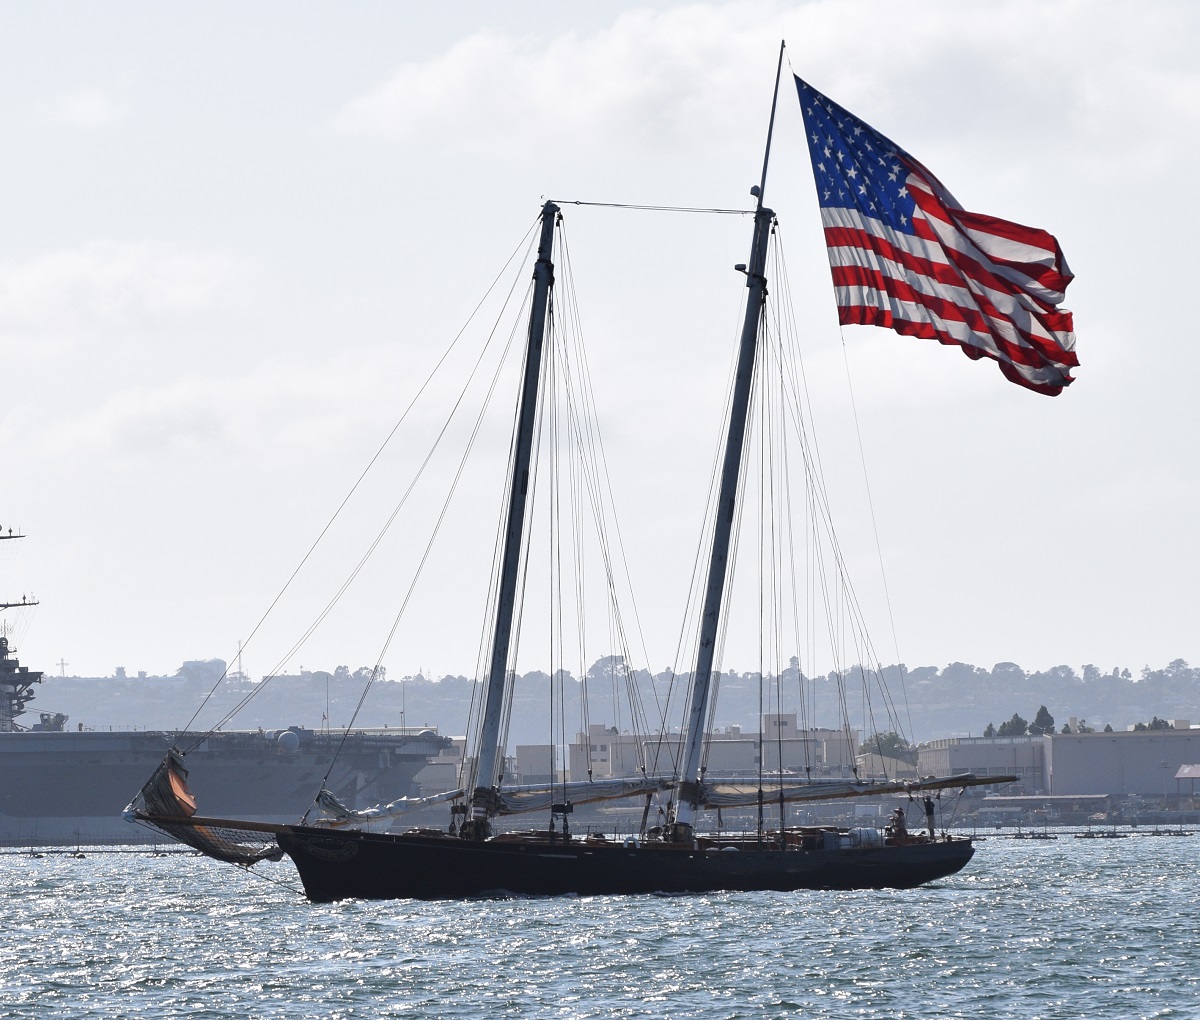
Ken, I was pretty much joking about the flag on the America. That flag is so huge that they don't even try to fly it when the sails are up (they have a much smaller flag that fly's when they are under sail). That flag on the Niagara is pretty good sized though, and you are right about historical paintings, although I always wonder about how much of what we assume is 'right' in many paintings is something that was changed by the painter for artistic value. No matter what size you choose to make, based on the rest of your work, I'm sure it will look fantastic!
- 440 replies
-
- 3
-
-
- niagara
- model shipways
- (and 1 more)
-
Have you tried emailing the manufacturer to see if you can just get a new instruction book?
-
You'll really like the Syren line, but it might spoil you for other kit lines even when it's better than MS line.
- 20 replies
-
- 1
-
-
- phantom
- model shipways
- (and 1 more)
-
Thanks all. The cradle is staying, it's a display board to sit under it, and also add the slight bow up angle that I am churning around in my head.
- 831 replies
-
- 6
-
-
- Armed Virginia Sloop
- Model Shipways
- (and 1 more)
-
I'm sure it can't be any worse! Pretty sure most kits have cotton or linen line of some kind, but in the case of my Constructo Carmen, it was hilariously fuzzy and out of scale. They only provided 2 sizes, and the smaller size wouldn't fit through the blocks from the kit, even when I drilled them out significantly larger. I threw it all away and bought Syren line for that kit too (which was my very first one). If you go through build logs for the ships you are going to build, and look at the rigging, you may be able to get a better idea of how good it is (assuming the log you are looking at is using the kit line). You can also just open those kits up and experiment with that line and see how you like it, how fuzzy it is, etc. If you take a look at my build log, you can get an idea of what the Syren line looks like, since that's what I'm using, and compare it and make your decision. Note that if you go through the rigging subforum, and lots of build logs here, you will find lots of information on how to fight the fuzzies on the cotton/linen kit lines using various things like beeswax, if you would rather use that sort of approach. You can also make your own line, and there are plenty of subjects on that too! The line in the Model Shipways kits is actually nylon, which is why it's so difficult to work with and keep tight. It also has a tendency to not even be round because it's wound on the spools so tight and it's a plastic.
- 20 replies
-
- 1
-
-
- phantom
- model shipways
- (and 1 more)
-
Unfortunately, the rigging line that is supplied with the Model Expo kits is very difficult to work with (it's probably the biggest complaint I have with their kits), and in your pictures they are rigged in a way where you don't have any sort of tackle to use to tighten them, so I really don't know how you can get it tight without cheating. To cheat, first test this on some scrap, because it may cause discoloring. Pull the line tight, and use some sort of knot that allows you to pull the line tight while you are tying it (as long as you are holding onto the line), and drop a tiny bit of fast CA glue on the knot while you hold it tight. The CA will dry quickly and keep the knot from slipping and loosening up the line. For future builds, consider replacing the rigging line with aftermarket line like that sold by Syren or other companies, it's much easier to work with, and looks much better.
- 20 replies
-
- 2
-
-
- phantom
- model shipways
- (and 1 more)
-
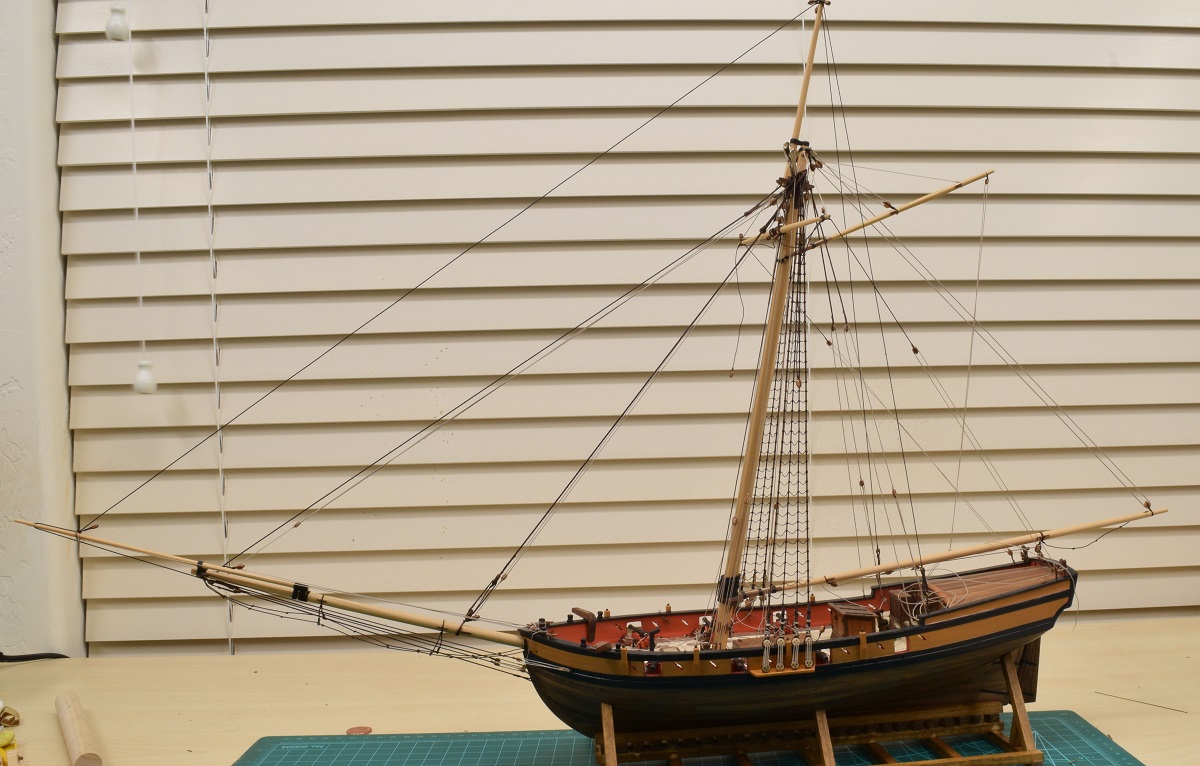
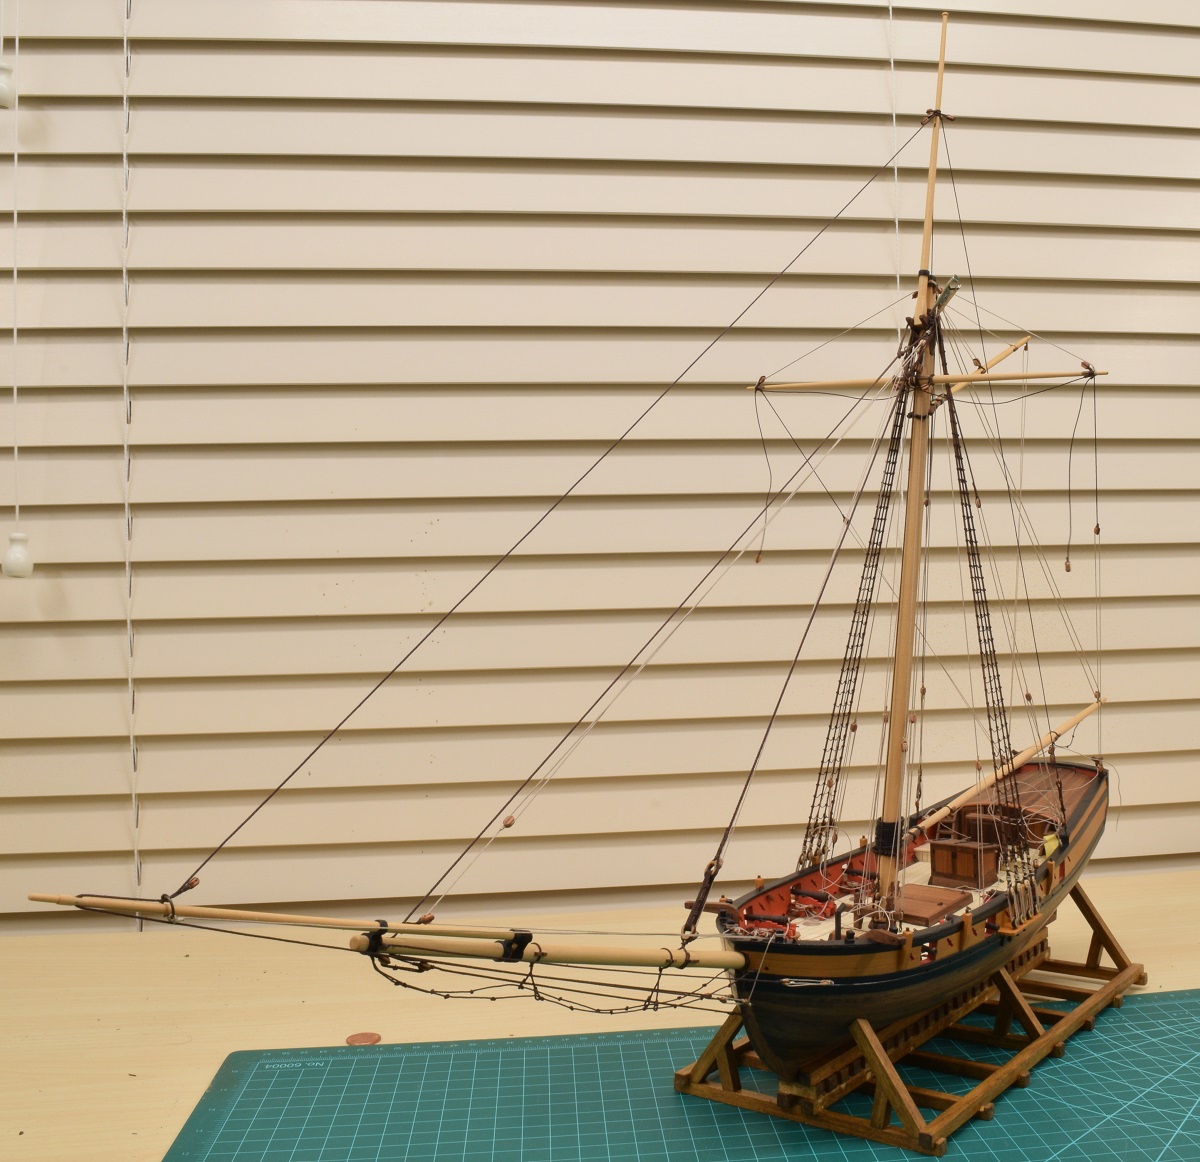
I'm finished tying clove hitches! Yay! Just before the final trimming... All trimmed up... And a couple of overall shots now. I made a bit of a list of what I think I have left to do, and I think I'm on track to finish in 2-3 weeks, barring something unforseen, or something taking more time than I expect. I then have an idea for a base which may take a couple more weeks, but overall, looking good for a mid-late October finish I think.

- 831 replies
-
- 24
-
-
- Armed Virginia Sloop
- Model Shipways
- (and 1 more)
-
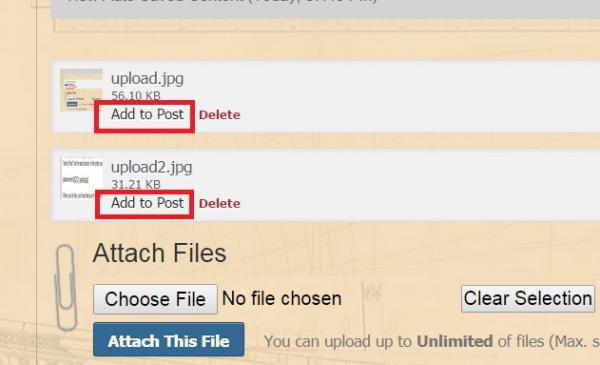
Michael, You are skipping a step in your picture posting that is leaving them on your post as an attachments, but without a specified order, so they'll just be wherever the uploader puts them. You are clicking the 'choose file' button, and then selecting your pictures and clicking 'attach this file', but that just puts them all at the bottom of your post as attachments, in whatever order. To finish up and make things neat, place the cursor in your post wherever you want the picture to appear, and click on the "Add to Post" link for each picture, in the order you want them to appear: When you do that, you'll see that your in-progress post now has the attachment, with a number, and the name of the file listed in a specific spot in your post, like this: Then when you are done and click "Add Reply", all of the pictures will appear at the location you've chosen. If you forget (or choose) not to click the "Add to Post" on any picture, it will still appear at the bottom of your post as a loose attachment.

-
Looks pretty good to my eye.
-
I ordered one. Hard to go wrong with that price.
-
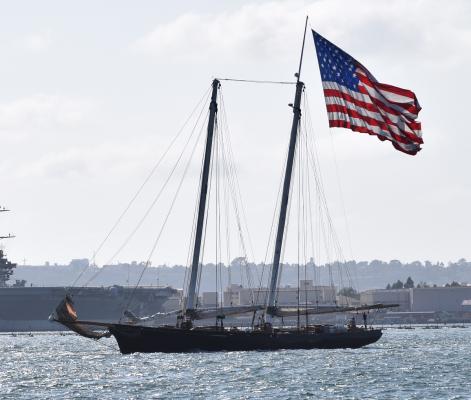
Since the Niagara is larger (at least in sparred length) than the America, you should make sure to use a larger flag than the America does. For reference, the America is listed at 130' LOA, 145' sparred length, and 130 gross tons vs. Niagara 123' along cap rail, 198' sparred length, and 297 long tons. Have fun making and hanging that flag!
- 440 replies
-
- 6
-
-
- niagara
- model shipways
- (and 1 more)
-
I can't really tell from your picture, is the bed laying flat? It should be flat laying on the board across the rear axle to the wire that gets run through the middle. You can also increase the depth of the notch where the trunion goes to drop the barrel a bit. Also, the trunion offset is towards the bottom of the barrel, it looks like you might have it upside down, but that only increases your clearance issue. I know that the carriages I got from Chuck were taller than the kit carriages, so you might just have to do some trimming/adjusting of the overall height to get it to fit your kit?
- 467 replies
-
- 1
-
-
- fly
- victory models
- (and 1 more)
-
That's a lot of gun tackle rigging! Looking good Sal.
- 659 replies
-
- 2
-
-
- syren
- model shipways
- (and 1 more)
-
Looks fantastic, either with or without the bit on top, so just choose the way you think looks best to you!
-
Hi Martin, Nice job on the quoin handle. I did something very similar when I got my Proxxon lathe from John, but I was never happy with the size. In the end I just stuck a short piece of black wire into the quoin and used CA glue to build up a little bit of a 'ball' for the end and painted it black. Yours looks better than I ever managed, but I agree that it's still a bit oversized. However, if you are happy with that look over a simple solution like I ended up going with, then that's all that matters, and I think it will look just fine, especially when the entire model is being viewed, and not just that single detail.
- 467 replies
-
- 1
-
-
- fly
- victory models
- (and 1 more)
-
Nicely done so far. I'm not sure I ever want to do a copper plated hull. They just don't look like much fun to me.
- 20 replies
-
- 1
-
-
- phantom
- model shipways
- (and 1 more)
-
Hi Don, I have never done any resin models, but just wanted to let you know that I am enjoying your posts on this boat, and look forward to seeing it progress.
-
You can upload at least 1200 pixels on the long side, as long as they are under 2mb per picture (and at 1200x800 they'll only be about 250-400k each). That's the only size I ever post in my log. I just love seeing nice pictures of everyone's work, and my eyes are getting too old.
-
And, the starboard side is done. I was hoping to finish both sides this weekend, but I had a fair number of other chores to do around the house, and I discovered that I was only able to tie off about 6 lines before feeling the need to get up and do something else for a bit, so it took a little time. Tomorrow night I'll put lines on the guide for the other side and start the next half. Woo...
- 831 replies
-
- 26
-
-
- Armed Virginia Sloop
- Model Shipways
- (and 1 more)
-
Looks good. Just wish your pictures were bigger!
-
Piet, My MF-70 was purchased used, so I don't have a box for it. The mill itself does not have any country of origin labeling. However, the back page of the instruction booklet that I got along with the mill says: Made in Luxemburg Distributed in the U. S. by Prox-Tech, Inc. My DB-250 lathe, which was purchased new near the end of last year, has the same Made in Luxemburg label on both the box and the instruction booklet.