


Chuck
-
Posts
9,388 -
Joined
-
Last visited
Content Type
Profiles
Forums
Gallery
Events
Posts posted by Chuck
-
-
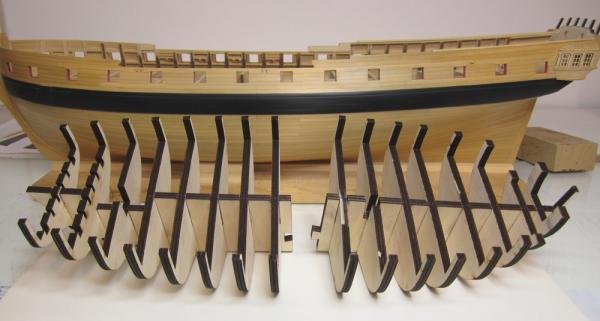
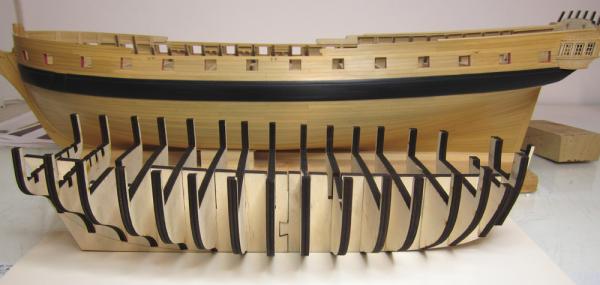
Today I laser cut the bulkheads and false keel from 1/4' thick ply. It was comforting that the laser cutter will have no problem cutting through this thickness of ply. That is really good. Normally you will see 3/16" thick bulkheads. I have started to use the thicker stuff in my latest designs. I think it really helps with the stability and strength of the hull. Its just a better thickness to go with in my opinion if you choose POB. When you no longer have to worry about mass production and kit MFG profit vs. loss, you are free to do these things. Its a great feeling and in the end make the modeling experience so much better.
The parts fit really well. You can see how large in comparison to the Winnie in the background. I made the bulkhead former in two pieces as you can see. I think its important to make these in shorter lengths. If they are too long they have a tendency to warp and bend. The slots cut for the bulkheads makes this even more of a problem. It helps the warping become even worse. You will also notice the many, many bulkheads. I have added a picture of the Sherbourne cutter by Caldercraft for comparison of design. With bulkheads that far apart the planking is going to be tough.
Chuck
- Leo-zd, FrankWouts, dvm27 and 37 others
-
 40
40
-
Thanks guys.
I may use it because Jeff has a stash of it at Hobbymill. I have samples and it looks like real nice stuff. Its a bit cheaper than boxwood but only marginally so. But if you didnt know which was which side by side it would be hard to tell the difference. Because they are so similar why not give it a try. Boxwood is slightly more tightly grained and the the color is more even. But if you get choice pieces of Pau Marfin it looks just as nice. It isnt as hard as Boxwood but its really close. More along the lines of pear in my opinion. But I figured why not give it a try. It also helps Jeff get rid of some. Maybe if more folks see a model made from it they might give it a try like I may do. It all depends on how long I have to wait for it. I think Jeff is going on vacation soon if he hasnt already. But I can still make the bulkheads and stuff while I wait...

Chuck
- FrankWouts, Archi, WackoWolf and 2 others
-
5
-
Thanks guys for the interest..I am just waiting on some wood to be delivered then I will start making some sawdust. I am looking forward to it like you cant believe. I couldnt find any decent quality 1/4" thick ply anywhere within driving distance so I had to order online. I may just use solid wood instead for the bulkheads but I will see what I get.
Chuck
- qwerty2008, SawdustDave and FrankWouts
-
3
-
Not yet...I am sourcing a bunch of places for printing as we speak.
Chuck
-
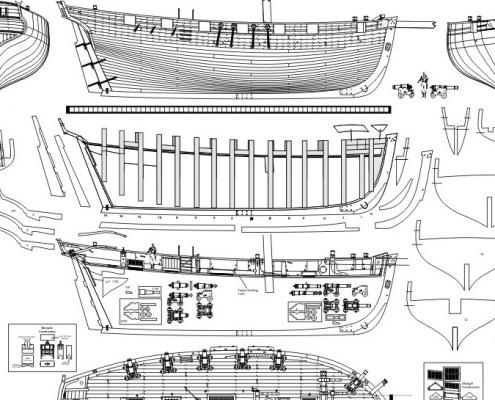
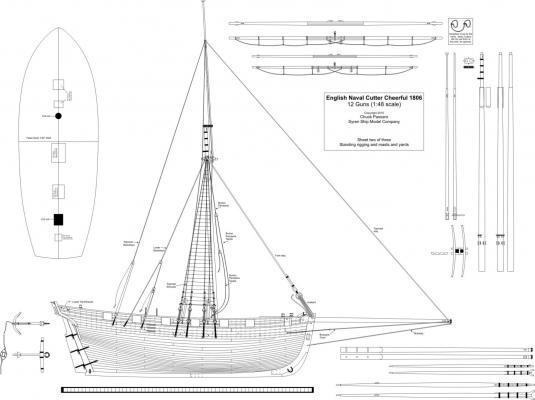
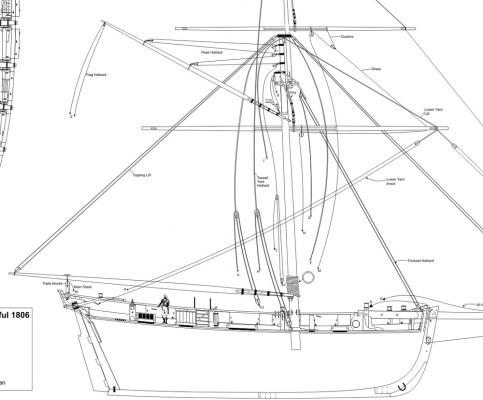
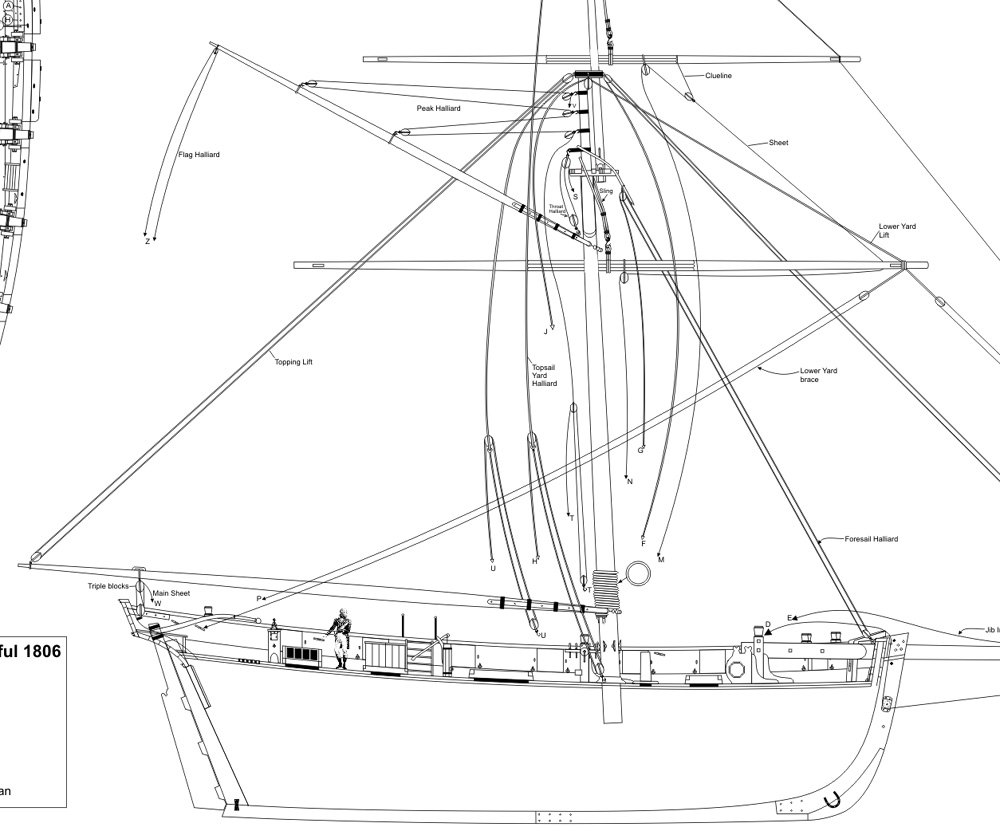
This will mark the beginning of my project to build the prototype for the Cutter Cheerful. The plans are completed and I am getting ready to release the plans in a few months. I will be building her out of Boxwood or possibly even Pau marfin. I havent decided. This project is a POB build as you can see from the details in the plans posted below. Its not a very cumbersome project with just a cutter rig to deal with. She is carvel planked and not Clinker planked. This is one of the reasons why I chose it as a subject.
Once I have the skeleton built and the hull planked, the plans will be released. The remainder of the project is pretty straight forward and doesnt need much of an explanation. I just need to prove out the design concepts for the hull skeleton. It shouldnt take too long. I will be writing a monograph as I build her and posting it on my website for free download as well as here on MSW should folks want to read it. But as I stated, I wont need to finish the entire project to release the plans as they are really straight forward. At a 1/4" scale...the hull will be 28 inches long and 26" tall. A nice size yet built at a larger scale to show some great details.
I am finally at a point with the Syren store where my inventory is quite full and I will be able to enjoy working on both the Winnie and the Cheerful for several hours each day. I just cant wait to get started. Having a laser cutter doesnt hurt either. It will save me much time.
Chuck
-
That would not be the best thing to do. In fact there are other words to describe wanting to even consider it. Wait a few days and get a new one. PLEASE
A few dollars and a few days vs. .......a few fingers or your eyesight or worse.
-
The tutorial is in the database and explains it in much detail and with pictures
-
Once you get into a groove with this you will never go back to planking any other way!!! Enjoy the process.
-
Yes you should....double it up...
-
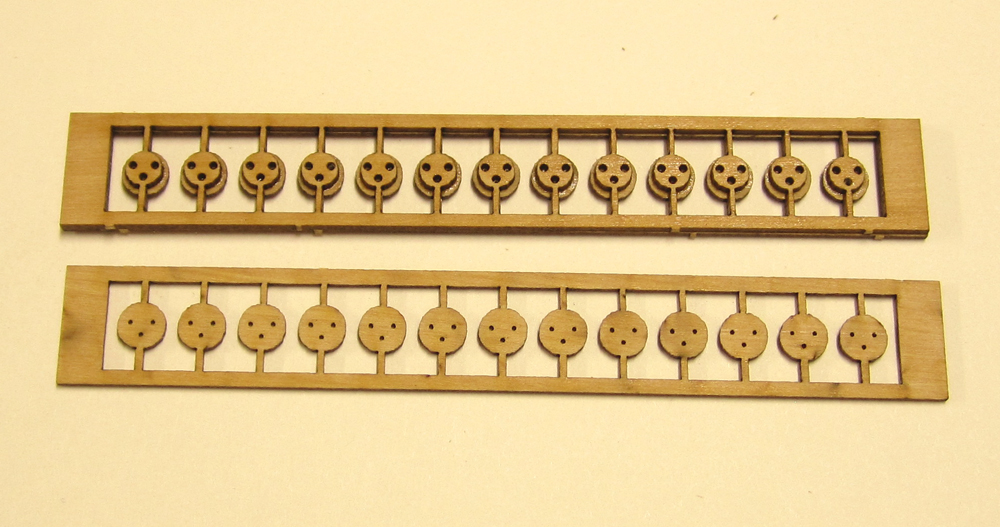
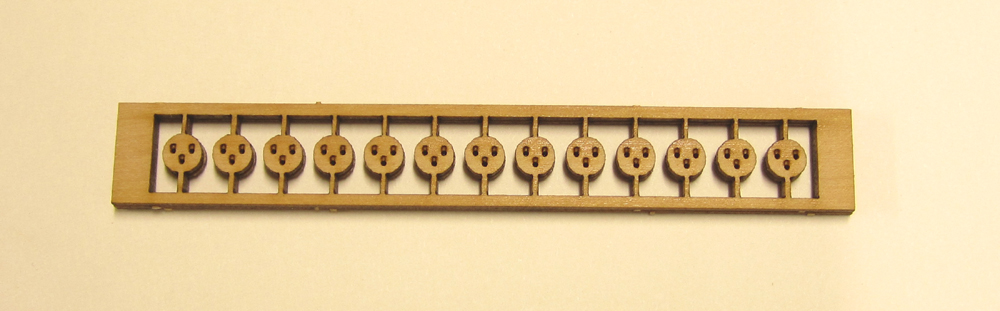
Remember....you dont have to assemble the deadeyes one at a time. They were made and aligned as a group. No pins needed. Although your method keeps the holes from clogging wwith glue. Very nice touch. You can glue the three layers of each sprue together and just use the surrounding bounding box as a guide to line them up. You actually made it ten times harder than it needed to be even though they look great. Or at least it looks like it took a long time doing it one at a time. It is also a good idea to file down those tabs on the deadeyes before you throw them into the tumbler. It makes them keep their shape better and it wont take as long in the tumbler is is a very violent process. It only takes a few seconds with a file before you throw them into the tumbler.
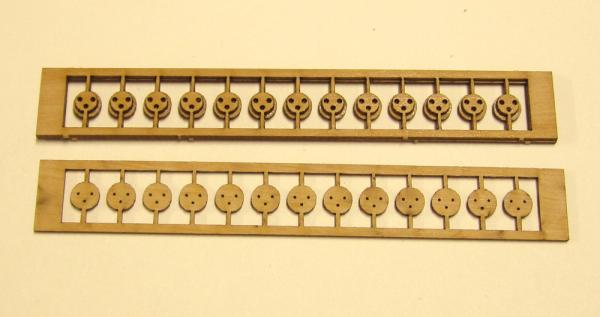
Gluing up a whole row at one time with all three layers.
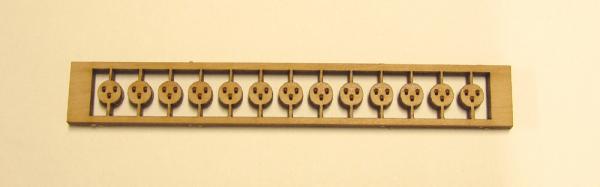
Three layers all glued together
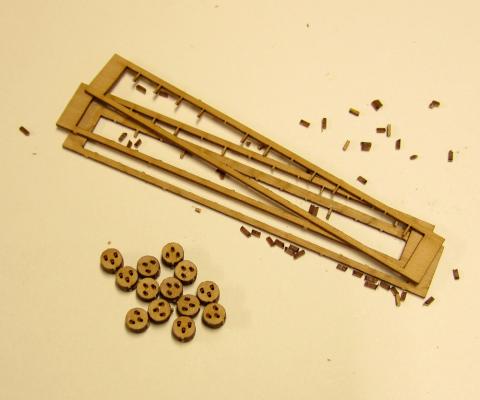
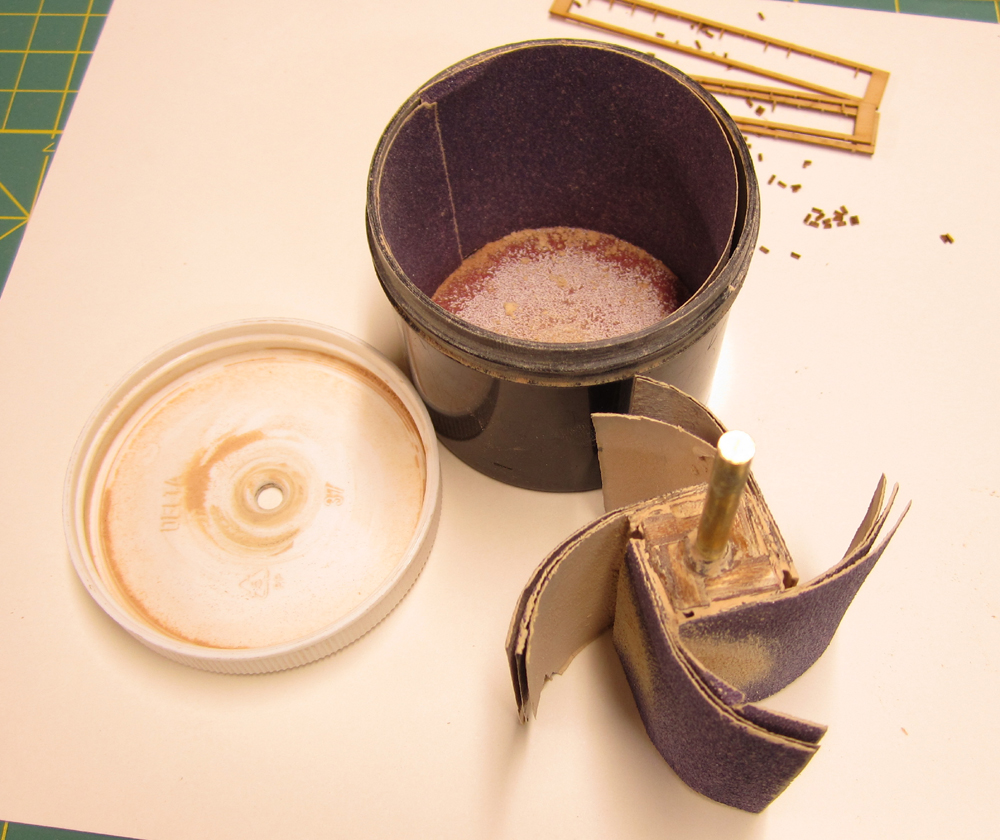
Use a snippers to cut them free.
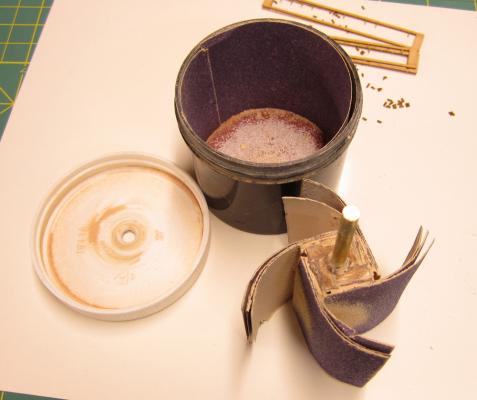
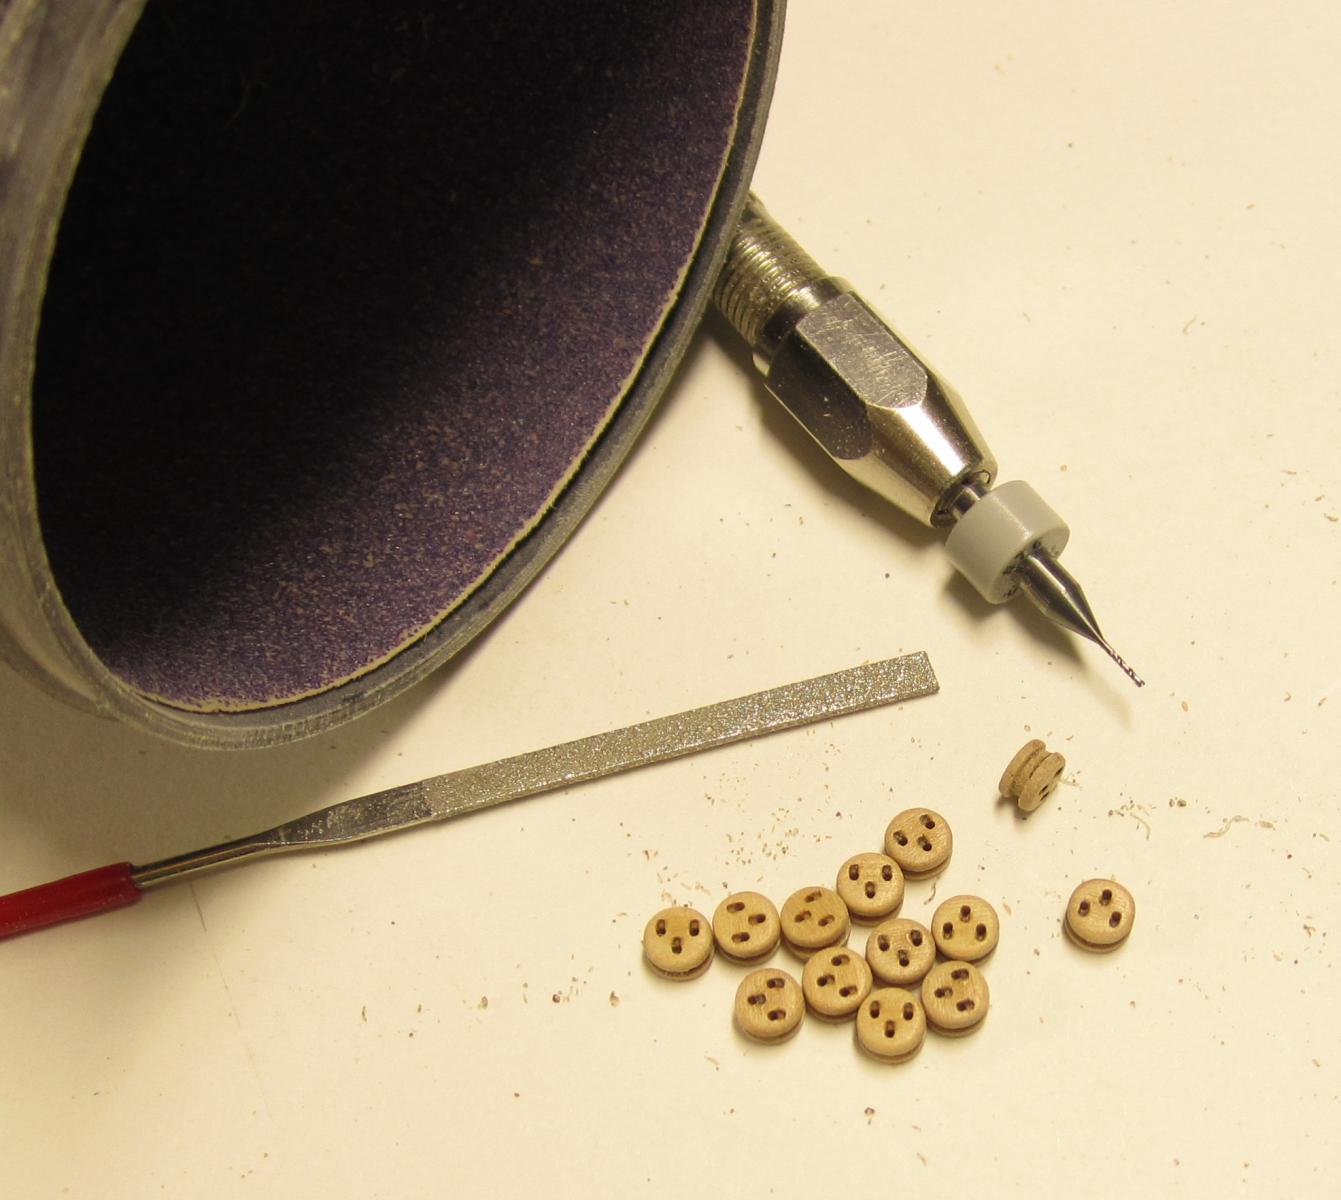
Tumble them up....remember to modify the tumbler and NOT use the stiff wood flaps. Just add three sheets of sandpaper...220 grit to each side of the spindle to make a flap wheel. The three sheets of sandpaper are not glued together...they are left lose which make the flap wheel more stiff without obliterating your deadeyes and blocks. It works better like this in my opinion. Dont forget the read through the full set of instructions. I have also stopped making them with 13 deadeyes in a row as there were too many to glue up easily within a reasonable time frame...so instead I have cut them down to seven in each sprue...as its more manageable. I include four in a pack which actually gives you more deadeyes. Let me know if you have any questions at all.

I am glad you are having fun with it. They do look good.
And remember...DON'T TUMBLE THE FIDDLE BLOCKS...they are not round but soon will be if you use the tumbler. Those must be shaped by hand. AND those are meant to be assembled one at a time and not in a strip of six as stated in the instructions.
Chuck
- riverboat, GuntherMT, CaptainSteve and 3 others
-
6
-
Just checking in as we get get closer to the conference.....There is still plenty of time time to sign up. There will be plenty of vendors there (I will be one of them), great speakers and a riverboat cruise. Its always a great time. So if you are considering going please sign up to meet us all there. I am sure there will be quite a few folks from MSW there. Its a fantastic opportunity to meet them in person.
I am also bringing my wife and son to the conference to help me work the vendor table while I do my workshop on ropemaking. I am looking forward to it and hope to see you all there.
Chuck
-
You did a fantastic job on her. Almost done!!!
-
Remember that the MS line is actually Nylon so watch what you use. Dont use anything that will actually melt it.
Chuck
-
I just wanted to let folks know that the hotel rooms are starting to fill up now. So dont wait to long to take advantage of the special room rate for the NRG. AND...remember folks, you are all associate members now and can take advantage of the NRG member conference discount when you register.
I would love to see you guys in person and it will be a great time for sure.
Chuck
-
Yes indeed......use some sewing thread to seize the line around the mast.
-
No....you should use smaller rope to seize the .021 rope around the mast. Use smaller .008 or .012 black for that. The rope is .021 because Expo doesnt have anything else other than really large rope above that size. My .025 brown line is perfect size for the shrouds. But for the kit they have to supply only what they have available.
Chuck
-
Not wire....its Rope...........that was a typo which was never corrected.
-
Persistence and practice....I dont use any clips. I use CA which is fast setting to glue teh planking and make sure they are bent to fit without any force bending.
Chuck
- Nirvana and Stuntflyer
-
2
-
Just create another album....and let me know where the old one is and I will delete it.
Chuck
-
Nope...it just rests against it. The only thing securing the chain is the small nail. Other than that it doesnt sit against the hull at all . It rests against the molding of the cap rail though so there will be a tiny space behind it that is not detectable.
Chuck
-
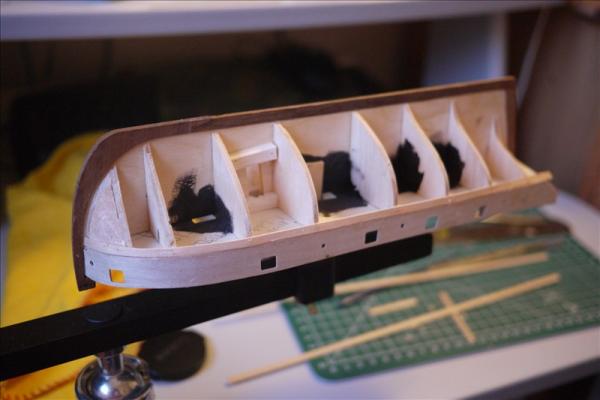
Beautiful work...I am actually planning right now a larger version that is more detailed with floors and true framing practice. It will be double the size and represents a 30 foot longboat. This way the rig and details can be added without compromises for a mass produced kit. So you will just have to build it again!!!
-
-
Dont forget that its not just for the time...the hair dryer adds heat. A lot of heat. This will make it very pliable and you can get a more drastic bend or twist. Probably another 20%.
Chuck
- Stuntflyer, mtaylor, fnkershner and 1 other
-
4
-
Ok guys....can we get back on topic here. Just a friendly reminder...this is what we have talked about before. Please review the last dozen pages for build log content/ ship modeling content. You wont find any. Please take these conversations off list or to the shore leave section we set up especially for this kind of stuff..
Thanks for understanding.
Admin
Chuck


HM Cutter Cheerful 1806 by Chuck - FINISHED - 1:48 scale - kit prototype
in - Kit build logs for subjects built from 1801 - 1850
Posted
I was thinking about it. But just the bulkheads and false keel. What you see in that photo. I want this to be a scratch project and scratch experience for the builder. As much as possible anyway. The bulkheads are easy and anyone could cut them out with the scroll saw. It doesnt take much skill. So if I offered them it would be only in an effort to save folks time so they can get to the fun stuff quicker. They would still need a scroll saw to complete the project. I basically cut these out over two-plus hours. My laser cutter is very small but very powerful. So I can only cut a few pieces at a time. But it would have taken me far longer to cut them out by hand. Its basically just a time-saver.
I am a little worried it might be too expensive though. Good 1/4" thick plywood is expensive. These few pieces fit on three sheets of ply that cost me $30 and then another two-plus hours to cut. There is a lot of waste because of the funky shapes. Its midwest plywood. I would have to look around for something as good but cheaper. But thats a tall order. Everything else I looked at was warped or a weird composition of woods. This is some nice heavy stuff. The stuff at my local Lowes and Home depot was just horrible.
I am not sure what the price would be and if it would be too high for folks. This 1/4" stuff is also heavy and would cost a pretty penny to ship... Its the reason why you get half the bulkheads needed for most commercial kits. But I would be willing to do it if enough folks are interested. But I am definately not going into teh complete kit business. I will do al-a-carte stuff like blocks and cannon and carronades....My recommendation would be to just cut them out yourself...then it would just cost you the price of the plywood.
I will be giving Jeff a wood supply list as well. So that will be easy enough.