gjdale
-
Posts
4,894 -
Joined
-
Last visited
Content Type
Profiles
Forums
Gallery
Events
Everything posted by gjdale
-

Cutter Cheerful 1806 by rafine - FINISHED
gjdale replied to rafine's topic in - Build logs for subjects built 1801 - 1850
Great job on the deck planking Bob, it looks beautiful.- 525 replies
-
- 3
-

-
- cheerful
- Syren Ship Model Company
- (and 1 more)
-
Another interesting build Clare. I've grabbed a centre front row seat for this one!
- 51 replies
-
- 4
-
-
- wasen
- thermal studio
- (and 1 more)
-
That is just stunning Remco, as we have come to expect from you. I will join the others in asking for further description/explanation of the tube jig.
- 1,215 replies
-
- 1
-
-
- sloop
- kingfisher
- (and 1 more)
-
Robbyn, A "poor man's" waterline marker can be made by grabbing a takeaway coffee cup (preferably empty), turning it upside down, then inserting a pencil through one side and out the other at the required height. Then run the coffee cup around the ship. Voila - instant waterline!
-
Thanks Danny, No, you didn't send me the capsquares - but would be most grateful if you can spare some. Yes, will be filing off the flash and drilling the bore - these were just placed for the photo and to check size.
- 456 replies
-
- 6
-
-
- finished
- bomb ketch
- (and 2 more)
-
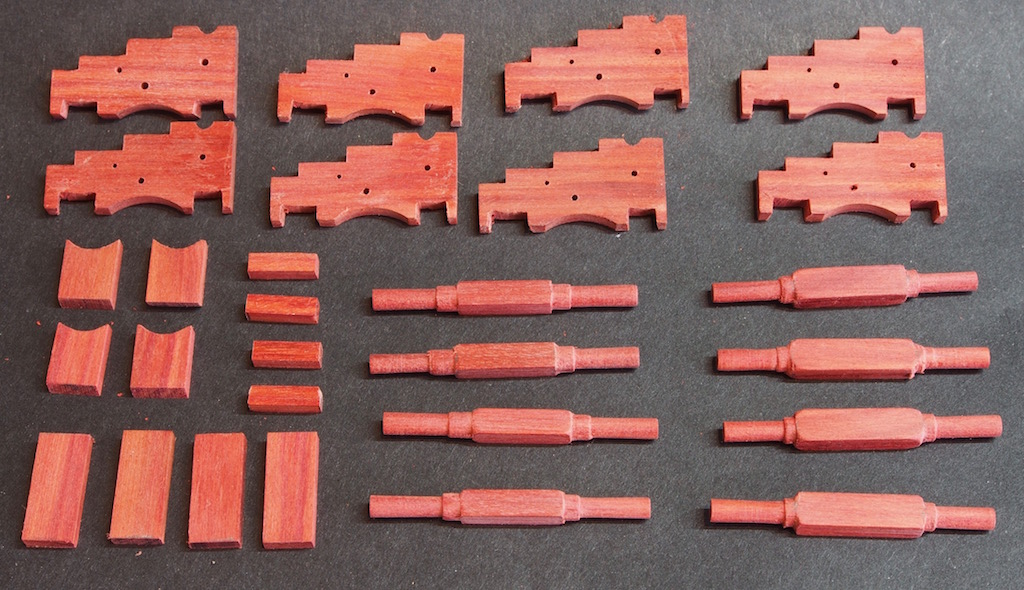
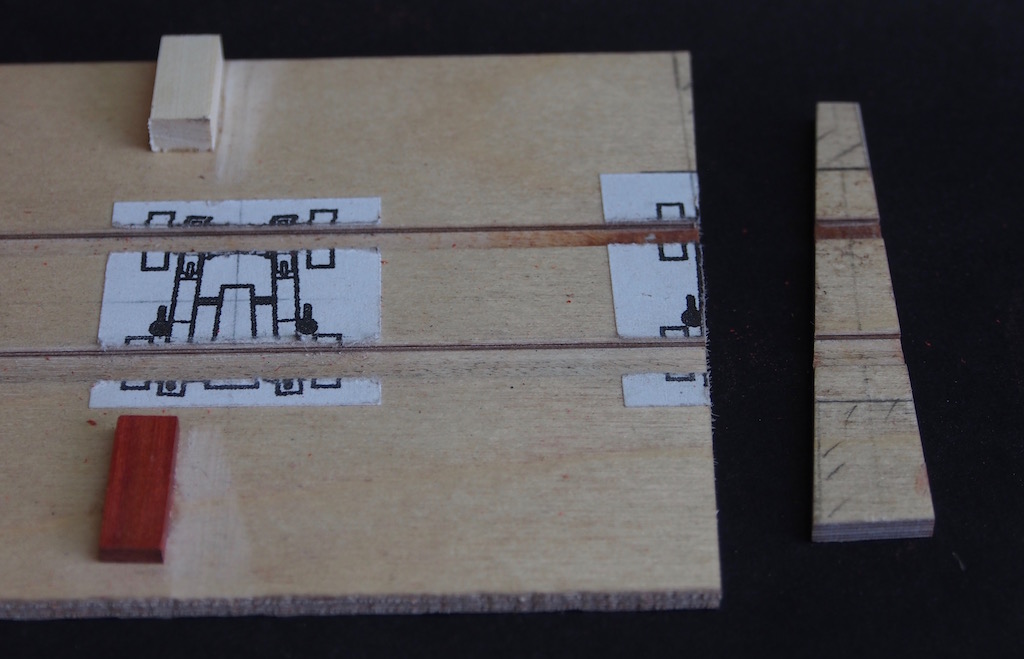
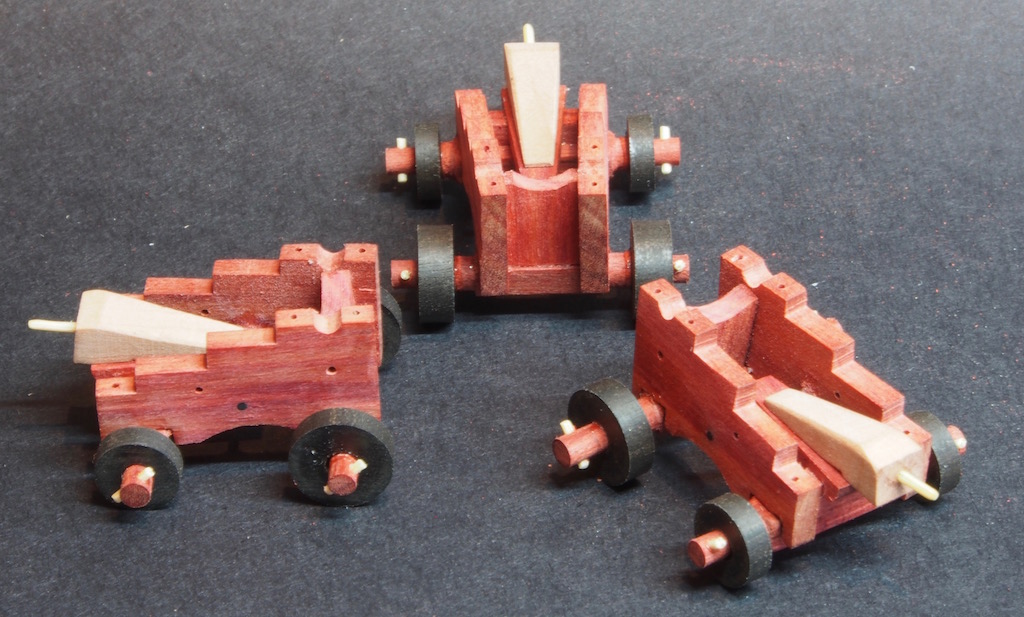
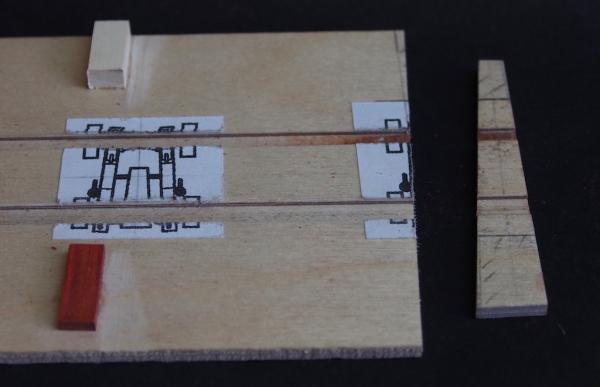
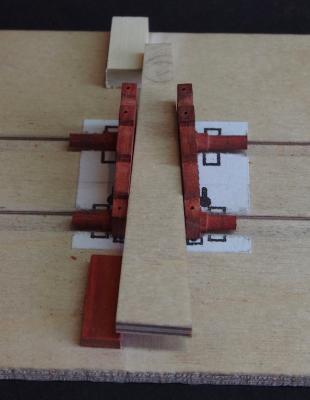
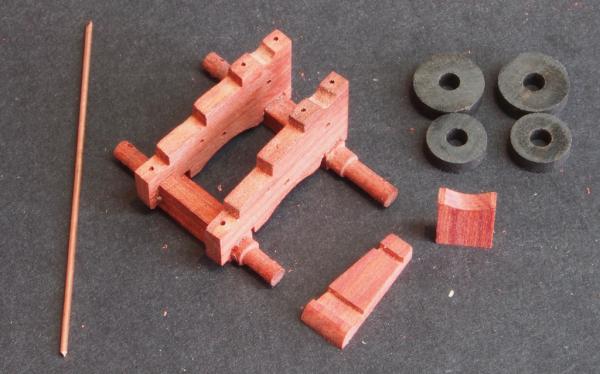
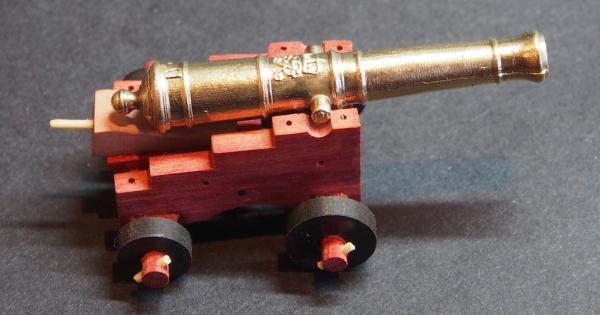
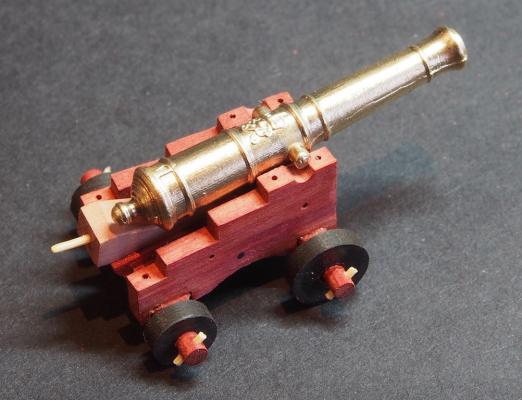
Thank you Crackers, and again to everyone else for the Birthday wishes. It seems that another month has flown by without an update on the build log. It had been my intention to wait until I'd finished the gun carriages before posting another update, but decided I'd show where I'm up to as it is going to be another couple of weeks before I get some more serious bench time in (life just keeps getting in the way!). Anyway, here is a small update to bring everything up to date. 4lb Gun Carriages (continued) The remaining components of the gun carriages were made up using measurements and templates as necessary from the drawings. The axles were made from square and rectangular stock, with the ends turned cyclindrical on the lathe. Here are most of the parts prior to assembly (although some of these required a ‘do-over’ later on): The sides of the gun carriages are not parallel when assembled and this caused a slight modification to be made by opening the angle of the axle slots in the carriage sides. The next problem to solve was how to hold the pieces in place during assembly while the glue dried. The solution was a fairly simply jig mad from some scrap plywood. A plan view of the carriage was place on the plywood, and two dados were cut to accept the front and rear axles. A section was cut off the end and then sanded to a wedge shape to match the angle between the sides. A couple of scrap blocks were glued in place to act as stops for the wedge to press up against: The axles were then placed in the jig, the wedge placed over them and pushed up hard against the stop blocks, and the sides were then attached: Once the glue had dried, the carriage was removed from the jig and prepared for final assembly. The following picture shows the remaining components, which include a copper bar that will pass through the centre of each side and will support the front end of the Stool bed (lower right in the picture – showing it has been dadoed for both the copper bar and the rear bolster). Also shown is the transom, which will be placed between the sides over the front axle (it will subsequently be drilled for a second copper bar). The transoms all required a do-over to ensure a snug fit in each carriage. Finally, the trucks (wheels), which were turned from some ebony stock. The Quoins were then made from some scrap boxwood, with handles from bamboo drawn through the Byrnes drawplate. The Quoins are used to adjust the elevation of the gun barrel and so would be free to move, but I have elected to glue them in place. I also drilled each of the axles and inserted a pin made from some more bamboo drawn through an even smaller hole in the Byrnes drawplate. Not shown in the photos, I have since added the copper bar through the transom above the front axle (the empty hole can be seen in the photos). Danny Vadas was kind enough to give me two gun barrels left over from his Vulture build, that seem to be pretty much spot-on for scale. These are the ones he imported from Russia, and come complete with the monogram. Thanks Danny! They still need a little cleaning up and blackening, but are shown here for effect. I’m still going to have a crack at turning a couple of barrels from ebony and if these work out, I will use two guns on the ship, and two as part of the display base. I have since given the carriages a coat of Wipe-on Poly, but have yet to manufacture the required eye-bolts, ring-bolts and cap squares. Soon……….


- 456 replies
-
- 18
-
-
- finished
- bomb ketch
- (and 2 more)
-
Thanks Mobbsie and George - yes, it is today. Hopefully an update to the log this weekend!
- 456 replies
-
- 4
-
-
- finished
- bomb ketch
- (and 2 more)
-
Glad to hear that Judy is improving Michael. Fantastic work on the lights/hinges, but I'm glad you made a mistake - that's actually very encouraging for the rest of we lesser mortals!
-
Just lovely work John. She really is looking beautiful.
- 745 replies
-
- 3
-
-
- francis pritt
- mission ship
- (and 1 more)
-
Magnificent work on the wheel Ian, and a great tutorial to boot. Please do publish your drawings here - I'm sure many would be grateful for them. I know I would be!
-
Congratulations Mobbsie - a truly fine build and a very productive year!
- 255 replies
-
- 4
-
-
- granado
- bomb ketch
- (and 2 more)
-
Cutter Cheerful 1806 by rafine - FINISHED
gjdale replied to rafine's topic in - Build logs for subjects built 1801 - 1850
Lovely work on the deck Bob!- 525 replies
-
- 4
-
-
- cheerful
- Syren Ship Model Company
- (and 1 more)
-
THE 74-GUN SHIP by Jeronimo
gjdale replied to Jeronimo's topic in - Build logs for subjects built 1751 - 1800
Beautiful work as always Karl. Love your wonderfully simple method/jig for ensuring a straight and accurate cut. -
Barry - congratulations. Prepare to be delighted!
-
John, I suggest you contact Jim Byrnes directly with your questions, either through his website or PM from here as he is a member here. Then again, he may see your post and respond directly anyway. Good luck with re-starting your modelling career - you have some mighty fine tools to help you get going!