DONATION DRIVE - SUPPORT MSW - DO YOUR PART TO KEEP THIS GREAT FORUM GOING!
×


popeye the sailor
-
Posts
16,007 -
Joined
-
Last visited
Content Type
Profiles
Forums
Gallery
Events
Everything posted by popeye the sailor
-
 all within the art of creation..........I wonder if 'He' threw out the 'first attempt'? sorry 'bout that.......I just had to jot that one down. I think you did well Tom.........it gives the build a nice contrast of art work. your also finding out that different textures of wood, behaves differently under certain circumstances. I owe a lot of kudos to the site as well, but your perseverance to create, should also be counted. you've done an admirable job
 -
I began to think of the doll house stuff, after I saw the hinges in the Midwest kit of the Lobster boat, Bug. they are the same size. I'd use the door knobs as well......but I don't want to give the impression that Suzie Smart, or Sally Grow-a-tooth is going to walk through the door! they do look cool though.........I can even get a chandelier for the main cabin........how posh is that mainly though....I'm just looking at the scribed wood.......I don't do wall paper.
-
I didn't know that........thanks John, I'll keep that in mind. I'll be back on track with the planking soon........had to take care of a deck issue with my United States build. got that resolved, but now we had a decent snowfall...........time to shovel I'll be back at it soon!
-
YOUR HOME ANDY!!!!!! hooray!!!!!!!!! I thought it was looking like we needed to send out three countries to save you too! :D
- 382 replies
-
- 1
-

-
- stadacona
- sylvan scale models
- (and 1 more)
-
same thing happened with vista & w/7.........everyone had to scramble to do the drivers for their products. my admiral was having fits! I'm still hunkered down with XP...........I won't give up without a fight!
- 2,250 replies
-
- 1
-
-
- model shipways
- Charles W Morgan
- (and 1 more)
-
it is hard to make a feature in a model kit, that is movable. in the early days of plastic, you had pyro and lindberg line, that had the best luck with this. Revell made some feeble attempts your problem is compounded by the scale of build your working with.......hard to go into that much detail. I'm sure there is a mechanical and functional means to actuate this, but I think as long as you can make it work reasonably enough....you'll have done what you set out to do. you've definitely put a interesting aspect into this build
-
what is that..........a rubric's cube? I'm sure it was a joke, that you can compute the bulkhead spacing with that! :D that's a big hull frame there my friend....looks very nice! the half Moon looks good.........when is the log going to start up again?
-
I must not have hit the button........sorry about that......I did post on the first set of pictures you did a very nice job of the planking........yes.....you covered the gaps! I guess this particular kit isn't one that the deck platform can be planked ahead of time looking sweet!
-
these little boats are contagious.....aren't they happy Holidays!
-
you made it! good to see you could pull it off! congrats. it just goes to show what a dedicated modeler and his x-actor can do! wonderful work..........superb looking builds!
- 209 replies
-
- 1
-
-
- muscongus bay lobster smack
- midwest products
- (and 1 more)
-
nice looking stand..........looking like the hull may be finished soon, so it can be bolted to it permanently!
-
hope your feeling better.....Happy new years!
-
.....something I'm working my way back to Augie.............something I'm working my way..............if the others would just sit still and wait their turn, I could! update soon, I promise!
- 165 replies
-
- 1
-
-
- united states
- revell
- (and 1 more)
-
Happy New year's everyone! I'm hoping that 2014 has a gas pedal.......I gotta get moving! thanks John........the decks done in two different approaches {grain directions} got me thinking that I should redo the gun deck......I'm happy though that I kept a cool head and kept it. I also noticed another crack intersecting where the mizzen mast hole is, but that is governed by the spine, so I'm not too concerned........when it is planked, it will take care of it. I think now that by doing the spar deck this way will insure that if it does any curling at all, it will be a template for cambering the beams. I have built these Revell kits before Jeff........this is my second time with this one. the deck assembly has been the Achilles heel of everyone who has done one. we have a few folks here that are doing some bash work with styrene, and there is Dr. Dafi, who is doing his Victory build in this manner....that where I got the idea. the decks will not be the only wood aspects that I'm going to do. I'm hoping that it come out well.......hope to see you follow along......I'll try to update in shorter intervals hey Marty......I didn't know they had upgrades for this kit. it's stuff like this that makes me wonder why they didn't continue to produce the other kits. I think that would be a great idea........to see other folks do something like this. I've done the Connie, two Cutty Sarks, and the Alabama...and this is my second build of this ship. just a shame....they are beautiful builds when finished. I'm going to be using 3 mm wide planking.........probably should be 2 mm.........but even if I did it with 4 - 5 mm, it would still look great! hope you follow along.......thanks for the good word!
- 165 replies
-
- 2
-
-
- united states
- revell
- (and 1 more)
-
happy New Year's my friend! the paint work came off great!......nice looking plank work....great looking hull!
- 2,191 replies
-
- 1
-
-
- confederacy
- Model Shipways
- (and 1 more)
-
thanks Augie........great way to spend a New Year's day. I really need to get this gun deck planked though......and get it in place permanent! ........and pronto!
- 165 replies
-
- 1
-
-
- united states
- revell
- (and 1 more)
-
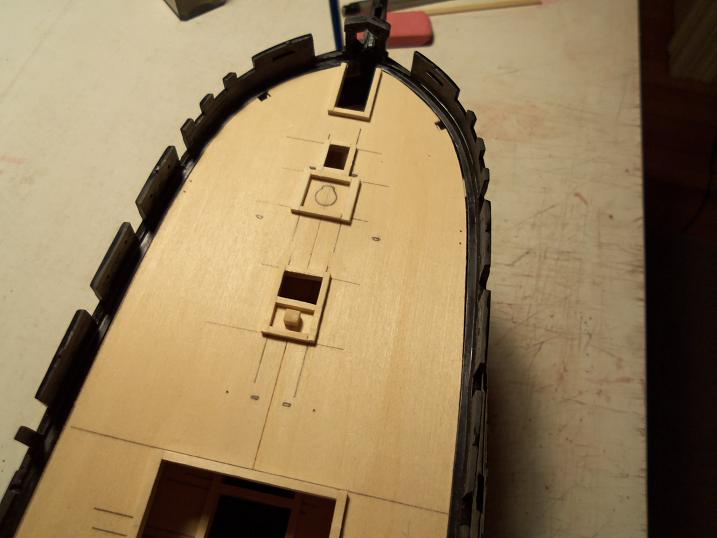
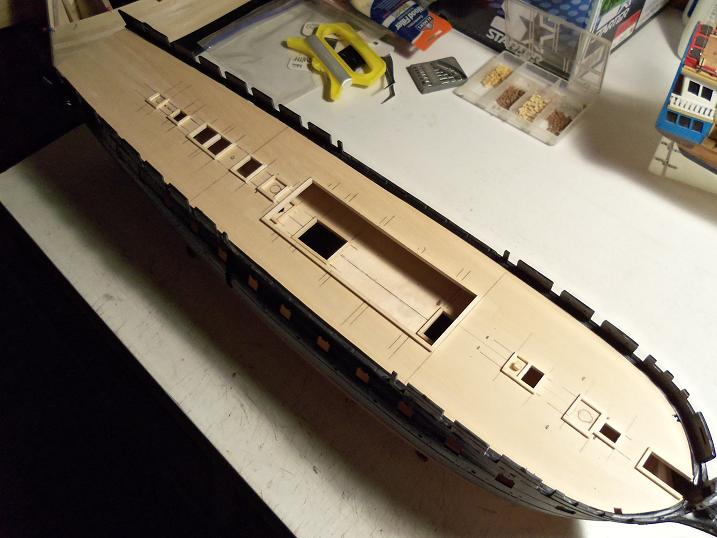
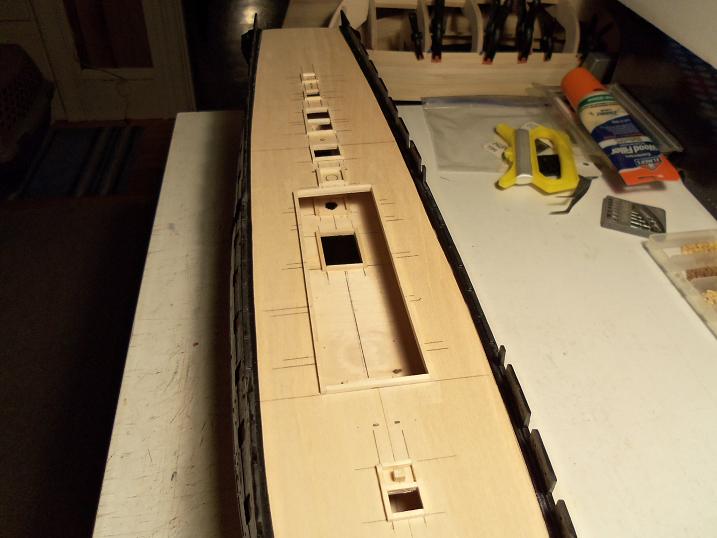
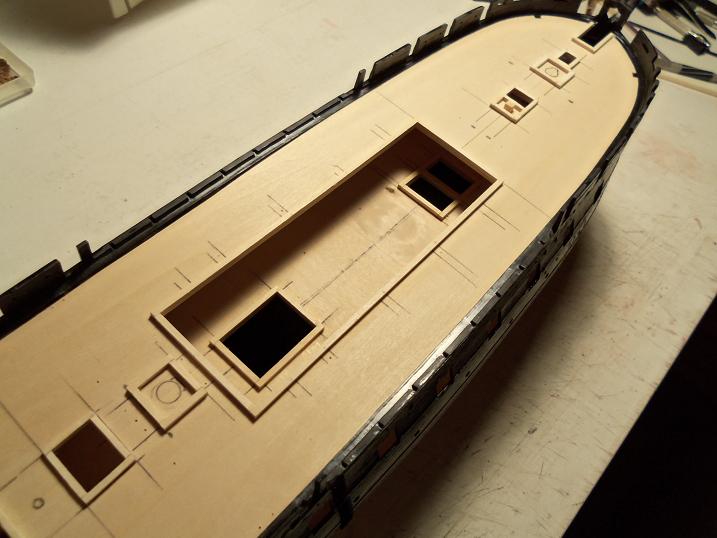
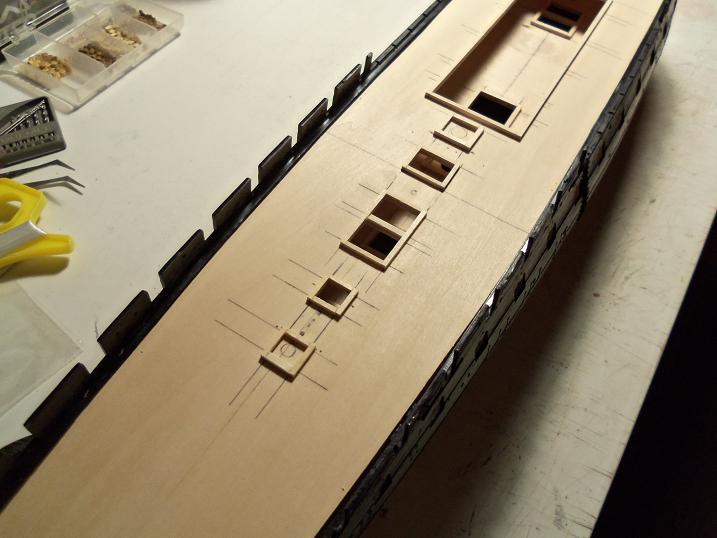
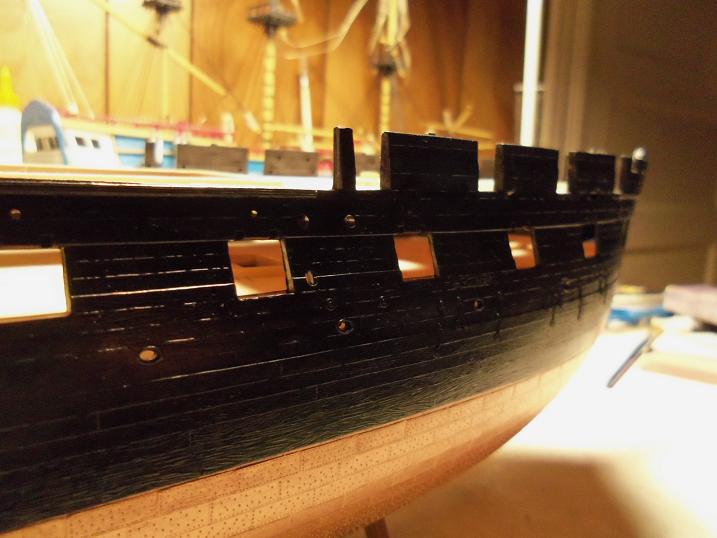
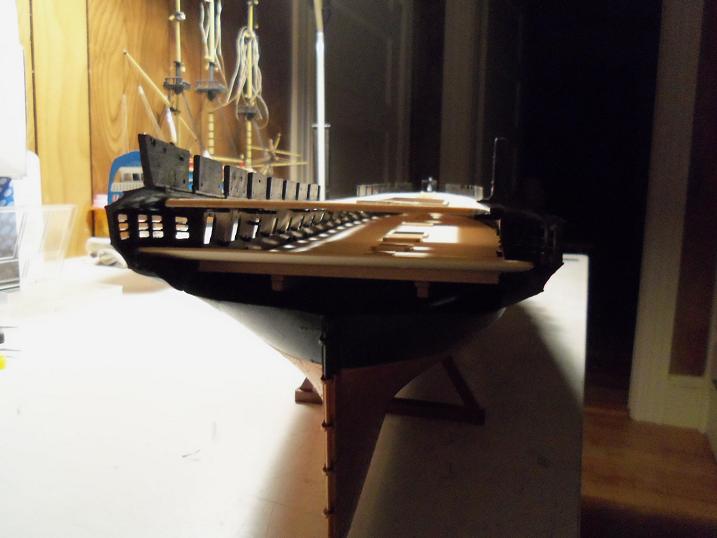
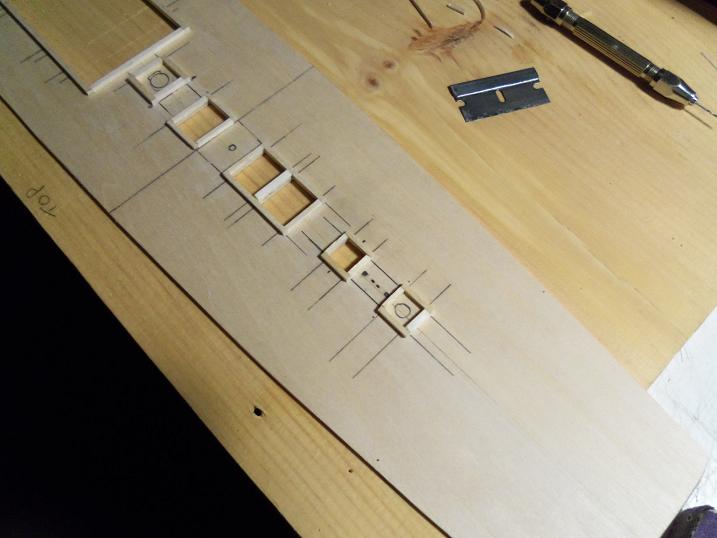
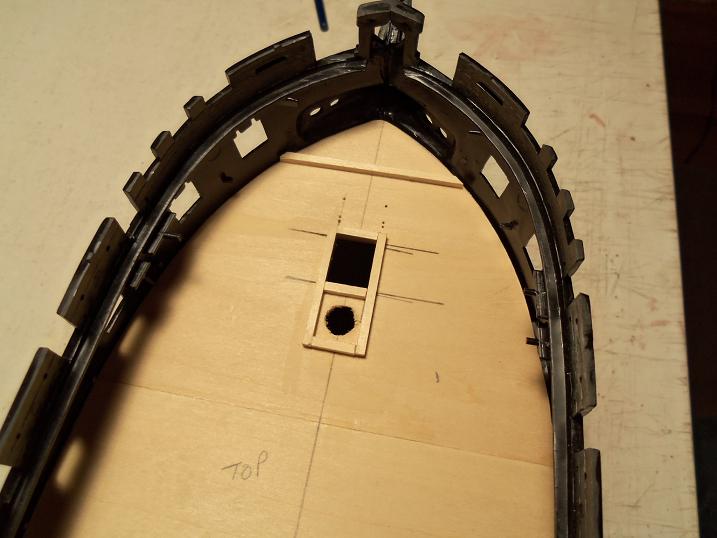
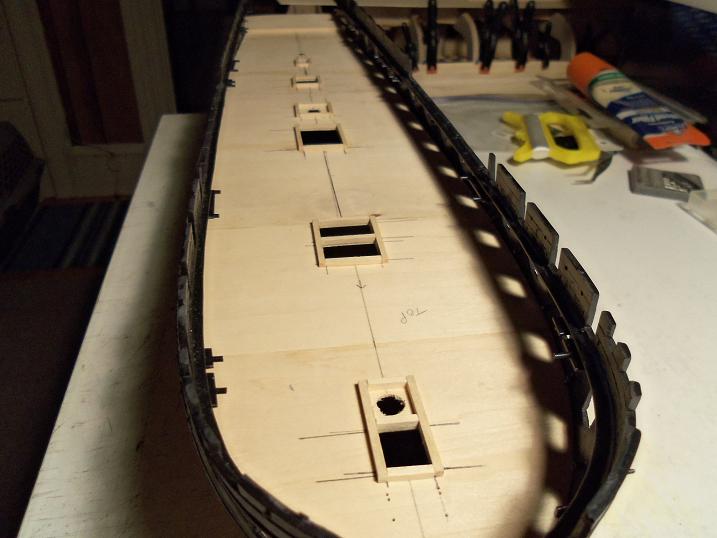
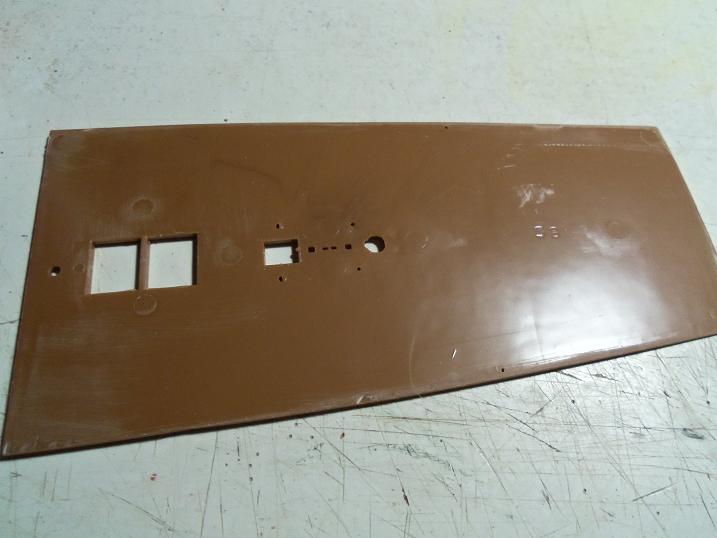
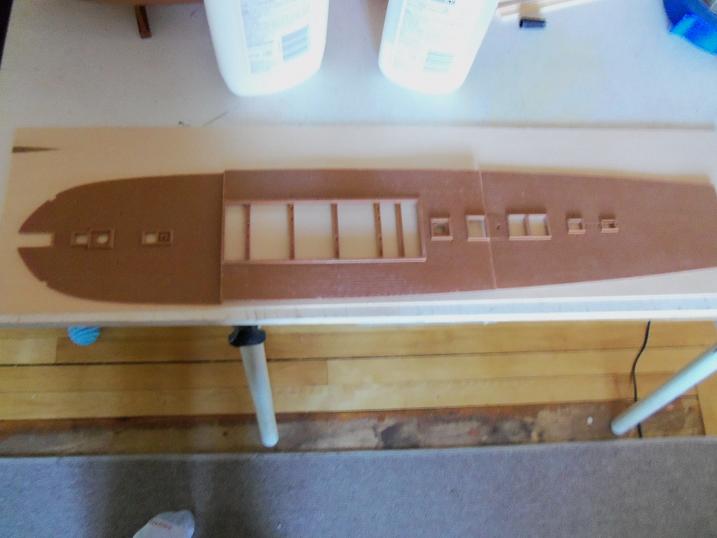
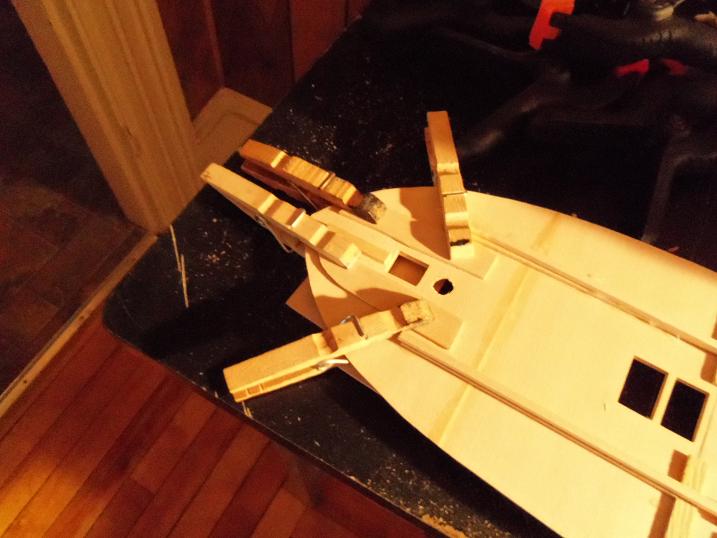
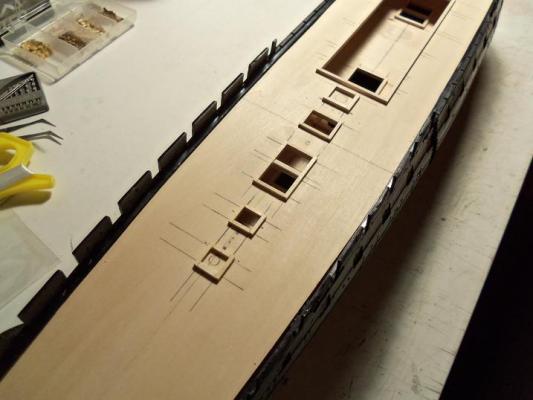
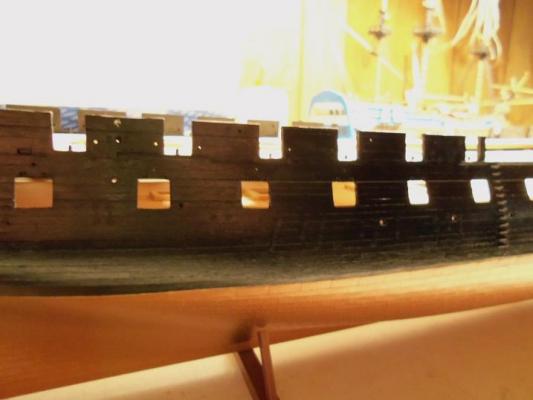
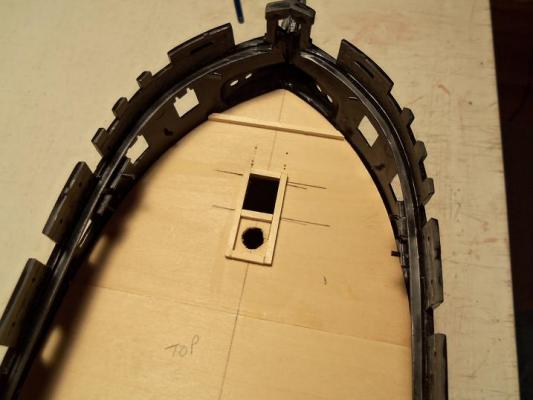
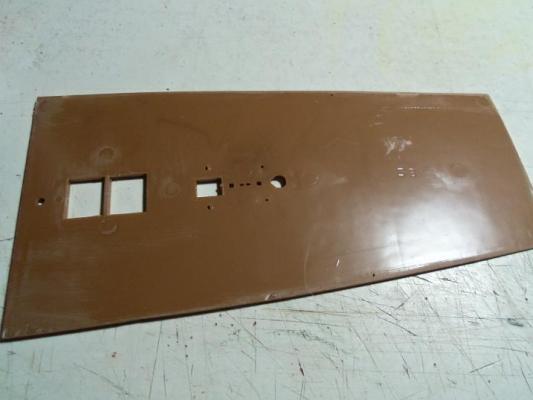
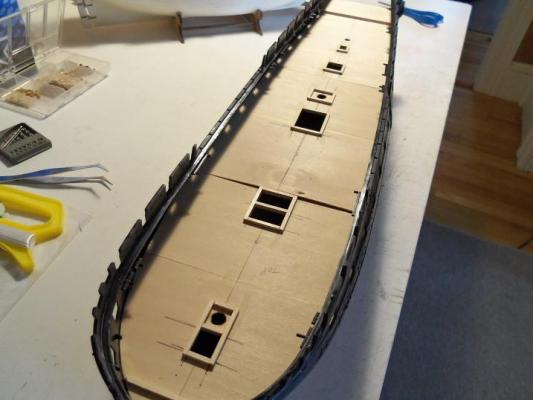
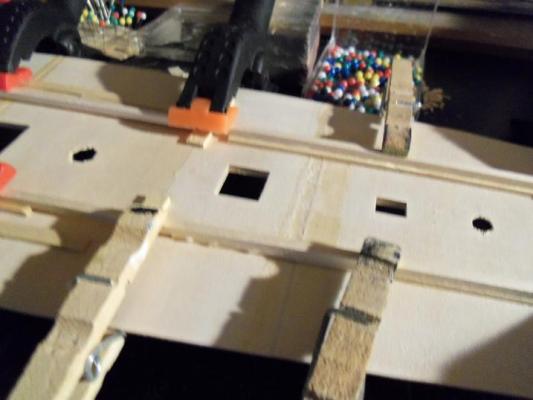
I tried my best to keep the separations in the big hole in the mid deck section......but when I went to cut them out......one of them cracked and broke, so I did them all. there will be beams there. one of the structural supports I still need to add...are these beams. with the grain the direction it's going, I will add them in, is spacings under the deck......I also will give them a little camber. the bow section sits in the cavity pretty good. I will plank this deck after it is cemented in place, so I can do the planking all the way to the edge of the bulwarks. I may thicken the bulwarks as well. I also tried a feeble attempt to get a couple pictures of the gun deck, through the gun ports. it may give you some idea of what you can see, although there will be cannons there, blocking the view. I can skimp a little.......I'll use some of the other thin stock that I have.


- 165 replies
-
- 9
-
-
- united states
- revell
- (and 1 more)
-
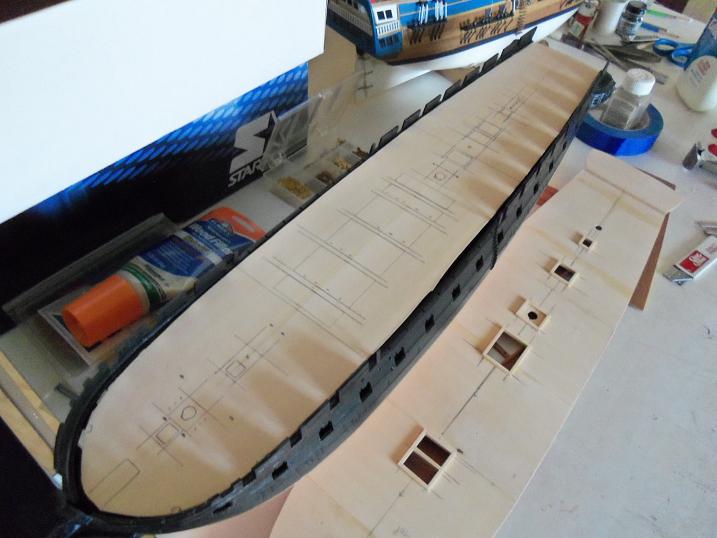
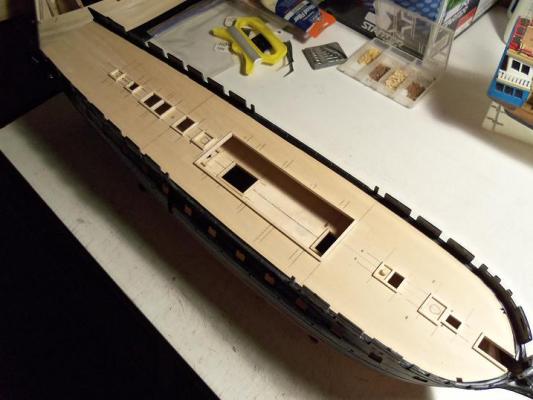
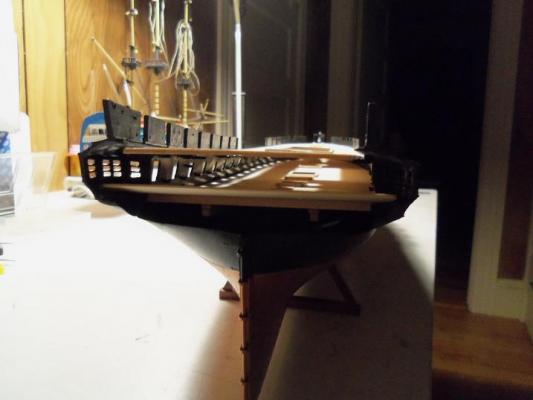
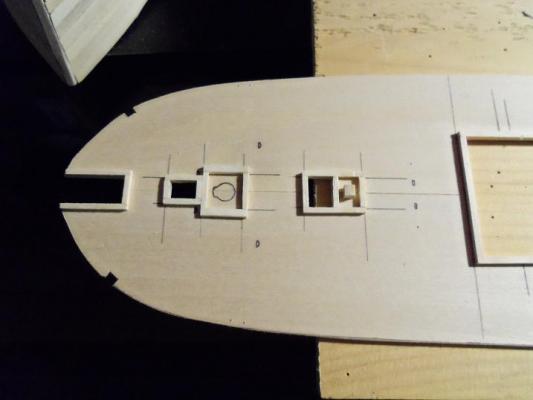
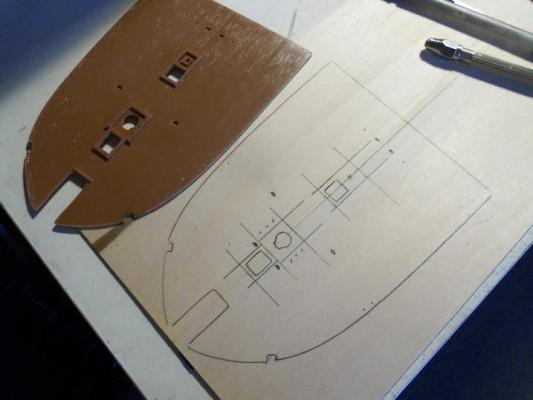
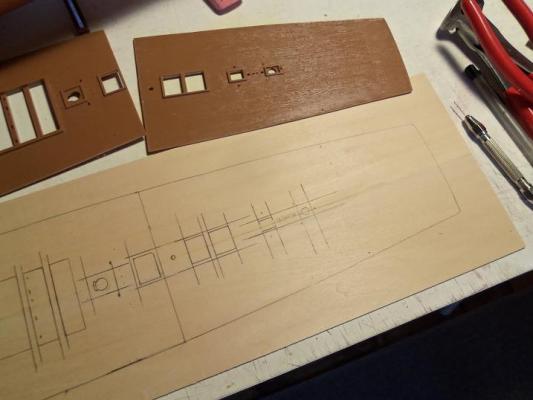
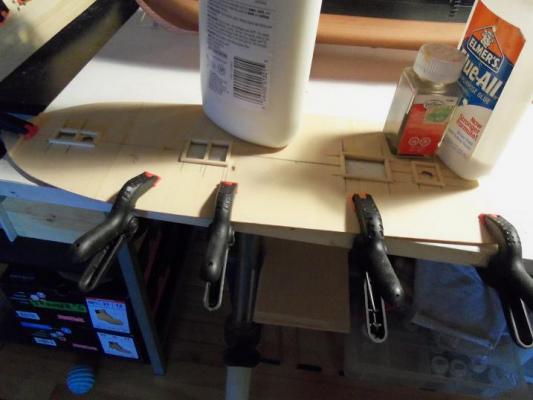
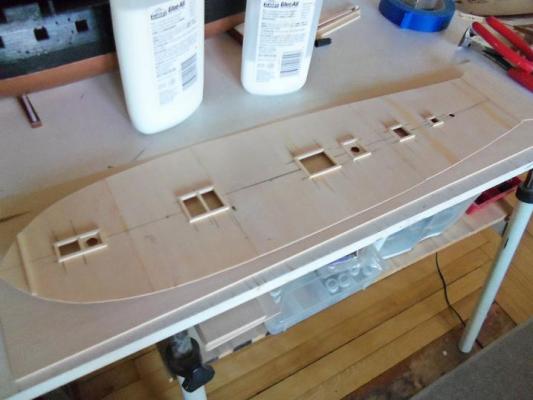
the deck was cleaned up.......smoothing the cut edges. the holes in the deck were then cut out. they will be edged with 3/32 and 1/16 square stock. all of the inside edges were sanded with sanding sticks I had made, using different width deck planking strips. putting the gun deck back in wasn't too bad...I can't wait to see how it will come back out. the bow tucks nicely in the cavity.


- 165 replies
-
- 3
-
-
- united states
- revell
- (and 1 more)
-
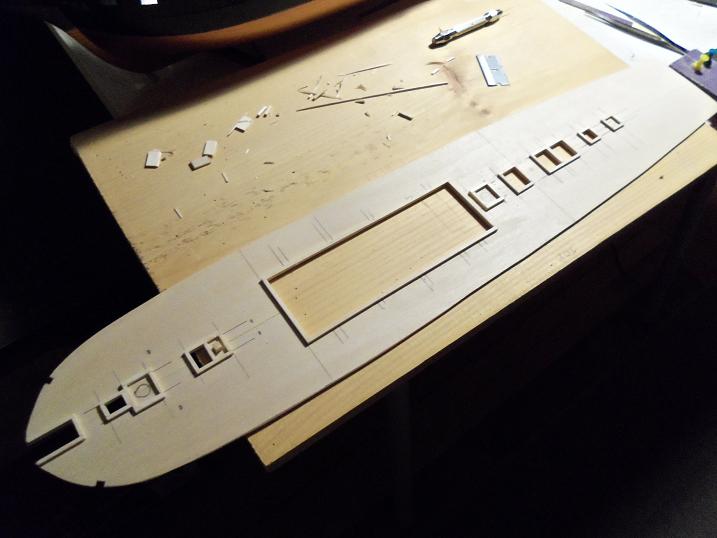
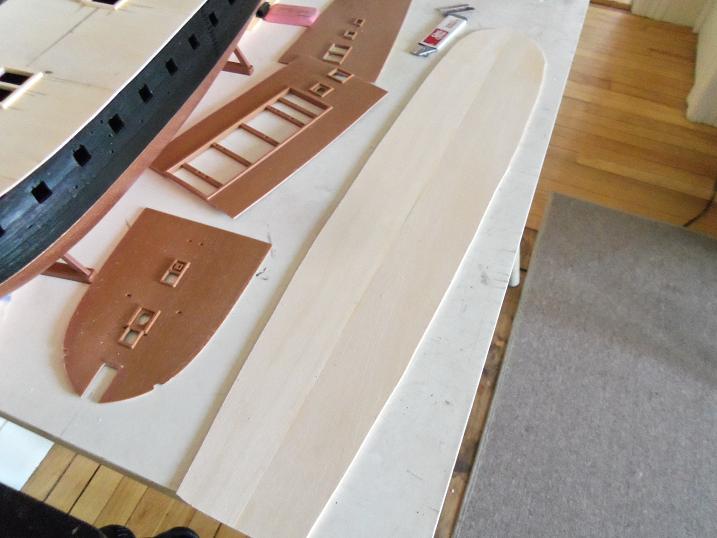
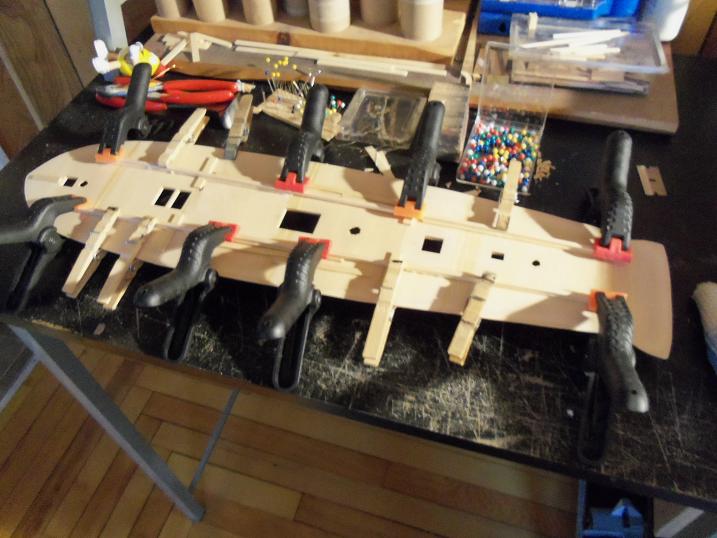
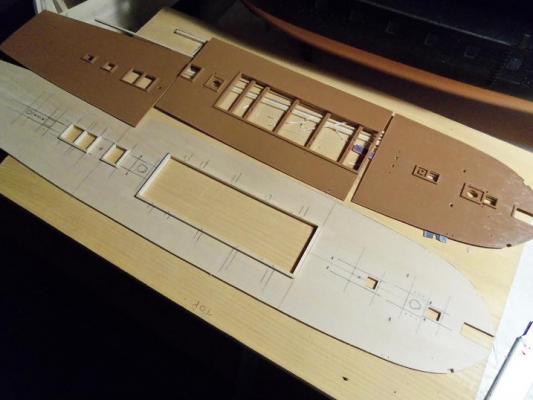
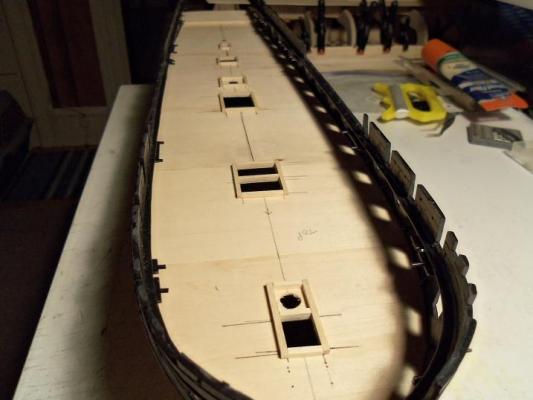
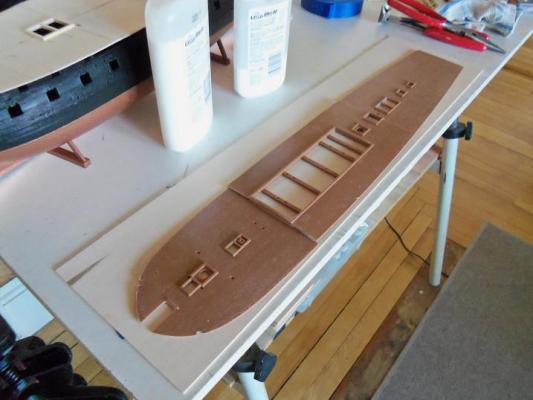
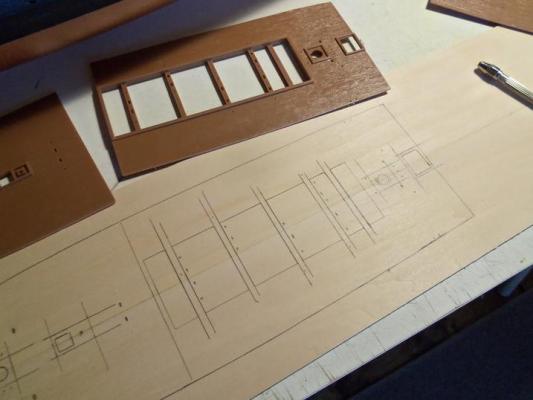
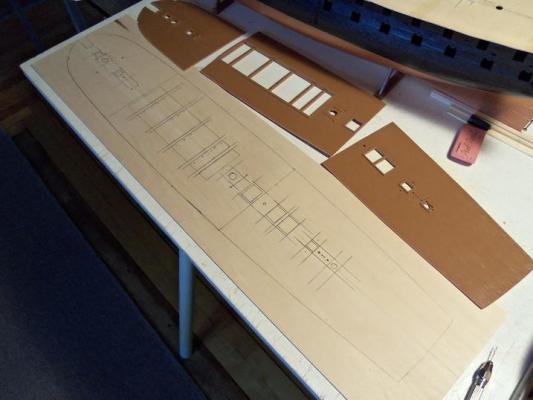
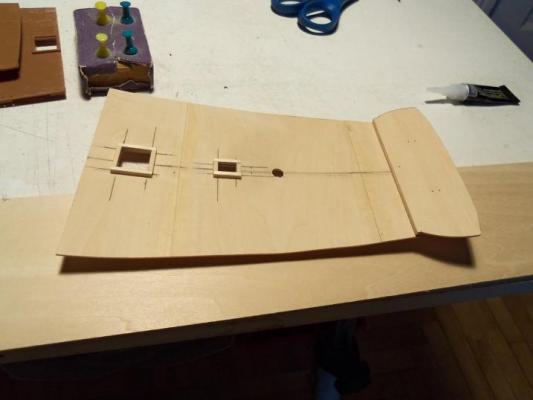
while I was working on the gun deck, I began to assemble the spar deck. one of the major players in the gun deck curling up like that, was the way the grain runs....side to side. dryness is another factor, and when I get to doing the deck planking, I will use steam or hot towels on it.......not long though....I don't want to undo all that I have done. I had set aside the two 4 inch wide panels for it, but I found that I could use the 3 inch ones just as well. I cemented two of them together lengthwise.......I will have the grain run fore to aft. to trace out the sections, all extruding pins and tabs must be removed, and then sanded. the sections were then laid on the joined panel. then......trace them out......starting with the bow section. .....and then the mid section. ...and then the stern section. the deck was cut out of the panel.


- 165 replies
-
- 5
-
-
- united states
- revell
- (and 1 more)
-
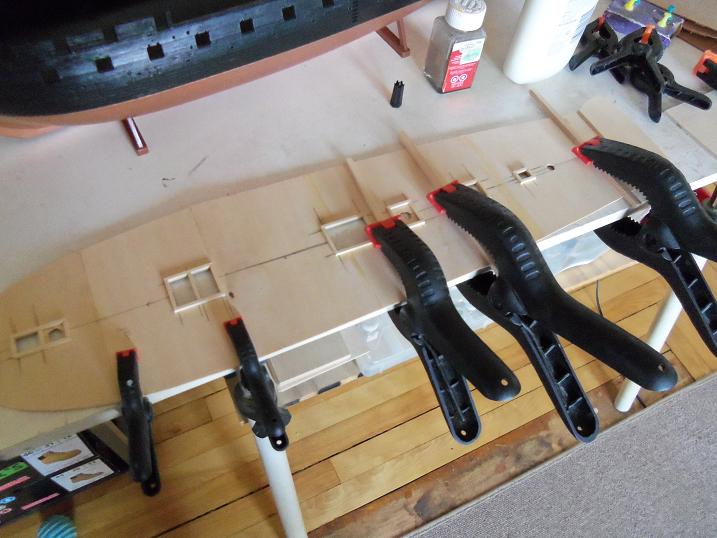
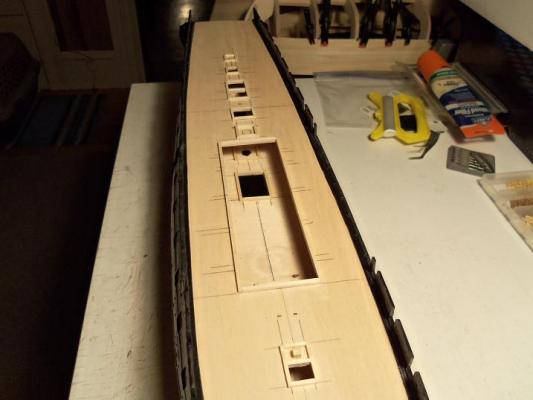
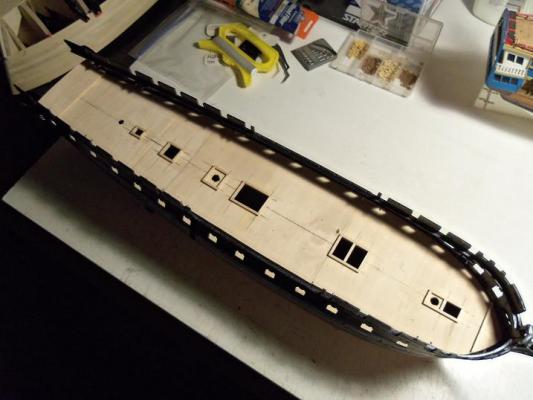
I recently posted my year end report of my builds and where they're at. all of the others are fine.......all except for the United States. the gun deck appeared to have a slight case of curling......small problem I thought. since I had the wood to do the spar deck, I decided to put it together, so I could see if perhaps a bit of scrimping on the gun deck planking. I did an examination of the gun deck.......and I was amazed at what I saw! this is just a sample of what I saw. I didn't take pictures of the big picture......I should have. to straighten it out, I decided to cement the sections together, and add in a pair of spines underneath. first, cement the sections together. then, when they were dry, the spines were added.......a pair of 1/8 square stock. most of the curl has been taken care of in doing this. I had done the gun deck some time ago.....the end of 2012.....to be exact. perhaps the cold in the hallway {no heat in there} didn't help matters either.......I think I should get the other builds out of there as well. while I was handling the deck, the one area not supported by the spines, the curved tip of the bow, cracked and almost broke off! I made up a couple of plates and cemented them in place, after cementing up the crack.


- 165 replies
-
- 2
-
-
- united states
- revell
- (and 1 more)
-
good to see your back on line with this bad girl........I'm sure you'll have a wonderful journey
- 1,616 replies
-
- 1
-
-
- caldercraft
- agamemnon
- (and 1 more)
-
thanks Bob........Have a great New Year............walking dead Marathon tonight.......me & Chinese food........I'll be there!
-
thanks Jesselee....still a lot more to do.......see you in 2014! I did that with the Gothenborg Bob. I can do what I intend to do with the Danmark diagrams........I'm going to bring the parts panel diagrams to a copy place, and have them blown up. I still have those I still have a few ideas kicking around in this old{er} brain box of mine. I think it best to keep them there for the time being though thanks for the thought