druxey
-
Posts
13,357 -
Joined
-
Last visited
Content Type
Profiles
Forums
Gallery
Events
Everything posted by druxey
-
 Great result, Mike. The hanging of a rudder is so often poorly done with a huge gap between it and the stern post.
- 607 replies
-
- 2
-

-
- winchelsea
- Syren Ship Model Company
- (and 1 more)
-
Quick! Ask Phineas for his 'shipwright's secrets'!
-
Have you considered turning just a master pattern and casting the guns that you need? That way they would all be identical. As Wefalck points out, your lathe set-up is far from ideal for repetitive miniature work.
-
Well done, Dan. Your client mailed the parts in an ordinary envelope????? At least I'm glad that the aquarium case has gone! She looks great. And now you don't have to smell the ivory any more!
- 95 replies
-
- 7
-
-
- POW
- Bone model
- (and 2 more)
-
Don't slather on the epoxy? Also, you could put a bolt through that has a light coat of oil or grease if you are really concerned, then remove said bolt after.
-
Making Knees
druxey replied to Don Case's topic in Building, Framing, Planking and plating a ships hull and deck
You will find, unless building a floating box, that every knee will be slightly different and will need custom fitting. Mass production here won't fit. -
HMS Discovery 1789 by Don Case - 1:48
druxey replied to Don Case's topic in - Build logs for subjects built 1751 - 1800
Each knee will be 'custom', not off the shelf! If you are planning to rig later, there are also a myriad blocks to make.... -
Swan-Class Sloop by Stuglo - FINISHED - 1:48
druxey replied to stuglo's topic in - Build logs for subjects built 1751 - 1800
About ¼" by 3", but I make them in all kinds of sizes depending on the application. -
I suppose that the wood specie you are using is the issue. You need a dense wood such as pear or Castillo for such items.
-
Usually the wing transom is fitted first.
-
If you look at the frame pattern, you will see the slot for the deadwood. There are two lines across the top of the slot. The solid line is the fore edge of the frane pair and the dashed line indicates the bevel to allow the frame to sit at the correct height. Does that solve your problem?
-
Making Knees
druxey replied to Don Case's topic in Building, Framing, Planking and plating a ships hull and deck
Run the grain diagonally so that neither arm is cross-grained. -
In the lower image (the upper one is an early 17th century example) the 'short' timber is the fashion piece and the abutting one forward of it is the aftermost (half) cant frame. The transoms were usually tenoned or dovetailed into the fashion pieces.
-
Swan-Class Sloop by Stuglo - FINISHED - 1:48
druxey replied to stuglo's topic in - Build logs for subjects built 1751 - 1800
Not too long or too wide, either! -
I'm trying to understand what went amiss here. Was the last cant frame a little high or the the first square frame a bit low to cause the disparity? Another possibility is that the inner surfaces of the cant frames needed more fairing. The way to determine this is to check the thickness of the last cant at various points and compare with the thickness of the dead flat pattern at her same points along the frame.
-
Stitching sails with sewing machine
druxey replied to Jorge Hedges's topic in Masting, rigging and sails
Yes, water is used to dilute acrylic paints, mediums and varnishes. -
Swan-Class Sloop by Stuglo - FINISHED - 1:48
druxey replied to stuglo's topic in - Build logs for subjects built 1751 - 1800
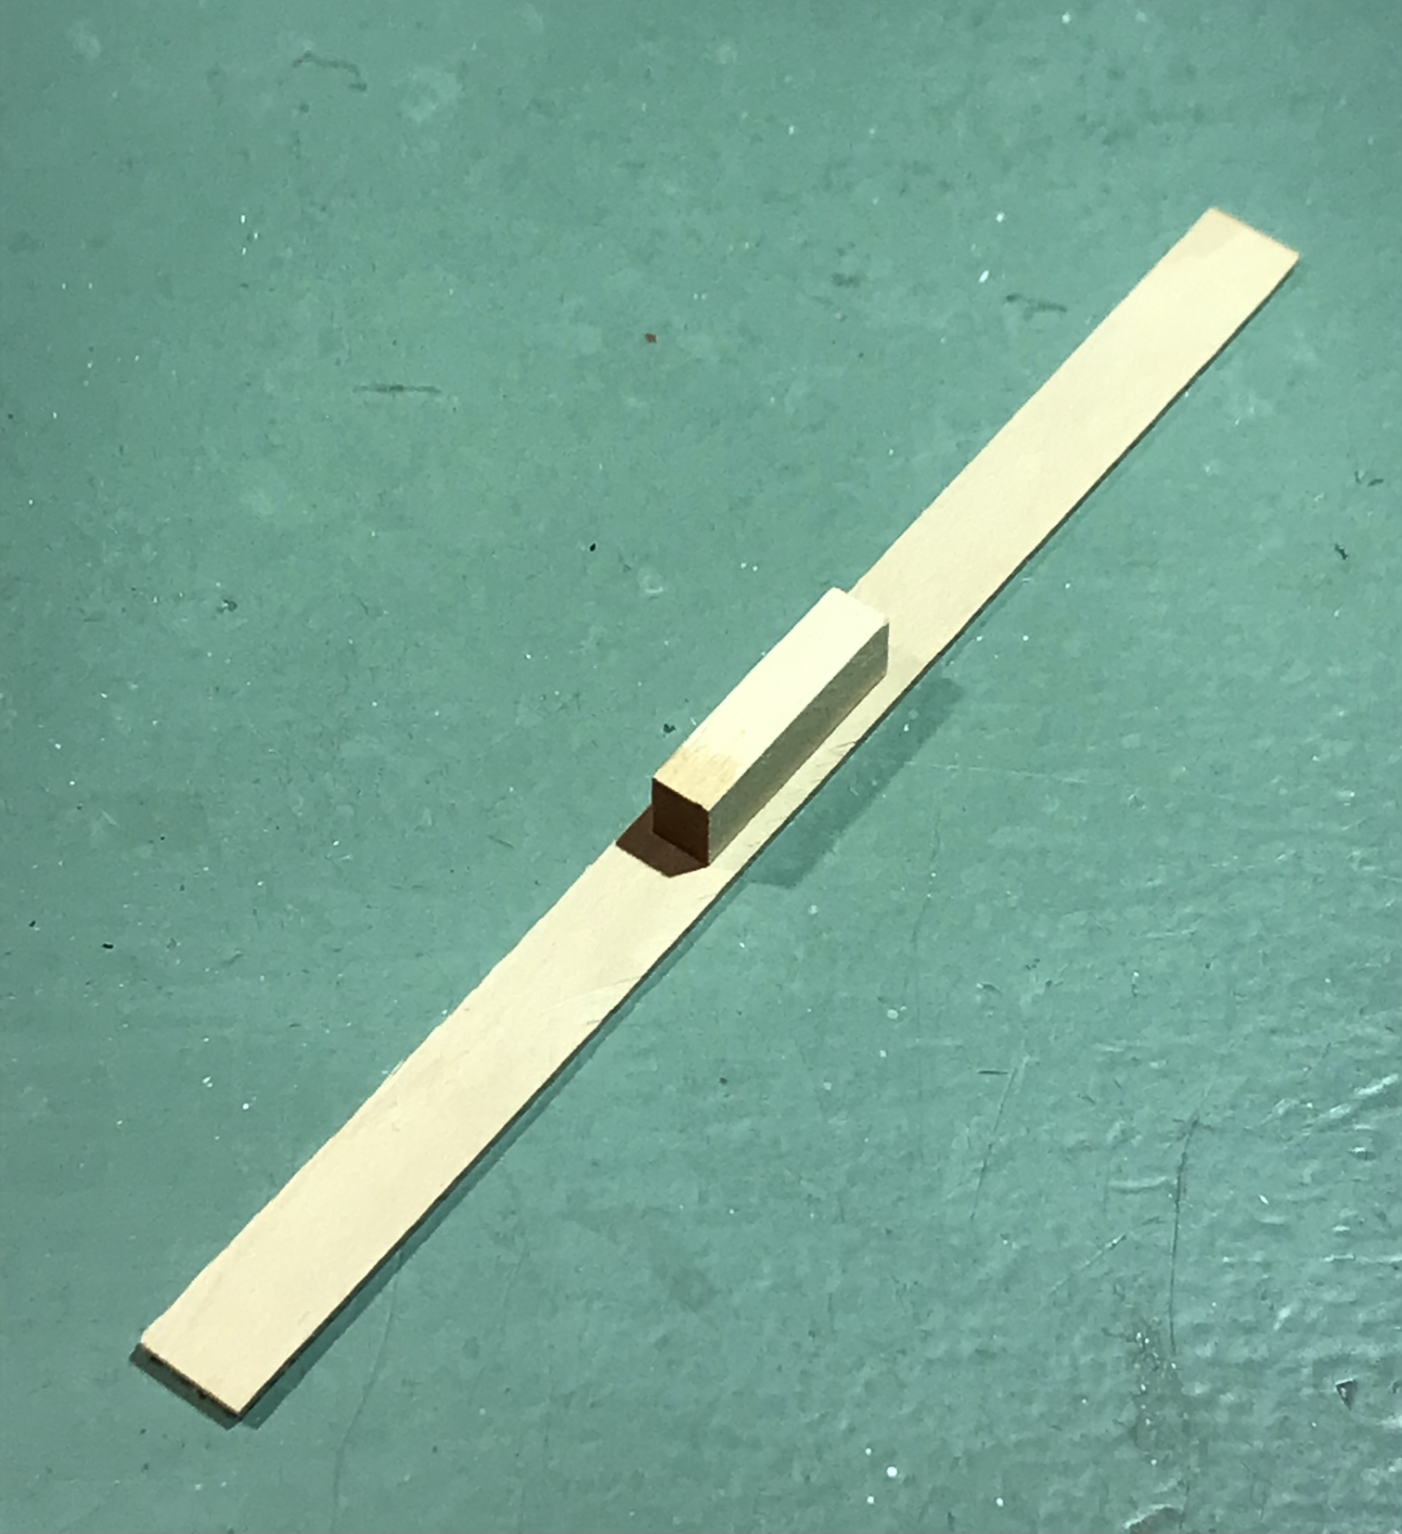
Here is an example of sanding stick: The sandpaper is rubber-cemented on the lower side of the thin, flexible batten, so is easily replaced.
-
I'm afraid I have to contradict you. Look at this contemporary plan of a vessel with considerable drag: https://collections.rmg.co.uk/collections/objects/85907.html As you can see, the frames are at right angles to the keel, not the waterline. There are many other similar archival examples. This is not unique.
-
I've never seen a pantograph as sophisticated as the one above. A beautiful bit of kit.
-
Sweet! Too bad part of the railing is hidden below deck.
-
Swan-Class Sloop by Stuglo - FINISHED - 1:48
druxey replied to stuglo's topic in - Build logs for subjects built 1751 - 1800
I find flexible wood sanding sticks with a small handle helpful for inner fairing, other than at the extreme ends of the hull. Starting to look good inside, Stuglo!