


gjdale
-
Posts
4,894 -
Joined
-
Last visited
Content Type
Profiles
Forums
Gallery
Events
Everything posted by gjdale
-
 Kevin, The brass will tarnish over time (I’m sure you remember polishing lots of it in your early Naval career!). If you don’t want to polish it now that it is in place, a coat of clear finish will prevent it from tarnishing further as it will seal it and prevent oxygen getting at it. You should be able to apply the clear coat with the brass in situ.
- 273 replies
-
- 3
-

-
- panart
- amerigo vespucci
- (and 1 more)
-
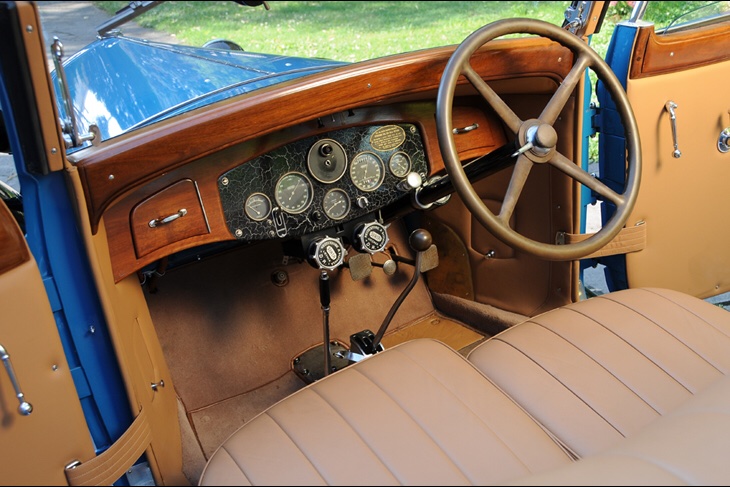
Perhaps before leaping in with this advice, you might do me the courtesy of a little more research. Here are two examples of actual cars with wooden dash panels. Whether they were “as built” or added later by subsequent owners I have no idea. But they do exist and I chose to make such a modification to my model. It is not for you to tell me otherwise.
.jpg.a34b5b7749945d5b7fd086bf491ae55b.jpg)
- 224 replies
-
- 10
-
-
Amati Riva Aquarama Transmission and RC
gjdale replied to tomsimon's topic in RC Kits & Scratch building
I’m not familiar with this particular boat set-up but I imagine it would need something similar to my Dumas Chris Craft. For that, I use a 2.4GHz radio controller (which all the modern ones seem to be). I opted for a handset that is the same as that often used for RC cars - the “trigger” type. It is much easier to use with a simpler learning curve than the “two stick” types. These also have a third channel, which I used to control the lighting (navigation and cockpit lights). The other thing I did was to use LiPo batteries in the boat - lighter and greater endurance. Lou is right in that your local RC hobby shop should be able to give you good advice, even if they specialise only in cars and planes. Lou also mentioned a speed controller - often referred to as an ESC (Electronic Speed Controller). Again, your local RC place can advise. -
Looking great Chris!
-
Looking good Andrew. Seems that the cat scan was all clear too! 😉
-
Congratulations on your purchase Ron, you will not be disappointed! "Quality is remembered long after price is forgotten"
-
Welcome back Stuart. Nice to see you back at the bench and bringing this beauty along.
-
I agree Kevin - it’s always interesting to see your progress on this one, particularly as this has been a resurrection from a subject you had all but given up on. I might not comment much, but I do enjoy following your progress.
- 273 replies
-
- 3
-
-
- panart
- amerigo vespucci
- (and 1 more)
-
I’m in too! Sounds like an interesting project.
-
I honestly can not see your “disaster” Bradley, so either it’s not that bad, or you did a superb job with your fix.
-
Must be a relief to have reached this stage! She’s looking great.
-
Mechanical Solar System by jim_smits - Eaglemoss
gjdale replied to jim_smits's topic in Non-ship/categorised builds
John, As others have suggested, check your gear sizes for the Venus gear. In your Photo #2, Step 1 it shows part #28 (41-tooth gear) on top and part #34 (39-tooth gear) on the bottom. There is a difference of only two teeth in these gears. Your subsequent photos look like there is a larger difference in size. I've just had a close look at mine, and the difference in overall size is negligible, as shown in the instruction pictures. I suspect you have somehow got a wrong gear in there. -
This kit is in my stash as well, so I’ll follow along with interest too. Looks like you’re off to a great start so far, Bradley.
-
Mechanical Solar System by jim_smits - Eaglemoss
gjdale replied to jim_smits's topic in Non-ship/categorised builds
John, Do you have the complete instructions for this? I ask because I too have built this Orrery and had no difficulty with getting things to go together correctly. If you do not have them, I can send you a PDF copy of them. -
Very nicely done John. You can be justifiably proud of a fine model.
- 51 replies
-
- 1
-
-
- model shipways
- picket boat
- (and 1 more)
-
Happy Birthday Andrew! More meticulous work I see - looking fabulous.
-
Cutty Sark by NenadM
gjdale replied to NenadM's topic in - Build logs for subjects built 1851 - 1900
Sorry to hear of your back pain issues Nenad, but glad to see you back posting again. Hope your health continues to improve.- 4,152 replies
-
- 3
-
-
- cutty sark
- tehnodidakta
- (and 1 more)
-
Hello Jay and welcome to MSW. You’ll find a strong contingent of us Aussies here. You’ve joined a very friendly and supportive forum too. There are plenty of build logs for your Cutty Sark here, so a wealth of information from those who have trodden your particular path before. Please do start your own build log too - you will find it the most valuable tool in your toolbox.
-
Very nice work so far Andrew. Thanks for taking the time to provide so much detail in how you have approached the build - I’m sure it will be helpful to many, me included as I have this kit in my stash. I’ll continue to follow your build with interest.
-
Great progress Bill - planking so far looks really good.
-
Very nice work Ryland. I must get back to mine soon, having had a month away doing other projects.
- 263 replies
-
- 2
-

-
-
- Medway Longboat
- Syren Ship Model Company
- (and 1 more)