HOLIDAY DONATION DRIVE - SUPPORT MSW - DO YOUR PART TO KEEP THIS GREAT FORUM GOING! (Only 51 donations so far out of 49,000 members - C'mon guys!)
×


FriedClams
-
Posts
1,368 -
Joined
-
Last visited
Content Type
Profiles
Forums
Gallery
Events
Everything posted by FriedClams
-
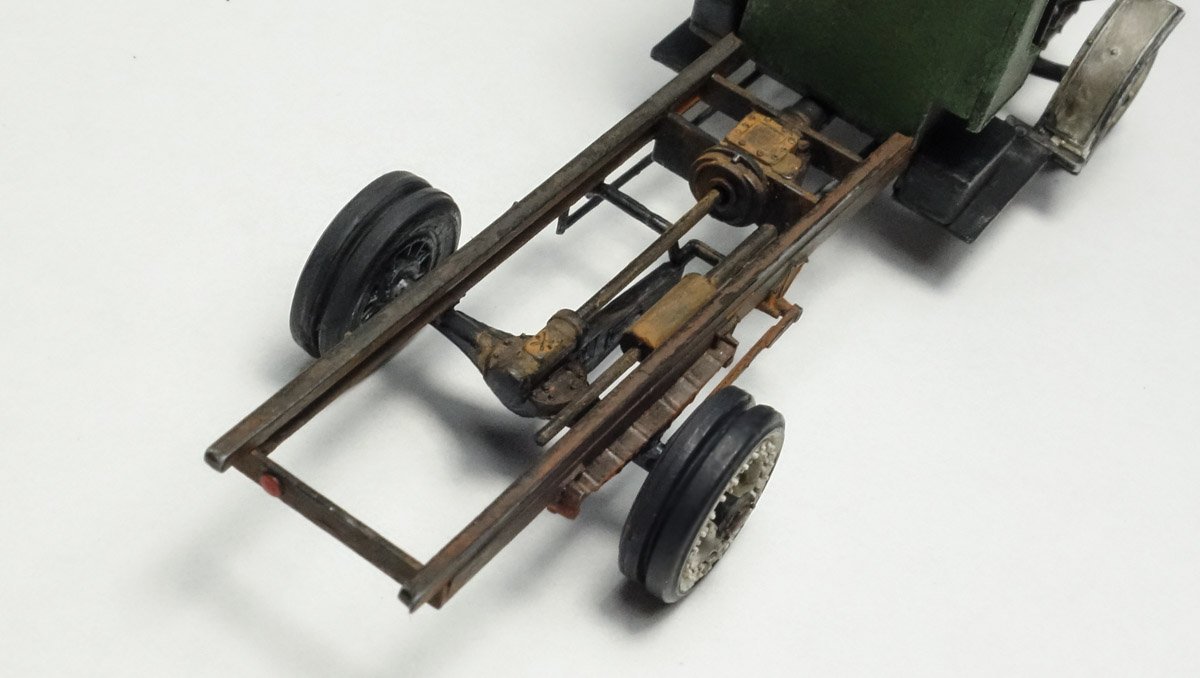
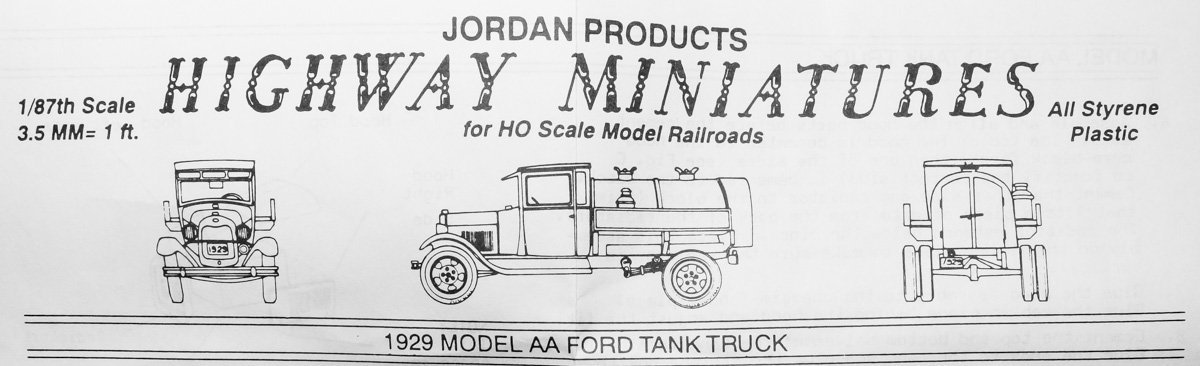
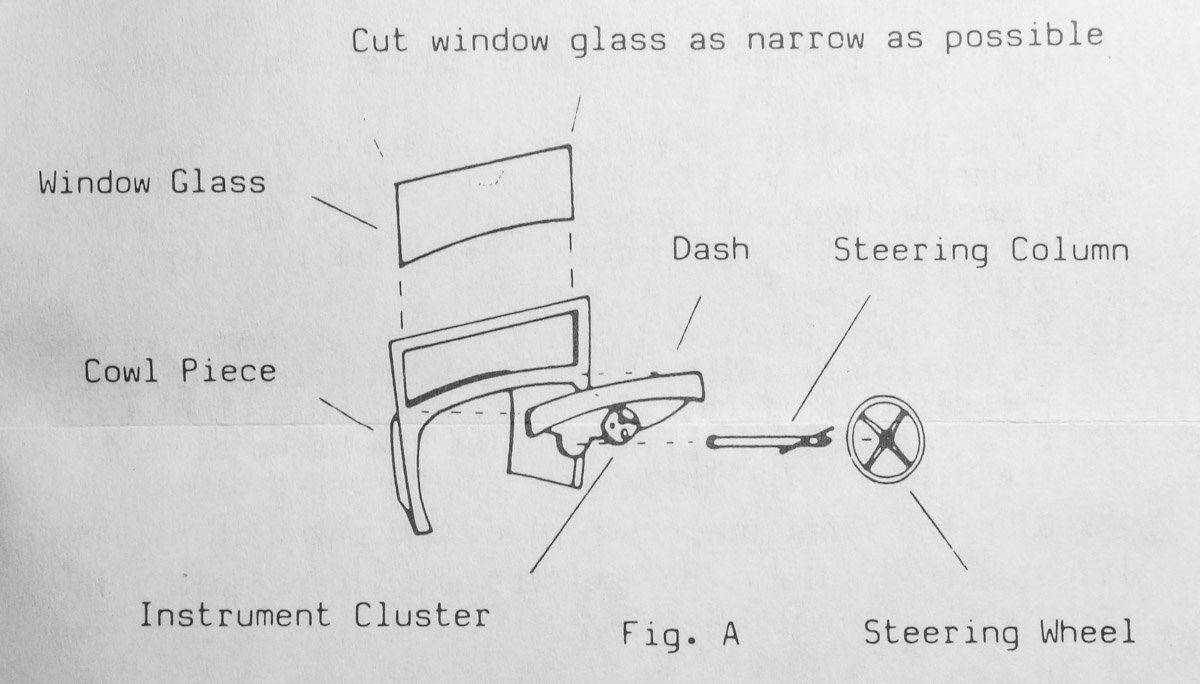
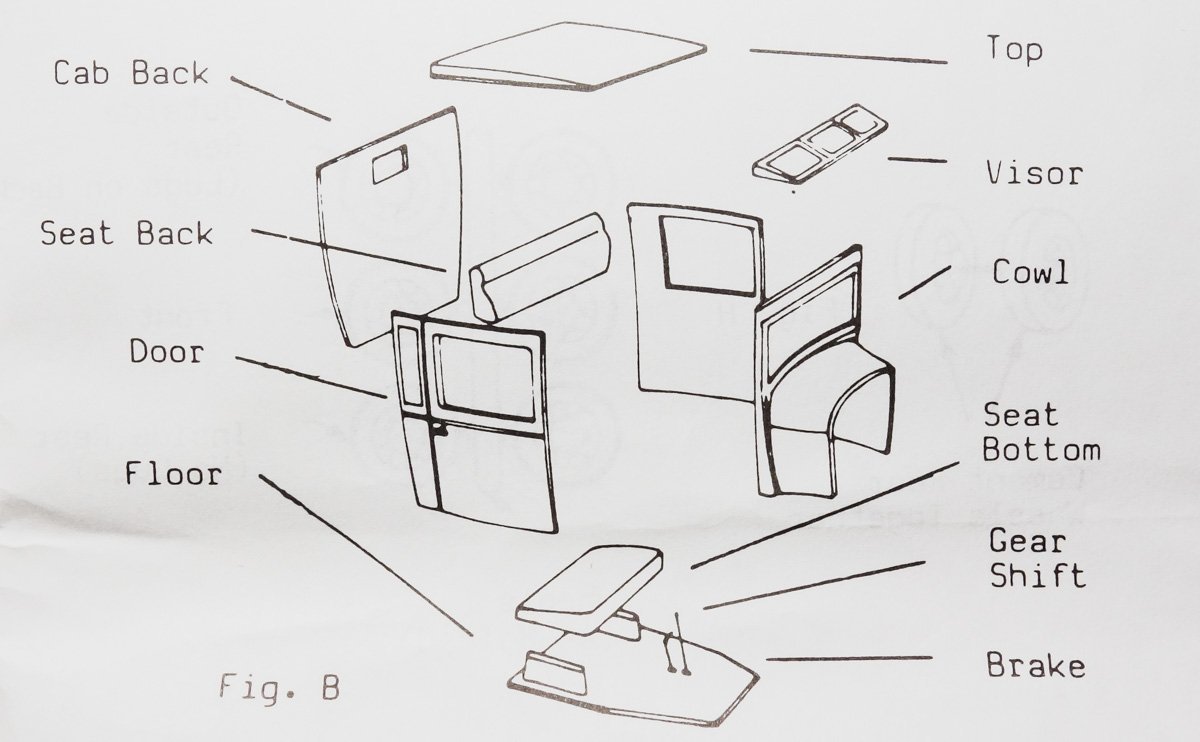
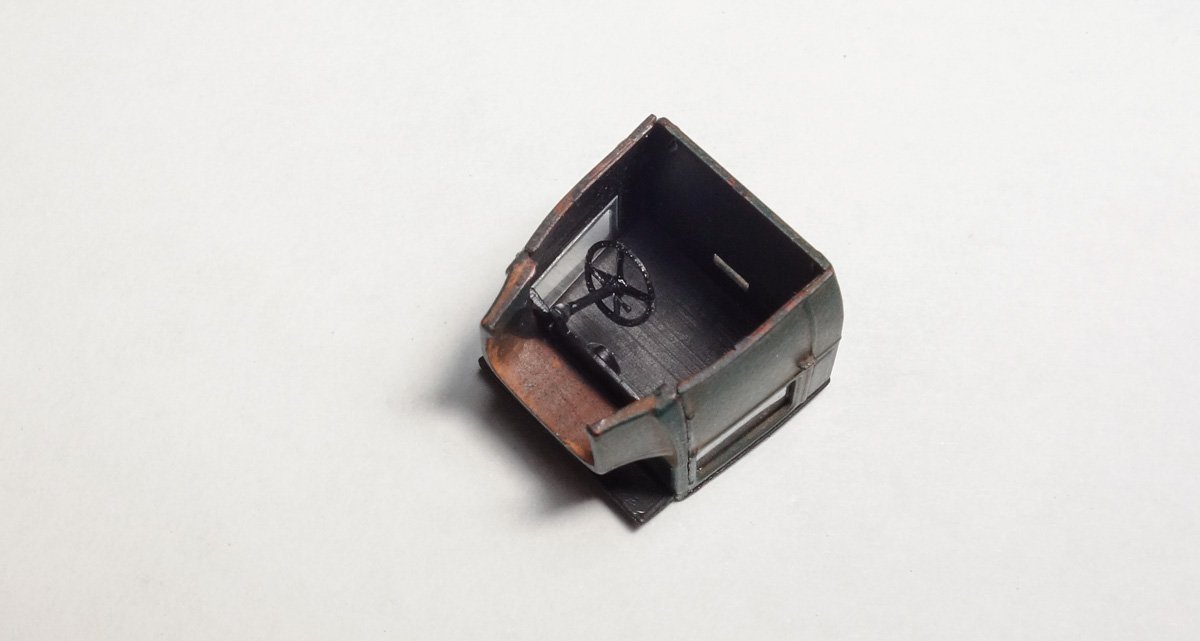
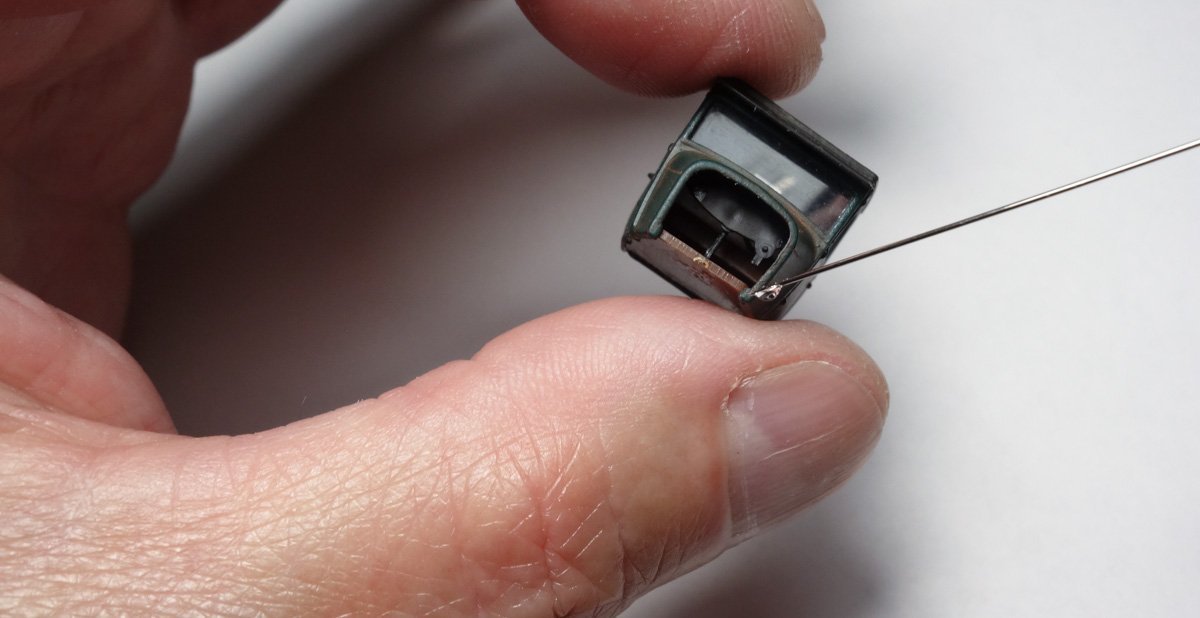
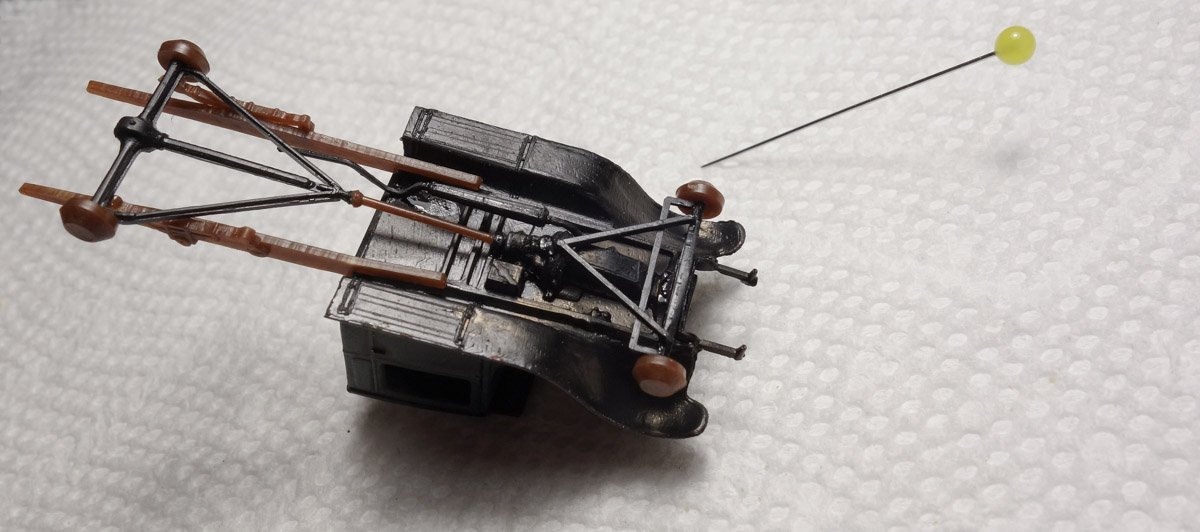
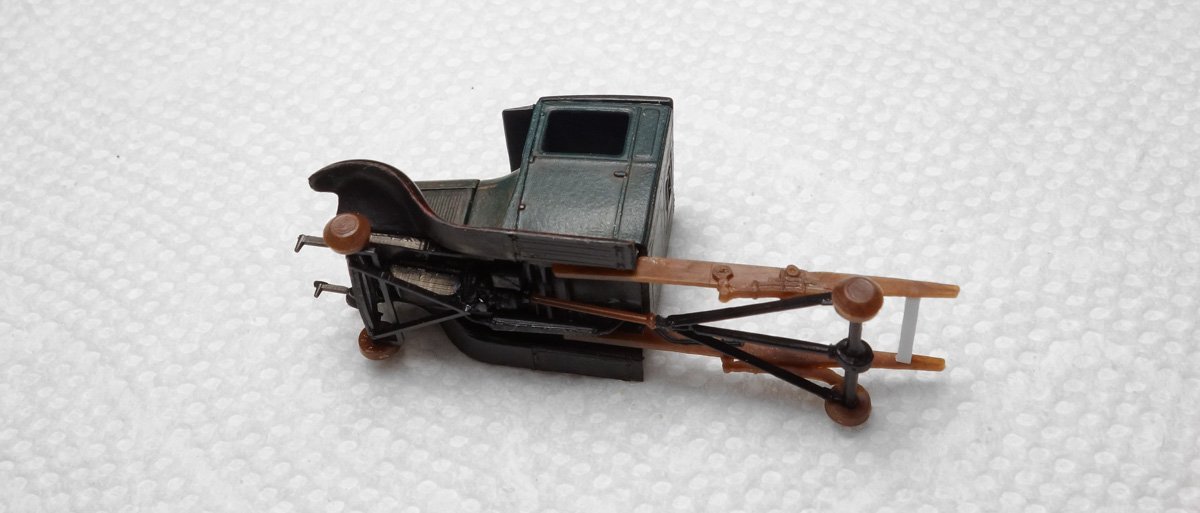
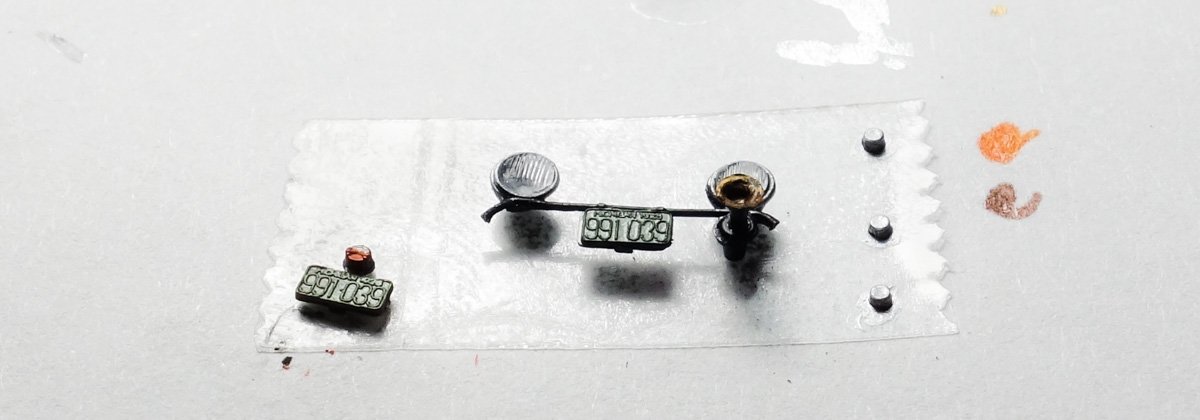
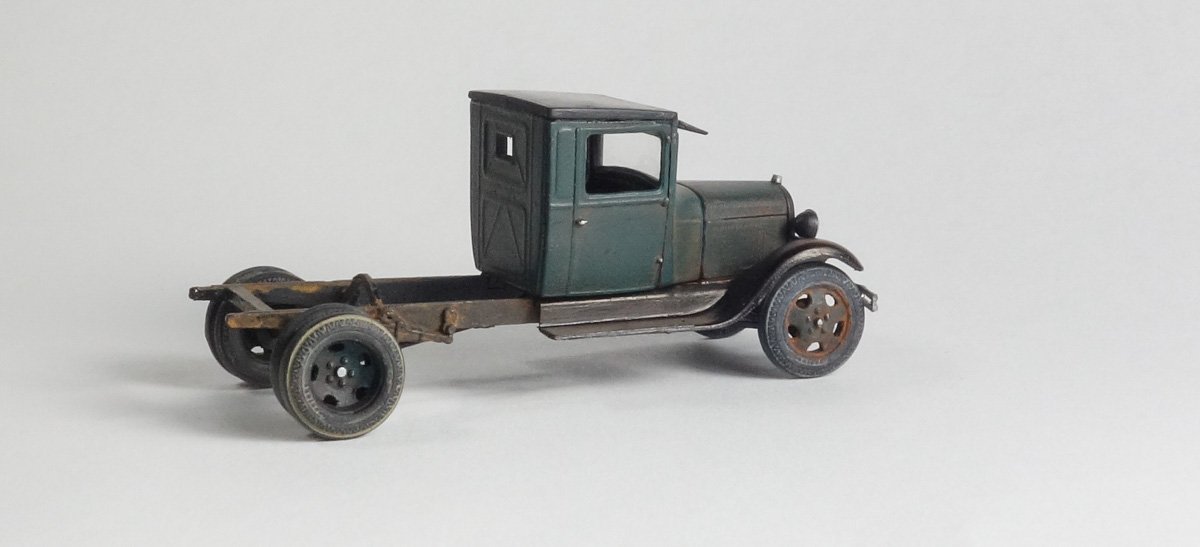
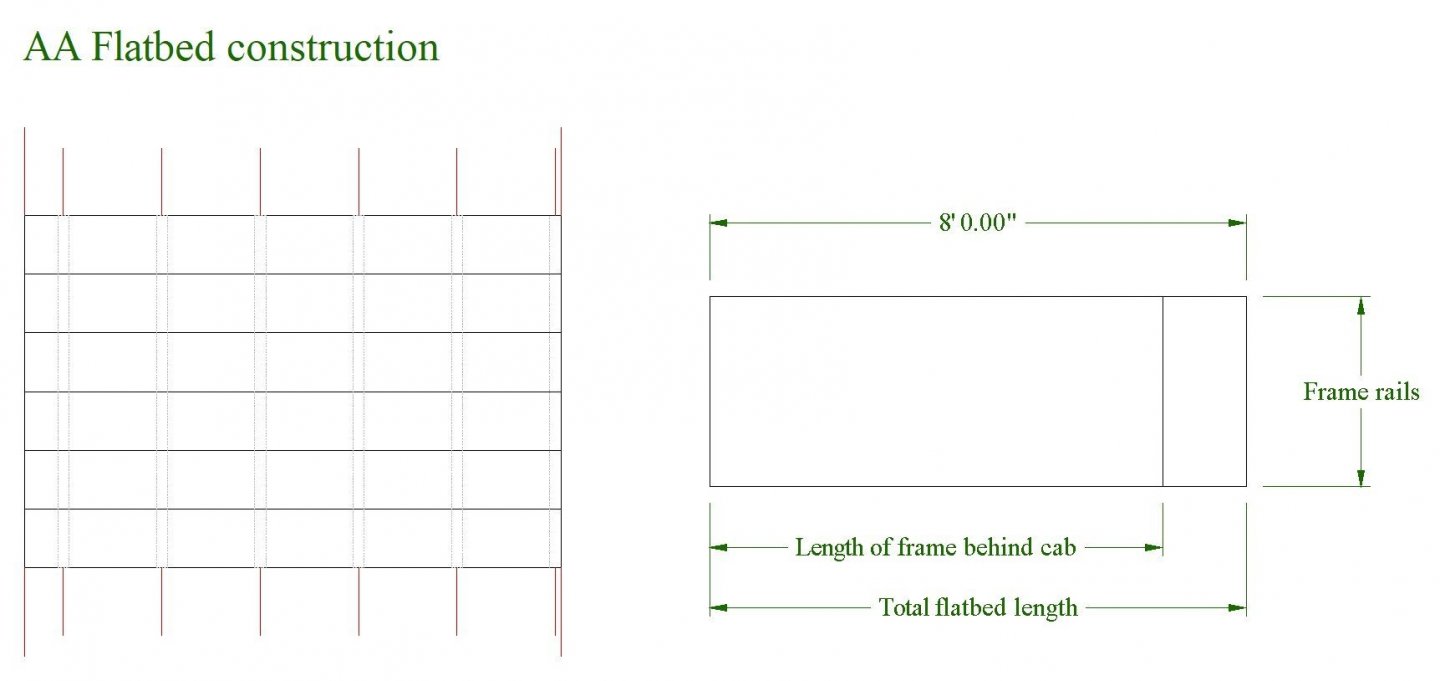
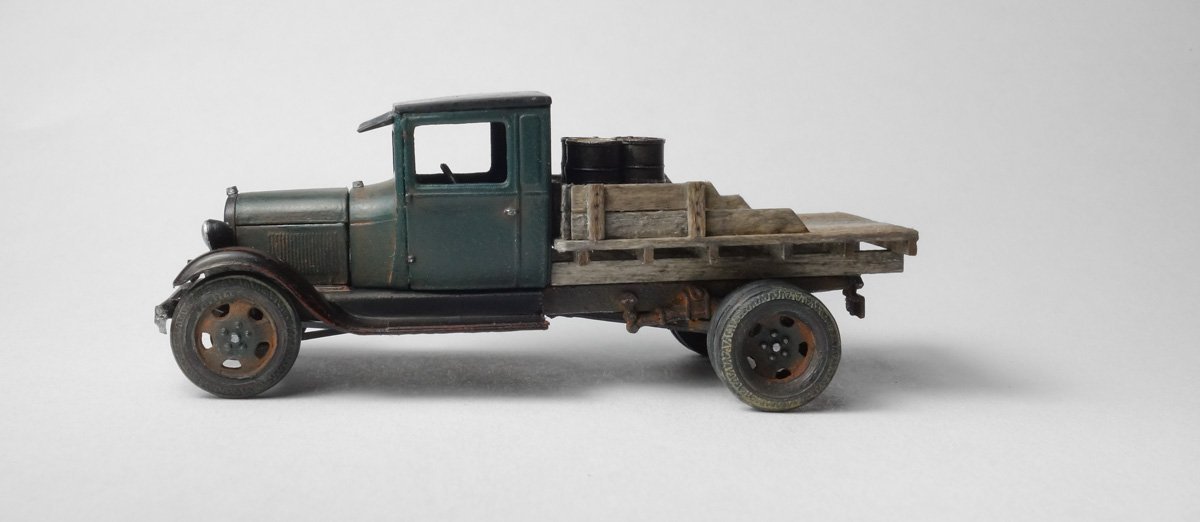
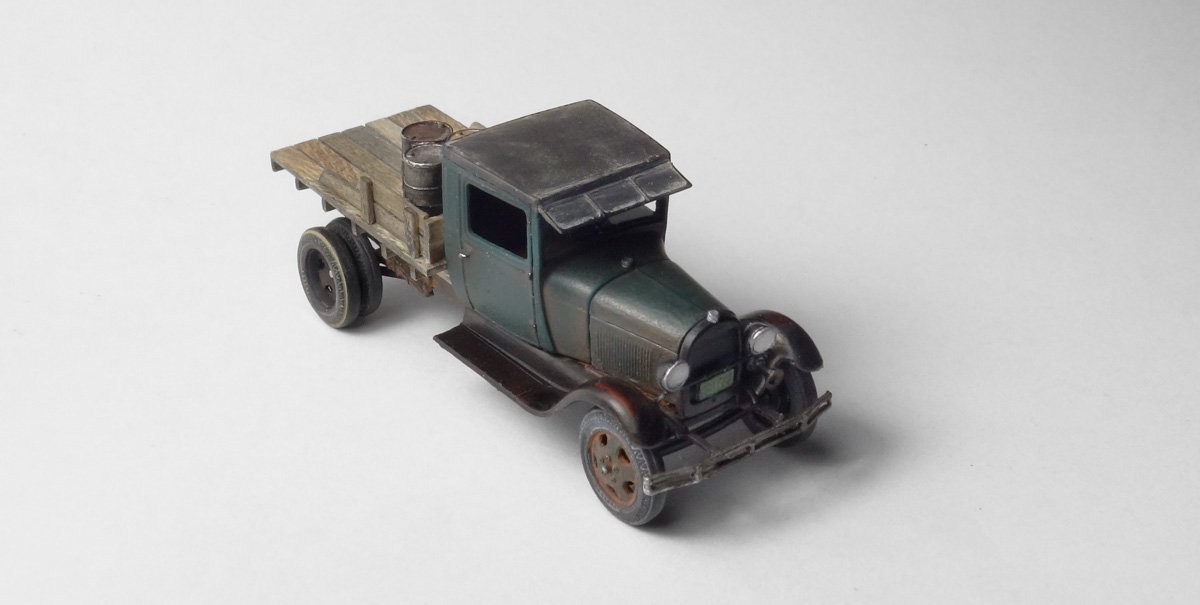
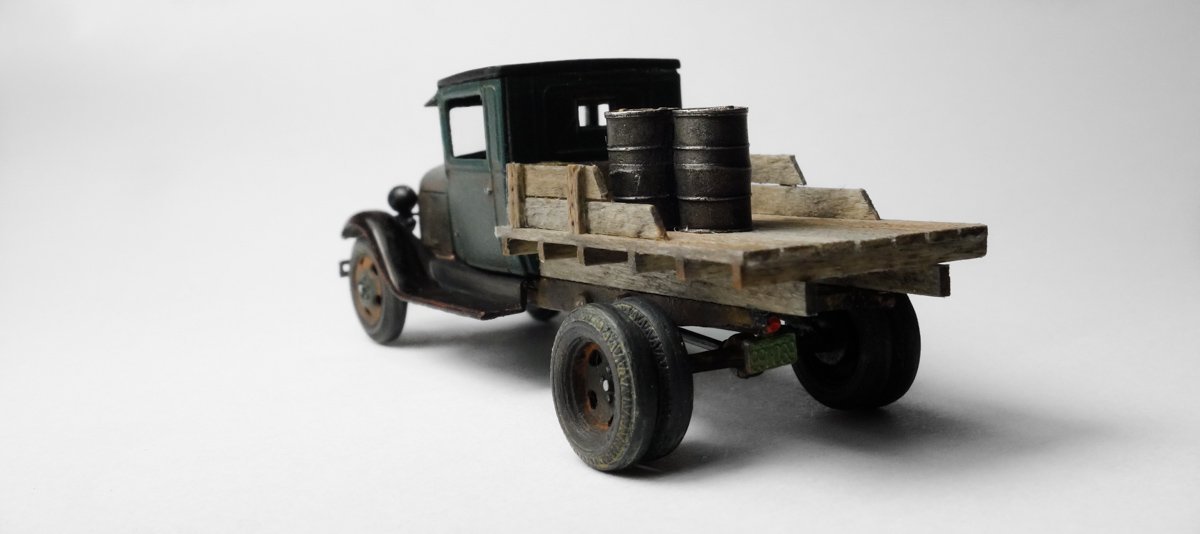
 Thank you very much OC. Thank you Mark and Ken for the nice comments. A dog eh? That would be a nice addition. I've got a growing list of possible details - I bet Preiser has a dog or two. Thanks for the suggestion. Hello Druxey - I'm glad you found this log and thanks for the nice comments. "King of grunge" ? - you are a sweet talker. I know the kind of pits you refer to and yes they were far more common than the fancy one I've built. And I can clearly see the wood leg bench vice with the pipe handle - my grandfather had one in his cellar shop. I can still remember the dirt floor and that dank humid smell. Thanks for the comment Lou. Thank you Popeye Welcome Grant and thanks. I'm glad you found this log and I hope you find something useful here. Thank you so much for your continuing support Keith. It's good to hear you're enjoying the log. And thanks to all for stopping by and for the "likes" A vehicle for the pit frame Jordan Highway Miniatures was a company that manufactured styrene model kits in HO scale for the model railroad hobby. Primarily, they produced vehicles of the early 20th century including autos, trucks, fire engines and farm tractors, but they also had a line of horse drawn carriages, carts and the like. These kits made up into detailed and delicate little models and it's unfortunate they are no longer in business. The kits can still be found on ebay, but one must be willing to pay two or three times what they originally cost. $6.95 no longer. I have a few of these kits in my stash which I bought years ago and I narrowed down the choice to a couple of models – a 1922 Packard truck (cab only) or a 1929 Ford Model AA truck. I built them both and I think I'm going with the Ford. First, here's how the Packard turned out. The Packard has a rather detailed drive train especially considering the 1:87 scale. Here is a brief description of how the Model AA went together. The kit comes configured as an oil tanker, but I choose not to use the tank as it would block much of the diorama behind it from view. Instead I modified it and scratched a simple flatbed. Below is the complete kit and as you can see, it is not a complicated construction. But it is a test of patience. I applied Tamiya Fine Surface Primer (oxide red) to the body panels followed by Testor's flat Hunter Green enamel. Then a couple of thin acrylic washes of black and silver. The cowl section is put together first, followed by the cab. Because the material is so thin there are no pins or shoulders to assist in locating one part to another. You simply glue edge to edge and adjust the angle between the parts as best you can. Here's the cab from the underside. The floor pan with the seat, gearshift and brake are inserted up from below and glued in. I find the point of a dress maker's pin makes a good CA applicator in small tight situations like this. The hood/radiator assembly is not a single molding, but rather a five piece construction. The fenders, running boards and body pan are mercifully a single molding. It was primed with the oxide red and then “painted” black with straight India ink. I allowed some of the primer to show through on the fender tops. The cab is glued on. Underside items are glued on – front spring, radius rods, frame extensions w/springs, differential, drive shaft and finally the brake drums. The headlight lenses are glued on and the trumpet is fixed to the horn motor. The license plates are 3mm wide and above the number it reads “Michigan 1929”. The dots on the right are gas/radiator caps. Tamiya “Rubber” is used on the tires and washed with gray/yellow acrylic to pull out the detail. The wheel rims were painted with the hunter green enamel followed by a rust colored pigment/water wash. The flatbed is a simple affair of basswood 2x4s and 2x8s. I placed a short rail around the forward half of the flatbed and all the wood is colored with India ink/alcohol. The barrels are just something I temporally placed on the truck and may be removed or repainted. And a little natural light. Thanks for talking a look. Be safe and stay well. Gary
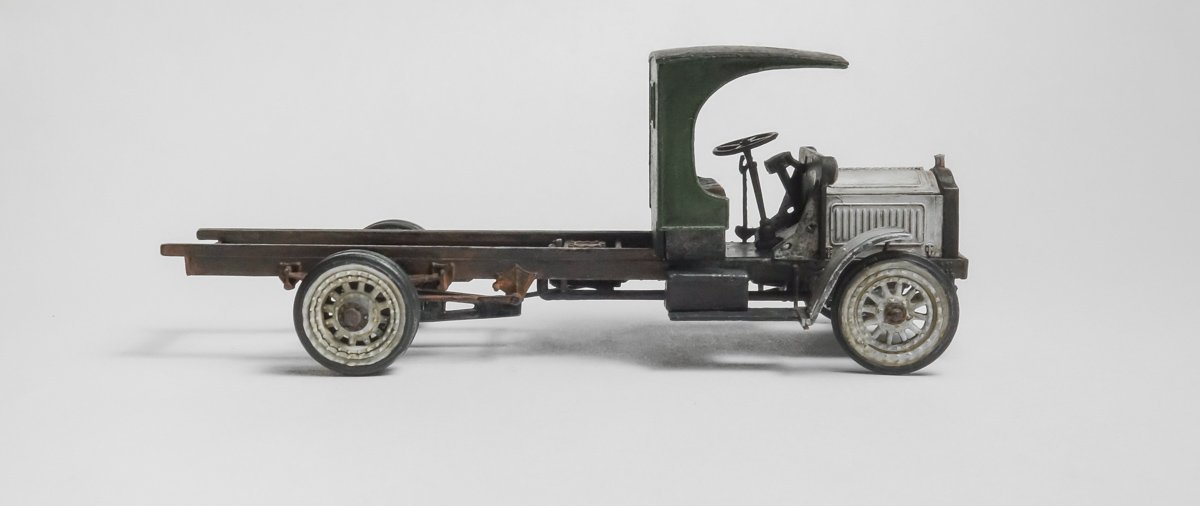


- 189 replies
-
- 27
-

-

-
Just catching up Wefalck. Wonderful work on impossibly small components. Great stuff. Gary
-
Very nice progress FF. Using styrene sheet as plank caulking is a clever technique. I like the louver jig also. Gary
-
Very nice progress G.L. The metal can and paint burner is a great idea. Gary
- 153 replies
-
- 1
-
-
- Ancre
- Bruno Orsel
- (and 2 more)
-
Looking really good OC - every bit of it. Gary
-
Just catching up on your diorama OC. and it's looking terrific! This is a very interesting building as I have not seen an MDF laser cut kit before. It has some nice detailing to it and I very much like your enhancements so far. I find one of the biggest challenges in modeling is to make one material look like something it's not. So your modifications to the "brick" (extra carving, mortar and painting techniques) really transformed the MDF into what convincingly looks like a real baked clay product. Excellent. I agree with your decision to glaze the windows - catching a glint of light off of them can really add to the illusion. Interior walls and detailing is ambitious and sounds very cool. Looking forward to watching your future work on the structures and the diorama in general. Gary
-
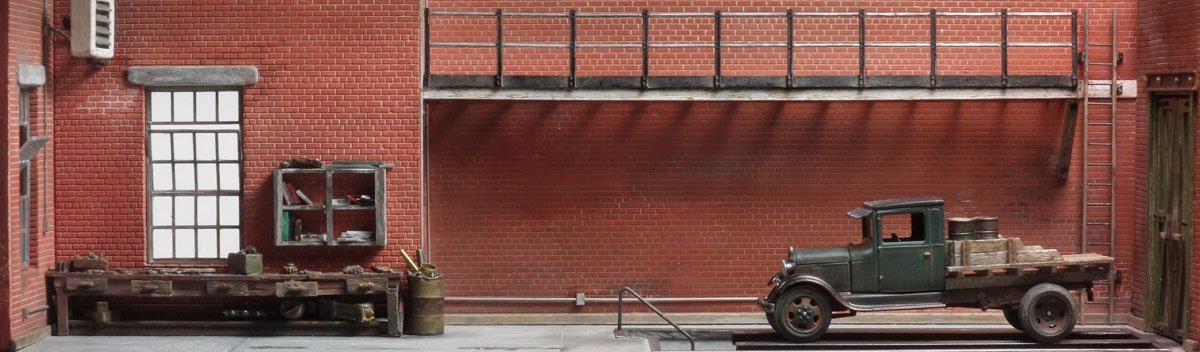
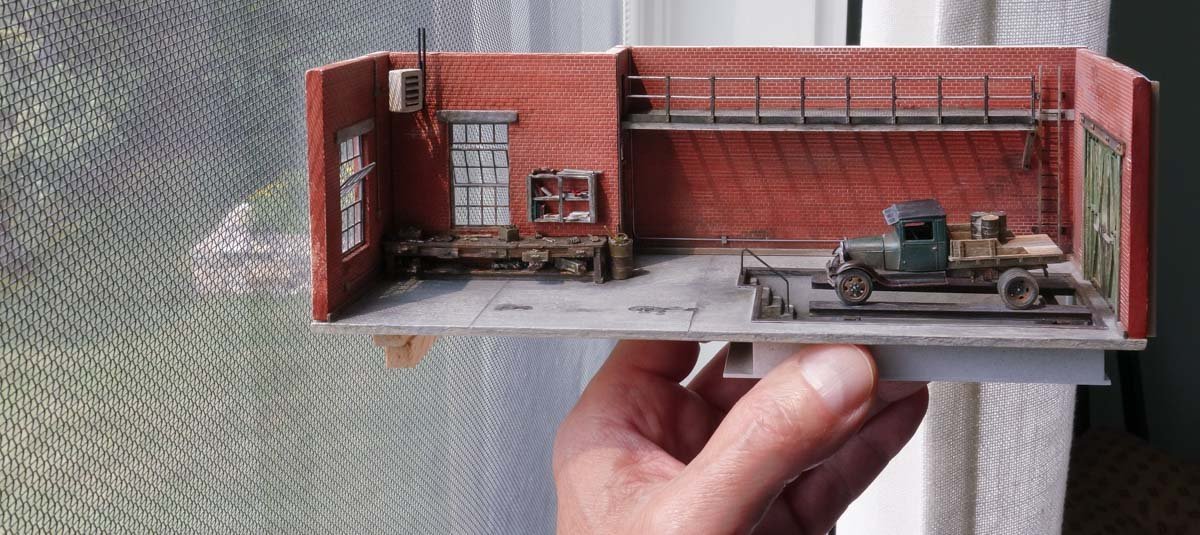
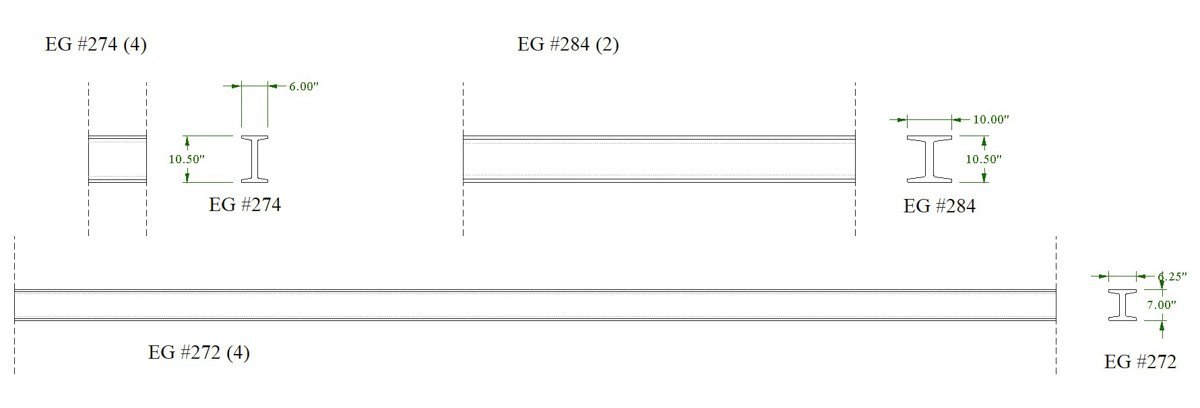
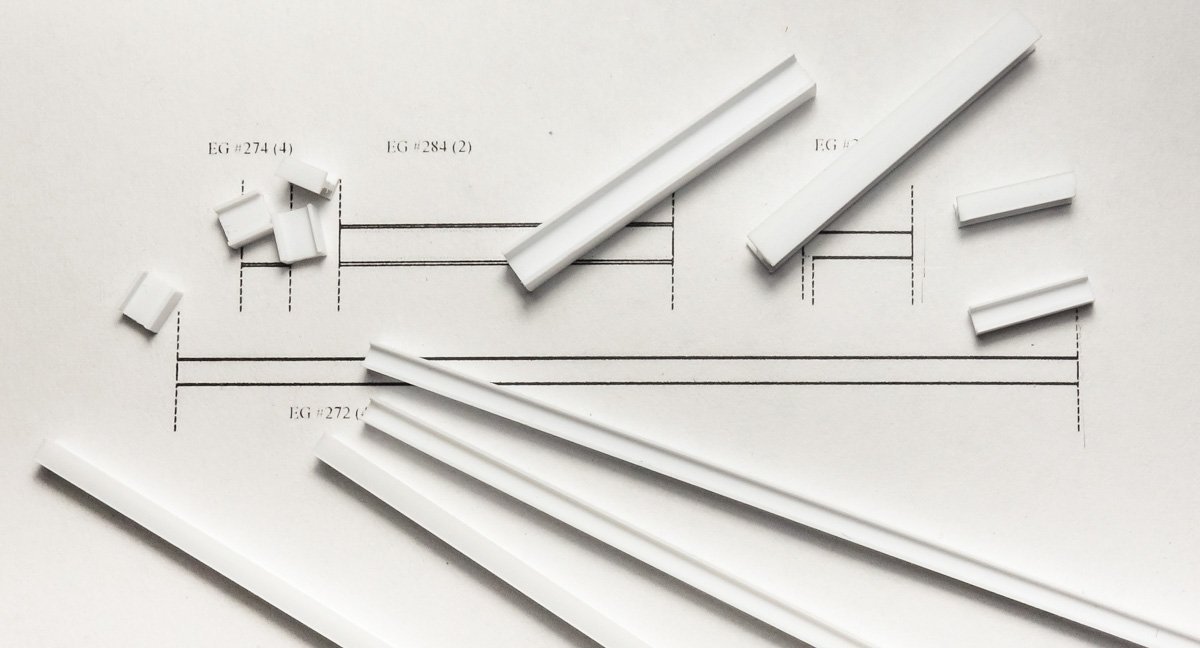
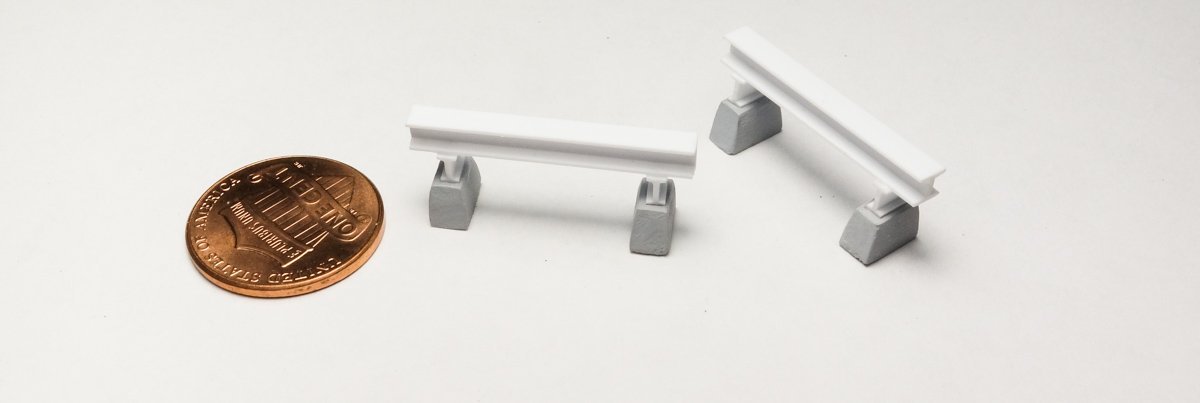
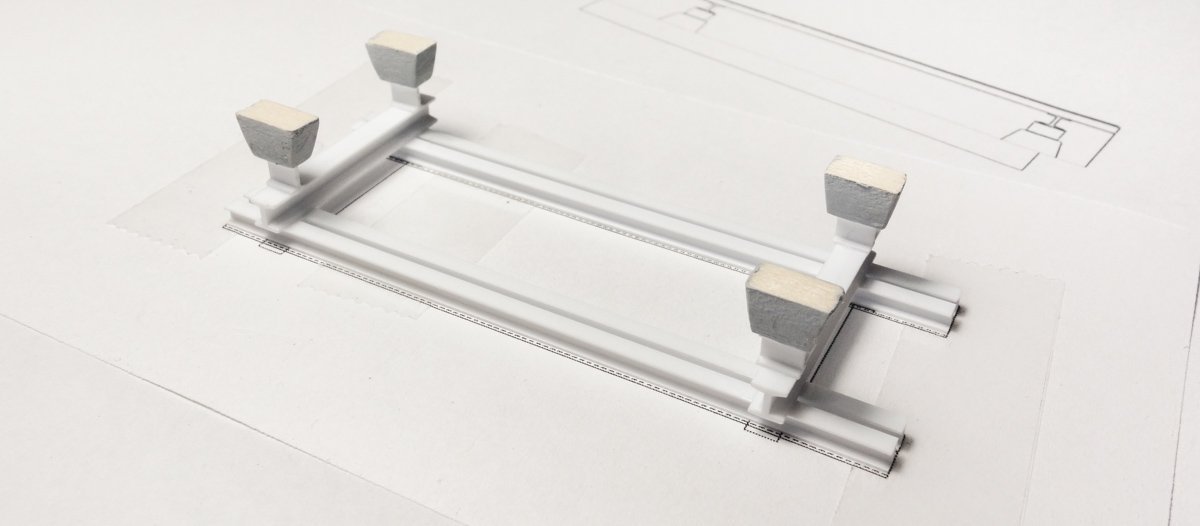
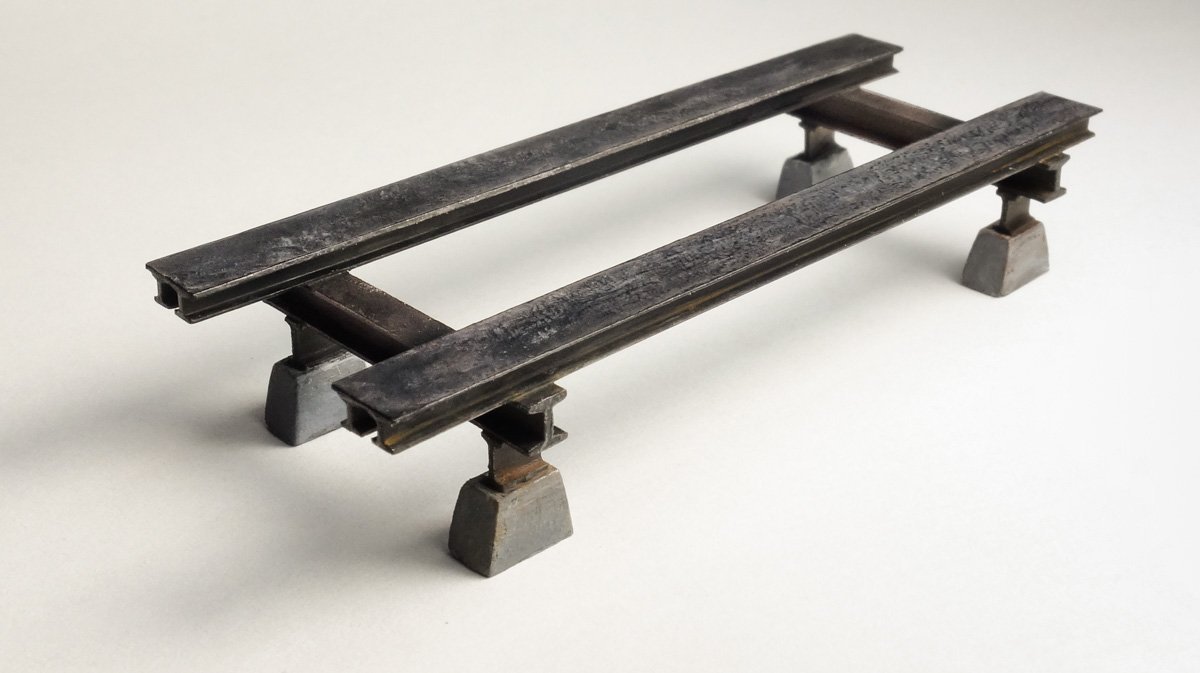
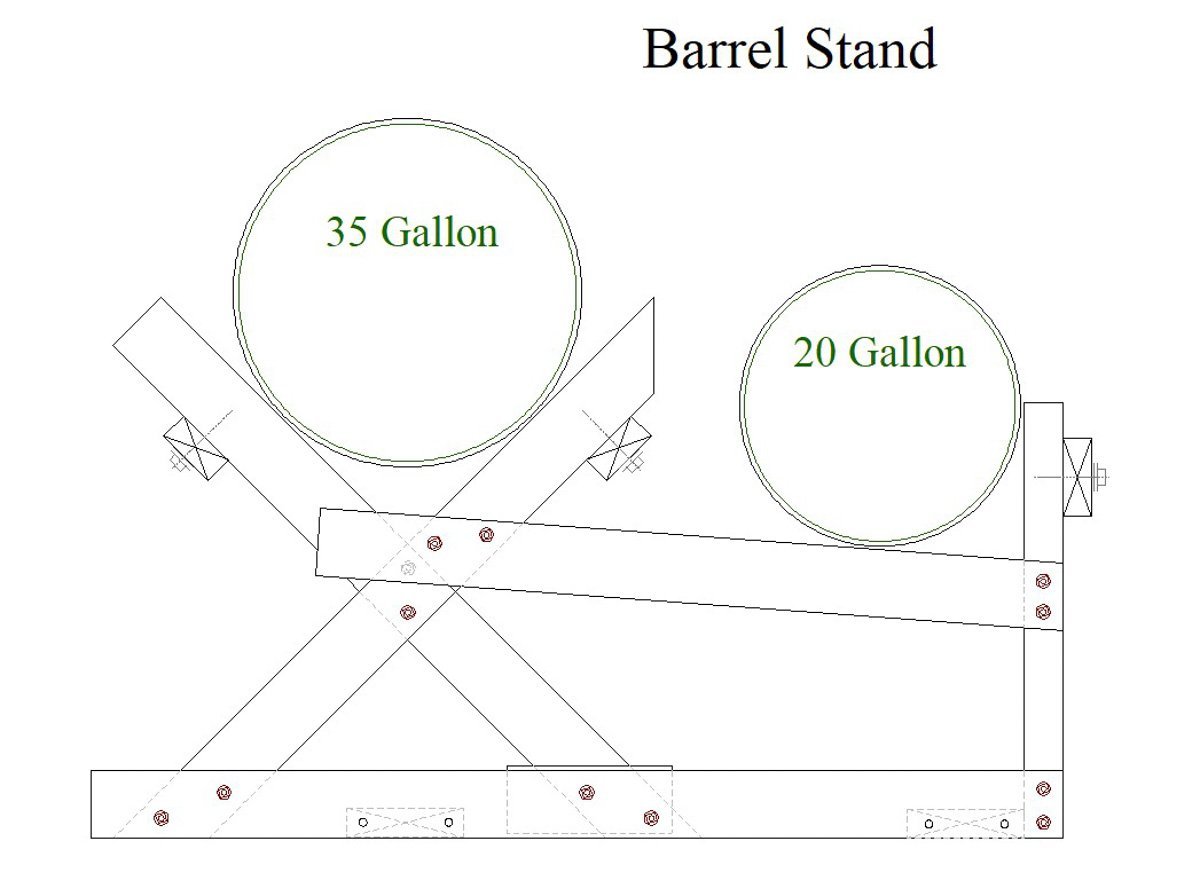
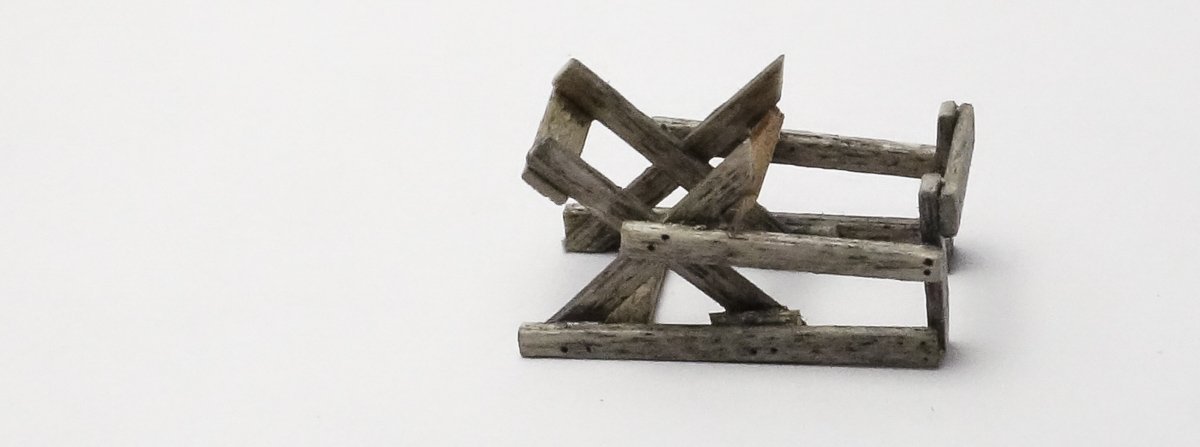
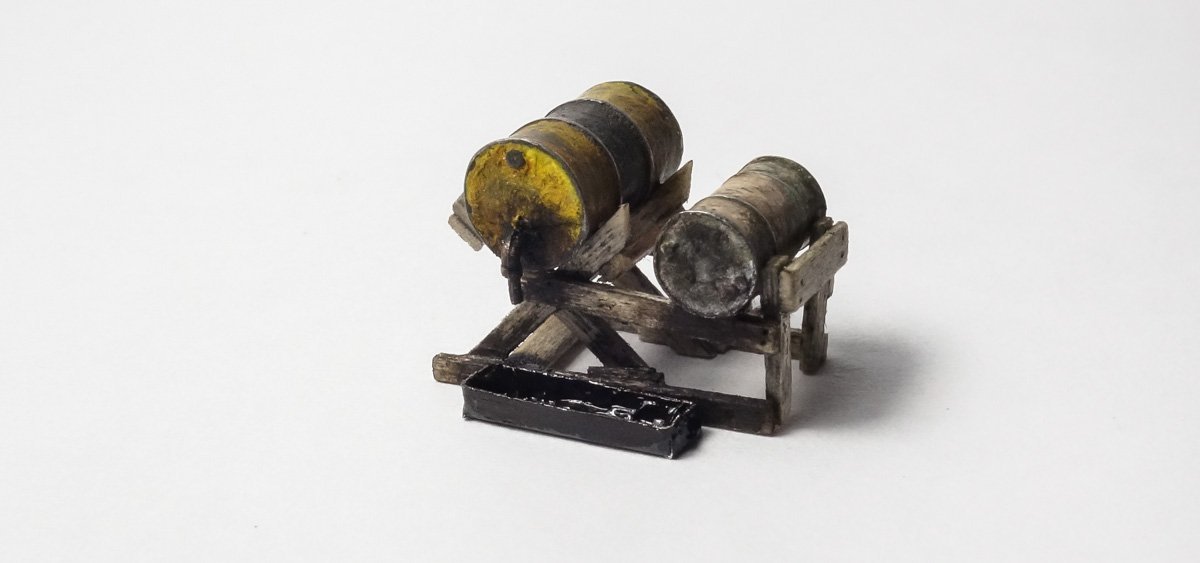
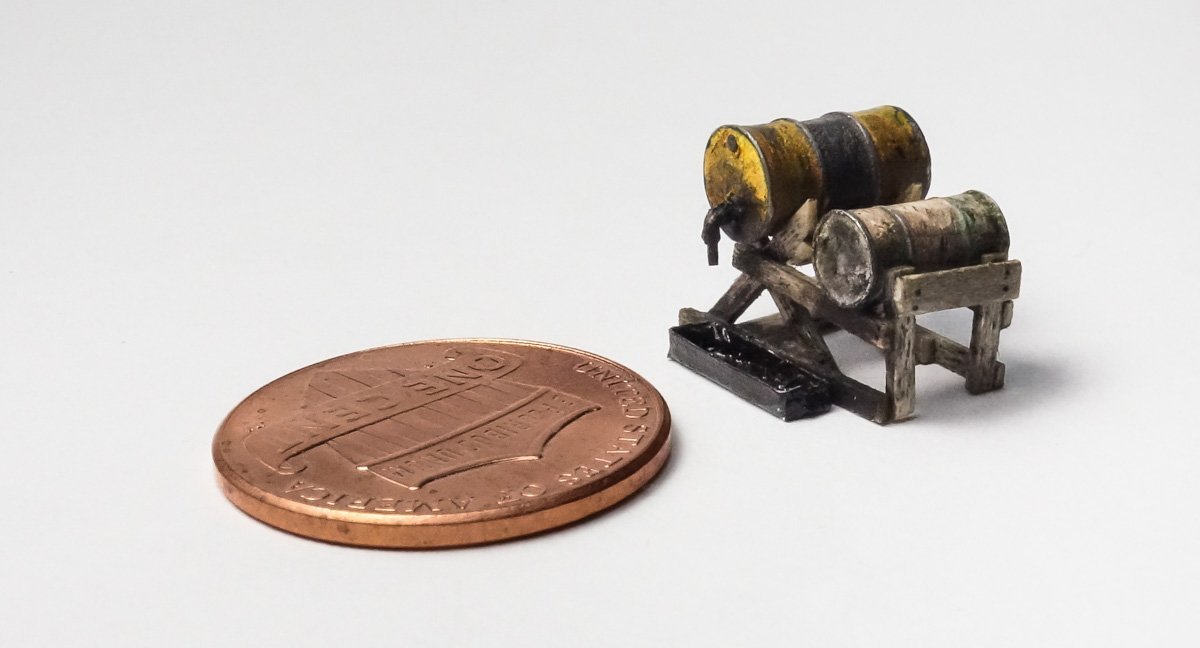
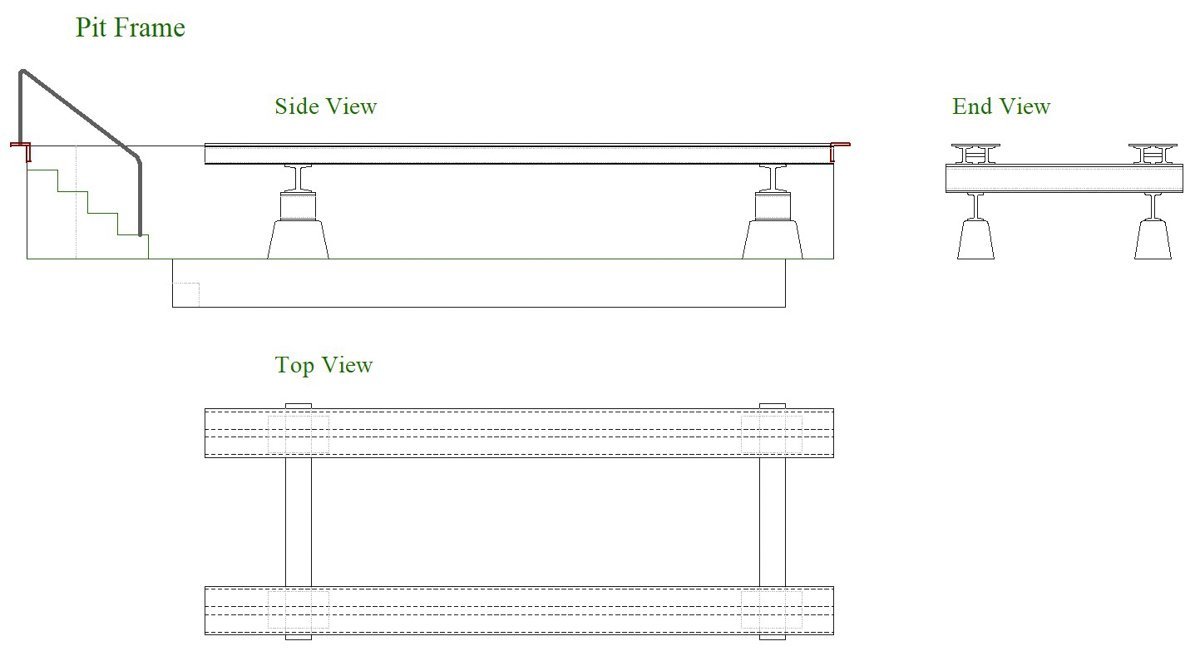
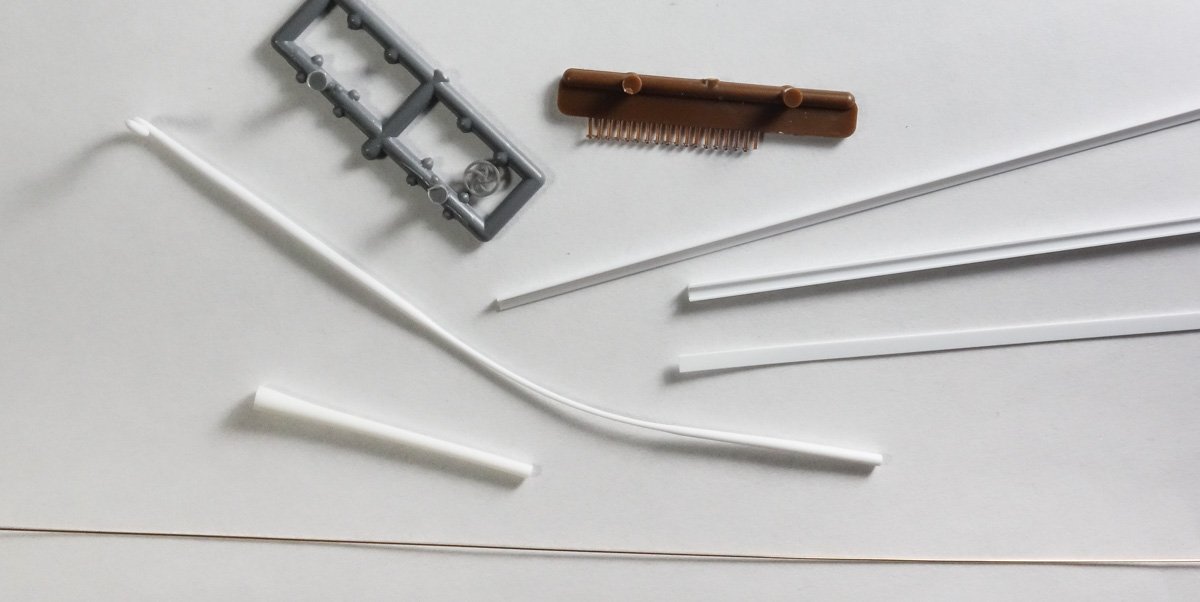
Mark, Egilman. Keith, Ken and Popeye - thank you so much for your comments of information and support. I really do appreciate it. And thanks to all for looking in and for the "likes". Pit Frame The pit frame begins with a CAD drawing. This drawing describes the three “steel” frame pieces and the lengths needed for each. The drawing is used as a cutting template for the styrene. The image below shows an extra “I” beam member which I decided not to use as it really crowded the pit. The four concrete footings are made from basswood painted with acrylic. The top view drawing is used as a positioning template. A couple of strips of double sided cellophane tape are placed on the template to keep the four long beams positioned properly as everything is cemented together. Styrene sheet that scales to around .75” is used for the steel plate which covers the parallel beams. After cleaning everything with isopropyl, the “steel” was brush painted with flat-black enamel and selected areas were lightly textured with a cosmetic sponge. Once the enamel dried, I applied a light mahogany colored acrylic wash and allowed it to dry. Then a heavier gray wash on top of that, which I mostly wiped off with my finger leaving the color predominantly in the recesses. Then just a touch of rusty pigment powder and finally some edge highlighting with graphite. Then glued in place. The frame is made entirely of basswood and the drawing is used as a construction template. The wood was stained with an India ink/alcohol solution beforehand. The tiny dots pretending to be bolt heads are just pin holes made with a pin dipped in ink. The barrels are white metal pieces that needed some filing and cleaning up. The catch tray is folded paper from the sticky end of a Post-It note. Once it was formed, a drop of very thin CA was applied which saturated and hardened the thing. Black oil paint was applied in and out. The barrels are base painted with enamels followed by pigments. Thanks for taking a look. Gary


- 189 replies
-
- 22
-
-
-
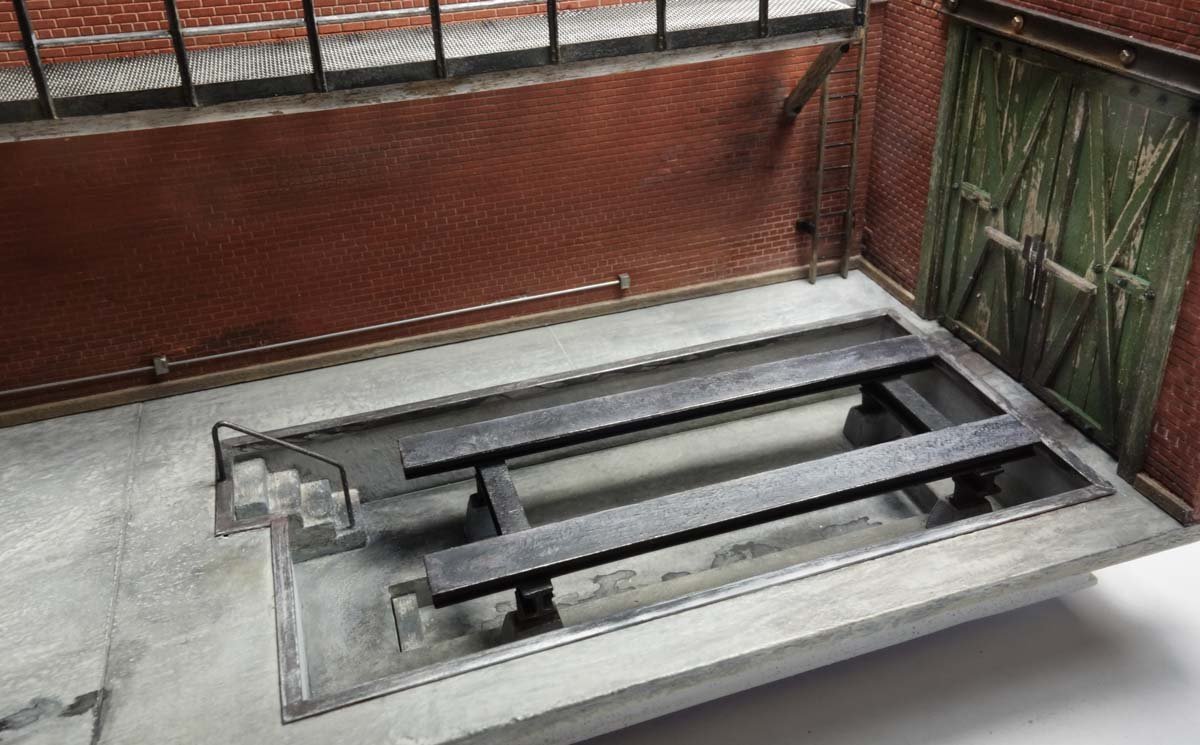
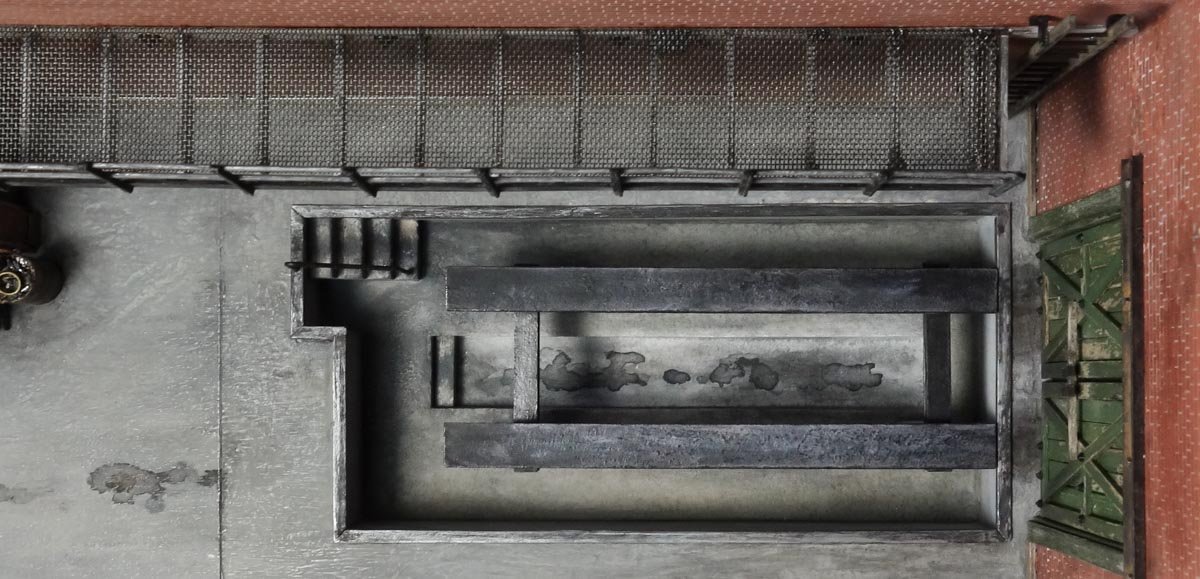
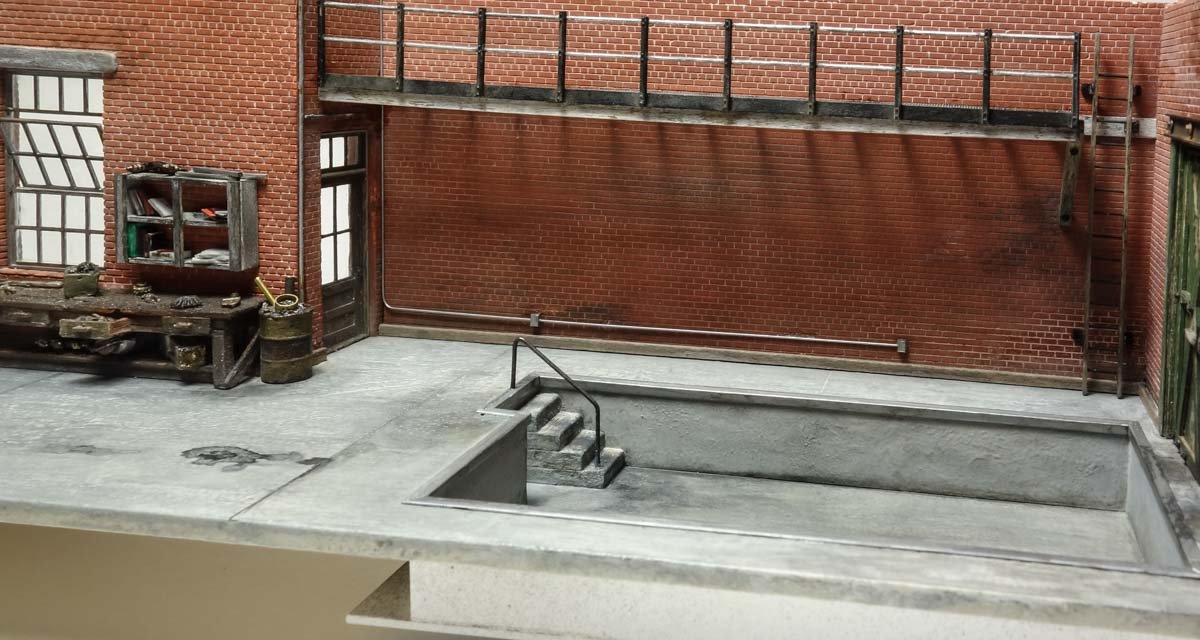
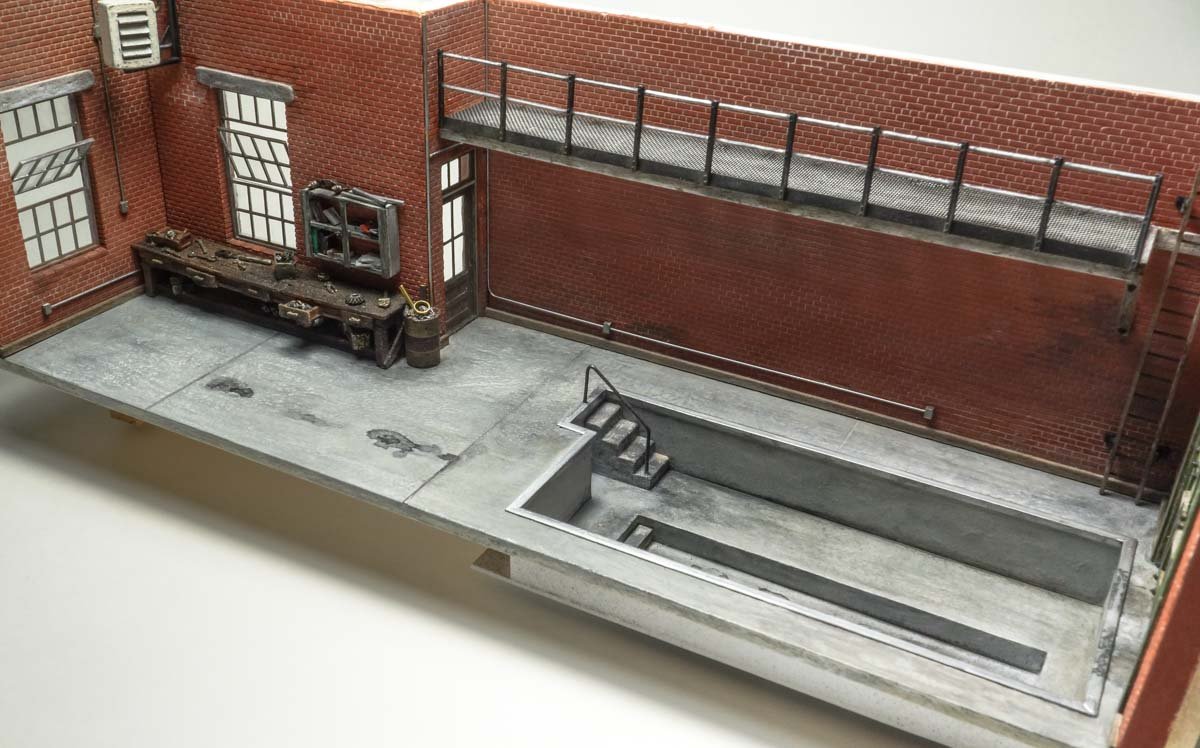
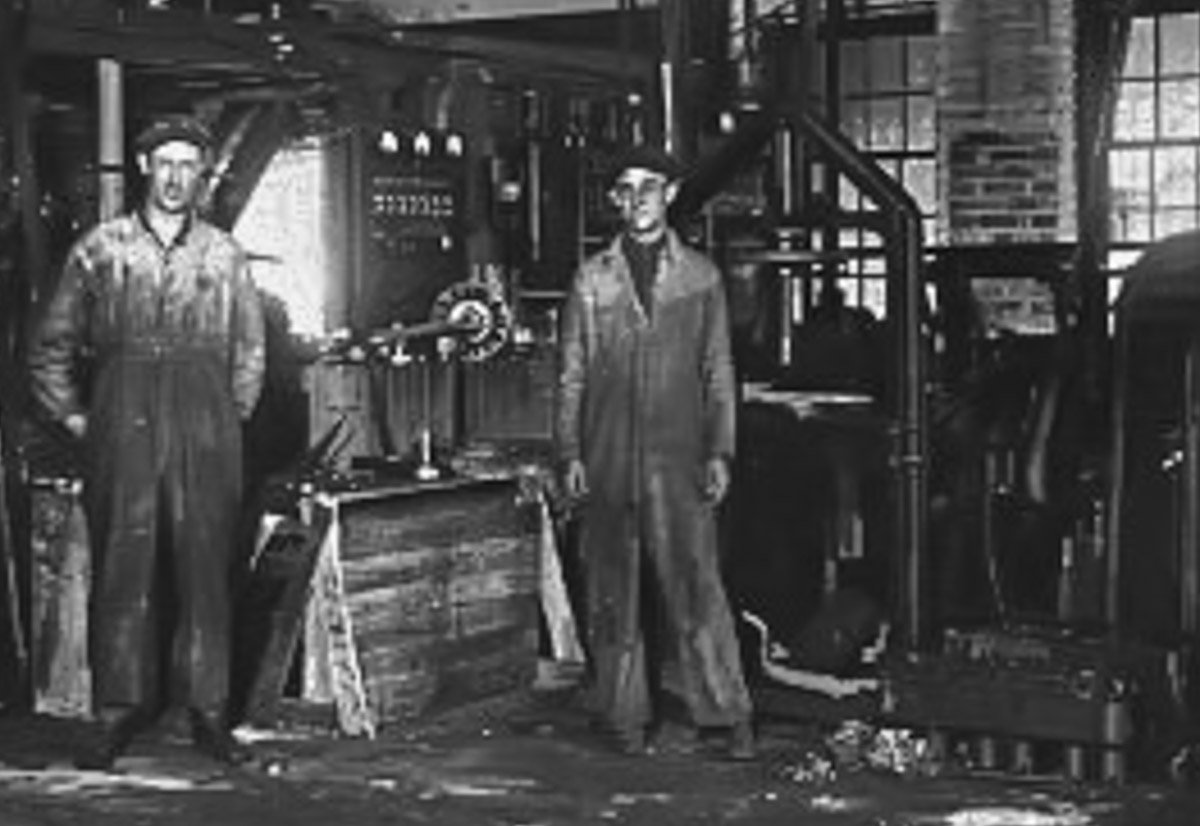
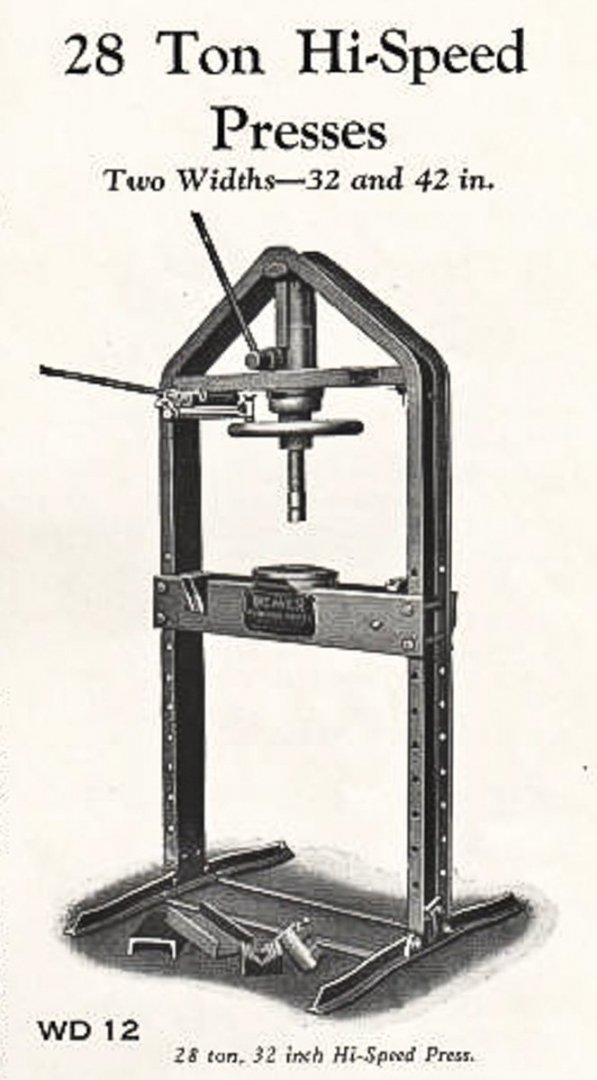
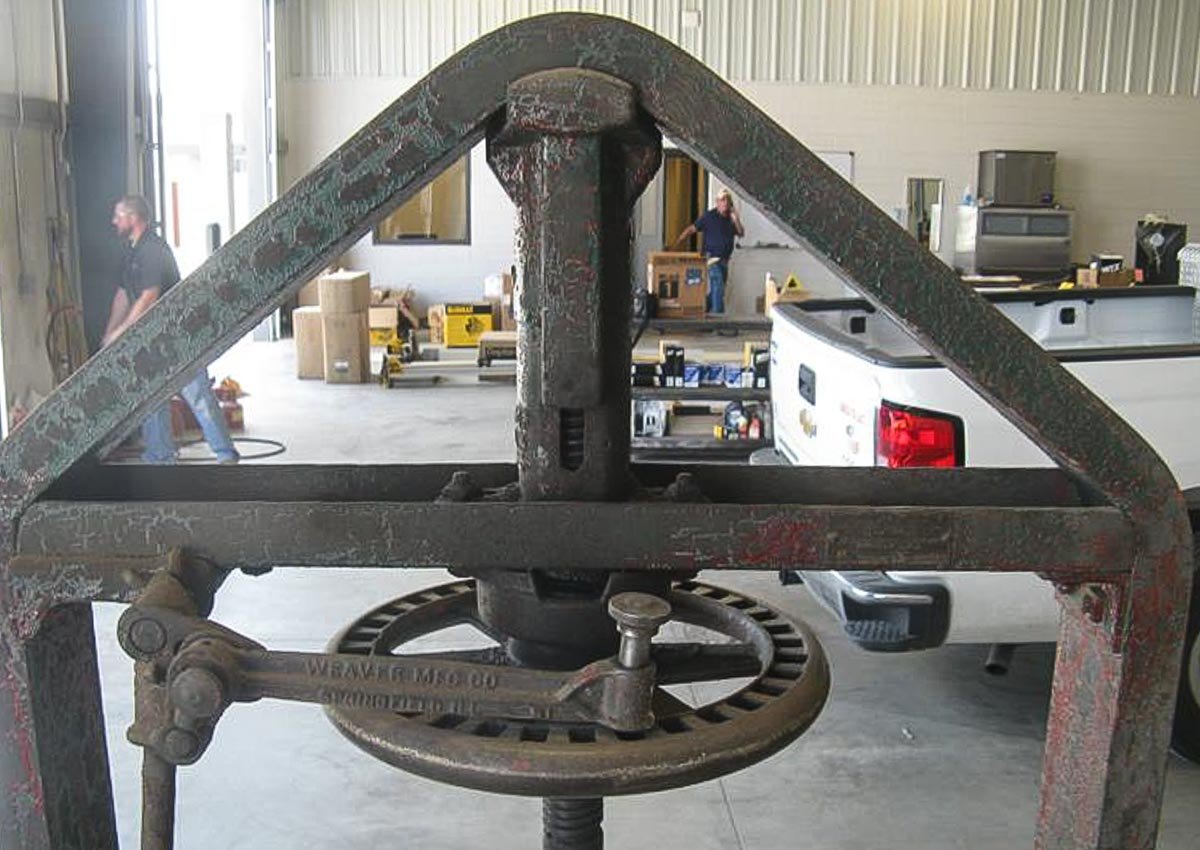
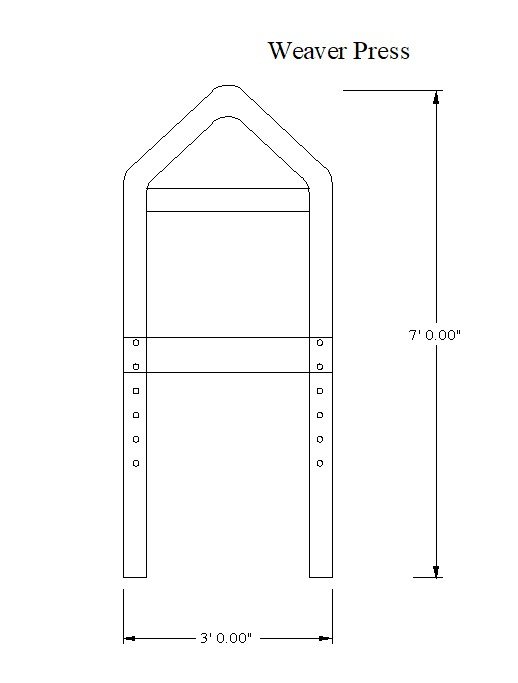
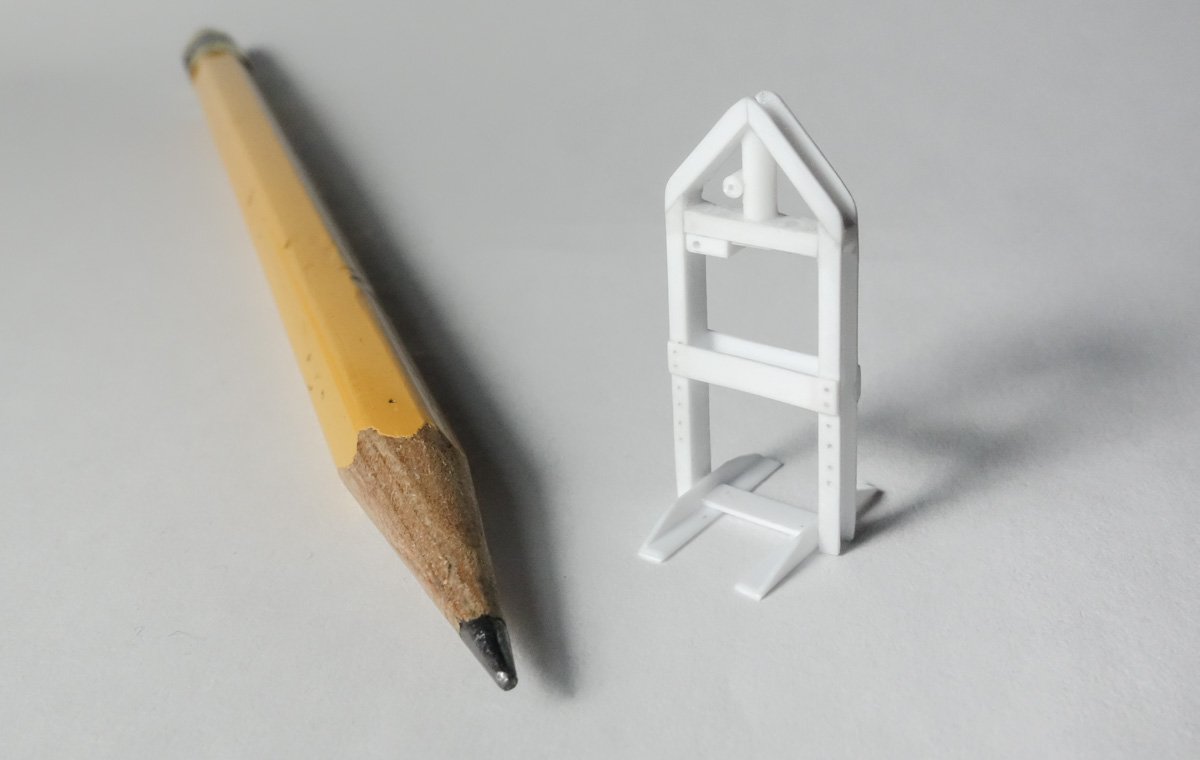
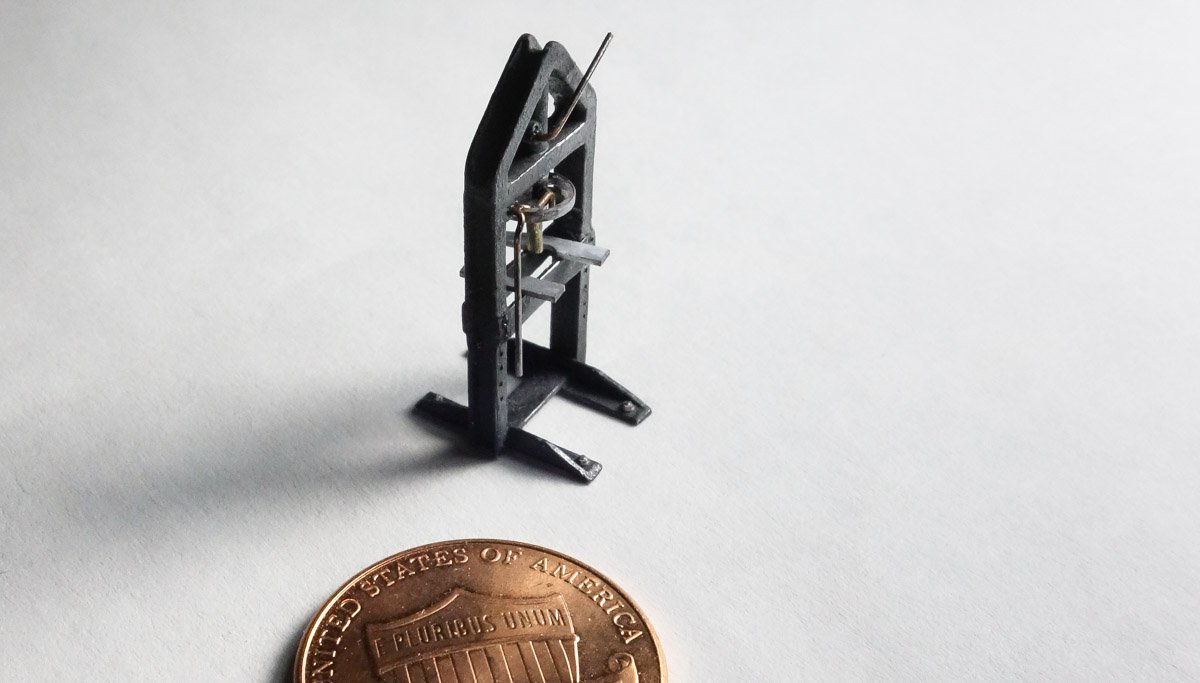
Thanks to all for stopping by and for the "likes". Seems a bit scary to me also Mark. Check this photo out. This seems like a false sense of security to me. The rear wheel doesn't even appear to be chocked to keep it from rolling backwards (or forwards.) I wouldn't want to be under that thing if the chainfall let go and the weight shifted. I wonder if this little house of cards arrangement has ever been tested? It works pretty well. The most difficult part is keeping the drill straight and true when going through the rails. Thanks for the comment O.C. I believe you're right Keith. That's a great understanding of the times and one that I never stopped to consider. All the years I worked in manufacturing the company always supplied uniforms and laundry service. So yes, what would you do with oil soaked clothes on a modest salary? Leave them hung over the fence at night? Yes those jacks would add some nice atmosphere and I particularly like the high lift bumper jack. I don't know of anyone who casts or molds anything like them at this scale, so I'm going to try and scratch some. Emphasis on try as the high lift would be right at 1/2" tall. Thanks for the suggestion and photos Egilman. Everyone would run for cover when OSHA would step out onto our manufacturing floor. But when you see the dangerous work places of the "good old days", OSHA starts looking pretty good. Thanks for the comment and nice words Ken. Hello Allen, thanks for looking in. I agree, especially the oil can as it would be easily identifiable - but crazy small. I may just give it a try. Some Pit Work Everyday life choirs and activities has kept me from the workbench and little has gotten done. So this update will be a short one. I added back some electrical piping along the back wall that was pulled off to accommodate the pit installation. Instead of running the conduit to the right as it was originally, it now runs to the left and up the corner and covers a nasty little gap where the two walls meet. I then replaced some of the “angle iron” around the perimeter of the pit because it was out of square. Looking at the photo below I can see the angle needs some attention as it doesn't look like iron (too silvery.) Steps are added leading down into the pit. They are 2' wide with a 8” rise and 10” run (like you really wanted to know that) and are made of stacked basswood pieces. The hand rail is .022” brass which scales to just under 2” diameter. The pit and steps were dirtied up with some blackish pigment powders and a wash of India ink mixed with water. The wash brought forward the texture of the pit walls (which I now realize I failed to mention in the last post.) The texture is straight white PVA dabbed on with a cosmetic sponge. At first the glue keeps leveling itself out, but as it dries it starts to hold peaks. I also added some oil stains to the lower center pit and a step down to it. Arbor Press A break from working on the pit. In the last post I showed a photo of four men in greasy coveralls. Below is a crop of that photo and just behind the gentleman in the center is a mechanical arbor press. It appears to be a 20 ton Weaver Hi-Speed Press or one very similar. The Weaver 28 and 60 ton models have an extra leverage arm high up that the press shown above does not. These presses had three levels of power vs speed. The hand wheel could be turned for gentle precise work with little power. The upper lever was a rack/pinion sort of affair that offered more speed and considerable power. If that wasn't enough you could choose the nuclear option by using the lever on the left which provides the greatest force. The photo below is a 20 ton press so it doesn't have the upper lever, but it's a good look at its simplicity and how it works. Note that the arm (with the Weaver branding) has a choice of pivot points at its left end – three of them, where you can select how much leverage is required. There are three holes in the pivot plate and the arm is currently occupying the center hole so the the other two holes are not visible. I made one of these Weaver presses for the dio, but much of the mechanical detail is not there - just too small. Anyway, I began with a drawing based on photo scaling. I gathered up some stuff. The wheel is an injection molded HO scale boxcar brake wheel. I pulled the styrene rod and tubing over heat to get the right diameters needed. The brown sprue is nut/bolt heads. Cut, glue and drill. Enamel paint and powders. The left side power mechanism is just two pieces of bent wire inserted into a styrene bit. The angle iron that bolts to the floor is out of scale for sure but. . . Now back to the pit. Thanks for looking. Gary

- 189 replies
-
- 26
-
-

-
-
Splendid work Druxey - so delicate and well crafted. I am curious - early on in the build you expressed regrets about selecting castello for the project instead of holly. Since you found a way to work with the castello, would you choose it again or opt for a different species? Looking forward to the final glamour shots. Gary
- 433 replies
-
- 4
-
-
- open boat
- small boat
- (and 1 more)
-
This is some very nice sub-atomic modeling you're doing here CDW. I had no idea injection molded aftermarket details were available at such a small scale. And they look quite crisp too. I've pulled up a chair to follow your progress. Gary
- 127 replies
-
- 5
-
-
- Akitsushima
- Pit Road
- (and 2 more)
-
A very nice start on your model Popeye. I'll be following along. Gary
-
Hello Tim. Thank you for thinking of my Stonington boat model in regards to showing it at the Northeast Conference this coming October. I registered on-line several weeks ago and I will be bringing this Stonington dragger model with me. I'm looking forward to the event and seeing all the great models displayed by our fellow modelers. Should be fun and educational. And I thank you for the high appraisal of the model - I only hope it doesn't disappoint in person. See you there. Gary
-
Very nice carvings Mark. If I had carved those, I'd be pumped. Gary
-
Just found this build G.L. and I have read it from the beginning. Like your previous logs, it is packed with simple and innovative techniques. The bow sander makes so much sense and I'm surprised I haven't seen that idea used before, but I will be trying it. I also like your frame lamination method - nifty. And thanks for showing us the details of Mr. Orsel's strake cutting sled which is a perfect tool for hulls of this shape. Excellent work G.L. and I will be watching for future updates. Gary
- 153 replies
-
- 1
-
-
- Ancre
- Bruno Orsel
- (and 2 more)
-
Spectacular figure painting yet again, O.C. You can almost hear that flag snapping and popping in the wind. Gary
-
Very nice progress on the Skipjack. Sorry to hear of your problems with CTS Michael. I wish you a successful outcome from the surgery and a rapid recovery. Gary
-
Nice progress on the carrier Paul - looking really good. Sweet 1:1 boat too! Gary
- 100 replies
-
- 1
-
-
- pauline
- BlueJacket Shipcrafters
- (and 1 more)
-
Sweet work Eric! I really like the cargo chests. They have a nice authentic feel and will be a nice visual addition to the display. One of the most difficult things about having to make so many of one item (besides the boredom) is getting them to all look the same - your oars look great! Gary
-
We are a patient bunch Keith. Better to be happy with your work on the first attempt, because backtracking, re-dos and that "if I had to do over" feeling can be so deflating. The "aha moment" will come. Nice score on the display case. Gary
-
Roter Löwe 1597 by Ondras71
FriedClams replied to Ondras71's topic in - Build logs for subjects built 1501 - 1750
Just catching up Ondras. Your model is looking fantastic - nice work on the lion also! Gary -
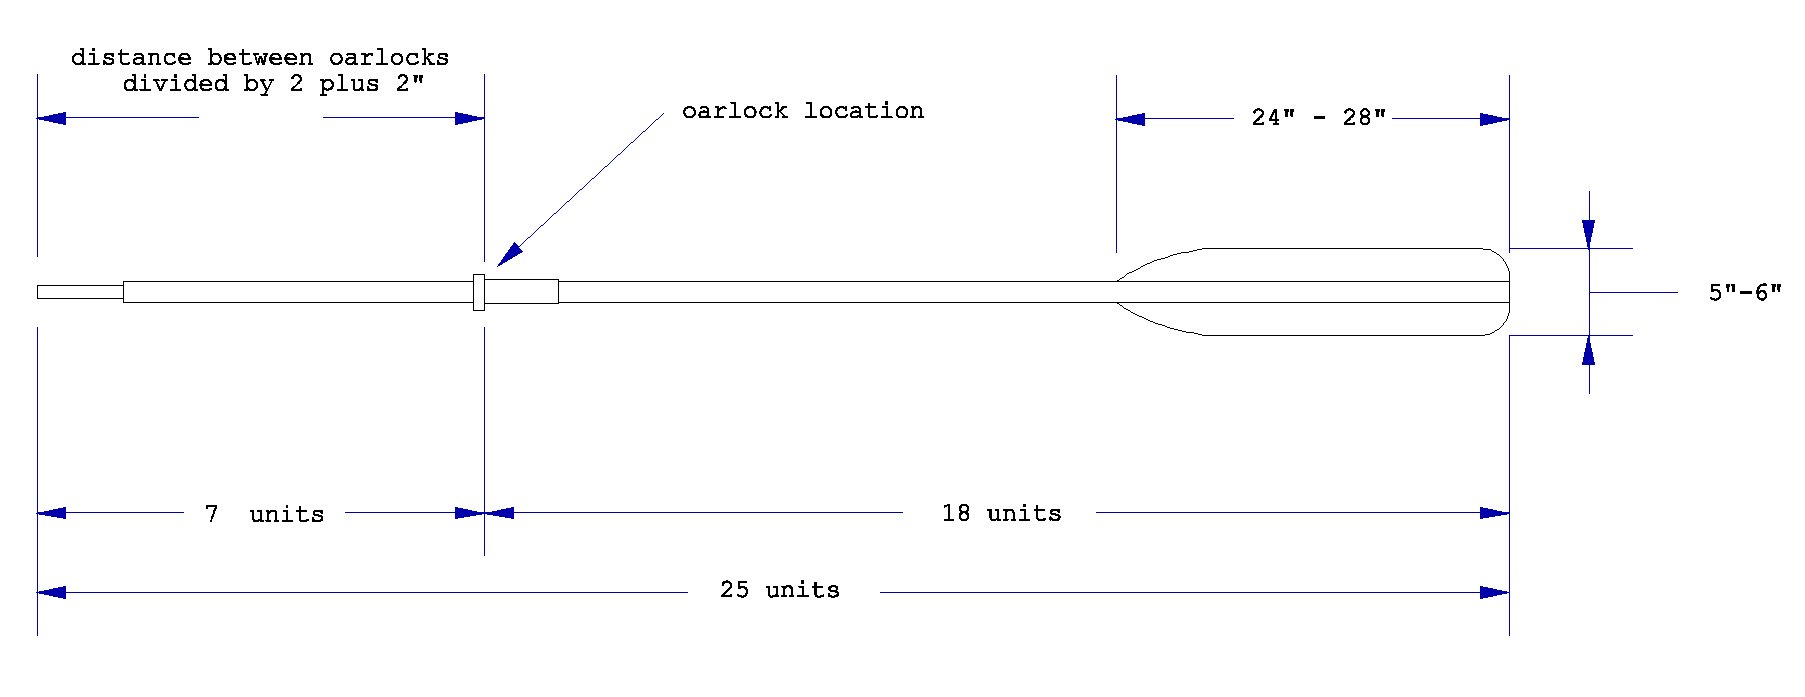
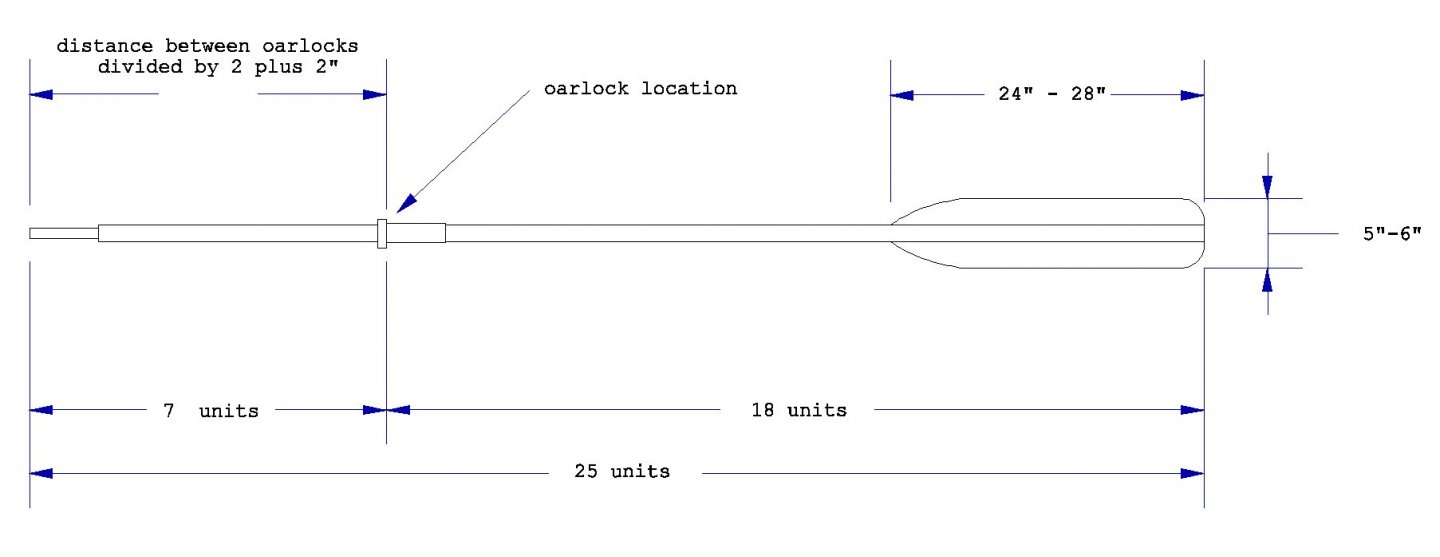
Beautiful work Druxey! This build log is a real tour de force of small open boat modeling. In regards to the oar length, I found this formula when building a small wherry a few years ago. It comes from a oar and paddle manufacturer's web site and it is similar to others I've seen. [(D/2 +2) divided by 7] x 25 = length. D = distance between oar locks . It states that the inboard to outboard length ratio should be 7:18. The length of the inboard portion of the oar is dictated by the width between oarlocks. To maximize leverage, the oar handles should overlap by 4" when held level (parallel to the waterline.) So for each oar, the inboard length is 1/2 the distance between oarlocks plus 2". So for instance the beam on your boat is 7' or 84”. 84" divided by 2 + 2" = 44”' To achieve the recommended 7:18 ratio, the inboard portion must be 7/25ths of the total length. In this case that means (44 / 7) X 25 = 157” And 157” is just a hair over 13' total. This formula is probably not applicable to your model, but I though I would throw it out there anyway. Love this model Druxey - thanks for sharing your build techniques. Gary
- 433 replies
-
- 8
-
-
-
- open boat
- small boat
- (and 1 more)
-
Congratulations on completing the Dragone Jim - she looks fabulous! I always liked the contrasting woods tones on her and I think the natural finish is just the ticket. Great job! Like the cradle stand too. Gary
-
Catching up Mark and I think your carving is quite good. I also believe it will look better still when viewed in context on the stern of the ship. Placing it on the penny is great for comprehending it's small size but does nothing to foster appreciation of the piece as a delicate carving of wings. I like the progress on the planking as well. Nice work. Gary
-
Nice update Keith and I'll be watching for further progress. Good to hear you've been reconnecting with family and friends after the year long dumpster fire of 2020. I hope we can all get back to something that feels like normal this year. Gary