BANYAN
-
Posts
5,961 -
Joined
-
Last visited
Content Type
Profiles
Forums
Gallery
Events
Everything posted by BANYAN
-
 A beautiful model well executed Dan. you can be justifiably proud of this one; not to imply your other work is any less well deserving. cheers Pat
- 287 replies
-
- 2
-

-
- michelangelo
- ocean liner
- (and 1 more)
-
Looks like great progress Mark; hang in there mate. i like your build jig concept. cheers Pat
-
Always a pleasure to view updates to this beauty. Your detailing is excellent. cheers Pat
-
Stunning work as usual Alex. That scraper worked well, the molds look very 'clean'. regards Pat
-
Looks really good mate - love that small boat heading for the pier with the surprise in store for them (Kraackin) I am driving up your way later this month; if you are not otherwise engaged would love to pop in an see this beauty? cheers Pat
-
Nice job on the cross-trees UV; persistence paid off with a great result. cheers Pat
- 786 replies
-
- 1
-
-
- Royal Louis
- Finished
- (and 1 more)
-
That's some very neat rigging Dave; best give your riggers an extra tot me thinks . cheers Pat
-
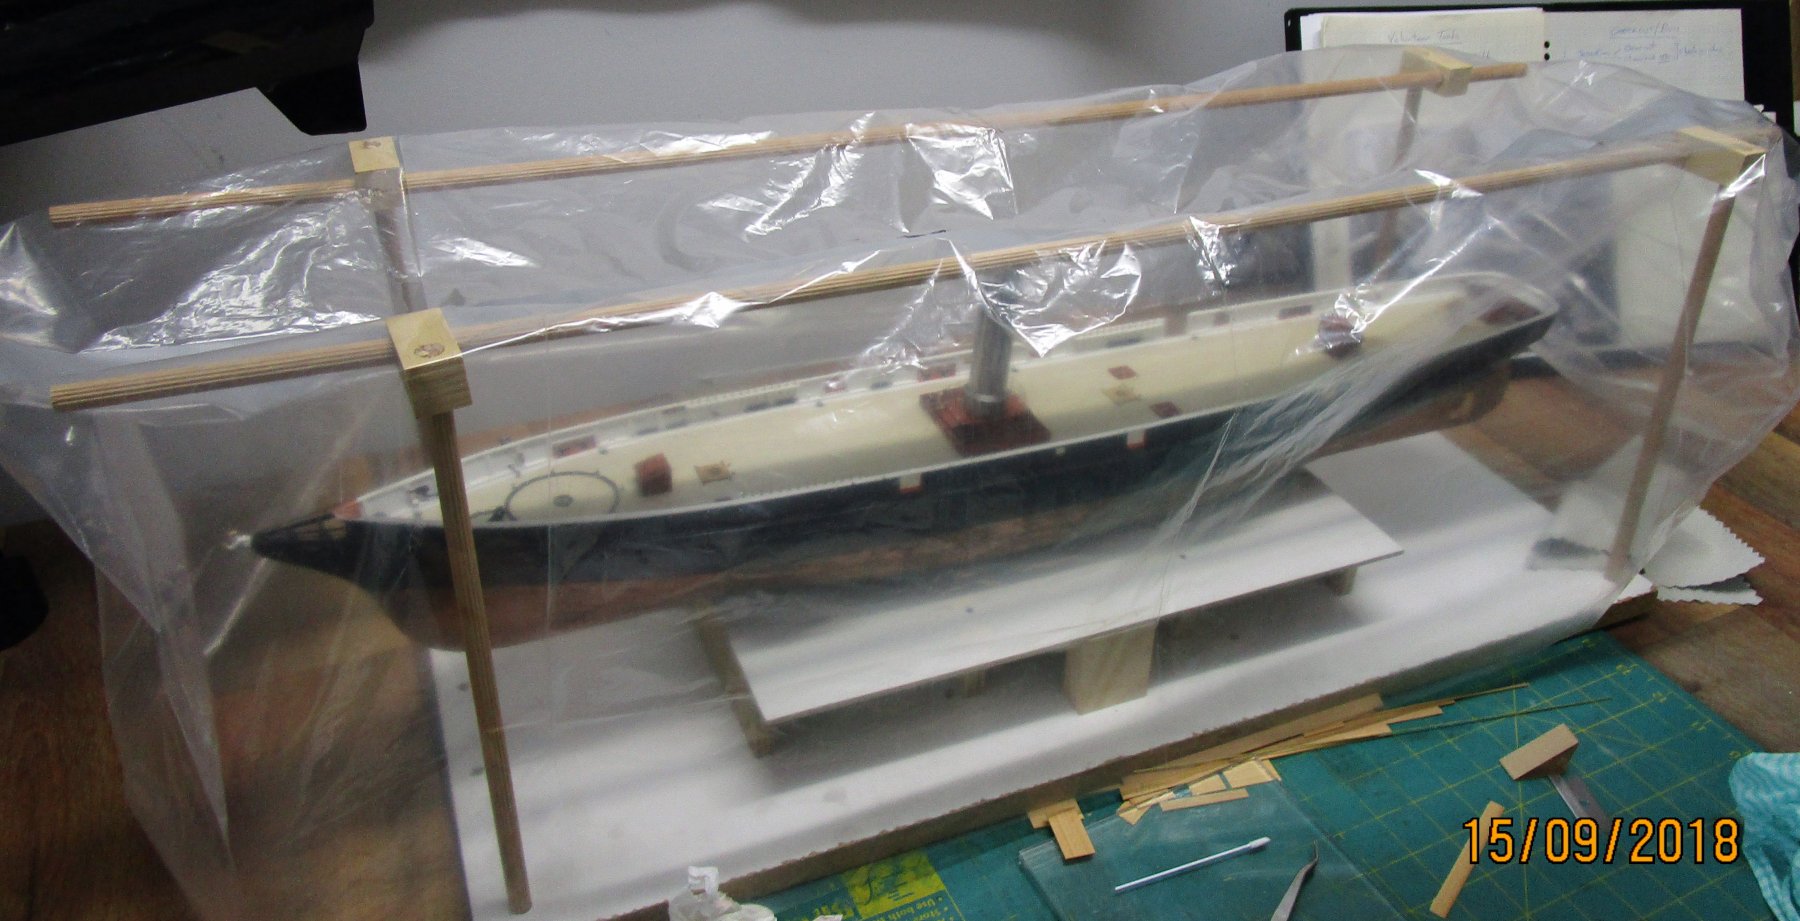
Hi OC. Your Warspite model is looking real nice; great job on her. The set-up for a temp dust cover I was referring to is like the one I am using for Victoria (see following) - cost zilch as I had the dowel, I am using the building board and I had a large clear plastic Bag I cut the end off and taped one side. Just an idea cheers Pat

-
Tools, supplies and workstation......
BANYAN replied to CPDDET's topic in Modeling tools and Workshop Equipment
Hi again Dave, again that is a very broad question as there are usually several very good makers/suppliers of the same tool, so brand does not usually help too much. Also, some cheap tools suffice quite well - BUT from my experience, the best advice I can give, is to, wherever possible and within your budget, buy QUALITY. One example of brands is a small plane - again what sort of job do you intend to do will probably steer you right but good planes can be supplied/made by many excellent makers such as Lee Valley, Veritas, Ibex, et etc. As advised in other posts/threads do not get locked into woodworking or general tool companies, or even specialist hobby suppliers, but look outside the box. Some very good quality and useful tools can be found through Jewellers suppliers, beading shops, medical/dental/vet suppliers, luthier suppliers, and for threads etc try crocheting or sewing suppliers. Sometimes the specialist hobby suppliers are not looking at quality but keeping the price down and the tools reflect - "you gets whats yous pays for" Not sure where you live but also try to buy local as shipping costs are getting to the point it costs more than the tools. I recently tried to order a $8.50 part from the US and the shipping was US$56 - can you believe that? i have had to stop buying via the US for this reason and now get any internationally sourced stuff I need from the UK and/or Europe, with the UK still quite reasonable with shipping costs. I hope that helps a bit? cheers Pat -
For first layer, agree with 'Doc', it is sometimes used in kits for this purpose. Very forgiving and flexible wood but definitely NOT a top/finish layer wood. cheers Pat
-
Another beauty Rob, nice to preserve history in such beautifully executed painting. cheers Pat
- 1,208 replies
-
- 5
-
-
- great republic
- clipper
- (and 1 more)
-
Tools, supplies and workstation......
BANYAN replied to CPDDET's topic in Modeling tools and Workshop Equipment
Hi Dave, as Kurt suggests there are several discussion topics that can be read, including the 'stickies' and also have a look in the Database where there are some excellent topics to help you. One of your first questions is what style of build you want to do as that will govern your needs. Is it a basic klit (plank on bulkhead), solid hull, plank-on frame, or a scratch build. Some modellers have produced excellent scratch built models using the most basic tools; this may be a bit slower but can be achieved. Others (like me) are a bit of a tool aholic and have amassed a suite of power tools. There is a topic devoted to basic tool needs and perhaps if you start with 'beginner' level quick build of a similar type of vessel (motor, sail, static, period?) you will be able to assess which tools need to be improved, added to or unnecessary? cheers Pat -
These things happen mate. If it is not too late one easier way to mate these is to glue the item back together, then drill down if it is not too great a distance. Then insert the pin with a good coating of glue to reinforce it. Good luck cheers Pat
-
Looks great Rob and I love that painting in the background. cheers Pat
- 1,208 replies
-
- 4
-
-
- great republic
- clipper
- (and 1 more)
-
I did all the standing rigging and only the running rigging that would have stayed in place when the sails were unbent. Same as you, I had to make a decision Both authors apparently have a few errors in their books so it is best to triple check against other sources as well I found. I did not catch that item on the thimble Good luck with your research; you are rapidly closing in on the closure of your rigging yard cheers Pat
-
Glad to see you back Clare, and especially to hear that the accident didn't do you any major injury. Love the details on this build of an unusual subject. cheers Pat
-
Unless you pointed that out Dave, only the more knowledgeable riggers would have known Looks good and nicely done. cheers Pat
-
Superb work Jason, that looks really well detailed with clean crip joinery and metalwork. cheers Pat
-
If you find some that would be great, thanks Dave. I sourced my in a beadshop (doing the same thing - browsing and on the hunt) but have never found any as nice as that. Cheers Pat
-
That's a very comprehensive coverage of the process and nice results on the bowsprit Joss. What's the brand and type of tweezers (locking) that you used, it looks very useful for rigging also? cheers Pat
- 38 replies
-
- 1
-
-
- bounty
- caldercraft
- (and 1 more)
-
That sounds very feasible and good way to do it Rob; look forward to seeing this. cheers Pat
- 1,208 replies
-
- 3
-
-
- great republic
- clipper
- (and 1 more)