yvesvidal
-
Posts
3,634 -
Joined
-
Last visited
Content Type
Profiles
Forums
Gallery
Events
Everything posted by yvesvidal
-
 Excellent choices, especially the Sabre and P-38 which are not so common. Yves
 -
F-86F-30 Sabre by Javlin - FINISHED - Kinetic - 1/32
yvesvidal replied to Javlin's topic in Non-ship/categorised builds
Superb bird. So elegant. Yves -
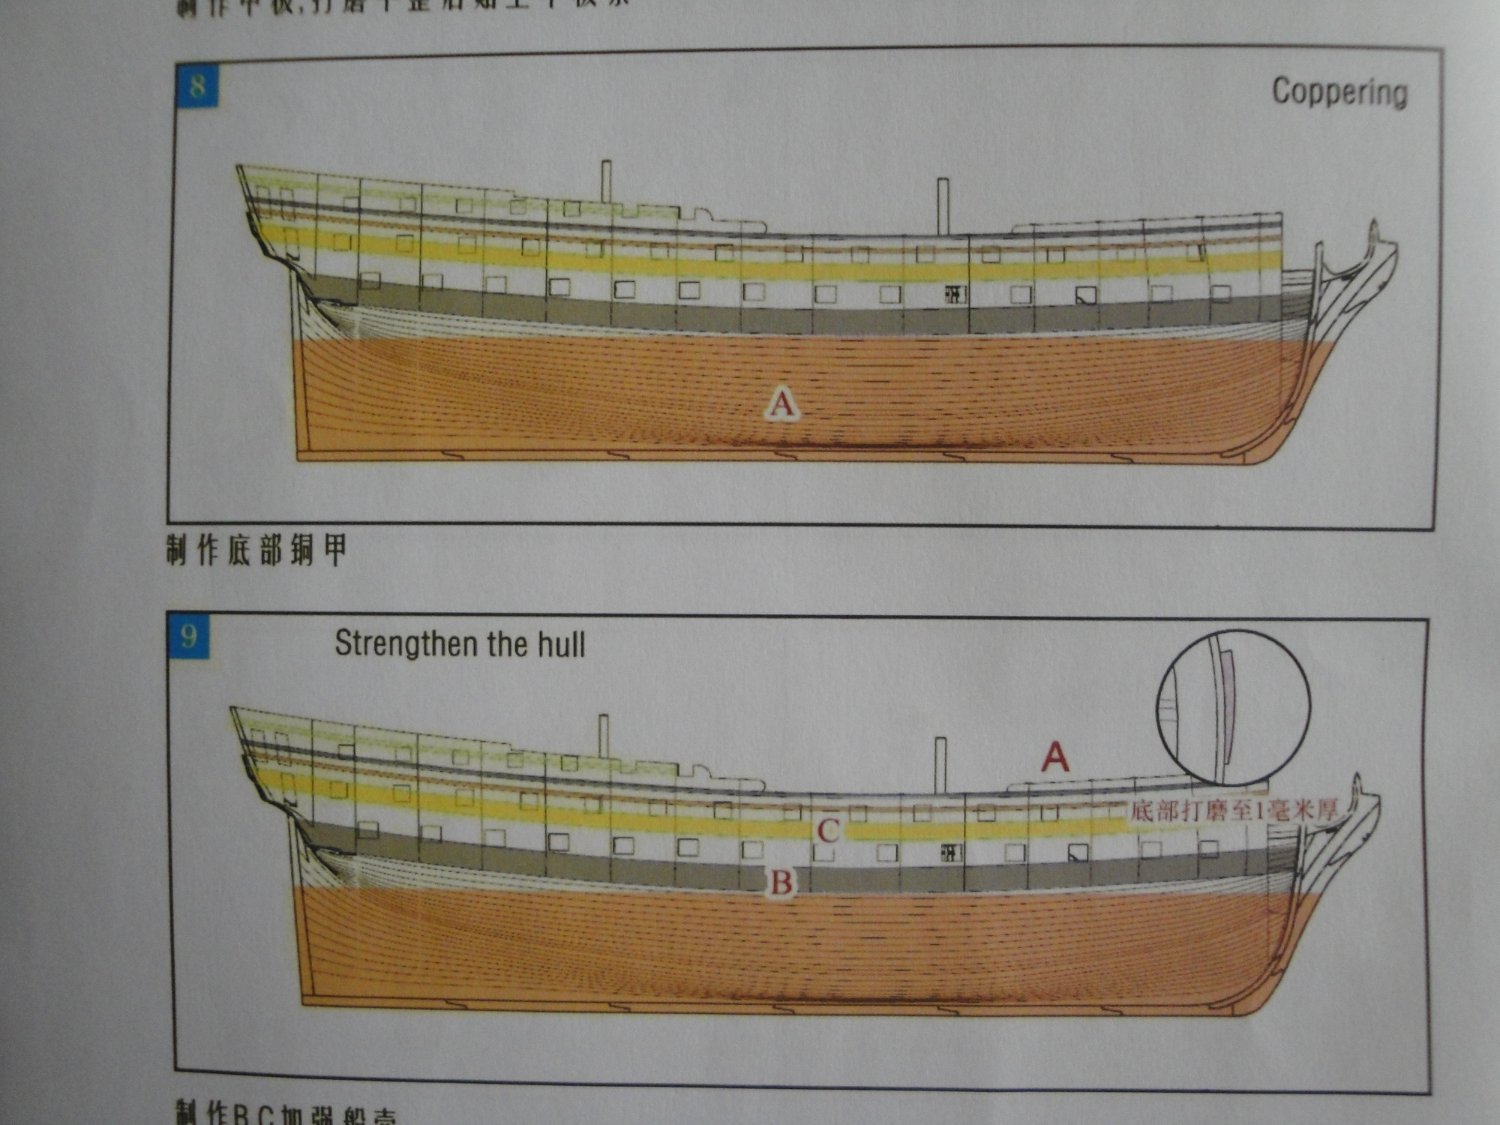
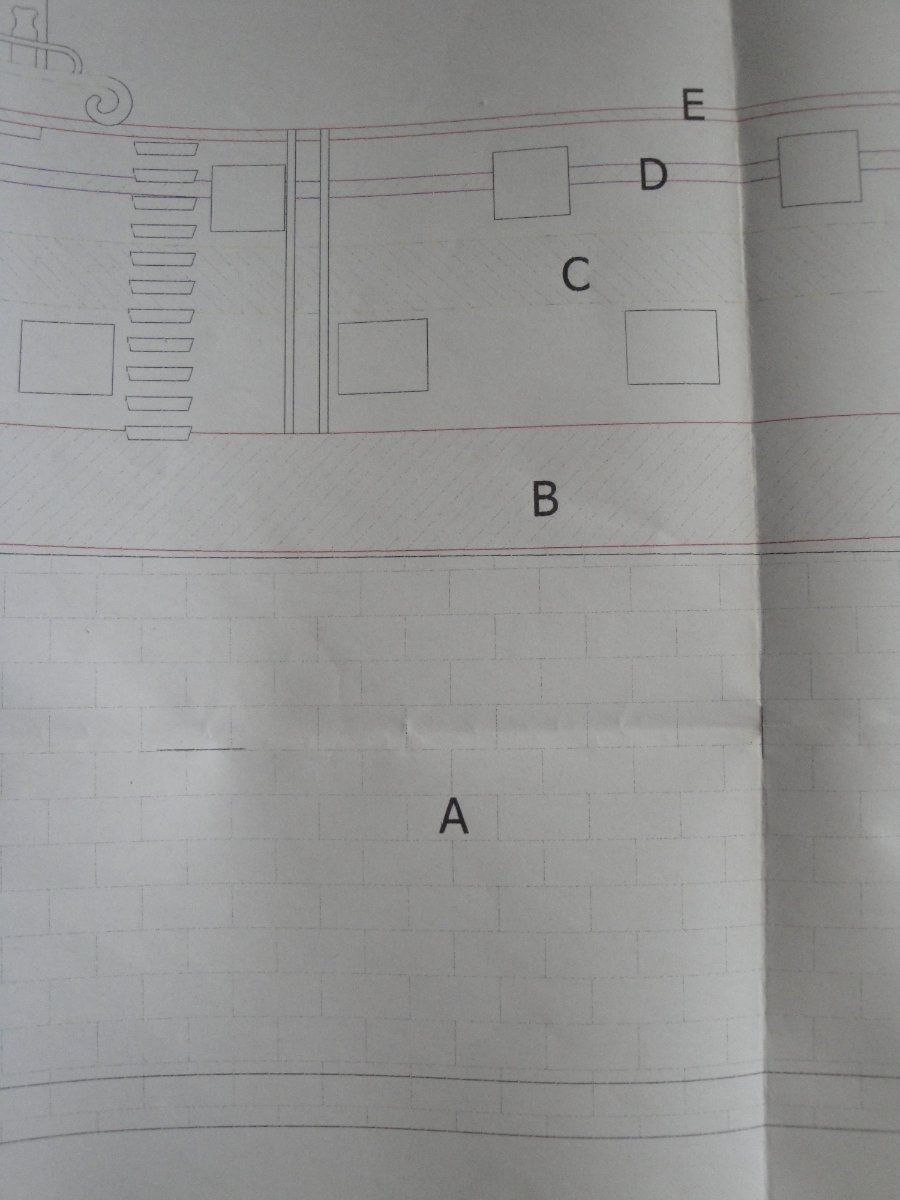
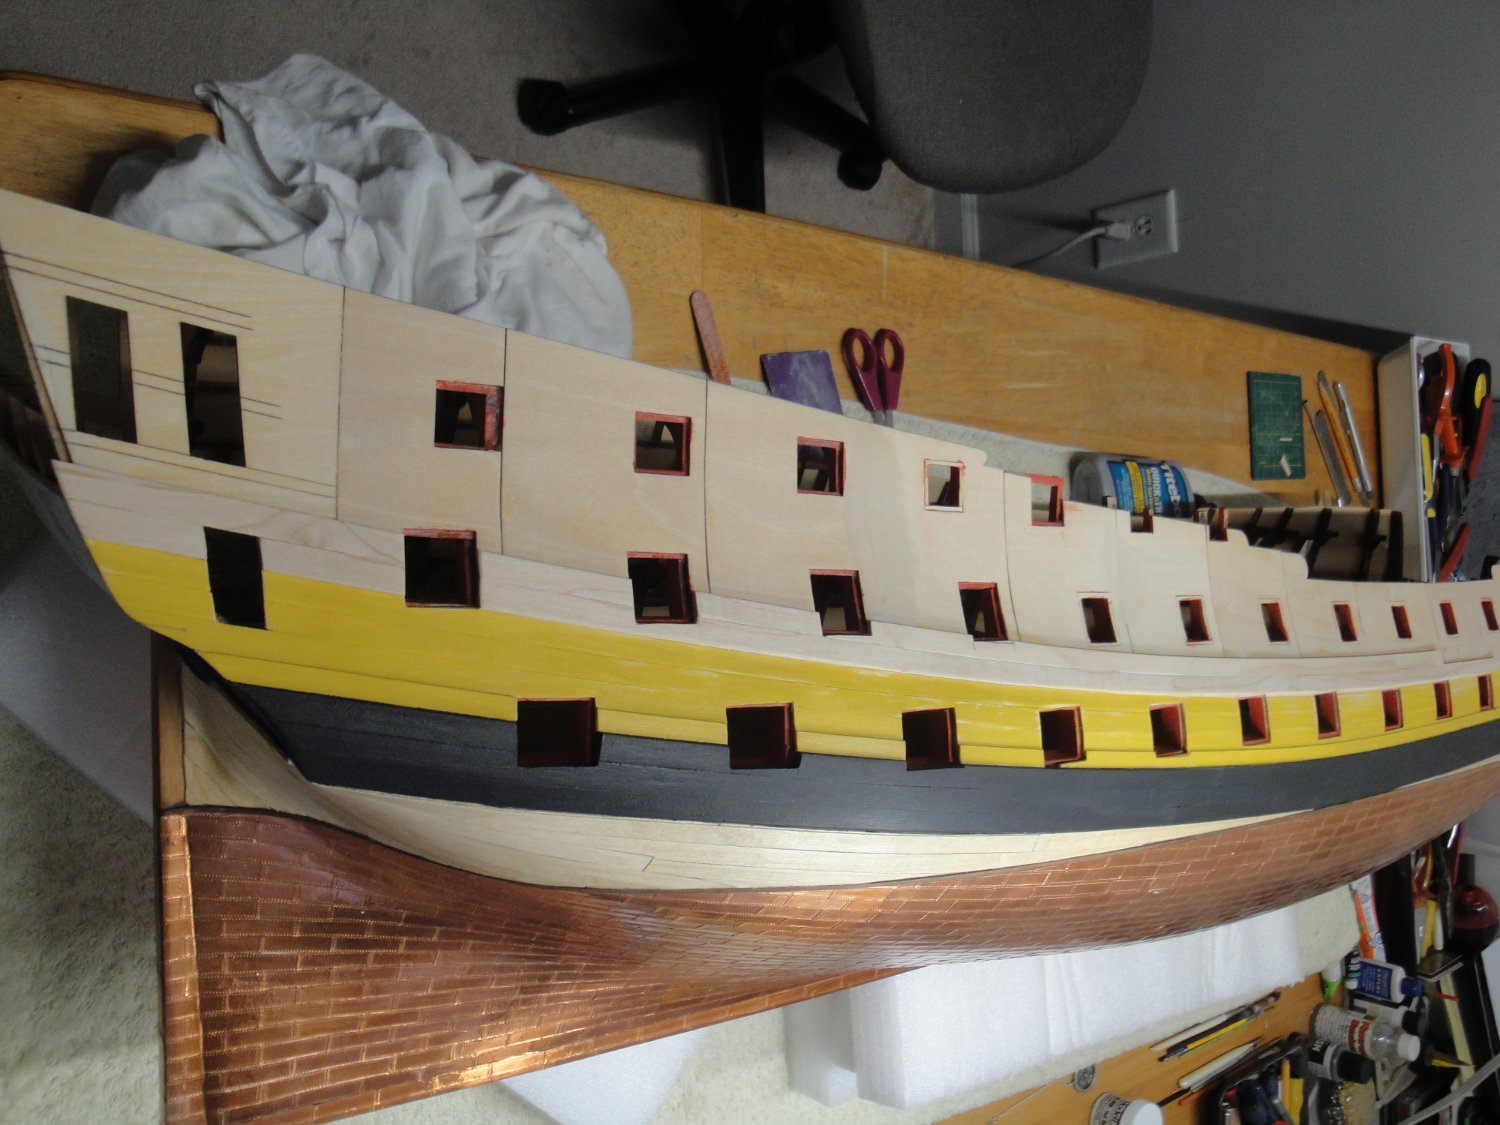
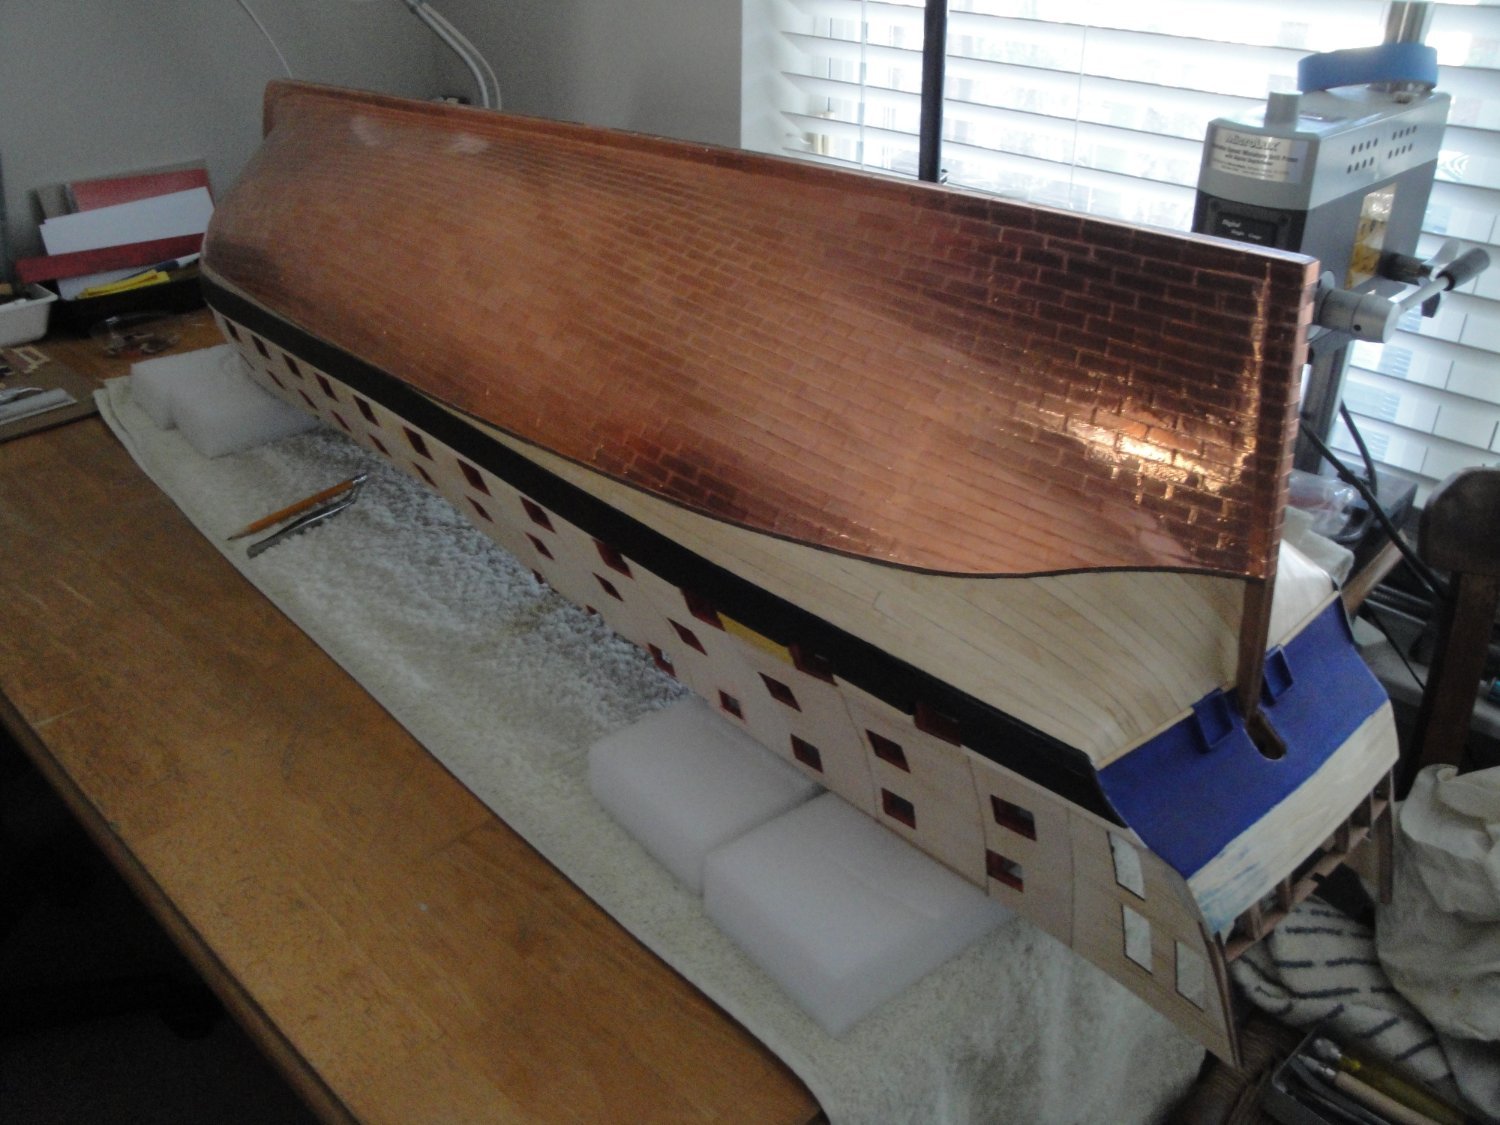
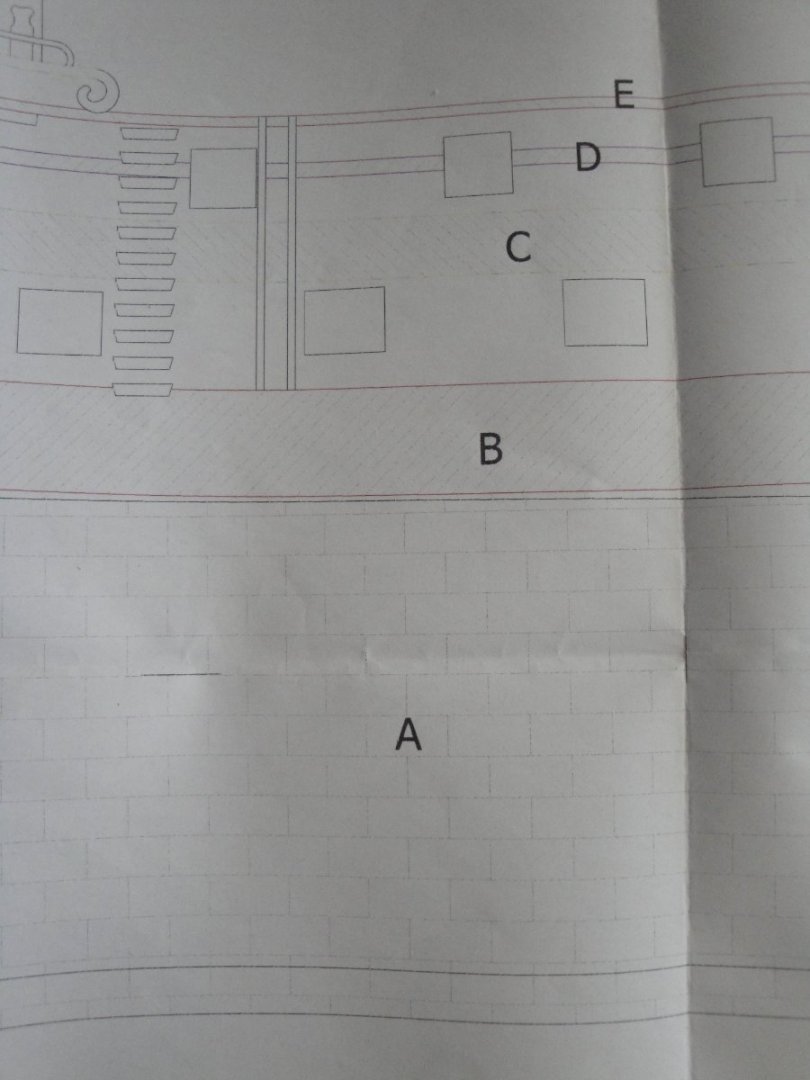
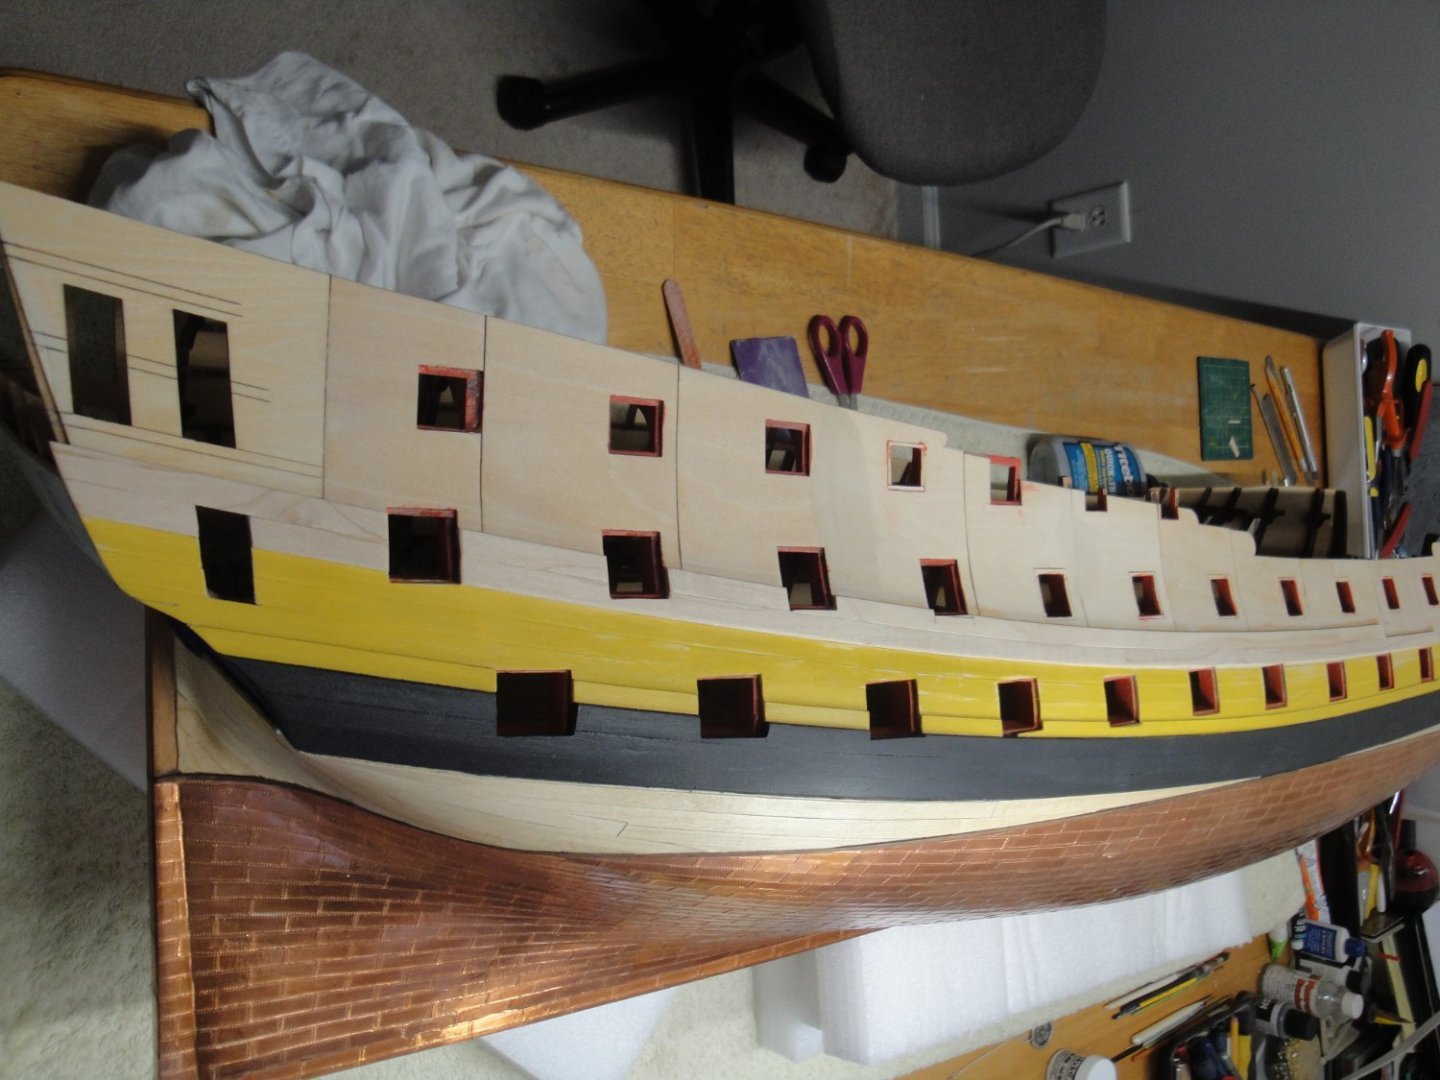
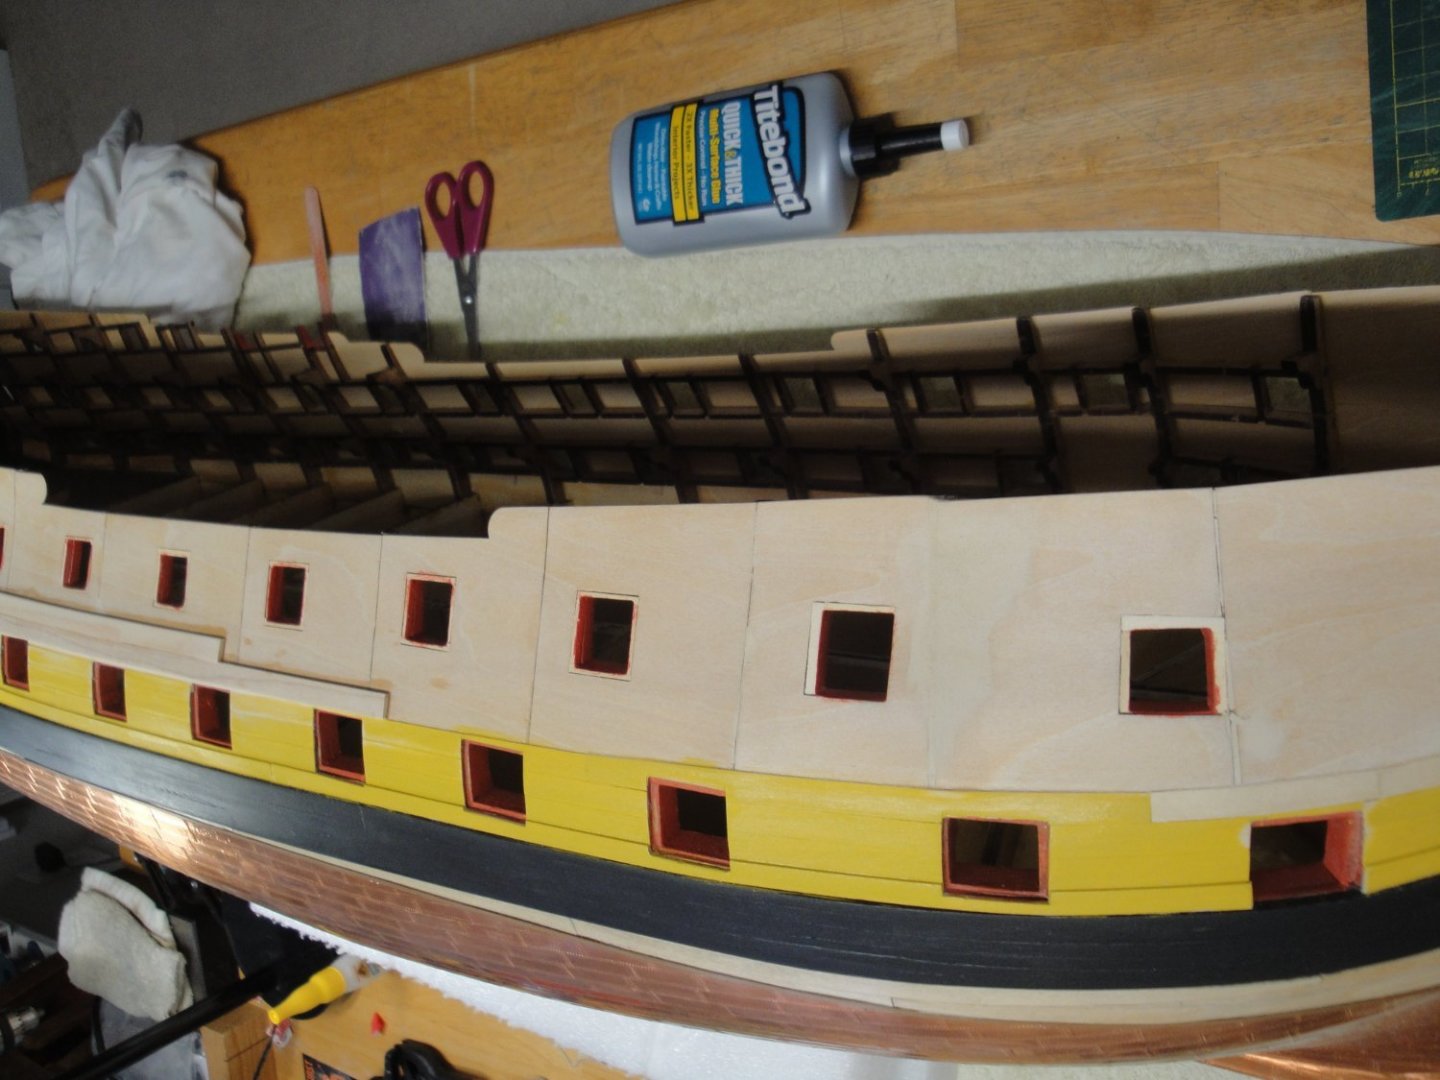
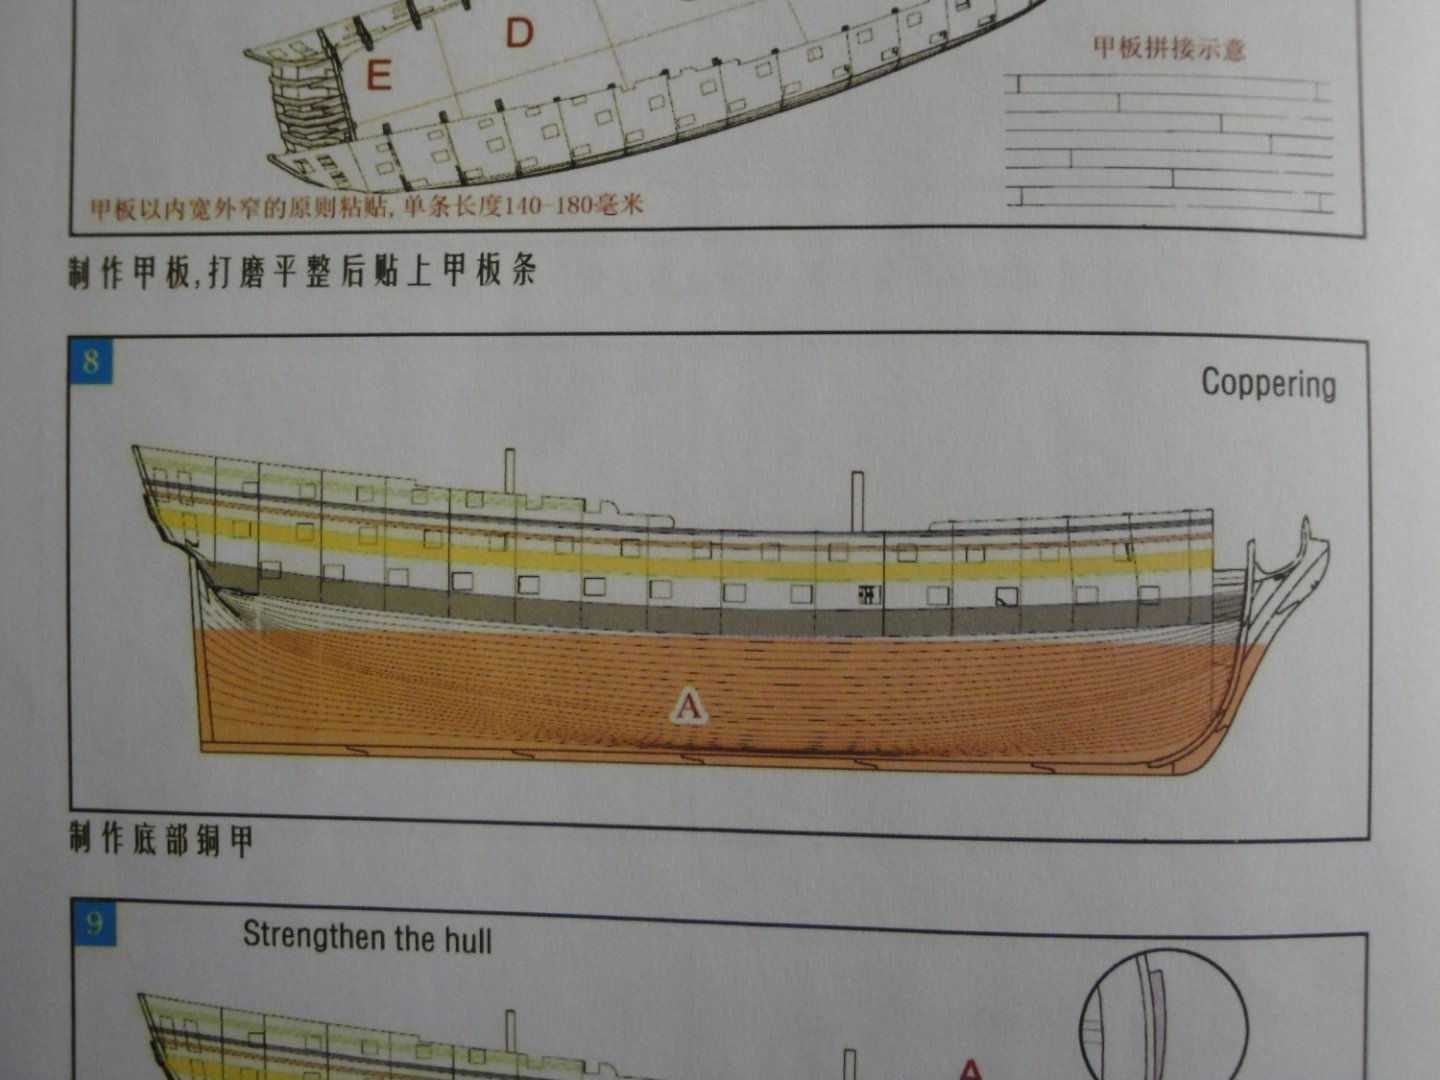
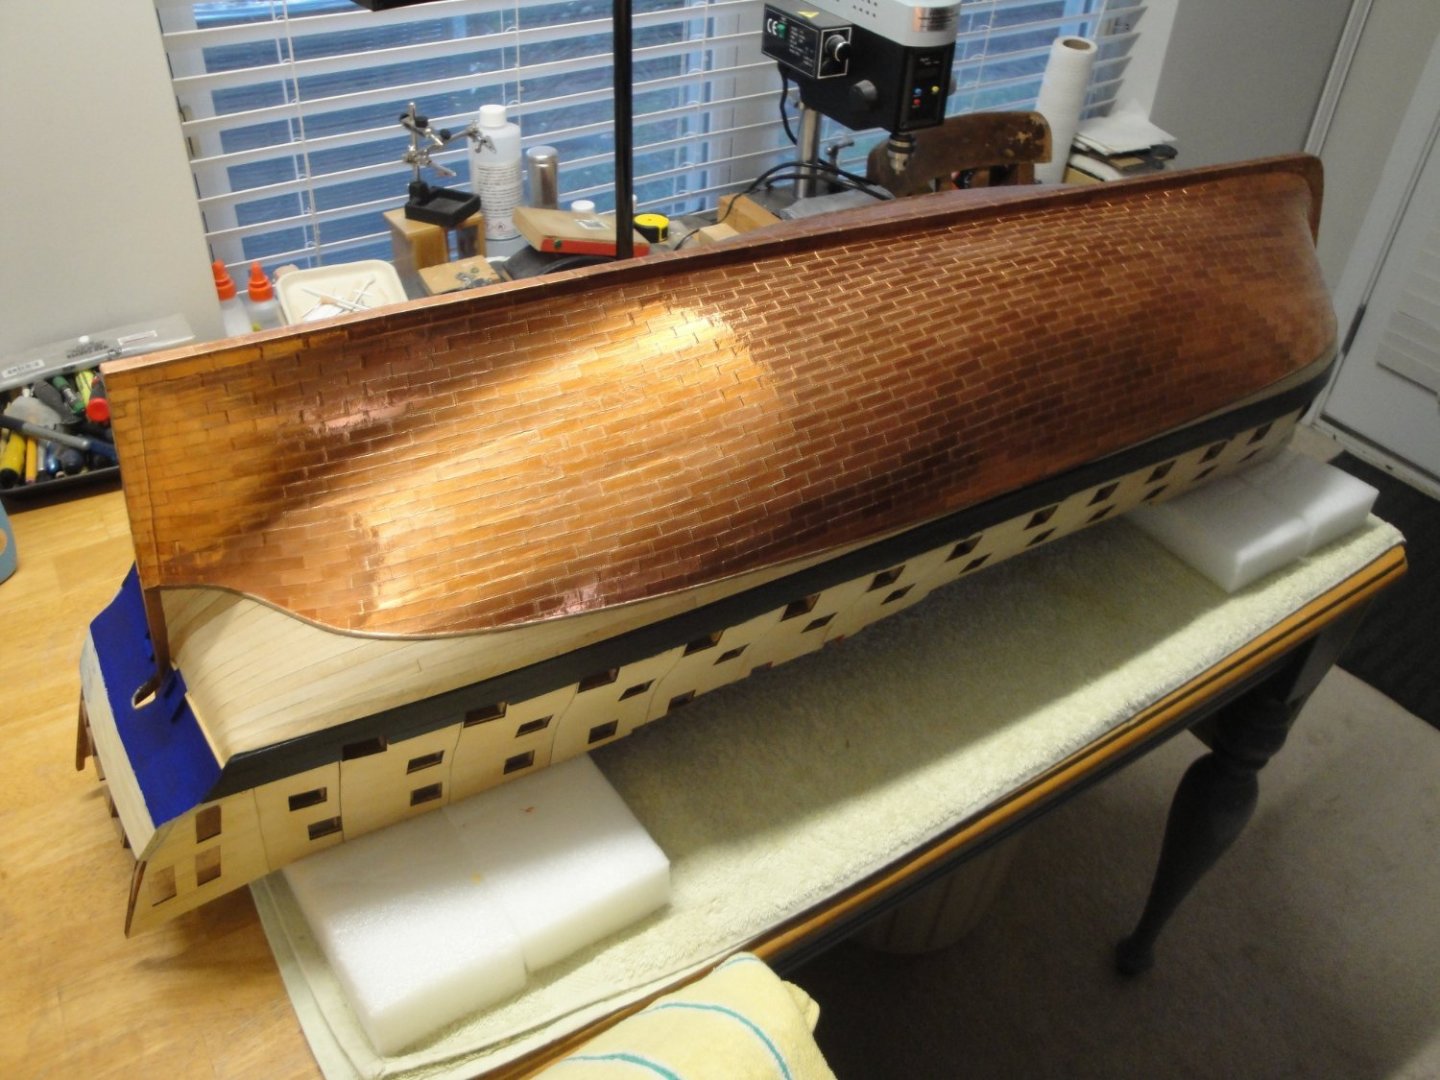
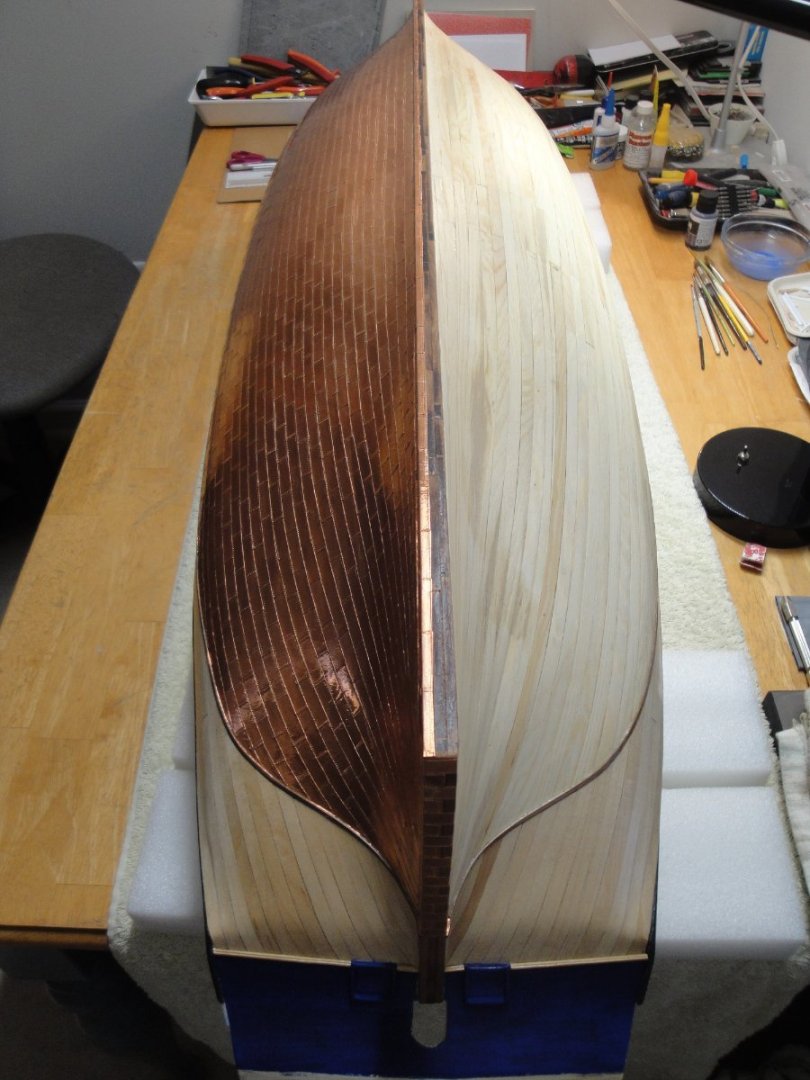
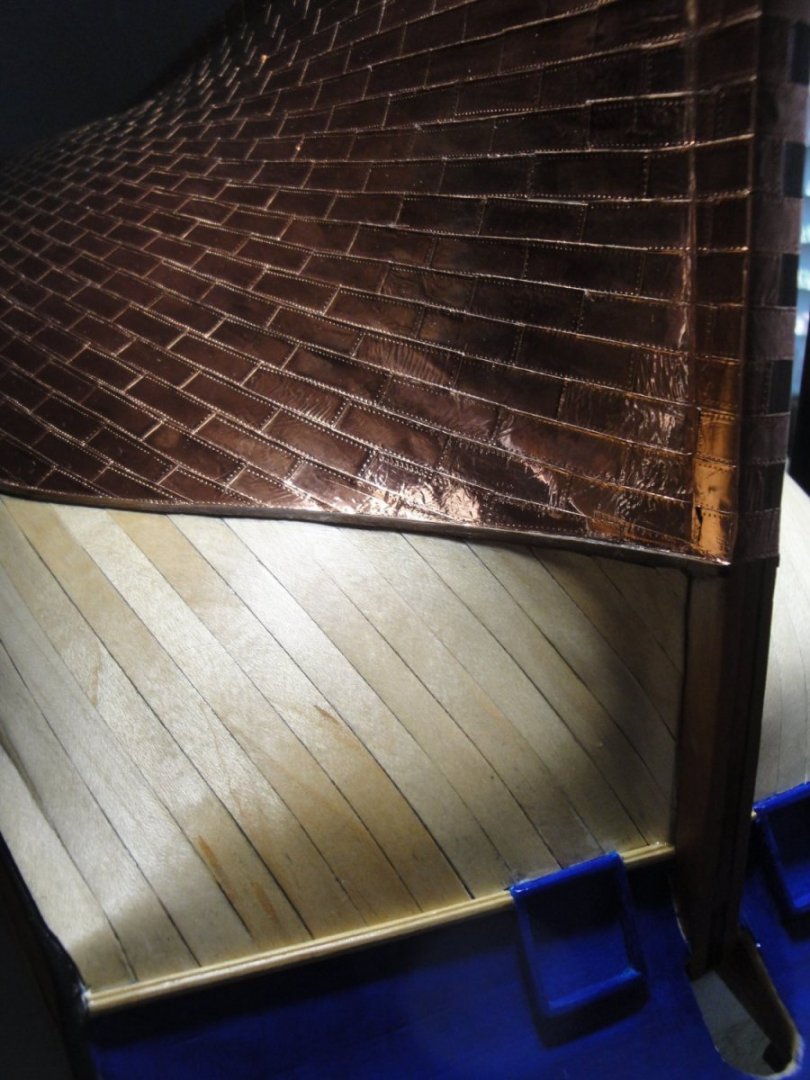
Still following (more or less) the CAF Model instructions, it is now time to dress and stiffen the upper section of the hull. I am approaching one side of the hull at a time. Because of the large size and weight of the hull, it is not practical to jump back and forth between the two sides. So, after Step #8 (Coppering), we are now focusing onto Step #9. The main wales (B) have already been taken care of before the planking of the hull, as indicated before. I am now planking the space between (B - Wales) and (C - Channels). This is done in the following way, after careful measurements: (A) is coppering, (B) are the wales and (C) the channels. The distance between the wales and the Channels is of about 28-29 mm. As some of you may recall, I installed a lime wood strip of 6 mm wide x 2 mm thick (not provided in the kit) on top of the main wales. That strip plus three strips of 8 mm x 0.4 mm Maple (provided in the kit) will end up at around 29 mm, once sanded and glued. So it will fit perfectly and is easy to install and cut with scissors. You can see the progressive transition from the bulky 3 mm thick wales to the top wale (2 mm) and then the hull planking at 0.4 mm. A view of the bow: You can see that I started building the Channels, using the 2 mm x 8 mm planks provided in the kit (Package "C"). The question came for the stern. Should I extend all the planking to the very end of the ship or should I stop it at a certain distance? Will the planking (and specifically the channels), affect the construction of the Galleries (coming in Session #5 .... and thus far away). After a quick discussion with Tom, it was decided to extend all planking all the way to the end, and then sand very thin the channels at the exact size of the side galleries, so that no extra thickness exists to jeopardizes the alignment of the windows. I hope you are enjoying the discovery of that complex and large kit. Yves

- 507 replies
-
- 15
-

-

-
Beautiful result and lovely boat. Yves
-
Mercedes 300 SL by kpnuts 1/16 italari
yvesvidal replied to kpnuts's topic in Non-ship/categorised builds
If there is a big and beautiful car kit on the market, KPNuts has it !!!! Superb model, once again. Yves -
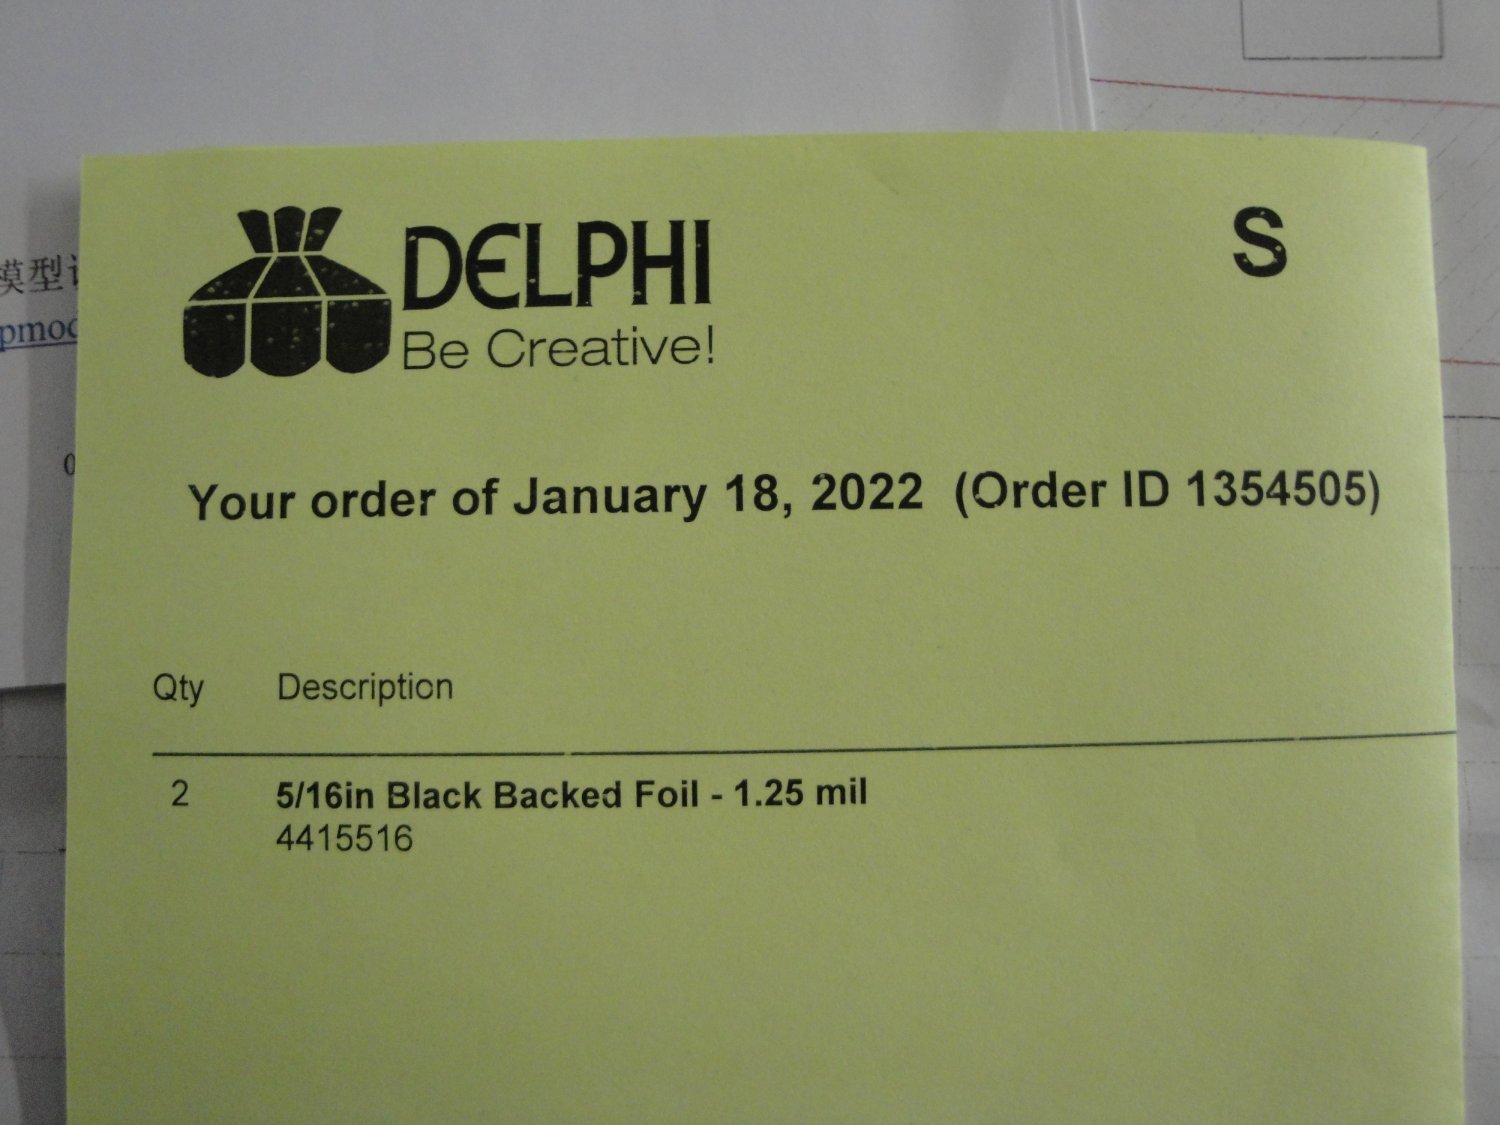
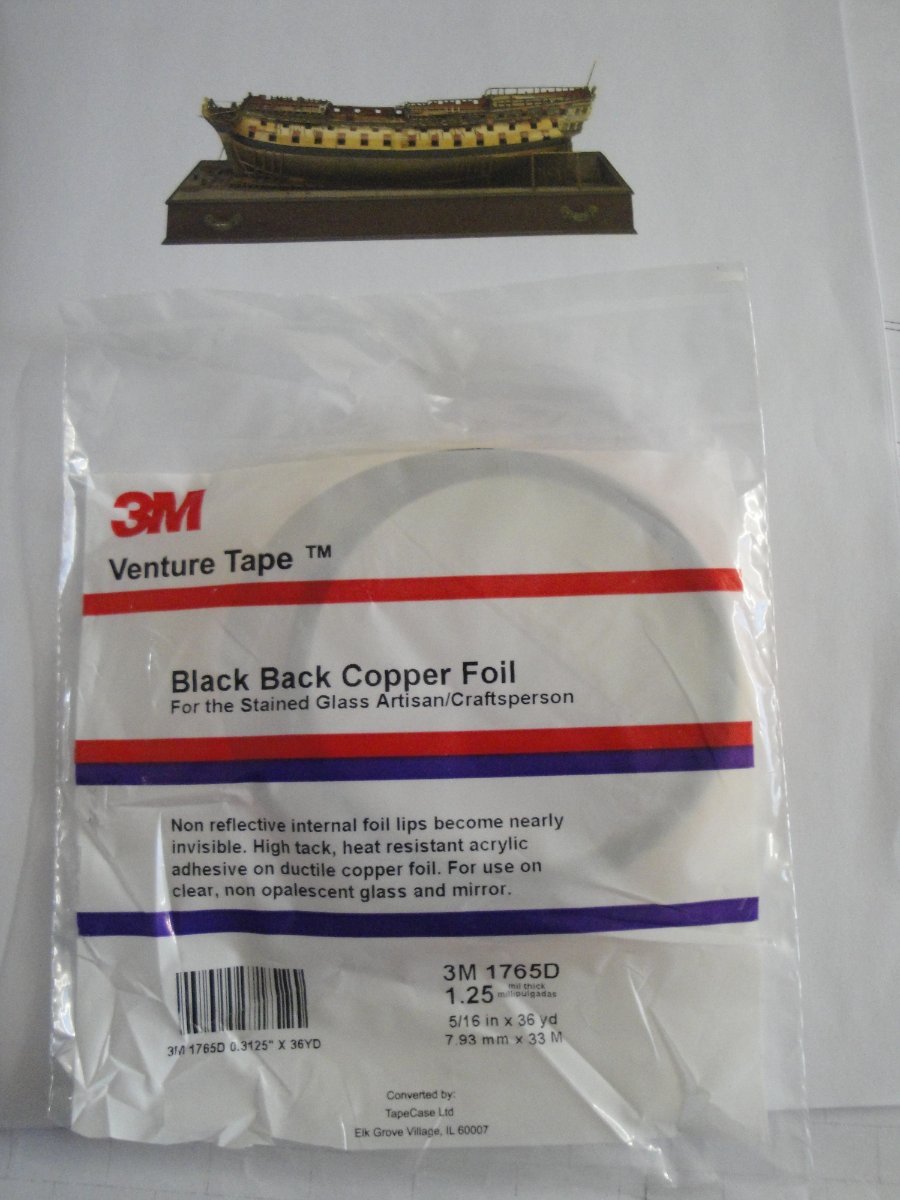
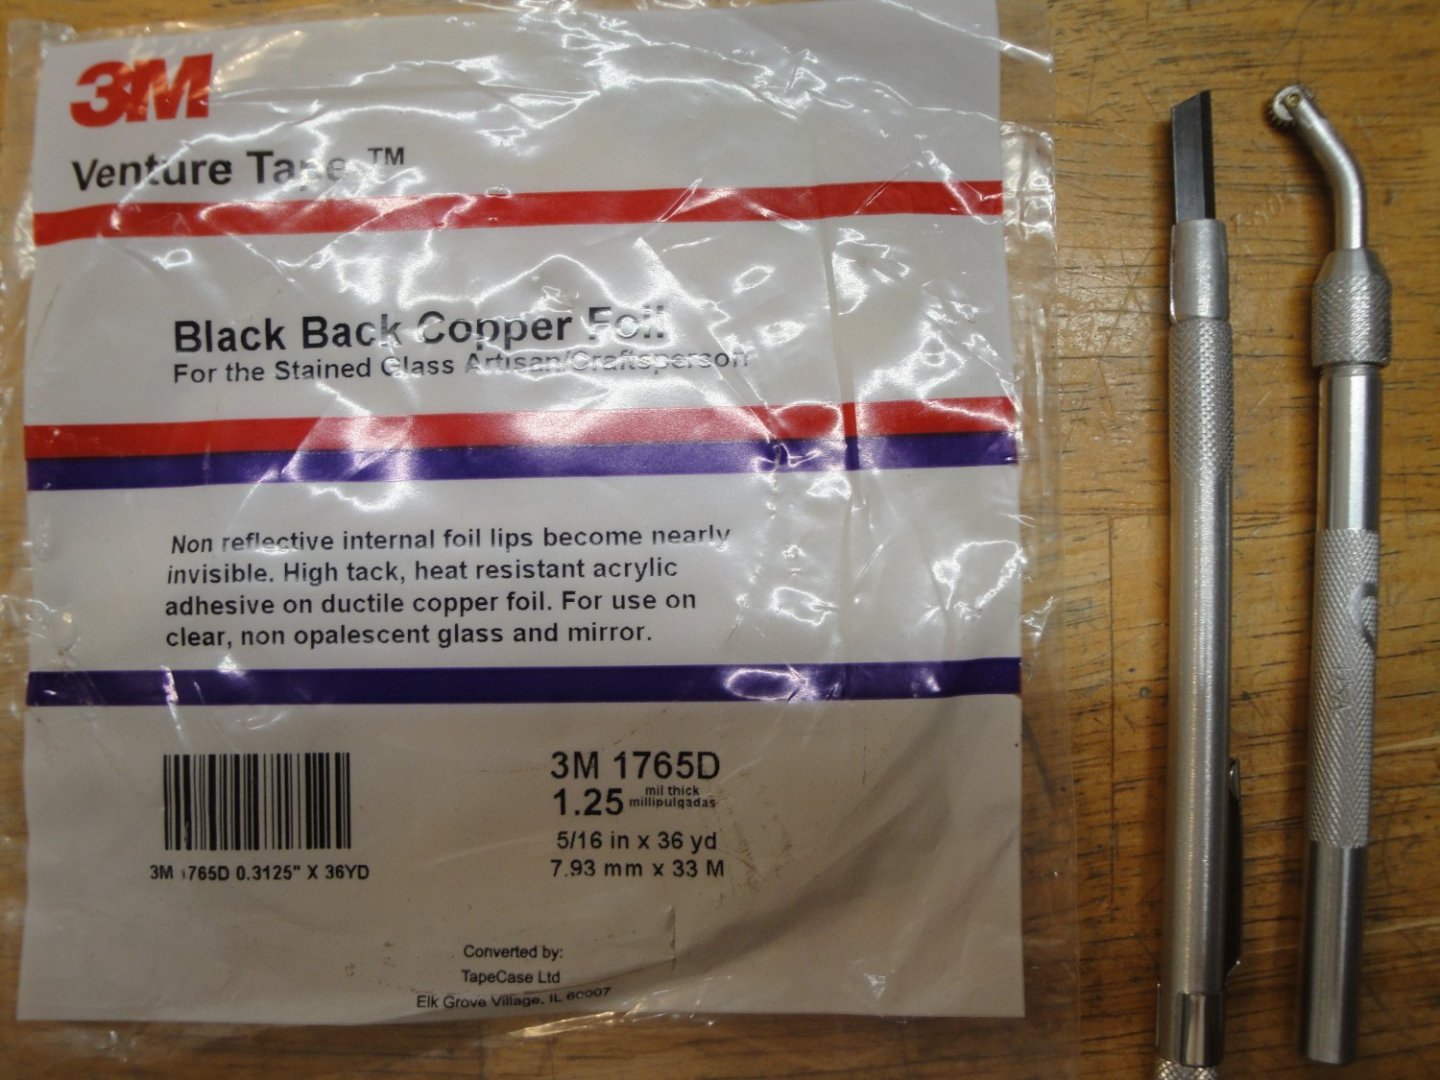
Hamilton, I am not familiar with the tape provided in the Model Shipways kits (Constitution, Syren....). I assume it is the same one that they sell on their catalog but I have no detail where they are sourcing it. The tape I used is from 3M and was recommended to me by many model ship enthusiasts. That tape also happens to have the right width for the tiles, which is a big plus when you have to cut slightly more than 2,400 one of them. Yves
-
My goal is to get a nice even reddish color around the hull and seal it with Future Floor. It will most likely continue its process of disintegration over the years, but should be extremely slowed down by the coating. Yves
-
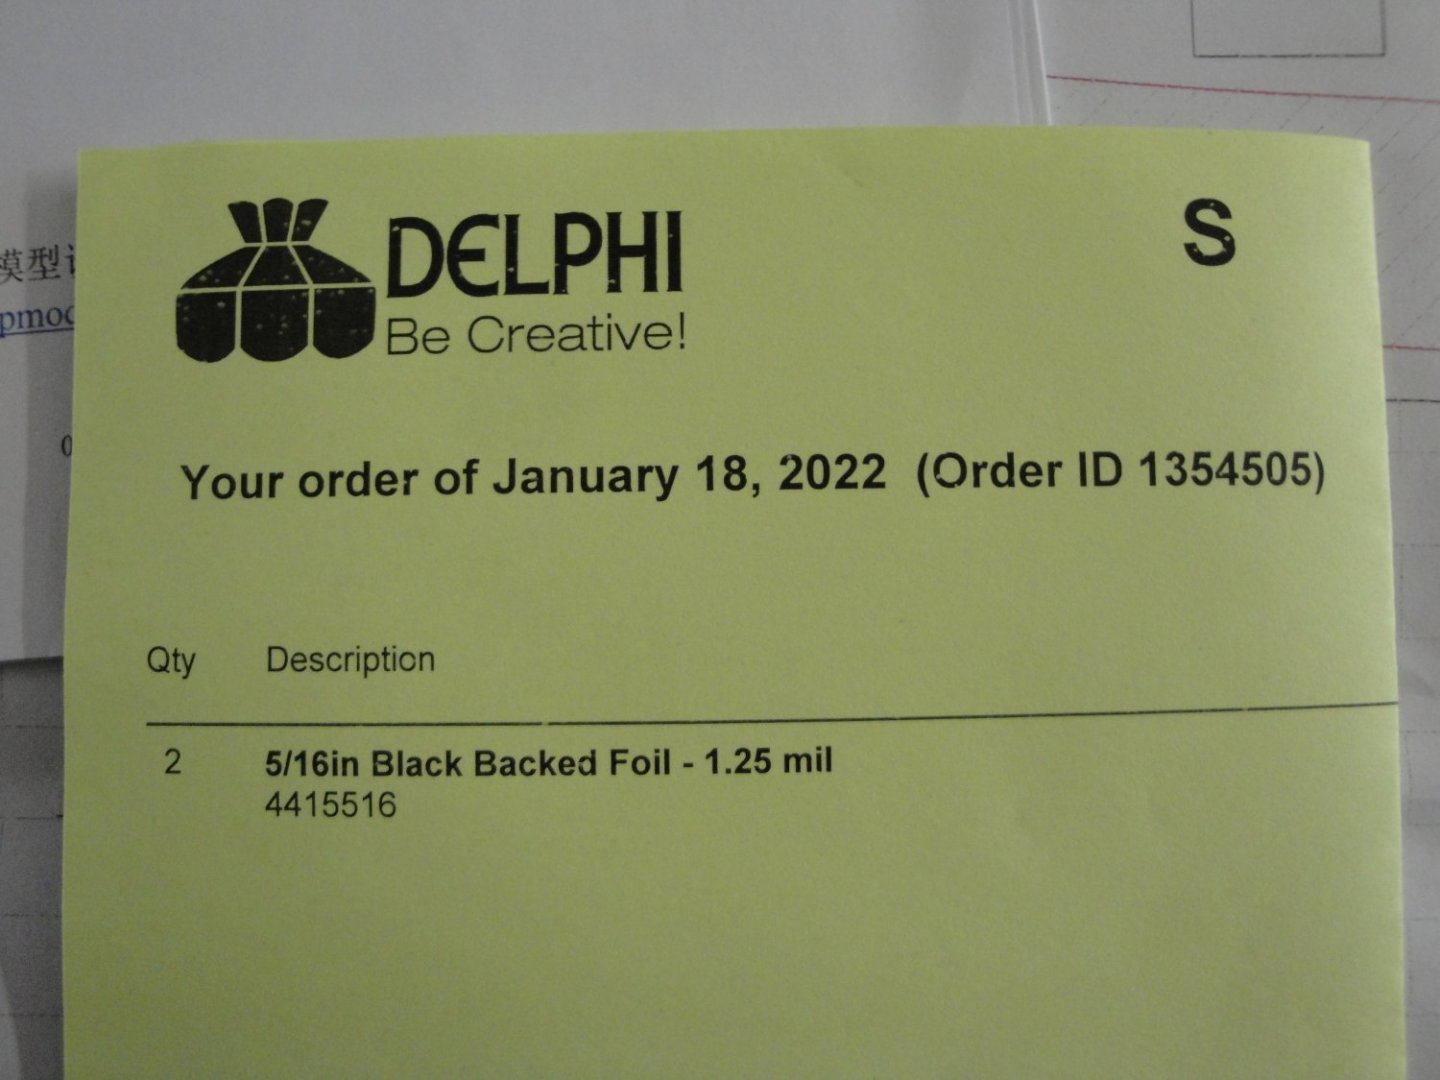
All the details have been given before. You just need to read them. The tape was procured from Delphi https://www.delphiglass.com/ They are specialized in Stained glass and you should be able to find this material in England, where this kind of art is quite common. Yves
-
1978 JPS by kpnuts - Tamiya - 1/12 - PLASTIC
yvesvidal replied to kpnuts's topic in Completed non-ship models
That John Player Special dress is always an eyes turner.... Yves- 1 reply
-
- 6
-
-
Yes, it is a superb model, with an incredible paint. I am a sucker for Alfas..... Yves
-
Start a new thread Kevin: it will be cleaner and clearer. Yves
- 83 replies
-
- 5
-
-
- marcle models
- card
- (and 1 more)
-
Seeing you build this model, brings back tons of memory when I built it in 1985, on the French Riviera. Yves
- 58 replies
-
- 5
-
-
- Calypso
- Billing Boats
- (and 1 more)
-
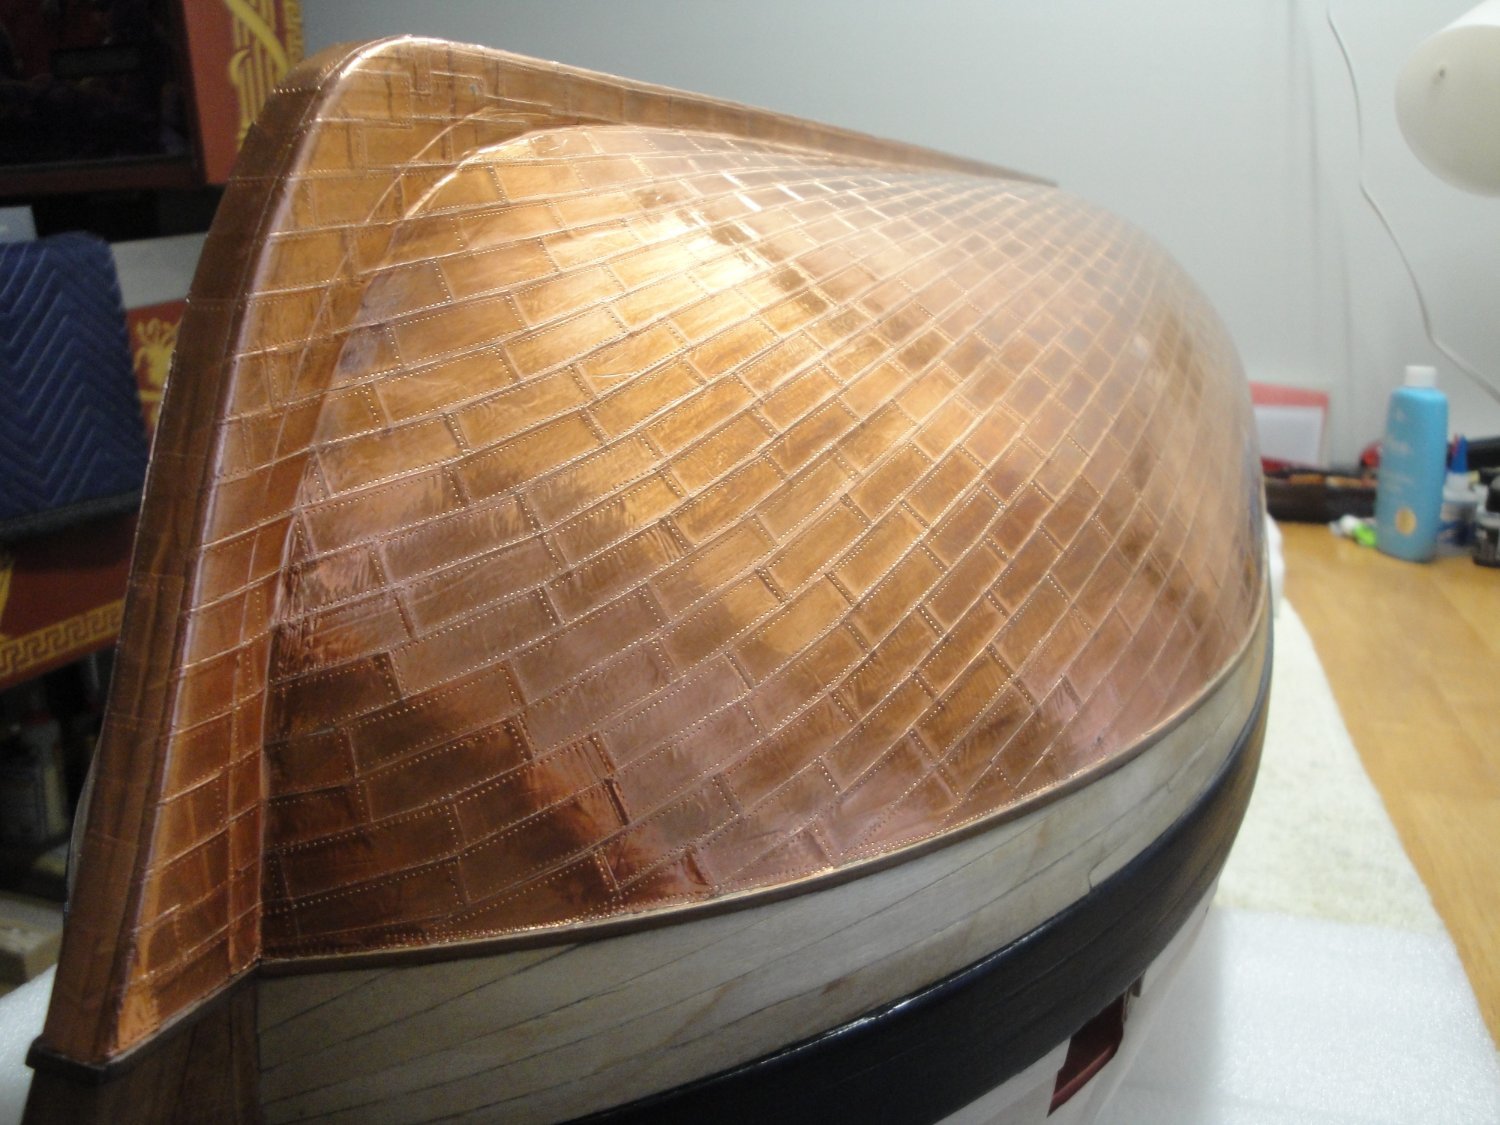
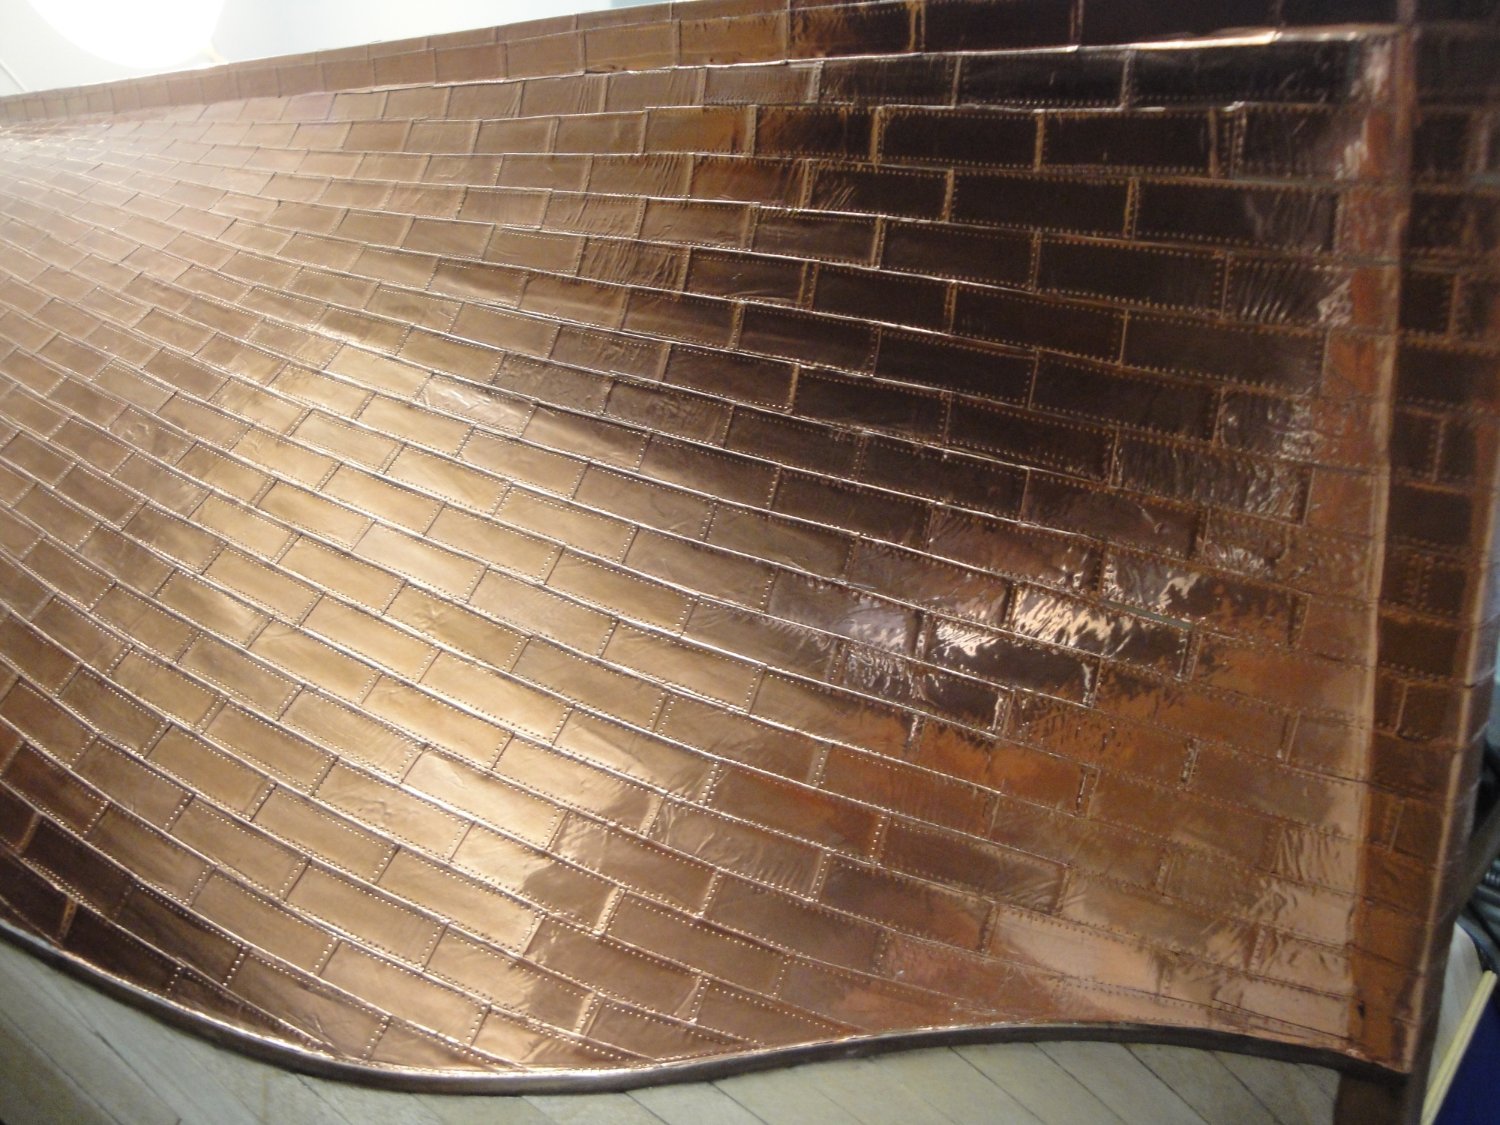
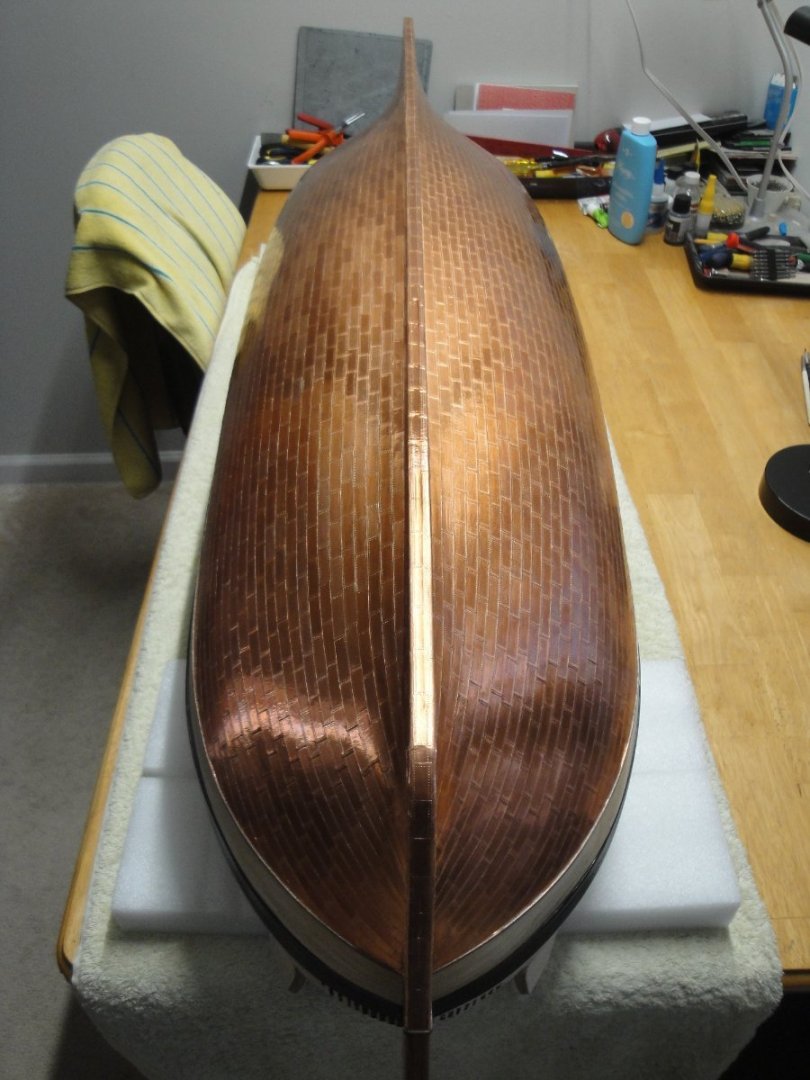
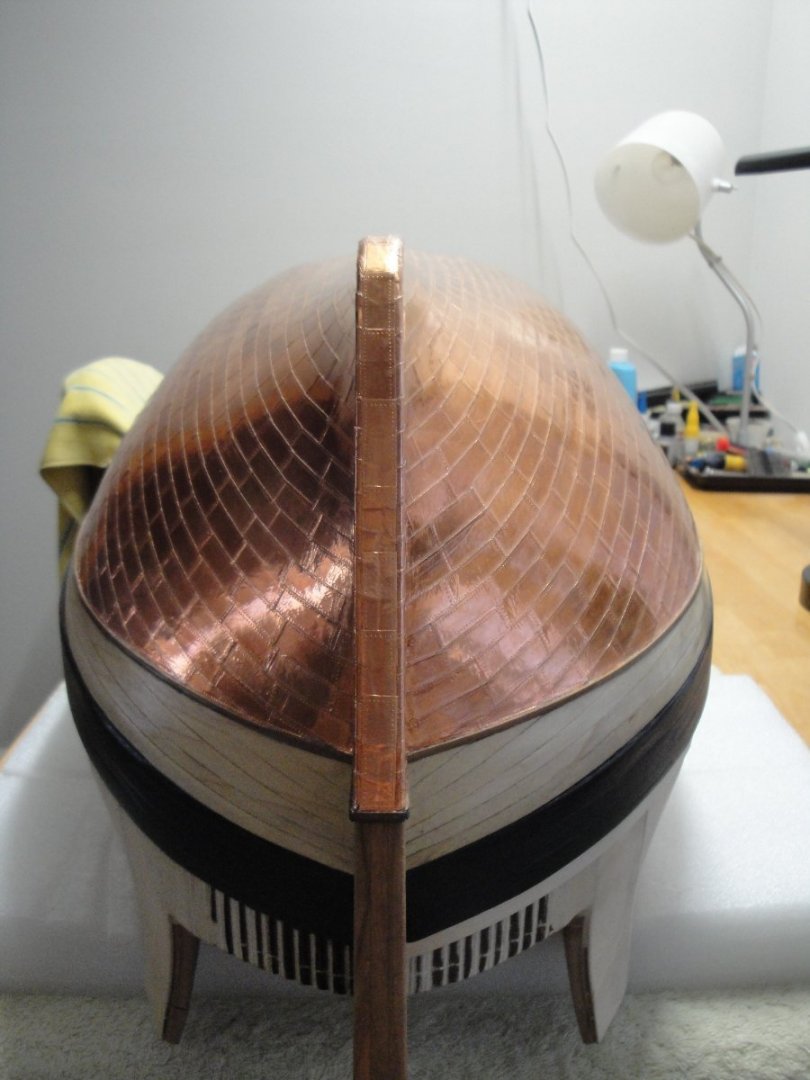
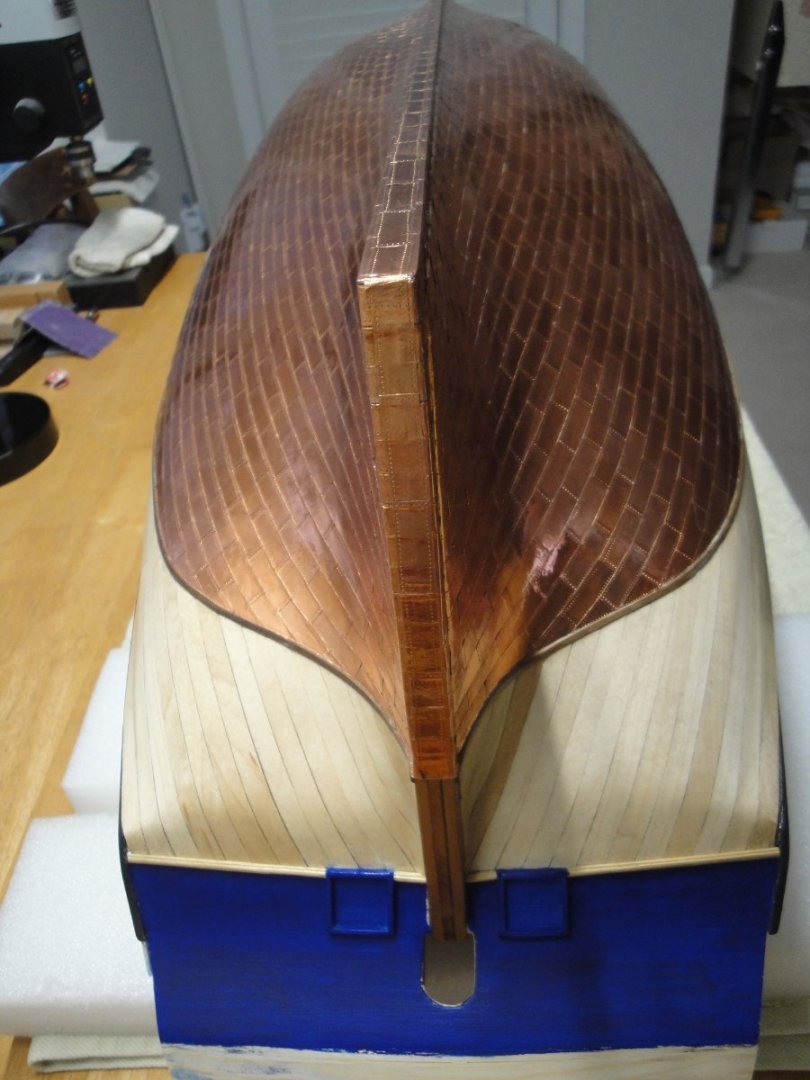
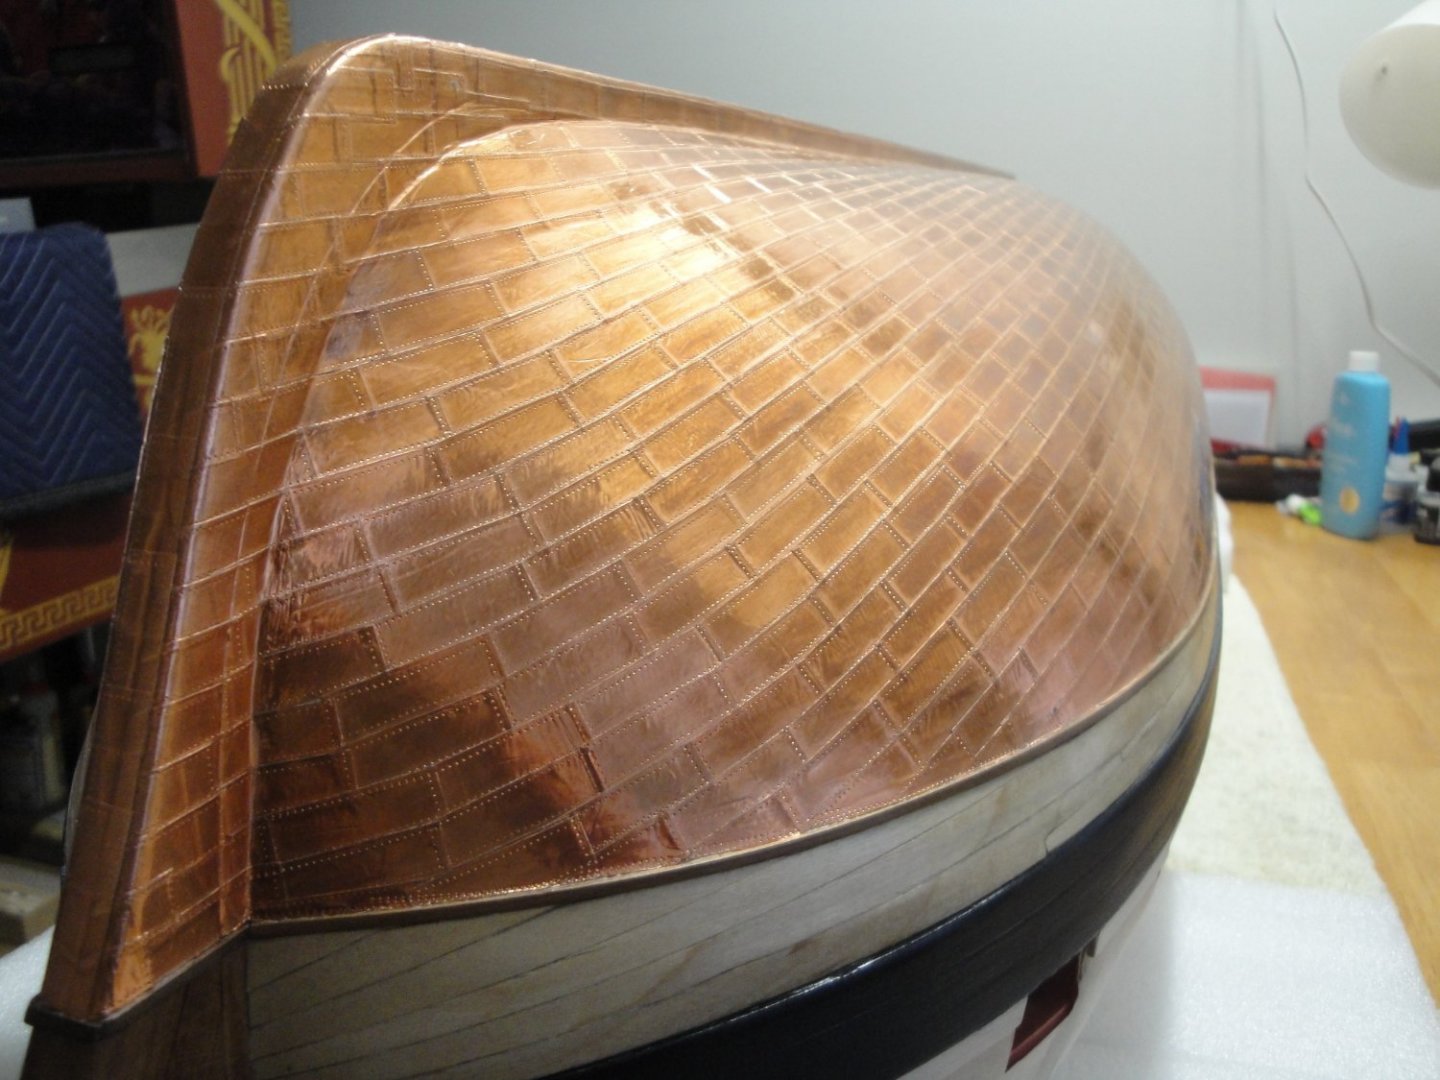
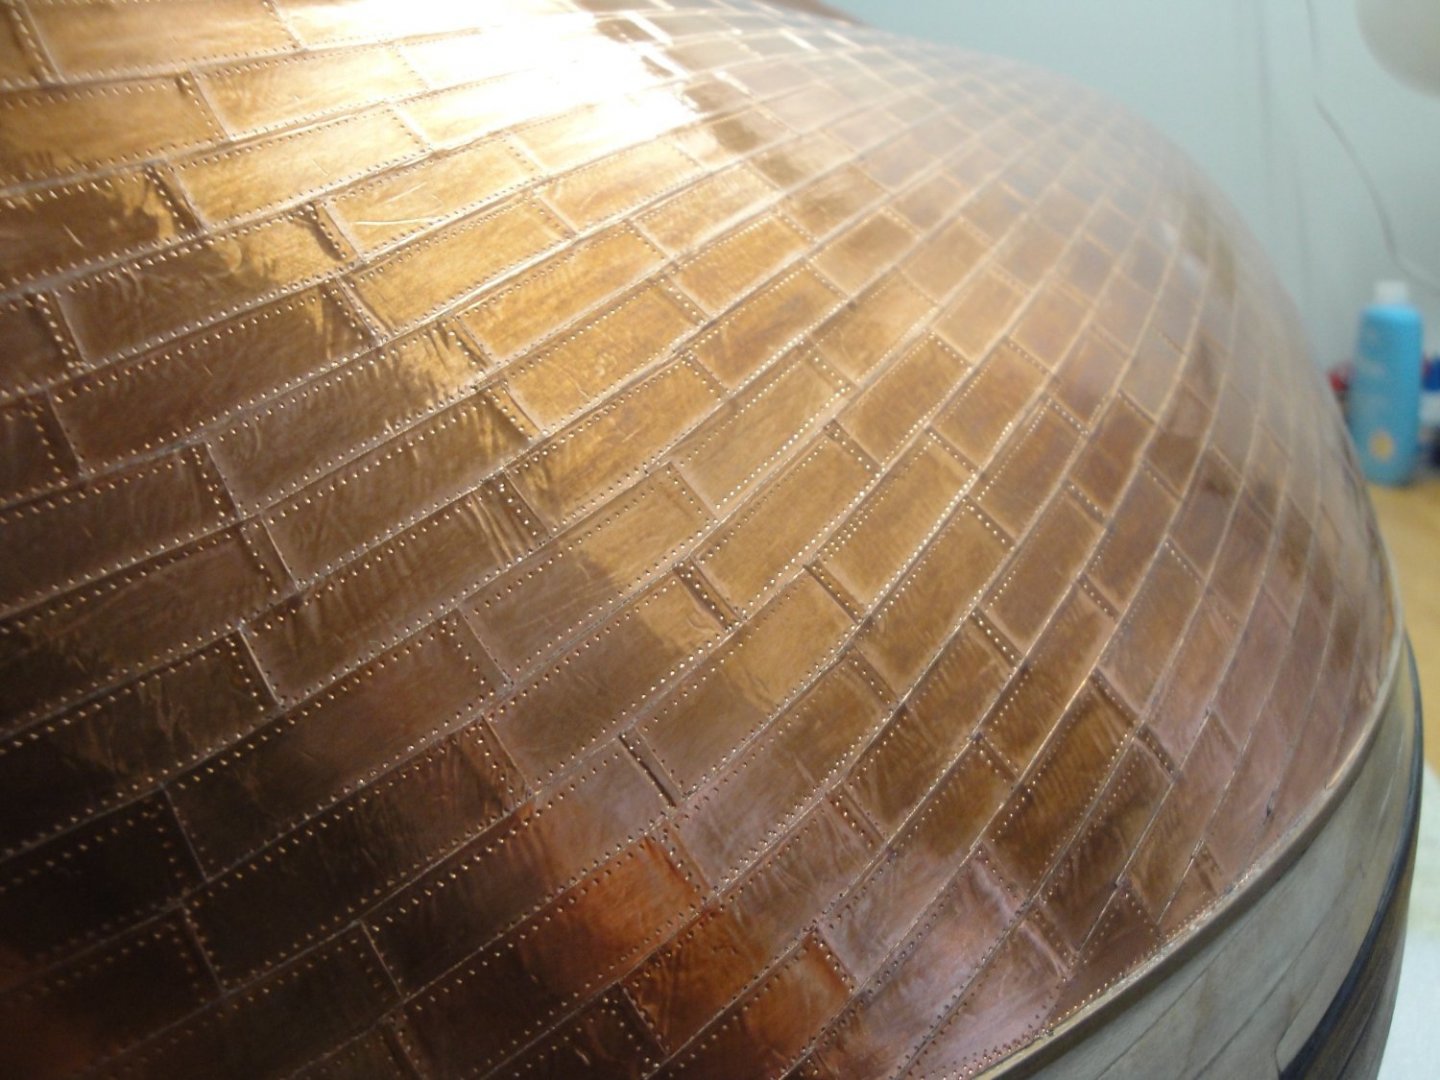
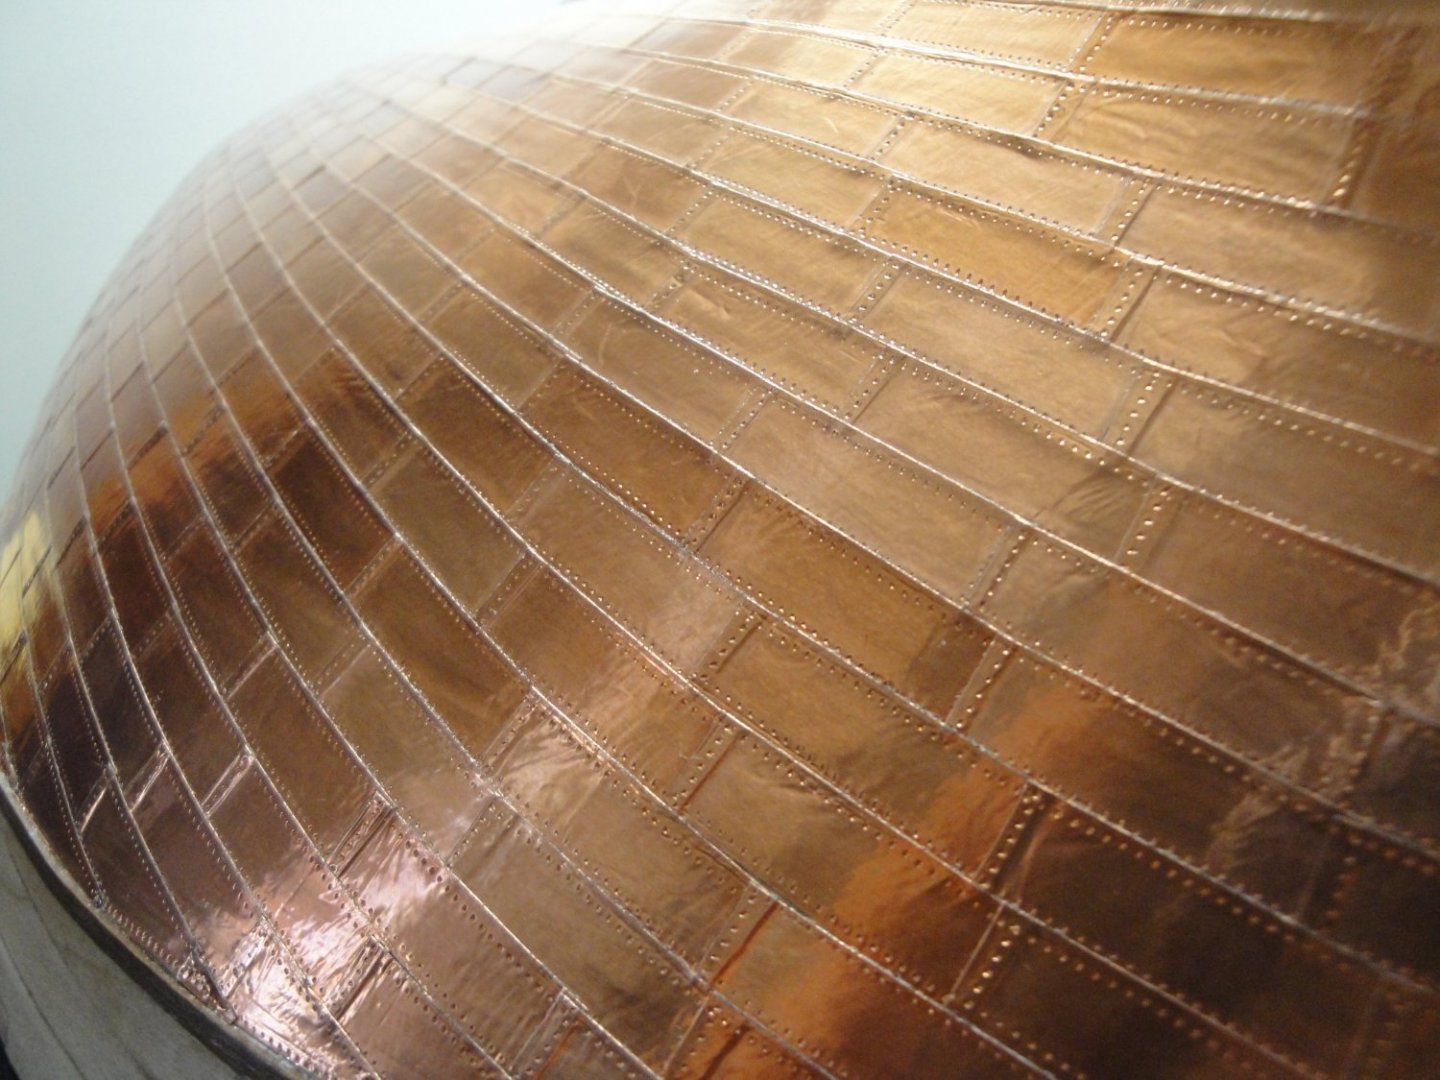
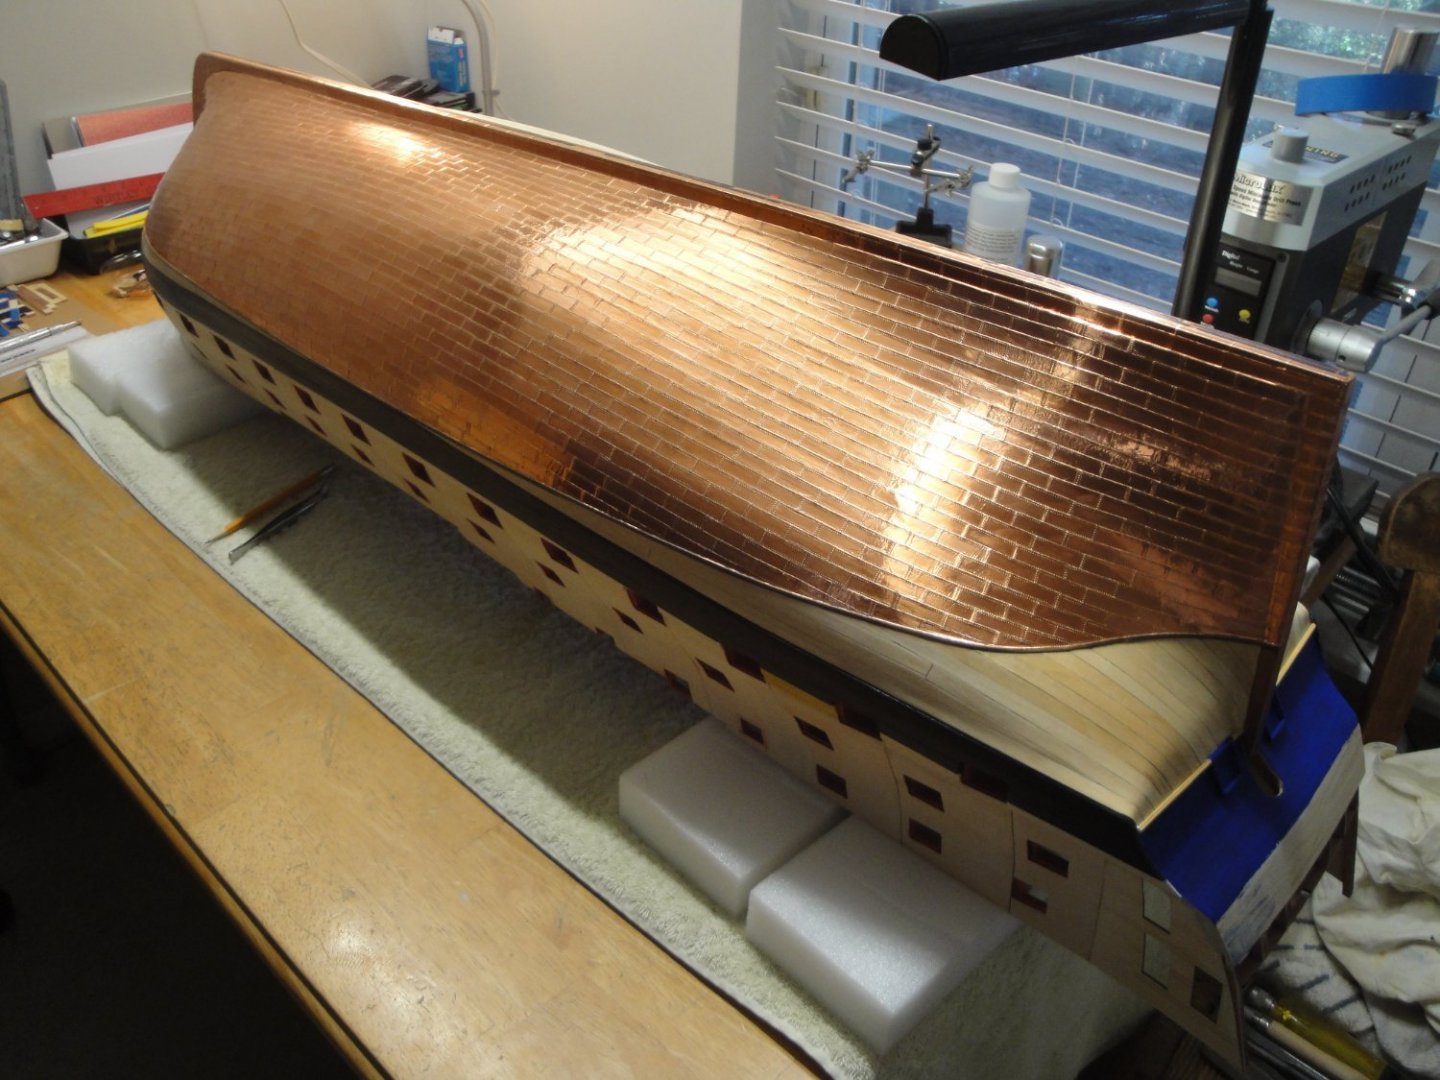
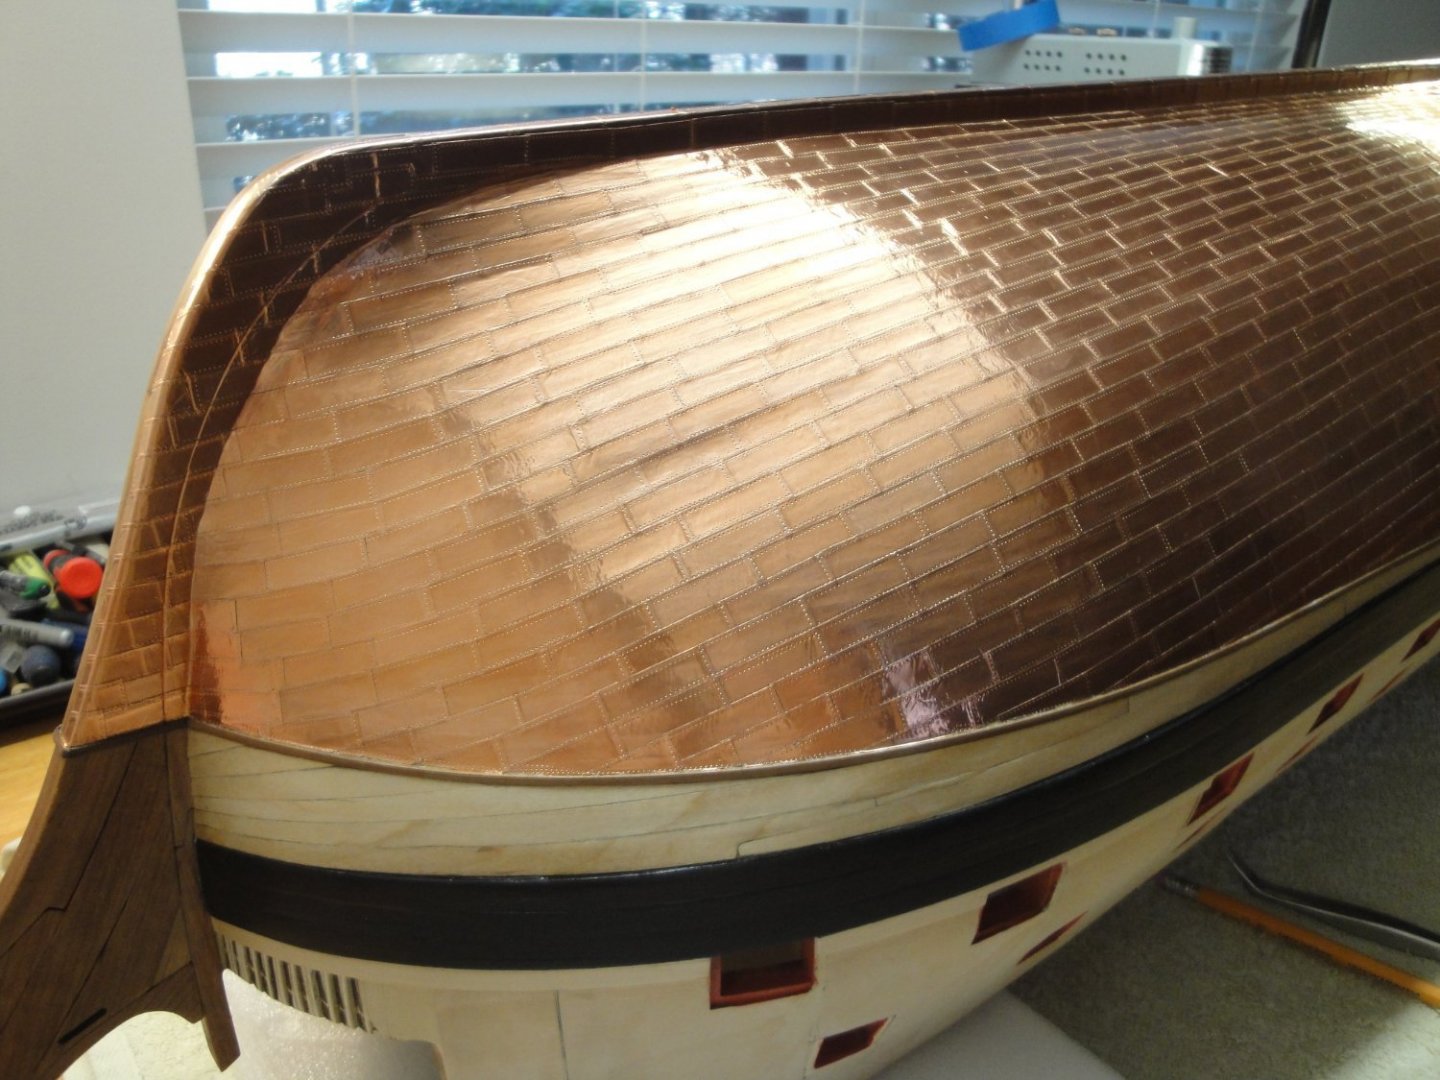
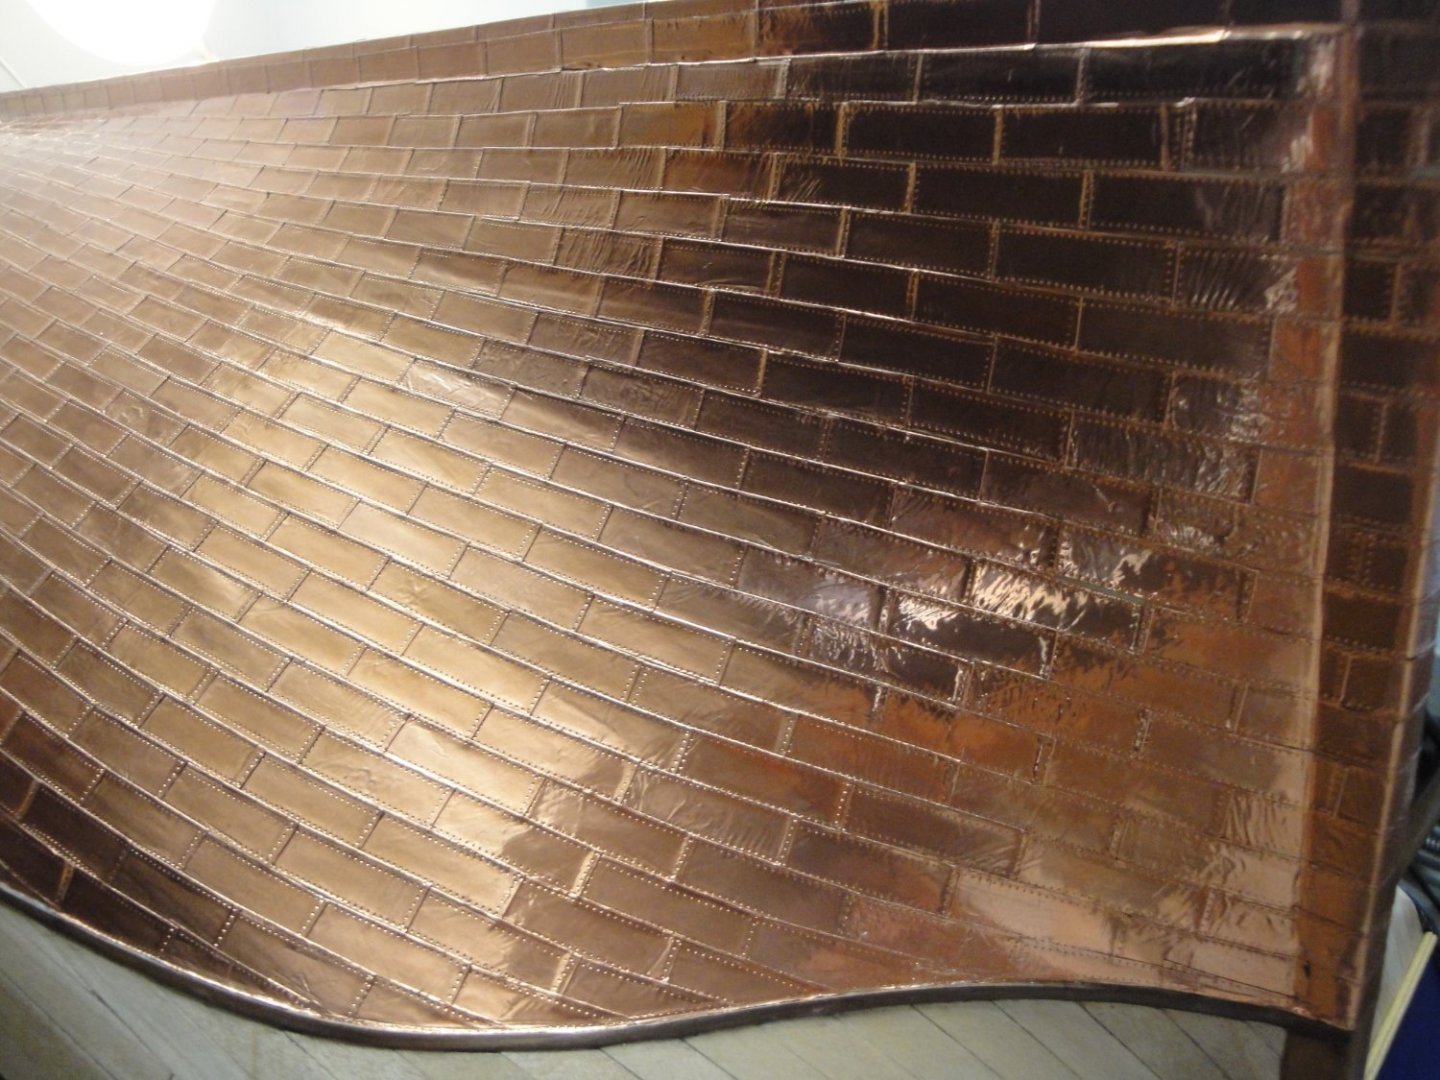
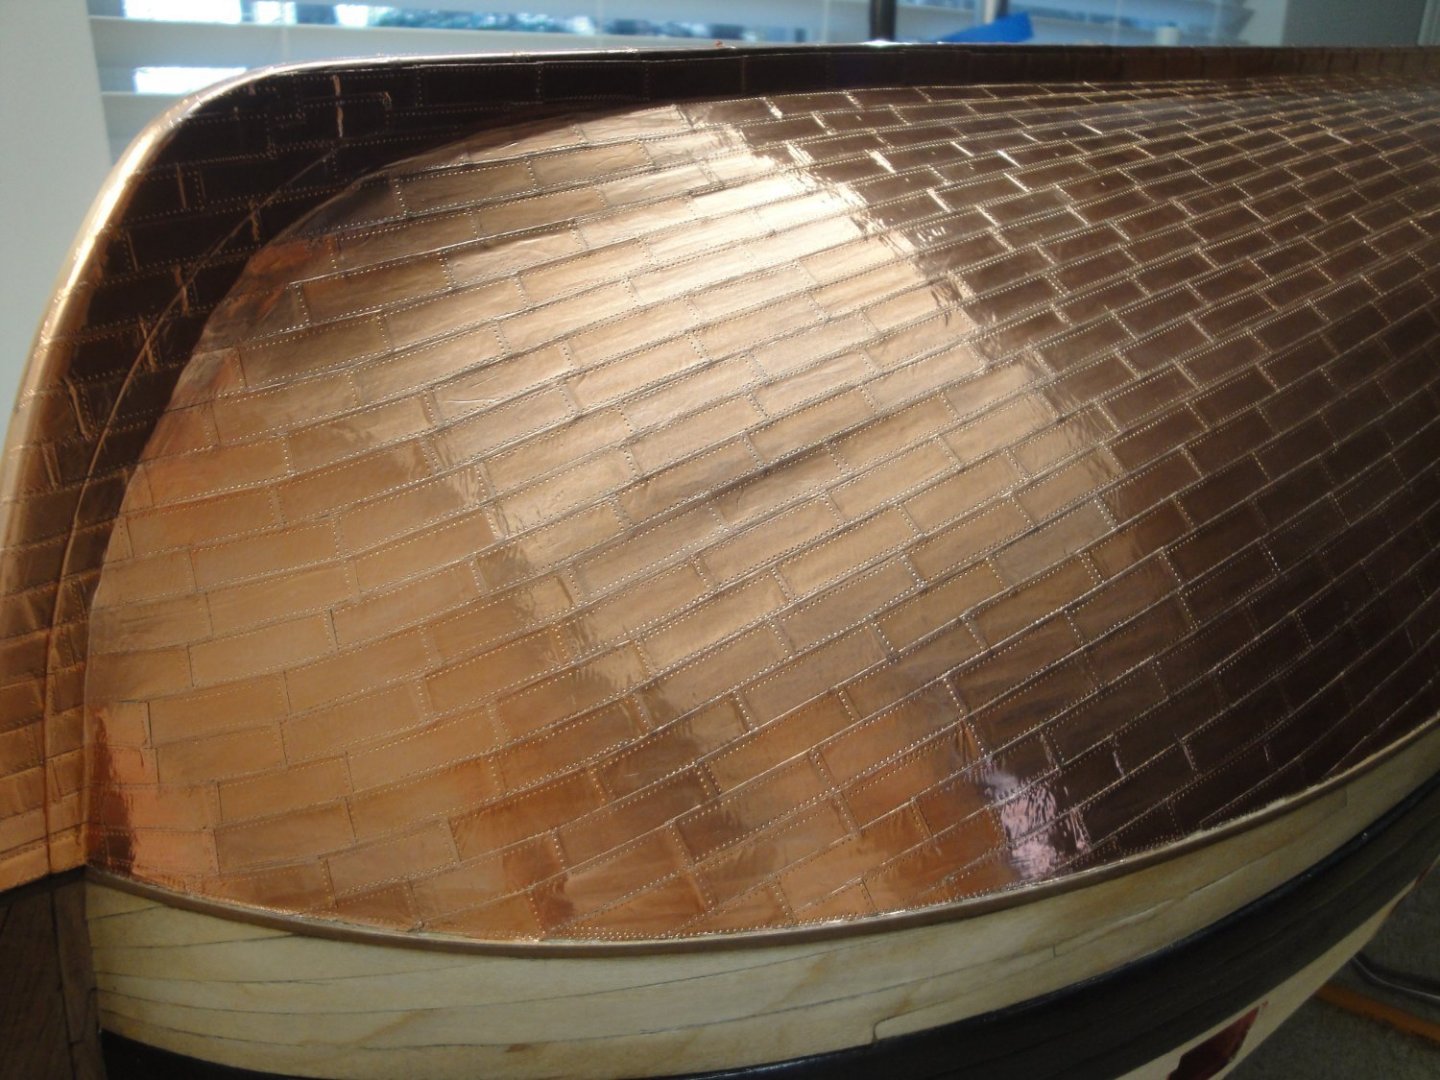
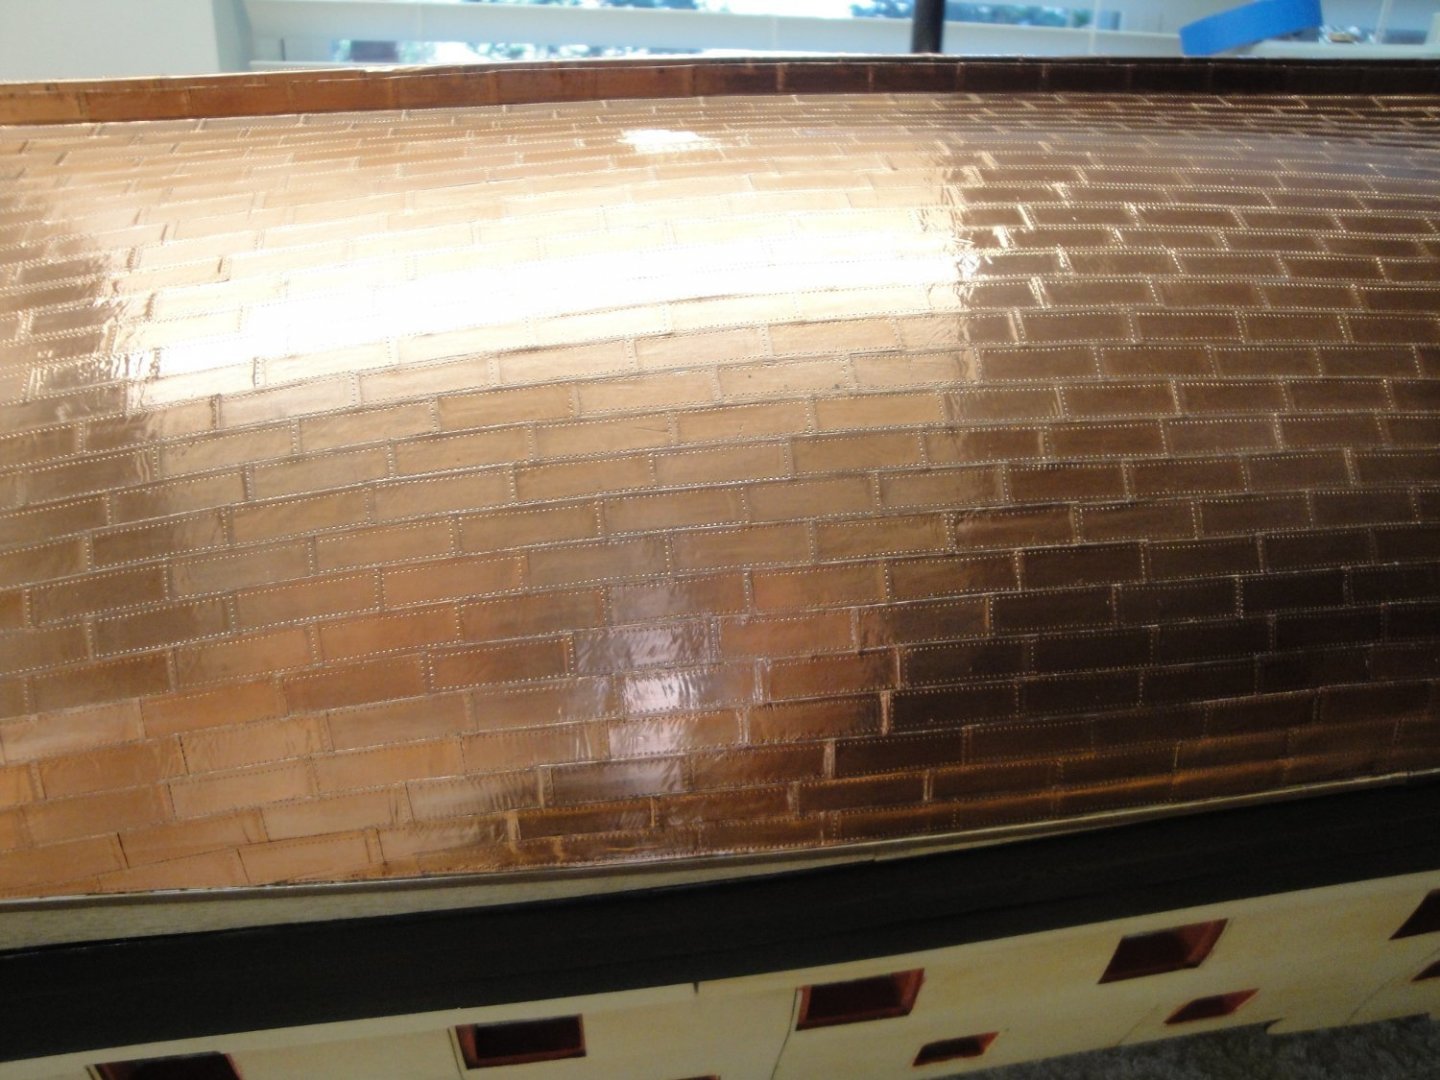
Finally, Step 8 of the second session is over. I am letting you enjoy the plethora of information and guidance that CAF model is giving to the builder: Coppering !!! It is all in the name :-) That tedious process is finally over, with close to 2,400 tiles cut, embossed, peeled and placed by hand. The number is very close to what the real ship used and that is a testimony to the size of the model tiles (25 mm x 8 mm). I would absolutely recommend the process of using the 3M copper tape, as it is so much easier to prepare, install and glue than pre-cut tiles with CA glue. The burnishing allowed with the copper tape also permits you to finish nicely, those delicate sections where a piece of metal may not fit perfectly. Finally, if the cost is a consideration, know that I was able to finish this enormous hull with only two rolls of tape and I have plenty left for the rudder or any repair. Cost was $43 including shipping versus the $400 for the tiles + many glue bottles that the kit copper tiles would cost you. A big thank you to all the readers that have convinced me to go with the tape. I am going to let it sit for a few days, as the copper is slowly tarnishing and acquiring that red and warm hue that I enjoy so much. After that I will seal it with Future Floor most likely. Let's enjoy some pictures of the finished animal: For those who would be tempted to follow this process, here is the invoice for the two rolls of 3M tape: and the product: There are some variations in the color of the tiles, which is actually rather pleasant, but the more I wait and the more everything blends nicely like the foliage in autumn. I hope you have enjoyed that approach. I know I was very hesitant to start it and I do not regret it in any ways. The only casualty of this process is that I no longer have a full nail on my right thumb, after peeling 2400 copper tiles from their protective adhesive backing. I am going to force on the brewer's yeast supplements to re-grow that nail.... Yves


- 507 replies
-
- 23
-
-

-
-
I am completely ignorant in these tropical species, but does that coffeewood smell like coffee? It would make for a very fragrant model... 🙂 Yves
-
OcCre San Francisco Cable Car by bogeygolpher
yvesvidal replied to bogeygolpher's topic in Completed non-ship models
For people, I would use the large choice of figures available in 1/24th scale. G scale is not 1/24, more like 1/29th.... O-scale is 1/48th 1-Scale is 1/32nd G-scale is around 1/29th if I am not mistaken. MASTER BOX offers a nice range of girls, ladies and men at that scale. Yves -
Can't stop building, even when relaxing in one of the most beautiful locations on the planet. I would be in the water, all day long.... Enjoy. Yves
-
Porsche 934 restoration by kpnuts 1/12 Tamiya
yvesvidal replied to kpnuts's topic in Non-ship/categorised builds
Nice recovery from the rust.... Yves -
So beautiful. I can feel that you truly are enjoying building this model. Yves
- 857 replies
-
- 4
-
-
-
- Sphinx
- Vanguard Models
- (and 1 more)
-
Not exactly the same, but it could serve as a base for your upcoming RC model: https://www.cgtrader.com/3d-print-models/hobby-diy/other/castle-class-corvette Yves
-
That is such a great idea. Your direct descendants may not care about your models, but someone down the line may have one day some curiosity about them. These scrolls will tell them about you and the building of that model. Yves
- 857 replies
-
- 3
-
-
-
- Sphinx
- Vanguard Models
- (and 1 more)
-
I love the suspension of the cabin 🙂 Yves
-
Big milestone today, as the starboard side is fully tiled: Close to 1200 copper tiles went onto the hull. Each tile being 25 mm x 8 mm, cut, embossed and placed by hand one at a time. The beautiful side of the copper tape is that you can burnish each tile and make it blend with the neighboring tiles, for a more realistic aspect. Each tile is overlapping on two sides by a minute amount (usually under 1 mm). Now, of course, I still have the port side to cover and blend the two sides together: Below are the reference of the copper tape used. Very inexpensive and with two packs, I should be able to cover the entire hull and may have some tiles left for the rudder. Some close-ups pictures: Once both sides are ready I will let the copper tarnish to a beautiful red color and will seal it to prevent ripping the tiles and to block the oxidation to a certain amount. I have been running some tests and will be disclosing the chemical soon: no, it is not Wipe On Poly. WOP is not strong enough for such a large covering. Without additional light, the reddish color is starting to show nicely: Yves

- 507 replies
-
- 27
-
-
-