popeye the sailor
-
Posts
16,007 -
Joined
-
Last visited
Content Type
Profiles
Forums
Gallery
Events
Everything posted by popeye the sailor
-
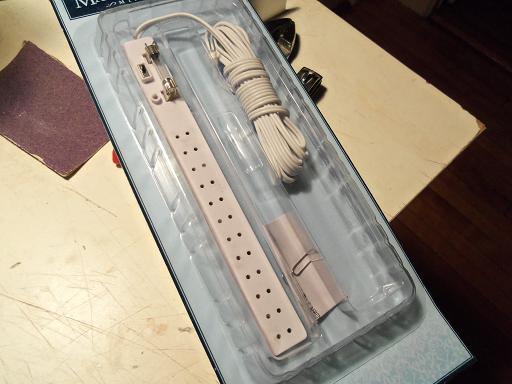
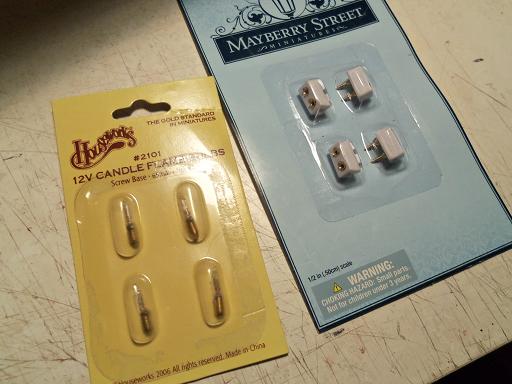
 yes Nenad.......it more fitting I have another one I found that looks really cool, but it doesn't fit either. so, I went back to what fits better. anyway.....I promised I'd show you what I scored in my recent scavenger hunt. as I mentioned, the lighting kit was about $70.00.....I should have looked closer the first time. I wouldn't have been so shocked. I decided to go piece meal with it to save a little. first, the transformer for $19.99. this will attach to the bus board that I got for $9.99. I'm going to take a close look at this, because if I can do it, I want to cut this down to about 3 or 4 outlets. the rest will be hardwired in the hull, for the lights that have plugs already on them. I'll cement the plugs in place, so they don't fall out with time. I found the website.......these are exclusive to Hobby Lobby. they don't carry any of the metal parts for them.........if I can do what I want to do, all I will need is solder and heat shrink tubing. I also picked up a package of outlets and these really cool bulbs, that are supposed to flicker. they will be perfect to set up near the windows. as far as the wood goes, I didn't go back to get the correct thickness. I took some 1/16 & 1/32 flat stock and glued it together.......it's being pressed as we speak. I'll see how this works out when I trace and cut them.
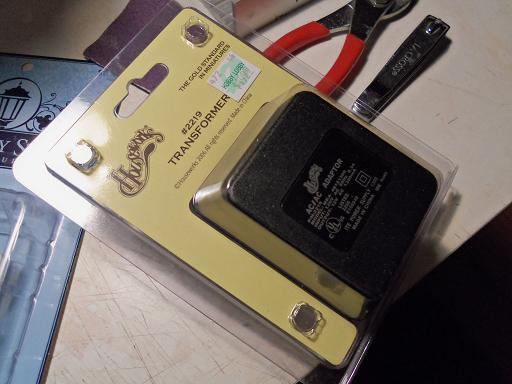
-
Cutty Sark by NenadM
popeye the sailor replied to NenadM's topic in - Build logs for subjects built 1851 - 1900
I don't know Nenad......tough choice. two if you can center the star a bit better....if not, three good job on the lettering, the rope is a nice touch.- 4,152 replies
-
- 1
-

-
- cutty sark
- tehnodidakta
- (and 1 more)
-
the Lettie looks great bob....congrats with finishing her I hope the doorway isn't a source for wind or a stiff breeze........I had my America next to a window, and that resulted in a bit of a repair job. superb work.......really nice pictures of her
-
I was out today.......I got the wrong thickness wood......1/8 instead of 3/16. bad guess on my part. I also had a closer look at the light kit and almost had a heart attack......they want $70.00 for it! I looked at the piecing out the parts, and walked out of there spending $37.00. I'll show you what I got soon. you never know John.....what was meant for one thing, can be fashioned and altered for something else.
-
Sjors, she looks absolutely beautiful.....such a work of art! I am astounded by the size difference.....it would be interesting to see the exact size difference of the Corsair, in comparison to the Fonz. but it's really cool to see your fleet all together! congratz, my friend.........now you have more time for the Aggie!
- 1,873 replies
-
- 2
-
-
- occre
- san ildefonso
- (and 1 more)
-
Nenad: just the spice Sjors: I was glad to show you just one of my future ideas. I still need to get to hobby Lobby for the wood......and maybe even the lighting kit. I really like to get the tree boat up to speed with the Jingle Belle John: I don't throw anything away. in the few years that I've been doing this medium {5 - 6 years}, I've amassed quite a bit of inventory......I have a filing system that works fairly well for me. I have a separate one for the wood....I have some old pictures, perhaps I can take some updated ones to show you. thanks to all for the likes and the kind comments
-
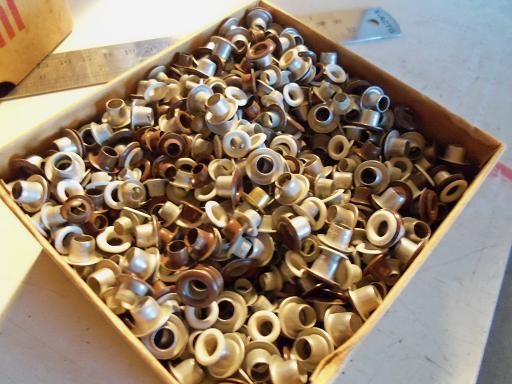
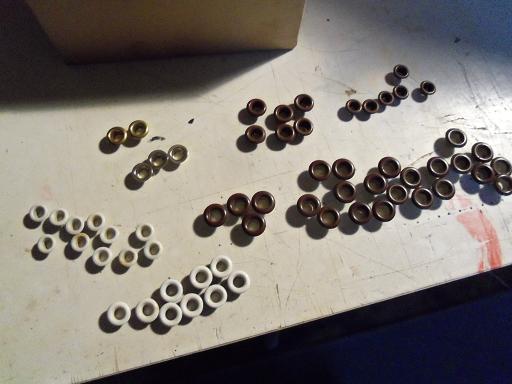
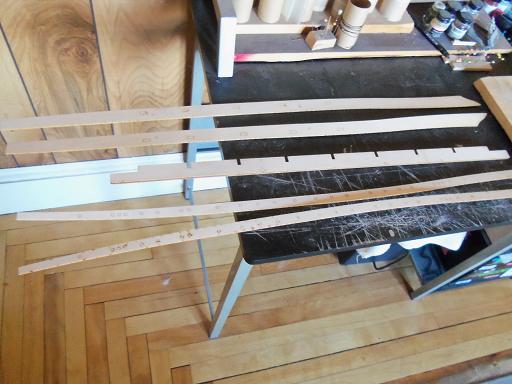
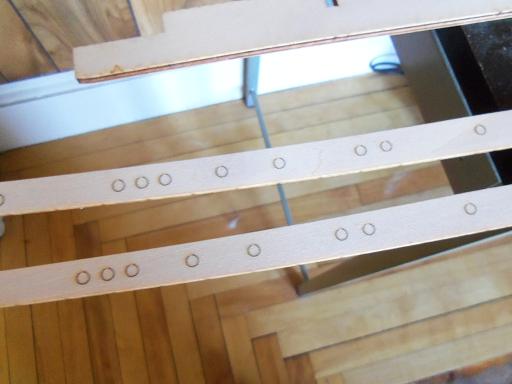
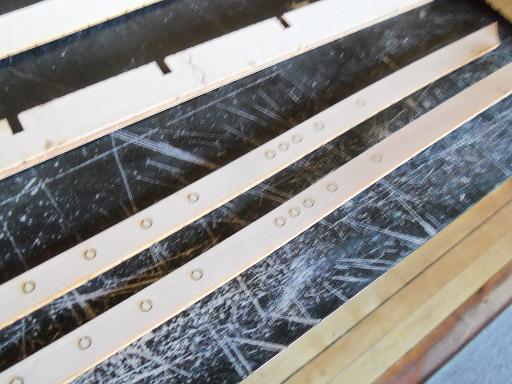
so, here is what I'm looking at Sjors. in checking out the capping rails for the Boulogne, I took them and dry fitted them on the Jingle Belle. now I wish I had a picture of the parts panel......you could see how efficient they were in utilizing most of the panel blank, when they laser cut the parts. some of them aren't so good.......quite a bit of cast off after the parts are punched out, which is good in the event that you'd need to make another part. perhaps I can do that later, when I cut the parts out. so here is the Jingle Belle with the rails, during my search for the rails, I happened on the box I had found in the cellar. this is full of eyelets, in about several different sizes and colors. I started to separate them.......I set up several medicine pill bottles to put them in. I had to stop though, because it became to monotonous. this will take time. these can be used a number of ways........but the two best aspects for them are hawse holes and portholes. they can also be used for sheave holes as well, if one can be satisfied with them being totally round. when I first found this box, a future project came to mind. I have some parts, that I came by a while ago........there is a story but it's kinda long, and I'm sure you don't want to hear it. these are parts that belong to a Billing's Danmark kit. I got the main part of the keel, the bulwark panels {2} and the lower panels {2}. I also got some of the fitting parts, brass rods, and a block of balsa {which I already used}. to look at the lower sections, these eyelets would be perfect to insert in the holes to dress them up. I have the plans for the Danmark as well. My plan is to take the parts diagrams and have them blown up 1:1 to the model, later to be transferred to wood.......but just the hull parts, since.....who knows, it might not even be the Danmark when I'm done. the reason to show you this.......I've been wanting to, and the face that I was looking at them when I was talking to the admiral about the cap rails. I need to get the wood to make them, and she made the suggestion that I use the bulwark panels to make them true.....these panels are of the thickness I need. but, in checking them out, due to the laser cut holes, it would be a terrible waste of wood to try and cut them out. so, it's errand time.......I will take the admiral with me.....perhaps we will do some more scavenger hunting. I am glad to finally be able to show this to you. it's another project that I have in mind, and when I'm ready to roll it out........your surely to be the first to know! I'll try and cook up some meaningful progress when I get back
-
sorry 'bout that Sjors....I was doing some exploring yesterday. I need to make the cap rails for these two, so I turned to the Boulogne to see if there were supplied parts for them....and there are {for the curvature of the bow}. I then went into the 'parts panel box' that I created for them, and dug out the templates to trace them. trouble is, they need to be made thicker than the flat stock that I have on hand. I don't want to glue them together as layered, to make them thicker.........I rather make them from solid pieces. not seeing any useable wood from the parts panels {yes, some of them are sacrificed when I really need a particular wood}, I thought a bit further. I do have what I need, but I hate to ruin the pieces........I have to show you......I'll be right back.
-
yepper! super job Omega a display stand is in order for her.........do you have a certain style thought up for it? very well done!
- 120 replies
-
- 1
-
-
- mystic
- motor yacht
- (and 2 more)
-
you spoke to Andy huh......... jee, haven't really thought about it........windows are big enough. I've added them to three of my other builds.........not a bad idea. I'll keep it in mind Piet!
-
you wear the hat well Michael
-
thanks Nenad.........not that I plan to drop it any time soon almost breaking things off is a constant worry for most.......just my way of heading it off at the pass! whoa Baby!!!! that the high test brand! I only do regular I think it best to just have a radio behind it or something......the vibrations mat tend to jar things loose thanks for the idea though. if I started to do things like that, I think 'ole Nick would get the impression that I was trying to horn in on his turf!
-
what can I say Ed......she's my sounding board. I've run many ideas by her........a few times, even pulled up some pictures for me. she won't do sails though it's nice to hear that other folks have admirals that are behind them in what they do.......I know Michael's does. thanks Michael......it would be even more fun if both boats were up to snuff with one another. the real fun part is yet to come....outfitting them thanks John for the vote of confidence. now all I need is for Phyl to see your post........I can just hear it now......."see......even he knows you can do it!" I'm thinking........... I guess you can say that.....get a bunch of revved up carolers on board........someone sneaks some beverage on board {name your poison}.........they'll be kum-buya 'round that tree in no time! the results of the scavenger hunts have to be kept sealed for the time being. Christmas is a time of surprises......t'wouldn't be fun if you knew what you were getting thanks for the good word Lawrence. thanks to all who hit the like button
-
we're building models..........not sentences we know what you mean. dinghy looks fine to me.......don't know why you want to do another. looks perfect in the hold
-
Cutty Sark by NenadM
popeye the sailor replied to NenadM's topic in - Build logs for subjects built 1851 - 1900
believe me Nenad........when you have the deck fitted out, the structures in place and masted, any inconsistency is going to seem very small. I've followed your log for some time now, and to see how you arrived to where you are now......it's nothing short of amazing! the detail you....{and Bob as well} have put into your build......I've not seen it in any shelf version of kits. the effort you've put into her so far really shows.........you have my respect, good sir! I look forward in seeing more! cute puppy! a face like that would make me forget all the cons- 4,152 replies
-
- 2
-
-
- cutty sark
- tehnodidakta
- (and 1 more)
-
I used to work in a cabinet shop in Florida........they did vacuuform for vanity doors and drawer fronts. the machine they used is huge and used a vacuum system to create the forms. the forms were placed in the machine......they had little holes all around to remove the displaced air..........unfortunately, the rest of the process was hidden by the machine itself. but, as you did, the heated plastic was lowered onto the form and the vacuum sucked out the air trapped in between. I would help in the dept sometimes, if they needed it. I used to do the router work on the filler boards {doors and fronts}, to put in the formed plastic. later the edges were trimmed and the backs were painted white to match the formed fronts. a pretty cool process! well! that's what I get for not turning on the sound! I didn't even notice that there was a vacuum hooked up to the form box......watching it the second time made even more sense yepper! if I had something like that, I wouldn't have had to do all that planking.
- 205 replies
-
- 3
-
-
- kw49 antje
- trawler
- (and 1 more)
-
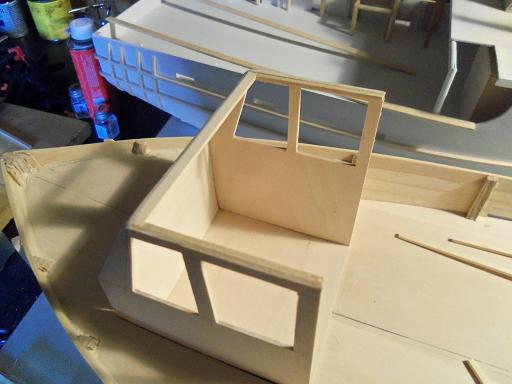
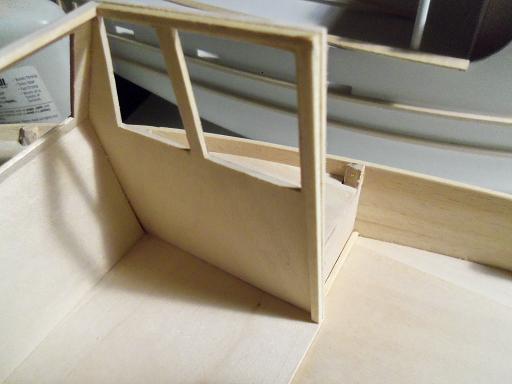
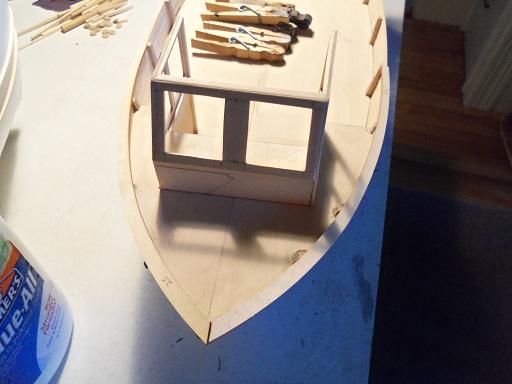
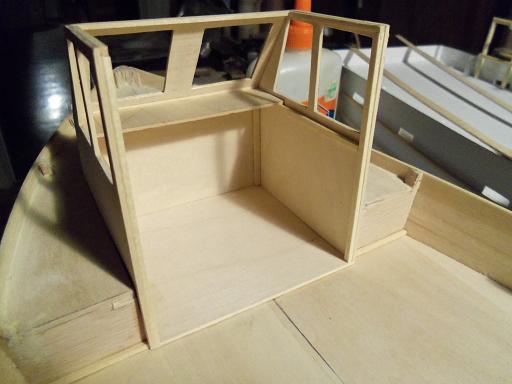
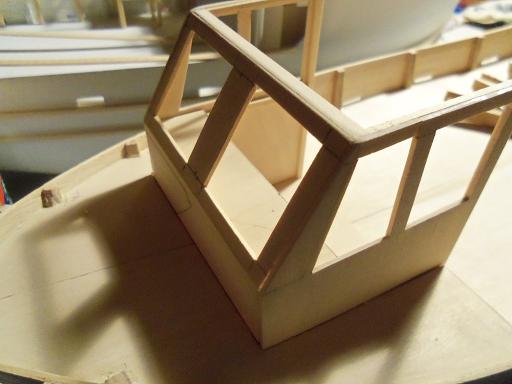
I did do a bit more to help strengthen the helm. I had mentioned to the admiral that I was favoring the lighting kit.......we kicked that ball around a little bit. then we started to muse over this one.....the possibility of lighting it came into the picture {my god.......she thinks I can do anything!} Boy! don't I have her snowed! I ran some framing along the bottom of the windows and started to install the dash. I might add in a cabin door...engine access and such.
-
it's great for those who are in between builds, don't have a stash of kits..........and saving up for a kit they've been eying. in the meantime, they can trace out a set of bulkheads....and away they go! like your Morgan John........it's a whaler, and there are many other ships that have the same hull construction and shape. with a little modification, there very well could be more. I'd love to get a hold of some from a large scale sailing ship, but with what I have in cue at the moment........I'll leave it as a pipe dream to think inside the box......one must remember there is an outside as well keep on thinking free!
-
are you kidding...........I like the ship's wheel! it looks great in there! in my dealings with the window maker, I have never seen it do that . basically you'll be doing it after everything is cemented in place, so it shouldn't be a problem. make up a test structure and give it a try {a little box with windows in it should be good enough} it's very easy to do
- 120 replies
-
- 2
-
-
- mystic
- motor yacht
- (and 2 more)
-
I look forward in seeing more of your fine build John, when you get settled back in. I think your build is a bit more complex, as far as reference goes it like what I always hear though.....any progress is good progress thanks John!
-
very nice project - lots of neat detail
-
thanks Kees......doubt I'd be able to compare to the work that you do your new build looks awesome! there is a difference though Keith.......the lobsie twins were the product of a goof. the day that Capt. Bob made the startling comment, I knew I had pushed it too far. since I created the first two hulls, it was easy to switch gears on it and make it a dual build. I did find out one thing though........sheeting the hull in balsa is not for me. I think I swallowed some water on that one but....if you say so..........it spawned another hull {I want to make a couple of others some time down the road} I won't debate it! the Holiday Harbor boats are a deliberate experiment
-
glad I caught your build this early! my goodness..........looks a lot like the Nordkap! Interesting way to build a hull.......very nice!
- 205 replies
-
- 1
-
-
- kw49 antje
- trawler
- (and 1 more)
-
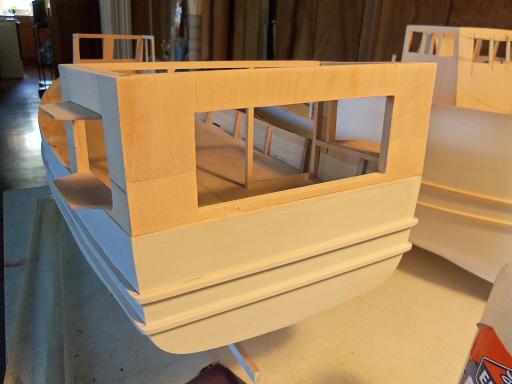
I forget when..........I'm just a modeler! I'm lucky to remember my own birthday. makes me glad I did the one on Word Press...sad thing is....it don't have all of the comments everyone posted on it.........it was such a fun build As for progress........I don't have much, but it's a tiny step forward. the framed wall at the transom has now been sheeted.......it will have flush mounted windows. ....and a look at the interior after almost breaking the frames for the helm for the second time....I thought it best to add some frame work to it as well. I want to try something a little different with this one...I still have some figuring out to do. I gave the roof line at the windshield a wide border, and then lined the sides of the roof line with some 1/16 square strip. going down the sides, I used 1/16 X 1/8 strip stock. I also laid some 1/16 pieces on both sides of the helm, at the main deck ......takes care of those tiny gaps...hee....hee well, that's about as far as I got..........ran back and fourth helping the admiral today. we made what we yanks call 'woopie pies' {chocolate cake with creme filling}. then bran muffins........yea.......yea....I know........'cuz I'm such a regular guy!