gjdale
-
Posts
4,891 -
Joined
-
Last visited
Content Type
Profiles
Forums
Gallery
Events
Everything posted by gjdale
-
 I certainly agree with Andy's method and wish I had thought of that when doing my Vic - would have been much easier, I think!
 -
Thanks Aldo, but it's not my technique, it's Chuck's - I just made a couple of minor mods to the jig. Thanks Keith for putting the link in to Toni's work - she's one talented lady! And thanks Mike for dropping by - nice to see you back at the all new MSW 2.0, and welcome aboard my log.
-
Okay, I guess we could fill a few pages with new superlatives based on Augie's name. Let's see: On this Augspicious occasion.......... That's really rather Augcellent work........ Quite Augstanding actually......... This Augurs well for your next build....... You can take that for Granted (oops, wrong name! What was I thinking? ) :P
- 1,668 replies
-
- 4
-

-
- syren
- model shipways
- (and 1 more)
-
Very nice Andy - your work always looks very neat (unlike your work space! ). I agree with you re TFFM vol IV - it's a great general reference and has been a big help to me on Victory. It helps me to understand the sometimes more dense writing of Longridge.
-
Nice job Patrick! The other side will be a doddle after this.
-
Thanks Keith for your very kind words. I love your acronym of TEAM - I'm hereby steeling that for use at work! To answer your question on the grating, the timber was pre-milled for me by Jeff at Hobby Mill (so they are similar to others that you can buy, only much smaller), but before you go asking him for the same, he did this as a one off to test/prove the concept himself. They were cut on the Byrnes saw, so I could have done them myself - but glad that Jeff did anyway! . Assembling them was a little tricky, but really only required patience and the magnification of the Optivisor. The pear trim was formed around them by simply soaking the thin pear strips in warm water for a few minutes and then gluing, bending and clamping while they were still wet. Then the whole thing was sanded lightly on a flat sanding board to even it out. Cutting out the extra slots/holes was the trickiest part. In terms of making your own, there are plenty of tutorials on the forum. Check out Toni Levine's work for an example. Can't remember now whether its on her Atlanta or Longboat log, but it's on one of them (I think!). The postman brought me presents this week! . Pics at the weekend!
-
Simply fantastic Dan. A beautiful model.
-
David if by Bullseyes you mean thimbles(?), these are easily made by cutting a small piece of brass (or copper) tube and either painting it black or chemically blackening it. That's what I did anyway.
- 439 replies
-
- 1
-
-
- victory
- caldercraft
- (and 1 more)
-
That planking looks very sweet Mark. It seems a shame to cover up ALL of that lovely framing, but one doesn't often get far in challenging Admiralty orders!
-
Very nice start to the boats Paul. I'm looking forward to seeing you rise to Pat's (Banyan)'s challenge!
-
Enjoy your break Mick. I look forward to seeing more progress on your return.
-
Very nice Robbyn, but I doubt that You know Who will be satisfied with a mere two pics to last another couple of weeks! The way you talk of your "to-do" list makes the wedding sound almost like an afterthought! 1. Get ready for Fall semester 2. Finish Summer class 3. Pack 4. Get ready for Sturgis 5. Now what was that other thing I had to do? Oh yeah, get married!!! I trust that's not really the case Robbyn 'cause the rest of us are certainly excited for you! Don't forget we expect lots of pics from the wedding.
- 773 replies
-
- 1
-
-
- san francisco ii
- artesania latina
- (and 1 more)
-
Now that is Niiiiice Rusty! I like your technique for the pear trim, cutting it in one piece - very clever.
-
Congratulations Augie, You have built yourself a true masterpiece! We'll all miss this log and all ints little side journies, but we will all be back to join you when you start the Confed. And if you think that log will be free from fish, moose, worms, spiders and frogs............then think again my friend!!! Enjoy your well earned break and I hope you catch lots of moose (or should that be fish). Where are you off to in Sep? We are heading O/S then too (UK, Paris, Florence and Venice). Please reserve a front row seat for me on the new log.
- 1,668 replies
-
- 1
-
-
- syren
- model shipways
- (and 1 more)
-
Thanks Bob, Mark and Danny, Bob - there is no way I'm going into competition with Chuck on this. Personal use only I'm afraid. Danny - I have the sensitive drill attachment already and considered using it, but the "production line" nature of the job rules this out (unless you happen to have two mills). This is because you need to drill the holes between passes on the mill and once the box is set up on the mill, you don't want to be removing it until you have finished the "production run" for that size of blocks. Having the breaking strain of a warm Mars Bar, I weakened and ordered the Proxxon mini Drill Press last night. The admiral doesn't know yet!
-
Thanks Mobbsie, Mick, Chuck, and Augie. All credit must go to Chuck - I just followed his instructions! Chuck - thanks for the extra info there too. Augie - about that timer................................
-
Augie, For the love of God man, can you please do something to stop Sjors from singing. I mean, have you heard him?
- 1,668 replies
-
- 2
-
-
- syren
- model shipways
- (and 1 more)
-
Hi Mark, I'm inclined to agree with Aldo. Plus, if there is not a definitive reference, then "Captain's Choice" is automatically invoked!
-
That's one sweet coppering job John - well done my friend! Splice the main brace and have a double beer issue.
-
Hi David, Nice work so far. Your are entering a very interesting part of the build. Do you have a copy of Longridge? I have found this to be an almost indispensable aid for the rigging. If you don't have it, you could do far worse than to follow Gil's log as Kevin has suggested. To answer your question, according to Longridge Burton Pendants and Pendants of Tackles are one and the same thing (and Antscherl says the same thing in TFFM). Two pairs were put over the lower mast head and one pair over the top masthead. The starboard pair was put on first. The mizzen lower pendant was single and there was no mizzen top mast pendant. (from Longridge, pg 228). If you need dimensions, let me know and I'll dig out the detail from Longridge for you. Just think, it won't be long now and you get to do the Ratlines!!!!! Now would also be a good time to think about whether you want to stick with the kit provided blocks and rigging line, or to upgrade to some "Chucky Blocks" and line from Syren. I've just ordered some line to do the Running Rigging (too late for the Standing Rigging), and I'm making my own blocks now following Chuck's method. One final tip. If you do go with a Lazy Susan, be VERY careful turning it once you get the bowsprit in! Don't ask me how I know.... Good luck with this very interesting, but SLOW part of the build.
-
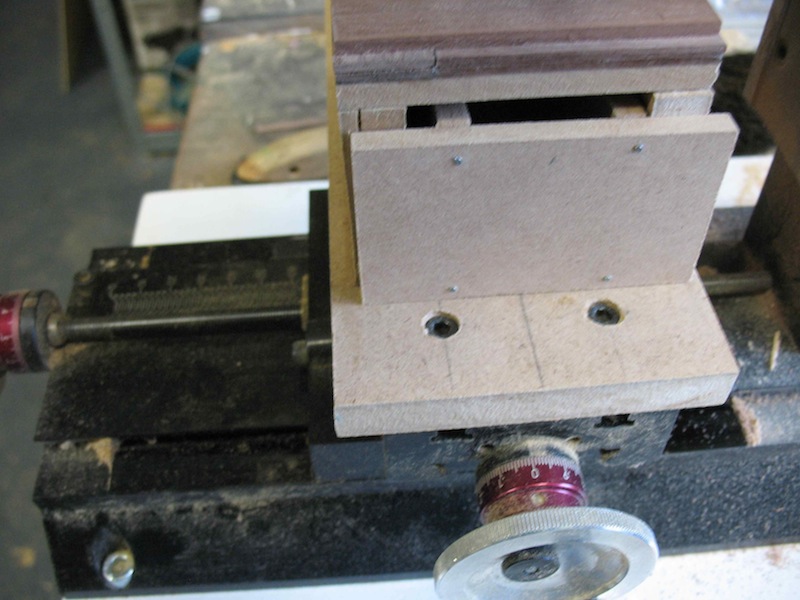
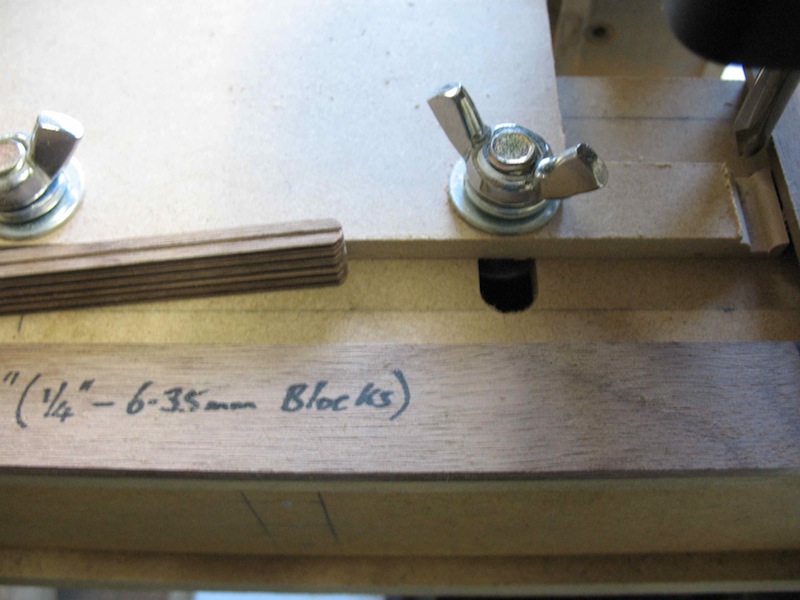
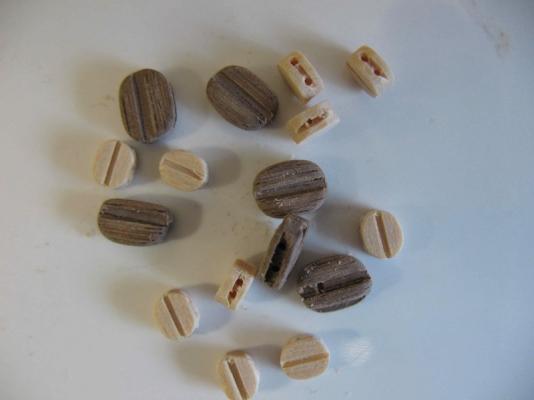
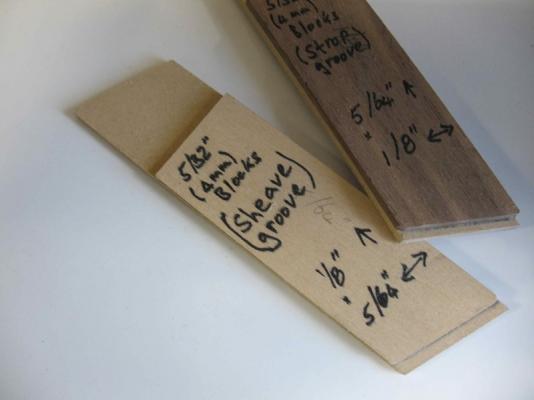
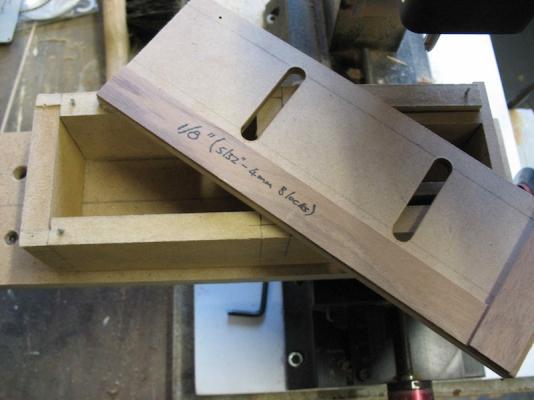
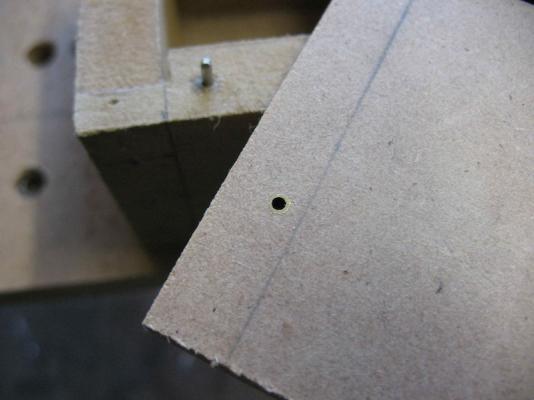
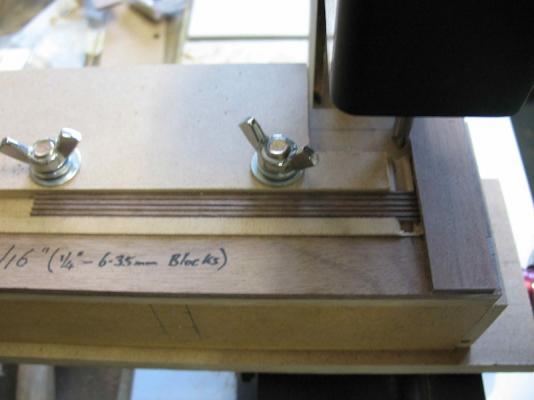
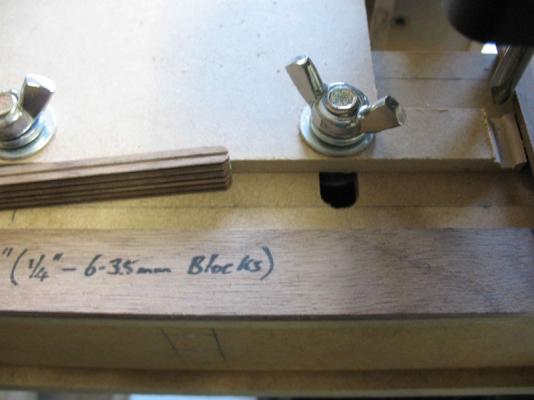
Hi all, Well, I said I was going to get on with the Running Rigging but a couple of things happened along the way. Firstly, I decided I'd like to use some of Chuck's excellent rigging line, so I've ordered a bunch of that and it's on the way. Secondly, rather than buying Chuck's superb looking blocks, I decided I'd really like to have a go at making my own "Chucky Blocks" by following the method described in Chuck's outstanding post on this subject. The following describes my journey to date in "learning how to fish" (and I'm not talking trout or moose here!). First of all, I must say what an excellent description Chuck gives in his post. I think that anyone with a Mill should have no problem at all in following suit. I did however make a couple of minor mods along the way. Chuck describes (and shows) making some feather boards for the Brynes Saw to assist in cutting both the Sheave groove and the Stropping groove. These are really easy to make and work like a charm. The best part is, by using these it's virtually impossible to get your fingers anywhere near the saw blade! You need two feather boards for each size block you're making, one each for the Sheave and Stropping groove. Here's a pair for the 5/32" (4mm) blocks: In making the "box" jig for the mill, I made a couple of minor mods. First up, I decided to attach the base to the mill by using the standard Sherline hex cap head bolts, which meant making a counter sunk hole in the box base plate. The advantage of this approach is that the base then becomes flush, with no bolts to get in the way of the drawer (or anything else). Here's a pic showing the box unit attached to the mill using the countersunk hex cap head bolts: The next mod I decided to try was the top of the box jig. Chuck advises that you need a separate jig for each size block you are making. I thought that if I made the top removable, I could make a set of interchangeable tops and save myself a bit of extra time and effort making up more boxes. The lids are held in place by locating pins (cut off nails). Here's the box with the lid separate: Because I'd be placing and removing the lids fairly frequently, I thought I'd protect the locating holes from wear by inserting a small brass bush in each locating hole. This was simply made by cutting off a piece of brass tube and inserting it in the hole with some epoxy glue. The result is a snug fit that doesn't get looser over time. Here's a close-up of the arrangement: The next mod was fairly simple. I just replaced the nuts on the adjustable fence with wing nuts to make them easier to operate. In this picture, you can see a set of strips with grooves cut placed in the jig ready for the milling process. And here is the result of two passes of the mill, using the special round-over cutting bit (as recommended by Chuck): I tested the set-up by making some small batches of both 1/4" (6.35mm) and 5/32" (4mm) blocks. I am waiting on some boxwood stock from Jeff at Hobbymill, but for test purposes I used what I had at hand in the appropriate thickness - some crappy walnut for the 1/4" and some basswood for the 5/32". I did the larger blocks first and discovered I had made both sheave and stropping grooves too deep. I adjusted a little with the smaller blocks, but there is still room for improvement. I don't have a small drill press like Chuck's (yet ) but had no real difficulty drilling the holes with the Dremel in its drill stand. I finished off the blocks by giving them a quick tumble in my previously built tumbler. They could do with some more finishing, but as these were for "proof of concept" only, they will do. Here's a selection from my test run: Observations: 1. It works! 2. The feather boards are a must - they are just brilliant. 3. All of my mods seem to work just fine. 4. The key to successful blocks (in my opinion) is getting the groove depths right. Unfortunately, there is no magic way to get this right. Trial and error and calibrating your eyeball is about the only way. Thanks again to Chuck for "teaching me to fish".

-
It was definitely Sjors, Kevin. Mobbsie saw him do it!!! :P Nice fix on the gunports. Very nice work on the fenders too!
- 1,319 replies
-
- 1
-
-
- caldercraft
- Victory
- (and 1 more)
-
Okay, I'm queuing up with the others for front row seats at the photo shoot. Will the Moose be attending?
- 1,668 replies
-
- 2
-
-
- syren
- model shipways
- (and 1 more)
-
Very neatly done David. Your meticulous work is a pleasure to watch.
-
Nice boat Sjors - but best you get some rope in there before Mobbsie sees it!
- 1,873 replies
-
- 1
-
-
- occre
- san ildefonso
- (and 1 more)