


BANYAN
-
Posts
5,951 -
Joined
-
Last visited
Content Type
Profiles
Forums
Gallery
Events
Everything posted by BANYAN
-
 Great progress Dan, she is coming al;ong very well; the careful sanding has sure provided great dividends for you. cheers Pat
- 295 replies
-
- 6
-

-
- amatsukaze
- halinski
- (and 2 more)
-
The barge looks superb Chuck, a testament to your skills. cheers Pat
- 269 replies
-
- 7
-
-
- Queen Anne Barge
- Syren Ship Model Company
- (and 1 more)
-
Nice work Gerhard, your Cairo is progressing very nicely. Any update is a good update - it took me 14 years to complete my first model Life simply gets in the way sometimes. cheers Pat
-
ancre Chebece 1750 by Jeronimo - FINISHED
BANYAN replied to Jeronimo's topic in - Build logs for subjects built 1501 - 1750
Simply stunning work Karl, that is another very fine example of miniature joinery - a joy to view. cheers Pat -
Boy, i go to the footy and find you have built a hull skeleton - slow down for the rest of is mortals Danny, I am out of breath keeping up Great start, and now that you have the parts sorted there will be no holding you back - looking forward to this one. BTW, if you need further help with the language give me a PM, i know someone whom may be able to assist you. cheers Pat
- 295 replies
-
- 6
-
-
- amatsukaze
- halinski
- (and 2 more)
-
Glad to see you back Mark. Sorry to hear of your health scare and offer my most sincere wishes for a full recovery mate. cheers pat
-
Very nice detail and work on those funnels Greg, they look really good. did you drill holes for the rail standoffs or simply glue them on? cheers Pat
-
Great progress Steven, she is coming along fine despite the issues caused by the garboard plank. As Druxey has said - great attitude to the process. cheers Pat
-
Very nice work Dave,the efforts paid off as they look very good. Did you try putting bits of white card behind the shrouds? i found that help me focus on the area of work a little better as the black on black against shadows certainly does do your eyes (and the brain) in. cheers Pat
-
That hull planking looks good Russ, she will be 'dressed' before you know it cheers Pat
- 420 replies
-
- 5
-
-
- captain roy
- lugger
- (and 2 more)
-
Simply stunning Jay; very nice finish and i really like the shape of those blades - some serious carving to be done with those., cheers Pat
- 714 replies
-
- 4
-
-
- lady nelson
- victory models
- (and 1 more)
-
That is some very impressive detailing Greg. A closed in bridge on a 'tin can' - they had some luxury there cheers Pat
-
Harpin
BANYAN replied to piratepete007's topic in Building, Framing, Planking and plating a ships hull and deck
Hi folks, just to confuse the situation more the following is an extract from the Contract for the building of the HMCSS Victoria (for the Colony of Victoria, Australia) built 1855: "Wales, Sheerstrake and Topside. - Mahogany, thick 3 inches, to taper forward and aft to 2 inches." cheers Pat -
New member from North Sydney Australia
BANYAN replied to Fernando E's topic in New member Introductions
Welcome aboard from just slightly further south cheers Pat -
She looks great Danny, seems you have adapted to card quite well. cheers Pat
- 193 replies
-
- 3
-
-
- cerberus
- paper shipwright
- (and 1 more)
-
Sone ingenuity you are demonstrating there Danny; they all look effective . One question though, would the fishing line hold paint if needed? cheers Pat
- 193 replies
-
- 2
-
-
- cerberus
- paper shipwright
- (and 1 more)
-
That's really good work Jason, you can be justifiably proud of your efforts. cheers Pat
-
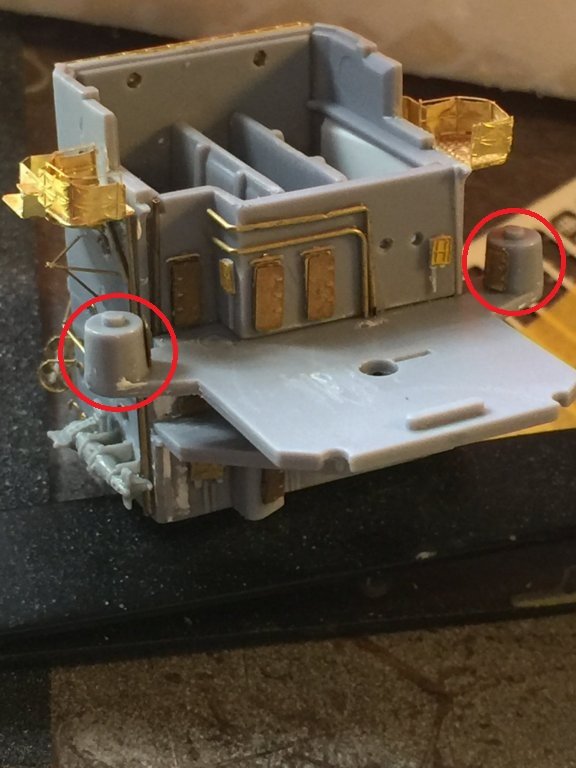
Hi Greg, sorry mate i thought it was resolved when you pointed out I had mis-identified the items. The items I was referencing to are those circled in a pic of yours I have edited. At first glance they looked a bit like a an EW equipment that emerged just after the war and I thought perhaps the Japanese were the first to use/invent it. I am wrong there I think. As you pointed out, these are the base for binoculars or some other equipment? Sorry to have confused the situation. Great diagram BTW - those were interesting Reference Manuals; ; the Admiralty Manuals of Seamanship (and the USN equivalent) are particularly useful for steel navy ships if you can get your hands on them - they were updated (new editions) every few years. cheers Pat
-
A Lorch Micro-Mill that never was ...
BANYAN replied to wefalck's topic in Modeling tools and Workshop Equipment
Where did you get those small (6mm) blanks from in the USA please Eberhard? cheers Pat -
Any update is a good update Gerhard - and family should always be first priority. look forward to your next update. cheers Pat
-
Ditto Druxey's comment Gaetan; very nice work and hopefully nothing knocks those bits off the tables. Speaking of which, do you think you have enough worktables cheers Pat
-
Those covered comms or Electronic Warfare (EW) domes (assuming that is what they are on the rear corners) seem a little advanced for WWII era Greg? - was this destroyer fitted as she was at the end of the war? Nice work on the super detailing. cheers Pat