


popeye the sailor
-
Posts
16,007 -
Joined
-
Last visited
Content Type
Profiles
Forums
Gallery
Events
Everything posted by popeye the sailor
-
 thanks Bob as I learned with the Mary Ann build, it's kinda like a tab-boo to add in things that weren't on the actual ship. I remember the person from Danmark who commented on my gallery pictures of her {word Press or Blogger.....I forget which}. he pointed out the things that weren't on the original boat........but, he did comment how he liked it for the imagination and ideas I had put into her. I could tell that he wasn't critiquing the build.......he was merely stating the facts that we both knew. I still feel good about how that build came out. it was fun to do....and it proved that I COULD go bananas.....without going bonkers! I didn't kill the subject.......not like I did with the lobster boat.......we BOTH know that thanks for the good word my friend........I'm trying not to go TOO overboard with this one thanks George..!
- 956 replies
-
- 2
-

-
- andrea gail
- trawler
- (and 1 more)
-
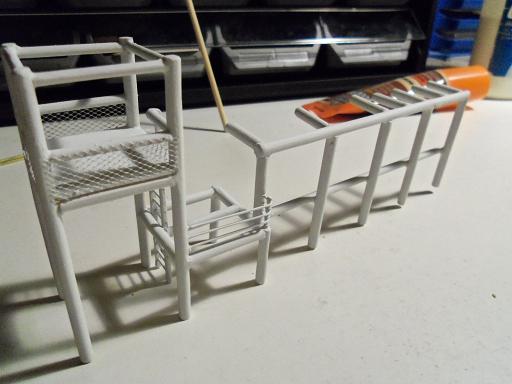
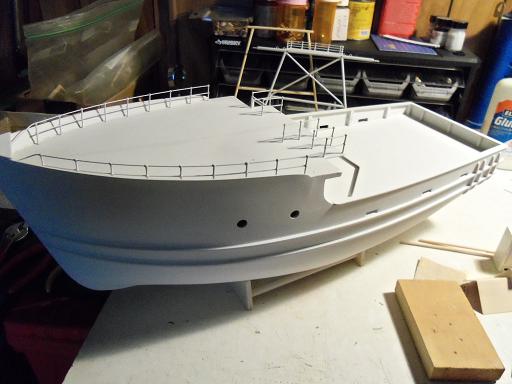
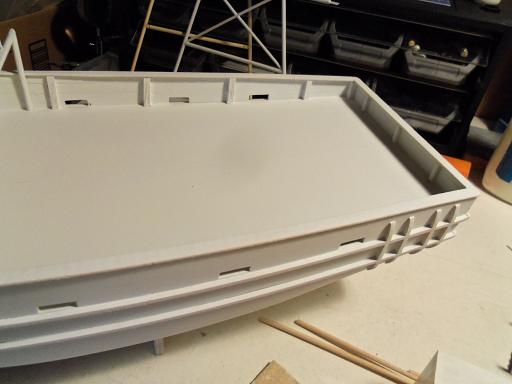
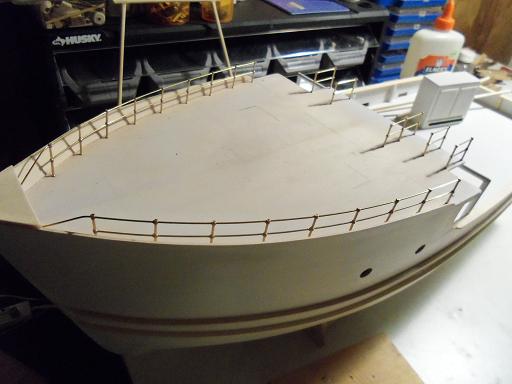
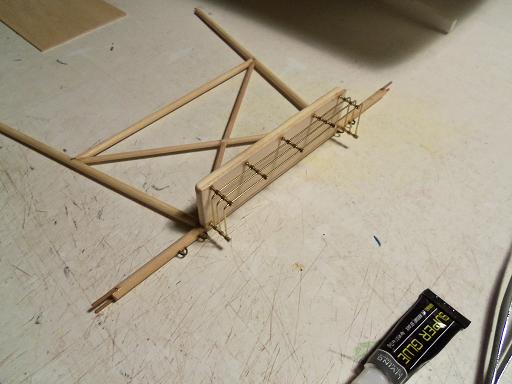
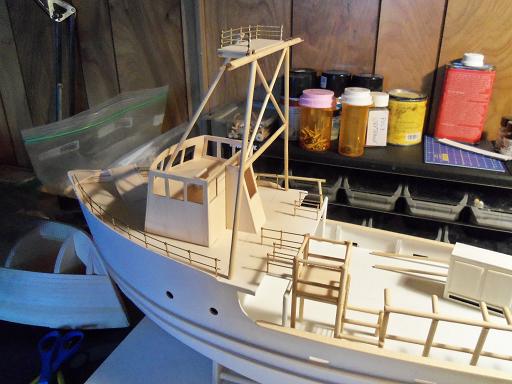
well........that was a bit of a process! I think I answered the question......."is a round surface easier to paint than a flat surface?" NO!!! not by a long shot! it's like trying to 'shoot the moon', so to speak! it's more like 'spray tanning'........ya gotta flip 'em over! I'm just spoof'in here of course......but it is true......let the first coat dry a bit, before it's flipped over to get the other side. so, it was done in two waves.......but it came out well. the other thing I had to wrestle with, is the fact that I used the spray can and not an airbrush. this primer is very watery, and the temp in the cellar isn't warm enough......I can't wait to see what the color paint will do with these factors. first.....the pilot house. I took the dash out to do it.......the idea that I put those pieces along the topsides of the roof opening, made it a bit hard to remove it. I did manage to miss one silly spot.......usually, I paint before I assemble, but I was flying blind, in toggling the paint and assembly.....and well, one of them had to win then....the rack / podium. I was glad to see that I didn't fill in all the holes in the netting. I tried to be careful with this.....glad it paid off. the holes for that little bit of railing can barely be seen...I filled them with CA prior to painting. then......the first section of the trawl rig. I like the way it came out.......some drips did occur with the railings, but they were easily remedied with a finger. you can see the scope of the whiteness...even the railings are white. now you see these aspects three all painted white as they can be all that's left, is this only one I did the vessel, just for fun! the railings needed to be done......so why not simply leave them where they are, and spray them all at once. I didn't flip 'er over to do the underside of the rub rails though......and that pesky line down the middle of the deck......I'll fill that thing or else!!! the problem here is that the main deck was done in two pieces, rather than the one piece, the fore deck was made from {I had cemented the two pieces of flat stock together, prior to cutting it out......or, was it three pieces???? oh, well!}. I don't plan on giving the deck areas any other paint, aside from what you see........flat white
- 956 replies
-
- 14
-
-
- andrea gail
- trawler
- (and 1 more)
-
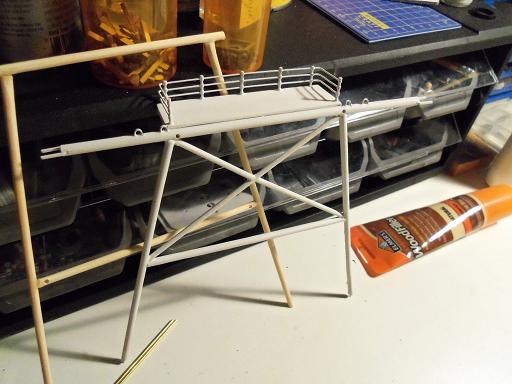
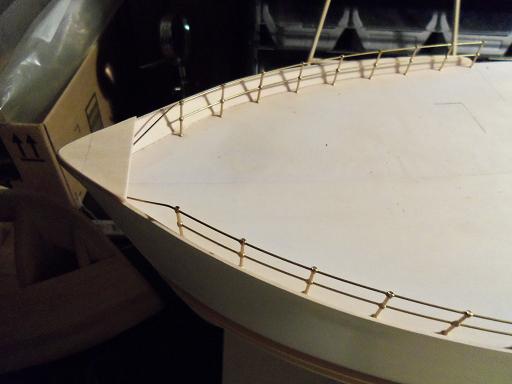
since I was on a railing binge........I figured I trim the railings on the fore deck. I had already cemented them together. at the bow cap, the lower railing was trimmed off and the top one was bent down, according to the plans then......the moment I have been waiting for........damn the exhaust fan, the pilot house, the rack / podium, and the first section, are getting primed!
- 956 replies
-
- 11
-
-
- andrea gail
- trawler
- (and 1 more)
-
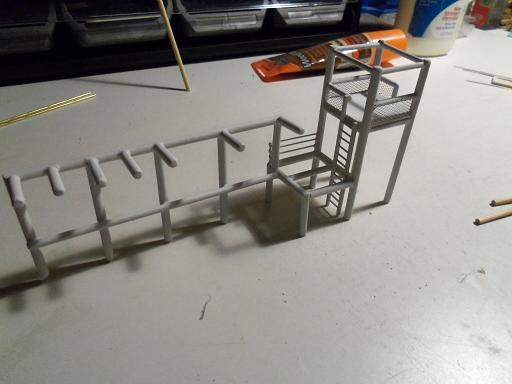
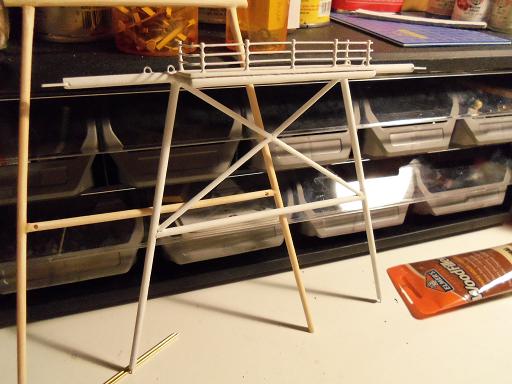
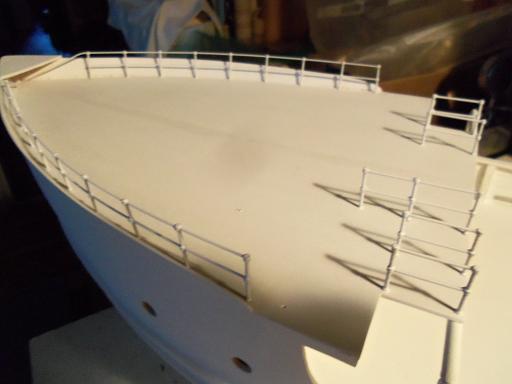
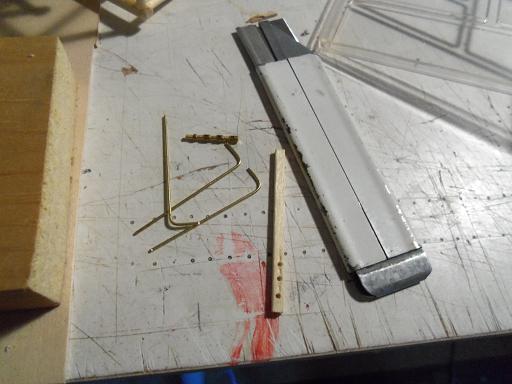
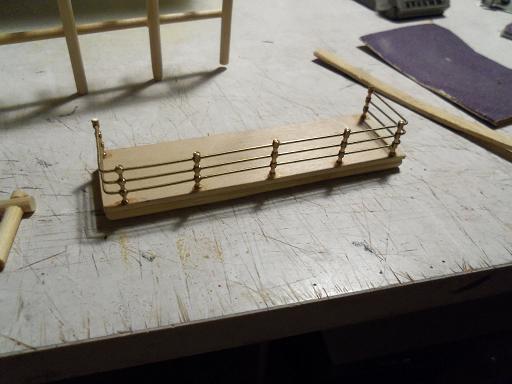
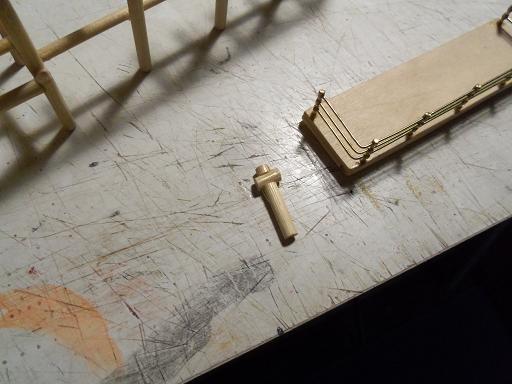
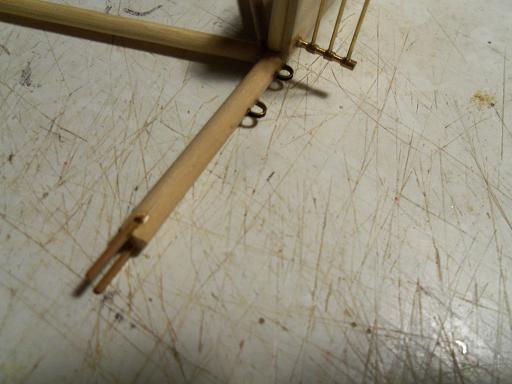
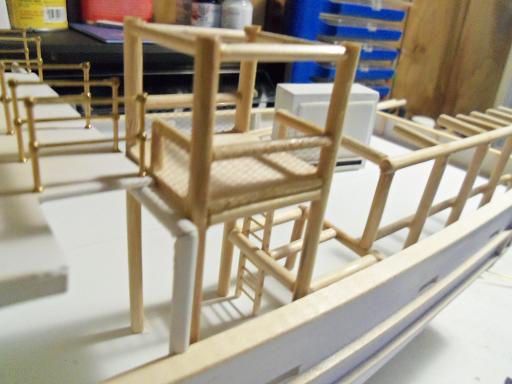
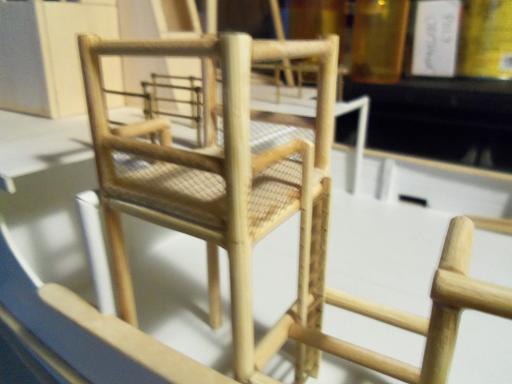
it's a losing battle Sjors........I'm JUST getting caught up again!!!! .....and that's just the scratch builds!!! thanks for the good word! :D Nenad and Michael...........I think that's where 'crazy glue' got it's name. never stick it in your pocket though........we all know what happens to pens thanks for the good word as well Omega {Patrick}, Piet, and Patrick....thanks for the good word! color is getting to be quite an issue now.......glad when I can finally get there I think I know what your referring to Mark........that open area in the rack / podium. well.......silly me......I had to mention it. all this time, I've been looking at the build from the starboard side....not paying any heed to the port side. when I turned the boat around, is when I noticed it.....but kind of shook it off since there was no platform there. but then I began to think.......what if for some reason, there was a problem, and the only access to it was from this vantage point. brrrrrrr.......cold chills and a watery drink! so I decided to put something there. I know that it's not in the plans......perhaps not even on the original vessel........but why not add it in anyway first things first.......let's drill the holes. I have one more of those stanchions left.....shame to have it in inventory.......what would I use it for? then I cut and bent the railings for it I had to make a jig to drill the holes........sad to say I was 1/2 a MM off.......but I did a bit of trimming and I got it in place. I'll just have to fill in the holes. possibilities of probabilities........we'll just chalk it up to added detail. gee......perhaps a platform there would be in order
- 956 replies
-
- 10
-
-
- andrea gail
- trawler
- (and 1 more)
-
I like the way you did this.........the margin planks with the king plank down the middle. it suggests that the open areas are filled in with the actual planking at first glance, I thought it strange.......but in the terms of planking.....it looks logical nice!
-
I was sorry to hear of the shortcoming.......with what I've seen you do up to now.......you WILL find a way you plan an open coolant circuit, siphoning water from outside the boat, and expelling it at the other end..........but have you given any thought to a closed system? the only problem with this, is you would need a radiator to cool the fluid you will use. there are other fluids that have a higher cooling rate than water.
-
gee........you even got Dave studdering!
-
Cutty Sark by NenadM
popeye the sailor replied to NenadM's topic in - Build logs for subjects built 1851 - 1900
I like that eye bolt plate.........it works well generals are smarter after battle, because they already know the outcome.........we know, ONLY when we say it is she's looking good........your making some big steps forward- 4,152 replies
-
- 1
-
-
- cutty sark
- tehnodidakta
- (and 1 more)
-
are you going to show any other parts of the ship? nice progress......good to see your back
-
looking super Nils.......your really moving right along! your method of pre hung sails is working well for you the rigging is really nice!
-
thanks George! .....that little tube of super glue......at one point, I couldn't find it! I looked through the mess on my table...and I couldn't see it. I knew I had removed the build - up on the nozzle....but what did I do with it from there? I found it hanging off of my shirt! it must have been on the edge of the table, and I leaned in to do something! it's the weird stuff....it makes one laugh! thanks for the good word!
- 956 replies
-
- 3
-
-
- andrea gail
- trawler
- (and 1 more)
-
thanks Augie........you caught me in mid post the gangway looks much better now Gibbs says thanks thanks Matija....I appreciate the kind comment and welcome to my log.......always glad to see new folks
- 956 replies
-
- 3
-
-
- andrea gail
- trawler
- (and 1 more)
-
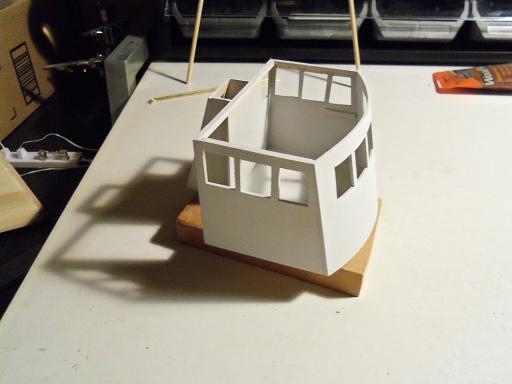
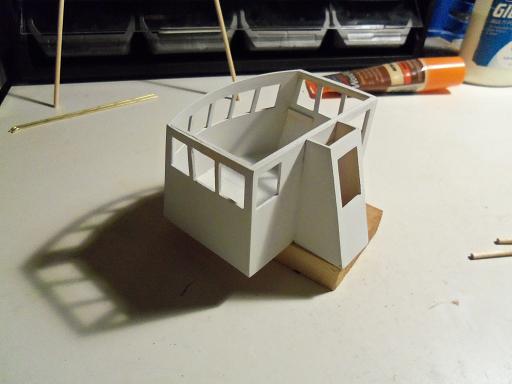
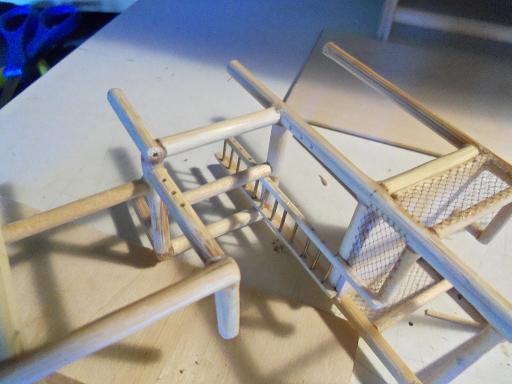
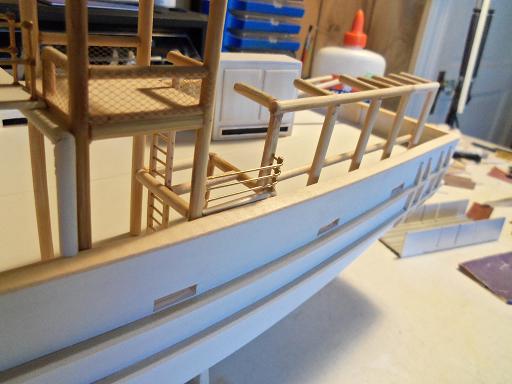
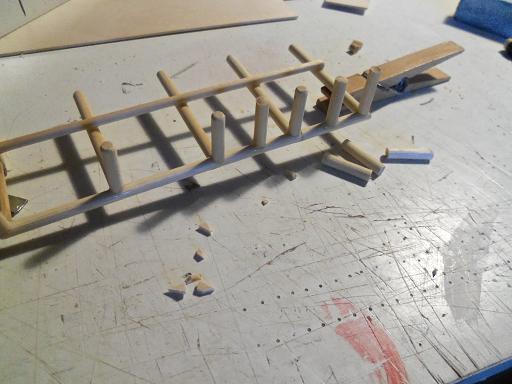
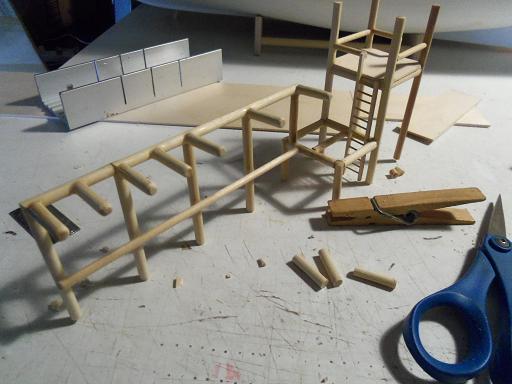
FINE!!!! I'll just do a reset! there.......it worked now! the instructions call for a single rail on the gangway........I have stanchions for three rails.......I'll use them after all.......I don't want to copy the plans to the letter now, do I?!?! one corner is a bit more than the other, but with what it took to do this, I left it. I saw that it was just the matter of drilling another hole, moving the offending stanchion, and then filling the hole, but it's all cemented at this point........really don't want to see what it would look like after ahhhh, but we all know what happens to things that irritate I then made up what I believe is the sampson post......I think I cut the cross bars a bit too short......I may make another . more bits of detail was added to the first section of the trawl rig......those horseshoe looking thing I showed earlier found a place here. the yokes at the ends of the cross bar were also added......these are Billing's idea of the pintle / gungeon assembly in some of their kits {I'm giving them the benefit of the doubt here}. I also have some of the plastic yokes used in some of their gaff parts....I hang onto them.......use them for other things. yea........this process was a bit rushed as well........I failed to take pictures of the step by step. the gangway is in place at this point. I had to do a dry fit........but now it is unstable. I used a prop pole for this, since I haven't got the roof done yet. it's the next thing......... as a matter of fact.........here is the beginnings of the roof.....left to dry over night now the shaping.......the visor {front and sides}..........I really need to get some paint on her, so the pilot house can be cemented in place. the next update should be in detailing the structure
- 956 replies
-
- 15
-
-
- andrea gail
- trawler
- (and 1 more)
-
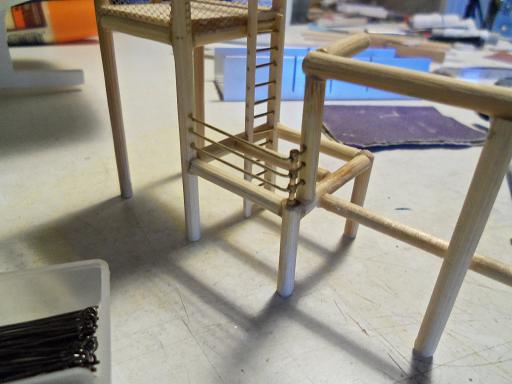
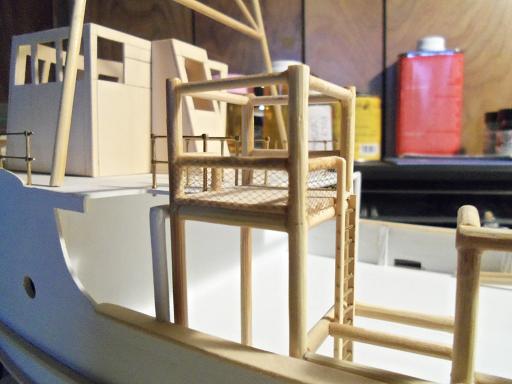
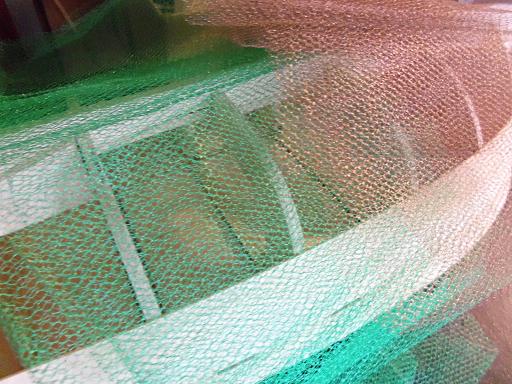
the tulle was used to net off the railings of the podium........I was looking at the lower area. there is a part that is level with the cap rails.....I have such an itch to put something there......it's killing me! the plans show nothing there.......so it's a hard decision {I don't want a 'man overboard' situation} I got a bit rushed with this.......the top part of the podium frame has been added as well. oh.......oh.......picture problem......
- 956 replies
-
- 10
-
-
- andrea gail
- trawler
- (and 1 more)
-
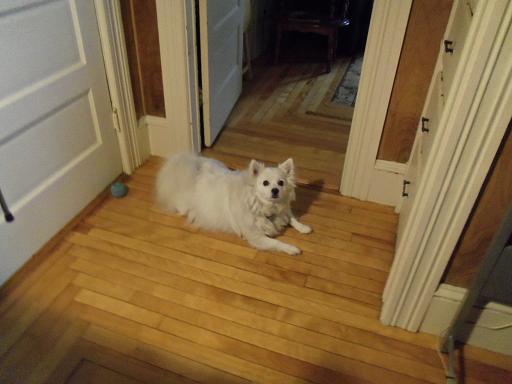
HOLY COW!!!! I've been catching up on all the builds I watch.......MAN!! you folks have been busy! I watch so many builds......it's a wonder I get any of my own building done .....I love it though, so many beautiful builds out there........and more ideas that I can shake a stick at so much......that I had to take a day off from work. no....I didn't play hookey.......I have plenty of time to cover it! I still have two weeks of vacation time.......took one for the Christmas holiday.......and now the admiral is ribbing me for when I'm gonna do it again. you'd think that after a four day 'week end'....she'd be sick of me Gibbs loves it when I'm home......actually he like to goad me into the living room, so he can sit on the floor with his chewies......or sit with me on the couch and watch TV! you should have seen him the day he saw a real horse! here's one of his favorite poses, in his efforts to get me into the living room -----------> what a HAM!!!!!!! he has a few other tricks......but I would have to show you in video anyway........Monday started out with something I wanted to do for a couple of sittings now......the start of the upper gangway it will span the length between the first section uprights.......it's what the tall ladder is for. I also wanted to put the finish on the rack / podium......first adding extra divider pegs for the floatation buoys. then.....a little sanding to get them all to match I got out some of the netting that I had found a while ago, in one of my scavenger hunts. the kit supplies green netting for the reels......but I have some in brown as well. I also brought out some tulle.....for another area of the build......not sure what the kit supplies for this, but it is shown in the instructions. the gangway frame got the platform floor put on at this time

- 956 replies
-
- 9
-
-
- andrea gail
- trawler
- (and 1 more)
-
nice work on the windlass.......looks very good
-
I'm not the greatest with it either.......the method of planking is an art anyway it's common knowledge that the mid ship is wider that the bow.......and the stern {in some cases}. to keep the plank line, so that it is consistent and even, by the time you get to the bulwarks, the ends of the plank are tapered {narrowed in width}. in clinker planking, I would imagine that the plank could overlap the preceding plank more, to achieve the same result. the clinker method is tough in it's own right.......one would absolutely need to start at the Garboard plank to achieve it........plank from the bottom ...up. with more traditional planking........most work down from the bulwarks until they reach the 'turn', and then plank the rest from the Garboard. other phrases would be the 'turn of the bilge' or 'chine'. I tend to keep in mind the imaginary waterline.........others like to 'band' their hull frames to keep track of this {it also helps with tapering} in the instance where the mid ship requires one or even two more planks than the bow, or the stern, the act of merging two planks into one, is called Jogging. there are a few way that this is done.......there are some really nice examples of this peppered throughout the site. another useful bit of planking, when found that a plank need more surface...primarily at the stern, would be the 'stealer'. should the plank be unable to make the full wrap, a gap can be left, and a piece of planking can be fitted in later. none of this applies to your build.......at the moment. when you get into more complex builds {not that clinker planking isn't complex in itself}, you will experience a lot more. you doing a great job with this.......cripes......all I have to do is....not to do any tapering.....and I get all the clinker I want {don't want} but what your trying to achieve is a lot different than that it's a good idea to pre sand the planks before you cement them in place.......leaving just some slight touch ups afterwards. I hope I gave you some insight.....and didn't confuse you. help????.........your here.....help is only a shout away my friend!
-
another fine update John........it's so good to see your back at the table
- 2,250 replies
-
- 1
-
-
- model shipways
- Charles W Morgan
- (and 1 more)
-
very nice rigging Kester.........who knows......perhaps by the next update, you'll have found a solution to those problems you mentioned
-
I like the Plastruct products.......we carry the evergreen line up here as well. what is that bottle next to the hull? nice start on the mod....
-
love that paint!!!! she looks so sweet! exactly.........no doubt that she'll pass the admiral's muster! I like the idea that the doors are removable......you never know when you'll need to replace the sofa!
- 176 replies
-
- 2
-
-
- muscongus bay lobster smack
- Midwest Products
- (and 1 more)
-
gunnery Sargent Sjors.........looks like your ready for gun practice! looking mighty fine...I knew you'd whip them into shape!
- 1,616 replies
-
- 3
-
-
- caldercraft
- agamemnon
- (and 1 more)
-
such a great finish Gil...........I hope I can say that. such a superb build........the finishes.....the rigging.....a very high quality museum build! .....and lets not forget the ship's boats..........awesome!