


popeye the sailor
-
Posts
16,007 -
Joined
-
Last visited
Content Type
Profiles
Forums
Gallery
Events
Everything posted by popeye the sailor
-
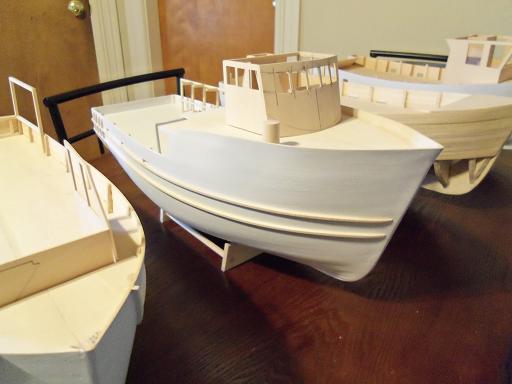
 thanks Adam and Ed I had done a group shot earlier.........when they were just a bunch of frames and not much to look at. I really need to put some serious moves on the tree boat hull and get her up to speed with the others. I'm still thinking about where to drill the holes for the wiring on the deck. the other week, I was lurking around the dollhouse dept at Hobby Lobby, and I was impressed with the electrical accessories they have for them. I can buy a complete kit.......it has the transformer, plug in outlets, wiring, along with a few other goodies. I kinda like the outlets......... I can fit one of them into the hull, so there won't be a wire coming out of it. I can simply plug in the power supply whenever I want to light it judging from the lighting used, there is little threat of heat generation, so I'm thinking that this might be a viable solution. I saw some really neat sconce lights.....hey.....maybe even a chandelier! now.....wouldn't that look simply charming! >jacket time.........maybe< "they're coming to take me away......................ripping the sawdust from my teddy bear!" thinking aloud..........the bulwarks are a reasonable height.......the badges can be framed in. the upper and lower profiles must be made so all of the windows are the same size. I had planned to do kind of a stained glass thing, not allowing the interior to be seen. but, for this much visibility, I really don't think I'm going to get away with it. yech........I hate wallpaper, as much as I hate stucco
 -
I think you goofed Piet........it doesn't look like a proto type anymore.........it's a model I think you've gone too far!!!! perhaps a beach diorama might be in order....it looks really sweet!
-
sorry to hear that you've been ill.....I wish you the best and hope to see you beat this
-
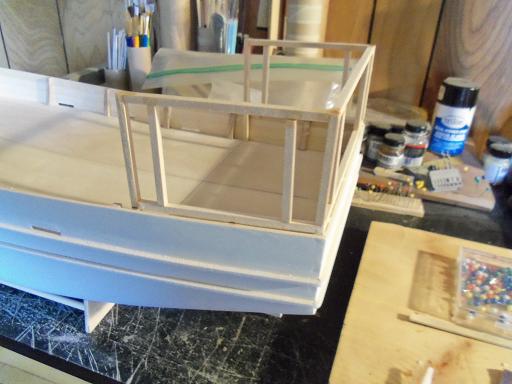
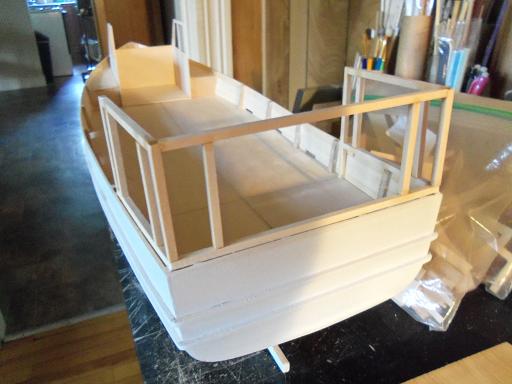
come to think of it John........I do have a couple of pictures in the camera. the 'warming house' has been a thought on my mind. I had a chuckle........I thought of....of all things.......Jed Clampett's cabin, from the TV series. yea, I'm right on it then I thought about ships that have 'badges' on their stern galleys. I like the idea..........I would have to install bay windows on both sides. but.......what about the transom wall? on most contemporary ships, these are flush mount windows........I'm thinking.........I'm thinking here is what I have so far on the Jingle Belle.............. I still have to create the front wall. I hope to have more on this soon
-
I'm not sad Nils........the person who I built them for is enjoying them....that's what counts I was told that someone wanted to buy it form him at the expo.........said he'd split the money with me. he didn't sell it though.........I think he couldn't part with it the Billing's Cux kit is a really good kit....the Mary Ann kit is a spin off {but don't tell anyone I said that } there are a couple of others that utilize the same hull design. I still have the parts panels........I could make up another hull. I won't do that right now though.......I think I have more than enough on the table at the moment I'd be better to get one done soon.............I don't want folks to think I'm totally off my nut! looking forward to more of your fabulous workmanship... ..........perhap later you'll bring your Cux out in the forefront and do some work on her oh.......and I keep cloth drapes over my builds until I bring them back out to work on them. I'm not into the dust thing either
-
thanks John.......last day of my work week. should have some progress up soon
-
I've only had two leave the house so far........I hated to see the Cux 87 go. it ended being shown at a model expo in Chicago, so it lessened the pain.........gotta get me another one {it was a fun build}. the Nordkap, Mary Ann, and the Gundalow are in boxes in the hallway closet. still haven't made or bought a case for them....if anyone wants to see them, I bring them out. the main thing is that I don't want them to get dusty. the other four that I have, are in an open faced book case that I modified for them....in the living room. it's a low dust room........no one goes in there but me to watch the TV the admiral already has her favorite........no one touches the M&M boat! not even ME!
-
mac and cheese? .........is there a difference between weevil and grub? {sorry.......my American influence is showing }
-
I like the way it came out.........definitely has that 'been in the water' look to her. there is absolutely no problem in weathering a hull.....it gives it more depth..........but don't try and make her look 'too deep' I sometimes wish I could weather like other folks do.....most of the time, it happens to me by mistake great work, my friend!
-
well Keith........I think you got my 2014 builds in review already figured out yup.......that's the rest of them. I hear you Sjors.....when will you see a finished one. with how fast the year is winding down to the end...I would say.....none. but, I can see it's going to be a very active 2015. I can't very well say the heck with it, and finish any of them without all the bells and whistles I planned to put into them. that wouldn't be any fun at all thanks to you all for your kind comments and likes. I will continue to amuse
-
here is something else to tease the brain. I had the painful pleasure to see the Robin William's Movie 'Popeye' last evening. Popeye enters the movie in a dingy.........not that big of a model, 'tis true. I enjoyed looking at the boats, especially the one seen in the middle of the harbor........sunk when Popeye finally finds his pappy {ray Walston} {very good job in the look alike dept}......they give chase after Bluto in a paddle boat. I tried to find pictures of this boat.........I even showed it to the admiral. she just shook her head.......walking out of the room saying..........."good luck with that one!" this is the best I can find at the moment. this is the boat where Pappy was held captive......that is, after Bluto tied him up. I'm not committing in doing a model of it.......not without further pictures and specs. as far as specs go, throw them out the window........and call it weathering if anyone has seen the movie, you can agree that it would be an interesting build as for the movie of the Andrea Gail........the ice maker went down........they were going to turn around, but then changed their minds. it was first thought that the storm wouldn't hit as soon as it did, or that they would be heading right into it. they lost radio contact soon after the storm picked up momentum.


- 956 replies
-
- 9
-

-
- andrea gail
- trawler
- (and 1 more)
-
yea, I can understand that it's good to show your technique though.......I'm sure that someone will come away with an idea or two. I know I did........ how much of an edge fold do you allow, before you sew on the rope edging {bolt ropes?}
-
whether upside down......or right side up........you've done an excellent job this time around Mark. the portholes look really REALLY good! what I've found to be a complimenting part of this site is the moderation team.....you folks do an admirable job. given the subjects I tend to model, it's good to see you and John {Jim Ladd} have taken an interest. I had the pleasure to meet John, back when I finished the M&M Fun Ship. for me, with all there is to see here in the states, he took the time to stop in for a visit, and take pictures of this off the wall build. I was very humbled and honored. don't know when........or how........but one day, I hope to get to meet you too
-
there's no ignorance here Keith.......just jaw dropping beauty, from what I see of some of the builds on this site yes, there will be an ice machine.......don't know about the working part....I'm not that good for the drums.......a top and bottom will be made, with brass rings for the segments. once filler is added and sanded in the proper contour, I should arrive at a pretty convincing 55 gal drum. I have quite a few to make. I hope to have more on this and other sub assemblies soon........thanks for the extreme vote of confidence thanks also to those who hit the like button......glad your enjoying the build
- 956 replies
-
- 3
-
-
- andrea gail
- trawler
- (and 1 more)
-
Cutty Sark by Keith B
popeye the sailor replied to Keith B's topic in - Build logs for subjects built 1851 - 1900
you gotta love those easy repair jobs...........remember to make the adjustment to your rudder as well some really nice work your doing, the galley structure looks super! -
great sail making technique Nils......the patchings make for a really nice touch they look quite real
-
your progress is really awesome Michael!
-
are you going to include the wheels on the back end of the carriage? yours looks much better.......a great improvement given the thickness of the bulwarks.....sounds like a very good idea to cut them out now. would a template help you in cutting them all out exact?
-
is this a common thing to have the dinner ware at the fighting station? I would have thought it would have 'rose such a clatter' when the cannons were in use. the sadder thought of this would have to be, going to the family and informing them that their son or husband was killed by a flying plate "by a plate....you say?" "well.....let me tell you.....I've thrown hundreds of plates at the blighter, an' none of 'em ever so much as put a dent in his head!" "what would have made this any different?" "Velocity, Ma'am..........velocity!"
-
good to see her finished Mobbsie you've done a superb job.....she looks absolutely stunning! the level of detail you put into her really shows the time spent I'll be looking forward to your next build.......have you begun the cross section yet?
- 1,279 replies
-
- 1
-
-
- agamemnon
- caldercraft
- (and 1 more)
-
cannon barrels look great Augie.......do you need to assemble the carriages as well?
- 2,191 replies
-
- 1
-
-
- confederacy
- Model Shipways
- (and 1 more)
-
great looking forge..........and a wonderful review to go along with it! got some really nice shots there! superb work Dr. Dafi!
-
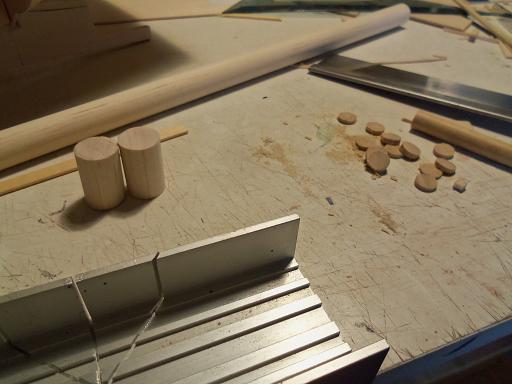
thanks Lawrence.........man.......did I pull the biggest goof! I posted a picture in the Holiday Harbor log ...........with a 55 gal drum on the deck! it's just a start.........when I got the thinner so I can paint, I bought a length of 5/8 dowel. looking at it though, it might be a bit too big. I haven't done much else......I took another piece of dowel, and cut some slices. looking at them as well, I have the feeling they might be too large, for what I want to make from them. I'll continue with them though........with what I trying to make, all of my circle templates are too small. ....more on this soon

- 956 replies
-
- 8
-
-
- andrea gail
- trawler
- (and 1 more)
-
thanks John.......I was amazed at what was in the camera I watch quite a few builds.......kit and scratch..I try to use the like button as much as I can. so many wonderful builds here........it didn't stop the number from rising. I'm glad to have seen your recent progress, very impressed with what your doing keep it up .........and thanks again for looking in thanks to all those who hit the like button..........and Carl, how did you know what came home with the thinner the other day.......thought I'd keep it a secret I haven't even gotten into the ribbons and bows yet.......hee.........hee! which reminds me.......I'd better get them off the dining room table before the admiral gets home. you should have seen how big her eyes got when she saw the scope of what I've been up to! ..........and that's not even ALL the builds put together......she'd shut me down for sure!