


James H
-
Posts
5,618 -
Joined
-
Last visited
Content Type
Profiles
Forums
Gallery
Events
Posts posted by James H
-
-
3 hours ago, DelF said:
You've made several references to varnish in your log, both poly and acrylic. Could you share what brands you use, and whether or not you dilute them at all? I'm still trying to find a combination I really like.
For polyurethane varnish, I've used several brands, but currently using Rustins matt varnish, which I've been diluting 50:50 with white spirit.
I use aerosols for big stuff like wales and lower hulls, with Plastikote being my favourite generally, but I do like Games Workshop Chaos Black as a spray as it covers so easily.
When painting smaller areas, I like Vallejo acrylics that I usually just add a tiny amount of water to so it flows easily. I also use Humbrol enamels for some areas, like blue and ochre, mixed 50:50 with white spirit. Tamiya acrylics also get used, mixed 50:50 with Mr Levelling Thinner.
I do sometimes use lacquers too, such as the Xtreme Metal from Vallejo. Those are pre-mixed. Examples are the copper used on horseshoes, depth marks and fishplates etc. That stuff is for airbrushing.
Of course, there's the alcohol-based Vallejo Liquid Gold, thinned with a drop of isopropyl.
In short, I use many different brands and types from lacquers, acrylic lacquers, enamel, acrylics etc. Generally, whatever I have that I know will do the job.
-
7 minutes ago, JJT said:
Please share
")
Take a look a little up my build log on this page 😆
- chris watton, Keith Black, mtaylor and 3 others
-
 6
6
-
-
1 hour ago, Matt D said:
The gold painting looks so perfect, James. Well done, sir!
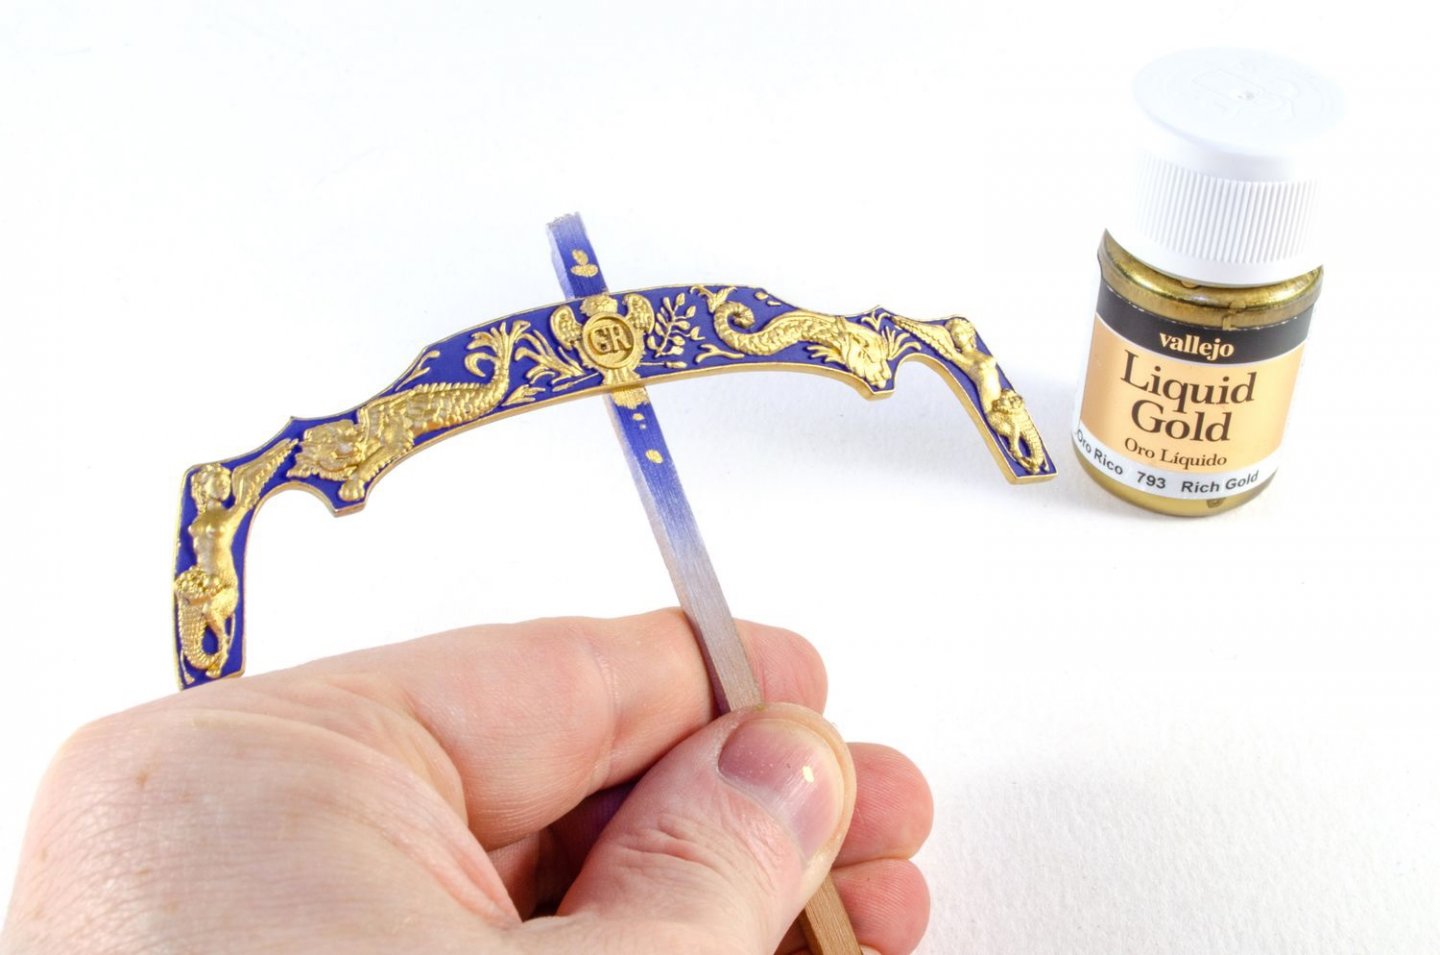
Gold is notoriously bad for brush painting. The results are usually crap.
The stuff I use (recommended by Chris) really is amazing. You can get a dipped gold effect with a brush, as long as you shake well and just add a couple drops isopropyl to a small amount of paint. It's a revelation for me.
- KentM, chris watton and mtaylor
-
3
-
40 minutes ago, RockinBudgie said:
I've dipped my toe in the water by ordering Lady Eleanor from Chris, but have to say, this is the one i'm hankering for!
I just love everything about this kit, and can't wait for release. 😍
Have any prices been mooted about yet
Cheers RB
There is a list price I have, but it's not finalised yet so will wait until Chris confirms it. There are over 30 sheets of laser cut material with this one, as well as 5 sheets of photo-etch, laser cut acetate windows, resin castings, 3D-printed figurehead and cannon and of course those three boats that sit atop it too. I can guarantee with the manual (currently around 600 photos), it'll be a whopping and heavy box!
-
4 hours ago, nzreg said:
Just took delivery of this saw (6 weeks shipping to New Zealand)
Very pleased with the tool feels like a quality build and as James wrote “very sharp”
They are also very fine, and don't seem to have the flex of the ones I normally use, which is good.
- Canute, mtaylor, thibaultron and 1 other
-
4
-
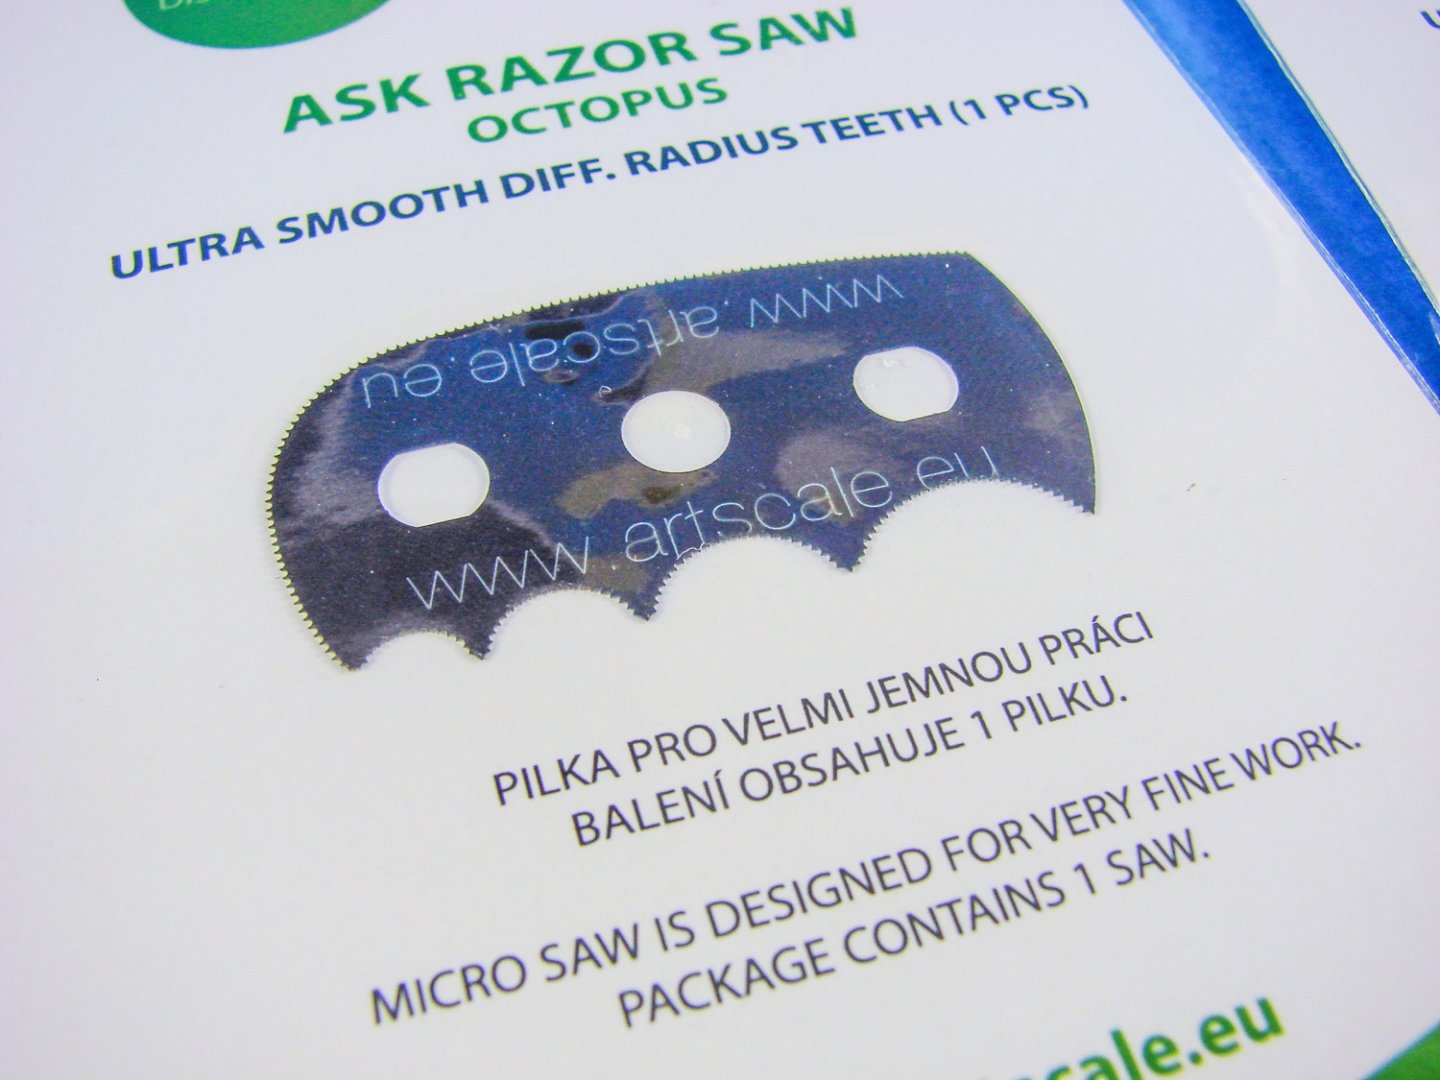
Artscale have now released some new blades for their razor saw, and these should prove very useful.

Got to love the one called 'BATMAN'! 😆 I can't imagine why it's called that!
These will be perfect for cutting around circular materials, or even adding panel lines too. The 'OCTOPUS' is perfect for swiping cuts with the shape of the longer edge, whilst the underside presents all sorts of possibilities. If you have the saw, then these are worth getting, and if you don't these are a perfect excuse to go shop one.

- chris watton, Ryland Craze, Wacom and 5 others
-
7
-
 1
1
-
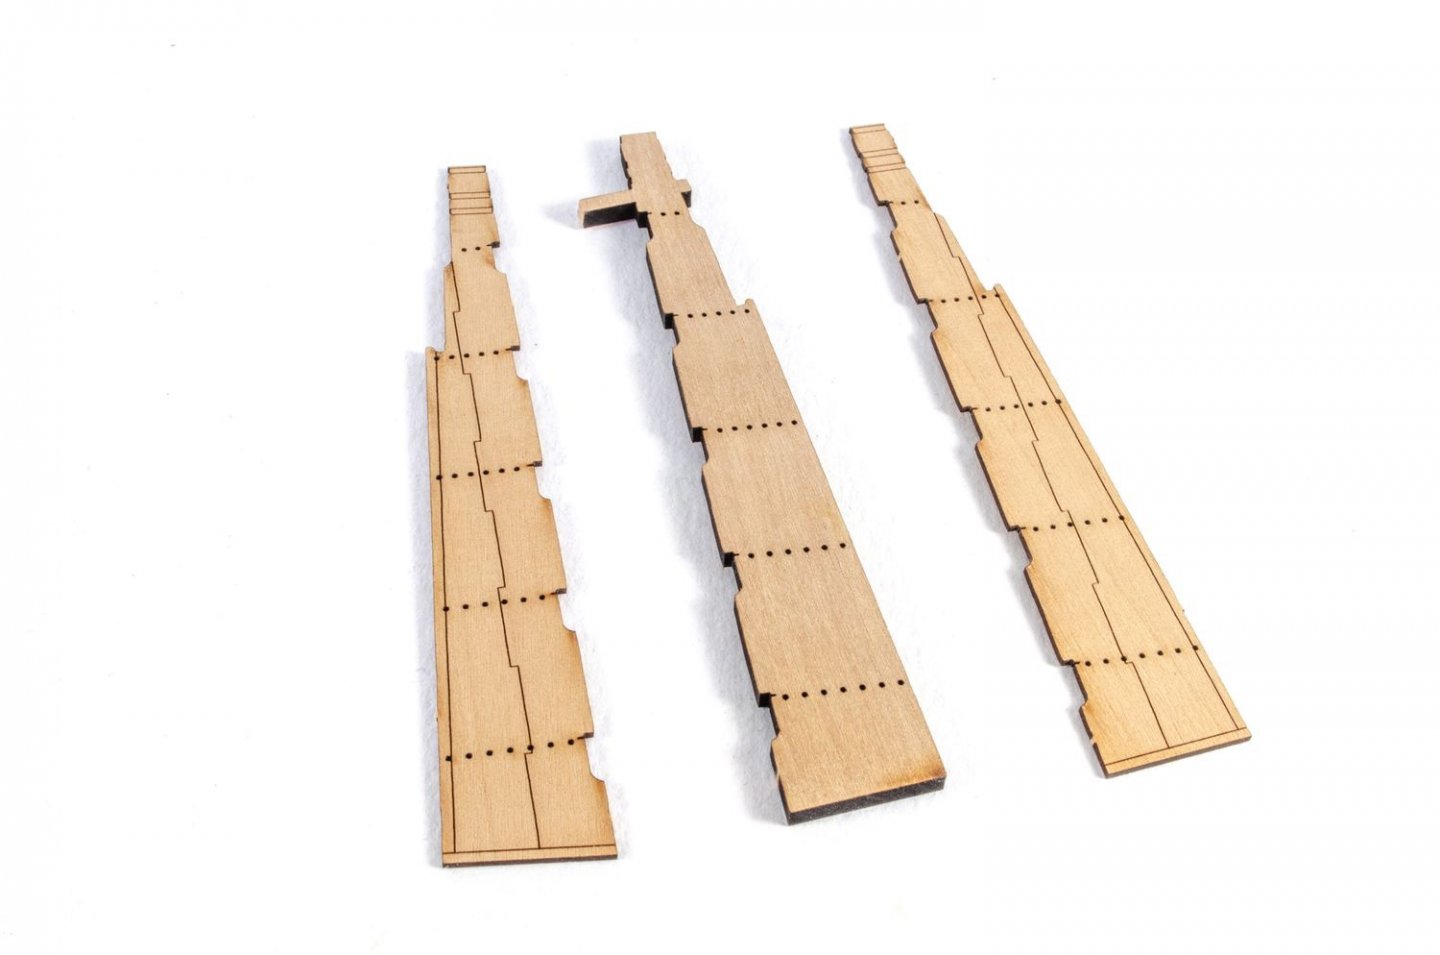
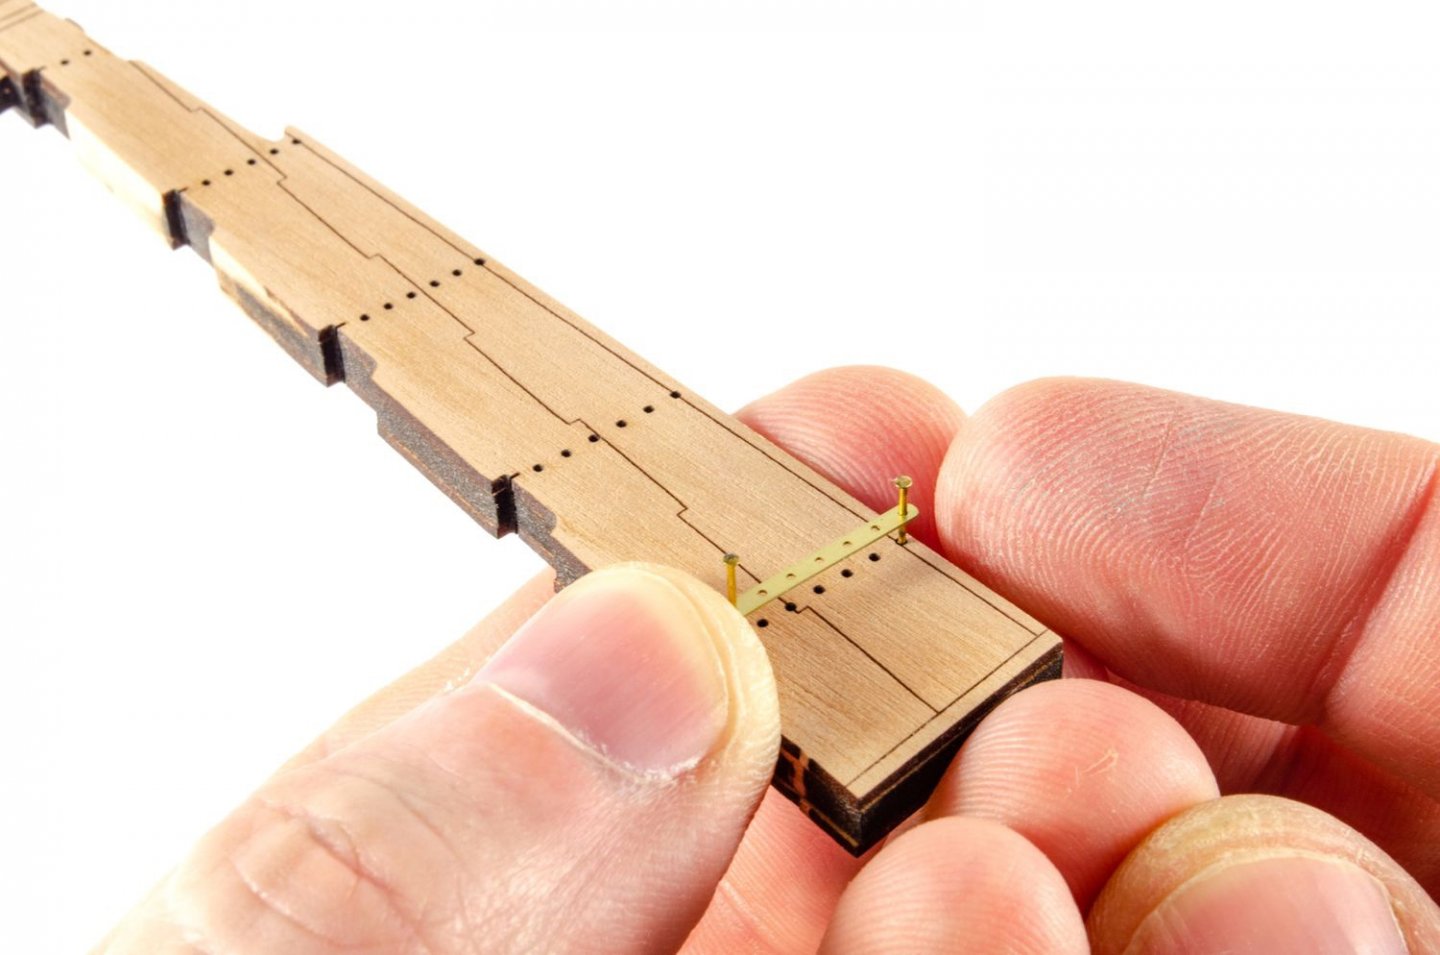
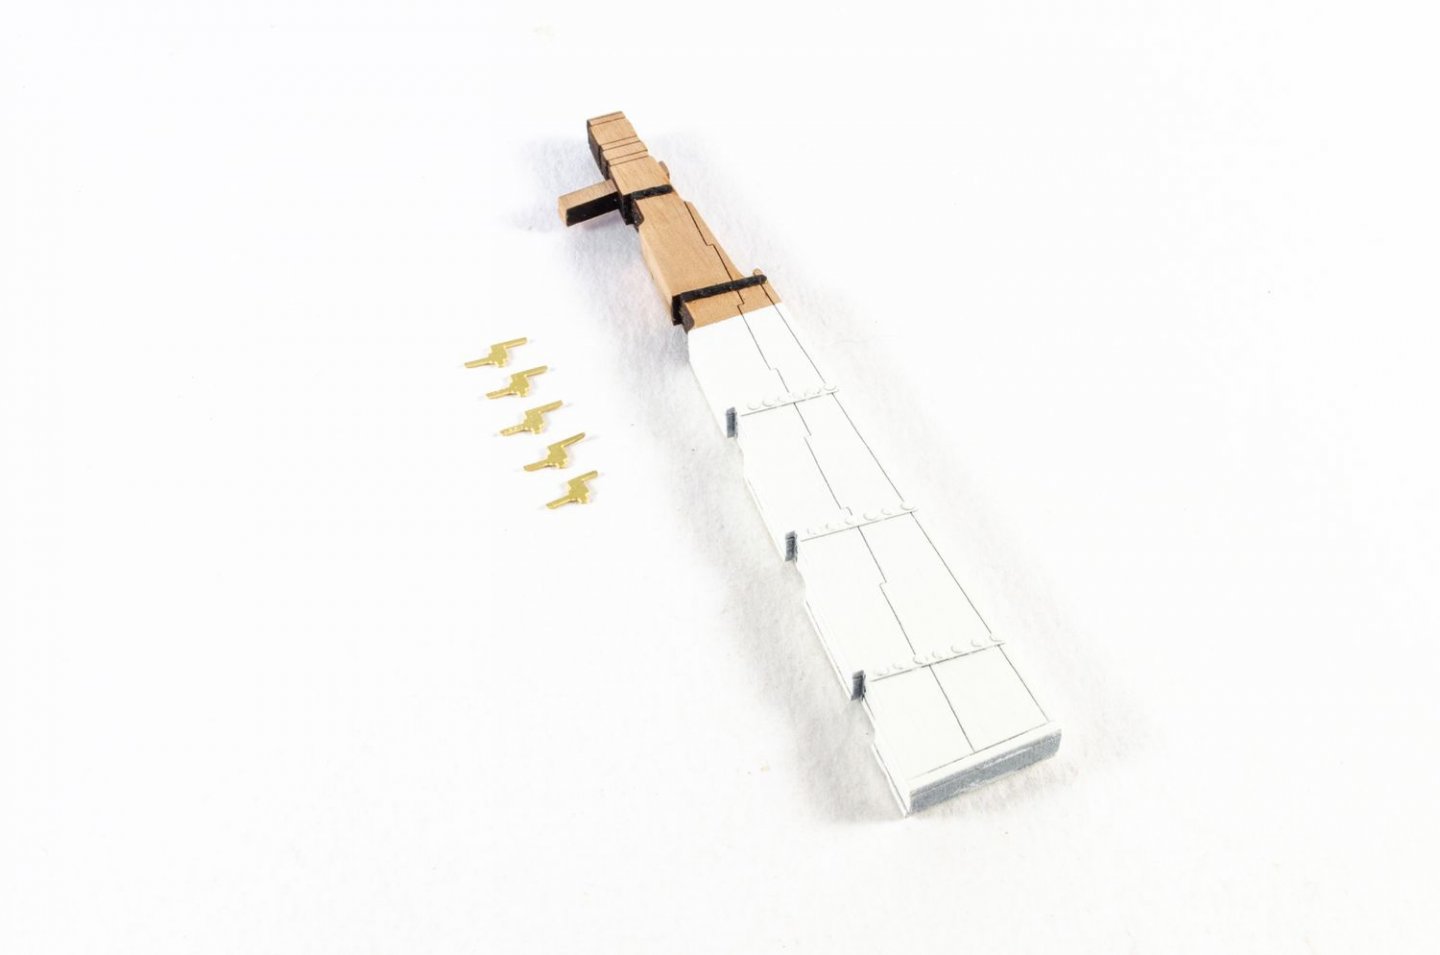
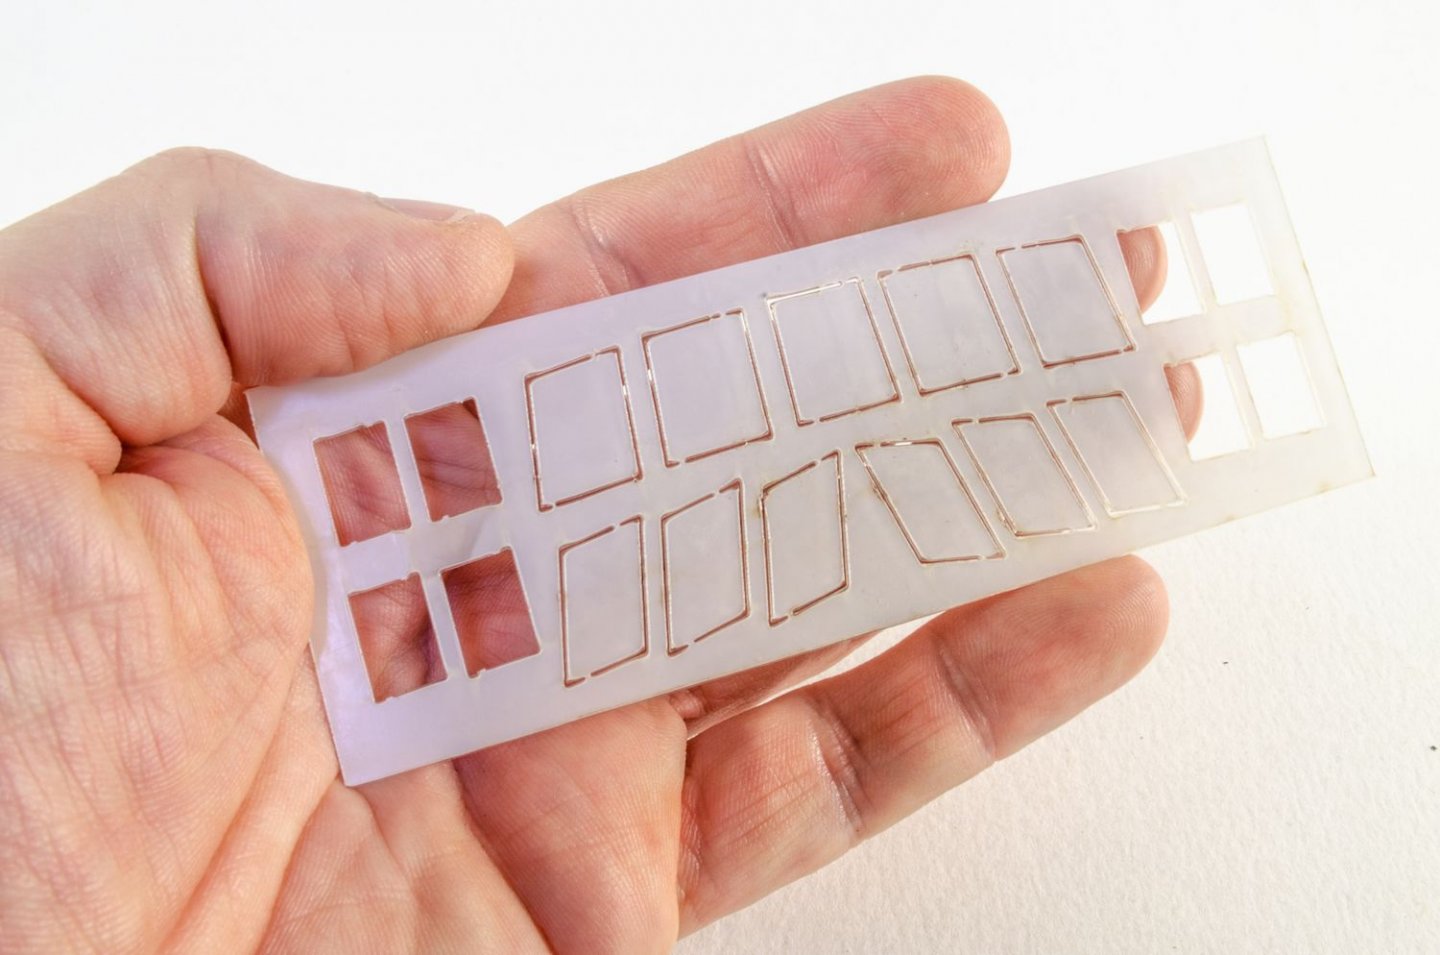
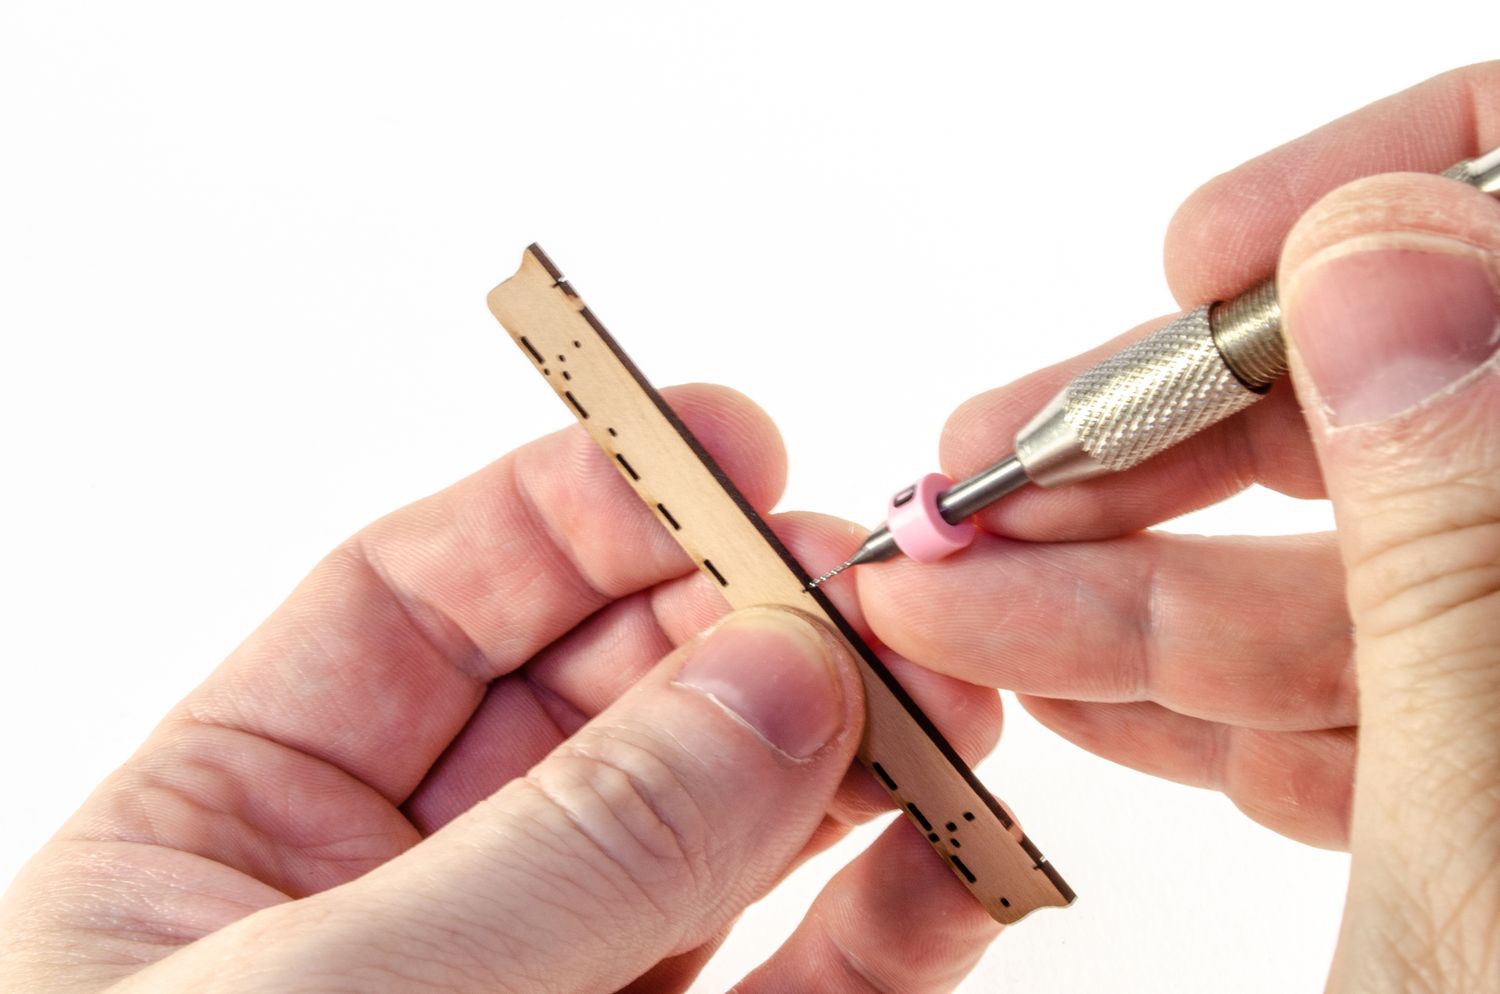
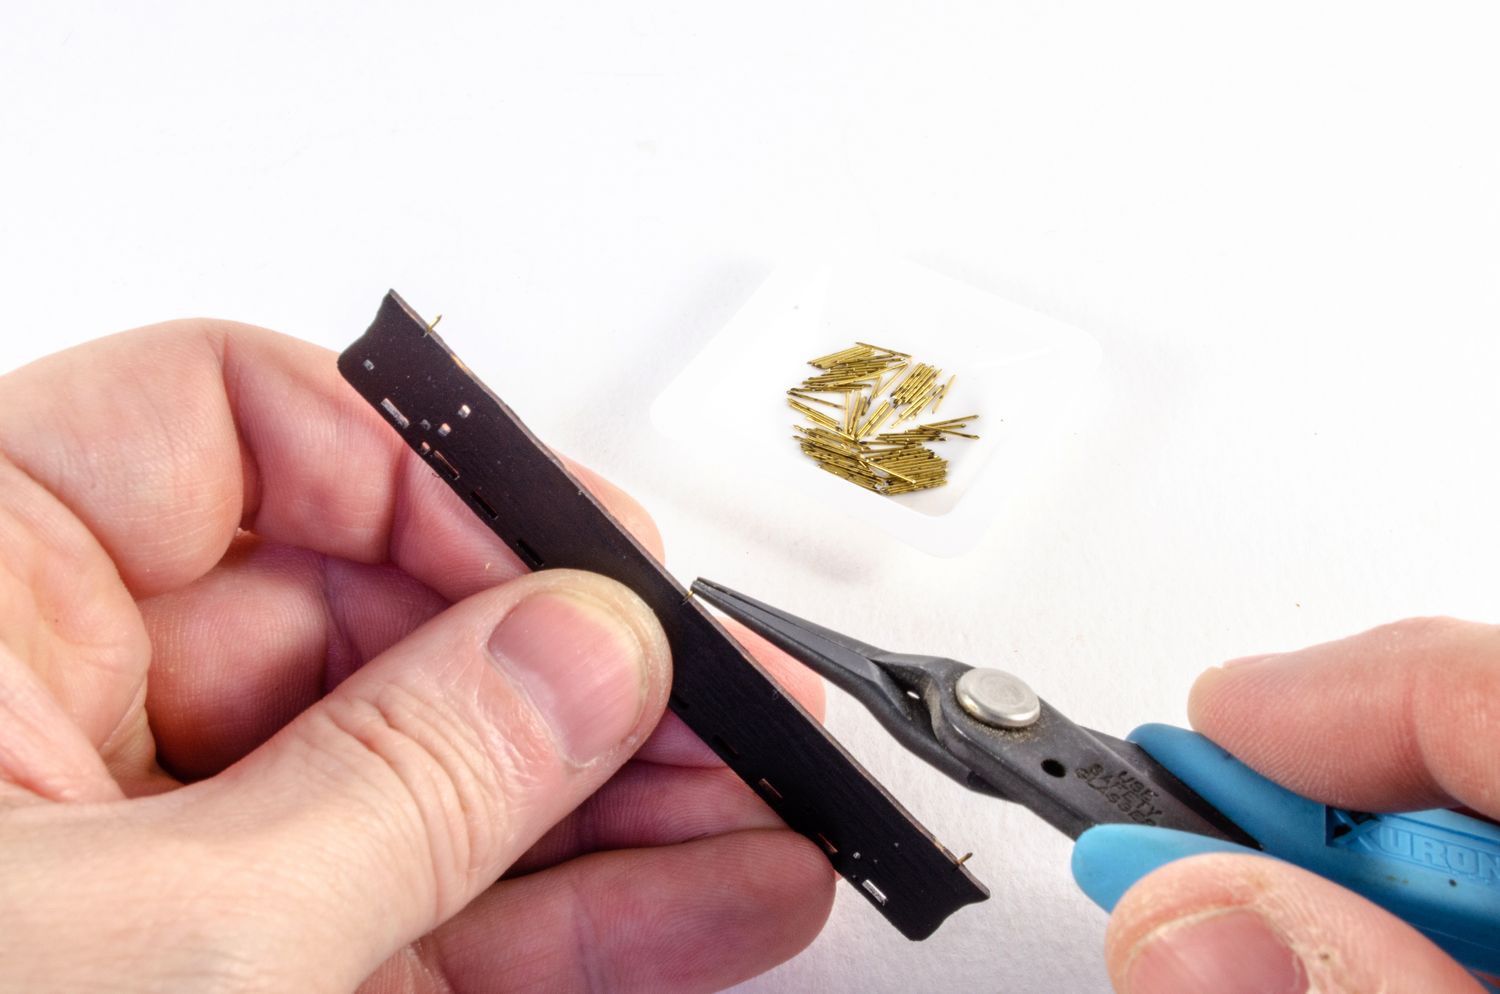
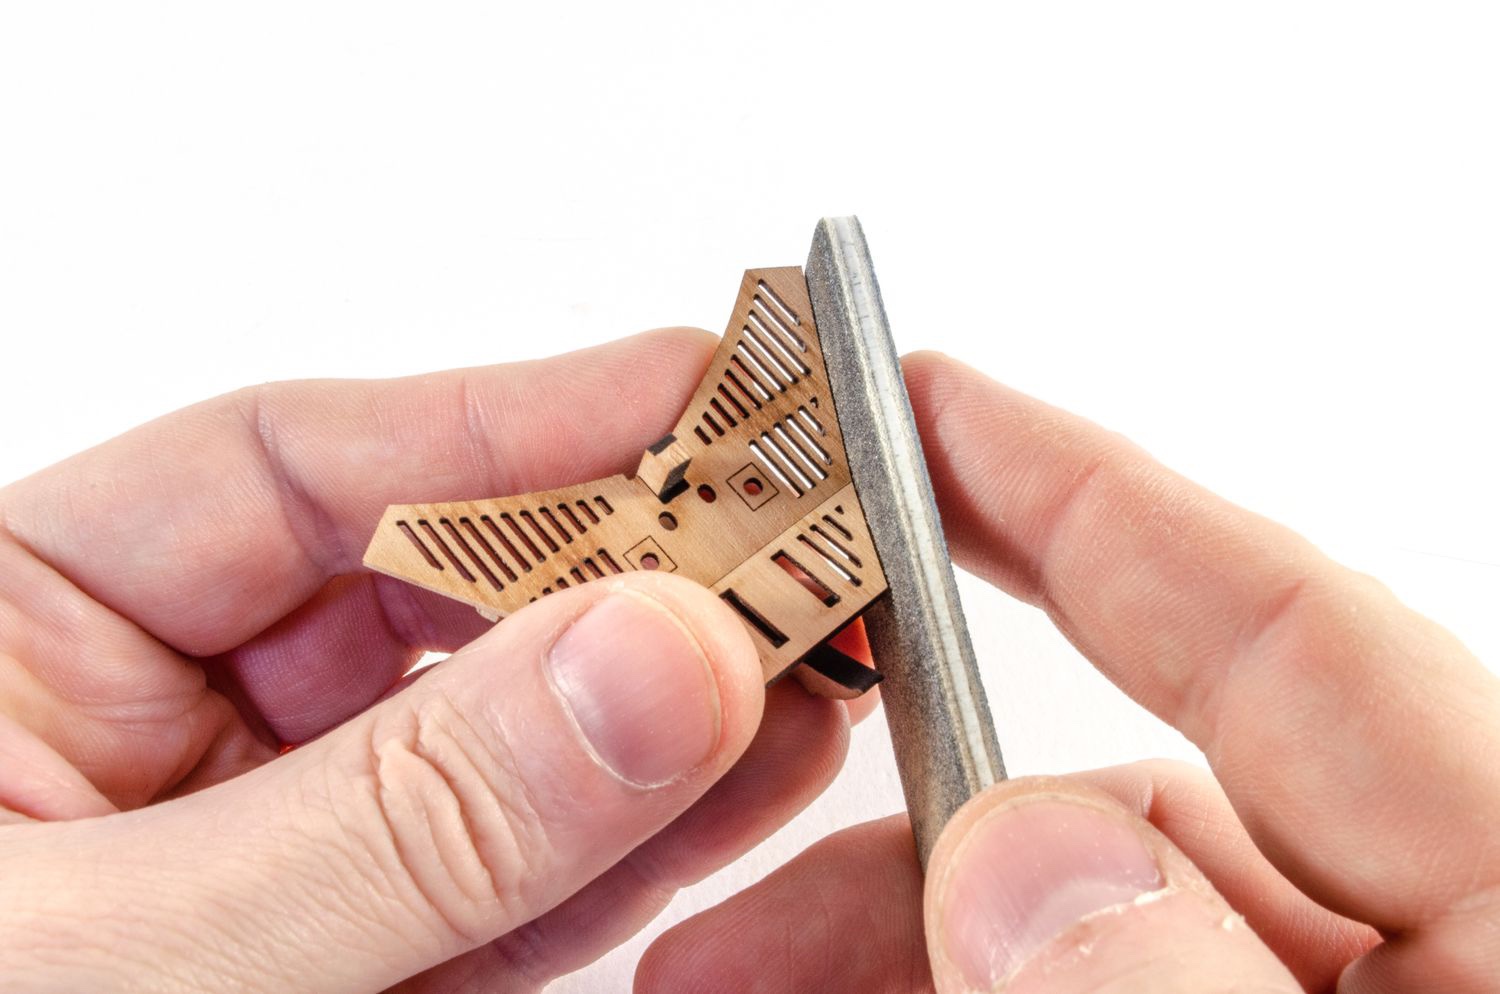
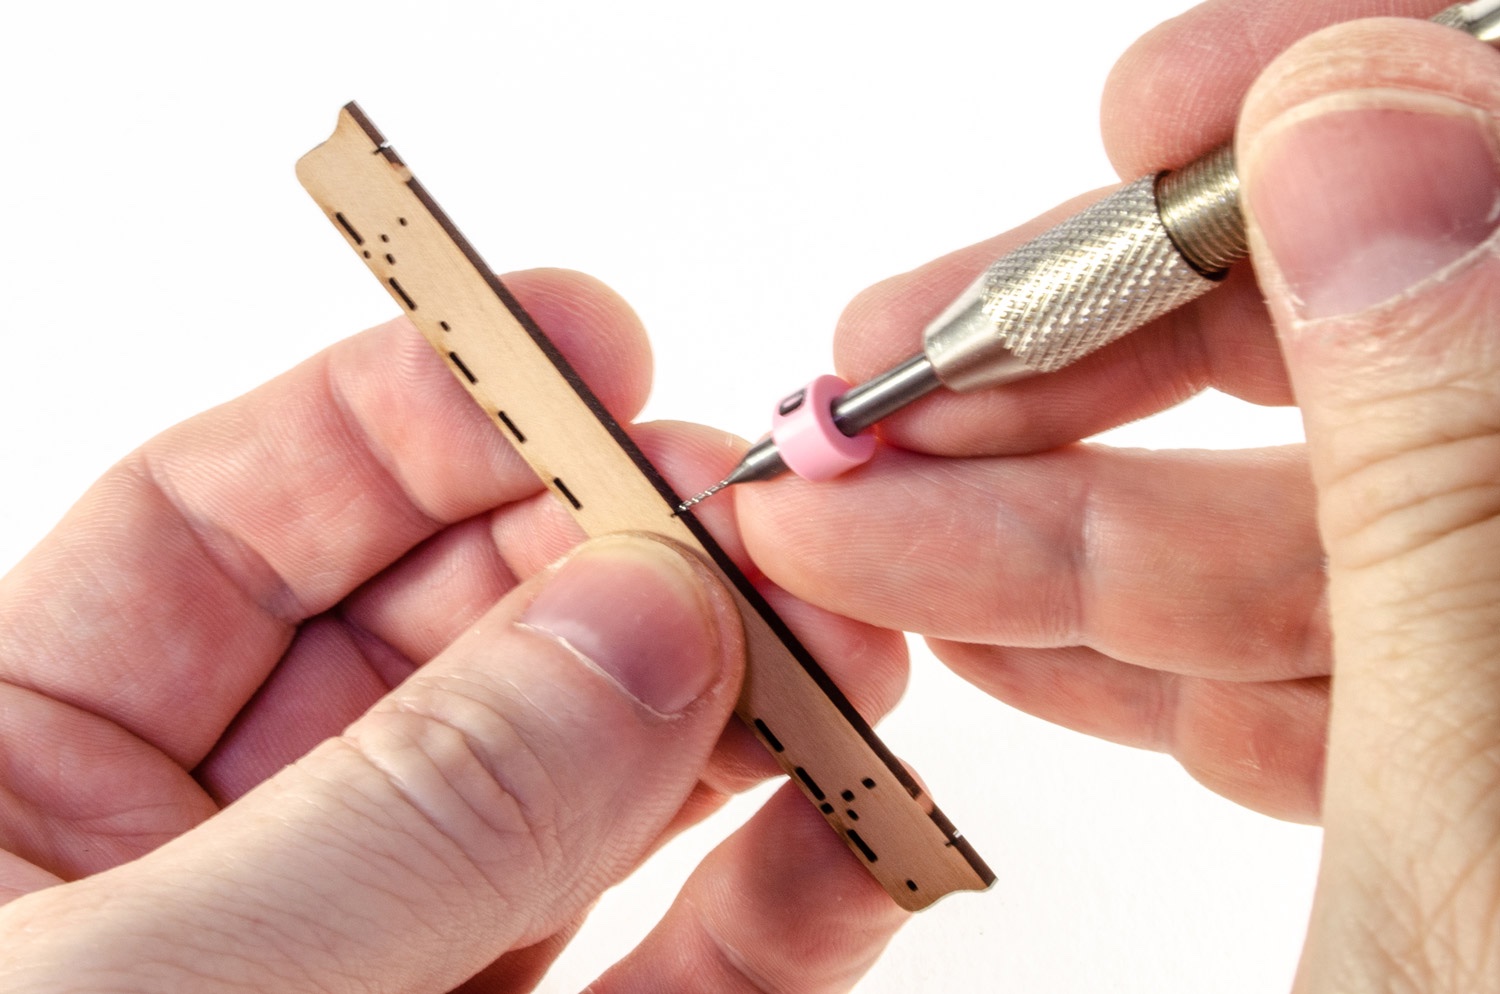
The laser cutting on the waterline marker is very fine and really needs cutting though from both sides on the tabs to make sure you don't break anything. Just takes a little extra time.
Are you trying an acrylic filler with a little wood glue in, diluted of course? I apply this before any paint, and rub back and fill again. There's always more filler needed when the paint goes on though....never any luck with me in avoiding that 😆
-
-
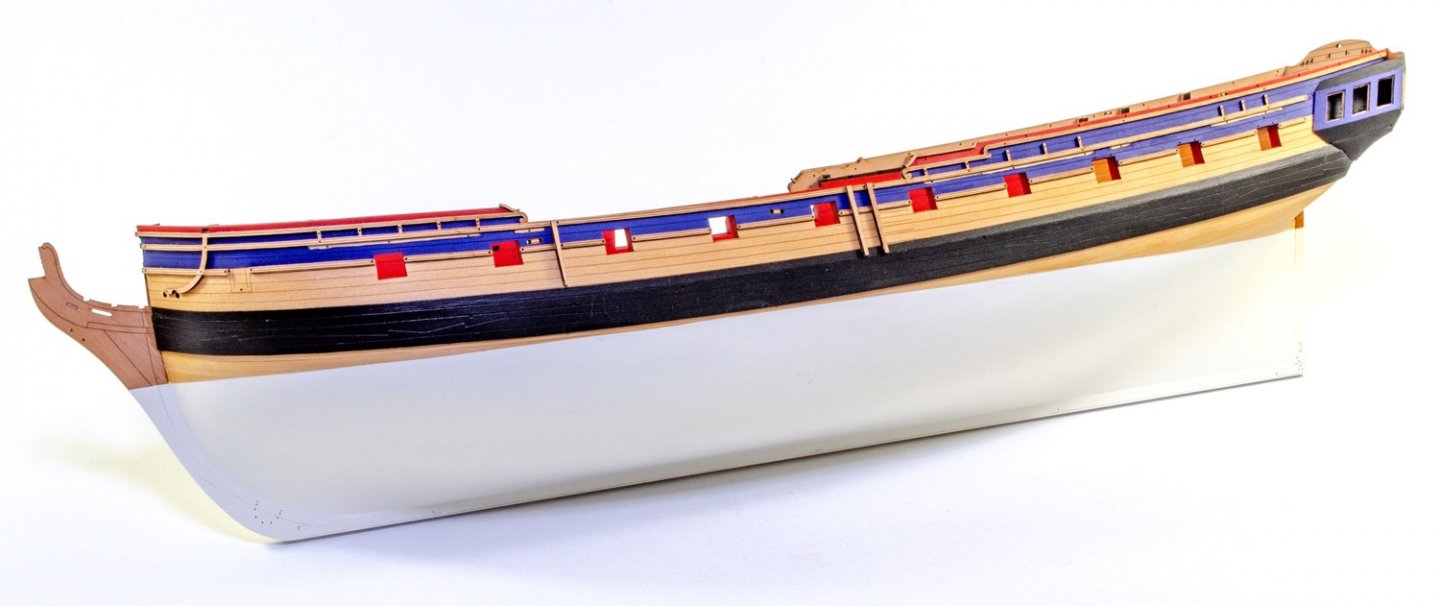
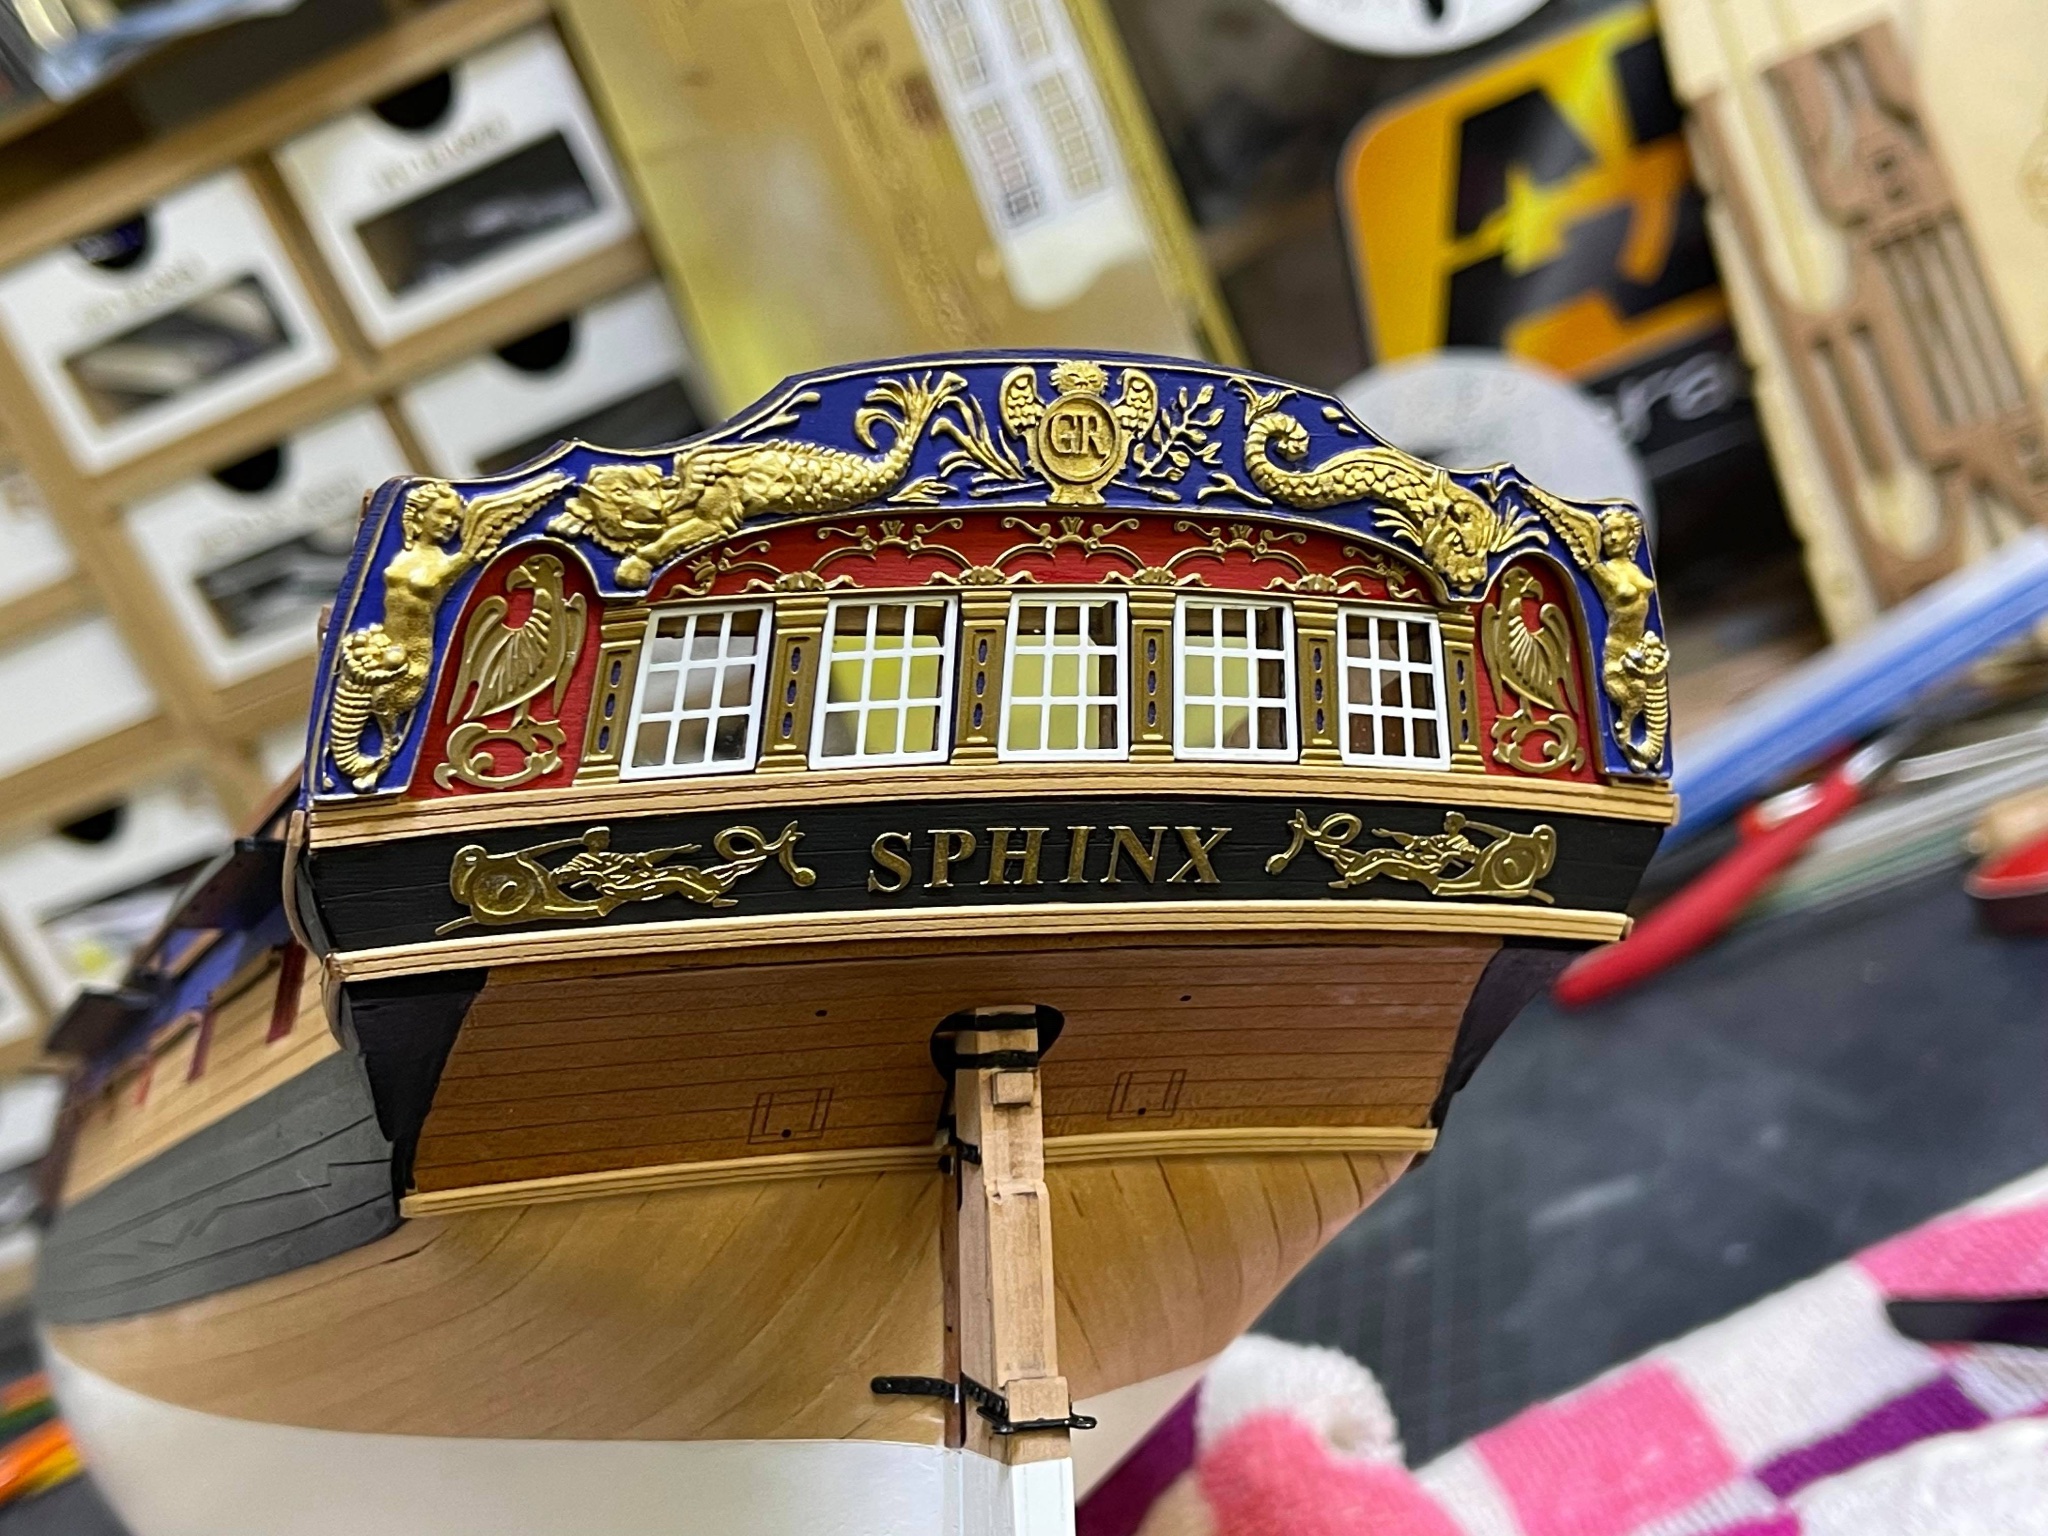
Time for another small update.
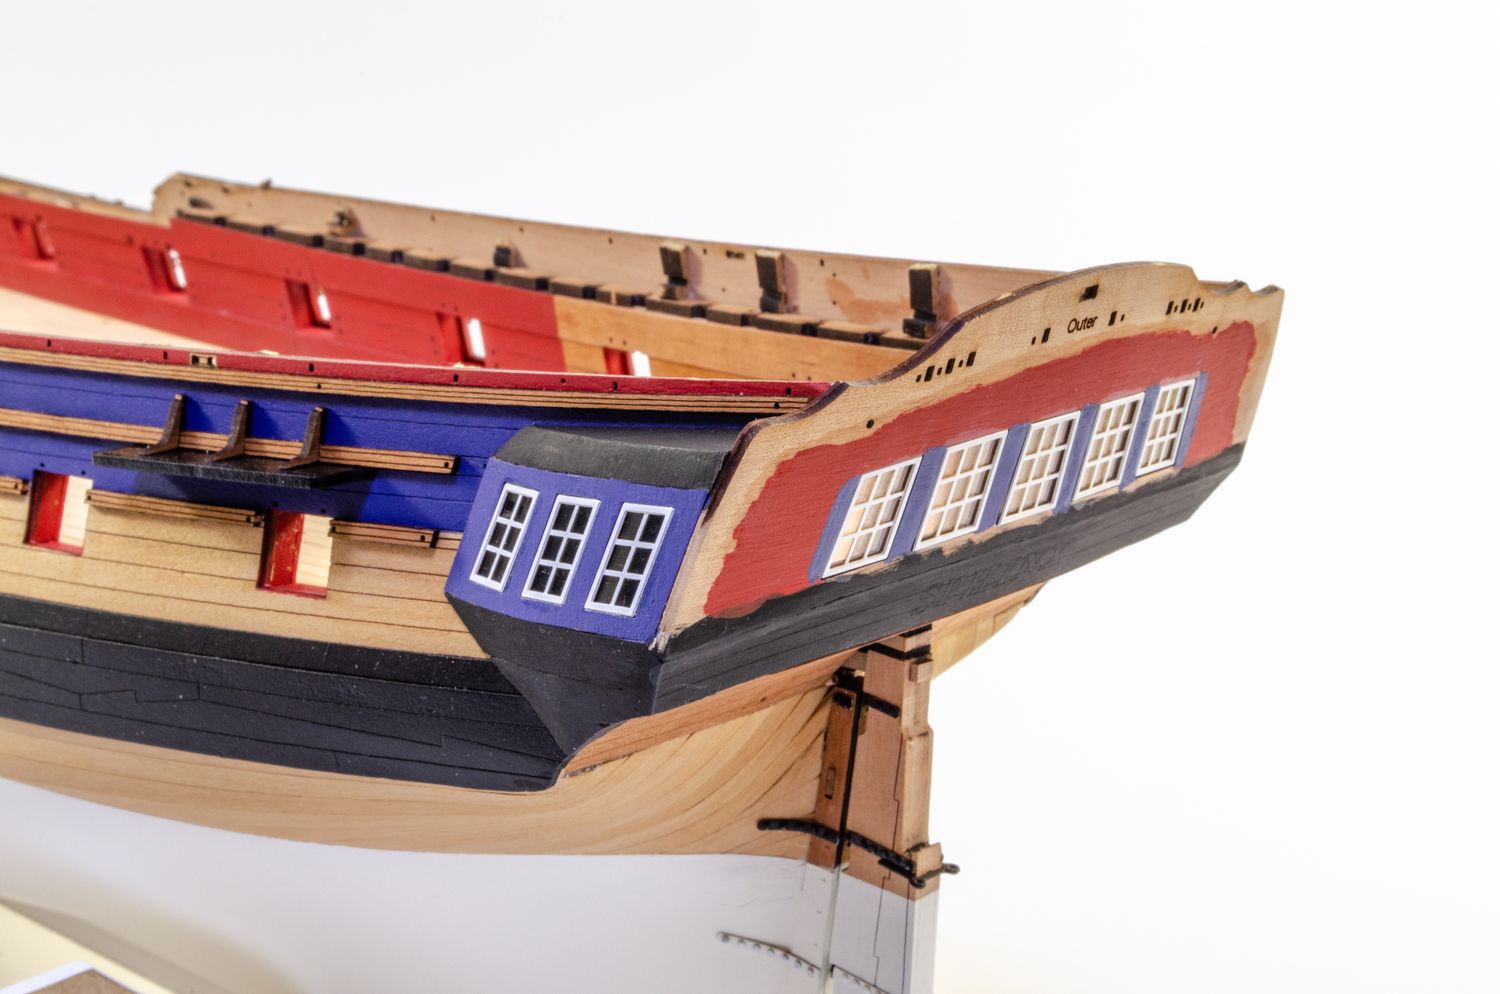
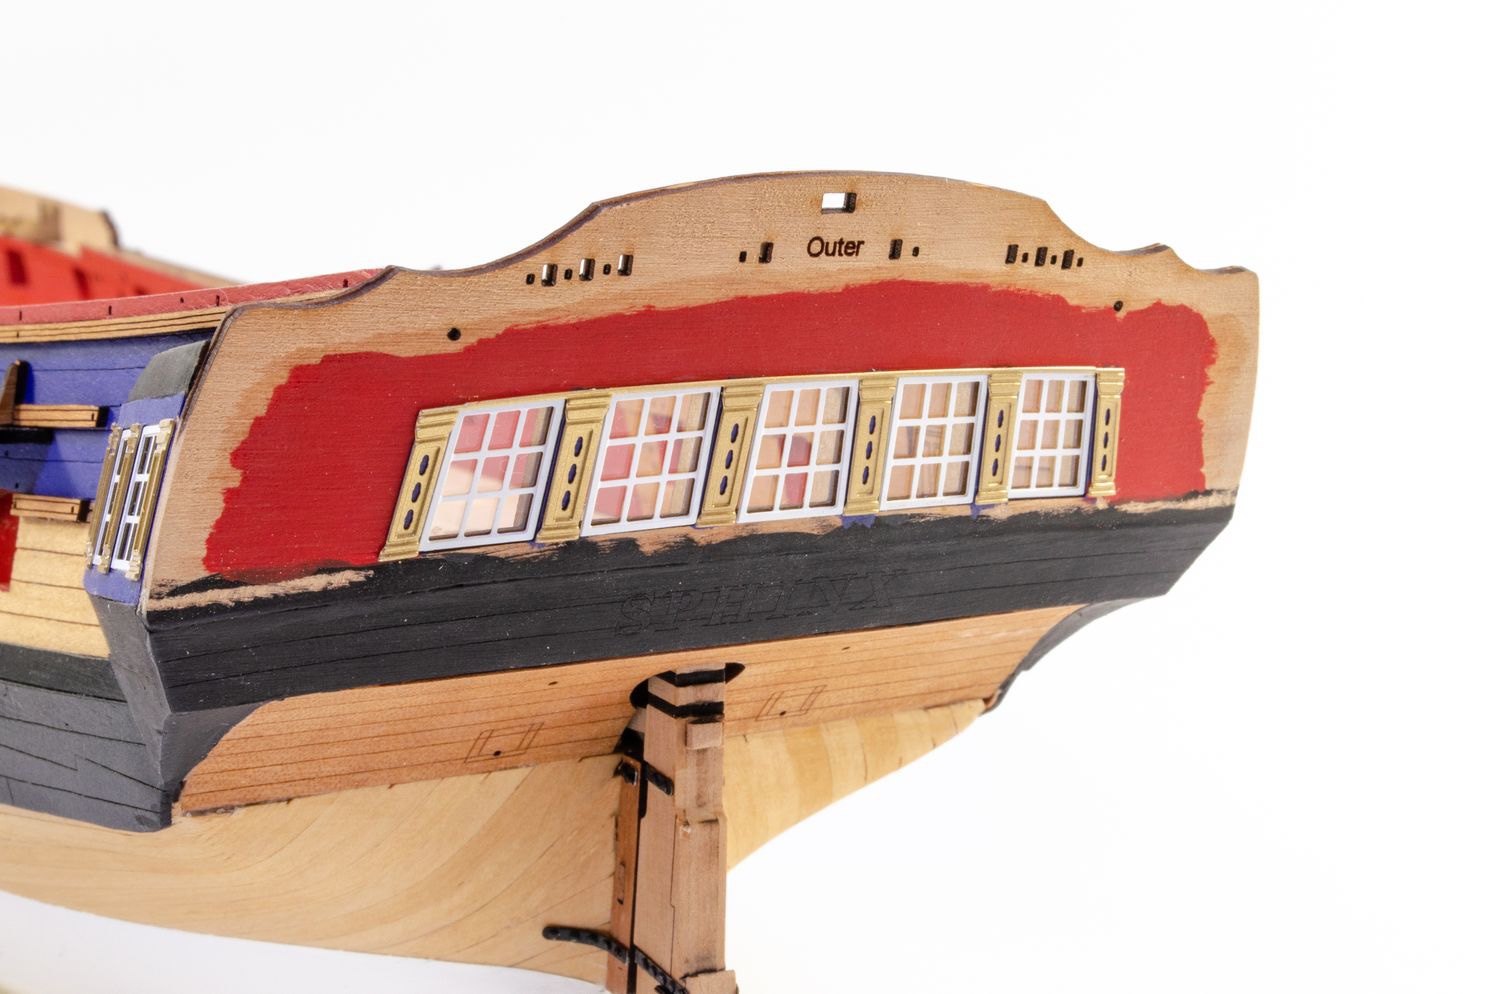
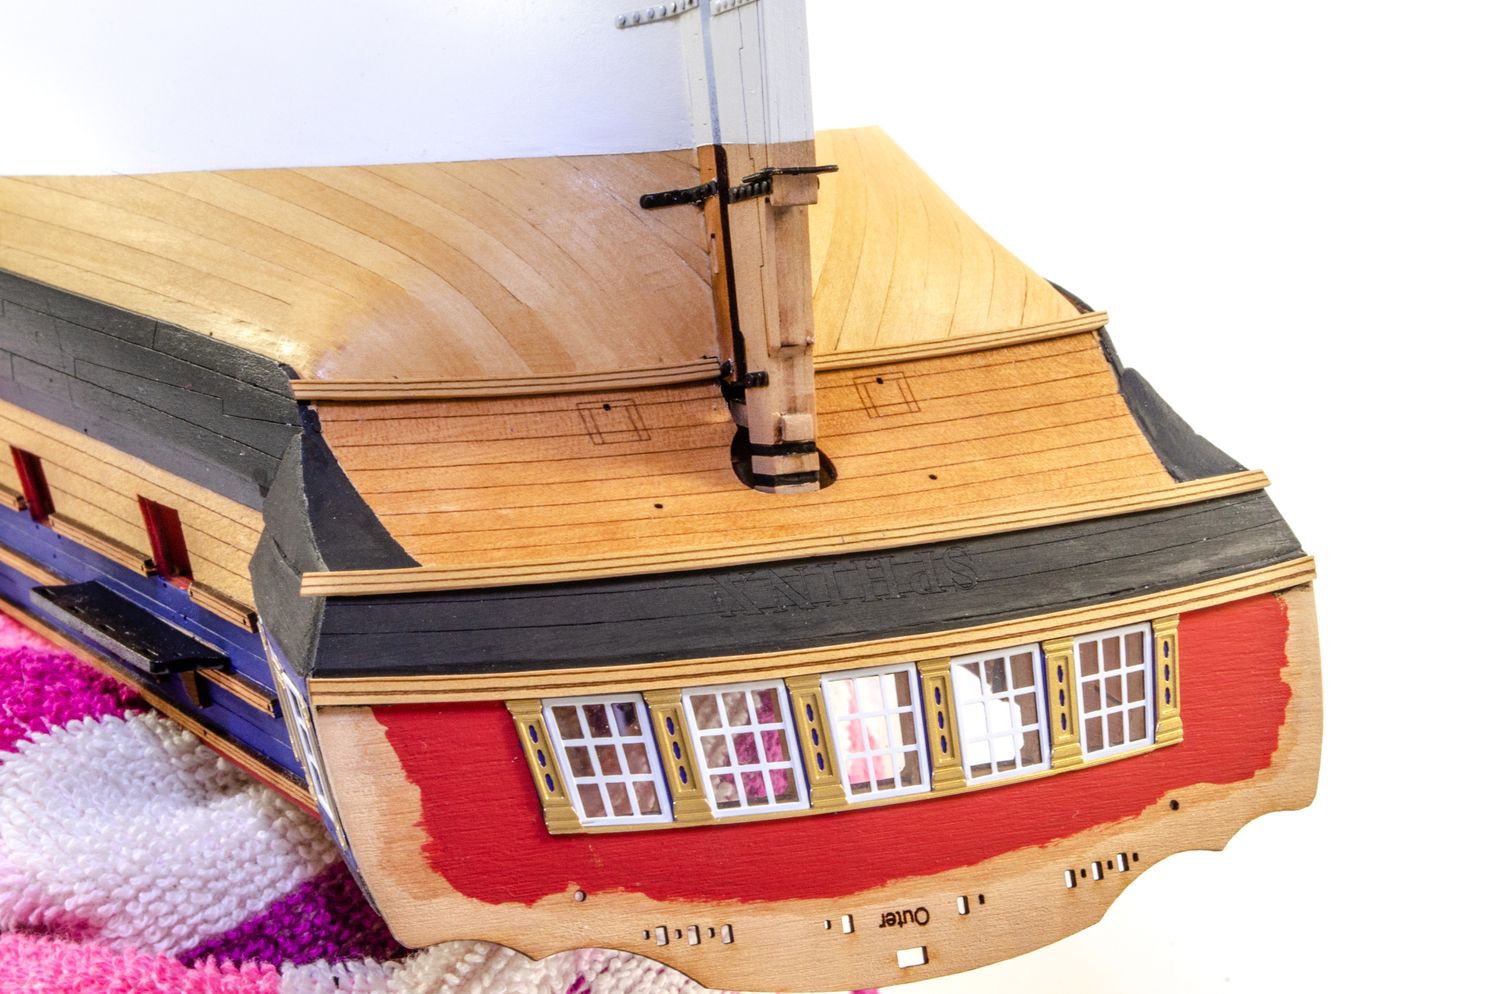
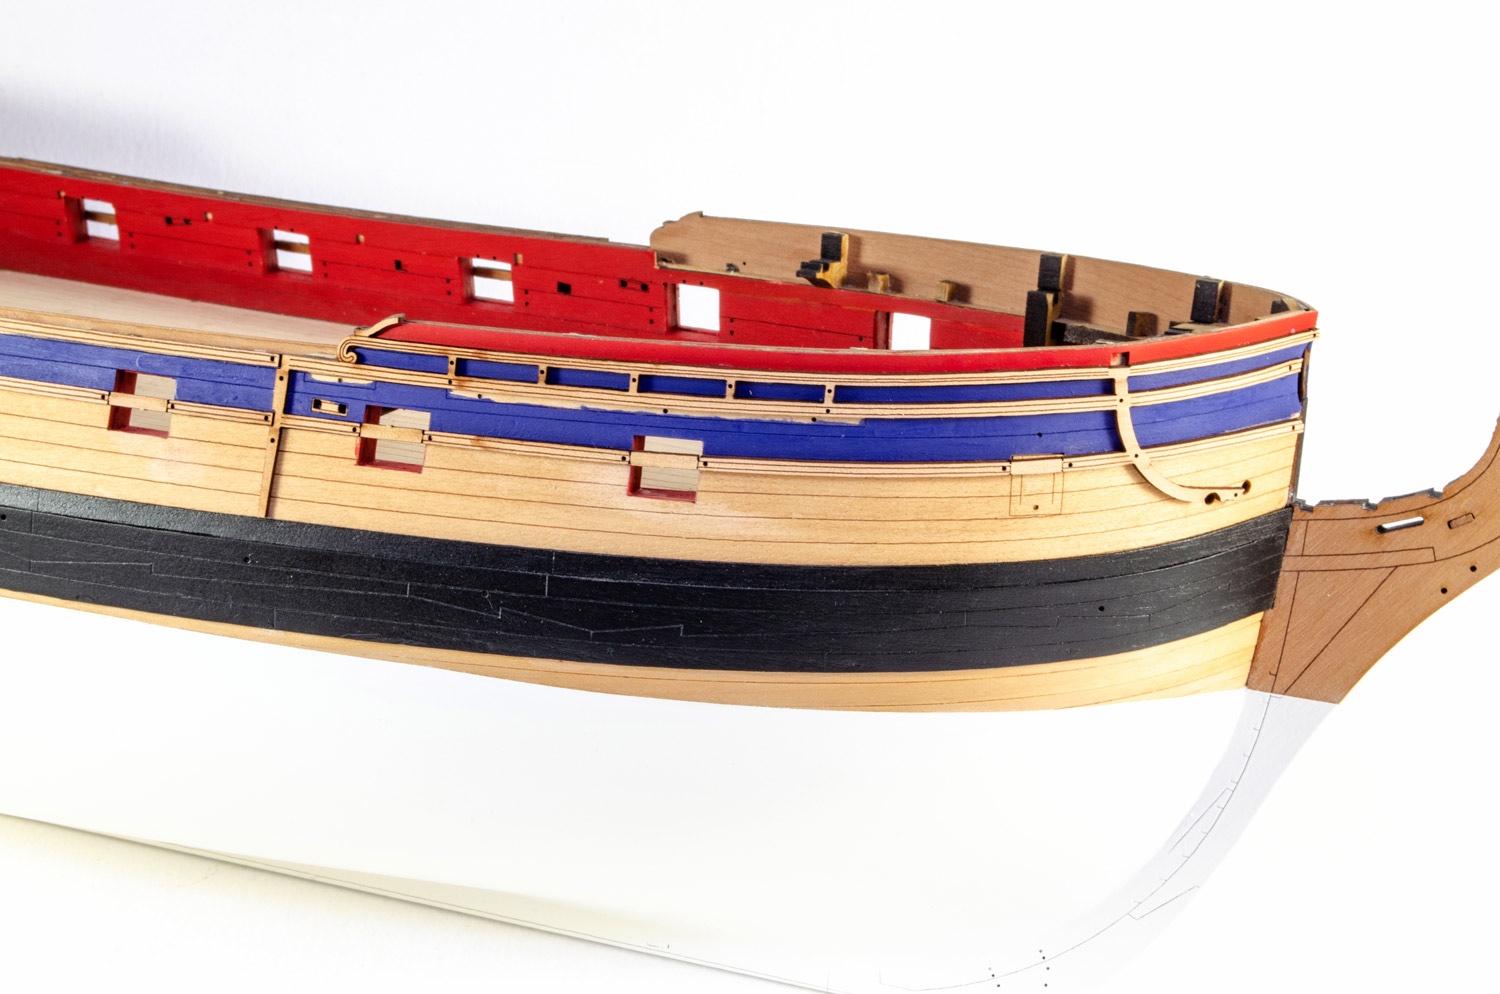
I'm currently working on the stern and galleries of Sphinx, so I can show you what I've done up to that point.
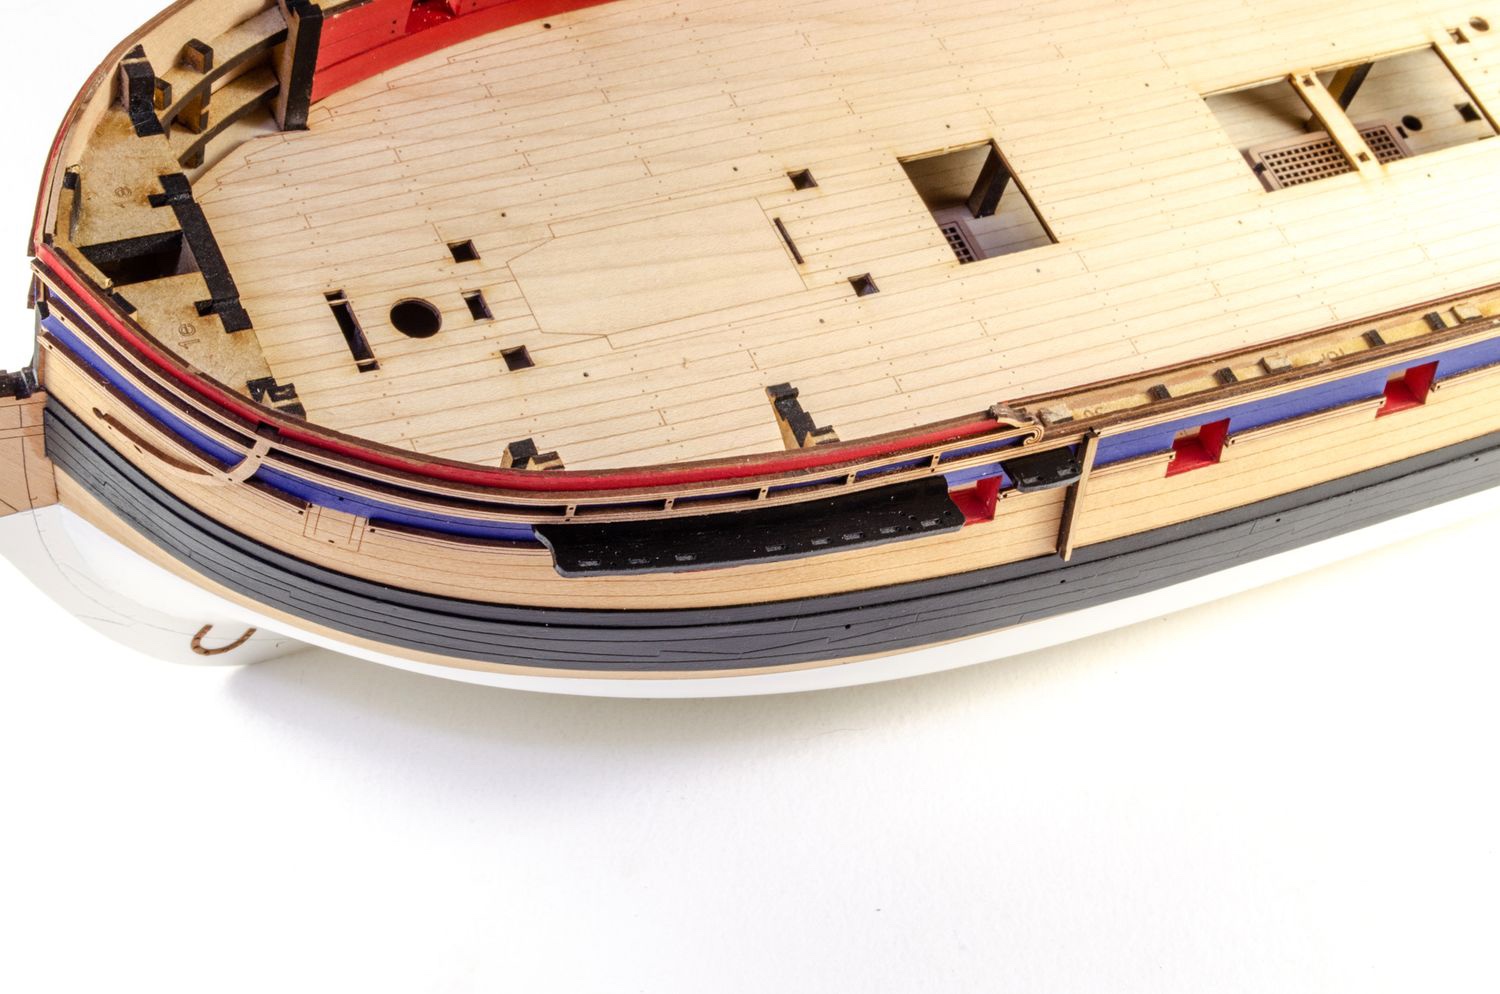
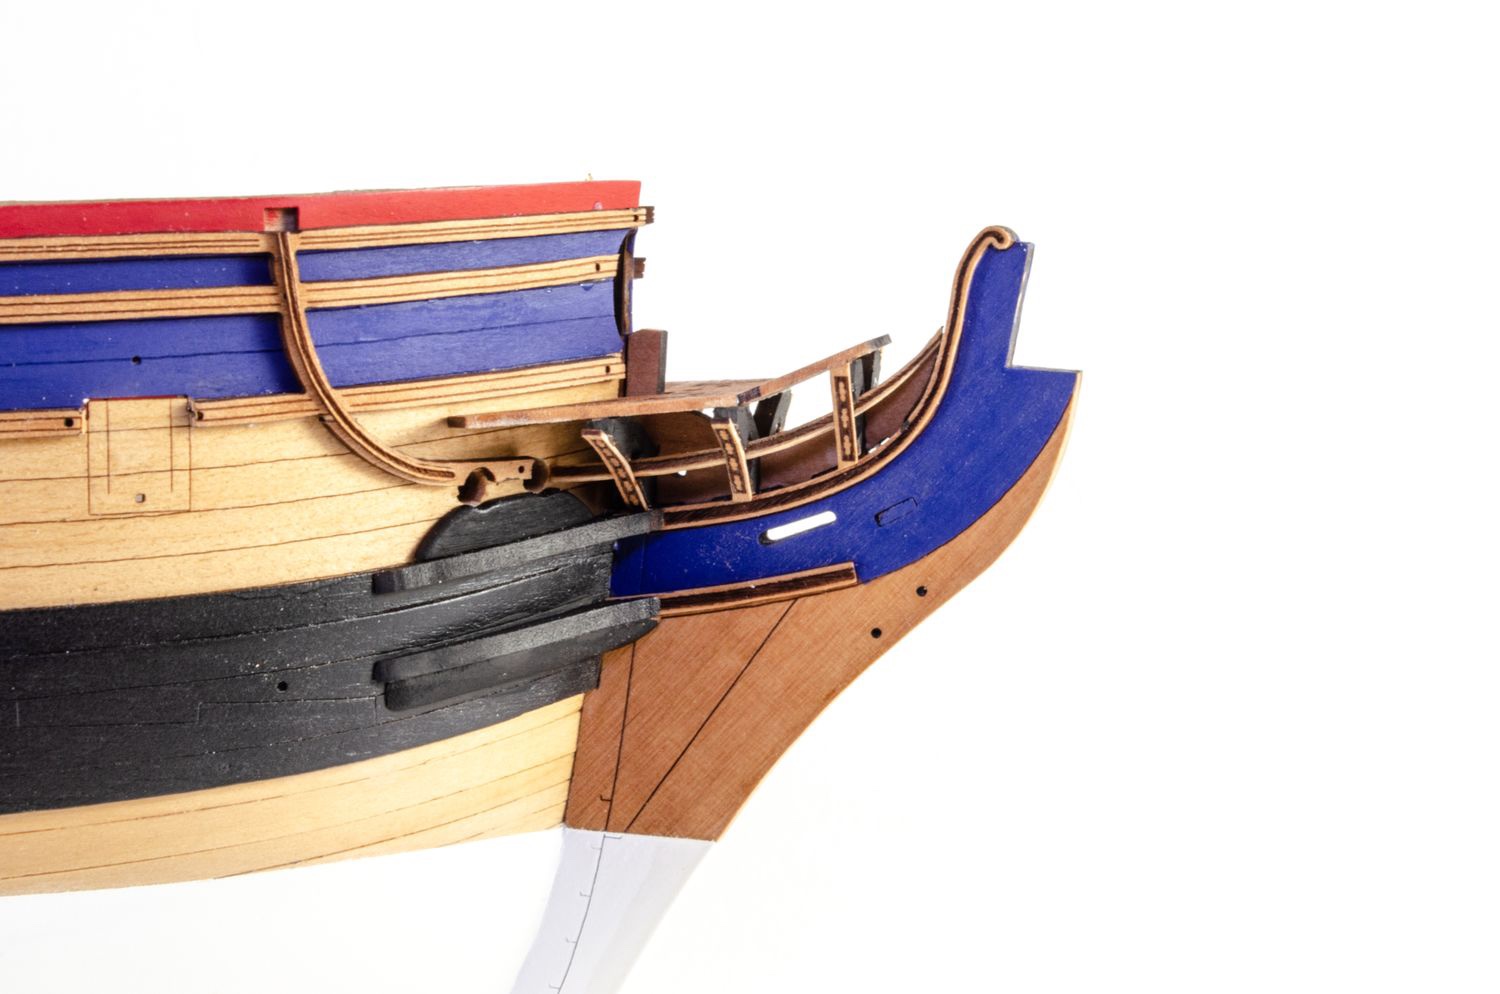
The rudder is built from a 3mm pear core, with 1mm engraved pear facings on either side. This is first glued up and then the rudder pintle straps are fitted. I use cut off pins to insert here so I have the domed head on either side. Laser slots in the timber give the locations for the 'hinges' that hang the rudder to the stern post. The spectacle plate is then added and the upper straps etc. painted in black.

The rudder brace straps are then glued to the hull after hanging the rudder. The pins are also then painted white and the upper straps painted black (not shown here).
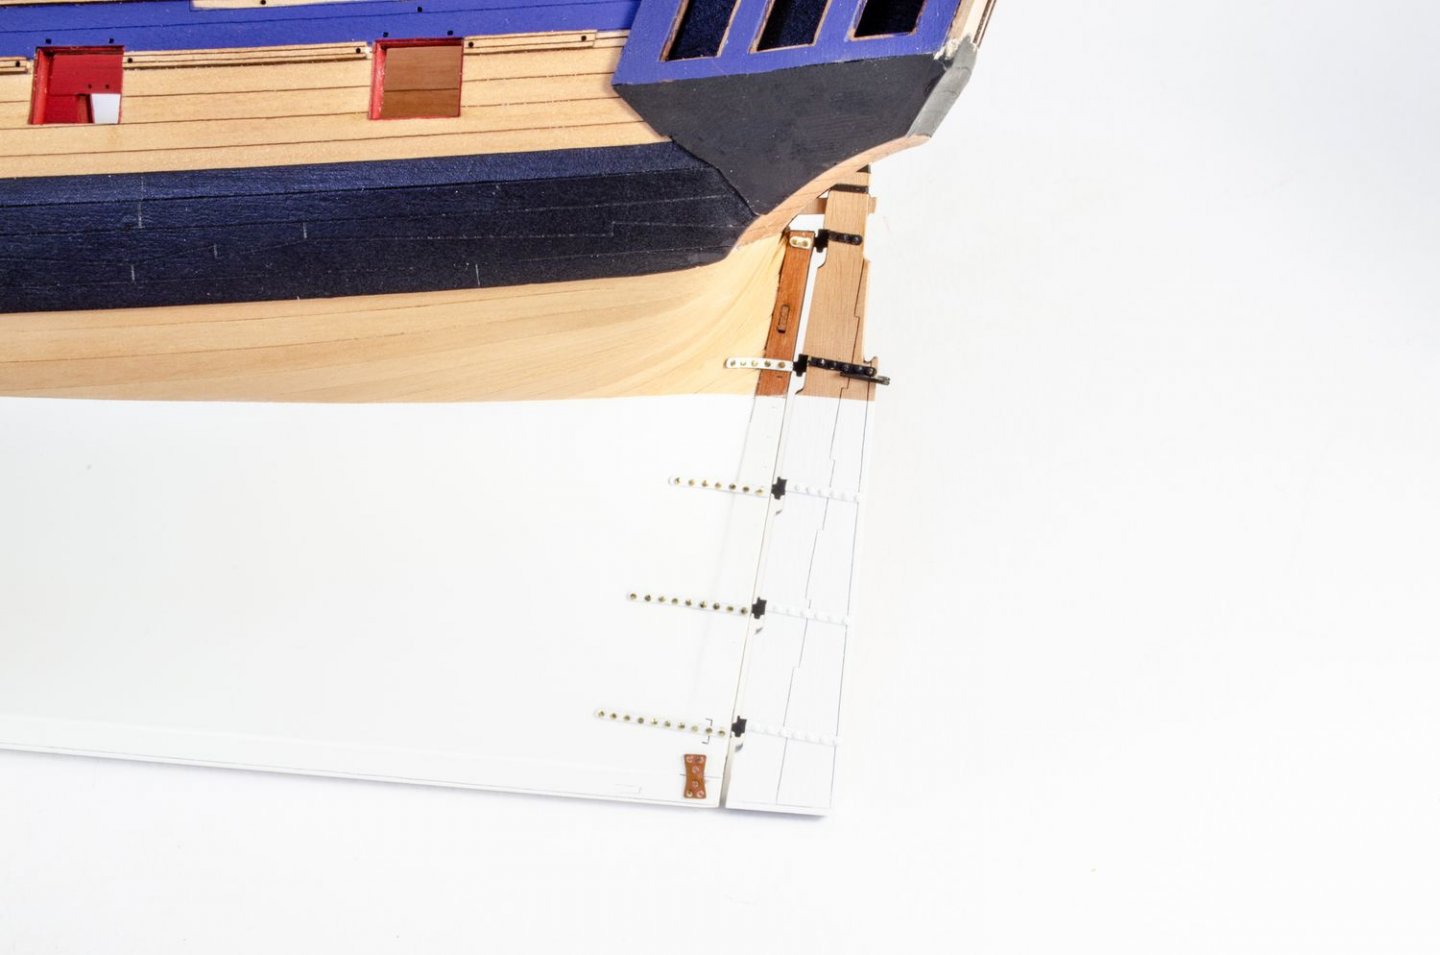
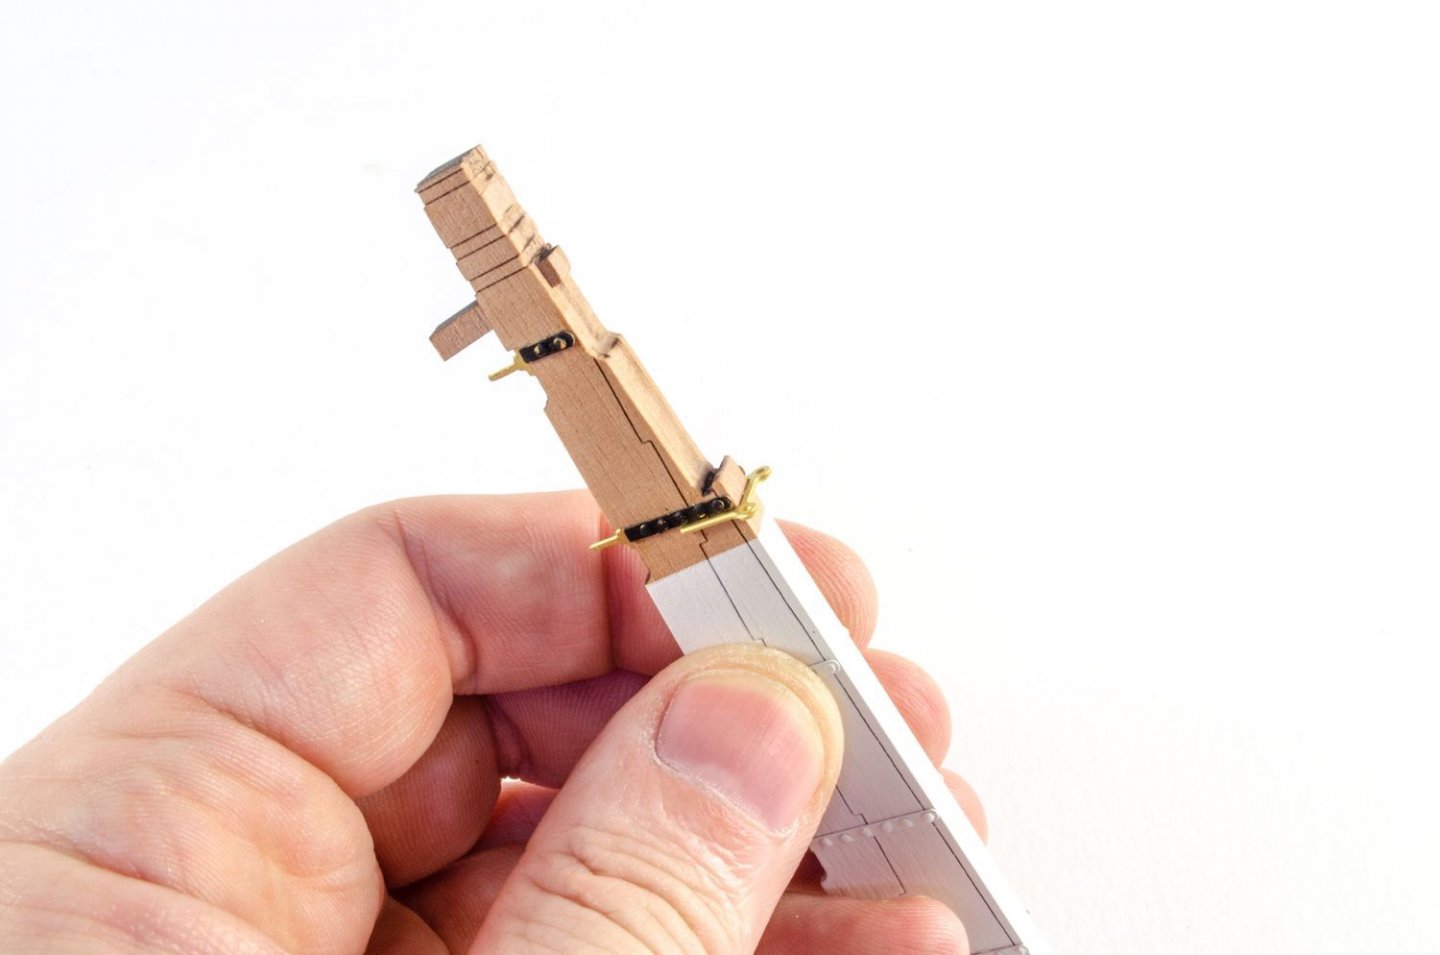
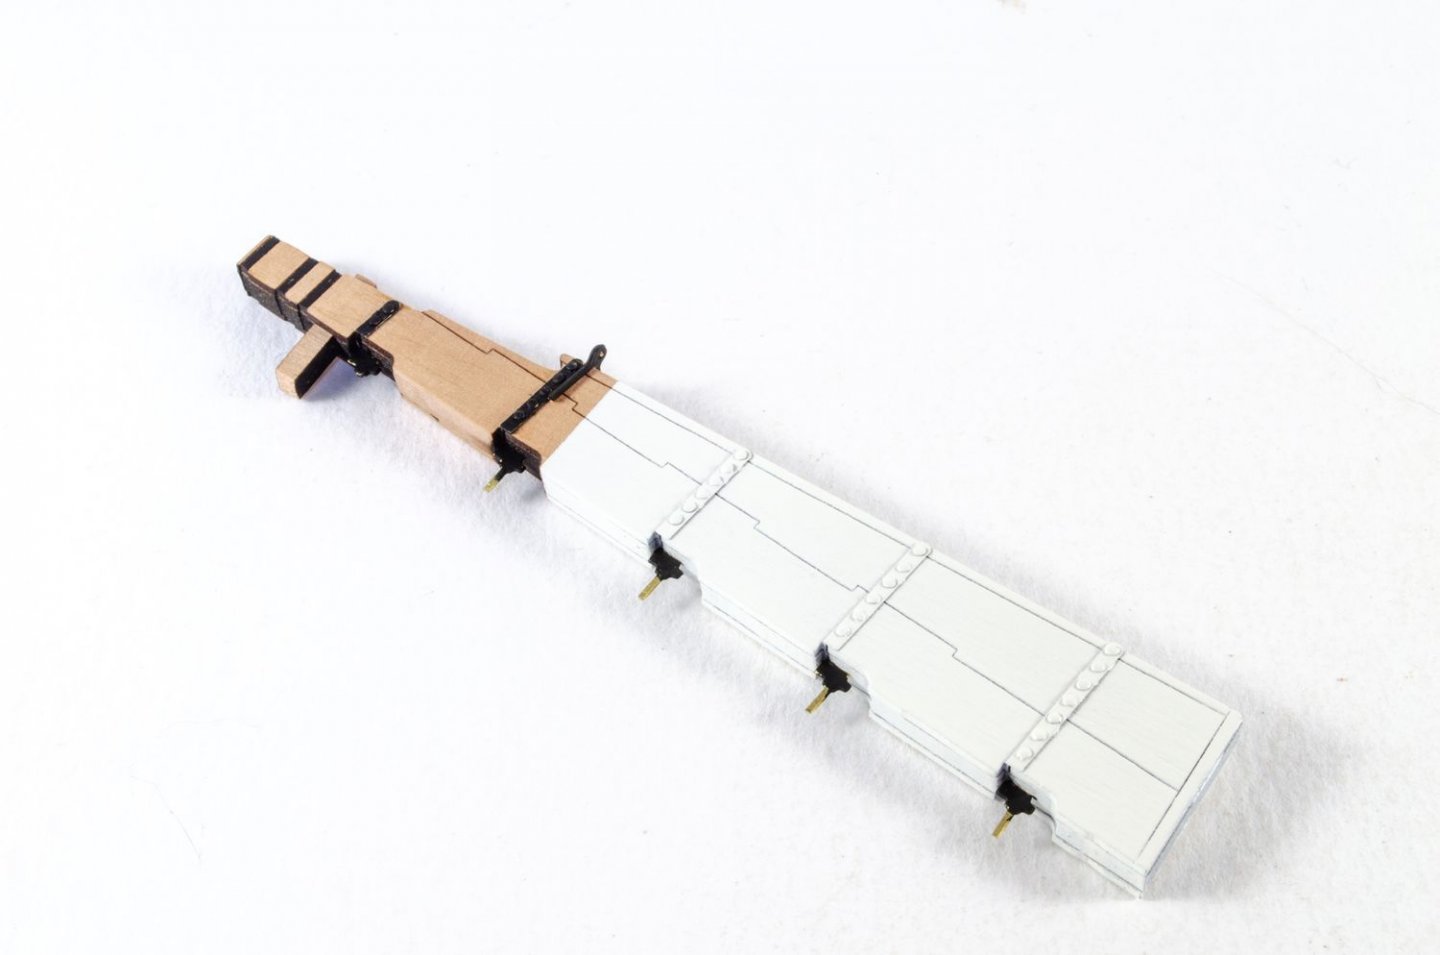
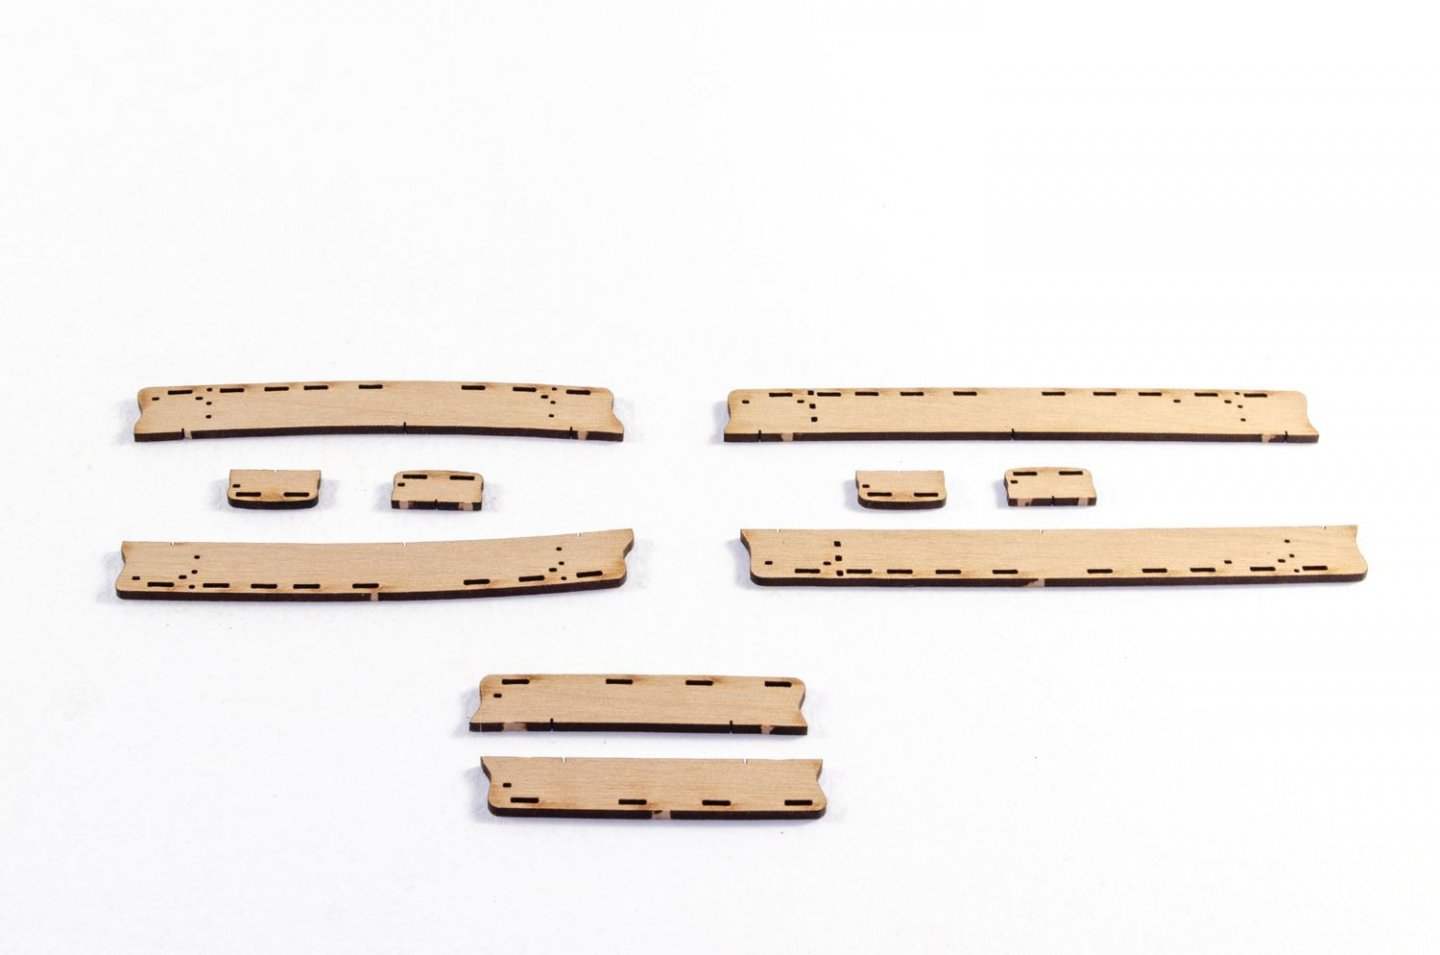
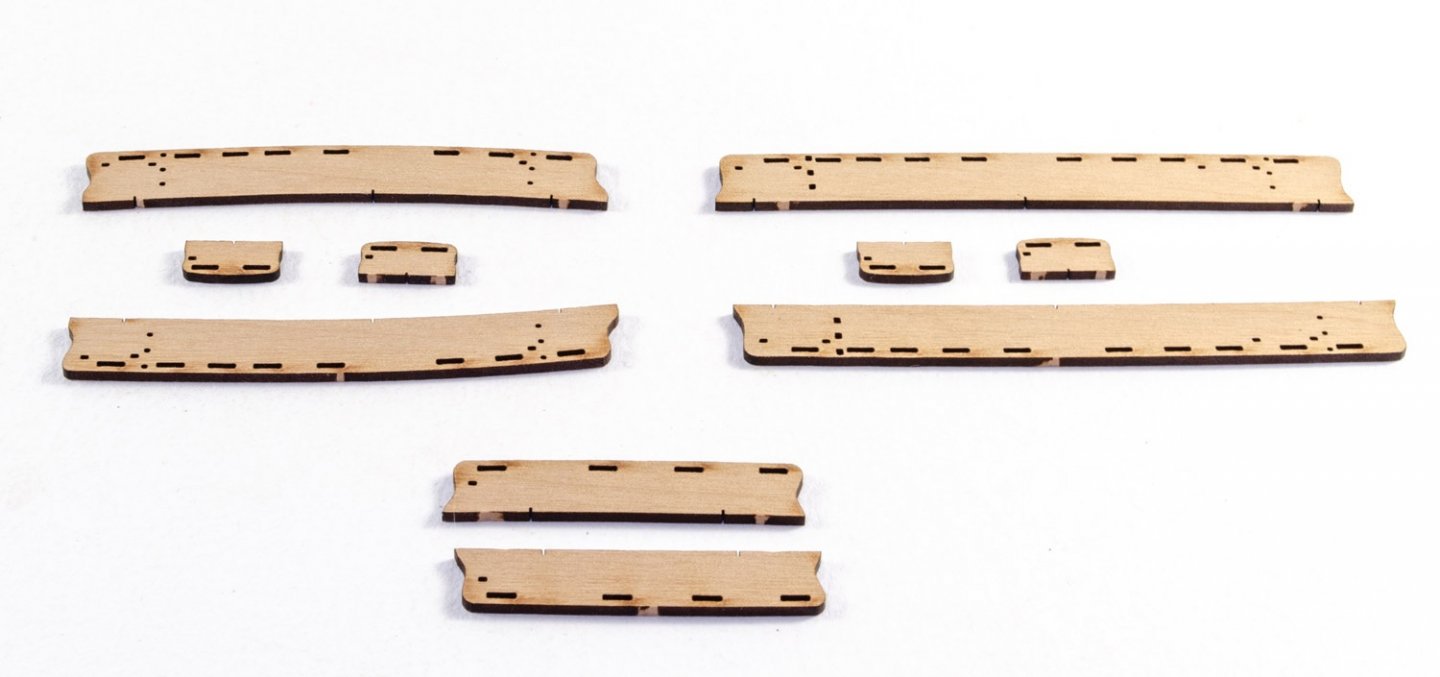
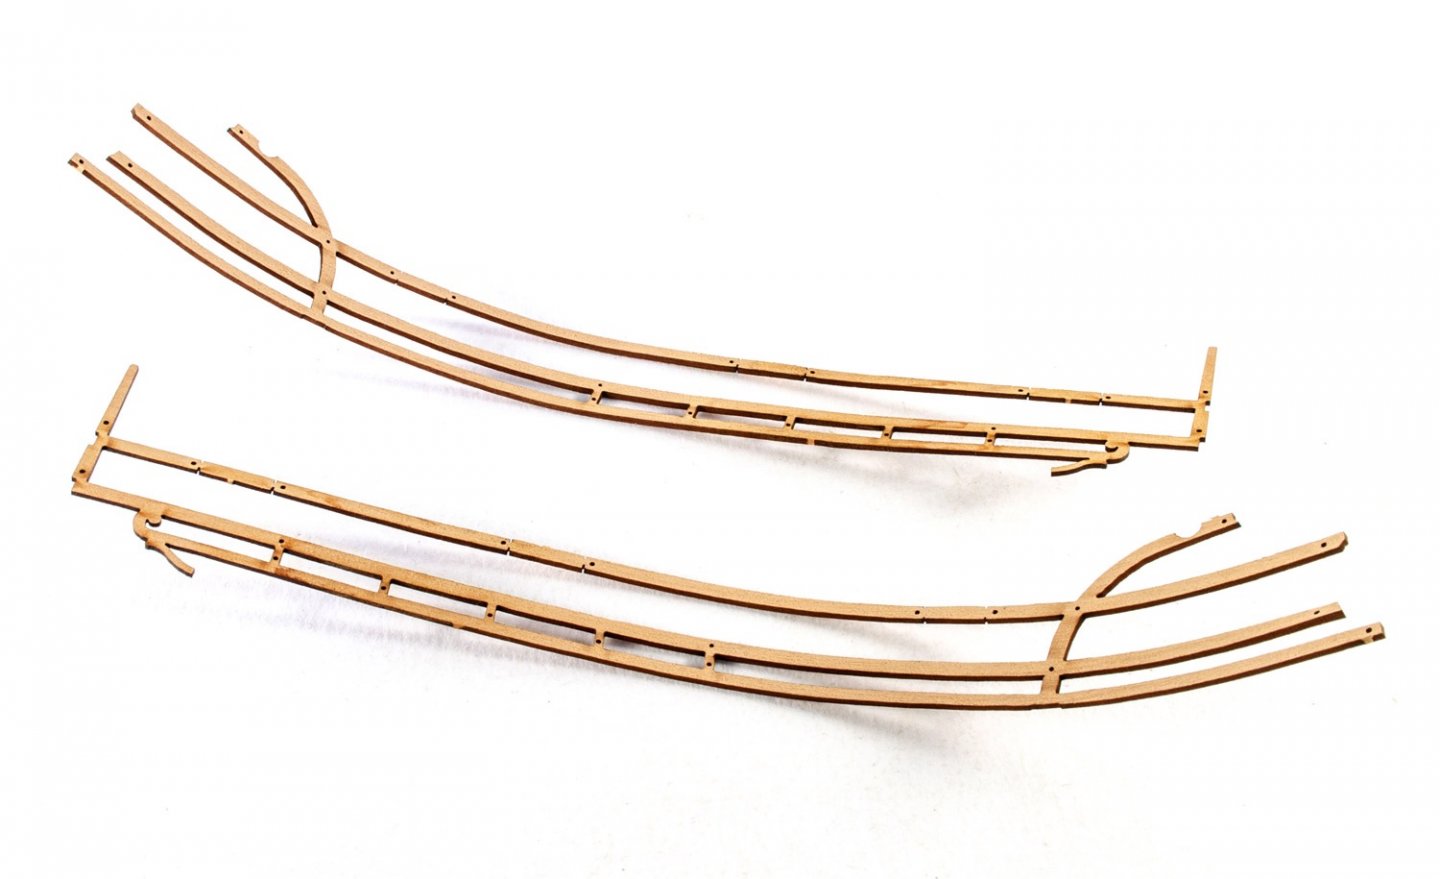
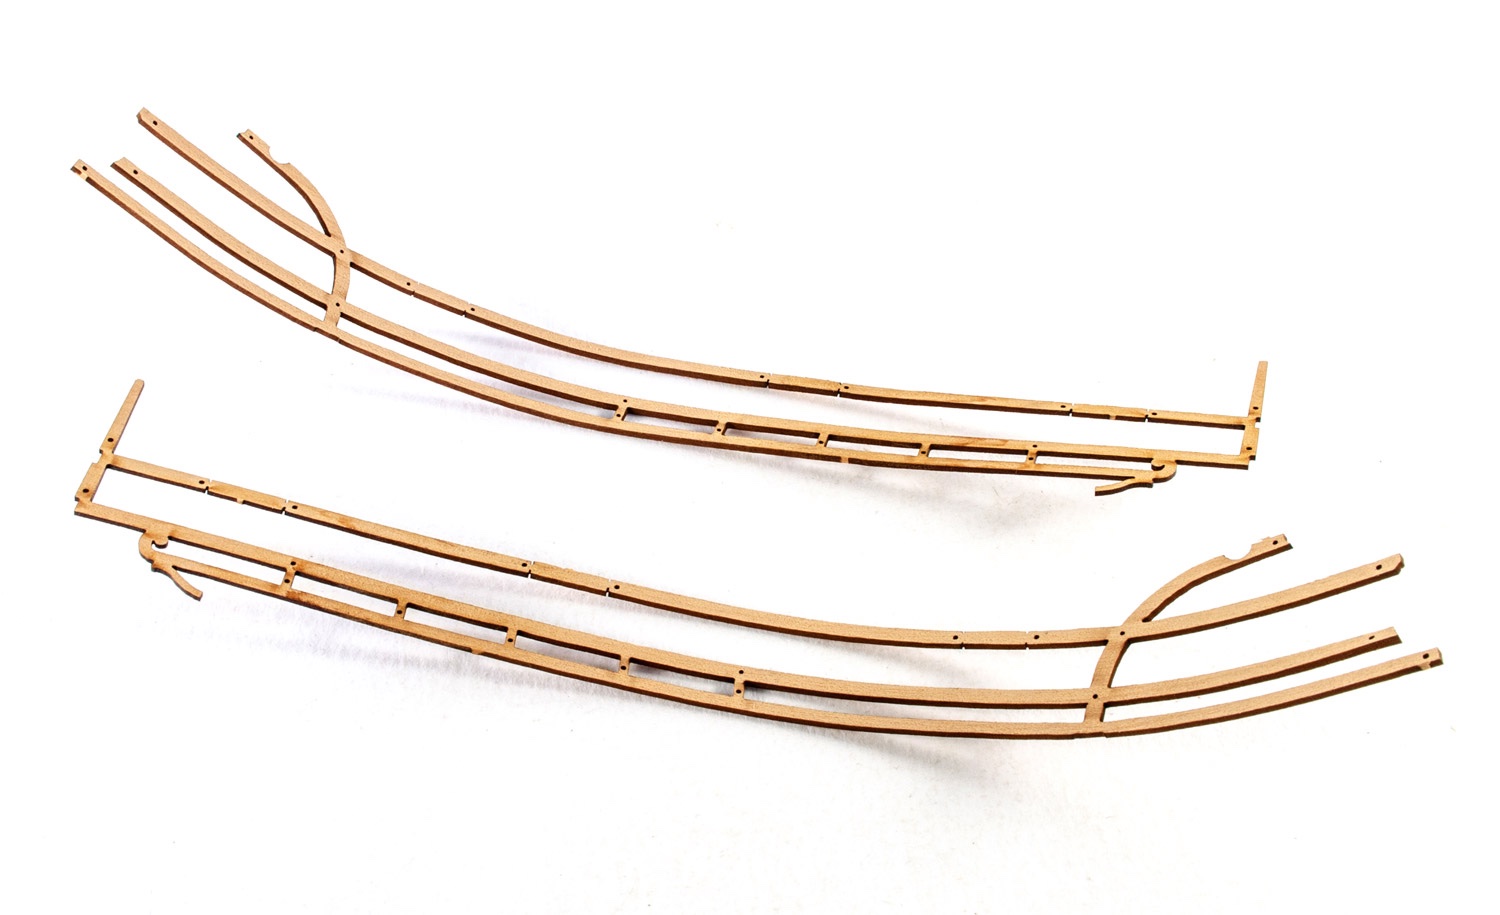
Onto the channels. All of these are also engraved with a position which needs to be drilled to locate the support pins. Those pins match up with holes that are laser cut into the hull, in an engraved area which matches the channel.


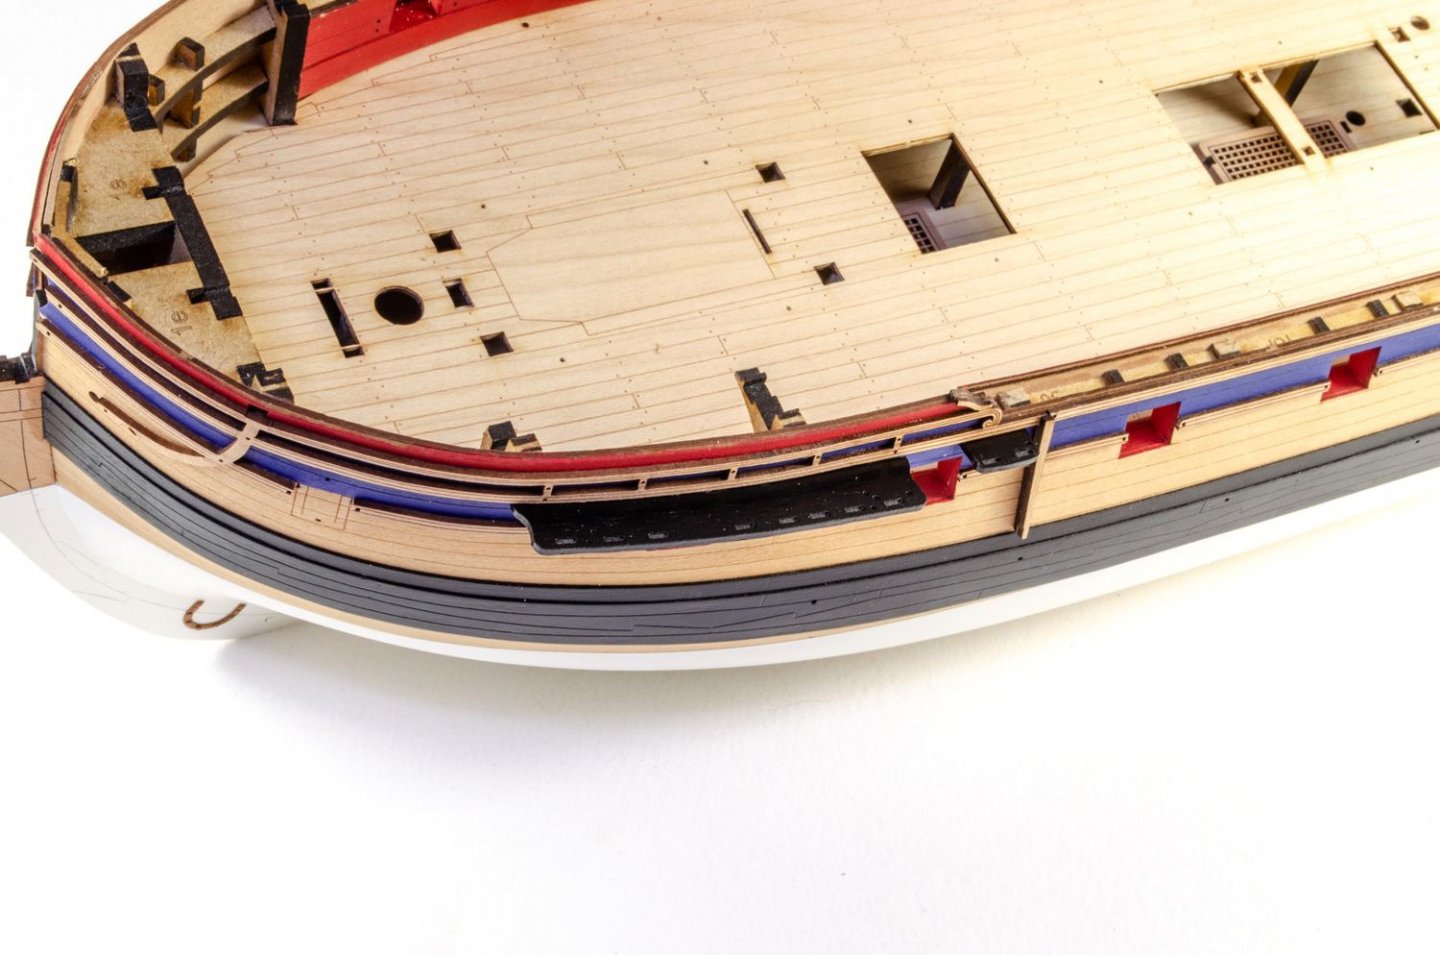

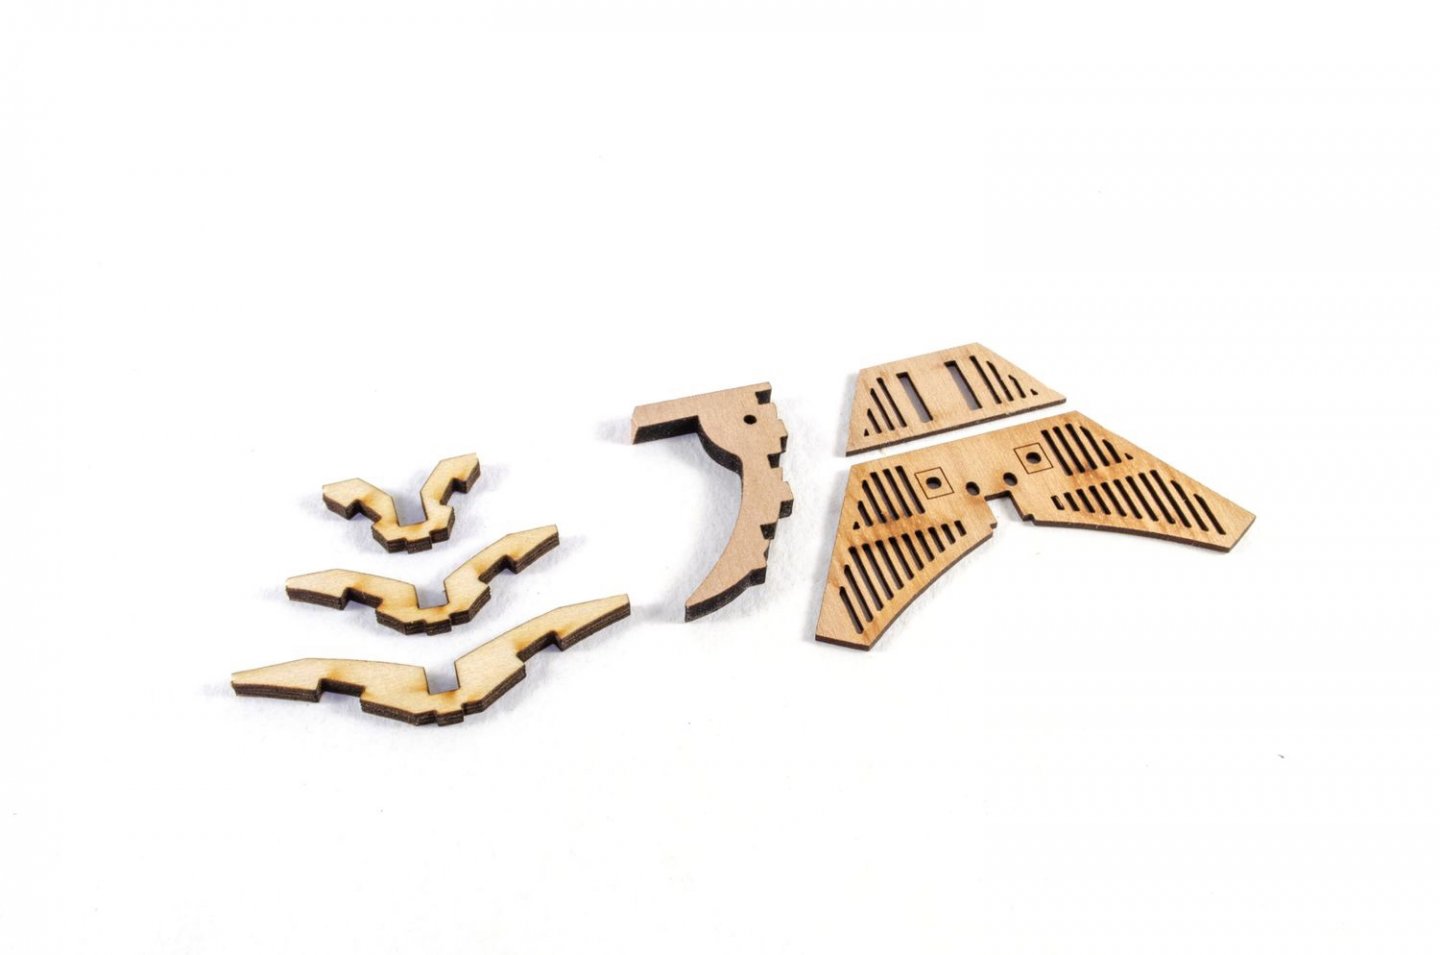
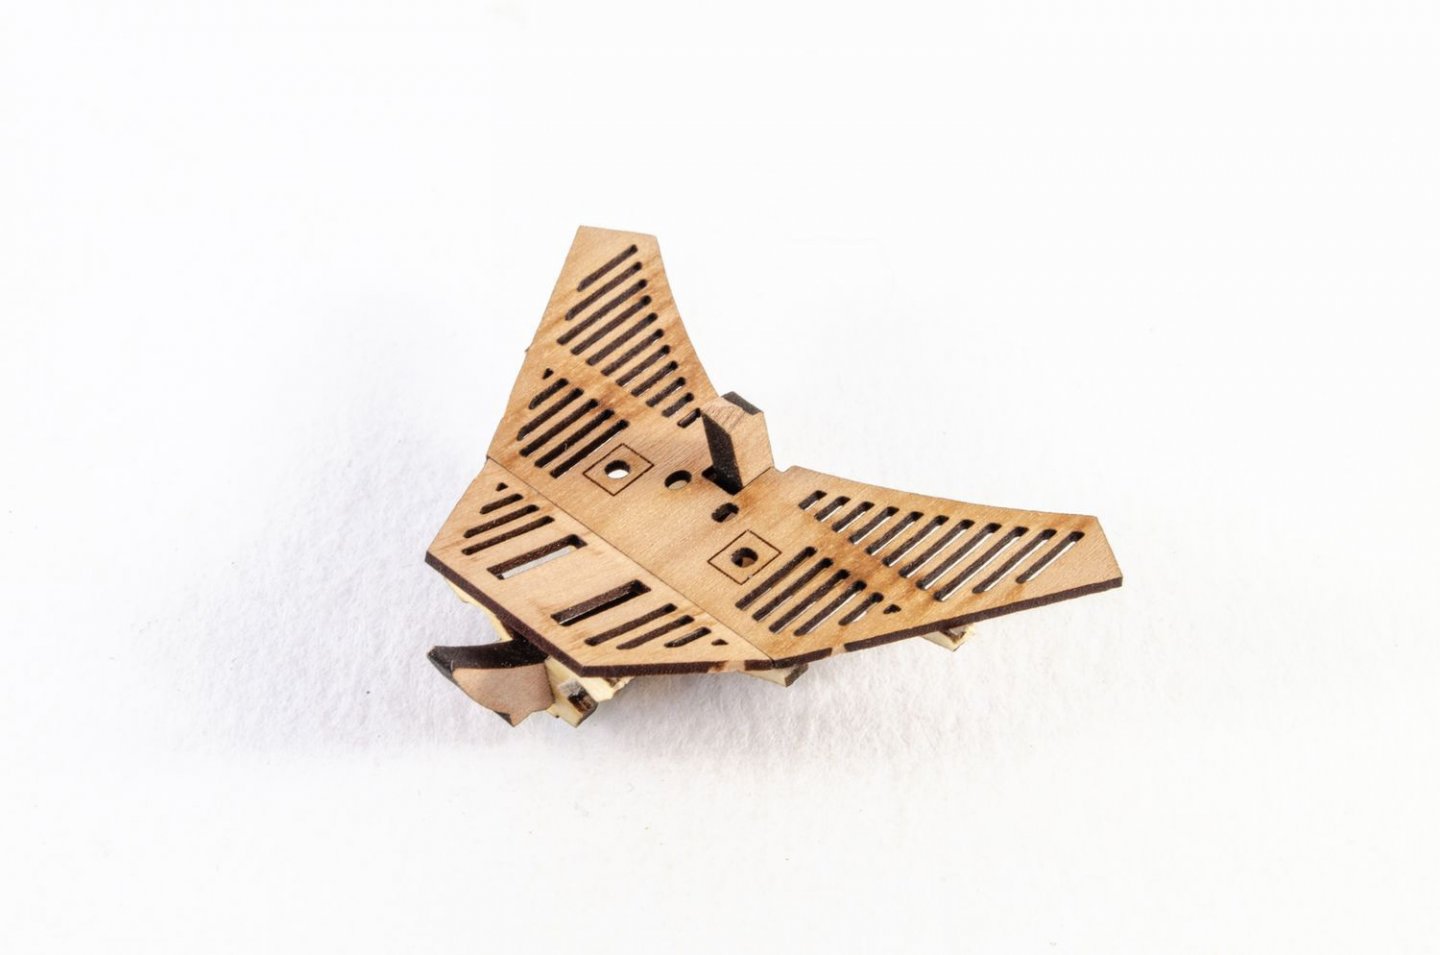
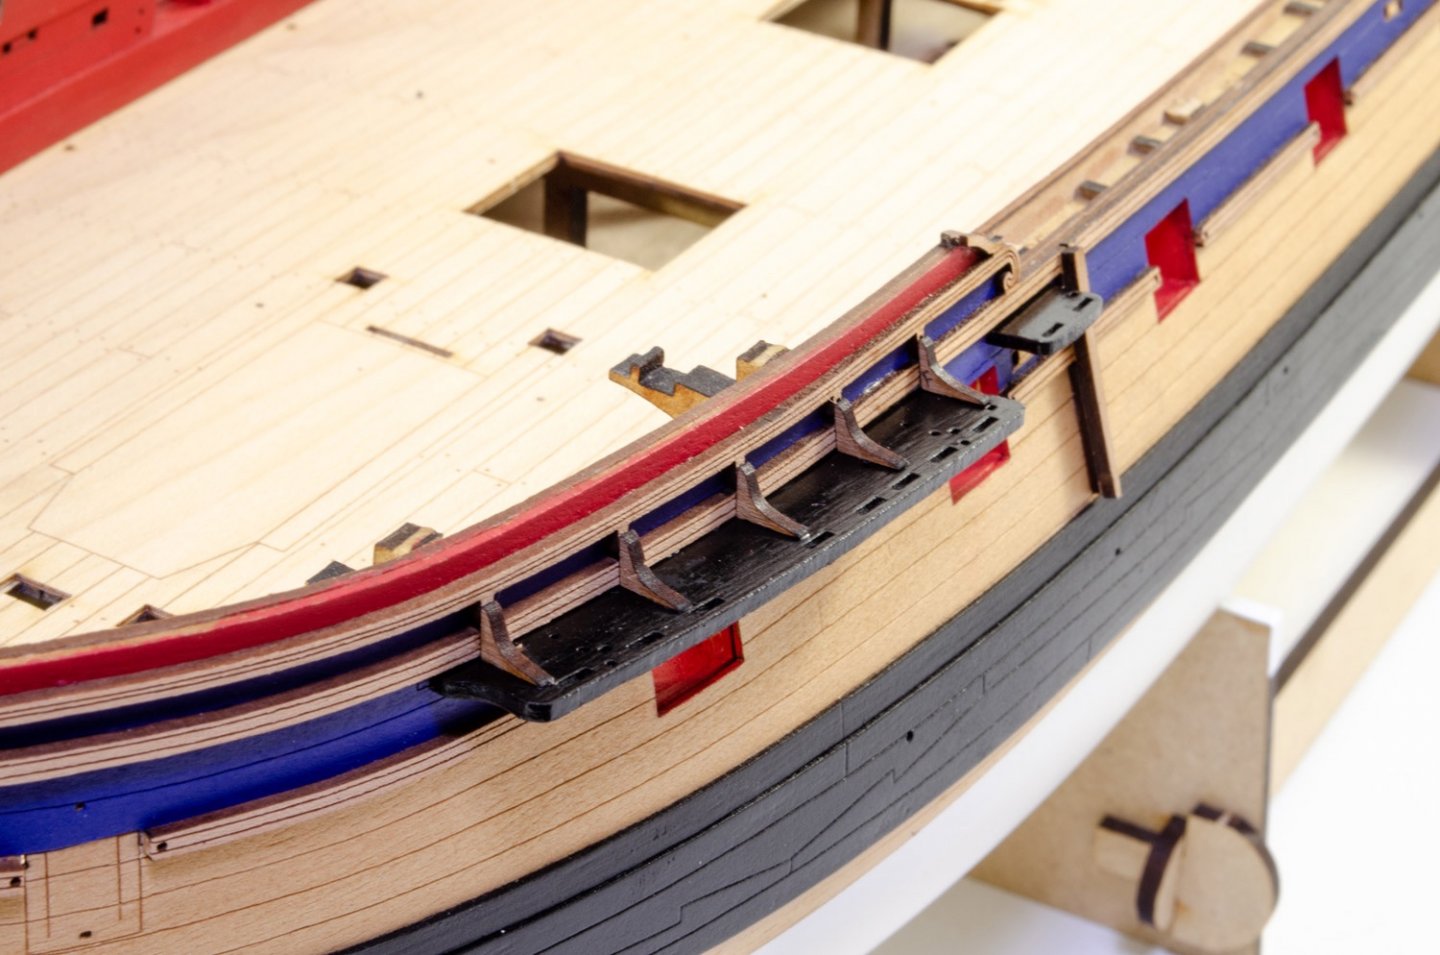
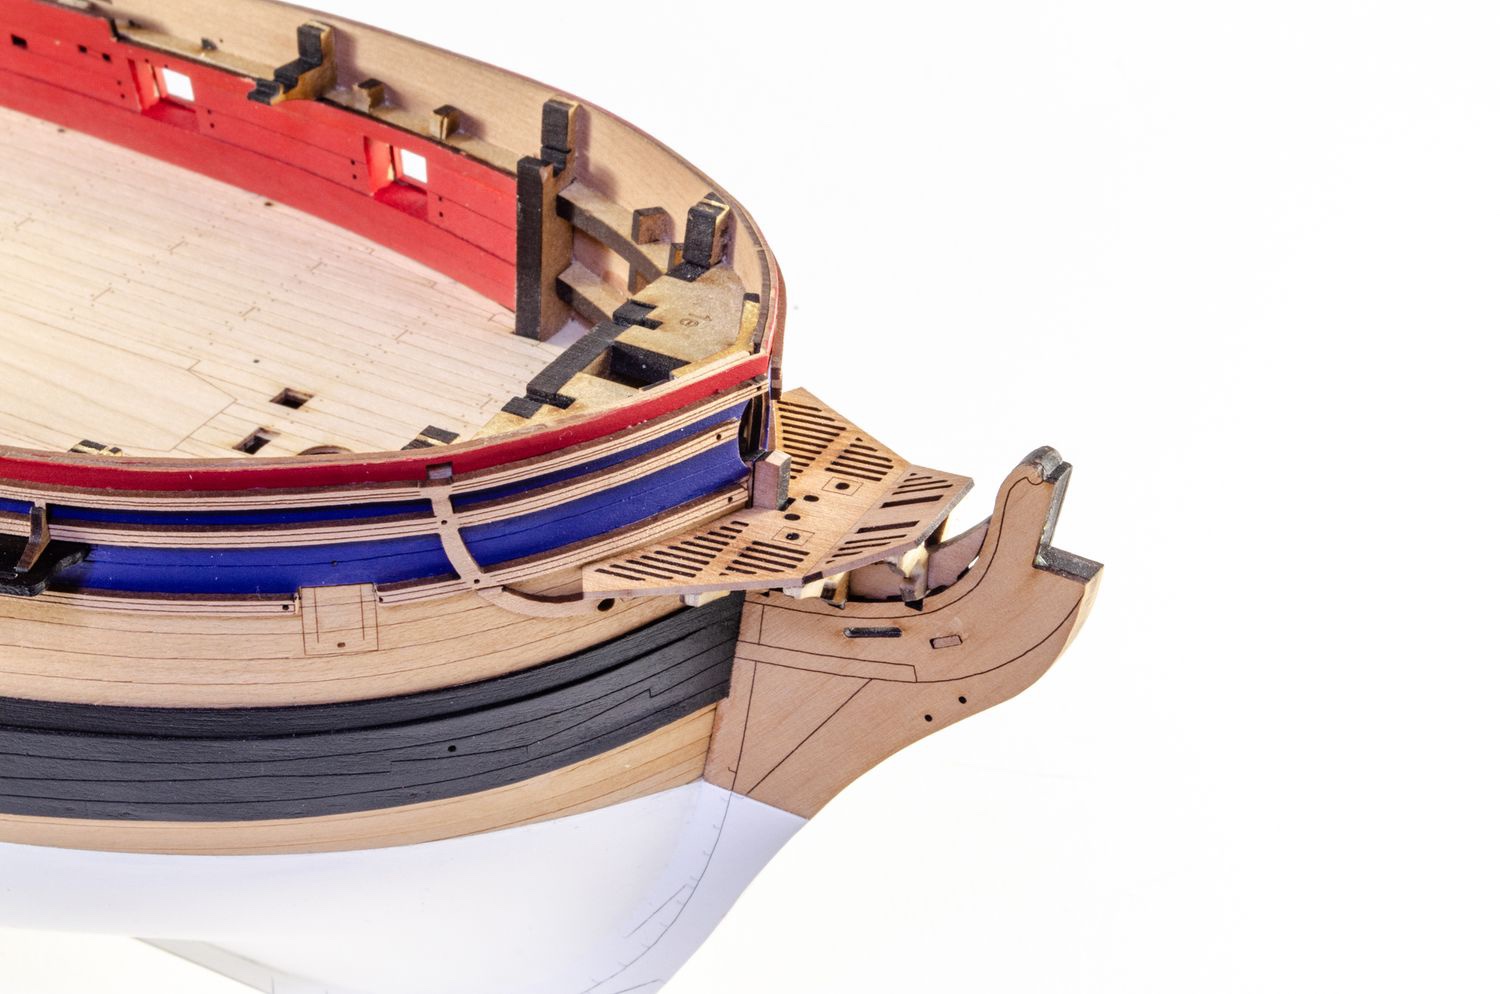
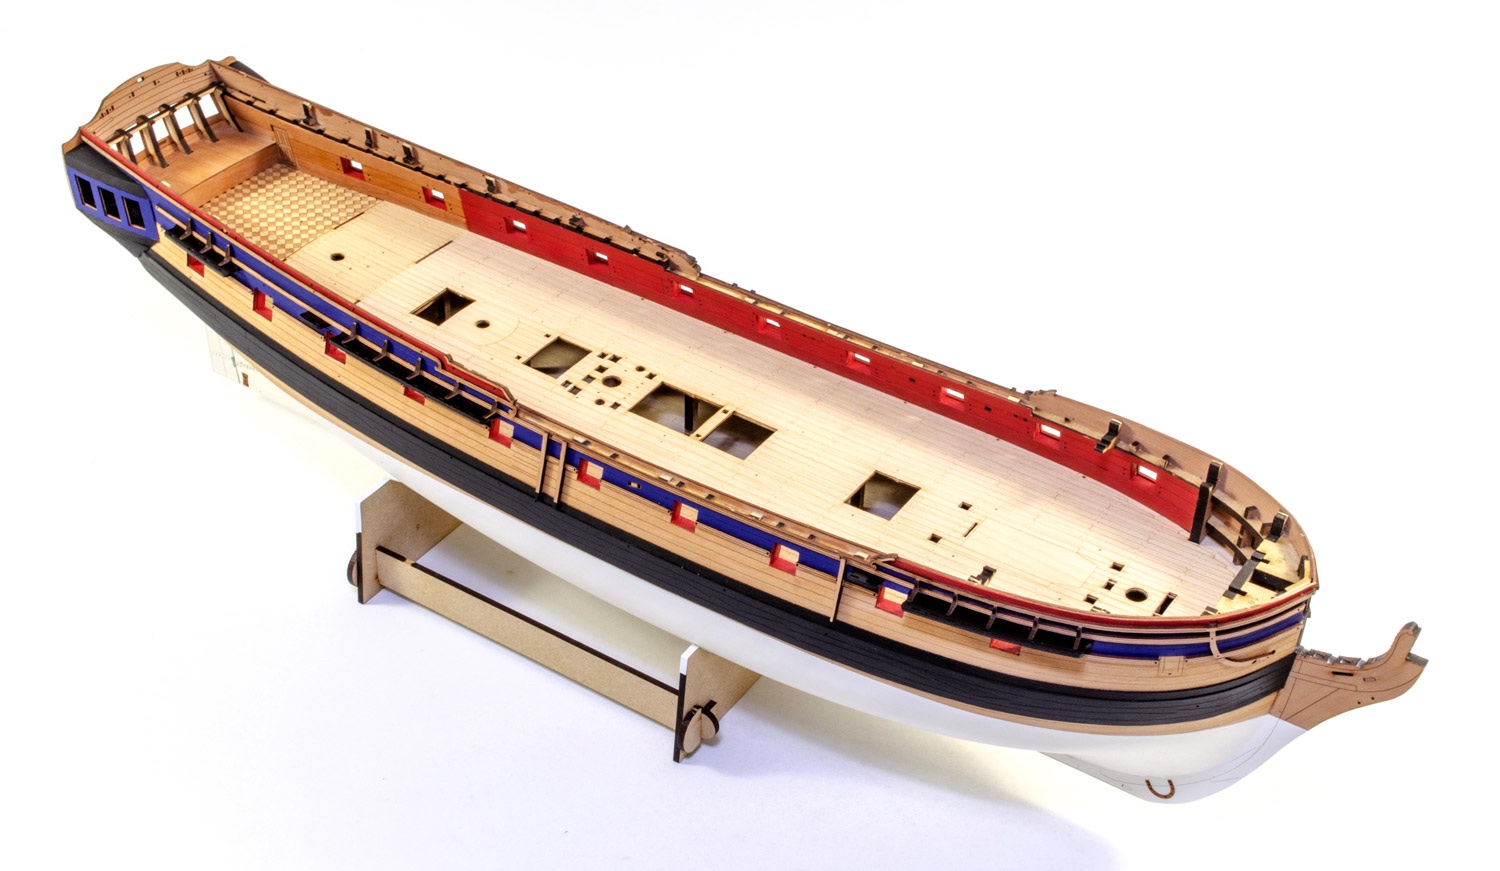
A small break now to work on the bow area. The v-brackets and bow gratings are assembled on the hull without gluing to the hull. The assembly is then removed and finished off before finally gluing onto the hull.


The various bow rails are now added, including the hawse, bolster etc. All of this will be unified later under a coat of matt poly varnish. Some shaping of these parts will need two be done, but they're designed to have extra timber to allow for any hull variations the modeller may have introduced inadvertently.
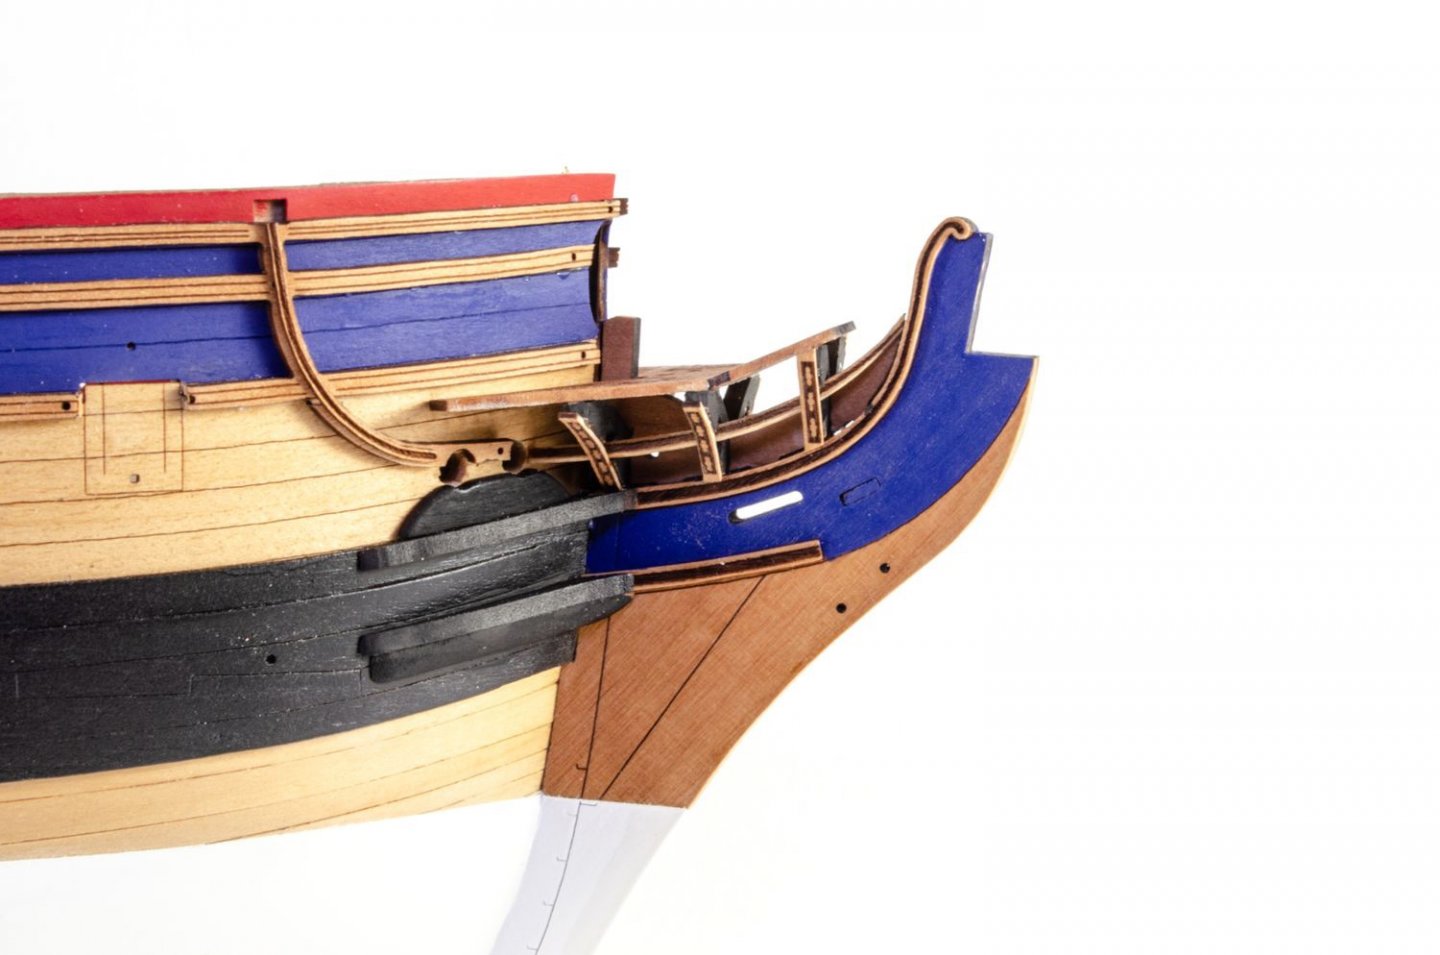
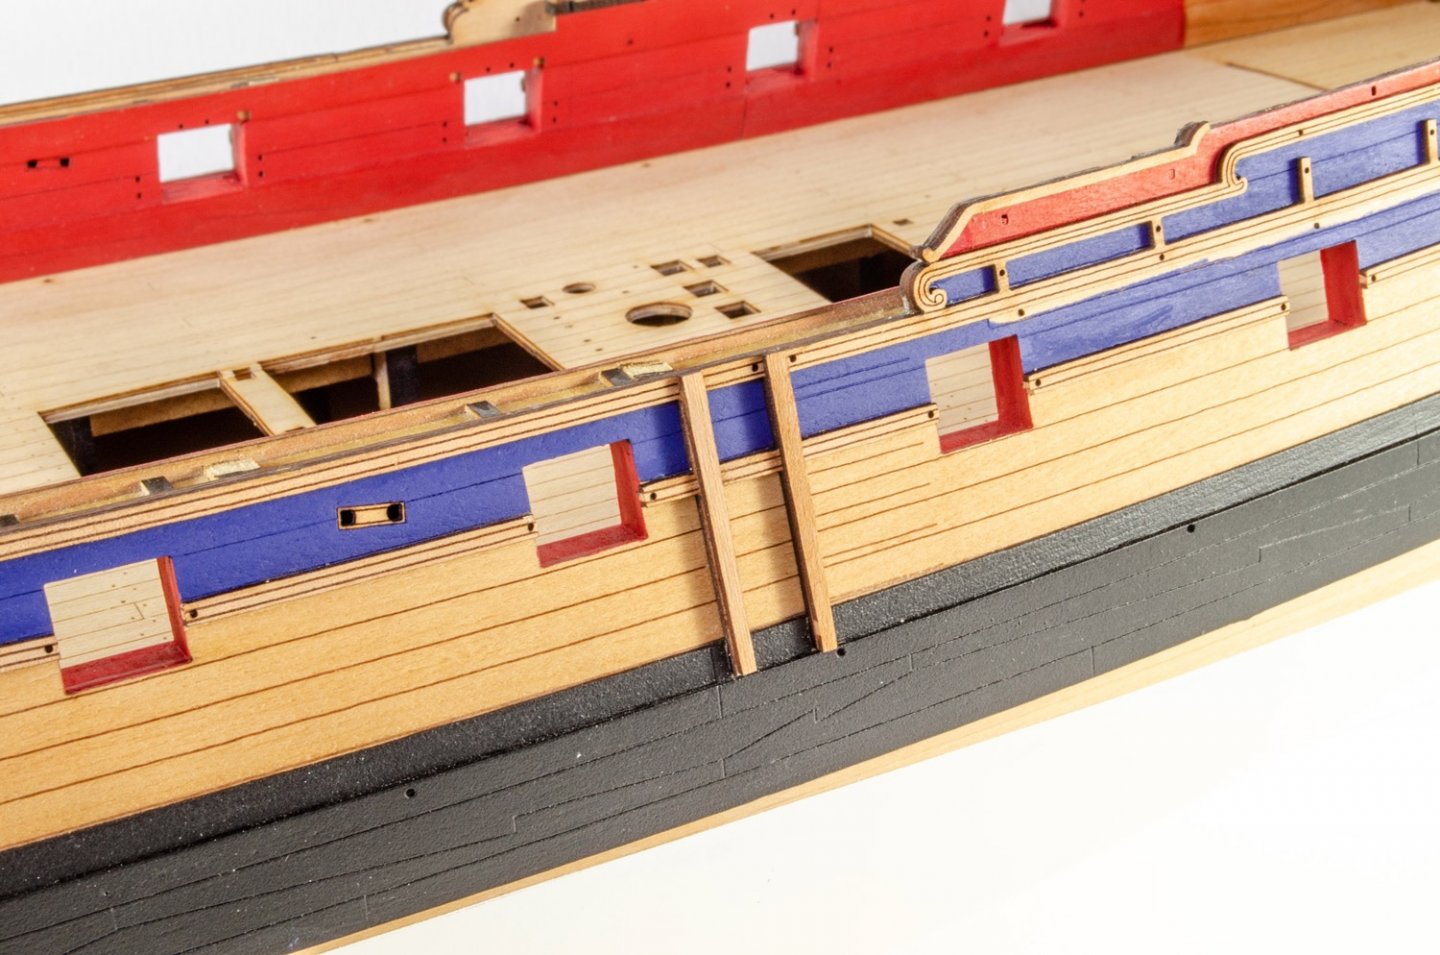
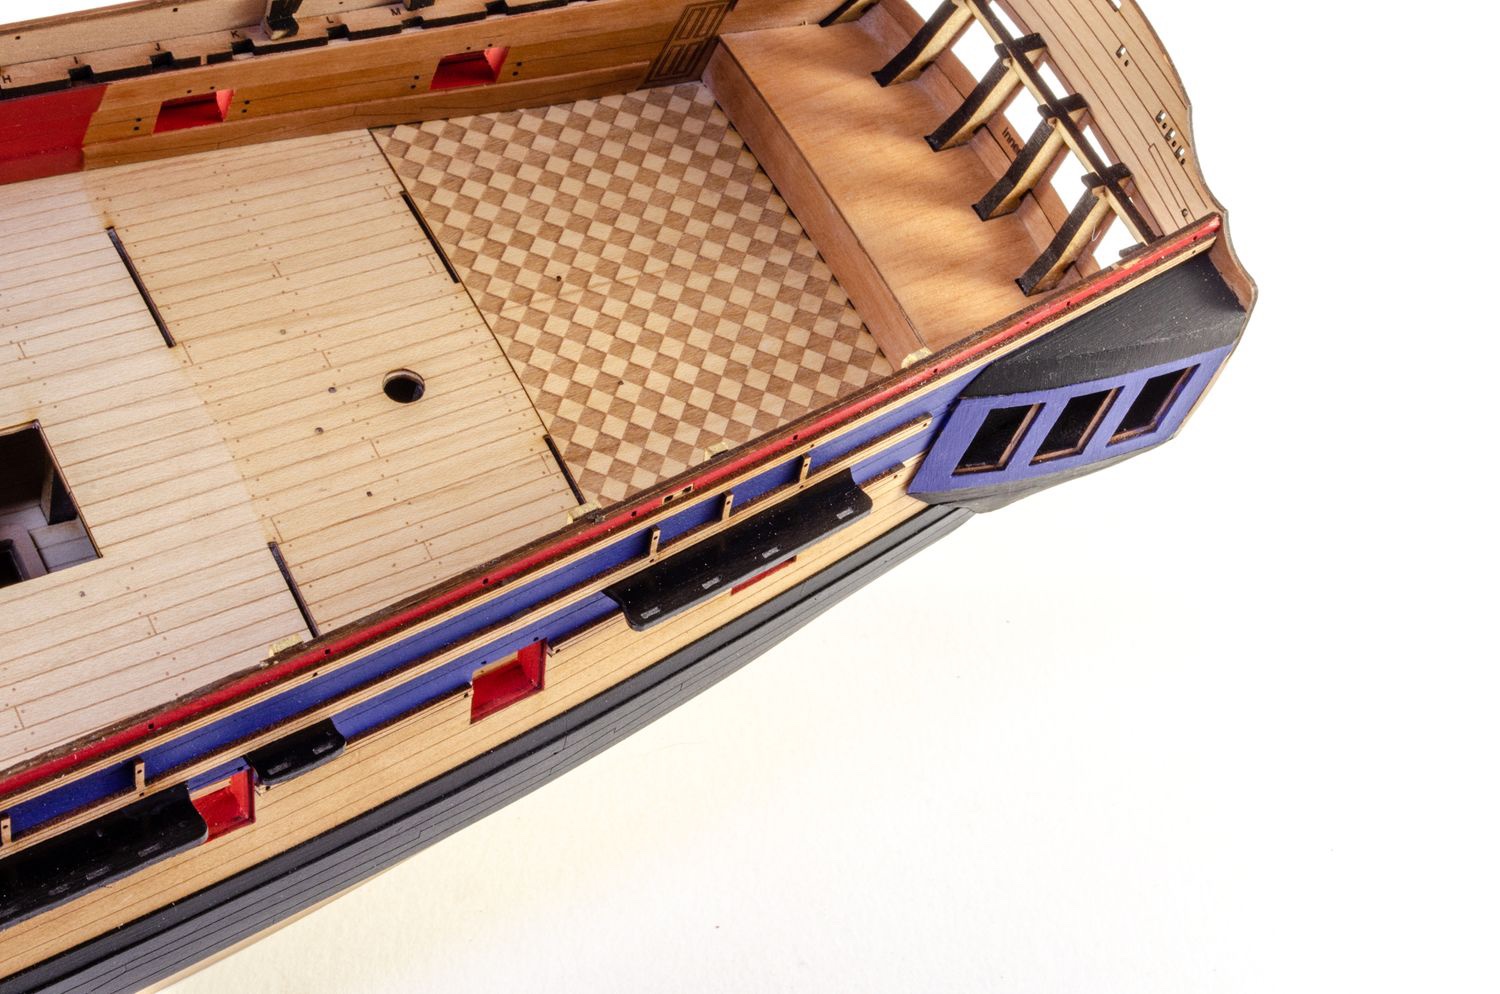
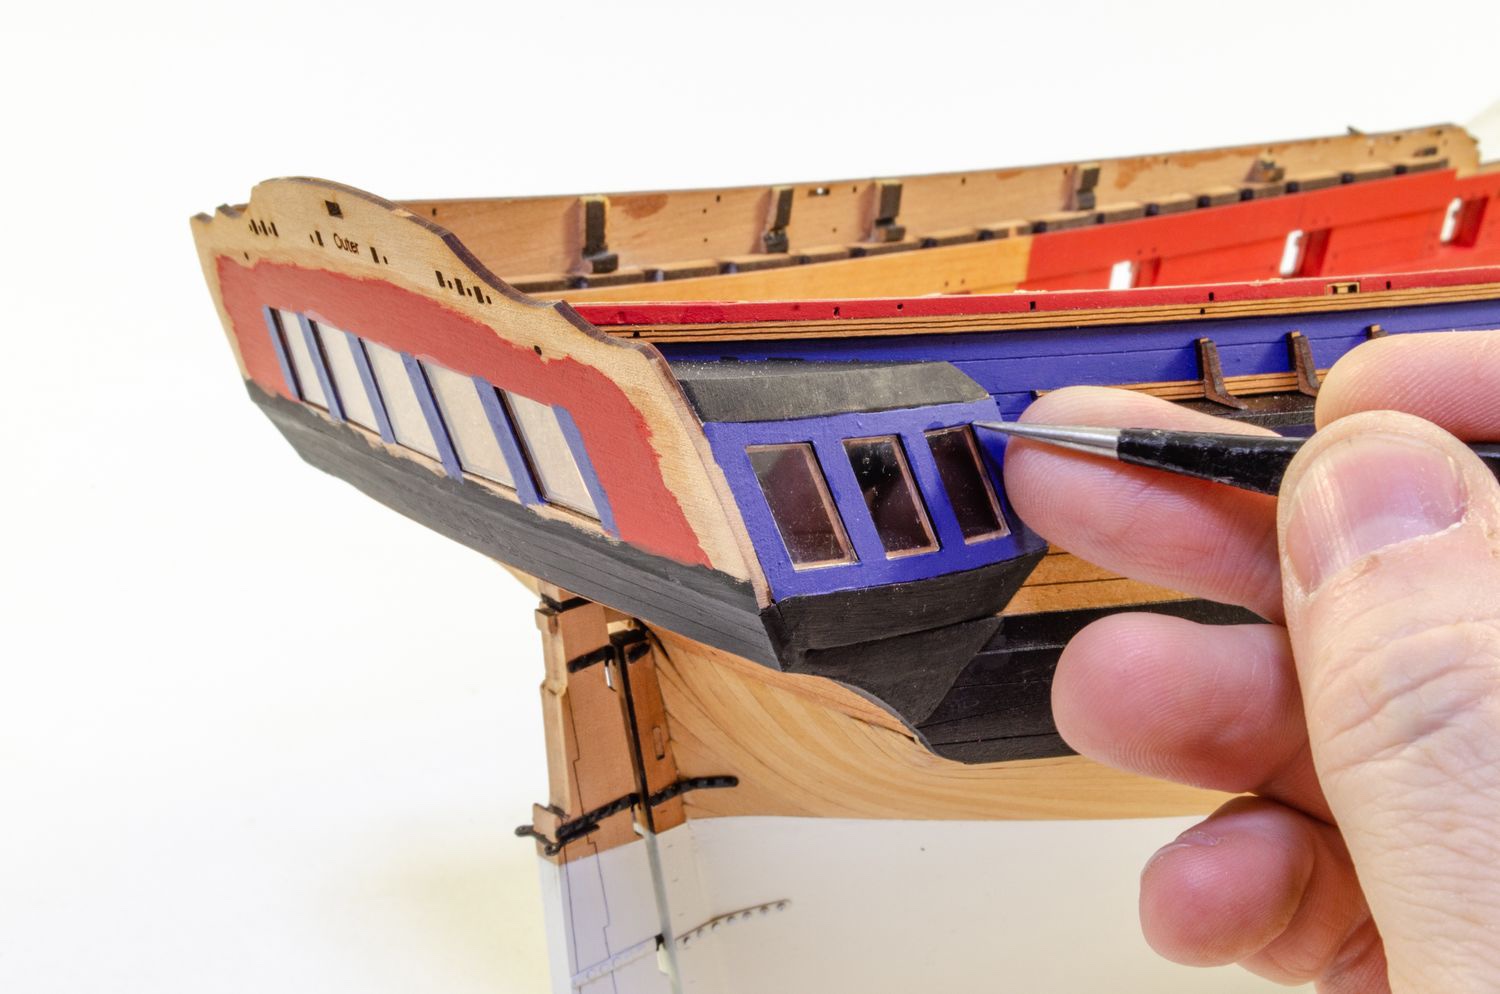
Back to the stern again now. The acrylic windows are now removed, gently filed and fitted to the stern and galleries using acrylic varnish as a glue to hold them. I didn't want to use CA due to potential fogging. I know there are odourless CA types, but I just didn't have any to hand 🙃

Once dry, the white window frames were fitted using more acrylic varnish as glue.

The golden pillars between the windows were now fitted. For these, I prefer CA gel as it gives a moment or so to manipulate stuff.

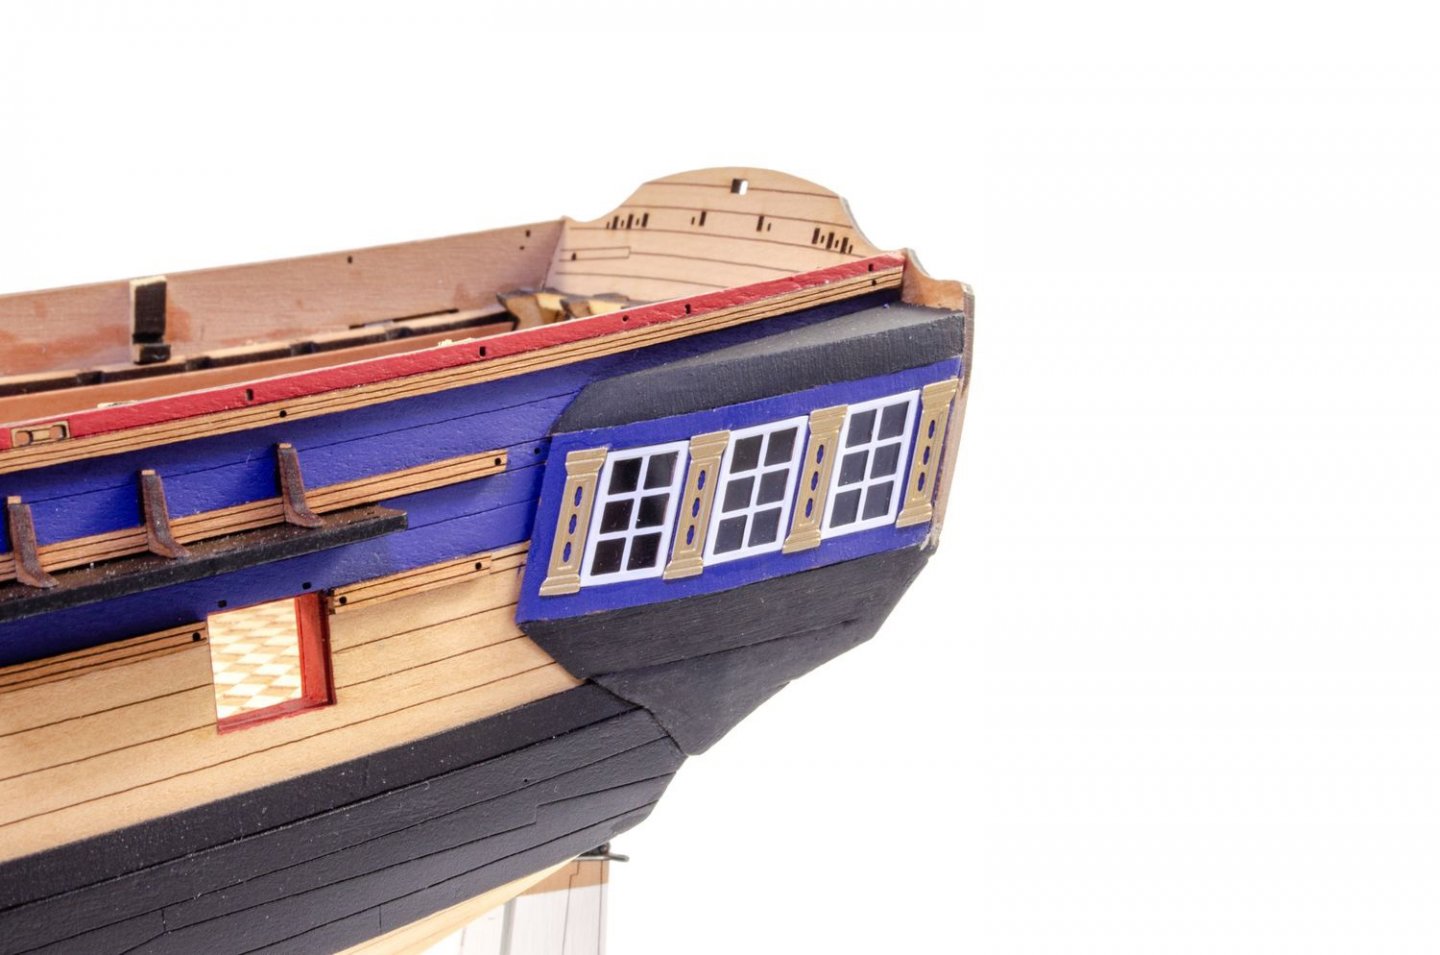
The various rails are now fitted...

Whilst waiting for things to set and cure, I painted the stern decoration. This was first primed in Tamiya fine white primer, and then airbrushed with Humbrol Matt 25 Blue. Vallejo Liquid Gold was then diluted with a few drops of isopropyl alcohol and brushed onto the stern with a size 0000 brush. The whole lot was then varnished to protect it.
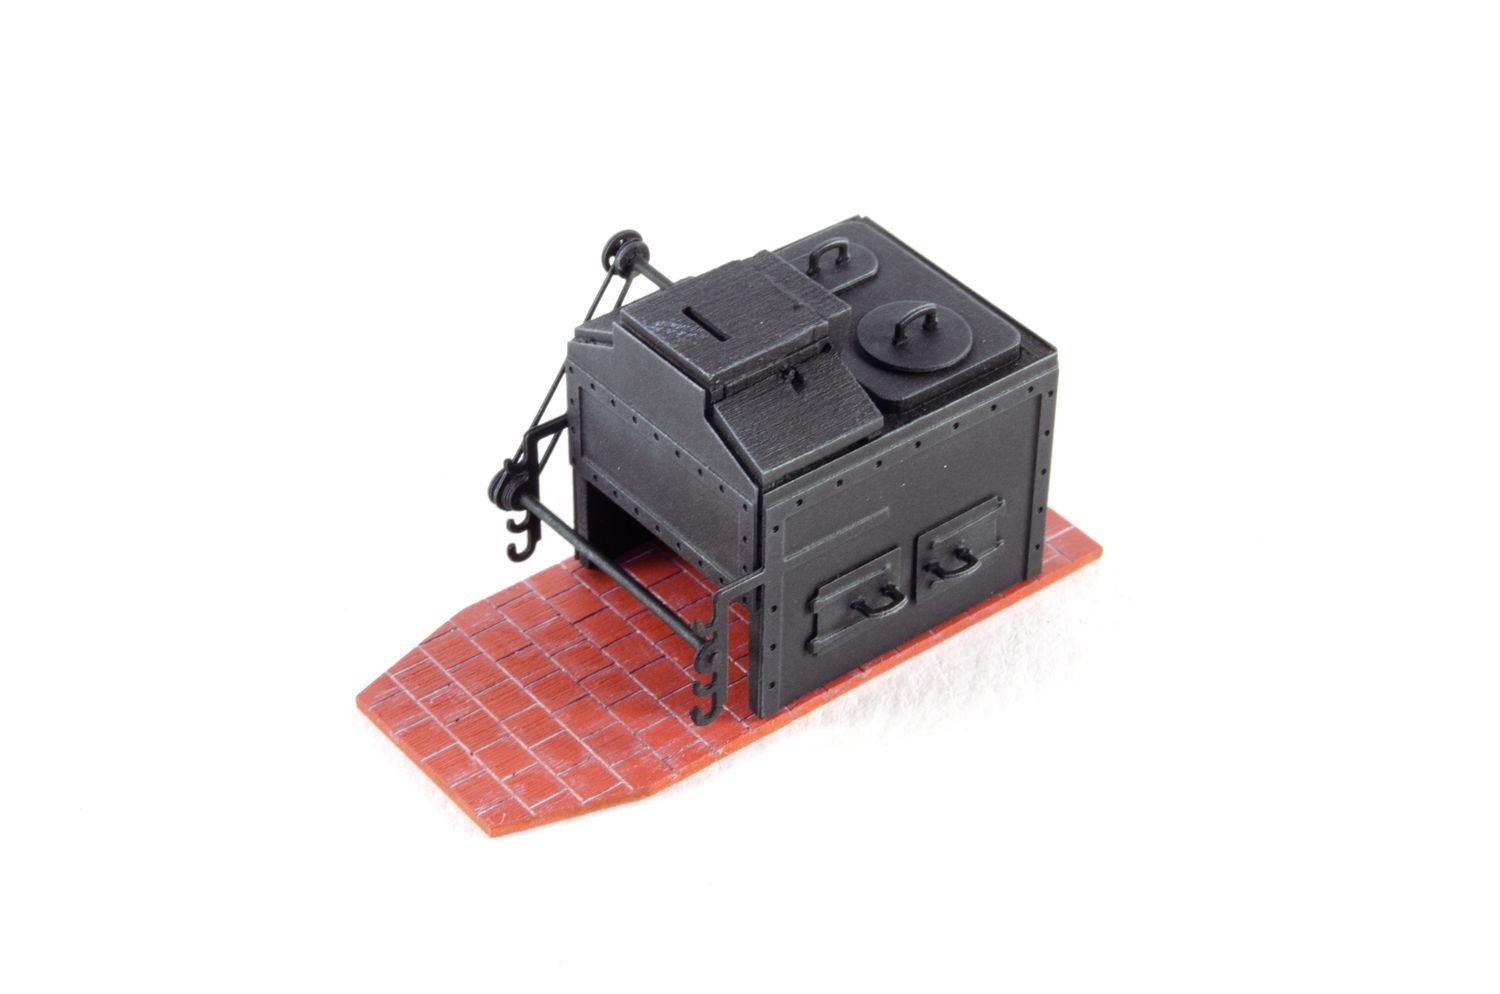
Lastly for this update, I completed the stove. After a coat of primer, Tamiya Flat Black was airbrushed over it, and then steel pigments applied to it before being sealed in matt varnish. The bricks were painted in MRP RAF Roundel Red, sealed, and then a light grey panel line wash applied.

until next time...
- yvesvidal, rybakov, marktiedens and 50 others
-
53
-
10 minutes ago, glennard2523 said:
I'm not a big fan of my Amati waterline marker. I will need to add the water line to Cutter Alert in the next few days. I am very tempted to buy the one you have for sale.
I made up the test one tonight and I do like it. Nice and stable and easy to move around.
- Ryland Craze, chris watton, mtaylor and 3 others
-
5
-
1
-
-
-
While we're waiting for some nice laser-cut goodies coming from Italy for this build, perhaps you'd like to take a look at this link and give them your wholehearted support:
This promises to be an amazing project and about as close to the actual Trafalgar that any of us could ever hope to get!
Go forth! '
EnglandModel Ship World expects that everyone will do their duty'! -
-
53 minutes ago, RockinBudgie said:
Hi Jim
Not wanting to hijack this thread taking about Bismarck, but is it the same as the old one or any electrical bits like the Hachette?
Following this prototype build with interest
No, this isn't the old Bismarck kit, and there are no electrical parts like the Hachette/Agora.
-
8 minutes ago, chris godson said:
I would love to get my hands on one of the 1/64th model kits of HMS Victory.
Is there any way we can be notified when this kit becomes available, please?
Thank you
Hi Chris,
You'll find out all the info you need right here on MSW. Best thing to do is to follow this topic and I'll update as soon as I have first-hand information for you. If you read some purposely misleading posts on FB, they'll tell you this particular build stopped 'years ago'. due to 'bad quality materials'. You'll see it was only last August and that's because:
- Pandemic and Italy being crippled with it, especially in the north where Amati are and the parts are produced.
- The company producing the parts for Amati, did so from an unsuitable (not bad quality) material. This is now being sorted at the moment and I expect this build to be on again in a few months.
Jim
- ccoyle, kiwiron, chris godson and 5 others
-
8
-
That looks just beautiful. Very clean.
-
36 minutes ago, Ozzieos said:
Hello model ship world, my name is Oz, I have just joined this site, so very new, I have read the helpfully hints there by Chuck, yes I will try to to interact, it's lonely out here, I am building a great model of the Victory, and have pictures from start, but for now yes to try make some friends. Oz
PLEASE share a build log with us! My own Vic will be restarting in the next few months.
- Ryland Craze and mtaylor
-
2
-
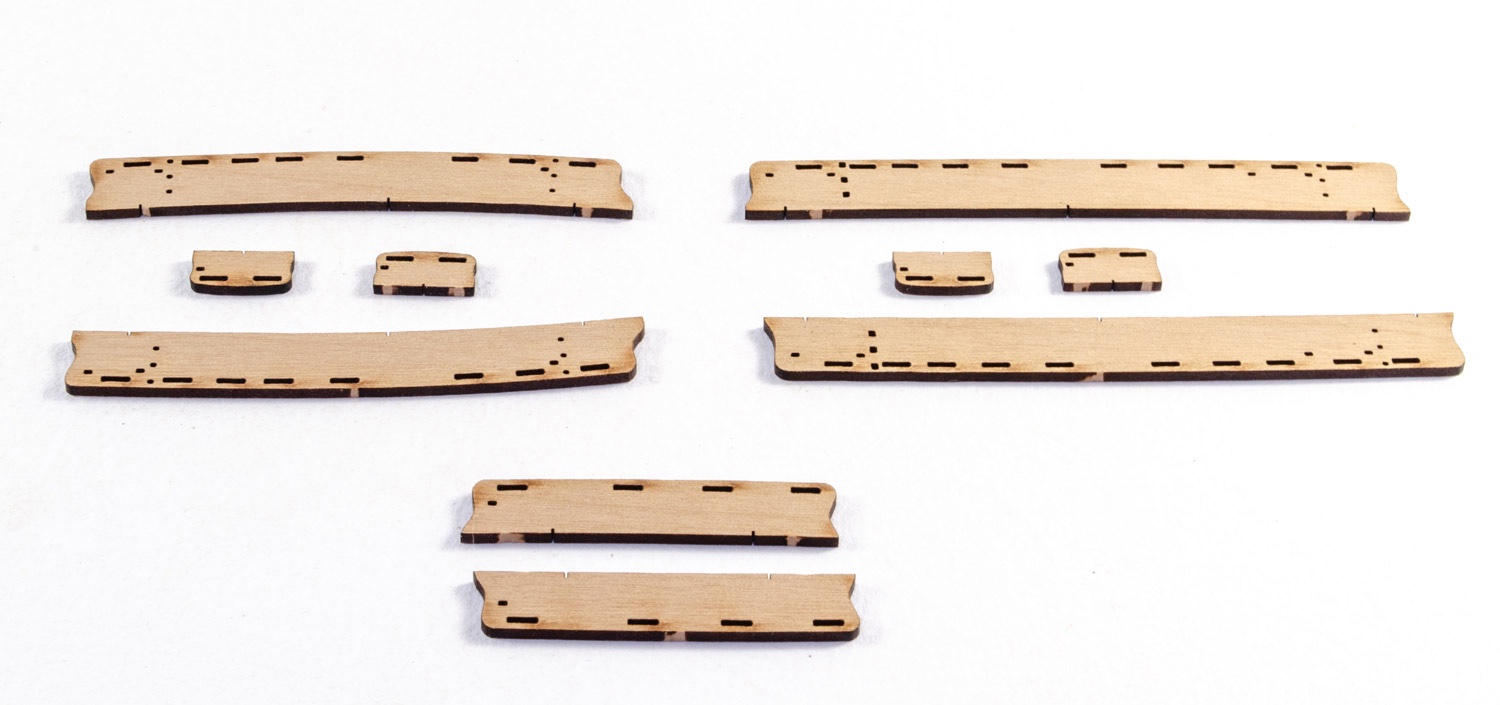
A quick end of week update before I delve into the bow area and then onto the stern/decor.
This last couple of days been finishing the rudder and fitting it, adding the pintle/gudgeon straps, the horse shoe/fishplates to the keel....and the channels.
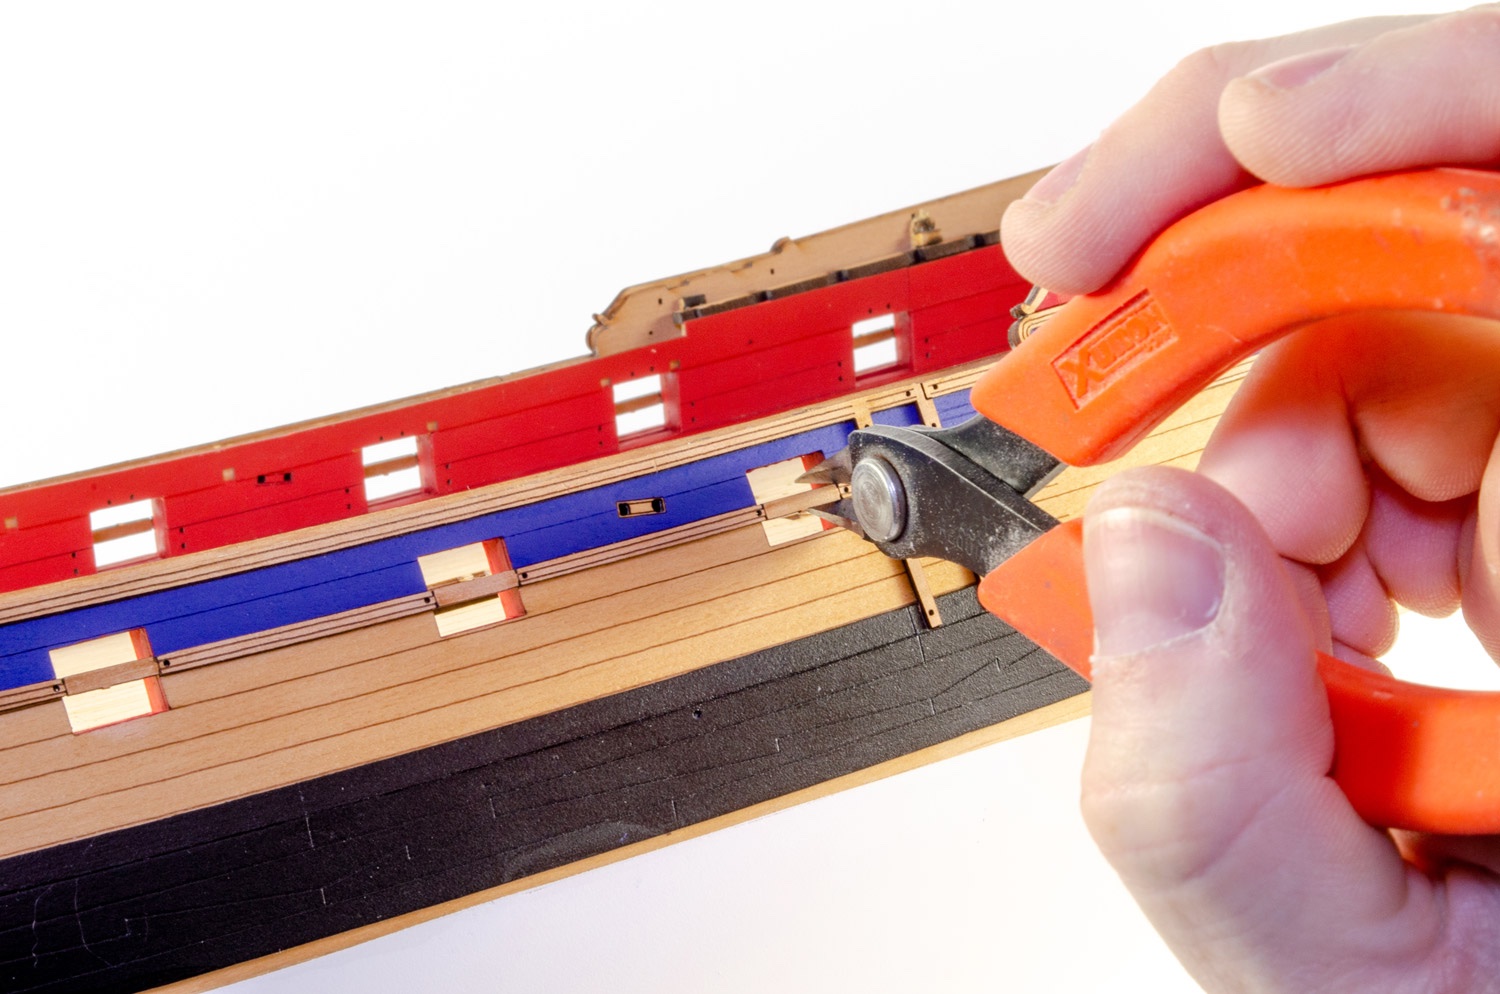
All channel parts are first drilled with a 0.5mm drill bit in pre-cut laser slots and then painted black (after masking joint edge). Cut-off brass pins are then CA'd into the holes. Corresponding laser holes in the sides of the hull are then used to locate these when glued into position. Once fitted, the channel knees are added. I decided to leave the char on the upper edges of these with bare pear sides instead of just hiding the shapes under black paint. Here's the work so far.


-
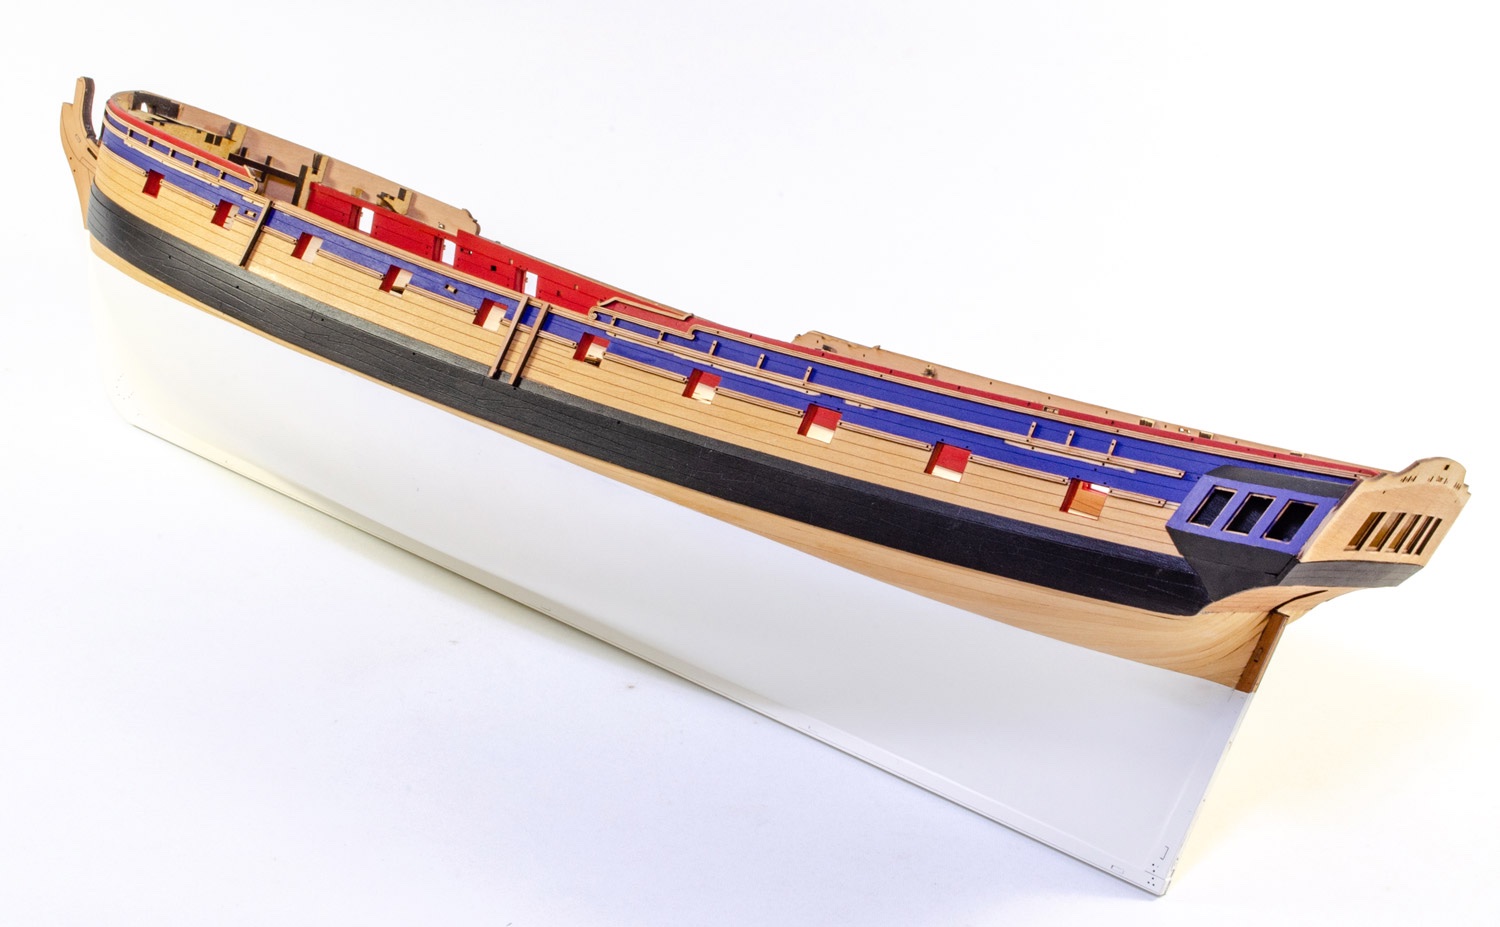
I thought I'd do another quick update as I've managed to put a little colour on things.
Before paint, all the areas which would be under colour were first brushed with a little polyurethane varnish to prevent the paint soaking into the timber and looking grainy. For paint, I've used Humbrol 25 Flat Blue and Vallejo Flat Red. These are just brushed on by hand. I've purposely gone a little into the rail area so I know there won't be any areas I need to later touch up. You will still notice some areas where the channels will be fitted. I just want a solid wood - wood connection with no varnish in there.
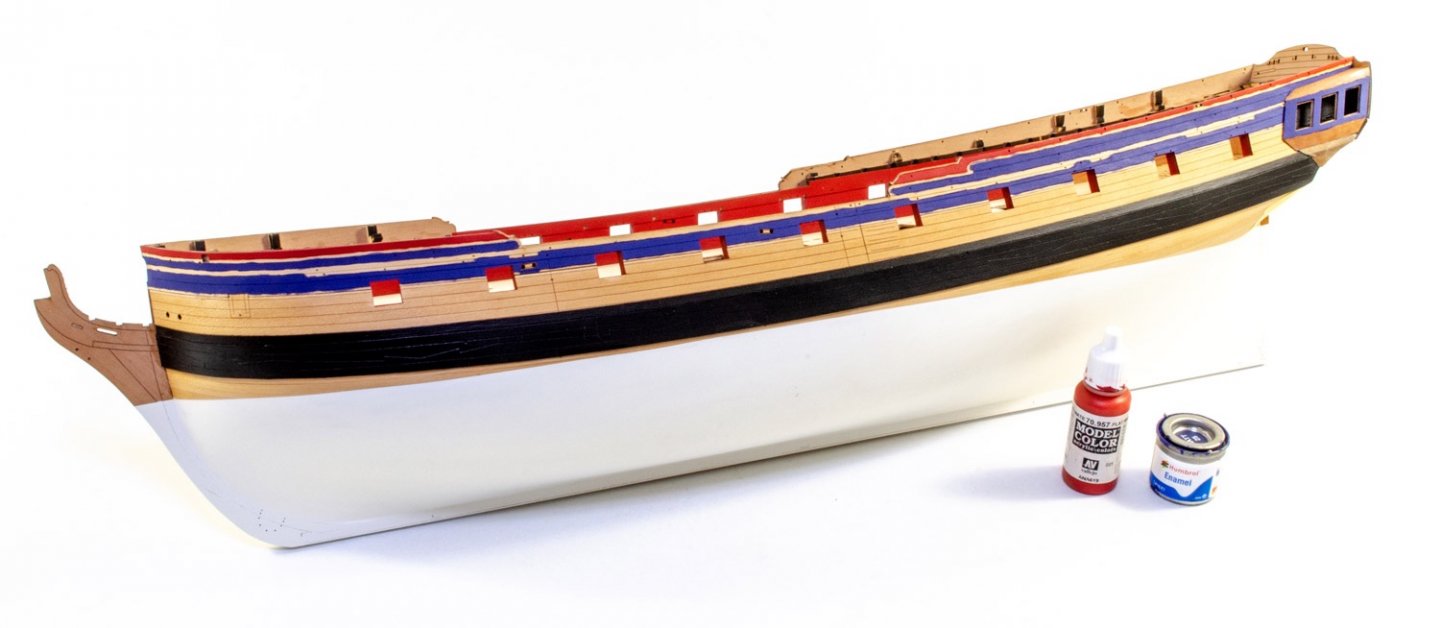
The rails are now added to the sides, making things look a little tidier. The sections over the cannon ports are part cut through with the laser, so I just snip them out.


Fenders fitted:
The last thing I've done is to get some paint on the quarter galleries and stern, prior to be doing the decoration within the next week. My next update should see things looking quite different.

Until then...
-
-
33 minutes ago, Kusawa2000 said:
John: I found that as well and added the information but it didnt seem to make a difference when I posted on MSW. But I have dropped a line to Kurt and we will see what happens! Thanks
Mike Draper
Remember, only staff can see it.
To me, I can see your membership number, so you set it correctly.
-
Ok, done.
You also have a button in your profile which you should activate if you are an NRG member. There's a field to put your membership number into also. Only staff will be able to see the number.

If members here can switch that button on and add their number, I can also add the badge as I see your number online. It makes things easier for staff.
- Neill, mtaylor and Ryland Craze
-
3


La Volage - 1693 (English Edition)
in Book, Monograph and Magazine reviews and Downloads. Questions and Discussions for Books and Pubs
Posted
La Volage – 1693 (English Edition)
‘A long bark of the western Ocean’
Written and prepared by Jean-Claude Lemineur
Published and available from Ancre from €112 (depending on plan scale)
This new monograph is concerned with the study of a long bark, the Volage, built in Dunkirk in 1693, in the middle of the War of the Great Alliance by René Levasseur, the first master shipwright who succeeded Hendrick who died in 1689. The Volage was a warship of Louis XIV French Royal Navy. Armed with ten 4-pdrs, with a burthen of 50 tons and a 50-man crew, she was one the biggest of her class with a length of 63 1⁄2 feet. In the Navy records of 1696 to 1702, reported as being good, and even sharp under sail. Really built for privateering, she possessed nautical properties that allowed her to overtake her prey, and therefore, to be highly appreciated by Dunkirk privateers.
It was aboard a similar bark that Jean Bart began his talented career as a privateer captain in 1674 during the conflict with the United Provinces of the Low Countries. The Volage participated in the guerrilla warfare initiated by Vauban and from 1693, by the Royal Navy itself against English trading fleets, within the framework of the War of the Great Alliance. Her activities probably continued during the War of Spanish Succession. Ordinarily, she insured the safety of the French coasts, protecting merchant vessels from piratical raiding. Her missions extended to the protection of fishing fleets on the Newfoundland Grand Banks. She was stricken from the Navy list in 1706, hauled ashore and rebuilt at Dieppe, probably for a private ship owner.
Adapted and Taken from Ancre’s La Volage information sheet.
MSW recently received a pack of three titles from French specialist publisher, Ancre. La Volage is the first of these I will look at. From the outset, this is an impressive set for the collection. Here is an overview of the title:
Presentation of the book.
The book is presented in a blue fabric-covered 24cm x 31cm box containing a 104-page brochure that includes the sources, history and plates in a reduced scale, along with commentaries and a 16-page colour brochure containing details of rigged and timbered models, as well as the 31 plates at the 1/26th scale necessary to build the structure.
Chapters
List of the plates
What is a Monograph?
If you’ve never seen a Monograph before, the idea is that you practically receive as much information about a subject as is possible to need to be able to build a specific vessel, plus having the historical content to hand to digest too. They really are a delight, even if you are only a collector, and without the ability or means to translate the information into a finished model ship.
If you do want to look at creating something from the sheer mass of information given in La Volage, your finished hull will have these dimensions, scale-dependent:
1:24
1:36
1:48
La Volage is a little over A4 in size when it comes to the attractive fabric strengthened box in which it’s supplied, and there is quite a bit off weight behind it with the 104-page perfect bound book, printed on extremely high-quality paper and with nice, clear illustration and layout. The 31 sheets of plans (known as plates) are large in this scale, and all are superbly printed with fine lines that measurements can be directly taken from as a comparison.
One could ponder for many hours, weeks and months over the minutiae of detail supplied. A 16-page colour brochure is also included which shows you what La Volage will look like when built, in various stages of construction. Remember of course, that this type of publication will present an actual representation of the vessel that will translate directly into what we call a POF model, but of course with some skills, the lines can be utilised to design your own POB project.
Conclusion
Ancre’s monographs really never disappoint in their sheer depth of information, presentation, production quality and of course, subject matter. La Volage is no exception. This really is an exquisite set and with me only ever really having built British ships, it’s extremely interesting to see how the French are in comparison with layout, style, shape etc. La Volage is most certainly a very beautiful barque and one which is less of a lifetime project than something like the Saint Phillipe which I reviewed a couple of years ago. A much more manageable size in 1:48, and even in 1:24 if you have an average size workshop. I certainly won’t comment on display space needed afterwards!
Having the colour booklet with a completed model will also not just give inspiration but gives you a rough idea of what you need to be aiming for. The book not only grounds you in the history surrounding the vessel and its origins and protagonists, but also into the construction of what was undoubtedly a beautiful ship. Amazing to think that you can actually build a complete, miniature ship from this set, down to every smallest detail.
La Volage – 1693 is available in English, French and Italian languages, and plans are available in 1:24, 1:36, and 1:48 scales. Check out the options on the Ancre website.
My thanks to Didier Berti of Ancre, for sending this Monograph out for review here on Model Ship World. To purchase directly, click the link at the top of the article.